Category: quick_meals

  • Baked Parmesan Crusted Cod (So Flaky, So Cheesy, So 20 Minutes)

    Baked Parmesan Crusted Cod (So Flaky, So Cheesy, So 20 Minutes)

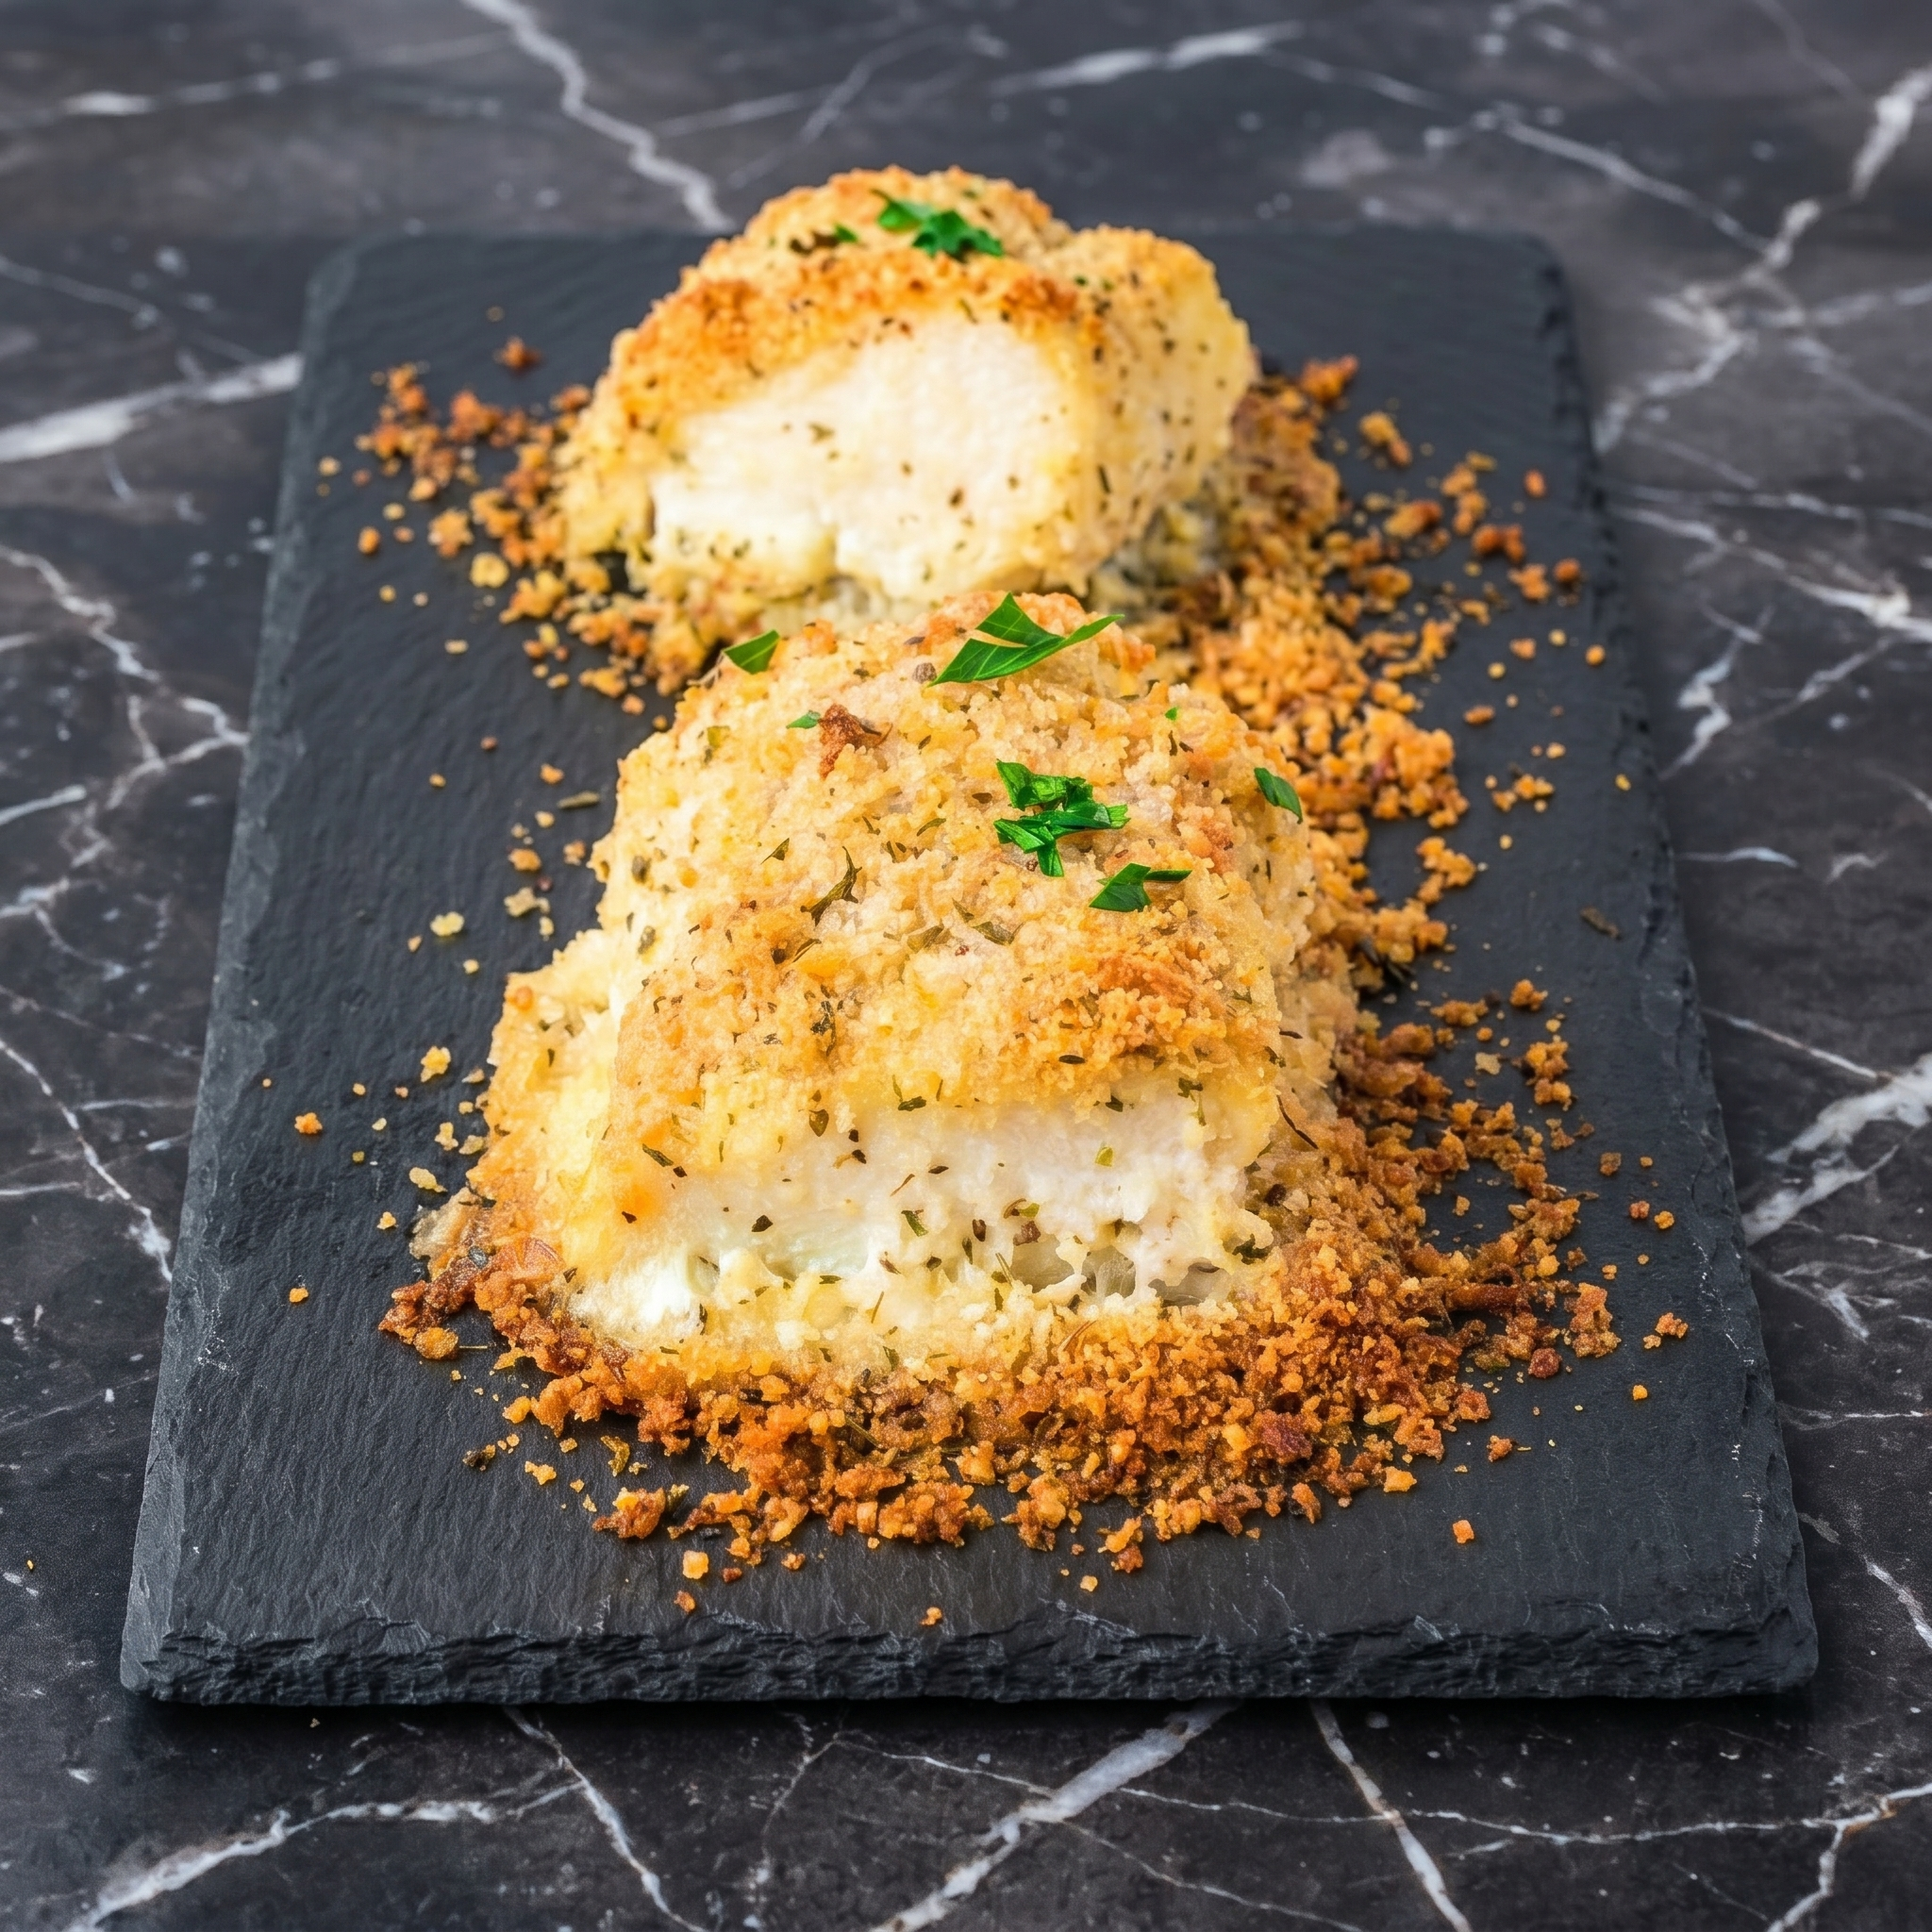
    Most people don’t cook fish at home because they’re scared. Scared of overcooking, scared of stinking up the kitchen, scared of it being boring.

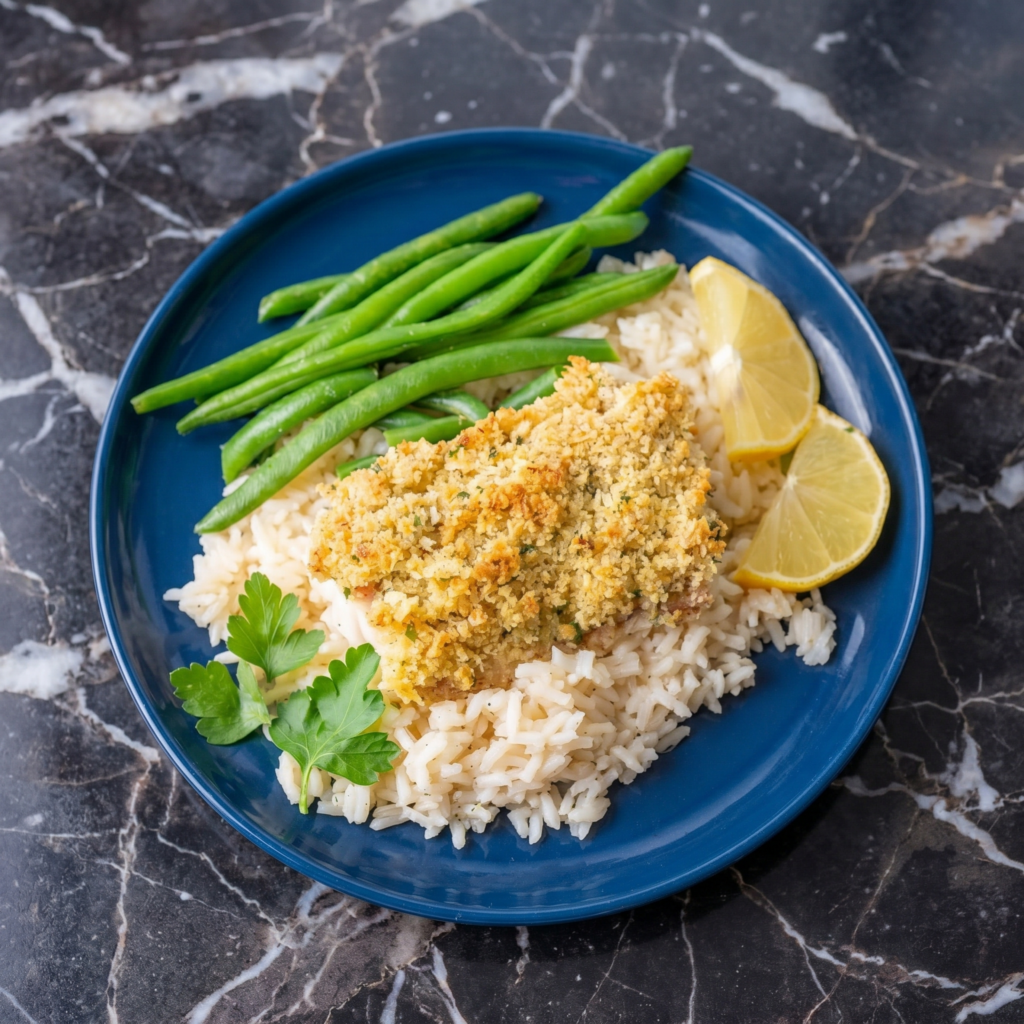
    This baked Parmesan crusted cod laughs in the face of fear. It’s foolproof, fast, and legitimately delicious. A crunchy, cheesy, herby topping. A tender, flaky interior. Lemon on the side. Dinner in 20 minutes. You’re welcome.

    Ingredients

    Serves 4.

    • 4 cod fillets (about 5-6 oz / 150g each)
    • ½ cup grated Parmesan cheese
    • ¼ cup panko breadcrumbs
    • 2 tablespoons melted butter
    • 2 cloves garlic, minced
    • 1 teaspoon dried parsley
    • ½ teaspoon paprika
    • Salt and pepper to taste
    • Lemon wedges for serving

    Step-by-Step Instructions

    Step 1: Preheat and Prep

    1. Preheat oven to 400°F (200°C).
    2. Line a baking sheet with parchment paper or foil.
    3. Pat cod fillets completely dry with paper towels.

    Step 2: Make the Topping

    1. In a small bowl, mix Parmesan, panko, melted butter, garlic, parsley, paprika, salt, and pepper.

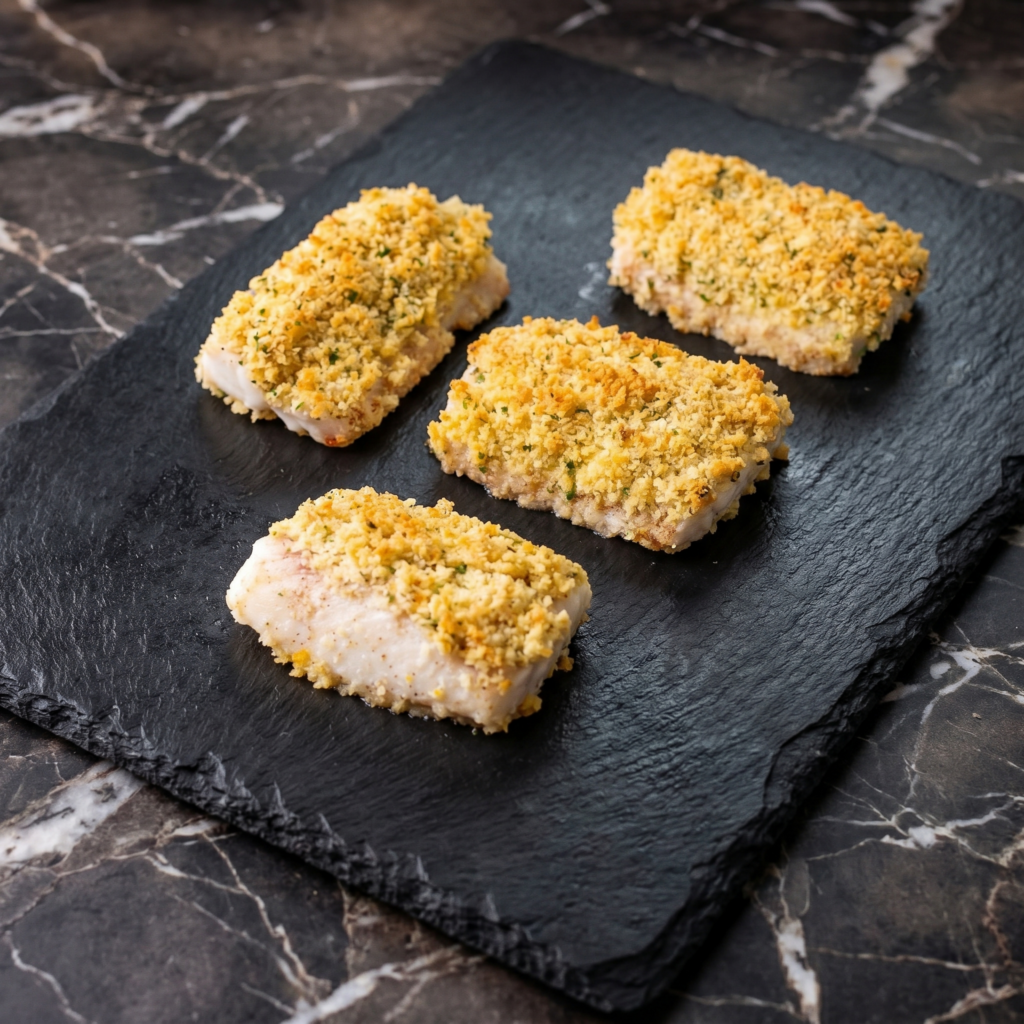
    Step 3: Top and Bake

    1. Place cod on the prepared baking sheet.
    2. Press the Parmesan mixture evenly onto each fillet.
    3. Bake for 10-12 minutes, until fish flakes easily with a fork and topping is golden.

    Step 4: Serve

    1. Squeeze fresh lemon over the top.
    2. Serve with roasted veggies, rice, or a simple salad.

    Summary

    Prep Time: 5 minutes | Cook Time: 12 minutes | Total Time: 17 minutes

    Yield: 4 servings

    Difficulty: Extremely Easy

    Storage Notes

    • Fridge: Leftovers keep for 2 days. Topping won’t stay crispy.
    • Reheat: Air fryer or oven at 350°F for 5 minutes. Skip the microwave.
    • Pro tip: This dish is best fresh. Only make what you’ll eat.
  • Teriyaki Chicken Skewers (Better Than Takeout, Stick by Stick)

    Teriyaki Chicken Skewers (Better Than Takeout, Stick by Stick)

    Let’s be real: takeout teriyaki is often sad, soggy, and swimming in sugar water. Not this one.

    These teriyaki chicken skewers are sticky, smoky, and downright addictive. The secret? A quick homemade glaze that clings to every chunk of juicy chicken. Fire up the grill (or a pan), soak some skewers, and get ready for your new weeknight obsession.

    Ingredients

    Makes 6-8 skewers (serves 3-4).

    • 1.5 lbs (680g) boneless chicken thighs (or breasts)
    • ½ cup soy sauce (low sodium recommended)
    • ¼ cup water
    • ¼ cup brown sugar
    • 2 tablespoons mirin (or honey)
    • 2 cloves garlic, minced
    • 1 teaspoon grated ginger
    • 1 tablespoon cornstarch + 2 tablespoons water (slurry)
    • Green onions and sesame seeds for garnish

    Step-by-Step Instructions

    Step 1: Skewer the Chicken

    1. Cut chicken into 1-inch chunks.
    2. Thread onto soaked wooden skewers (or metal ones). Don’t overcrowd.

    Step 2: Make the Sauce

    1. In a saucepan, combine soy sauce, water, brown sugar, mirin, garlic, and ginger.
    2. Simmer for 3 minutes.
    3. Add cornstarch slurry and stir until thick (about 1 minute). Set half aside for dipping.

    Step 3: Grill and Glaze

    1. Preheat grill or grill pan to medium-high heat.
    2. Grill skewers for 4-5 minutes per side, brushing with sauce frequently.

    Step 4: Garnish and Serve

    1. Remove from heat. Brush with remaining sauce.
    2. Sprinkle with green onions and sesame seeds.
    3. Serve with rice or steamed veggies.

    Summary

    Prep Time: 10 minutes | Cook Time: 10 minutes | Total Time: 20 minutes

    Yield: 6-8 skewers

    Difficulty: Easy

    Storage Notes

    • Fridge: Leftover skewers keep for 3 days. Remove from sticks first.
    • Reheat: Skillet or air fryer works best. Microwave makes them sad.
    • Make ahead: Prep and skewer chicken up to 24 hours in advance. Keep covered in the fridge.
    • Sauce: Extra teriyaki sauce keeps in the fridge for 2 weeks.
  • BBQ Pulled Pork Sliders (Big Flavor, Little Buns)

    BBQ Pulled Pork Sliders (Big Flavor, Little Buns)

    Some foods are meant for sharing. These BBQ pulled pork sliders are at the top of that list.

    Think tender, smoky pulled pork drenched in tangy BBQ sauce, piled onto buttery slider buns, and topped with a crisp, cool coleslaw for contrast. Your slow cooker does all the heavy lifting. You get all the credit. Perfect for game day, potlucks, or when you just want to eat seven tiny sandwiches in one sitting.

    Ingredients

    Makes 12 sliders.

    • 3 lbs (1.4 kg) pork shoulder (or pork butt)
    • 1 cup BBQ sauce (plus more for serving)
    • ½ cup chicken broth
    • 1 tablespoon smoked paprika
    • 1 tablespoon brown sugar
    • 1 teaspoon garlic powder
    • 1 teaspoon onion powder
    • 12 slider buns (brioche or potato)
    • 1 cup coleslaw mix (for topping)
    • Pickles (optional)

    Step-by-Step Instructions

    Step 1: Season the Pork

    1. Mix smoked paprika, brown sugar, garlic powder, and onion powder in a small bowl.
    2. Rub the spice mix all over the pork shoulder.

    Step 2: Slow Cook

    1. Place pork in the slow cooker. Add chicken broth.
    2. Cook on LOW for 8 hours or HIGH for 5 hours, until pork falls apart easily with a fork.

    Step 3: Shred and Sauce

    1. Remove pork and shred using two forks. Discard the fat.
    2. Return shredded pork to the slow cooker. Add BBQ sauce and stir to coat.
    3. Let sit for 10 minutes to soak up the flavor.

    Step 4: Toast the Buns

    1. Split slider buns and toast them lightly on a skillet or in the oven.

    Step 5: Assemble

    1. Place a generous pile of pulled pork on each bun bottom.
    2. Top with coleslaw mix and pickles (if using).
    3. Add a drizzle of extra BBQ sauce.
    4. Close with the bun top and secure with a toothpick.

    Summary

    Prep Time: 10 minutes | Cook Time: 8 hours (slow cooker) | Total Time: 8 hours 10 minutes

    Yield: 12 sliders

    Difficulty: Super Easy

    Storage Notes

    • Fridge: Pulled pork keeps for 4-5 days in an airtight container.
    • Freezer: Freezes beautifully for up to 3 months.
    • Reheat: Warm in a skillet or microwave with a splash of BBQ sauce.
    • Pro tip: Store pork separately from buns and slaw. Assemble fresh.
  • The Lazy Sunday Lemon Herb Roast Chicken (So Juicy, So Easy)

    The Lazy Sunday Lemon Herb Roast Chicken (So Juicy, So Easy)

    Let’s be honest: most roast chicken recipes are boring. Dry breast, sad skin, and a sink full of dishes. Not this one.

    This lemon herb roast chicken is sticky, golden, fragrant, and almost embarrassingly easy. You need one pan, a handful of ingredients, and about 15 minutes of hands-on time. The oven does the rest. Serve it for Sunday dinner, meal prep it for the week, or just impress yourself on a Tuesday.

    Ingredients

    Serves 4-6.

    • 1 whole chicken (about 4-5 lbs / 1.8-2.2 kg)
    • 2 lemons (1 sliced, 1 juiced)
    • 4 cloves garlic, smashed
    • 3 sprigs fresh rosemary
    • 3 sprigs fresh thyme
    • 2 tablespoons olive oil
    • 1 teaspoon salt
    • ½ teaspoon black pepper
    • Optional: 1 onion (quartered), 4 carrots (cut into chunks)

    Step-by-Step Instructions

    Step 1: Preheat and Prep

    1. Preheat oven to 425°F (220°C).
    2. Pat the chicken completely dry with paper towels. This = crispy skin.

    Step 2: Season Like You Mean It

    1. In a small bowl, mix olive oil, lemon juice, salt, and pepper.
    2. Rub this all over the chicken, including under the breast skin.

    Step 3: Stuff It

    1. Stuff the cavity with lemon slices, smashed garlic, rosemary, and thyme.

    Step 4: Roast

    1. Place chicken in a roasting pan or cast iron skillet. Add optional veggies around it.
    2. Roast for 50-60 minutes, until juices run clear or thigh hits 165°F (74°C).
    3. Halfway through, spoon pan juices over the chicken.

    Step 5: Rest and Serve

    1. Let chicken rest for 10 minutes before carving. Don’t skip this!
    2. Pour pan juices over everything. Serve with the roasted lemons and herbs.

    Summary

    Prep Time: 15 minutes | Cook Time: 55 minutes | Total Time: 1 hour 10 minutes

    Yield: 4-6 servings

    Difficulty: Easy

    Storage Notes

    • Fridge: Shredded or sliced chicken keeps for 3-4 days in an airtight container.
    • Freezer: Shredded chicken freezes well for up to 3 months.
    • Reheat: Warm in a covered skillet with a splash of broth or water to keep it juicy.
    • Leftover magic: Use in salads, sandwiches, soups, or tacos.
  • Nashville Hot Chicken (Crispy, Spicy, Finger-Licking Fury)

    Nashville Hot Chicken (Crispy, Spicy, Finger-Licking Fury)

    This isn’t spicy chicken. This is an event.

    Nashville hot chicken is fried chicken + cayenne-laced oil + white bread + pickles. The heat doesn’t mess around. Neither should you. Make it. Cry a little. Love every bite.

    Ingredients

    Serves 4.

    For the Chicken:

    • 4 chicken thighs
    • 2 cups buttermilk
    • 2 cups flour
    • 1 tablespoon salt
    • 1 tablespoon black pepper
    • Vegetable oil for frying

    For the Hot Oil:

    • ½ cup frying oil (from the pot)
    • 3 tablespoons cayenne pepper (reduce for less heat)
    • 1 tablespoon brown sugar
    • 1 teaspoon paprika
    • 1 teaspoon garlic powder

    For Serving:

    • 4 slices white bread
    • Pickle slices

    Step-by-Step Instructions

    Step 1: Brine

    1. Soak chicken in buttermilk for 2 hours (or overnight).

    Step 2: Dredge

    1. Mix flour, salt, and pepper. Remove chicken from buttermilk, letting excess drip.
    2. Dredge in flour mixture. Repeat for extra crunch.

    Step 3: Fry

    1. Heat 2 inches of oil to 350°F (175°C). Fry chicken 10-12 minutes per side until golden and 165°F internal.
    2. Drain on a wire rack (not paper towels—stays crispier).

    Step 4: Make Hot Oil

    1. Carefully scoop ½ cup hot frying oil into a heatproof bowl.
    2. Whisk in cayenne, brown sugar, paprika, and garlic powder.

    Step 5: Coat

    1. Brush or dunk hot chicken into the spicy oil. Both sides.

    Step 6: Serve

    1. Place chicken on white bread. Top with pickles. Add second bread if desired.
    2. Serve with extra pickles and a cold drink. Maybe milk.

    Summary

    Prep Time: 15 minutes | Brine Time: 2+ hours | Cook Time: 25 minutes | Total Time: ~3 hours

    Yield: 4 servings

    Difficulty: Medium

    Storage Notes

    Best Fresh:

    Nashville hot chicken loses its crunch and spicy kick by next day. Make only what you’ll eat immediately.

    Refrigerate Leftovers:

    Store in an airtight container for up to 2 days. Reheat in oven at 375°F for 10-15 minutes. Not microwave-friendly.

    Heat Levels:

    • Mild: 1 tablespoon cayenne
    • Medium: 2 tablespoons
    • Hot: 3+ tablespoons (you’ve been warned)

    Pro Tip:

    White bread and pickles aren’t garnish—they’re essential. The bread soaks up the spicy oil. Don’t skip.

  • Stuffed Portobello Mushrooms (Meaty, Juicy, Meat-Free Winner)

    Stuffed Portobello Mushrooms (Meaty, Juicy, Meat-Free Winner)

    Portobellos are nature’s edible bowls.

    These are stuffed with spinach, cream cheese, Parmesan, and breadcrumbs. Bake until tender and golden. They’re hearty, flavorful, and nobody misses the meat. Plus: 10 minutes of prep.

    Ingredients

    Serves 4 as main, 8 as appetizer.

    • 4 large portobello mushrooms, stems removed
    • 2 tablespoons olive oil
    • ½ cup ricotta cheese
    • ¼ cup cream cheese, softened
    • ¼ cup grated Parmesan
    • ½ cup shredded mozzarella
    • 2 cups fresh spinach, chopped
    • 2 cloves garlic, minced
    • ¼ cup breadcrumbs (panko preferred)
    • Salt and black pepper to taste

    Step-by-Step Instructions

    Step 1: Prep Mushrooms

    1. Preheat oven to 375°F (190°C). Line a baking sheet with parchment.
    2. Wipe mushroom caps clean. Remove stems and scrape out gills with a spoon.
    3. Brush caps inside and out with olive oil. Season with salt and pepper.

    Step 2: Make Filling

    1. In a bowl, mix ricotta, cream cheese, Parmesan, mozzarella, spinach, and garlic.
    2. Season with salt and pepper.

    Step 3: Stuff

    1. Divide filling among mushroom caps. Press down gently.
    2. Sprinkle breadcrumbs on top.

    Step 4: Bake

    1. Bake 15-20 minutes until mushrooms are tender and tops are golden and bubbly.

    Step 5: Serve

    1. Let cool 5 minutes. Serve warm with a side salad or crusty bread.

    Summary

    Prep Time: 10 minutes | Cook Time: 20 minutes | Total Time: 30 minutes

    Yield: 4 servings

    Difficulty: Easy

    Storage Notes

    Refrigerate:

    Store cooked mushrooms in an airtight container for up to 3 days. Reheat at 350°F for 8-10 minutes. Not microwave-friendly (soggy mushrooms).

    Prep Ahead:

    Stuff mushrooms up to 1 day ahead. Cover and refrigerate. Add 5 minutes to bake time.

    Freeze Unbaked:

    Freeze on a tray, then transfer to a bag. Bake from frozen at 375°F for 25-30 minutes.

    Customize It:

    Add cooked sausage (for meat lovers), sun-dried tomatoes, or chopped artichoke hearts.

  • Potato Pavé (The Fancy Potato That’s Totally Worth It)

    Potato Pavé (The Fancy Potato That’s Totally Worth It)

    This potato sounds French. It is. But don’t run.

    Potato pavé is thinly sliced potatoes layered with cream and herbs, pressed overnight, then cut into bricks and fried until crispy. Crunchy outside. Velvety inside. Yes, it takes time. Yes, it’s worth it.

    Ingredients

    Serves 6-8 as side.

    • 3 lbs (1.4kg) russet or Yukon Gold potatoes
    • 1 cup heavy cream
    • 4 cloves garlic, minced
    • 2 tbsp fresh thyme (or rosemary)
    • 1 tsp salt
    • ½ tsp black pepper
    • 2 tbsp butter (for pressing pan)
    • Vegetable oil for frying

    Step-by-Step Instructions

    Step 1: Prep

    1. Preheat oven to 350°F (175°C). Line a loaf pan with parchment paper (overhang on sides).
    2. Peel potatoes. Slice paper-thin (use a mandoline, 1/16 inch).

    Step 2: Make Cream Mixture

    1. Mix cream, garlic, thyme, salt, and pepper in a bowl.

    Step 3: Layer

    1. Layer potatoes in the loaf pan, brushing/drizzling cream mixture every few layers.
    2. Press down firmly after every few layers. Fill to the top.

    Step 4: Bake and Press

    1. Cover with parchment. Weigh down with another loaf pan or foil-wrapped bricks.
    2. Bake for 1.5-2 hours until potatoes are tender and edges are brown.
    3. Cool completely. Refrigerate overnight (still weighted).

    Step 5: Slice and Fry

    1. Remove potato block from pan. Slice into 1-inch thick rectangles.
    2. Heat ¼ inch oil in a skillet over medium-high heat.
    3. Fry each brick until golden and crispy on both sides (2-3 minutes per side).

    Step 6: Serve

    1. Drain on paper towels. Sprinkle with salt. Serve immediately.

    Summary

    Prep Time: 30 minutes | Bake Time: 2 hours | Chill Time: Overnight | Fry Time: 10 minutes | Total Time: ~13 hours (mostly hands-off)

    Yield: 6-8 servings

    Difficulty: Medium (needs planning)

    Storage Notes

    Make Ahead Hero:

    Baked and pressed potato pavé keeps in the fridge for 4 days before frying. Fry when ready to serve.

    Freeze Sliced:

    Freeze unbaked slices on a tray. Bake from frozen at 350°F for 25 minutes.

    Reheat Leftover Fried Pavé:

    Oven at 375°F for 5-7 minutes (not microwave—soggy).

    Pro Tip:

    Don’t skip the overnight press. That weight is what gives pavé its dense, layered structure.

  • Ground Beef Quesadilla: Cheesy, Beefy, 15-Minute Hero

    Ground Beef Quesadilla: Cheesy, Beefy, 15-Minute Hero

    Quesadillas are the ultimate lazy dinner. But when you stuff them with seasoned ground beef? Now we’re talking. Crispy tortilla. Oozy cheese. Savory, spiced beef.

    Fifteen minutes. One skillet. Zero regrets. Serve with salsa, sour cream, or just eat it over the sink like a champion.

    Ingredients

    Serves 2-3 (makes 2 large quesadillas).

    • 2 large flour tortillas (burrito size)
    • ½ lb ground beef (85/15 is good)
    • 1½ cups shredded cheese (cheddar, Monterey Jack, or Mexican blend)
    • ¼ small onion, diced
    • 1 clove garlic, minced
    • ½ teaspoon chili powder
    • ½ teaspoon cumin
    • ¼ teaspoon salt
    • 1 tablespoon oil or butter
    • Optional toppings: salsa, sour cream, avocado, hot sauce

    Step-by-Step Instructions

    Step 1: Cook the Ground Beef

    1. Heat a skillet over medium-high heat. Add ground beef.
    2. Cook for 5-6 minutes, breaking it apart, until browned.
    3. Add onion and garlic. Cook for 2 minutes until soft.
    4. Stir in chili powder, cumin, and salt. Remove from heat.

    Step 2: Assemble the Quesadilla

    1. Wipe the skillet clean. Return to medium heat.
    2. Place one tortilla in the dry skillet.
    3. Sprinkle half the cheese over half the tortilla.
    4. Top cheese with half the beef mixture.
    5. Sprinkle with a little more cheese (the glue that holds it together).
    6. Fold the empty half over the filling.

    Step 3: Cook Until Golden and Crispy

    1. Cook for 2-3 minutes until bottom is golden brown.
    2. Flip carefully. Cook second side for 2 minutes until cheese is melted and tortilla is crispy.
    3. Repeat with second quesadilla.

    Step 4: Slice and Serve

    1. Let rest for 1 minute. Slice into wedges.
    2. Serve with salsa, sour cream, or guac. Maybe all three.

    Summary

    Prep Time: 5 minutes | Cook Time: 12 minutes | Total Time: 17 minutes

    Yield: 2 large quesadillas (2-3 servings)

    Difficulty: Easy

    Storage Notes

    Fridge:

    Store leftover quesadillas in an airtight container for up to 4 days.

    Reheating (Don’t Microwave):

    Air fryer at 375°F for 3-4 minutes. Dry skillet over medium heat for 2 minutes per side. Oven at 375°F for 8 minutes. Microwave = sad and floppy.

    Freezing:

    Freeze cooked and cooled quesadillas for up to 2 months. Reheat from frozen in a skillet or air fryer.

    Make It Yours:

    Add black beans, corn, jalapeños, or bell peppers to the beef. Everything works.

  • BBQ Ribs (Fall-Off-the-Bone, No Smoker Required)

    BBQ Ribs (Fall-Off-the-Bone, No Smoker Required)

    No smoker? No problem.

    These ribs bake low and slow in the oven until they’re practically falling apart. Then you slather them with BBQ sauce and blast ’em under the broiler for that sticky, caramelized finish. Fork-tender. Finger-licking. Foolproof.

    Ingredients

    Serves 4.

    • 2 racks baby back ribs (about 2 lbs each)
    • 2 tbsp yellow mustard (binder)
    • ¼ cup brown sugar
    • 2 tbsp paprika
    • 1 tbsp garlic powder
    • 1 tbsp onion powder
    • 1 tsp black pepper
    • 1 tsp salt
    • 1 cup BBQ sauce (your favorite)

    Step-by-Step Instructions

    Step 1: Prep Ribs

    1. Preheat oven to 275°F (135°C). Line a baking sheet with foil.
    2. Remove membrane from back of ribs (grab with paper towel and pull).
    3. Brush ribs lightly with mustard.

    Step 2: Season

    1. Mix brown sugar, paprika, garlic powder, onion powder, pepper, and salt.
    2. Rub generously all over ribs.

    Step 3: Bake Low & Slow

    1. Wrap ribs tightly in foil. Place on baking sheet.
    2. Bake for 2.5 to 3 hours until meat is very tender.

    Step 4: Sauce and Sear

    1. Unwrap ribs. Brush both sides with BBQ sauce.
    2. Set oven to broil. Broil 2-3 minutes per side until sticky and charred.

    Step 5: Serve

    1. Rest 10 minutes. Slice between bones. Serve with extra sauce.

    Summary

    Prep Time: 15 minutes | Cook Time: 3 hours | Total Time: ~3.5 hours

    Yield: 4 servings

    Difficulty: Easy (needs patience)

    Storage Notes

    Refrigerate:

    Store ribs in an airtight container for up to 4 days. Reheat in oven at 300°F for 15 minutes, covered with foil.

    Freeze:

    Wrap tightly in foil and bag. Freeze for up to 3 months. Thaw overnight. Reheat at 300°F.

    Pro Tip:

    Don’t skip the membrane—it gets chewy. And don’t boil ribs (washes away flavor). Low oven only.

  • Pork Belly Buns (Soft, Sticky, Bao-tiful)

    Pork Belly Buns (Soft, Sticky, Bao-tiful)

    Bao buns are clouds. Clouds that hold pork belly.

    Sticky, tender, five-spice pork belly tucked into a fluffy steamed bun with crunchy slaw and hoisin. It’s sweet, savory, soft, and crisp all at once. Impressive? Yes. Hard? Not at all.

    Ingredients

    Makes 8 buns.

    For the Pork Belly:

    • 1 lb (450g) pork belly, sliced into ½-inch thick pieces
    • ¼ cup soy sauce
    • 2 tbsp hoisin sauce
    • 2 tbsp brown sugar
    • 1 tsp five-spice powder
    • 2 cloves garlic, minced

    For the Buns:

    • 8 pre-made bao buns (or homemade)

    For Toppings:

    • ½ cucumber, julienned
    • 2 green onions, sliced
    • Extra hoisin sauce
    • Sriracha (optional)

    Step-by-Step Instructions

    Step 1: Marinate Pork

    1. In a bowl, mix soy sauce, hoisin, brown sugar, five-spice, and garlic.
    2. Coat pork belly slices. Marinate 30 minutes (or overnight).

    Step 2: Cook Pork

    1. Heat a skillet over medium-high heat. Sear pork 2-3 minutes per side until caramelized.
    2. Add leftover marinade + ¼ cup water. Simmer 5 minutes until sticky and thick.

    Step 3: Steam Buns

    1. Steam bao buns according to package instructions (usually 3-5 minutes).

    Step 4: Assemble

    1. Open each bun. Spread hoisin inside.
    2. Add pork belly, cucumber, and green onions.
    3. Drizzle with extra hoisin and sriracha if desired.

    Step 5: Serve

    1. Serve warm. Eat with your hands. Smile.

    Summary

    Prep Time: 10 minutes | Marinate Time: 30 minutes | Cook Time: 15 minutes | Total Time: ~55 minutes

    Yield: 8 buns

    Difficulty: Easy

    Storage Notes

    Store Components Separately:

    • Pork belly: Refrigerate for up to 4 days. Reheat in a skillet.
    • Bao buns: Freeze for up to 2 months. Re-steam from frozen.
    • Toppings: Cucumber is best fresh.

    Do Not Store Assembled:

    Buns get soggy. Assemble right before eating.

    Quick Sub:

    No homemade bao? Use King’s Hawaiian rolls or small burger buns. Different, still delicious.

    Make It Spicy:

    Add chili crisp or sriracha mayo to the bun.