Category: quick_meals

  • Garlic Knots: The Bread That Ends Friendships (Over the Last One)

    Garlic Knots: The Bread That Ends Friendships (Over the Last One)

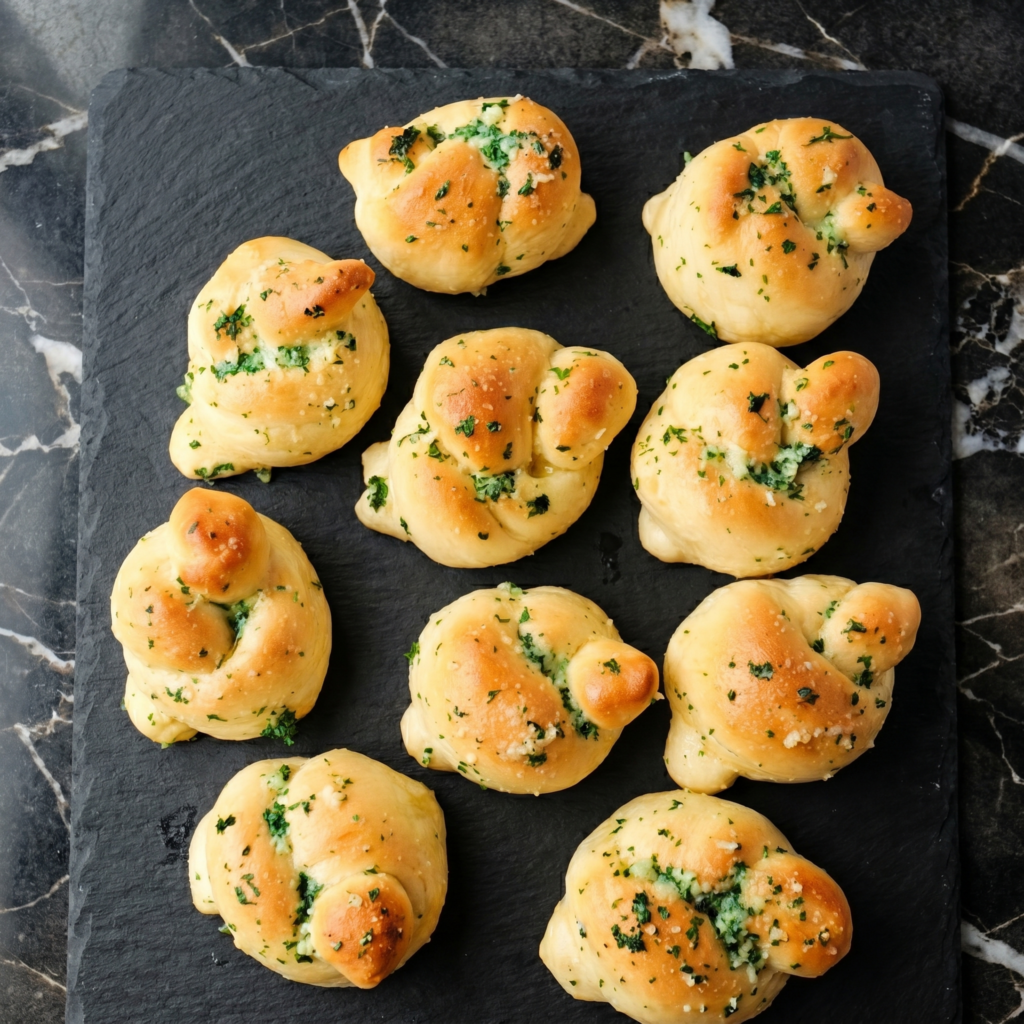
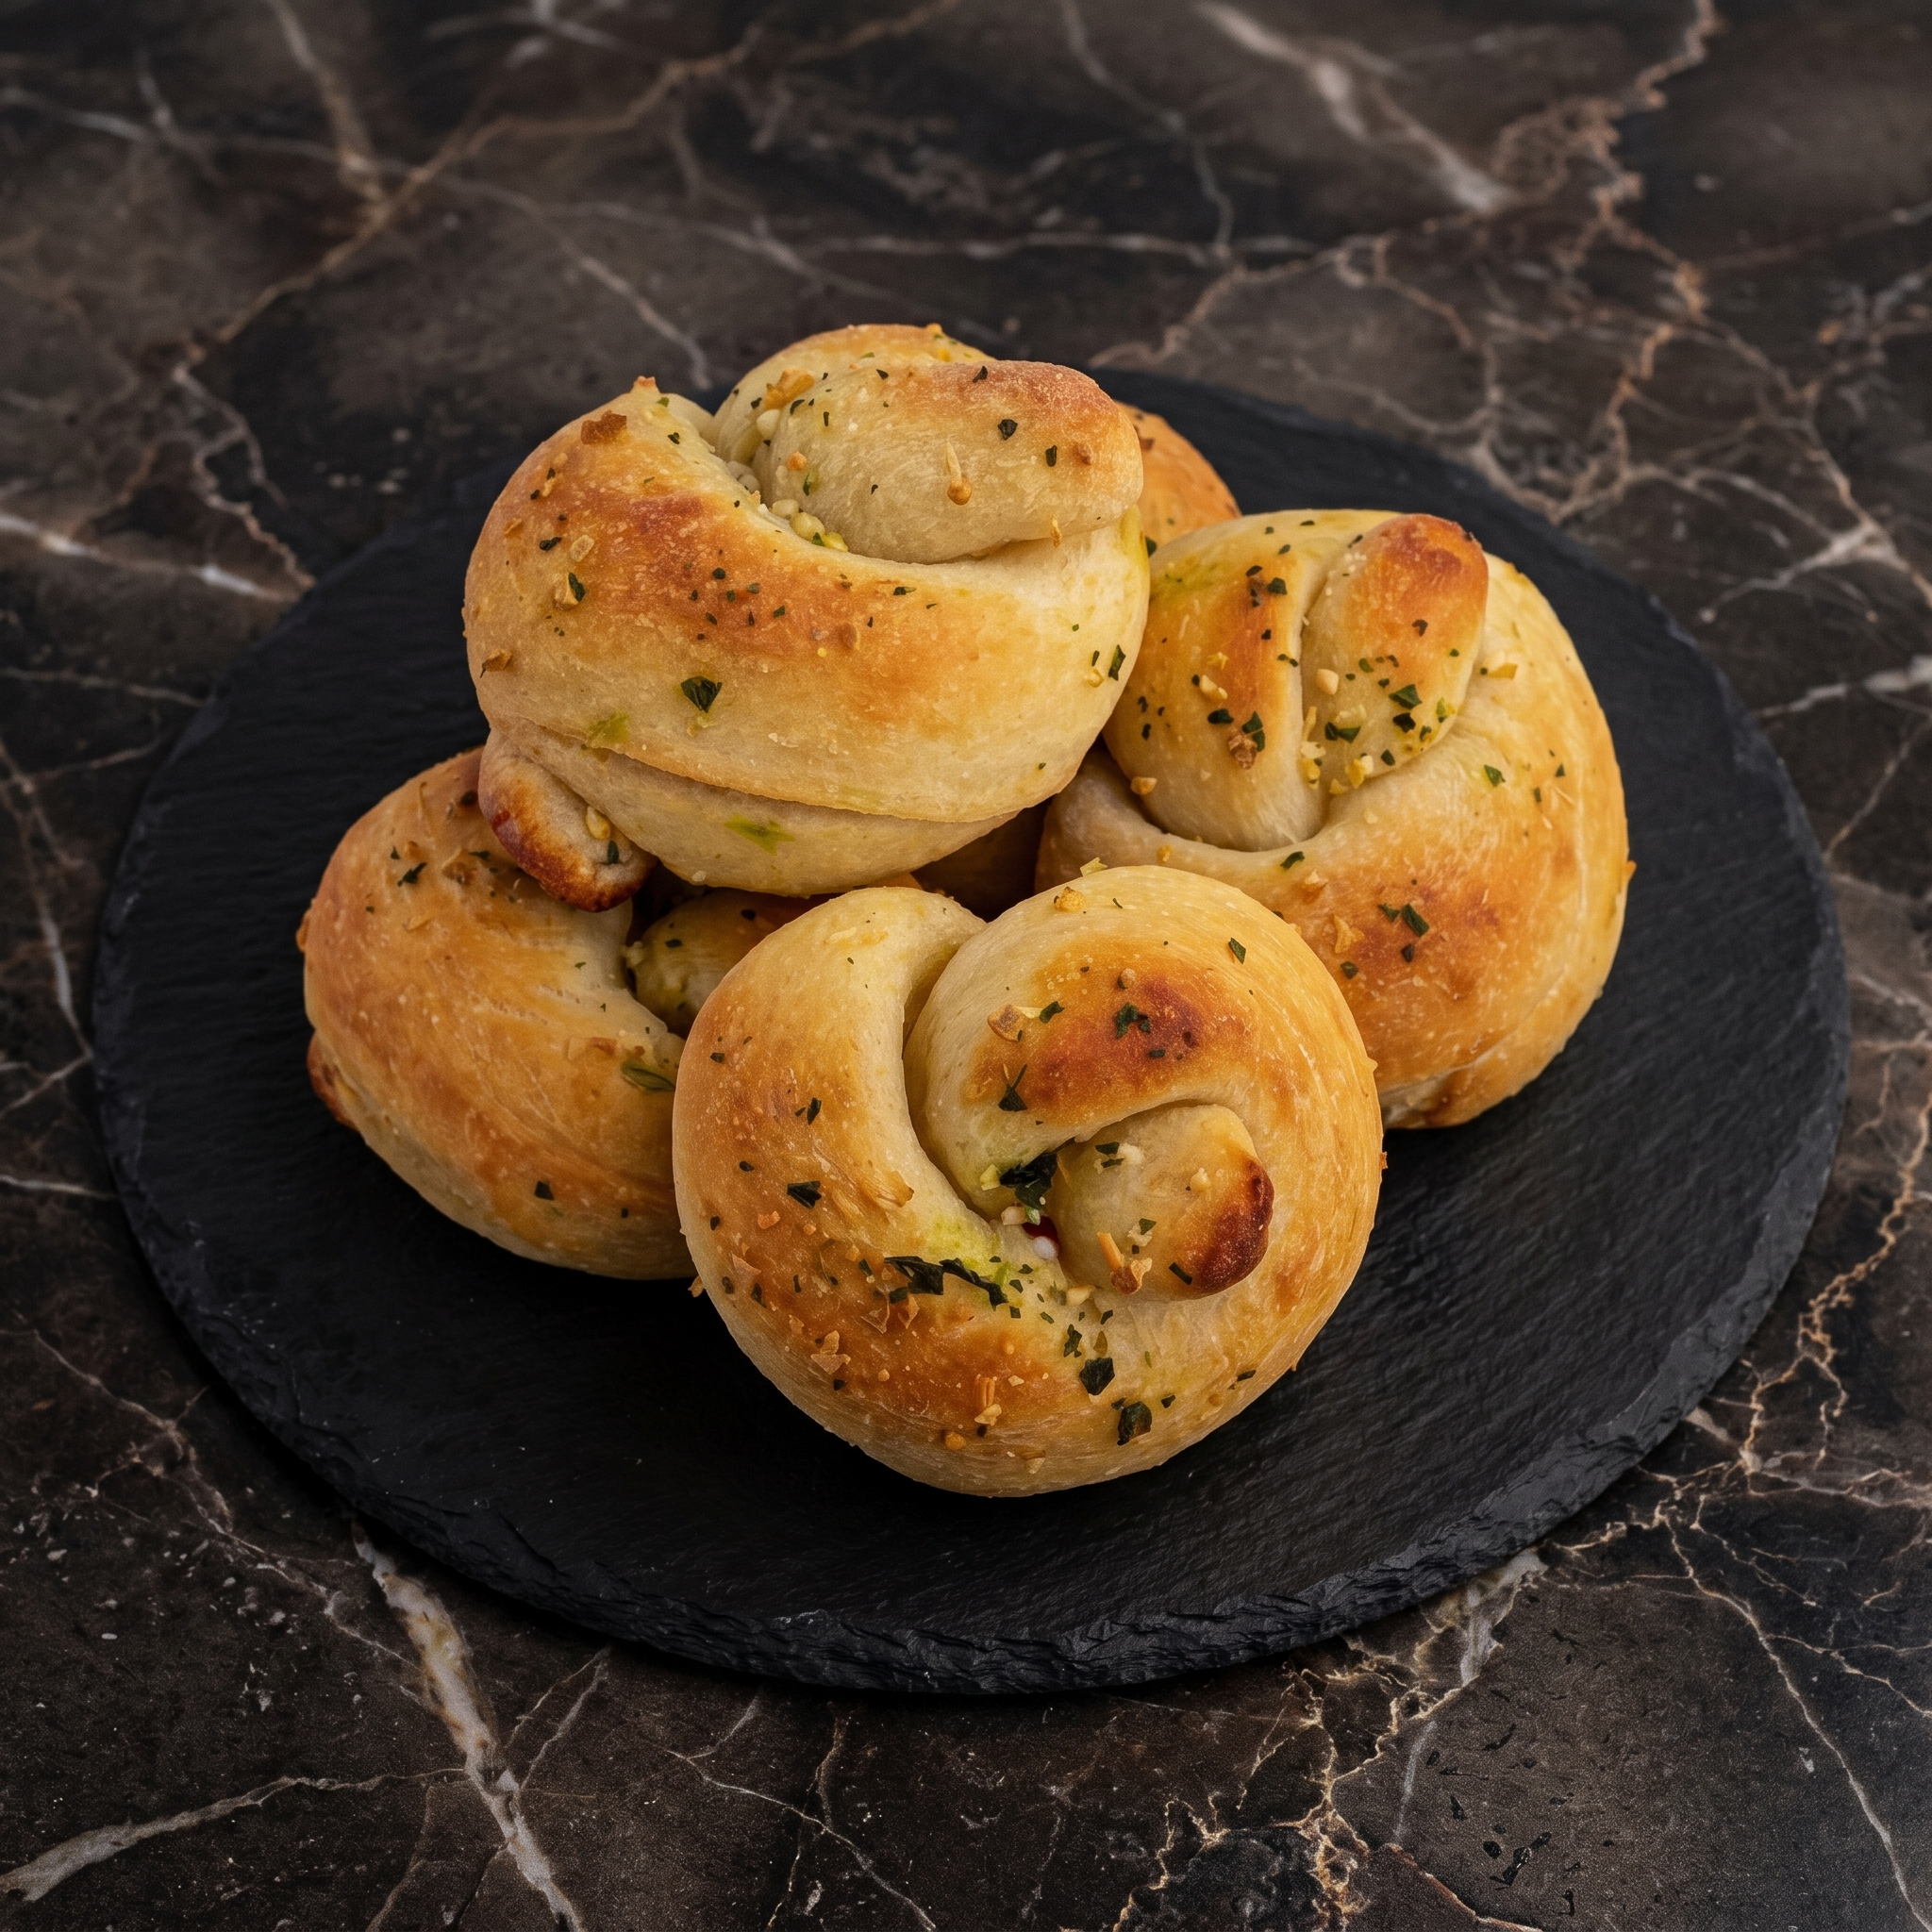
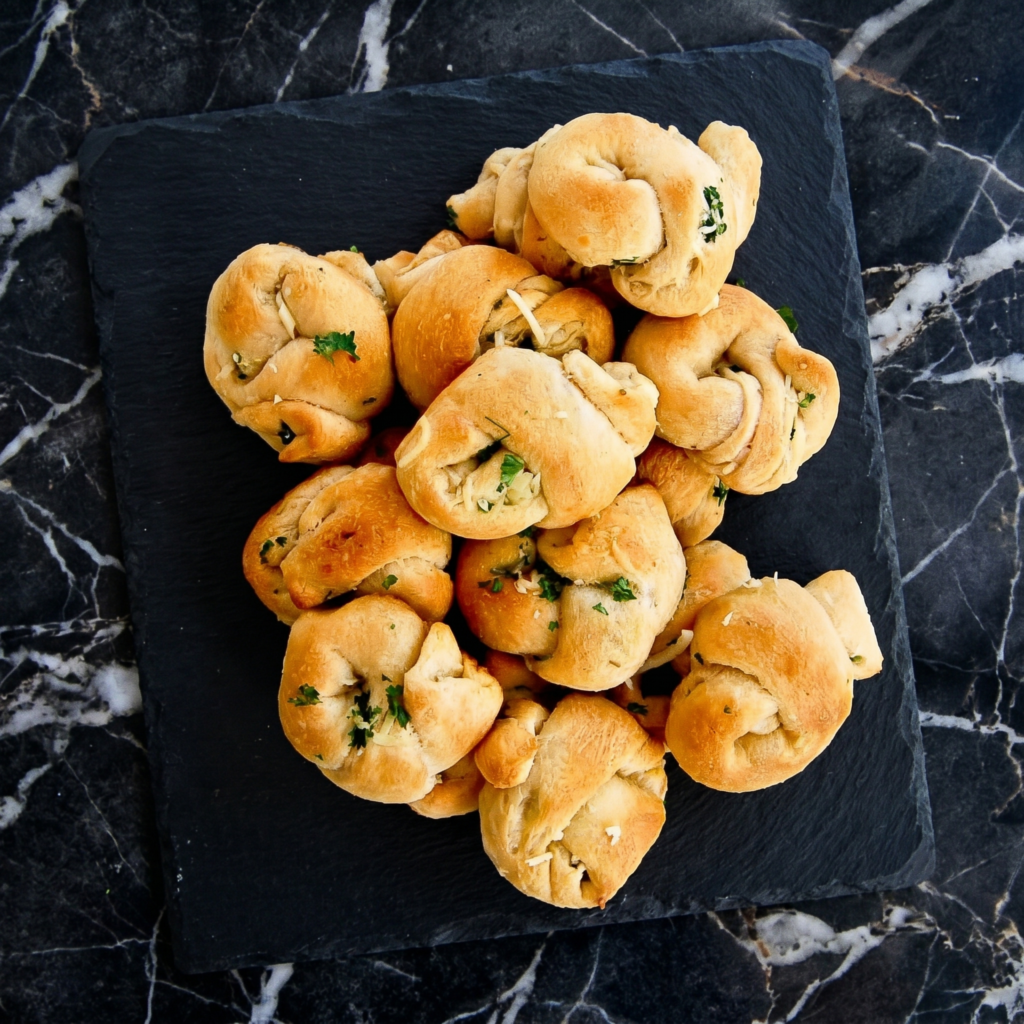
    Garlic knots are proof that simple things done right are unstoppable.

    Take pizza dough. Tie it in a knot. Bake until golden. Then drown it in garlic butter, Parmesan, and parsley. That’s it. That’s the recipe. These disappear in about four minutes flat, so make extra.

    Ingredients

    Makes 16 knots.

    For the Knots:

    • 1 lb store-bought pizza dough (or homemade)
    • 2 tablespoons olive oil

    For the Garlic Butter:

    • 6 tablespoons salted butter
    • 6 cloves garlic, minced
    • ¼ cup fresh parsley, finely chopped
    • ¼ cup grated Parmesan cheese
    • ½ teaspoon salt

    Step-by-Step Instructions

    Step 1: Prep & Preheat

    1. Preheat oven to 400°F (200°C). Line a baking sheet with parchment.
    2. Lightly flour a surface. Roll pizza dough into a 12×8-inch rectangle.

    Step 2: Make the Knots

    1. Cut dough into 16 strips (each about 1 inch wide and 6 inches long).
    2. Tie each strip into a loose knot. Tuck the ends underneath.
    3. Place knots on the baking sheet. Brush with olive oil.
    4. Bake for 12-15 minutes until golden brown.

    Step 3: Make the Garlic Butter

    1. While knots bake, melt butter in a small pan over low heat.
    2. Add minced garlic and cook for 1 minute until fragrant (don’t burn it).
    3. Remove from heat. Stir in parsley and salt.

    Step 4: Toss & Serve

    1. Transfer hot knots to a large bowl. Pour garlic butter over them. Toss to coat.
    2. Sprinkle with Parmesan cheese. Toss again.
    3. Serve warm with marinara sauce for dipping.

    Summary

    Prep Time: 10 minutes | Bake Time: 15 minutes | Total Time: 25 minutes

    Yield: 16 knots | Difficulty: Easy

    Storage Notes

    Best fresh and hot. Store leftovers (ha!) in an airtight container in the fridge for up to 3 days. Reheat in an air fryer at 350°F for 3-4 minutes or in an oven. Never microwave—they turn into rubber.

  • Samosas: The Triangle Everyone Fights Over

    Samosas: The Triangle Everyone Fights Over

    Is it even a party without samosas? No. The answer is no.

    These little triangles are pure magic: a shatteringly crisp shell wrapped around warm, spiced potatoes and sweet peas. They’re easier to make than you think. No fancy equipment. No hard-to-find spices. Just a simple dough, a killer filling, and your favorite cooking method—fry, bake, or air fry.

    Ingredients

    Makes 12 samosas.

    For the Dough:

    • 2 cups all-purpose flour
    • ½ teaspoon salt
    • ¼ cup oil or ghee
    • ½ cup water (approx)

    For the Filling:

    • 3 medium potatoes, boiled and mashed
    • ½ cup frozen peas
    • 1 teaspoon cumin seeds
    • 1 teaspoon garam masala
    • ½ teaspoon turmeric
    • 1 green chili, minced (optional)
    • Salt to taste

    Step-by-Step Instructions

    Step 1: Make the Dough

    1. Mix flour and salt. Rub in oil until crumbly.
    2. Add water slowly and knead into a stiff dough. Rest for 30 minutes.

    Step 2: Make the Filling

    1. Heat 1 tablespoon oil. Add cumin seeds until they pop.
    2. Add mashed potatoes, peas, spices, chili, and salt. Cook 2-3 minutes. Cool.

    Step 3: Shape the Samosas

    1. Divide dough into 6 balls. Roll each into a 6-inch circle. Cut in half.
    2. Take one half, form a cone, and seal the edge with water.
    3. Stuff with filling. Seal the top edge with water. Repeat.

    Step 4: Cook Your Way

    1. Fry: Heat oil to 350°F. Fry 3-4 minutes until golden.
    2. Bake: Brush with oil. Bake at 375°F for 20 minutes, flipping halfway.
    3. Air Fry: 375°F for 10-12 minutes, shaking once.

    Summary

    Prep Time: 20 minutes | Cook Time: 10 minutes | Rest Time: 30 minutes

    Yield: 12 samosas | Difficulty: Medium

    Storage Notes

    Freeze uncooked samosas on a tray, then transfer to a bag for up to 3 months. Cook from frozen (add 2-3 minutes). Cooked samosas last 3 days in the fridge—reheat in an air fryer or oven, not microwave.

    Dip with: mint chutney, tamarind sauce, or ketchup. No judgment.

  • Banana Egg Rolls: 10-Minute Dessert Danger

    Banana Egg Rolls: 10-Minute Dessert Danger

    Egg rolls aren’t just for takeout anymore.

    Meet your new late-night obsession: Banana Egg Rolls. Warm, jammy bananas tucked inside a shatteringly crisp shell, dusted with cinnamon sugar. No deep fryer needed. Just a pan with oil, a few ingredients, and five minutes of courage. Let’s get rolling.

    Ingredients

    Makes 8 egg rolls.

    • 8 egg roll wrappers
    • 3 ripe bananas, cut into small chunks
    • ¼ cup brown sugar
    • 1 teaspoon cinnamon
    • Oil for frying (vegetable or canola)
    • Optional: powdered sugar, chocolate syrup, caramel sauce

    Step-by-Step Instructions

    Step 1: Mix the Filling

    1. In a small bowl, toss banana chunks with brown sugar and cinnamon.

    Step 2: Roll the Egg Rolls

    1. Place an egg roll wrapper like a diamond. Add 2-3 banana chunks to the center.
    2. Fold bottom corner over filling. Fold in sides. Roll tightly and seal the top corner with a dab of water.
    3. Repeat for all 8.

    Step 3: Fry ‘Em Up

    1. Heat 1 inch of oil in a skillet to 350°F (175°C).
    2. Fry egg rolls 1-2 minutes per side until golden brown and crispy.
    3. Drain on paper towels.

    Step 4: Finish & Devour

    1. Dust with powdered sugar or cinnamon sugar. Drizzle with chocolate or caramel.
    2. Serve warm. Trust us—these vanish fast.

    Summary

    Prep Time: 5 minutes | Cook Time: 5 minutes | Total Time: 10 minutes

    Yield: 8 egg rolls | Difficulty: Super Easy

    Storage Notes

    Best eaten fresh and hot. To reheat, air fry at 350°F for 3-4 minutes (not microwave—they’ll get soggy). You can freeze uncooked egg rolls for up to 2 months; fry straight from frozen, adding 1-2 extra minutes.

  • Key Lime Pie So Good, You’ll Hear Steel Drums

    Key Lime Pie So Good, You’ll Hear Steel Drums

    Some desserts taste like a vacation. This is one of them.

    Key lime pie is pure magic: a buttery graham cracker crust, a silky, tart-sweet lime filling, and a cloud of whipped cream on top. No oven required. No complicated techniques. Just 15 minutes of hands-on work and a few hours in the fridge. Let’s go coastal.

    Ingredients

    Serves 8.

    For the Crust:

    • 1 ½ cups graham cracker crumbs (about 12 full sheets)
    • ⅓ cup granulated sugar
    • 6 tablespoons unsalted butter, melted

    For the Filling:

    • 2 (14-oz) cans sweetened condensed milk
    • ¾ cup key lime juice (or bottled key lime juice—no shame)
    • 1 tablespoon key lime zest (regular limes work too)
    • 4 large egg yolks

    For the Topping:

    • 1 cup heavy whipping cream
    • 2 tablespoons powdered sugar
    • Lime slices or zest for garnish

    Step-by-Step Instructions

    Step 1: Make the Crust

    1. Preheat oven to 350°F (175°C) — just for the crust.
    2. Mix graham crumbs, sugar, and melted butter until it looks like wet sand.
    3. Press firmly into a 9-inch pie pan (bottom and up the sides).
    4. Bake for 8 minutes. Let cool completely.

    Step 2: Make the Filling (No Oven Needed)

    1. In a large bowl, whisk egg yolks until pale and thick (about 2 minutes).
    2. Add sweetened condensed milk and whisk until smooth.
    3. Add key lime juice and zest. Whisk until thick and creamy — it will start to set almost immediately.

    Step 3: Assemble & Chill

    1. Pour filling into cooled crust. Smooth the top.
    2. Refrigerate for at least 4 hours (overnight is better).

    Step 4: Whipped Cream Topping

    1. Whip heavy cream and powdered sugar until soft peaks form.
    2. Spread or pipe over the chilled pie.
    3. Garnish with lime slices or extra zest.

    Summary

    Prep Time: 15 minutes | Chill Time: 4 hours | Total Time: 4 hours 15 minutes

    Yield: 8 slices | Difficulty: Easy

    Storage Notes

    Cover loosely with plastic wrap and refrigerate for up to 5 days. Do not freeze — the texture will become grainy. Add whipped cream right before serving for best results.

  • Crispy Beef Tacos (The Shell Shatters. The Heart Sings.)

    Crispy Beef Tacos (The Shell Shatters. The Heart Sings.)

    Soft tacos are fine. But crispy tacos? Crispy tacos are an event.

    That first bite where the shell shatters. The seasoned beef. The cool lettuce and sour cream. The avalanche of hot sauce. These crispy beef tacos take 20 minutes and taste like the best version of your childhood Tuesday night. No fancy stuff. Just pure, crunchy happiness.

    Ingredients

    Makes 8-10 tacos (serves 4).

    • 1 lb (450g) ground beef (80/20 recommended)
    • 1 packet taco seasoning (or homemade: chili powder, cumin, paprika, garlic powder, onion powder)
    • ⅓ cup water
    • 8-10 hard taco shells
    • 1 cup shredded cheddar or Mexican blend cheese
    • Shredded lettuce
    • Diced tomatoes
    • Sour cream
    • Hot sauce or salsa
    • Optional: diced onion, pickled jalapeños, cilantro

    Step-by-Step Instructions

    Step 1: Cook the Beef

    1. Heat a large skillet over medium-high heat. Add ground beef.
    2. Cook for 5-7 minutes, breaking it apart with a spatula, until browned.
    3. Drain excess grease.
    4. Add taco seasoning and water. Stir and simmer for 2-3 minutes until thickened.

    Step 2: Warm the Shells

    1. Preheat oven to 350°F (175°C). Place taco shells on a baking sheet.
    2. Warm for 3-5 minutes until toasty and fragrant.

    Step 3: Assemble (The Right Way)

    1. Spoon seasoned beef into each taco shell.
    2. Top immediately with shredded cheese (so it melts slightly).
    3. Add lettuce, tomatoes, sour cream, and hot sauce.

    Step 4: Serve

    1. Serve immediately with extra hot sauce on the side.
    2. Do not wait. Soggy tacos are sad tacos.

    Summary

    Prep Time: 5 minutes | Cook Time: 15 minutes | Total Time: 20 minutes

    Yield: 8-10 tacos

    Difficulty: Easy

    Storage Notes

    • Fridge: Cooked seasoned beef keeps for 4 days. Store separately from shells and toppings.
    • Reheat beef: Skillet or microwave with a splash of water.
    • Shells: Never store assembled tacos. They’ll become a sad, soggy mess.
    • Taco night pro tip: Set up a taco bar. Let everyone build their own fresh.
  • Mac and Cheese Balls (Fried, Golden, Dangerously Good)

    Mac and Cheese Balls (Fried, Golden, Dangerously Good)

    Mac and cheese is perfect. But you know what’s even better?

    Mac and cheese you can hold in your hand. Mac and cheese with a crunchy shell and a molten, gooey center. These mac and cheese balls take everyone’s favorite side dish and turn it into a crispy, dippable, crowd-devouring appetizer. Make them with leftovers or make them from scratch. Just make them.

    Ingredients

    Makes about 15-20 balls.

    • 3 cups leftover mac and cheese (cold, firm)
    • 1 cup all-purpose flour
    • 2 large eggs, beaten
    • 1½ cups breadcrumbs (panko preferred)
    • ½ cup grated Parmesan cheese (optional, for extra crunch)
    • Oil for frying (vegetable or canola)
    • Salt to taste

    For Dipping:

    • Marinara sauce, ranch, or sriracha mayo

    Step-by-Step Instructions

    Step 1: Prep the Mac

    1. Scoop cold mac and cheese into 1.5-inch balls. Pack tightly so they hold together.
    2. Place on a parchment-lined tray. Freeze for 30 minutes (this is key—they won’t fall apart in the oil).

    Step 2: Set Up Breading Station

    1. Three bowls: flour, beaten eggs, and breadcrumbs mixed with Parmesan.
    2. Roll each cold mac ball in flour, then egg, then breadcrumbs.

    Step 3: Fry

    1. Heat 2 inches of oil in a pot to 350°F (175°C).
    2. Fry balls in batches for 2-3 minutes until golden brown and crispy.
    3. Drain on paper towels. Sprinkle with salt.

    Step 4: Serve

    1. Serve hot with dipping sauce on the side.
    2. Warn people they’re molten inside. They won’t listen. They’ll burn their mouths anyway.

    Summary

    Prep Time: 15 minutes + 30 minutes freezing | Cook Time: 10 minutes | Total Time: 55 minutes

    Yield: 15-20 balls

    Difficulty: Medium

    Storage Notes

    • Fridge: Fried balls keep for 3 days. Reheat to restore crunch.
    • Freezer (uncooked): Breaded, uncooked balls freeze for up to 2 months. Fry from frozen (add 1-2 minutes).
    • Reheat cooked: Air fryer at 375°F for 5 minutes or oven at 400°F for 8 minutes.
    • No microwave: You’ll get a sad, greasy sponge.
  • Blooming Onion (The Outback Classic, Made at Home)

    Blooming Onion (The Outback Classic, Made at Home)

    You know the one. The giant fried onion that arrives at the table and everyone gasps.

    This blooming onion is that. Crispy, golden petals. A sweet, tender center. And that iconic dipping sauce that’s creamy, smoky, and just a little spicy. It looks impressive. It tastes even better. And yes, you can absolutely make it at home without a deep fryer.

    Ingredients

    Serves 4 as an appetizer.

    • 1 large sweet onion (Vidalia or Walla Walla)
    • 1 cup all-purpose flour
    • 1 teaspoon paprika
    • 1 teaspoon garlic powder
    • ½ teaspoon cayenne pepper
    • ½ teaspoon salt
    • ¼ teaspoon black pepper
    • 2 large eggs
    • ½ cup milk
    • Oil for frying (vegetable or canola)

    For the Dipping Sauce:

    • ½ cup mayonnaise
    • 2 tablespoons horseradish (or to taste)
    • 1 tablespoon ketchup
    • 1 teaspoon smoked paprika
    • ¼ teaspoon garlic powder
    • ¼ teaspoon cayenne

    Step-by-Step Instructions

    Step 1: Cut the Onion

    1. Slice off the top (not the root end). Peel the onion.
    2. Place root-side up. Cut down into the onion, leaving ½ inch from the root. Make 4 cuts, then 8, then 12. Petals will fall open.
    3. Gently separate the petals with your fingers.

    Step 2: Soak

    1. Place onion in a bowl of ice water for 30 minutes. This helps petals open and removes sharpness.
    2. Drain and pat dry.

    Step 3: Season the Flour

    1. In a bowl, mix flour, paprika, garlic powder, cayenne, salt, and pepper.
    2. In another bowl, whisk eggs and milk.

    Step 4: Coat the Onion

    1. Dredge onion in flour mixture (get between petals). Shake off excess.
    2. Dip in egg mixture, then back into flour mixture for a second coat.

    Step 5: Fry

    1. Heat 3 inches of oil to 375°F (190°C).
    2. Place onion root-side down in oil. Fry for 3-4 minutes, rotating carefully.
    3. Flip and fry another 2-3 minutes until golden brown.
    4. Drain on paper towels.

    Step 6: Make the Sauce

    1. Mix all sauce ingredients in a small bowl.
    2. Serve onion with sauce on the side (or in the center).

    Summary

    Prep Time: 20 minutes + 30 minutes soak | Cook Time: 10 minutes | Total Time: 1 hour

    Yield: 1 blooming onion

    Difficulty: Medium

    Storage Notes

    • Leftovers? Honestly, blooming onions don’t reheat well. They get sad and soggy.
    • Make ahead: Cut the onion and refrigerate in water for up to 4 hours. Fry fresh.
    • Sauce: Dipping sauce keeps in the fridge for 1 week.
    • Pro tip: This is a fry-and-eat-immediately situation. Plan accordingly.
  • Garlic Parmesan Chicken Tenders (Better Than Any Drive-Thru)

    Garlic Parmesan Chicken Tenders (Better Than Any Drive-Thru)

    Let’s be honest: most homemade chicken tenders are boring. Dry. Bland. Sad.

    These are not those. These are garlic butter-drenched, Parmesan-crusted, crispy-on-the-outside-juicy-on-the-inside tenders. Baked or fried (your call). Ready in 25 minutes. Good enough for adults. Loved by kids. Make a double batch. Trust me.

    Ingredients

    Serves 4 (about 12-16 tenders).

    • 1.5 lbs (680g) chicken tenderloins (or chicken breasts cut into strips)
    • ½ cup all-purpose flour
    • 2 large eggs, beaten
    • 1 cup panko breadcrumbs
    • ½ cup grated Parmesan cheese
    • 1 teaspoon garlic powder
    • 1 teaspoon onion powder
    • ½ teaspoon salt
    • ¼ teaspoon black pepper
    • Cooking spray or oil for frying

    For the Garlic Butter Finish:

    • 3 tablespoons butter, melted
    • 3 cloves garlic, minced
    • 2 tablespoons fresh parsley, chopped
    • Extra Parmesan for topping

    Step-by-Step Instructions

    Step 1: Preheat and Prep

    1. Preheat oven to 425°F (220°C) for baking. Line a baking sheet with foil and place a wire rack on top.
    2. Pat chicken tenders dry with paper towels.

    Step 2: Set Up Breading Station

    1. Three shallow bowls: flour (seasoned with salt/pepper), beaten eggs, and panko + Parmesan + garlic powder + onion powder mixed together.
    2. Dredge each tender in flour → dip in egg → coat in panko mixture, pressing firmly.

    Step 3: Cook

    1. Bake: Place tenders on wire rack. Spray with oil. Bake for 12-15 minutes, flipping halfway, until golden and cooked through.
    2. Fry: Heat ½ inch oil in skillet to 350°F. Fry 3-4 minutes per side.
    3. Air fry: 375°F for 8-10 minutes, shaking halfway.

    Step 4: Make Garlic Butter

    1. While tenders cook, melt butter in a small pan. Add garlic and cook 1 minute.
    2. Stir in parsley.

    Step 5: Finish and Serve

    1. Place hot tenders in a bowl. Drizzle with garlic butter. Toss gently.
    2. Sprinkle with extra Parmesan. Serve with ranch, marinara, or honey mustard.

    Summary

    Prep Time: 10 minutes | Cook Time: 15 minutes | Total Time: 25 minutes

    Yield: 12-16 tenders

    Difficulty: Easy

    Storage Notes

    • Fridge: Cooked tenders keep for 4 days in an airtight container.
    • Freezer: Freeze uncooked breaded tenders for up to 3 months. Bake from frozen (add 5-10 minutes).
    • Reheat: Air fryer at 375°F for 5 minutes or oven at 400°F for 8 minutes.
    • Don’t microwave: You’ll get sad, rubbery tenders. Don’t do it.
  • Crispy Chicken Katsu (Better Than Your Takeout Spot)

    Crispy Chicken Katsu (Better Than Your Takeout Spot)

    There’s fried chicken. Then there’s chicken katsu.

    Pounded thin. Dredged in flour, egg, and flaky panko. Fried until it sounds like stepping on autumn leaves. Served with that sweet, tangy, addictive tonkatsu sauce. It’s simple. It’s perfect. And once you make it at home, you’ll never order delivery again.

    Ingredients

    Serves 4.

    • 4 boneless, skinless chicken breasts (about 6 oz / 170g each)
    • Salt and pepper to taste
    • ½ cup all-purpose flour
    • 2 large eggs, beaten
    • 1½ cups panko breadcrumbs (Japanese-style)
    • Oil for frying (vegetable or canola)

    For the Tonkatsu Sauce:

    • ¼ cup ketchup
    • 2 tablespoons Worcestershire sauce
    • 1 tablespoon soy sauce
    • 1 tablespoon honey or sugar

    For Serving:

    • Cooked white rice
    • Shredded cabbage
    • Lemon wedges

    Step-by-Step Instructions

    Step 1: Pound the Chicken

    1. Place chicken between two sheets of plastic wrap. Pound to ½-inch thickness.
    2. Season both sides with salt and pepper.

    Step 2: Set Up Breading Station

    1. Three shallow bowls: flour, beaten eggs, panko.
    2. Dredge chicken in flour → dip in egg → coat in panko, pressing firmly.

    Step 3: Fry

    1. Heat ½ inch of oil in a large skillet to 350°F (175°C).
    2. Fry chicken for 3-4 minutes per side until golden brown and cooked through.
    3. Drain on a wire rack (not paper towels—keeps it crispy).

    Step 4: Make the Sauce

    1. Whisk ketchup, Worcestershire, soy sauce, and honey in a small bowl.

    Step 5: Serve

    1. Slice katsu into strips. Serve over rice with shredded cabbage.
    2. Drizzle with tonkatsu sauce and a squeeze of lemon.

    Summary

    Prep Time: 15 minutes | Cook Time: 10 minutes | Total Time: 25 minutes

    Yield: 4 servings

    Difficulty: Easy

    Storage Notes

    • Fridge: Cooked katsu keeps for 3 days. It will lose crispiness.
    • Reheat: Air fryer at 375°F for 5 minutes or oven at 400°F for 8 minutes. Never microwave.
    • Make ahead: Bread the chicken up to 4 hours in advance. Refrigerate until frying.
    • Katsu curry: Serve with Japanese curry roux for the ultimate comfort meal.
  • Garlic Herb Roasted Turkey Breast (Thanksgiving Any Tuesday)

    Garlic Herb Roasted Turkey Breast (Thanksgiving Any Tuesday)

    Love turkey but hate wrestling a 15-pound bird? Same.

    This garlic herb roasted turkey breast is your answer. All the juicy, savory, crispy-skin goodness of a holiday turkey, but it cooks in under 90 minutes. No brining required. No giant roasting pan. No leftovers for three weeks. Just perfect turkey any day of the week.

    Ingredients

    Serves 4-6.

    • 3-4 lb (1.4-1.8 kg) bone-in, skin-on turkey breast
    • 2 tablespoons olive oil or softened butter
    • 6 cloves garlic, minced
    • 1 tablespoon fresh rosemary, chopped
    • 1 tablespoon fresh thyme leaves
    • 1 tablespoon fresh sage, chopped (or 1 tsp dried)
    • 1 teaspoon salt
    • ½ teaspoon black pepper
    • 1 lemon, quartered (optional, for roasting)

    Step-by-Step Instructions

    Step 1: Preheat and Prep

    1. Preheat oven to 400°F (200°C). Line a baking sheet or roasting pan with foil.
    2. Pat turkey breast completely dry with paper towels.

    Step 2: Make the Herb Butter

    1. In a small bowl, mix olive oil (or butter), garlic, rosemary, thyme, sage, salt, and pepper.
    2. Gently loosen the skin from the turkey breast with your fingers.
    3. Rub half the herb mixture directly under the skin. Rub the rest all over the outside.

    Step 3: Roast

    1. Place turkey on the pan. Tuck lemon quarters around it if using.
    2. Roast for 50-65 minutes, until internal temp hits 165°F (74°C).
    3. If skin is browning too fast, loosely tent with foil.

    Step 4: Rest and Serve

    1. Let rest for 10-15 minutes before slicing. This is critical for juiciness.
    2. Slice and serve with pan juices.

    Summary

    Prep Time: 10 minutes | Cook Time: 55 minutes | Total Time: 1 hour 15 minutes

    Yield: 4-6 servings

    Difficulty: Easy

    Storage Notes

    • Fridge: Sliced turkey keeps for 4 days in an airtight container.
    • Freezer: Freezes beautifully for up to 3 months. Slice first.
    • Reheat: Oven at 325°F with a splash of broth. Skip the microwave.
    • Leftover magic: Sandwiches, salads, soups, or turkey pot pie.