Category: quick_meals

  • Eggs Benedict: The Brunch Dish That’s Worth the Hype

    Eggs Benedict: The Brunch Dish That’s Worth the Hype

    There are a few dishes that define the art of brunch, and Eggs Benedict sits proudly at the top of that list. It’s the dish you order when you want to feel fancy, the one that arrives at your table looking so perfect you almost don’t want to cut into it. Almost.

    But here’s the secret: you don’t need to wait for a special brunch out to enjoy this classic. With a little patience and the right technique, you can create restaurant-worthy Eggs Benedict right in your own kitchen.

    We’ll walk through every component—the poached eggs with their runny golden yolks, the perfectly toasted English muffin, the salty Canadian bacon, and the crowning glory: a silky, lemony Hollandaise sauce that’s surprisingly doable at home. Let’s make brunch magic happen.
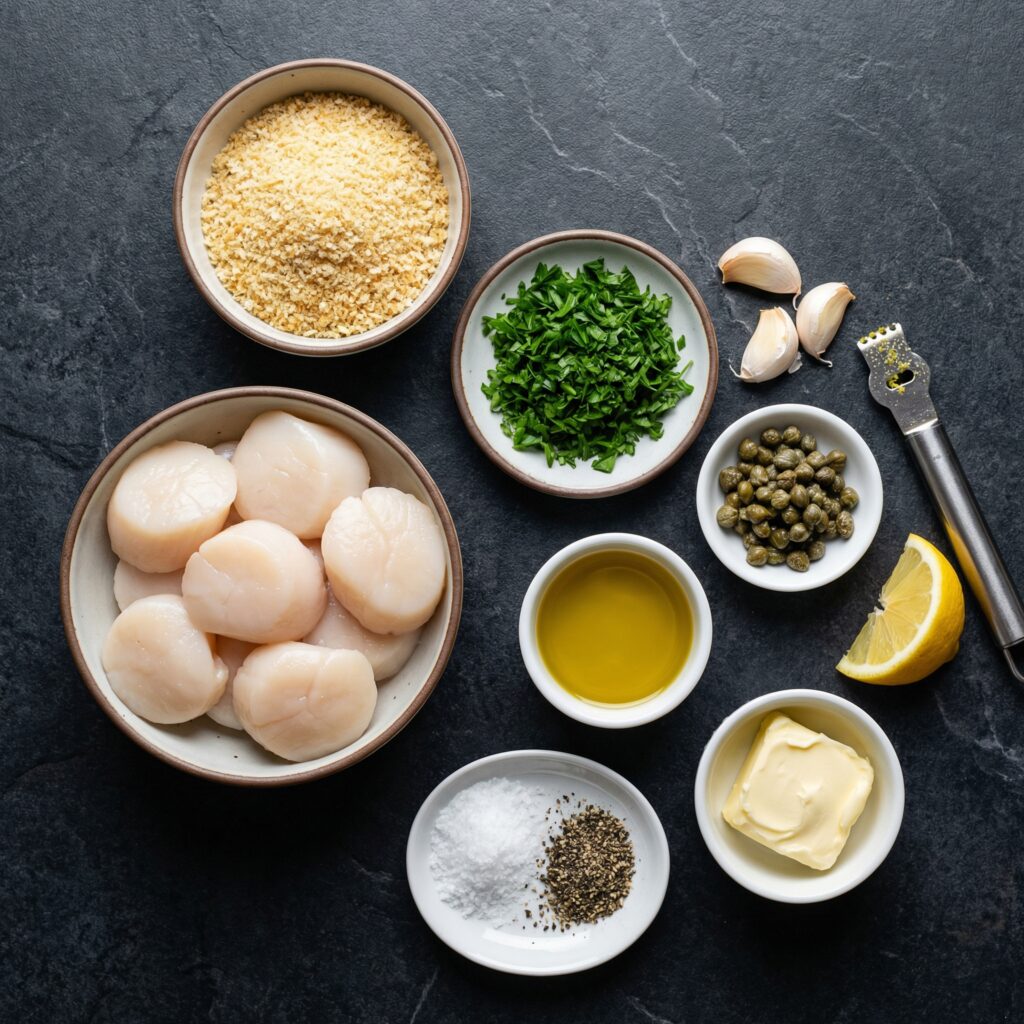
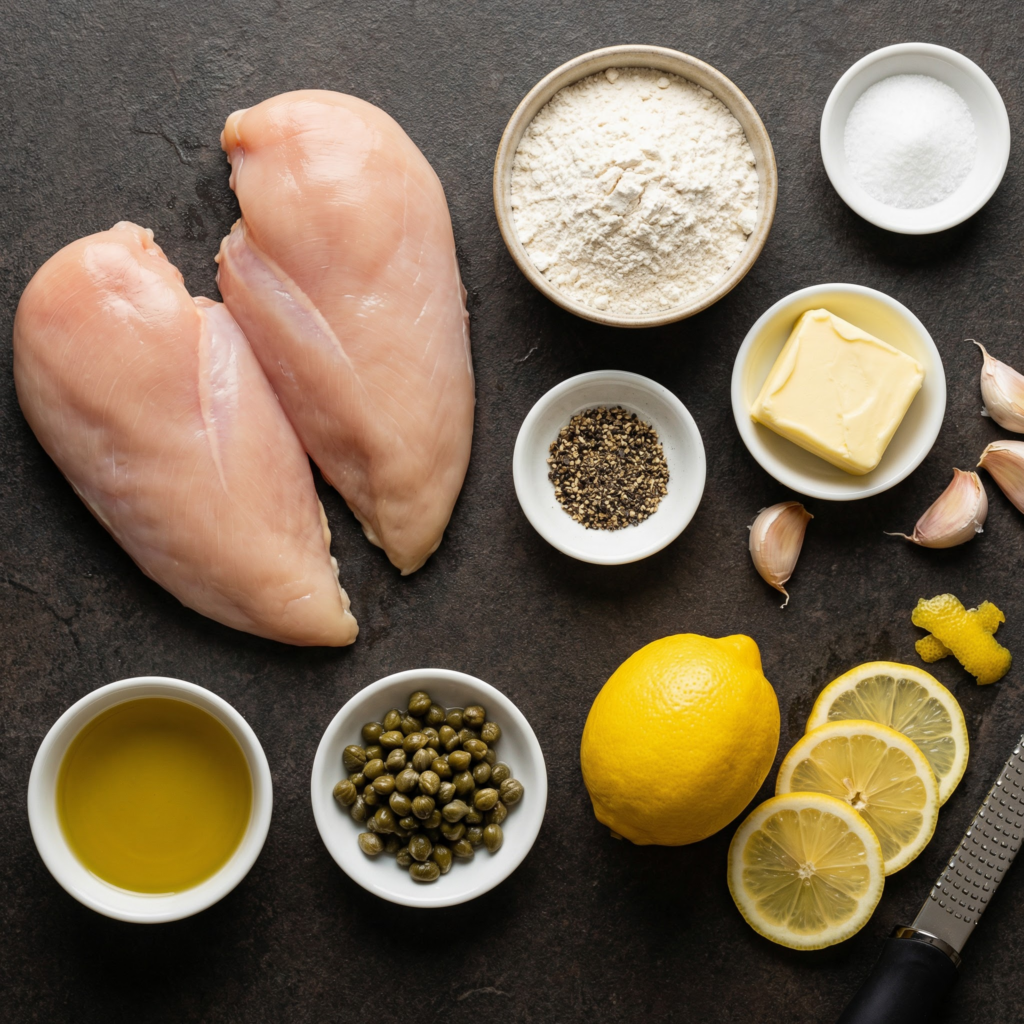
    Ingredients

    Serves 4.

    For the Poached Eggs:

    • 8 large eggs (the fresher, the better—fresh eggs hold their shape)
    • 1 tablespoon white vinegar (helps the egg whites coagulate)
    • Salt, for the water

    For the Hollandaise Sauce:

    • 3 large egg yolks
    • 1 tablespoon fresh lemon juice
    • 1 tablespoon cold water
    • 1 stick (½ cup / 115g) unsalted butter, melted and kept hot
    • Pinch of cayenne pepper
    • Salt and white pepper, to taste

    For Assembly:

    • 4 English muffins, split in half
    • 8 slices Canadian bacon (or thin ham slices)
    • Butter, for the muffins
    • Fresh parsley or chives, chopped, for garnish
    • Paprika, for sprinkling (optional)

    Step-by-Step Instructions

    Part 1: Make the Hollandaise Sauce (The Star of the Show)

    Note: Hollandaise is best made fresh and served immediately. Have all your ingredients ready before you start.

    Step 1: Whisk the Egg Yolks

    1. Place the egg yolks, lemon juice, and cold water in a blender. Blend for about 1 minute until the mixture is light and frothy.
    2. Alternatively, use a double boiler: whisk the yolks, lemon juice, and water in a heatproof bowl over gently simmering water until the mixture thickens and leaves a ribbon trail when the whisk is lifted.

    Step 2: Emulsify with Butter

    1. With the blender running, slowly drizzle the hot melted butter through the opening in the lid in a thin, steady stream. The sauce will immediately begin to thicken and become glossy.
    2. If using the double boiler method, add the melted butter drop by drop at first, then in a thin stream, whisking constantly until the sauce is thick and smooth.

    Step 3: Season and Keep Warm

    1. Stir in a pinch of cayenne pepper, salt, and white pepper to taste.
    2. Cover the sauce and keep it warm by placing the blender container or bowl over a pot of warm (not hot) water. Do not let it get too hot, or the sauce may separate.

    Part 2: Poach the Eggs

    Step 4: Prepare the Poaching Water

    1. Fill a large, deep skillet or saucepan with about 2-3 inches of water. Add the vinegar and a pinch of salt. Bring to a boil, then reduce the heat to a gentle simmer (small bubbles rising, but not a rolling boil).

    Step 5: Create a Vortex (Optional but Helpful)

    1. Crack one egg into a small cup or ramekin. Using a spoon, stir the simmering water in a circular motion to create a gentle vortex.
    2. Carefully slide the egg into the center of the vortex. The swirling water will help wrap the egg white around the yolk.
    3. Repeat with remaining eggs, cooking 2-3 at a time to avoid overcrowding.

    Step 6: Cook and Remove

    1. Let the eggs poach for 3-4 minutes for runny yolks, or 5 minutes for firmer yolks. The whites should be set and opaque.
    2. Remove the eggs with a slotted spoon and transfer them to a plate lined with paper towels to drain excess water. Trim any ragged edges if desired.

    Part 3: Assemble the Eggs Benedict

    Step 7: Prepare the Base

    1. While the eggs poach, toast the English muffin halves until golden brown. Butter them lightly.
    2. In a separate skillet, warm the Canadian bacon slices over medium heat until heated through, about 1 minute per side.

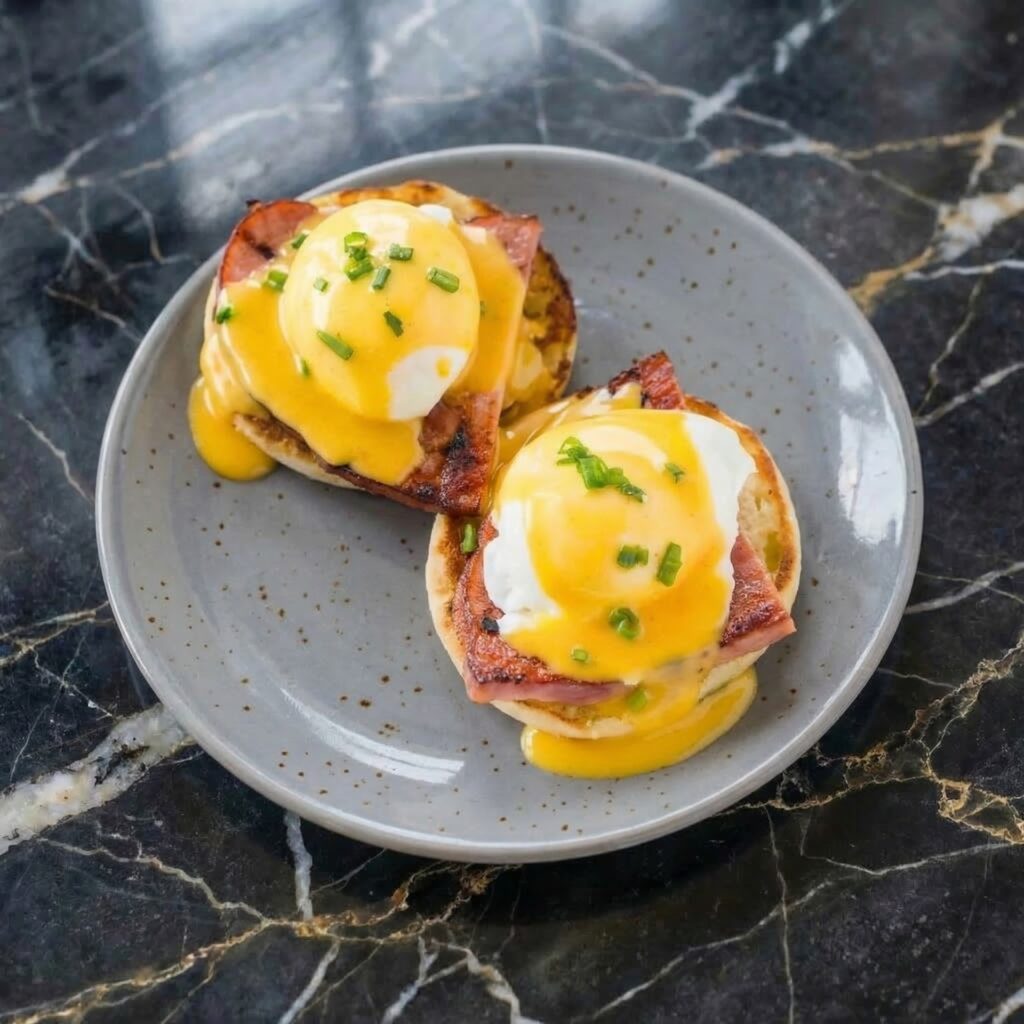
    Step 8: Bring It All Together

    1. Place two toasted English muffin halves on each plate, buttered side up.
    2. Top each half with a slice of Canadian bacon.
    3. Gently place a poached egg on top of each bacon slice.
    4. Spoon the warm Hollandaise sauce generously over the eggs, letting it cascade down the sides.

    Step 9: Garnish and Serve Immediately

    1. Sprinkle with chopped fresh parsley or chives and a dusting of paprika, if desired.
    2. Serve at once—this dish waits for no one!

    Summary

    Prep Time: 10 minutes | Cook Time: 25 minutes | Total Time: 35 minutes

    Yield: 4 servings

    Difficulty: Intermediate

    Storage Notes

    Can You Make Eggs Benedict Ahead?

    Eggs Benedict is truly best enjoyed fresh, right after preparation. However, you can prep components in advance:

    • Hollandaise Sauce: Can be made 1-2 hours ahead and kept warm in a thermos or in a bowl set over warm water. Stir occasionally. Do not refrigerate and reheat—it will likely separate.
    • Poached Eggs: You can poach eggs up to a day ahead. Immediately after cooking, transfer them to a bowl of ice water to stop the cooking process. Store in the refrigerator. To reheat, slip them into simmering water for 30-60 seconds just before serving.
    • Canadian Bacon and Muffins: These can be prepped just before serving; they’re quick to warm and toast.
  • Homemade Pita Bread (Soft, Puffy & Always Pockets!)

    Homemade Pita Bread (Soft, Puffy & Always Pockets!)

    There is something truly magical about watching pita bread puff up in the oven. One moment it’s a flat disc of dough, and the next—poof!—it balloons into a gorgeous, golden pocket, just waiting to be filled with your favorite ingredients.

    Making pita bread at home is easier than you might think. With just a handful of simple ingredients and a hot oven, you can create soft, pillowy pitas that put any store-bought version to shame.

    They’re perfect for stuffing with gyros and falafel, tearing and dipping into hummus, or simply slathering with butter and eating warm from the oven. Once you try homemade, there’s no going back. Let’s make some pita!

    Ingredients

    Yields 8 pitas.

    For the Pita Dough:

    • 3 ½ cups (440g) all-purpose flour or bread flour, plus more for dusting
    • 2 teaspoons instant yeast (or active dry yeast)
    • 2 teaspoons salt
    • 1 teaspoon sugar
    • 1 ¼ cups (300ml) warm water (about 105-115°F)
    • 2 tablespoons olive oil

    For Baking:

    • Cornmeal or semolina flour (for dusting baking sheets, optional)

    Step-by-Step Instructions

    1. Mix the Dough:

    1. In a large bowl or the bowl of a stand mixer, whisk together the flour, instant yeast, salt, and sugar.
    2. Add the warm water and olive oil. If using active dry yeast instead of instant, dissolve it in the warm water with a pinch of sugar first and let it sit for 5-10 minutes until foamy, then proceed.
    3. Mix with a wooden spoon or dough hook until a shaggy dough forms.

    2. Knead:

    1. If using a stand mixer, knead with the dough hook on medium-low speed for 5-7 minutes, until the dough is smooth and elastic.
    2. If kneading by hand, turn the dough onto a lightly floured surface and knead for 8-10 minutes, until smooth and springy.
    3. The dough should be soft, smooth, and slightly tacky but not sticky. Add flour one tablespoon at a time only if absolutely necessary.

    3. First Rise:

    1. Place the dough in a lightly oiled bowl, cover with plastic wrap or a clean kitchen towel, and let rise in a warm place for 1-1.5 hours, until doubled in size.

    4. Divide and Shape:

    1. Punch down the risen dough and turn it onto a lightly floured surface.
    2. Divide the dough into 8 equal pieces (about 110-120g each).
    3. Shape each piece into a smooth ball by pulling the edges underneath and pinching to seal. Place on a lightly floured surface, cover with a towel, and let rest for 15-20 minutes. This rest is crucial for easy rolling.

    5. Roll Out:

    1. On a lightly floured surface, roll each ball into a circle about ¼-inch thick and 6-7 inches in diameter. Roll gently and evenly—if the edges are too thin, they won’t puff properly.
    2. Place the rolled circles on a lightly floured baking sheet, separated by parchment paper or floured towels. Cover and let rest for 30-45 minutes while you preheat the oven.

    6. Preheat the Oven and Baking Surface:

    1. Place a baking stone, steel, or an inverted heavy baking sheet on the middle rack of your oven. Preheat to 500°F (260°C) for at least 30 minutes. The intense heat is essential for the pita to puff.
    2. If you have one, place a cast iron skillet on the bottom rack to create steam, or have a spray bottle ready for water.

    7. Bake:

    1. Carefully remove the hot baking surface from the oven and dust lightly with cornmeal or semolina if using (this prevents sticking and adds a nice texture).
    2. Place 2-3 pitas on the hot surface (don’t overcrowd).
    3. Bake for 2-3 minutes, until they puff up dramatically and get lightly golden spots. You can also toss a few ice cubes or spray water into the bottom of the oven just before closing the door to create steam, which helps with puffing.
    4. Flip and bake for another 1-2 minutes if desired, though this isn’t always necessary.
    5. Remove from the oven and wrap immediately in a clean kitchen towel to keep them soft. The steam trapped in the towel keeps them pliable.
    6. Repeat with remaining pitas.

    8. Serve:

    1. Serve warm, stuffed with your favorite fillings, or alongside dips like hummus, tzatziki, and baba ganoush.

    Summary

    Prep Time: 20 minutes | Rise Time: 1.5-2 hours | Bake Time: 3-4 minutes per batch | Total Time: About 2 hours

    Yield: 8 pitas

    Difficulty: Easy to Intermediate

    Storage and Make-Ahead Tips

    How to Store:

    Store cooled pitas in an airtight container or zip-top bag at room temperature for up to 3 days. To keep them soft, you can add a slightly damp paper towel to the bag and refresh in the microwave for 10-15 seconds.

    Can You Freeze Them?

    Absolutely! Pita bread freezes beautifully. Stack cooled pitas with parchment paper between each one to prevent sticking, then place in a freezer bag. Freeze for up to 3 months. Thaw at room temperature and warm in a dry skillet, oven, or microwave before serving.

    Make-Ahead Dough:

    You can prepare the dough through step 3 (first rise), then punch it down, cover tightly, and refrigerate for up to 24 hours. When ready to bake, let it come to room temperature, then proceed with dividing, shaping, and resting.

    Freezing Shaped Pitas:

    Roll out the pitas, place them on parchment-lined baking sheets with parchment between layers, and freeze until solid. Transfer to a freezer bag. Bake from frozen directly on a hot baking stone—they may need an extra minute.

    Reviving Day-Old Pitas:

    Sprinkle slightly stale pitas with a few drops of water, wrap in foil, and warm in a 300°F oven for 5-10 minutes. They’ll taste almost freshly baked.

  • Crispy, Cheesy, and Packed with Flavor: How to Make the Perfect Chicken Quesadillas

    Crispy, Cheesy, and Packed with Flavor: How to Make the Perfect Chicken Quesadillas

    Few meals are as satisfying, quick, and crowd-pleasing as chicken quesadillas. With crispy golden tortillas, juicy seasoned chicken, and layers of gooey melted cheese, this classic dish delivers bold flavor with minimal effort.

    Whether you’re preparing a quick weeknight dinner, a game-day snack, or a casual lunch, chicken quesadillas are always a reliable favorite.

    Originating from Mexican cuisine, quesadillas traditionally consist of tortillas filled with cheese and other ingredients, then cooked until the exterior is crisp and the filling is hot and melty.

    Adding seasoned chicken turns them into a hearty and protein-packed meal that’s both comforting and versatile.

    In this step-by-step guide, you’ll learn exactly how to make restaurant-quality chicken quesadillas at home, complete with tips for achieving perfectly crisp tortillas and flavorful fillings.


    Why Chicken Quesadillas Are So Popular

    Chicken quesadillas have become a staple in kitchens around the world for several reasons:

    • Quick cooking time
    • Simple ingredients
    • Customizable fillings
    • Perfect balance of crunchy and cheesy textures

    With just a few ingredients and one skillet, you can create a meal that tastes like it came from your favorite Mexican restaurant.


    Ingredients

    For four quesadillas, you will need:

    • 2 cups cooked chicken, shredded or diced
    • 4 large flour tortillas
    • 1 ½ cups shredded cheese (cheddar, Monterey Jack, or Mexican blend)
    • ½ small onion, finely chopped
    • ½ bell pepper, thinly sliced
    • 1 tablespoon olive oil
    • 1 teaspoon chili powder
    • ½ teaspoon paprika
    • ½ teaspoon cumin
    • ½ teaspoon garlic powder
    • Salt and pepper to taste
    • 2 tablespoons butter or oil for cooking

    Optional toppings:

    • Sour cream
    • Salsa
    • Guacamole
    • Chopped cilantro

    Step 1: Prepare the Chicken

    If you don’t already have cooked chicken, start by seasoning chicken breast or thighs with chili powder, cumin, paprika, garlic powder, salt, and pepper.

    Cook the chicken in a skillet with a little olive oil over medium heat for about 6–8 minutes per side, or until fully cooked.

    Once done, allow it to cool slightly, then shred or dice the meat into bite-sized pieces.

    Using leftover roasted or rotisserie chicken also works perfectly and saves time.


    Step 2: Cook the Vegetables

    Heat 1 tablespoon of olive oil in a skillet over medium heat.

    Add the chopped onion and sliced bell pepper, cooking for about 3–4 minutes until softened and slightly caramelized.

    This step enhances the flavor and adds a little sweetness that complements the savory chicken and cheese.

    Once cooked, remove the vegetables from the pan and set aside.


    Step 3: Combine the Filling

    In a mixing bowl, combine the shredded chicken with the cooked onions and peppers.

    Taste the mixture and adjust seasoning with a pinch of salt or extra spices if desired.

    Mixing the filling beforehand ensures each quesadilla has evenly distributed flavor.


    Step 4: Prepare the Tortillas

    Lay the tortillas flat on a clean surface.

    Sprinkle a layer of shredded cheese over half of each tortilla. The cheese acts as a “glue” that holds the filling together once melted.

    Next, add a generous scoop of the chicken mixture over the cheese.

    Top with another layer of shredded cheese before folding the tortilla in half.

    The double layer of cheese helps ensure every bite is deliciously gooey.


    Step 5: Heat the Skillet

    Place a large skillet or griddle over medium heat.

    Add a small amount of butter or oil and allow it to melt completely.

    The fat helps the tortilla crisp up while adding rich flavor.


    Step 6: Cook the Quesadillas

    Place one or two folded quesadillas into the skillet, depending on its size.

    Cook for about 3–4 minutes on the first side until the tortilla becomes golden brown and crispy.

    Carefully flip the quesadilla and cook the other side for another 2–3 minutes until the cheese melts and the tortilla is evenly toasted.

    Press gently with a spatula while cooking to help the filling heat evenly.


    Step 7: Rest and Slice

    Transfer the cooked quesadilla to a cutting board and let it rest for about one minute.

    This short resting period allows the melted cheese to settle slightly so the filling doesn’t spill out when sliced.

    Use a pizza cutter or sharp knife to slice each quesadilla into wedges.


    Step 8: Prepare the Remaining Quesadillas

    Repeat the cooking process with the remaining tortillas and filling.

    Add more butter or oil to the skillet if needed to maintain a crispy texture.

    Work in batches to avoid overcrowding the pan.


    Step 9: Serve with Toppings

    Arrange the sliced quesadillas on a serving plate.

    Serve them with your favorite toppings such as sour cream, salsa, guacamole, or fresh cilantro.

    The creamy and tangy toppings complement the cheesy filling perfectly.


    Tips for the Best Chicken Quesadillas

    For the most delicious results, keep these tips in mind:

    Use good melting cheese. Monterey Jack, cheddar, Oaxaca, or a Mexican cheese blend melt beautifully.

    Don’t overfill. Too much filling can cause the quesadilla to fall apart while cooking.

    Cook over medium heat. This allows the cheese to melt fully without burning the tortilla.

    Crisp both sides. A golden, crunchy exterior makes all the difference.


    Flavor Variations

    Once you master the basic recipe, you can experiment with different flavors.

    Try adding:

    • Corn or black beans for extra texture
    • Jalapeños for heat
    • Mushrooms for a savory twist
    • Chipotle sauce for smoky flavor
    • Avocado slices for creaminess

    Chicken quesadillas are incredibly flexible, making them perfect for using up leftovers or trying new combinations.


    Final Thoughts

    Chicken quesadillas are the ultimate combination of simplicity and flavor. With crispy tortillas, seasoned chicken, sautéed vegetables, and melted cheese, every bite delivers satisfying textures and bold taste.

    Best of all, they come together quickly with everyday ingredients, making them perfect for busy weeknights or relaxed weekend meals. Once you master this recipe, you’ll have a go-to dish that everyone will love.

    Serve them hot, add your favorite toppings, and enjoy a plate of homemade chicken quesadillas that taste every bit as good as restaurant versions—maybe even better.

  • Crispy, Golden, and Loaded: The Ultimate Chicken Chimichangas You Can Make at Home

    Crispy, Golden, and Loaded: The Ultimate Chicken Chimichangas You Can Make at Home

    If you love burritos but crave something crispy, indulgent, and packed with bold flavor, Chicken Chimichangas are about to become your new obsession.

    These deep-fried (or baked!) burritos are stuffed with seasoned shredded chicken, melty cheese, and savory fillings, then cooked until perfectly golden and crunchy on the outside.

    Every bite delivers a satisfying crunch followed by warm, flavorful filling that’s pure comfort food.

    The best part?

    They’re surprisingly easy to make at home. Follow this step-by-step guide and you’ll have restaurant-style chimichangas fresh from your own kitchen.


    Ingredients You’ll Need

    For the Chicken Filling:

    • 2 cups cooked shredded chicken (rotisserie works great)
    • 1 tablespoon olive oil
    • ½ small onion, finely diced
    • 2 cloves garlic, minced
    • 1 teaspoon chili powder
    • 1 teaspoon ground cumin
    • ½ teaspoon smoked paprika
    • ½ teaspoon salt
    • ¼ teaspoon black pepper
    • ½ cup salsa
    • 1 cup shredded Mexican blend or cheddar cheese

    For Assembling:

    • 4 large flour tortillas
    • Vegetable oil (for frying)

    Optional Toppings:

    • Sour cream
    • Guacamole
    • Shredded lettuce
    • Diced tomatoes
    • Chopped cilantro
    • Salsa

    Step 1: Prepare the Chicken Filling

    Heat olive oil in a skillet over medium heat. Add the diced onion and cook for 3–4 minutes until softened. Stir in the minced garlic and cook for another 30 seconds until fragrant.

    Add the shredded chicken to the skillet. Sprinkle in the chili powder, cumin, smoked paprika, salt, and black pepper. Stir well to coat the chicken evenly with the spices.

    Pour in the salsa and cook for 2–3 minutes, allowing everything to heat through and the flavors to blend. Remove from heat and stir in the shredded cheese while the mixture is still warm. The cheese should begin to melt slightly, creating a creamy filling.


    Step 2: Warm the Tortillas

    Warm the flour tortillas in the microwave for about 20–30 seconds. This makes them more pliable and less likely to tear when folding.

    Lay them flat on a clean surface, ready for assembly.


    Step 3: Assemble the Chimichangas

    Spoon about ½ to ¾ cup of the chicken mixture into the center of each tortilla. Be careful not to overfill, as this can make rolling difficult.

    Fold the sides inward first, then roll the tortilla tightly from the bottom up, burrito-style. The filling should be fully enclosed.

    Place each rolled chimichanga seam-side down on a plate while you finish assembling the rest.


    Step 4: Heat the Oil

    Pour about 1–2 inches of vegetable oil into a deep skillet or heavy-bottomed pot.

    Heat over medium heat until the oil reaches about 350°F (175°C). If you don’t have a thermometer, drop in a small piece of tortilla—if it sizzles immediately, the oil is ready.


    Step 5: Fry Until Golden

    Carefully place one or two chimichangas seam-side down into the hot oil. Do not overcrowd the pan.

    Fry for 2–3 minutes per side, turning carefully with tongs, until golden brown and crispy all over.

    Remove and place on a plate lined with paper towels to drain excess oil. Repeat with remaining chimichangas.


    Step 6: Alternative Baking Method

    If you prefer a lighter option, brush each chimichanga lightly with oil and place seam-side down on a baking sheet.

    Bake at 400°F (200°C) for 20–25 minutes, flipping halfway through, until crispy and golden.

    While not as deeply crispy as fried, the baked version is still delicious and satisfying.


    Step 7: Add Toppings and Serve

    Place the hot chimichangas on serving plates. Top with sour cream, guacamole, shredded lettuce, diced tomatoes, or extra salsa.

    For an extra indulgent touch, drizzle with warm queso or enchilada sauce before serving.

    Serve immediately while crispy and hot.


    Pro Tips for Perfect Chimichangas

    • Don’t overfill the tortillas to prevent bursting during frying.
    • Secure tightly when rolling to keep everything sealed.
    • Maintain oil temperature for even browning and crispiness.
    • Drain properly on paper towels to avoid sogginess.
    • Use rotisserie chicken for quick prep and extra flavor.

    Flavor Variations

    Once you master the classic chicken version, try these creative ideas:

    • Spicy Jalapeño Chicken: Add diced jalapeños to the filling.
    • Creamy Version: Stir in a few tablespoons of cream cheese for extra richness.
    • Bean & Rice Add-In: Add seasoned rice or refried beans for a heartier filling.
    • Buffalo Chicken Twist: Mix shredded chicken with buffalo sauce and mozzarella.

    Make-Ahead and Storage

    Chimichangas can be assembled ahead of time and stored in the refrigerator for up to 24 hours before cooking.

    Cooked chimichangas can be stored in an airtight container for up to 3 days. Reheat in the oven at 375°F until warmed through and crispy again.

    They also freeze well—wrap tightly in foil and freeze for up to 2 months.


    Why This Recipe Works

    Chicken chimichangas combine contrasting textures and bold flavors.

    The seasoned chicken filling is savory and slightly saucy, while the melted cheese binds everything together. Frying creates that irresistible crispy shell that makes chimichangas stand apart from regular burritos.

    They’re customizable, crowd-pleasing, and perfect for weeknight dinners or festive gatherings.


    Final Thoughts

    Chicken Chimichangas are comfort food at its finest—crispy on the outside, cheesy and flavorful on the inside.

    With just a handful of ingredients and simple techniques, you can recreate this restaurant favorite in your own kitchen.

    Whether you fry them for maximum crunch or bake them for a lighter option, these chimichangas deliver big flavor and satisfying texture every time.

    Serve them with your favorite toppings, gather around the table, and enjoy every golden, crunchy bite.

  • Creamy & Comforting: The Ultimate Mushroom Risotto With Peas (Step-by-Step Guide)

    Creamy & Comforting: The Ultimate Mushroom Risotto With Peas (Step-by-Step Guide)

    There’s something deeply comforting about a bowl of Mushroom Risotto with Peas. It’s creamy without heavy cream, rich without being overwhelming, and filled with earthy mushrooms and sweet bursts of green peas.

    This classic Italian-inspired dish transforms simple pantry staples into a luxurious meal that feels restaurant-worthy but is absolutely achievable at home.

    Risotto has a reputation for being fussy, but once you understand the technique, it becomes a relaxing and rewarding cooking experience. With patience, warm broth, and steady stirring, you’ll create a silky, flavorful dish that’s perfect for both weeknight dinners and elegant gatherings.

    Let’s walk through it step by step.


    Why You’ll Love This Mushroom Risotto

    • Creamy texture without cream
    • Deep, savory mushroom flavor
    • Bright sweetness from peas
    • Naturally gluten-free
    • Elegant yet comforting

    This dish is all about balance—earthy, sweet, rich, and fresh in every bite.


    Ingredients You’ll Need

    For the Risotto Base:

    • 1 ½ cups Arborio rice
    • 4–5 cups vegetable or chicken broth (kept warm)
    • 2 tablespoons olive oil
    • 2 tablespoons unsalted butter

    For the Vegetables:

    • 8 ounces mushrooms (cremini, button, or a mix), sliced
    • 1 small onion or 2 shallots, finely diced
    • 2 cloves garlic, minced
    • 1 cup frozen peas

    For Finishing:

    • ½ cup dry white wine
    • ½ cup freshly grated Parmesan cheese
    • Salt and freshly cracked black pepper

    Optional Garnish:

    • Fresh parsley
    • Extra Parmesan
    • Lemon zest

    Step 1: Warm the Broth

    Pour your broth into a saucepan and keep it gently simmering over low heat.

    Adding warm broth to risotto is essential—it allows the rice to cook evenly and release starch properly. Cold broth slows the cooking process and affects texture.


    Step 2: Sauté the Mushrooms

    Heat 1 tablespoon olive oil and 1 tablespoon butter in a large, heavy-bottomed skillet or saucepan over medium heat.

    Add the sliced mushrooms in a single layer. Cook for 5–7 minutes, stirring occasionally, until they release their moisture and turn golden brown.

    Season lightly with salt and pepper.

    Remove the mushrooms from the pan and set aside. Cooking them separately ensures they stay tender and flavorful rather than watery.


    Step 3: Cook the Aromatics

    In the same pan, add the remaining olive oil.

    Add diced onion or shallots and cook for 3–4 minutes until soft and translucent.

    Stir in the minced garlic and cook for 30 seconds, just until fragrant.

    These aromatics create a flavorful base that supports the creamy rice.


    Step 4: Toast the Rice

    Add the Arborio rice directly into the pan.

    Stir continuously for 1–2 minutes, coating each grain in oil. The edges will become slightly translucent while the center remains opaque.

    Toasting enhances the rice’s nutty flavor and helps maintain structure during cooking.


    Step 5: Deglaze with Wine

    Pour in the white wine and stir constantly.

    Allow it to simmer until most of the liquid evaporates. This adds acidity and depth, balancing the richness of the final dish.

    If you prefer not to use wine, substitute with a splash of broth and a squeeze of lemon.


    Step 6: Add Broth Gradually

    Add one ladle (about ½ cup) of warm broth to the rice.

    Stir gently and frequently until the liquid is mostly absorbed.

    Repeat this process—adding broth one ladle at a time—waiting for each addition to absorb before adding the next.

    This gradual addition is the key to creamy risotto. It encourages the rice to release starch slowly, creating that signature silky texture.


    Step 7: Stir with Patience

    Continue adding broth and stirring for 18–22 minutes.

    Taste as you go. The rice should be tender but still slightly firm in the center—al dente.

    Adjust the heat as needed to maintain a gentle simmer.

    Risotto isn’t about constant frantic stirring but steady, attentive movement.


    Step 8: Add Mushrooms and Peas

    When the rice is nearly done, stir the sautéed mushrooms back into the pan.

    Add the peas and cook for 2–3 minutes until heated through and bright green.

    The peas add a pop of sweetness and color, complementing the earthy mushrooms.


    Step 9: Finish with Butter and Parmesan

    Remove the pan from the heat.

    Stir in the remaining tablespoon of butter and the grated Parmesan cheese.

    This step, called mantecatura, gives risotto its luxurious, glossy finish.

    Taste and adjust seasoning with salt and freshly cracked black pepper.


    Step 10: Rest and Serve

    Let the risotto rest for 1–2 minutes before serving.

    It should flow slightly when spooned onto a plate—not stiff or dry.

    Garnish with fresh parsley, extra Parmesan, and a touch of lemon zest if desired.

    Serve immediately while warm and creamy.


    Texture and Flavor Highlights

    • Silky, creamy consistency
    • Tender rice with slight bite
    • Rich umami from mushrooms
    • Sweet bursts of peas
    • Savory, cheesy finish

    The combination creates a beautifully balanced dish that feels indulgent yet fresh.


    Pro Tips for Perfect Risotto

    Use Arborio rice. Its high starch content is essential.

    Keep broth warm. It ensures even cooking.

    Don’t rush the process. Gradual broth addition is key.

    Taste frequently. Texture matters as much as flavor.

    Serve immediately. Risotto thickens as it cools.


    Optional Variations

    • Vegan Version: Use olive oil instead of butter and plant-based Parmesan.
    • Protein Boost: Top with grilled chicken or shrimp.
    • Herb Forward: Add thyme or rosemary.
    • Extra Creamy: Stir in a spoonful of mascarpone at the end.
    • Lemon Brightness: Add extra lemon zest for freshness.

    Storage and Reheating

    Risotto is best enjoyed fresh, but leftovers can be stored in the refrigerator for up to 2 days.

    Reheat gently on the stovetop with a splash of broth or water to restore creaminess.

    Avoid high heat to prevent drying out the rice.


    Why This Recipe Works

    Mushroom Risotto with Peas works because it relies on technique rather than complicated ingredients. Slow stirring and gradual broth addition allow the rice’s natural starch to create creaminess.

    Sautéed mushrooms add depth and umami, while peas bring brightness and contrast.

    The finishing touch of butter and Parmesan ties everything together into a glossy, cohesive dish that feels comforting yet elegant.


    Creamy, savory, and beautifully balanced, Mushroom Risotto with Peas is a dish that rewards patience and simple technique.

    Once you master it, you’ll have a timeless recipe that delivers comfort, elegance, and incredible flavor every single time.

  • Crispy-Seared Scallops with Bread-Crumb Salsa Verde: A Restaurant-Worthy Dinner at Home

    Crispy-Seared Scallops with Bread-Crumb Salsa Verde: A Restaurant-Worthy Dinner at Home

    If you’ve ever ordered perfectly golden scallops at a restaurant and wondered how they achieved that caramelized crust and buttery center, you’re in for a treat.

    Scallops are surprisingly simple to cook at home, and when paired with a vibrant bread-crumb salsa verde, they transform into a dish that feels elegant yet approachable. This recipe walks you through every step, from selecting the scallops to plating like a pro.

    Let’s get started.


    Ingredients

    For the scallops:

    • 1 pound large sea scallops (about 12–16), side muscle removed
    • Salt and freshly ground black pepper
    • 2 tablespoons neutral oil (such as avocado or vegetable oil)
    • 1 tablespoon unsalted butter

    For the bread-crumb salsa verde:

    • 1 cup fresh parsley leaves, finely chopped
    • 2 tablespoons capers, drained and finely chopped
    • 1 small garlic clove, minced
    • Zest of 1 lemon
    • 2 tablespoons fresh lemon juice
    • ½ teaspoon red pepper flakes (optional)
    • ½ cup toasted fresh bread crumbs
    • ⅓ cup extra virgin olive oil
    • Salt and black pepper to taste

    Step 1: Prep the Scallops Properly

    Start by patting your scallops completely dry with paper towels. This is one of the most important steps. Moisture is the enemy of a golden crust, and any excess water will cause the scallops to steam rather than sear.

    If the small, tough side muscle is still attached, gently peel it off and discard. Season both sides of the scallops generously with salt and freshly ground black pepper. Let them sit at room temperature for about 10–15 minutes while you prepare the salsa verde.


    Step 2: Toast the Bread Crumbs

    For maximum flavor and texture, use fresh bread crumbs rather than store-bought dry ones. Pulse a slice or two of day-old crusty bread in a food processor until coarse.

    Heat a small skillet over medium heat. Add a drizzle of olive oil and toss in the bread crumbs. Stir constantly for 3–5 minutes, until they are golden brown and crisp. Transfer to a bowl and let cool completely. This step adds a nutty crunch that makes the salsa verde truly special.


    Step 3: Make the Bread-Crumb Salsa Verde

    In a medium bowl, combine the chopped parsley, capers, minced garlic, lemon zest, lemon juice, and red pepper flakes. Stir to combine.

    Add the cooled toasted bread crumbs and pour in the extra virgin olive oil. Mix until everything is evenly coated and vibrant. Taste and adjust seasoning with salt and black pepper as needed. The mixture should be bright, slightly tangy, and richly herbaceous, with a pleasant crunch from the crumbs.

    Set aside while you cook the scallops.


    Step 4: Heat the Pan Until Very Hot

    Place a large stainless steel or cast-iron skillet over medium-high heat. Let it heat for several minutes until very hot. Add the neutral oil and swirl to coat the bottom.

    You’ll know the pan is ready when the oil shimmers and just begins to smoke lightly. This high heat is essential for achieving that golden-brown crust.


    Step 5: Sear the Scallops

    Carefully place the scallops in the hot pan, flat-side down, leaving space between each one. Do not overcrowd the pan. If necessary, cook in batches.

    Resist the urge to move them. Let the scallops sear undisturbed for about 2–3 minutes. They should develop a deep golden crust.

    Once the bottom is beautifully browned, add the tablespoon of butter to the pan. Flip the scallops and spoon the melted butter over them as they cook for another 1–2 minutes. The centers should be just opaque and slightly translucent in the very middle.

    Remove immediately from the pan. Overcooked scallops become rubbery, so timing is key.


    Step 6: Plate Like a Pro

    Arrange the scallops on a serving platter or individual plates. Spoon a generous amount of bread-crumb salsa verde over the top or alongside each scallop.

    For an elegant touch, finish with an extra squeeze of fresh lemon juice and a drizzle of olive oil. A sprinkle of flaky sea salt can elevate the flavor even more.


    Serving Suggestions

    These scallops pair beautifully with creamy risotto, mashed potatoes, or a simple bed of lemony arugula. You can also serve them over a light pasta or alongside roasted vegetables for a complete meal.

    If you’re entertaining, consider serving them as an appetizer with small forks and a crisp white wine. The bright herbal salsa verde complements the sweet, delicate scallops perfectly.


    Pro Tips for Perfect Scallops

    • Always buy “dry” scallops rather than “wet” ones treated with preservatives. Dry scallops caramelize better.
    • Make sure the pan is hot before adding scallops.
    • Do not overcrowd the pan, as this lowers the temperature and prevents browning.
    • Let the scallops form a crust before flipping. If they stick, they’re not ready yet.

    Why This Dish Works

    The magic of this recipe lies in contrast. The scallops are tender and buttery with a crisp exterior, while the bread-crumb salsa verde is fresh, bright, and slightly crunchy. The acidity from the lemon and capers cuts through the richness of the scallops, creating a perfectly balanced bite.

    This dish feels sophisticated but relies on straightforward techniques. With just a handful of quality ingredients and attention to timing, you can create a meal that rivals your favorite seafood restaurant.

    Once you master this method, you’ll find yourself returning to it again and again for special occasions—or simply when you want to treat yourself to something extraordinary.

  • Bright, Buttery & Bold: The Ultimate Homemade Chicken Piccata

    Bright, Buttery & Bold: The Ultimate Homemade Chicken Piccata

    If you’re craving something comforting yet elegant, Chicken Piccata is the answer.

    This Italian-American classic delivers golden pan-seared chicken cutlets bathed in a silky lemon-butter sauce dotted with briny capers. It’s simple enough for a weeknight dinner, yet impressive enough for guests.

    The magic lies in balancing bright citrus with rich butter and savory chicken—creating a dish that tastes far more complex than the effort required.

    Let’s walk step by step through how to make perfect Chicken Piccata at home.


    Ingredients

    For the chicken:

    • 2 large boneless, skinless chicken breasts
    • Salt and freshly ground black pepper
    • ½ cup all-purpose flour
    • 3 tablespoons olive oil
    • 2 tablespoons unsalted butter

    For the sauce:

    • ¾ cup chicken broth
    • ⅓ cup freshly squeezed lemon juice (about 2 lemons)
    • 2 tablespoons capers, drained
    • 3 tablespoons unsalted butter, cut into pieces
    • 2 tablespoons fresh parsley, finely chopped
    • Lemon slices, for garnish (optional)

    Step 1: Prepare the Chicken Cutlets

    Place the chicken breasts on a cutting board. Carefully slice each one in half horizontally to create four thinner cutlets. If needed, gently pound them between sheets of plastic wrap to an even thickness—about ½ inch thick. Even thickness ensures they cook quickly and evenly.

    Pat the chicken dry with paper towels. Season both sides generously with salt and freshly ground black pepper.


    Step 2: Dredge in Flour

    Spread the flour on a shallow plate. Lightly dredge each chicken cutlet in flour, shaking off any excess. The flour creates a delicate crust and helps thicken the sauce later.

    Set the coated cutlets aside on a plate while you heat the pan.


    Step 3: Sear the Chicken

    Heat a large skillet over medium-high heat. Add the olive oil and 2 tablespoons of butter. Once the butter is melted and foamy, carefully place the chicken cutlets in the pan in a single layer. Avoid overcrowding; cook in batches if necessary.

    Cook for about 3–4 minutes on the first side without moving them. You’re looking for a golden-brown crust. Flip and cook for another 2–3 minutes until fully cooked through and no longer pink in the center.

    Transfer the cooked chicken to a plate and tent loosely with foil to keep warm.


    Step 4: Build the Lemon-Caper Sauce

    With the pan still over medium heat, pour in the chicken broth to deglaze. Use a wooden spoon to scrape up the browned bits from the bottom of the pan—this is pure flavor.

    Let the broth simmer for 2–3 minutes, allowing it to reduce slightly. Stir in the freshly squeezed lemon juice and capers. Continue simmering for another 2–3 minutes until the sauce reduces and thickens slightly.


    Step 5: Finish with Butter

    Reduce the heat to low. Add the remaining 3 tablespoons of butter, one piece at a time, stirring continuously until melted and incorporated. This technique—called “mounting with butter”—creates a silky, glossy sauce.

    Taste and adjust seasoning if needed. If the sauce is too tart, a small pinch of salt can help balance it. If you prefer more brightness, add an extra squeeze of lemon.


    Step 6: Return the Chicken to the Pan

    Place the chicken cutlets back into the skillet, spooning the sauce over the top. Let everything simmer together for 2–3 minutes so the chicken absorbs the flavors.

    The sauce should lightly coat the chicken without being too thick or too watery.


    Step 7: Garnish and Serve

    Sprinkle freshly chopped parsley over the chicken. Garnish with thin lemon slices if desired. Serve immediately while the sauce is glossy and warm.


    Serving Suggestions

    Chicken Piccata pairs beautifully with angel hair pasta, mashed potatoes, or fluffy rice to soak up the luscious sauce. For a lighter option, serve it alongside sautéed spinach or roasted asparagus. A simple green salad with a light vinaigrette complements the rich, buttery flavors.

    If entertaining, consider serving with crusty bread for dipping into the lemony sauce.


    Pro Tips for Success

    • Use fresh lemon juice for the brightest flavor. Bottled juice won’t give the same fresh zing.
    • Keep the heat steady when making the sauce. Too high, and it may reduce too quickly; too low, and it won’t thicken properly.
    • Don’t skip scraping up the browned bits after searing. They add incredible depth.
    • Thin, evenly pounded chicken cooks faster and stays tender.

    Why This Recipe Works

    Chicken Piccata is a masterclass in balance. The flour creates a light crust and helps thicken the sauce naturally. The lemon juice cuts through the richness of the butter, while capers bring salty bursts of flavor that keep every bite interesting.

    The key is restraint—just enough lemon to brighten, just enough butter to enrich. When done correctly, the sauce clings gently to the chicken without overpowering it.


    Make It Your Own

    You can add a splash of dry white wine before the broth for extra depth. Some cooks like to incorporate a bit of cream for a richer sauce, though traditional versions keep it light and lemon-forward. You can even substitute thin veal cutlets for a classic variation.


    Chicken Piccata proves that a handful of simple ingredients can create something extraordinary. With crisp golden chicken and a vibrant lemon-caper sauce, this dish brings restaurant-quality flavor straight to your kitchen. Once you make it from scratch, it’s bound to become a regular in your dinner rotation.