Category: quick_meals

  • Elotes (Mexican Street Corn That Steals Every Cookout)

    Elotes (Mexican Street Corn That Steals Every Cookout)

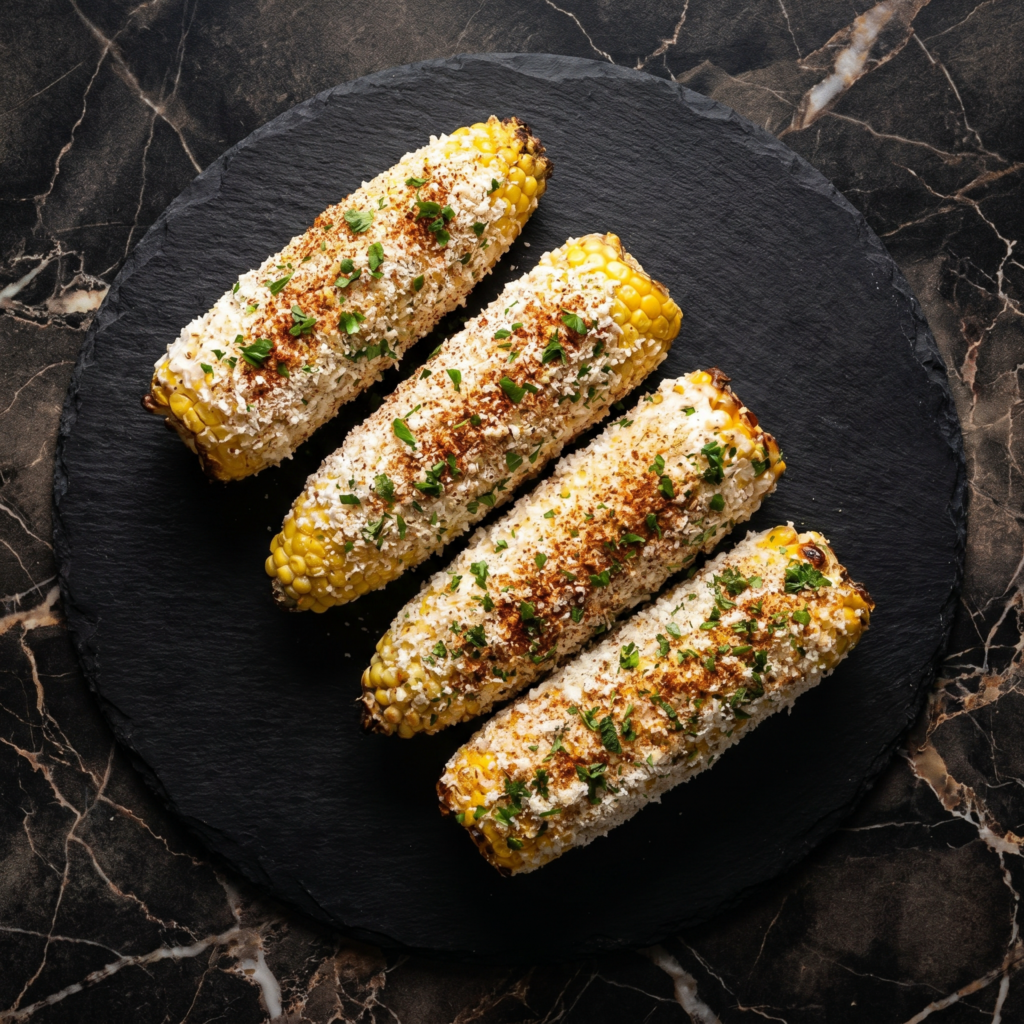
    Plain buttered corn is fine. Elotes is a party.

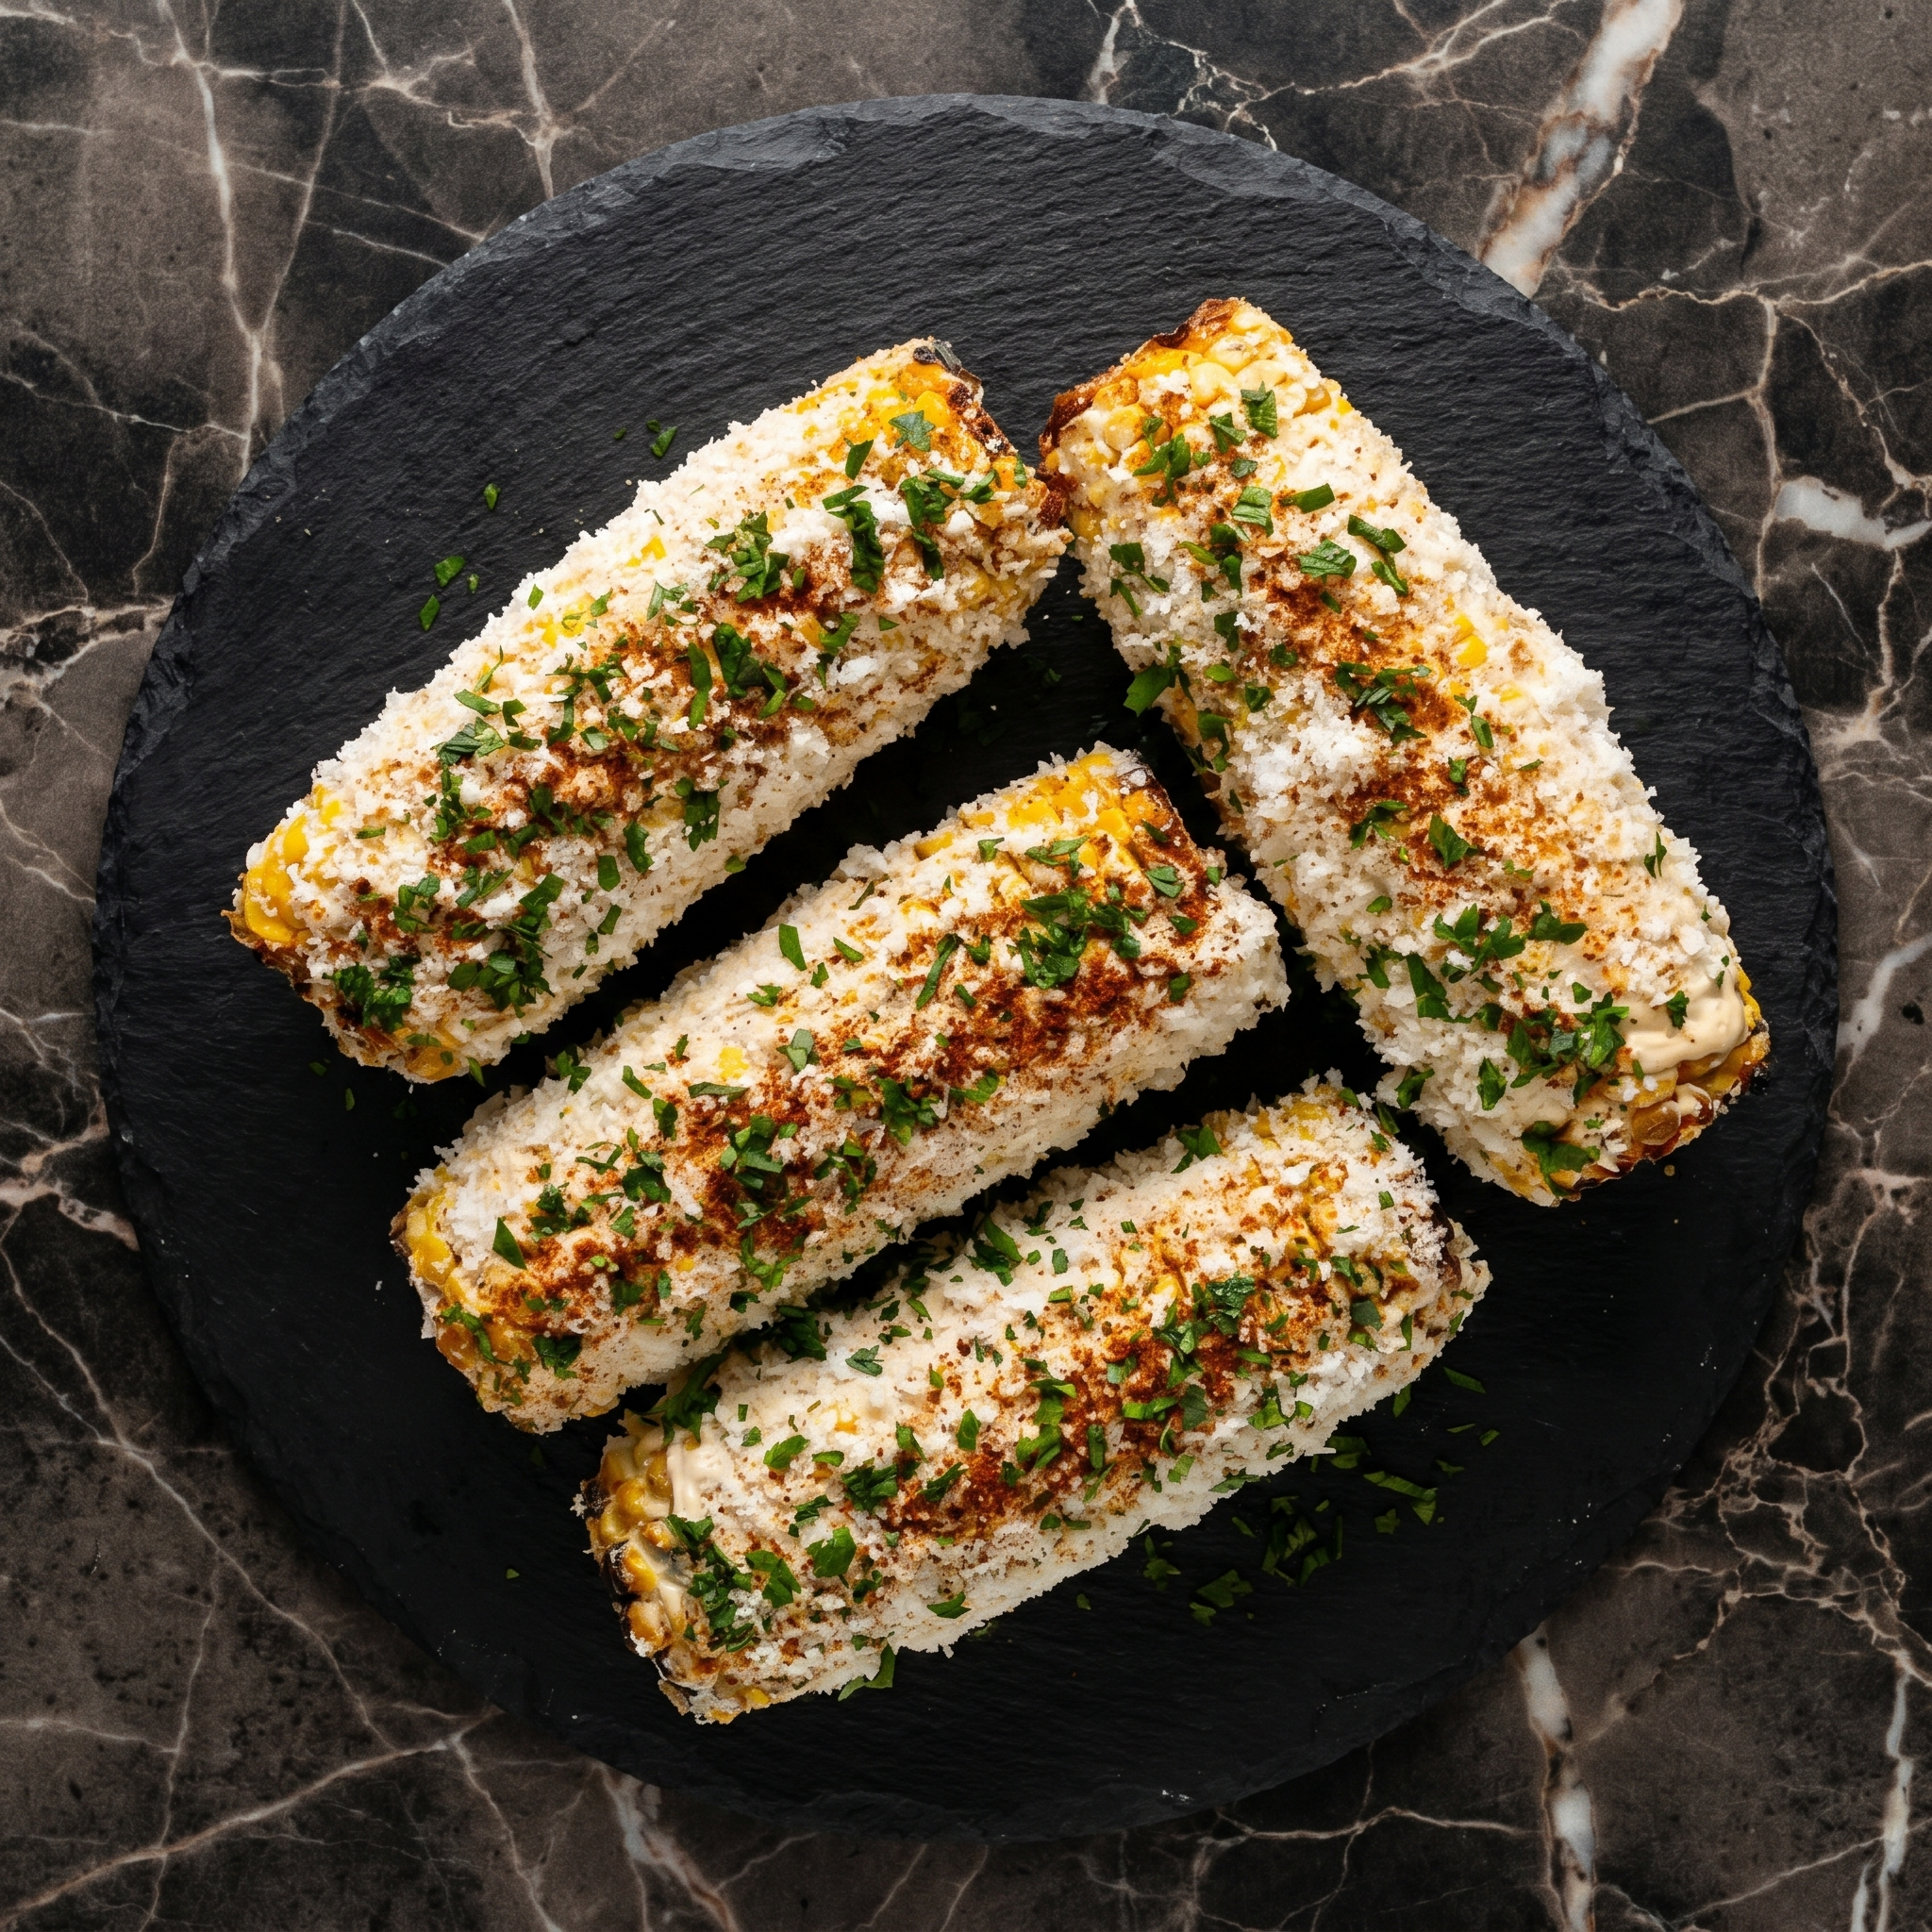
    Smoky grilled corn + creamy sauce + salty cotija + chili lime dust. It’s messy to eat. That’s the point. Serve it on a stick or scoop it into a cup (that’s esquites, equally amazing).

    Ingredients

    Serves 4.

    • 4 ears of corn, husked
    • ¼ cup mayonnaise
    • ¼ cup sour cream (or Mexican crema)
    • ½ cup cotija cheese, crumbled (plus more for topping)
    • 1 teaspoon chili powder (plus more for topping)
    • ½ teaspoon garlic powder
    • 2 tablespoons fresh cilantro, chopped
    • 1 lime, cut into wedges
    • Salt to taste

    Step-by-Step Instructions

    Step 1: Make Sauce

    1. In a bowl, mix mayo, sour cream, garlic powder, and a pinch of chili powder.
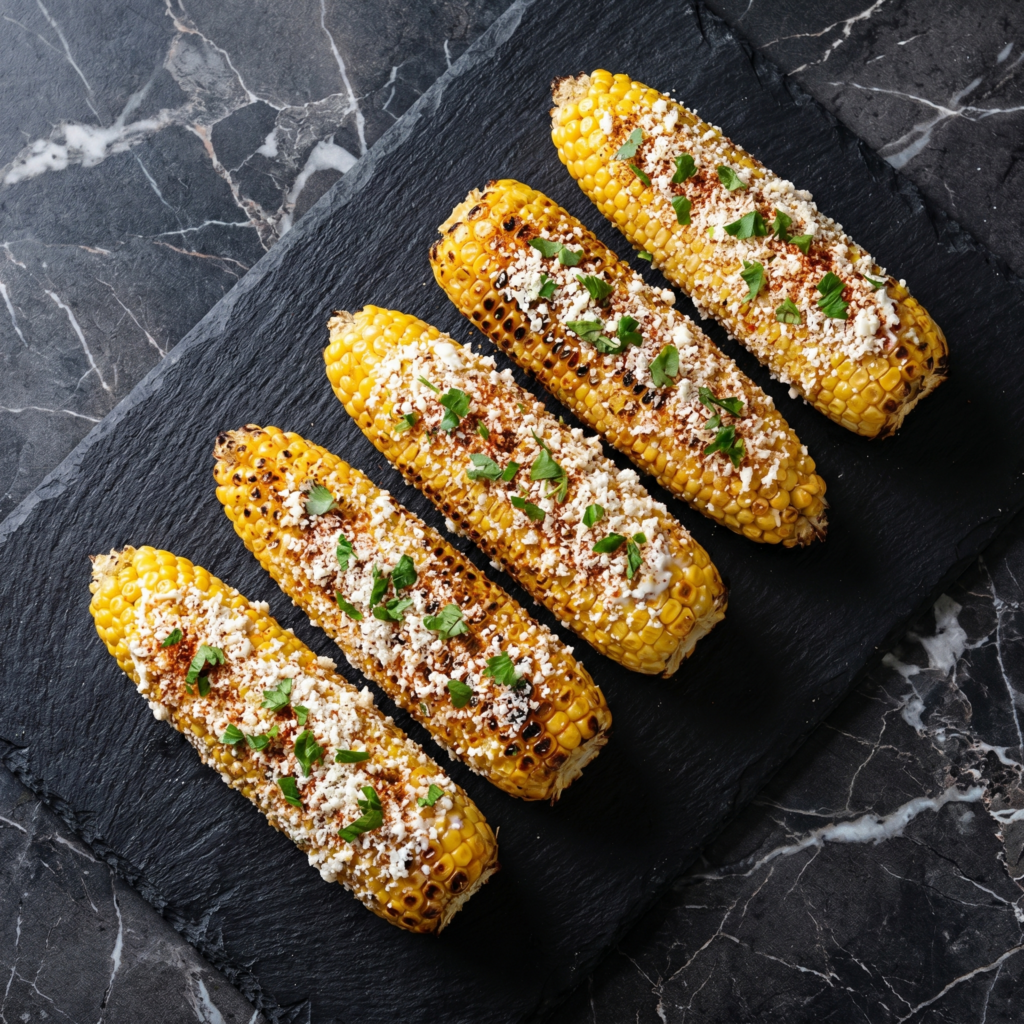
    Step 2: Grill Corn

    1. Heat grill to medium-high. Husk corn (leave stems on for handles if desired).
    2. Grill 8-10 minutes, turning occasionally, until charred in spots.

    Step 3: Coat

    1. Remove corn. Brush each ear with sauce while still hot.
    2. Roll in cotija cheese on a plate.

    Step 4: Finish

    1. Sprinkle with chili powder, cilantro, and salt.
    2. Serve with lime wedges. Squeeze before eating.

    Summary

    Prep Time: 5 minutes | Cook Time: 10 minutes | Total Time: 15 minutes

    Yield: 4 ears

    Difficulty: Easy

    Storage Notes

    Best Fresh

    Elotes are a now-or-never food. Leftover sauced corn gets soggy. Grill only what you’ll eat.

    Leftover Corn Kernels?

    Cut off the cob. Turn into esquites (Mexican corn salad). Mix with leftover sauce, cotija, and lime. Serve in a cup with a spoon.

    No Grill?

    Use a cast-iron skillet. Char corn over high heat, turning frequently.

    Cotija Substitute:

    Parmesan or feta in a pinch. But cotija is worth finding.

  • Chicken Burrito (A Whole Meal Wrapped in a Tortilla)

    Chicken Burrito (A Whole Meal Wrapped in a Tortilla)

    A great burrito is a miracle of engineering. All the flavors inside. None of them falling out.

    This chicken burrito packs rice, beans, chicken, cheese, and avocado into one beautiful, foil-wrapped package.

    Ingredients

    Makes 2 large burritos.

    • 2 large flour tortillas (10–12 inch, burrito size)
    • 1 cup (150g) cooked shredded chicken (rotisserie works great)
    • 1 cup (200g) cooked rice (white or cilantro-lime)
    • ½ cup (120g) canned black beans, drained and warmed
    • ½ cup (50g) shredded cheese (cheddar or Monterey Jack)
    • ¼ cup sour cream
    • ¼ cup salsa or pico de gallo
    • ½ avocado, sliced
    • Optional: hot sauce, cilantro, pickled onions, corn

    Step-by-Step Instructions

    Step 1: Warm the Tortilla

    1. Microwave tortillas for 20 seconds or heat in a dry pan until pliable. Warm tortillas don’t crack.

    Step 2: Layer Fillings Down the Middle

    1. In a line down the center (not edge to edge): rice → beans → chicken → cheese → sour cream → salsa → avocado.
    2. Don’t overstuff. Less is more for rolling.

    Step 3: Fold & Roll

    1. Fold the sides inward over the filling.
    2. Fold the bottom edge up and over. Roll tightly away from you, tucking as you go.
    3. Optional: Sear the seam side in a dry pan for 30 seconds to seal.

    Step 4: Wrap & Serve

    1. Wrap tightly in foil to hold the shape. Slice in half. Eat with hot sauce.

    Summary

    Prep Time: 10 minutes | Cook Time: 0 minutes (if using leftovers) | Total Time: 10 minutes

    Yield: 2 large burritos

    Difficulty: Easy (rolling takes practice)

    Storage Notes

    • Fridge: Wrap tightly in foil and refrigerate for up to 2 days. Reheat in a dry pan or air fryer. Microwave = soggy.
    • Freezer: Freeze foil-wrapped burritos for up to 2 months. Reheat from frozen at 375°F for 20–25 minutes.

    Pro tip: For the best roll, don’t put wet ingredients (salsa, sour cream) near the edges. Keep them in the middle.

  • Beef Enchiladas (Roll, Smother, Bake, Devour)

    Beef Enchiladas (Roll, Smother, Bake, Devour)

    Enchiladas are the perfect math: beef + cheese + sauce + tortillas = happiness.

    These beef enchilatas come together fast, bake until bubbly, and taste like a hug from the inside out.

    Ingredients

    Serves 4–6. Makes 8 enchiladas.

    • 8 corn or flour tortillas (soft taco size)
    • 1 lb (450g) ground beef
    • 1 small onion, diced
    • 2 cloves garlic, minced
    • 2 cups (200g) shredded cheese (cheddar, Monterey Jack, or Mexican blend)
    • 1 can (10 oz / 300g) red enchilada sauce
    • 1 tablespoon oil
    • Salt, pepper, cumin, chili powder to taste

    Optional Toppings:

    • Sour cream, cilantro, diced onion, jalapeños, hot sauce

    Step-by-Step Instructions

    Step 1: Cook Filling

    1. Heat oil in a skillet over medium heat. Cook onion until soft, 3 minutes.
    2. Add ground beef and garlic. Cook until browned. Drain fat.
    3. Season with salt, pepper, cumin, and chili powder. Stir in ¼ cup enchilada sauce. Remove from heat.

    Step 2: Prep

    1. Preheat oven to 375°F (190°C).
    2. Spread ½ cup enchilada sauce on the bottom of a 9×13 baking dish.

    Step 3: Roll

    1. Warm tortillas to make them pliable (microwave 30 seconds wrapped in a damp towel).
    2. Place beef mixture and a handful of cheese down the center of each tortilla.
    3. Roll tightly and place seam-side down in the dish.

    Step 4: Smother & Bake

    1. Pour remaining enchilada sauce over the rolled tortillas.
    2. Sprinkle remaining cheese on top.
    3. Bake for 15–20 minutes until bubbly and cheese is golden.

    Step 5: Serve

    1. Let cool 5 minutes. Top with sour cream, cilantro, or whatever you love.

    Summary

    Prep Time: 15 minutes | Cook Time: 20 minutes | Total Time: 35 minutes

    Yield: 8 enchiladas (4–6 servings)

    Difficulty: Easy

    Storage Notes

    • Fridge: Store in an airtight container for up to 4 days. Reheat in oven or microwave.
    • Freezer: Freeze unbaked or baked for up to 2 months. Bake from frozen at 375°F for 30–35 minutes.

    Pro tip: Warm your tortillas before rolling — cold tortillas crack and break.

  • Pesto Pinwheels (The Easiest Party Trick You’ll Ever Learn)

    Pesto Pinwheels (The Easiest Party Trick You’ll Ever Learn)

    Need a last-minute appetizer that looks fancy? These.

    Puff pastry + pesto + cheese = golden, flaky spirals of joy. Five ingredients. One baking sheet. Everyone thinks you tried hard. You didn’t. That’s the beauty.

    Ingredients

    Makes 16 pinwheels.

    • 1 sheet puff pastry, thawed
    • ¼ cup pesto (store-bought or homemade)
    • ½ cup shredded mozzarella or Parmesan
    • 1 egg, beaten (for egg wash)
    • 2 tablespoons sun-dried tomatoes or pine nuts (optional)

    Step-by-Step Instructions

    Step 1: Preheat and Prep

    1. Preheat oven to 400°F (200°C). Line a baking sheet with parchment.

    Step 2: Roll and Spread

    1. Lightly flour a surface. Roll puff pastry into a 10×12-inch rectangle.
    2. Spread pesto evenly over pastry, leaving a ½-inch border.

    Step 3: Add Cheese

    1. Sprinkle mozzarella over pesto. Add sun-dried tomatoes or pine nuts if using.

    Step 4: Roll Tight

    1. Starting from a long edge, roll pastry into a tight log.
    2. Brush the edge with egg wash to seal. Chill log for 10 minutes (easier slicing).

    Step 5: Slice and Bake

    1. Slice log into ½-inch rounds. Place cut-side up on baking sheet.
    2. Brush tops with egg wash. Bake 12-15 minutes until golden and puffed.

    Step 6: Serve

    1. Cool 5 minutes. Serve warm or at room temperature.

    Summary

    Prep Time: 10 minutes | Chill Time: 10 minutes | Cook Time: 15 minutes | Total Time: 35 minutes

    Yield: 16 pinwheels

    Difficulty: Easy

    Storage Notes

    Store Baked:

    Keep in an airtight container for up to 2 days. Reheat at 350°F for 5 minutes to restore crispiness.

    Freeze Unbaked:

    Freeze sliced pinwheels on a tray, then transfer to a bag. Bake from frozen at 400°F for 15-18 minutes.

    Make Ahead:

    Roll the log up to 1 day ahead. Wrap tightly in plastic and refrigerate. Slice and bake when ready.

    Flavor Swaps:

    Try sun-dried tomato pesto, tapenade, or spicy red pepper spread instead of pesto.

  • Egg-Stuffed Bell Peppers (The Cutest Low-Carb Breakfast You’ll Ever Eat)

    Egg-Stuffed Bell Peppers (The Cutest Low-Carb Breakfast You’ll Ever Eat)

    Muffin tins are boring. Bell peppers are not.

    Slice them into rings. Crack an egg inside. Bake. What comes out is a colorful, cheese-topped, protein-packed breakfast that looks like you tried way harder than you did. Plus, you can hold it like a tiny breakfast donut.

    Ingredients

    Serves 2–4.

    • 2 large bell peppers (any color)
    • 4 large eggs
    • ¼ cup shredded cheddar, feta, or Mexican blend cheese
    • Salt and black pepper to taste
    • ¼ teaspoon garlic powder or smoked paprika (optional)
    • Fresh parsley or chives, for garnish
    • Hot sauce or salsa, for serving

    Step-by-Step Instructions

    Step 1: Preheat and Slice

    1. Preheat oven to 375°F (190°C). Line a baking sheet with parchment paper.
    2. Slice bell peppers into ½-inch thick rings. Remove seeds and membranes.
    3. You’ll get about 2–3 rings per pepper. Save the tops and bottoms for another use.

    Step 2: Arrange

    1. Place pepper rings on the baking sheet in a single layer.
    2. Lightly spray or brush inside of each ring with oil to prevent sticking.

    Step 3: Add the Eggs

    1. Crack one egg into each pepper ring. Try not to break the yolk.
    2. If egg white spills under the pepper, that’s fine—crispy edges are delicious.

    Step 4: Season and Bake

    1. Sprinkle with salt, pepper, and garlic powder or paprika.
    2. Top each with shredded cheese.
    3. Bake for 12–15 minutes until egg whites are set and yolks are to your liking.

    Step 5: Serve

    1. Let cool 2 minutes. Garnish with fresh herbs.
    2. Serve with hot sauce, salsa, or just eat them with your hands like the breakfast genius you are.

    Summary

    Prep Time: 5 minutes | Cook Time: 12–15 minutes | Total Time: 17–20 minutes

    Yield: 4 egg-stuffed rings | Difficulty: Easy

    Storage Notes

    Fridge: Store in an airtight container for up to 3 days. Reheat in air fryer at 350°F for 3 minutes or toaster oven.

    Microwave warning: It works, but the pepper gets soft. Acceptable for work lunches, not for brunch flexing.

    Meal prep: Slice pepper rings ahead and store in the fridge. Crack eggs fresh the morning of.

    Pro tip: Buy peppers with flat bottoms so the rings stand stable. Crooked peppers = spilled eggs.

  • Egg Mayo Sando: Japan’s Fancy Egg Salad (With a Crunchy Twist)

    Egg Mayo Sando: Japan’s Fancy Egg Salad (With a Crunchy Twist)

    Egg salad, but make it Japanese. That’s the Egg Mayo Sando. Creamy, velvety eggs. Kewpie mayo. Squishy milk bread. And the secret weapon—quick-pickled celery that adds crunch and tang.

    It’s the sandwich they sell at every 7-Eleven in Tokyo for a reason. It’s perfect. Make a batch for lunch. Eat two. No judgment.

    Ingredients

    Serves 2 sandwiches.

    For the Pickled Celery:

    • 1 celery stalk, thinly sliced
    • 2 tbsp rice vinegar
    • 1 tsp sugar
    • Pinch of salt

    For the Egg Mayo:

    • 4 large eggs
    • 3 tbsp Kewpie mayo (or regular mayo + ½ tsp sugar)
    • 1 tsp Dijon mustard
    • Salt and white pepper

    For Assembly:

    • 4 slices shokupan (Japanese milk bread) or soft white bread
    • Butter (optional)

    Step-by-Step Instructions

    Step 1: Pickle the Celery

    1. In a small bowl, mix rice vinegar, sugar, and salt. Add sliced celery. Let sit 15 minutes. Drain well.

    Step 2: Boil the Eggs

    1. Place eggs in a pot. Cover with cold water. Bring to a boil.
    2. Turn off heat, cover, and let sit 10 minutes.
    3. Transfer to ice bath. Peel.

    Step 3: Make the Egg Mayo

    1. Roughly chop eggs (not too fine—leave some chunks).
    2. Gently mix with Kewpie mayo, Dijon, salt, and white pepper.
    3. Fold in pickled celery.

    Step 4: Assemble the Sando

    1. Lightly butter bread (or not).
    2. Pile egg mixture onto two slices. Top with remaining bread.
    3. Press down gently. Trim crusts for authenticity.
    4. Cut in half (triangle or rectangle). Serve.

    Summary

    Prep Time: 10 min | Cook Time: 10 min | Pickle Time: 15 min | Total: 35 min

    Yield: 2 sandwiches

    Difficulty: Super easy

    Storage Notes

    Best eaten fresh. Assembled sandos get soggy. Egg mixture keeps 2 days in fridge. Pickled celery keeps 1 week. Make components ahead, assemble right before eating. Slice crusts off. Close your eyes. Pretend you’re in Tokyo.

  • Baked Egg Avocado Boats: The 15-Minute Breakfast That Went Viral

    Baked Egg Avocado Boats: The 15-Minute Breakfast That Went Viral

    Six ingredients. One sheet pan. Zero regrets.

    Halved avocados get cradled with an egg, sprinkled with cheese, and baked until the whites are set and the yolks are runny. It’s breakfast, lunch, or a snack that looks impressive but takes zero skill.

    Ingredients

    Serves 2.

    • 2 ripe but firm avocados
    • 4 small eggs (or 2 large if your avocados are huge)
    • ¼ cup shredded cheddar, parmesan, or feta
    • Salt and black pepper
    • Red pepper flakes or paprika (optional)
    • Fresh chives or parsley, for garnish

    Step-by-Step Instructions

    Step 1: Preheat & Prep

    1. Heat oven to 425°F (220°C). Line a baking sheet with parchment paper.
    2. Cut avocados in half and remove pits. Scoop out a little extra flesh to make room for the egg (about 1 tablespoon per half).

    Step 2: Crack the Eggs

    1. Place avocado halves cut-side up on the baking sheet. Crack one egg into each well. Some white may spill over – that’s fine.
    2. Season with salt and pepper.

    Step 3: Bake

    1. Bake for 12–15 minutes. For runny yolks, pull at 12 minutes. For firm yolks, go longer.
    2. In the last 2 minutes, sprinkle cheese on top.

    Step 4: Finish & Devour

    1. Garnish with red pepper flakes and fresh chives. Eat immediately with a spoon or fork.

    Summary

    Prep Time: 5 minutes | Cook Time: 12–15 minutes | Total Time: 15–20 minutes

    Yield: 2 servings (4 boats) | Difficulty: Foolproof

    Storage Notes

    Don’t store these. Avocados turn brown, eggs get rubbery. Make fresh and eat immediately.

    But you can prep: scoop avocado wells ahead and refrigerate. Crack eggs right before baking. That’s it.

  • Korean Egg Roll (Gyeran Mari): The Pretty Egg You Make for Lunchboxes

    Korean Egg Roll (Gyeran Mari): The Pretty Egg You Make for Lunchboxes

    Gyeran Mari is Korea’s answer to the plain omelette. Same eggs, way more fun.

    Whisk in finely chopped carrots and scallions. Pour into a rectangular pan. Roll. Roll again. Slice into cute little spirals. It takes 10 minutes, uses one pan, and makes any meal look like you tried really hard (you didn’t).

    Ingredients

    Serves 2 as a side dish.

    • 4 large eggs
    • 1 tablespoon milk or water (for fluffiness)
    • ¼ teaspoon salt
    • 2 tablespoons finely chopped carrot
    • 2 tablespoons finely chopped scallion (green parts only)
    • 1 teaspoon vegetable or sesame oil
    • Optional: dash of black pepper or a pinch of sugar

    Step-by-Step Instructions

    Step 1: Whisk the Eggs

    1. In a bowl, whisk eggs, milk, and salt until smooth. Add carrot, scallion, and pepper. Whisk again.

    Step 2: Heat the Pan

    1. Oil a rectangular or small round nonstick skillet over medium-low heat. Wipe off excess with a paper towel—too much oil prevents rolling.

    Step 3: First Layer

    1. Pour about ⅓ of the egg mixture into the pan, swirling to cover the bottom. Cook until just set but still shiny on top, about 1–2 minutes.

    Step 4: Roll It

    1. Using a spatula, roll the egg from one side to the other like a jelly roll. Push the roll to the edge of the pan.

    Step 5: Repeat

    1. Pour another ⅓ of egg mixture, lifting the roll slightly to let raw egg flow underneath. When set, roll again. Repeat with remaining egg.

    Step 6: Slice and Serve

    1. Transfer the log to a cutting board. Let cool 1 minute. Slice into ½-inch pieces. Serve warm or at room temperature.

    Summary

    Prep Time: 5 minutes | Cook Time: 10 minutes | Total Time: 15 minutes

    Yield: 2 servings (side dish)

    Difficulty: Easy (first roll might be ugly—second will be pretty)

    Storage Notes

    Perfect for Lunchboxes

    Gyeran Mari is delicious cold or at room temperature. Store in an airtight container in the fridge for up to 3 days. No reheating needed—just pack and go.

    Freezer-Friendly

    Freeze sliced egg roll for up to 1 month. Thaw in the fridge overnight. Eat cold or gently microwave for 15 seconds.

  • Baked Eggs in Ham Cups: Breakfast in Crispy Pork Bowls

    Baked Eggs in Ham Cups: Breakfast in Crispy Pork Bowls

    Muffin tins aren’t just for muffins anymore.

    Press sliced ham into each cup. Crack in an egg. Bake. That’s it. The ham gets crispy like bacon. The egg cooks perfectly. You get a handheld breakfast cup that requires zero forks and makes you feel like a genius.

    Ingredients

    Serves 4 (makes 4 cups).

    • 4 slices deli ham (black forest or honey ham work great—not too thick)
    • 4 large eggs
    • Salt and black pepper
    • Optional toppings: shredded cheddar, chives, hot sauce, or paprika
    • Nonstick spray or butter for muffin tin

    Step-by-Step Instructions

    Step 1: Preheat and Prep

    1. Preheat oven to 375°F (190°C). Generously grease a standard 12-cup muffin tin (you’ll use 4 cups).

    Step 2: Make the Ham Cups

    1. Press one slice of ham into each greased muffin cup, gently molding it to form a cup shape. The edges will ruffle—that’s the crispy part.

    Step 3: Add the Egg

    1. Crack one egg into each ham cup. Season with salt and pepper. Add cheese or other toppings now if using.

    Step 4: Bake

    1. Bake for 12–15 minutes. For runny yolk: 12 minutes. For set yolk: 15–17 minutes. The ham edges should be dark and crispy.

    Step 5: Remove and Serve

    1. Run a knife around each cup to loosen. Lift out with a fork. Sprinkle with chives or hot sauce. Eat immediately.

    Summary

    Prep Time: 5 minutes | Cook Time: 12–15 minutes | Total Time: 20 minutes

    Yield: 4 servings (1 egg cup each)

    Difficulty: Easy (almost embarrassingly easy)

    Storage Notes

    Best Fresh, But Okay Leftover

    Ham cups are best straight from the oven when the ham is crispy. Leftovers? Store in the fridge for 2 days. Reheat in a toaster oven or air fryer at 350°F for 3–4 minutes. Microwave makes the ham sad and floppy.

    Meal Prep Move

    Bake a batch on Sunday. Reheat all week. Great for busy mornings.

  • Shepherd’s Pie (Cozy, Meaty, Mashed Potato Heaven)

    Shepherd’s Pie (Cozy, Meaty, Mashed Potato Heaven)

    Shepherd’s pie is what happens when leftovers dream big. But honestly? It’s better when you make it on purpose.

    Savory meat filling. Sweet carrots and peas. Topped with creamy mashed potatoes that get crispy edges in the oven. It’s a hug in a baking dish. No fancy skills required.

    Ingredients

    Serves 6.

    • 2 lbs (900g) russet or Yukon gold potatoes, peeled and cubed
    • 4 tablespoons butter, divided
    • ¼ cup milk or cream
    • 1 lb (450g) ground lamb (or ground beef for cottage pie)
    • 1 small onion, diced
    • 2 carrots, diced
    • 2 cloves garlic, minced
    • 1 cup frozen peas
    • 1 tablespoon tomato paste
    • 1 cup beef or chicken broth
    • 1 teaspoon Worcestershire sauce
    • Salt and pepper to taste

    Step-by-Step Instructions

    Step 1: Make the Mashed Potatoes

    1. Boil potatoes in salted water until fork-tender (about 15 minutes). Drain well.
    2. Mash with 2 tablespoons butter and milk until smooth and creamy. Season with salt.

    Step 2: Cook the Filling

    1. In an oven-safe skillet, brown the ground lamb over medium-high heat. Drain excess fat.
    2. Add onion, carrots, and garlic. Cook 5 minutes until softened.
    3. Stir in tomato paste, Worcestershire sauce, and broth. Simmer for 5-7 minutes until thickened.
    4. Add frozen peas. Season with salt and pepper.

    Step 3: Assemble and Bake

    1. Preheat oven to 400°F (200°C).
    2. Spread the mashed potatoes evenly over the meat filling.
    3. Use a fork to create ridges on top (these get crispy). Dot with remaining 2 tablespoons butter.
    4. Bake for 20-25 minutes until bubbly and golden brown.

    Step 4: Rest and Serve

    1. Let sit for 5 minutes before serving. It’s hot inside!

    Summary

    Prep Time: 15 minutes | Cook Time: 30 minutes | Total Time: 45 minutes

    Yield: 6 servings

    Difficulty: Easy

    Storage Notes

    Store in the fridge for up to 4 days. Reheat in a 350°F oven for 15-20 minutes or microwave individual portions.

    Freeze it: Yes! Freeze the assembled (unbaked) pie for up to 3 months. Bake from frozen at 400°F for 45-50 minutes.