Category: baking

  • Baked Banana Oat Cups (Breakfast That Tastes Like Dessert)

    Baked Banana Oat Cups (Breakfast That Tastes Like Dessert)

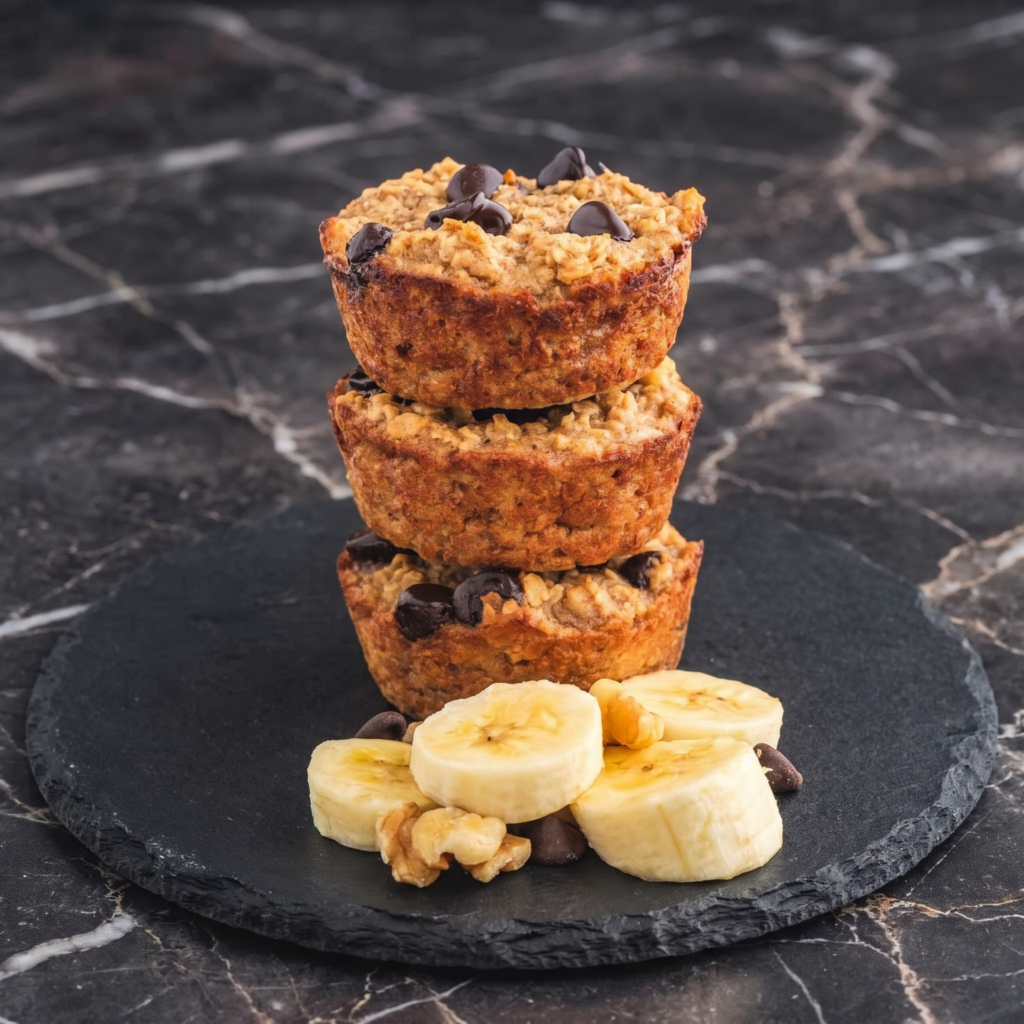
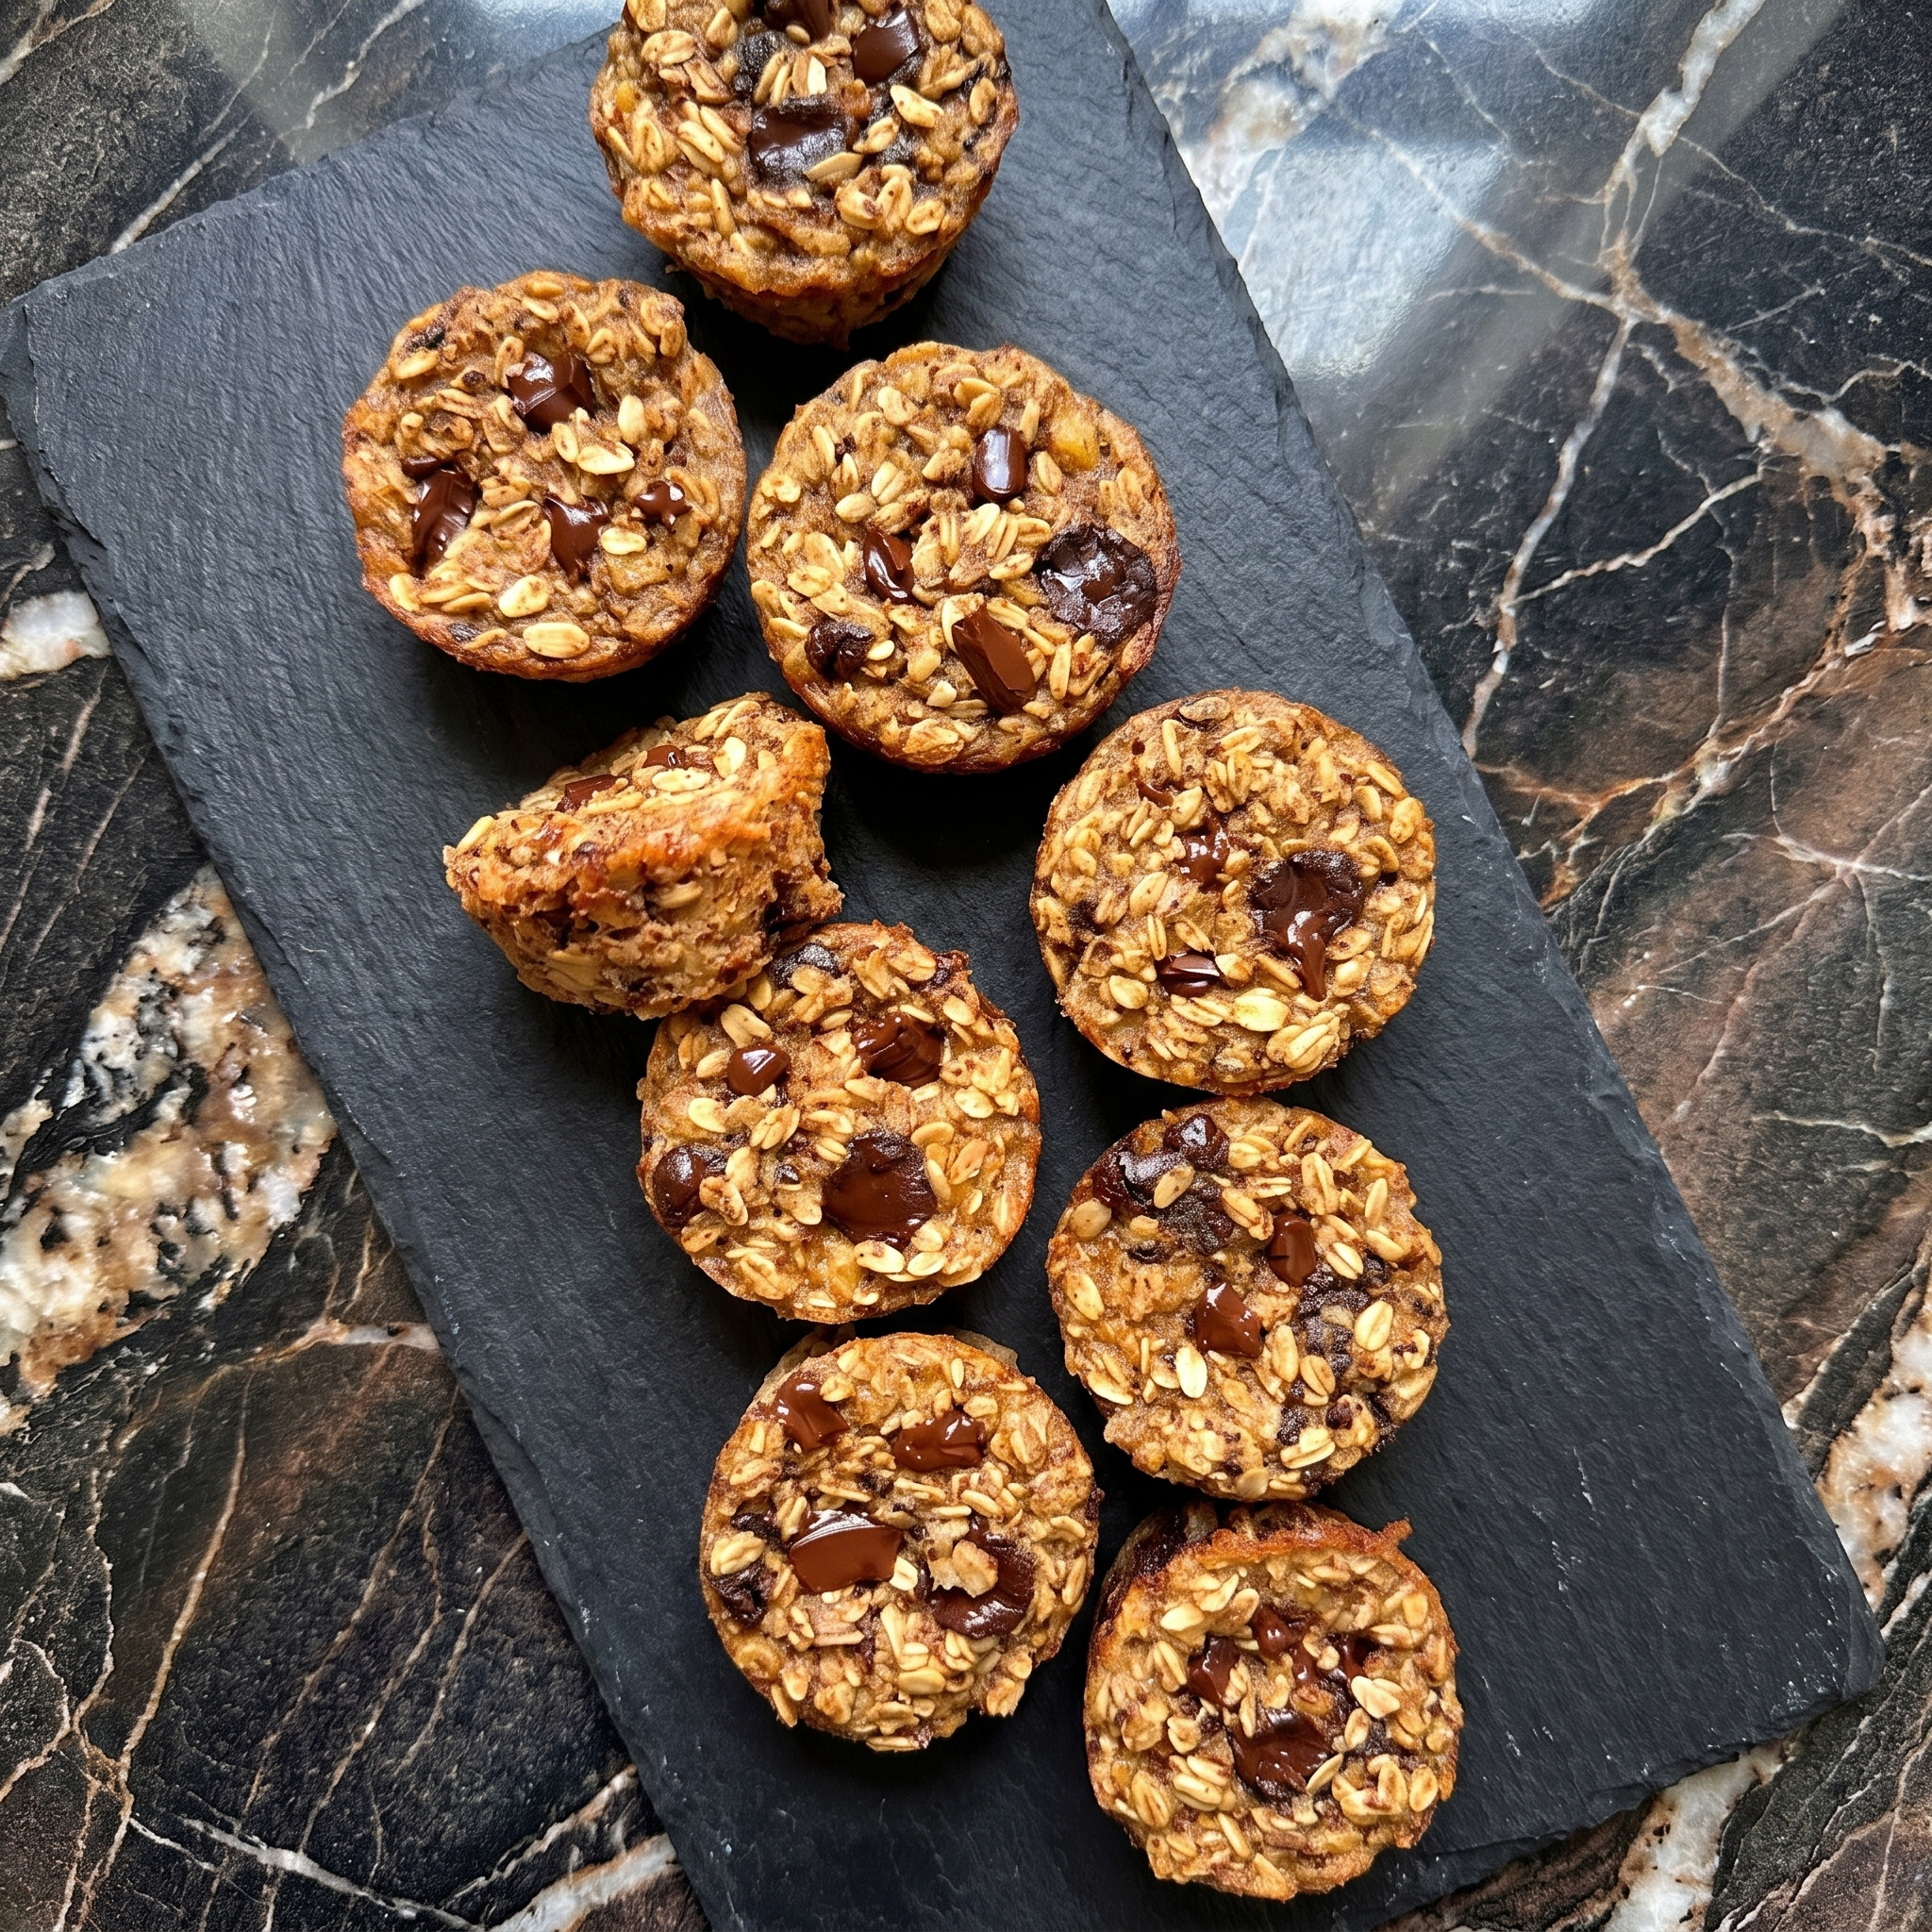
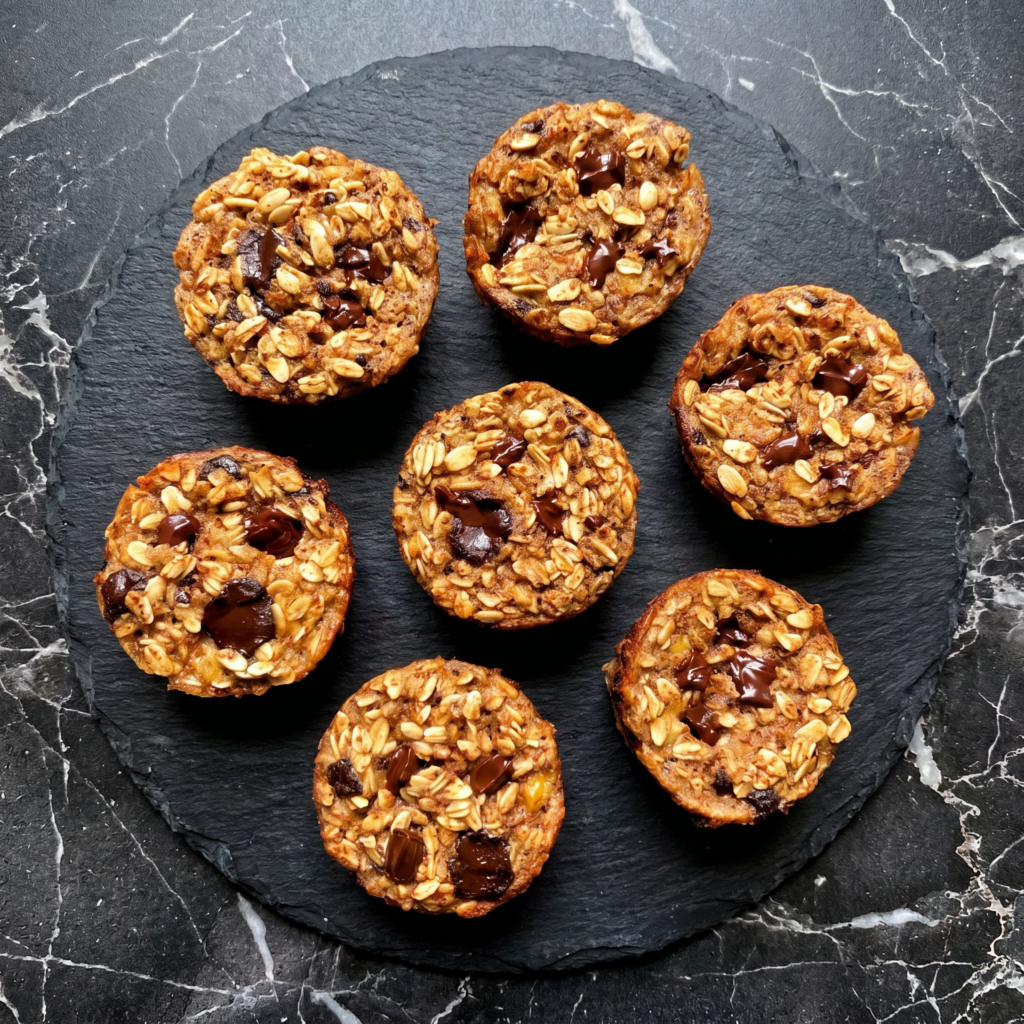
    Muffins are great. But these banana oat cups are easier, healthier, and somehow just as delicious.

    No flour. No refined sugar. Just bananas, oats, and a few pantry staples. Blend, pour, bake. You’ve got breakfast for the whole week. And yes, chocolate chips are mandatory.

    Ingredients

    Makes 12 oat cups.

    • 3 ripe bananas (spotty is best)
    • 2 cups (180g) rolled oats (use gluten-free if needed)
    • ¼ cup maple syrup or honey
    • ¼ cup milk (any kind)
    • 2 eggs
    • 1 teaspoon vanilla extract
    • 1 teaspoon cinnamon
    • 1 teaspoon baking powder
    • ¼ teaspoon salt
    • ½ cup chocolate chips or blueberries

    Step-by-Step Instructions

    Step 1: Preheat Oven

    1. Preheat to 375°F (190°C). Line a 12-cup muffin tin with liners or spray with nonstick spray.

    Step 2: Blend Everything

    1. Add all ingredients (except chocolate chips) to a blender.
    2. Blend until smooth, about 30-60 seconds. Scrape down sides if needed.

    Step 3: Add Chocolate Chips

    1. Stir in chocolate chips by hand (don’t blend them—they’ll disappear).

    Step 4: Fill and Bake

    1. Divide batter evenly among muffin cups (fill almost to the top).
    2. Bake for 18-20 minutes until golden and a toothpick comes out clean.

    Step 5: Cool and Store

    1. Let cool in pan for 5 minutes, then transfer to a wire rack.

    Summary

    Prep Time: 5 minutes | Cook Time: 20 minutes | Total Time: 25 minutes

    Yield: 12 oat cups

    Difficulty: Easy

    Storage Notes

    Fridge: Keeps 1 week. Eat cold or microwave for 15-20 seconds.

    Freezer: Freezes up to 3 months. Thaw overnight or microwave from frozen for 30-40 seconds.

    Meal prep gold: Make a double batch on Sunday. Grab and go all week.

  • Pepperoni Pizza Rolls (Better Than the Frozen Ones, Promise)

    Pepperoni Pizza Rolls (Better Than the Frozen Ones, Promise)

    Let’s be honest: frozen pizza rolls are fine. These are unforgettable.

    Real dough. Real cheese. Real pepperoni. Rolled up, sliced into pinwheels, and baked until golden. They’re crispy, gooey, and dangerously snackable. Make a double batch. Trust me.

    Ingredients

    Makes 20-24 pizza rolls.

    • 1 lb (450g) pizza dough (store-bought or homemade)
    • ½ cup marinara or pizza sauce (plus more for dipping)
    • 1½ cups shredded mozzarella cheese
    • ½ cup grated Parmesan cheese
    • 4 oz (120g) pepperoni, finely chopped
    • 1 teaspoon Italian seasoning
    • 1 egg, beaten (for egg wash)
    • Garlic butter for brushing (optional)

    Step-by-Step Instructions

    Step 1: Preheat and Prep

    1. Preheat oven to 400°F (200°C). Line a baking sheet with parchment paper.

    Step 2: Roll the Dough

    1. On a floured surface, roll dough into a 12×10-inch rectangle (about ¼-inch thick).

    Step 3: Add Fillings

    1. Spread marinara sauce evenly over dough, leaving a 1-inch border.
    2. Sprinkle with mozzarella, Parmesan, chopped pepperoni, and Italian seasoning.

    Step 4: Roll and Slice

    1. Starting from the long edge, roll dough tightly into a log. Pinch the seam to seal.
    2. Using a serrated knife, slice into 1-inch rolls (about 20-24 pieces).

    Step 5: Bake

    1. Place rolls cut-side up on the baking sheet. Brush with beaten egg.
    2. Bake for 15-18 minutes until golden brown and bubbly.

    Step 6: Serve

    1. Brush with garlic butter if desired. Serve warm with marinara for dipping.

    Summary

    Prep Time: 15 minutes | Cook Time: 18 minutes | Total Time: 33 minutes

    Yield: 20-24 pizza rolls

    Difficulty: Easy

    Storage Notes

    Fridge: Keeps 4 days. Reheat in oven at 375°F for 5-7 minutes or air fryer at 350°F for 3-4 minutes.

    Freezer (baked): Freeze up to 3 months. Reheat from frozen at 375°F for 10-12 minutes.

    Freezer (unbaked): Freeze sliced rolls on a tray, then bag. Bake from frozen at 400°F for 20-22 minutes.

  • Homemade Cheeze-Its: Sharp, Crunchy, Addictive (Send Help)

    Homemade Cheeze-Its: Sharp, Crunchy, Addictive (Send Help)

    The red box has nothing on this.

    These homemade cheese crackers are exactly what you want: crunchy, salty, intensely cheesy, and impossible to stop eating. Four ingredients. One bowl. No food processor required. Bake a batch and watch them disappear before the next commercial break.

    Ingredients

    Makes about 80 crackers.

    • 8 oz sharp cheddar cheese, finely shredded (2 cups)
    • 1 cup all-purpose flour
    • 4 tablespoons cold butter, cubed
    • ½ teaspoon salt
    • ¼ teaspoon smoked paprika (optional, but do it)
    • 2-3 tablespoons ice water

    Step-by-Step Instructions

    Step 1: Make the Dough

    1. In a bowl, mix flour, salt, and paprika.
    2. Add shredded cheese and cold butter. Use your fingers to pinch it all together until it looks like coarse crumbs.
    3. Add ice water 1 tablespoon at a time until dough forms a ball.
    4. Flatten into a disk, wrap, and chill for 30 minutes.

    Step 2: Roll & Cut

    1. Preheat oven to 375°F (190°C). Line two baking sheets with parchment.
    2. Roll dough very thin (⅛ inch) between two sheets of parchment paper.
    3. Cut into 1-inch squares. Use a toothpick or skewer to poke a hole in the center of each.

    Step 3: Bake

    1. Arrange crackers on baking sheets, spaced slightly apart.
    2. Sprinkle with a little extra salt.
    3. Bake for 12-15 minutes until edges are golden brown and crispy.
    4. Cool completely on the pan (they crisp up as they cool).

    Summary

    Prep Time: 15 minutes | Chill Time: 30 minutes | Bake Time: 15 minutes

    Yield: 80 crackers | Difficulty: Easy

    Storage Notes

    Store in an airtight container at room temperature for up to 2 weeks. They stay crunchy! No refrigeration needed. To keep them crisp, throw in a piece of bread or a silica packet (like a pro).

  • Homemade Pop Tarts: Store-Bought Could Never

    Homemade Pop Tarts: Store-Bought Could Never

    Pop Tarts lied to us. They said a dry, crumbly rectangle was fine. It was never fine.

    These homemade Pop Tarts are the truth. Buttery, flaky crust. A thick layer of real jam. And a vanilla glaze that cracks when you bite into it. Make a batch. Watch them vanish.

    Ingredients

    Makes 8 Pop Tarts.

    For the Crust:

    • 2 ½ cups all-purpose flour
    • 1 tablespoon sugar
    • 1 teaspoon salt
    • 1 cup cold butter, cubed
    • 6-8 tablespoons ice water

    For the Filling:

    • ½ cup strawberry jam (or any flavor)
    • 1 tablespoon cornstarch (to thicken)

    For the Glaze:

    • 1 cup powdered sugar
    • 2 tablespoons milk
    • ½ teaspoon vanilla extract
    • Sprinkles (non-negotiable)

    Step-by-Step Instructions

    Step 1: Make the Crust

    1. Whisk flour, sugar, and salt. Cut in cold butter until pea-sized crumbs form.
    2. Add ice water 1 tablespoon at a time until dough comes together.
    3. Divide dough in half, flatten into disks, wrap, and chill for 1 hour.

    Step 2: Roll & Fill

    1. Preheat oven to 375°F (190°C). Line a baking sheet with parchment.
    2. Roll each disk into a 9×12-inch rectangle. Cut into 8 rectangles (about 3×4 inches each).
    3. Mix jam with cornstarch. Spoon 1 tablespoon onto the center of 8 rectangles.
    4. Top with remaining rectangles. Seal edges with a fork.

    Step 3: Bake

    1. Poke a few holes in the top of each Pop Tart with a fork.
    2. Bake for 20-25 minutes until golden brown.
    3. Cool completely on a wire rack.

    Step 4: Glaze & Sprinkles

    1. Whisk powdered sugar, milk, and vanilla until smooth.
    2. Drizzle glaze over cooled Pop Tarts.
    3. Add sprinkles before the glaze sets. Wait 15 minutes. Devour.

    Summary

    Prep Time: 30 minutes | Chill Time: 1 hour | Bake Time: 25 minutes

    Yield: 8 Pop Tarts | Difficulty: Medium

    Storage Notes

    Store in an airtight container at room temperature for up to 5 days. Freeze for up to 3 months. To reheat, pop in a toaster oven or air fryer at 350°F for 5 minutes. Microwave works but kills the flaky vibe.

  • Pretzel Buns: Chewy, Salty, Better Than the Mall

    Pretzel Buns: Chewy, Salty, Better Than the Mall

    Pretzel buns are the main character. The burger is just there for the ride.

    These are chewy, salty, shiny, and impossibly golden. And no, you don’t need food-grade lye. A baking soda bath does the trick. Mix, boil, bake, and suddenly you’re a bakery. Let’s go.

    Ingredients

    Makes 8 buns.

    For the Dough:

    • 4 cups all-purpose flour
    • 1 packet (2 ¼ tsp) instant yeast
    • 1 ½ teaspoons salt
    • 1 tablespoon brown sugar
    • 1 ¼ cups warm water (about 110°F)
    • 2 tablespoons melted butter

    For the Baking Soda Bath:

    • 10 cups water
    • ⅔ cup baking soda

    For Topping:

    • 1 egg yolk beaten with 1 tablespoon water (egg wash)
    • Coarse sea salt or pretzel salt

    Step-by-Step Instructions

    Step 1: Make the Dough

    1. In a large bowl, whisk flour, yeast, salt, and brown sugar.
    2. Add warm water and melted butter. Mix until a shaggy dough forms.
    3. Knead for 8-10 minutes until smooth and elastic.
    4. Let rise in a greased bowl for 1 hour, until doubled.

    Step 2: Shape the Buns

    1. Punch down dough. Divide into 8 equal pieces (about 100g each).
    2. Roll each into a tight ball. Place on a parchment-lined baking sheet.
    3. Cover and rest for 20 minutes.

    Step 3: The Baking Soda Bath

    1. Preheat oven to 425°F (220°C).
    2. Bring 10 cups water to a boil. Slowly add baking soda (it will bubble up).
    3. Drop 2-3 dough balls into the water. Boil for 30 seconds per side.
    4. Remove with a slotted spoon. Return to baking sheet.

    Step 4: Bake

    1. Brush buns with egg wash. Sprinkle with coarse salt.
    2. Score an “X” on top with a sharp knife (optional).
    3. Bake for 15-18 minutes until deep golden brown.
    4. Cool on a wire rack for 10 minutes. Then destroy.

    Summary

    Prep Time: 20 minutes | Rise Time: 1 hour 20 minutes | Bake Time: 18 minutes

    Yield: 8 buns | Difficulty: Medium

    Storage Notes

    Store in an airtight container for up to 3 days. Freeze for up to 3 months. To reheat, wrap in foil and warm at 350°F for 8-10 minutes. Brush with melted butter for that “fresh out of the oven” magic.

  • Samosas: The Triangle Everyone Fights Over

    Samosas: The Triangle Everyone Fights Over

    Is it even a party without samosas? No. The answer is no.

    These little triangles are pure magic: a shatteringly crisp shell wrapped around warm, spiced potatoes and sweet peas. They’re easier to make than you think. No fancy equipment. No hard-to-find spices. Just a simple dough, a killer filling, and your favorite cooking method—fry, bake, or air fry.

    Ingredients

    Makes 12 samosas.

    For the Dough:

    • 2 cups all-purpose flour
    • ½ teaspoon salt
    • ¼ cup oil or ghee
    • ½ cup water (approx)

    For the Filling:

    • 3 medium potatoes, boiled and mashed
    • ½ cup frozen peas
    • 1 teaspoon cumin seeds
    • 1 teaspoon garam masala
    • ½ teaspoon turmeric
    • 1 green chili, minced (optional)
    • Salt to taste

    Step-by-Step Instructions

    Step 1: Make the Dough

    1. Mix flour and salt. Rub in oil until crumbly.
    2. Add water slowly and knead into a stiff dough. Rest for 30 minutes.

    Step 2: Make the Filling

    1. Heat 1 tablespoon oil. Add cumin seeds until they pop.
    2. Add mashed potatoes, peas, spices, chili, and salt. Cook 2-3 minutes. Cool.

    Step 3: Shape the Samosas

    1. Divide dough into 6 balls. Roll each into a 6-inch circle. Cut in half.
    2. Take one half, form a cone, and seal the edge with water.
    3. Stuff with filling. Seal the top edge with water. Repeat.

    Step 4: Cook Your Way

    1. Fry: Heat oil to 350°F. Fry 3-4 minutes until golden.
    2. Bake: Brush with oil. Bake at 375°F for 20 minutes, flipping halfway.
    3. Air Fry: 375°F for 10-12 minutes, shaking once.

    Summary

    Prep Time: 20 minutes | Cook Time: 10 minutes | Rest Time: 30 minutes

    Yield: 12 samosas | Difficulty: Medium

    Storage Notes

    Freeze uncooked samosas on a tray, then transfer to a bag for up to 3 months. Cook from frozen (add 2-3 minutes). Cooked samosas last 3 days in the fridge—reheat in an air fryer or oven, not microwave.

    Dip with: mint chutney, tamarind sauce, or ketchup. No judgment.

  • Crispy Beef Tacos (The Shell Shatters. The Heart Sings.)

    Crispy Beef Tacos (The Shell Shatters. The Heart Sings.)

    Soft tacos are fine. But crispy tacos? Crispy tacos are an event.

    That first bite where the shell shatters. The seasoned beef. The cool lettuce and sour cream. The avalanche of hot sauce. These crispy beef tacos take 20 minutes and taste like the best version of your childhood Tuesday night. No fancy stuff. Just pure, crunchy happiness.

    Ingredients

    Makes 8-10 tacos (serves 4).

    • 1 lb (450g) ground beef (80/20 recommended)
    • 1 packet taco seasoning (or homemade: chili powder, cumin, paprika, garlic powder, onion powder)
    • ⅓ cup water
    • 8-10 hard taco shells
    • 1 cup shredded cheddar or Mexican blend cheese
    • Shredded lettuce
    • Diced tomatoes
    • Sour cream
    • Hot sauce or salsa
    • Optional: diced onion, pickled jalapeños, cilantro

    Step-by-Step Instructions

    Step 1: Cook the Beef

    1. Heat a large skillet over medium-high heat. Add ground beef.
    2. Cook for 5-7 minutes, breaking it apart with a spatula, until browned.
    3. Drain excess grease.
    4. Add taco seasoning and water. Stir and simmer for 2-3 minutes until thickened.

    Step 2: Warm the Shells

    1. Preheat oven to 350°F (175°C). Place taco shells on a baking sheet.
    2. Warm for 3-5 minutes until toasty and fragrant.

    Step 3: Assemble (The Right Way)

    1. Spoon seasoned beef into each taco shell.
    2. Top immediately with shredded cheese (so it melts slightly).
    3. Add lettuce, tomatoes, sour cream, and hot sauce.

    Step 4: Serve

    1. Serve immediately with extra hot sauce on the side.
    2. Do not wait. Soggy tacos are sad tacos.

    Summary

    Prep Time: 5 minutes | Cook Time: 15 minutes | Total Time: 20 minutes

    Yield: 8-10 tacos

    Difficulty: Easy

    Storage Notes

    • Fridge: Cooked seasoned beef keeps for 4 days. Store separately from shells and toppings.
    • Reheat beef: Skillet or microwave with a splash of water.
    • Shells: Never store assembled tacos. They’ll become a sad, soggy mess.
    • Taco night pro tip: Set up a taco bar. Let everyone build their own fresh.
  • Garlic Parmesan Chicken Tenders (Better Than Any Drive-Thru)

    Garlic Parmesan Chicken Tenders (Better Than Any Drive-Thru)

    Let’s be honest: most homemade chicken tenders are boring. Dry. Bland. Sad.

    These are not those. These are garlic butter-drenched, Parmesan-crusted, crispy-on-the-outside-juicy-on-the-inside tenders. Baked or fried (your call). Ready in 25 minutes. Good enough for adults. Loved by kids. Make a double batch. Trust me.

    Ingredients

    Serves 4 (about 12-16 tenders).

    • 1.5 lbs (680g) chicken tenderloins (or chicken breasts cut into strips)
    • ½ cup all-purpose flour
    • 2 large eggs, beaten
    • 1 cup panko breadcrumbs
    • ½ cup grated Parmesan cheese
    • 1 teaspoon garlic powder
    • 1 teaspoon onion powder
    • ½ teaspoon salt
    • ¼ teaspoon black pepper
    • Cooking spray or oil for frying

    For the Garlic Butter Finish:

    • 3 tablespoons butter, melted
    • 3 cloves garlic, minced
    • 2 tablespoons fresh parsley, chopped
    • Extra Parmesan for topping

    Step-by-Step Instructions

    Step 1: Preheat and Prep

    1. Preheat oven to 425°F (220°C) for baking. Line a baking sheet with foil and place a wire rack on top.
    2. Pat chicken tenders dry with paper towels.

    Step 2: Set Up Breading Station

    1. Three shallow bowls: flour (seasoned with salt/pepper), beaten eggs, and panko + Parmesan + garlic powder + onion powder mixed together.
    2. Dredge each tender in flour → dip in egg → coat in panko mixture, pressing firmly.

    Step 3: Cook

    1. Bake: Place tenders on wire rack. Spray with oil. Bake for 12-15 minutes, flipping halfway, until golden and cooked through.
    2. Fry: Heat ½ inch oil in skillet to 350°F. Fry 3-4 minutes per side.
    3. Air fry: 375°F for 8-10 minutes, shaking halfway.

    Step 4: Make Garlic Butter

    1. While tenders cook, melt butter in a small pan. Add garlic and cook 1 minute.
    2. Stir in parsley.

    Step 5: Finish and Serve

    1. Place hot tenders in a bowl. Drizzle with garlic butter. Toss gently.
    2. Sprinkle with extra Parmesan. Serve with ranch, marinara, or honey mustard.

    Summary

    Prep Time: 10 minutes | Cook Time: 15 minutes | Total Time: 25 minutes

    Yield: 12-16 tenders

    Difficulty: Easy

    Storage Notes

    • Fridge: Cooked tenders keep for 4 days in an airtight container.
    • Freezer: Freeze uncooked breaded tenders for up to 3 months. Bake from frozen (add 5-10 minutes).
    • Reheat: Air fryer at 375°F for 5 minutes or oven at 400°F for 8 minutes.
    • Don’t microwave: You’ll get sad, rubbery tenders. Don’t do it.
  • Garlic Herb Roasted Turkey Breast (Thanksgiving Any Tuesday)

    Garlic Herb Roasted Turkey Breast (Thanksgiving Any Tuesday)

    Love turkey but hate wrestling a 15-pound bird? Same.

    This garlic herb roasted turkey breast is your answer. All the juicy, savory, crispy-skin goodness of a holiday turkey, but it cooks in under 90 minutes. No brining required. No giant roasting pan. No leftovers for three weeks. Just perfect turkey any day of the week.

    Ingredients

    Serves 4-6.

    • 3-4 lb (1.4-1.8 kg) bone-in, skin-on turkey breast
    • 2 tablespoons olive oil or softened butter
    • 6 cloves garlic, minced
    • 1 tablespoon fresh rosemary, chopped
    • 1 tablespoon fresh thyme leaves
    • 1 tablespoon fresh sage, chopped (or 1 tsp dried)
    • 1 teaspoon salt
    • ½ teaspoon black pepper
    • 1 lemon, quartered (optional, for roasting)

    Step-by-Step Instructions

    Step 1: Preheat and Prep

    1. Preheat oven to 400°F (200°C). Line a baking sheet or roasting pan with foil.
    2. Pat turkey breast completely dry with paper towels.

    Step 2: Make the Herb Butter

    1. In a small bowl, mix olive oil (or butter), garlic, rosemary, thyme, sage, salt, and pepper.
    2. Gently loosen the skin from the turkey breast with your fingers.
    3. Rub half the herb mixture directly under the skin. Rub the rest all over the outside.

    Step 3: Roast

    1. Place turkey on the pan. Tuck lemon quarters around it if using.
    2. Roast for 50-65 minutes, until internal temp hits 165°F (74°C).
    3. If skin is browning too fast, loosely tent with foil.

    Step 4: Rest and Serve

    1. Let rest for 10-15 minutes before slicing. This is critical for juiciness.
    2. Slice and serve with pan juices.

    Summary

    Prep Time: 10 minutes | Cook Time: 55 minutes | Total Time: 1 hour 15 minutes

    Yield: 4-6 servings

    Difficulty: Easy

    Storage Notes

    • Fridge: Sliced turkey keeps for 4 days in an airtight container.
    • Freezer: Freezes beautifully for up to 3 months. Slice first.
    • Reheat: Oven at 325°F with a splash of broth. Skip the microwave.
    • Leftover magic: Sandwiches, salads, soups, or turkey pot pie.
  • Bacon Wrapped Chicken Breasts (Juicy Inside, Crispy Outside)

    Bacon Wrapped Chicken Breasts (Juicy Inside, Crispy Outside)

    Chicken breast has a reputation for being dry, boring, and sad. This recipe exists to destroy that reputation.

    Wrap a chicken breast in bacon, and something magical happens. The bacon bastes the chicken as it cooks. The chicken stays juicy. The bacon gets crispy. Everyone wins. No brine. No complicated steps. Just dinner that tastes like you tried way harder than you did.

    Ingredients

    Serves 4.

    • 4 boneless, skinless chicken breasts (about 6 oz / 170g each)
    • 8 slices bacon (thin or regular, not thick-cut)
    • 1 teaspoon salt
    • ½ teaspoon black pepper
    • 1 teaspoon garlic powder
    • ½ teaspoon paprika (optional)
    • Optional: brown sugar for caramelized bacon

    Step-by-Step Instructions

    Step 1: Preheat and Prep

    1. Preheat oven to 400°F (200°C). Line a baking sheet with foil and place a wire rack on top.
    2. Pat chicken breasts dry with paper towels.
    3. Season all over with salt, pepper, garlic powder, and paprika.

    Step 2: Wrap in Bacon

    1. Wrap 2 slices of bacon around each chicken breast, slightly overlapping.
    2. Tuck the ends underneath. No toothpicks needed if tucked well.
    3. Sprinkle a little brown sugar on top if you want caramelized bacon.

    Step 3: Bake

    1. Place wrapped chicken on the wire rack (this lets bacon crisp on all sides).
    2. Bake for 25-30 minutes, until chicken hits 165°F (74°C) and bacon is crispy.
    3. For extra crispiness, broil for 1-2 minutes at the end.

    Step 4: Rest and Serve

    1. Let rest for 5 minutes. Serve with roasted veggies, potatoes, or a salad.

    Summary

    Prep Time: 5 minutes | Cook Time: 25-30 minutes | Total Time: 30-35 minutes

    Yield: 4 servings

    Difficulty: Easy

    Storage Notes

    • Fridge: Leftovers keep for 4 days in an airtight container.
    • Reheat: Oven or air fryer at 375°F for 8-10 minutes. Microwaving will make bacon soft.
    • Meal prep: Wrap seasoned chicken in bacon up to 24 hours ahead. Keep covered in the fridge.
    • Freezer: Freeze uncooked wrapped chicken for up to 2 months. Thaw before baking.