Category: baking

  • Cloud Eggs (Fluffy, Dreamy, and Peak TikTok Brilliance)

    Cloud Eggs (Fluffy, Dreamy, and Peak TikTok Brilliance)

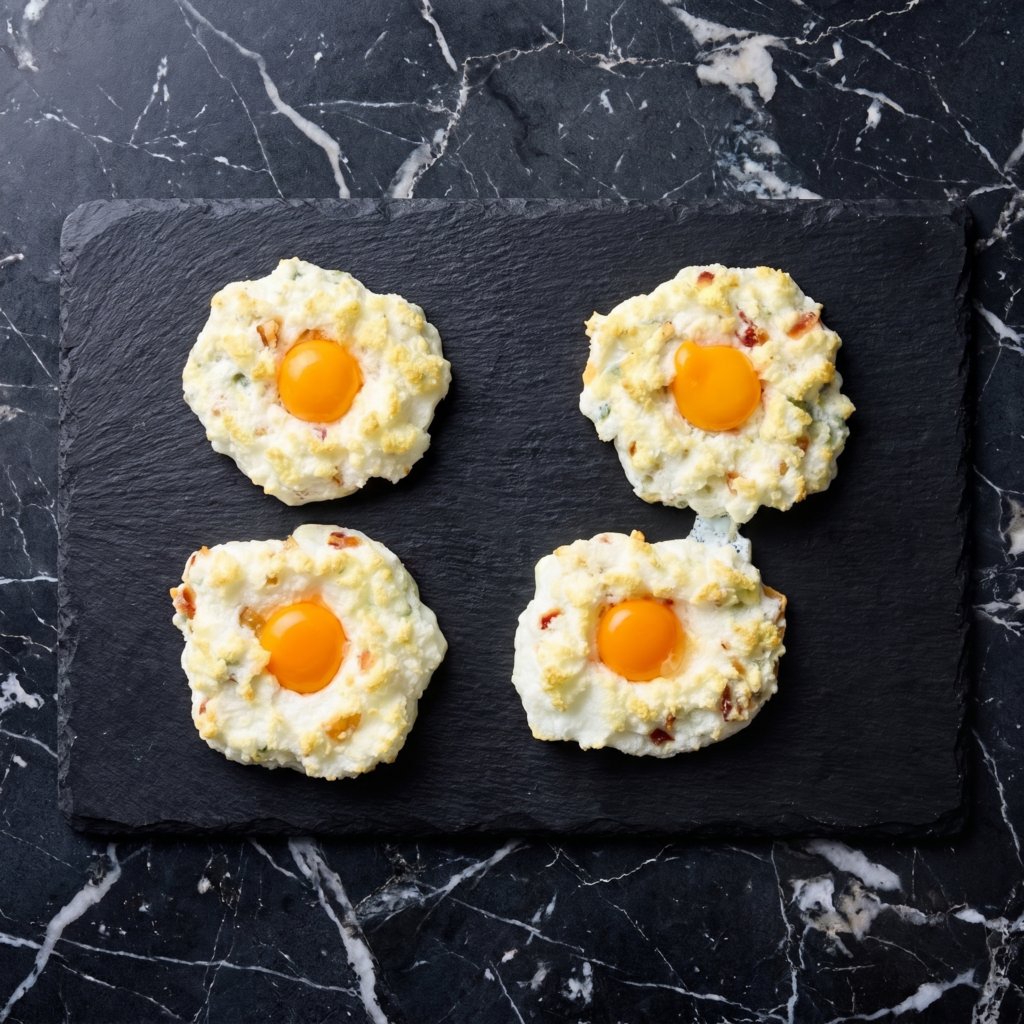
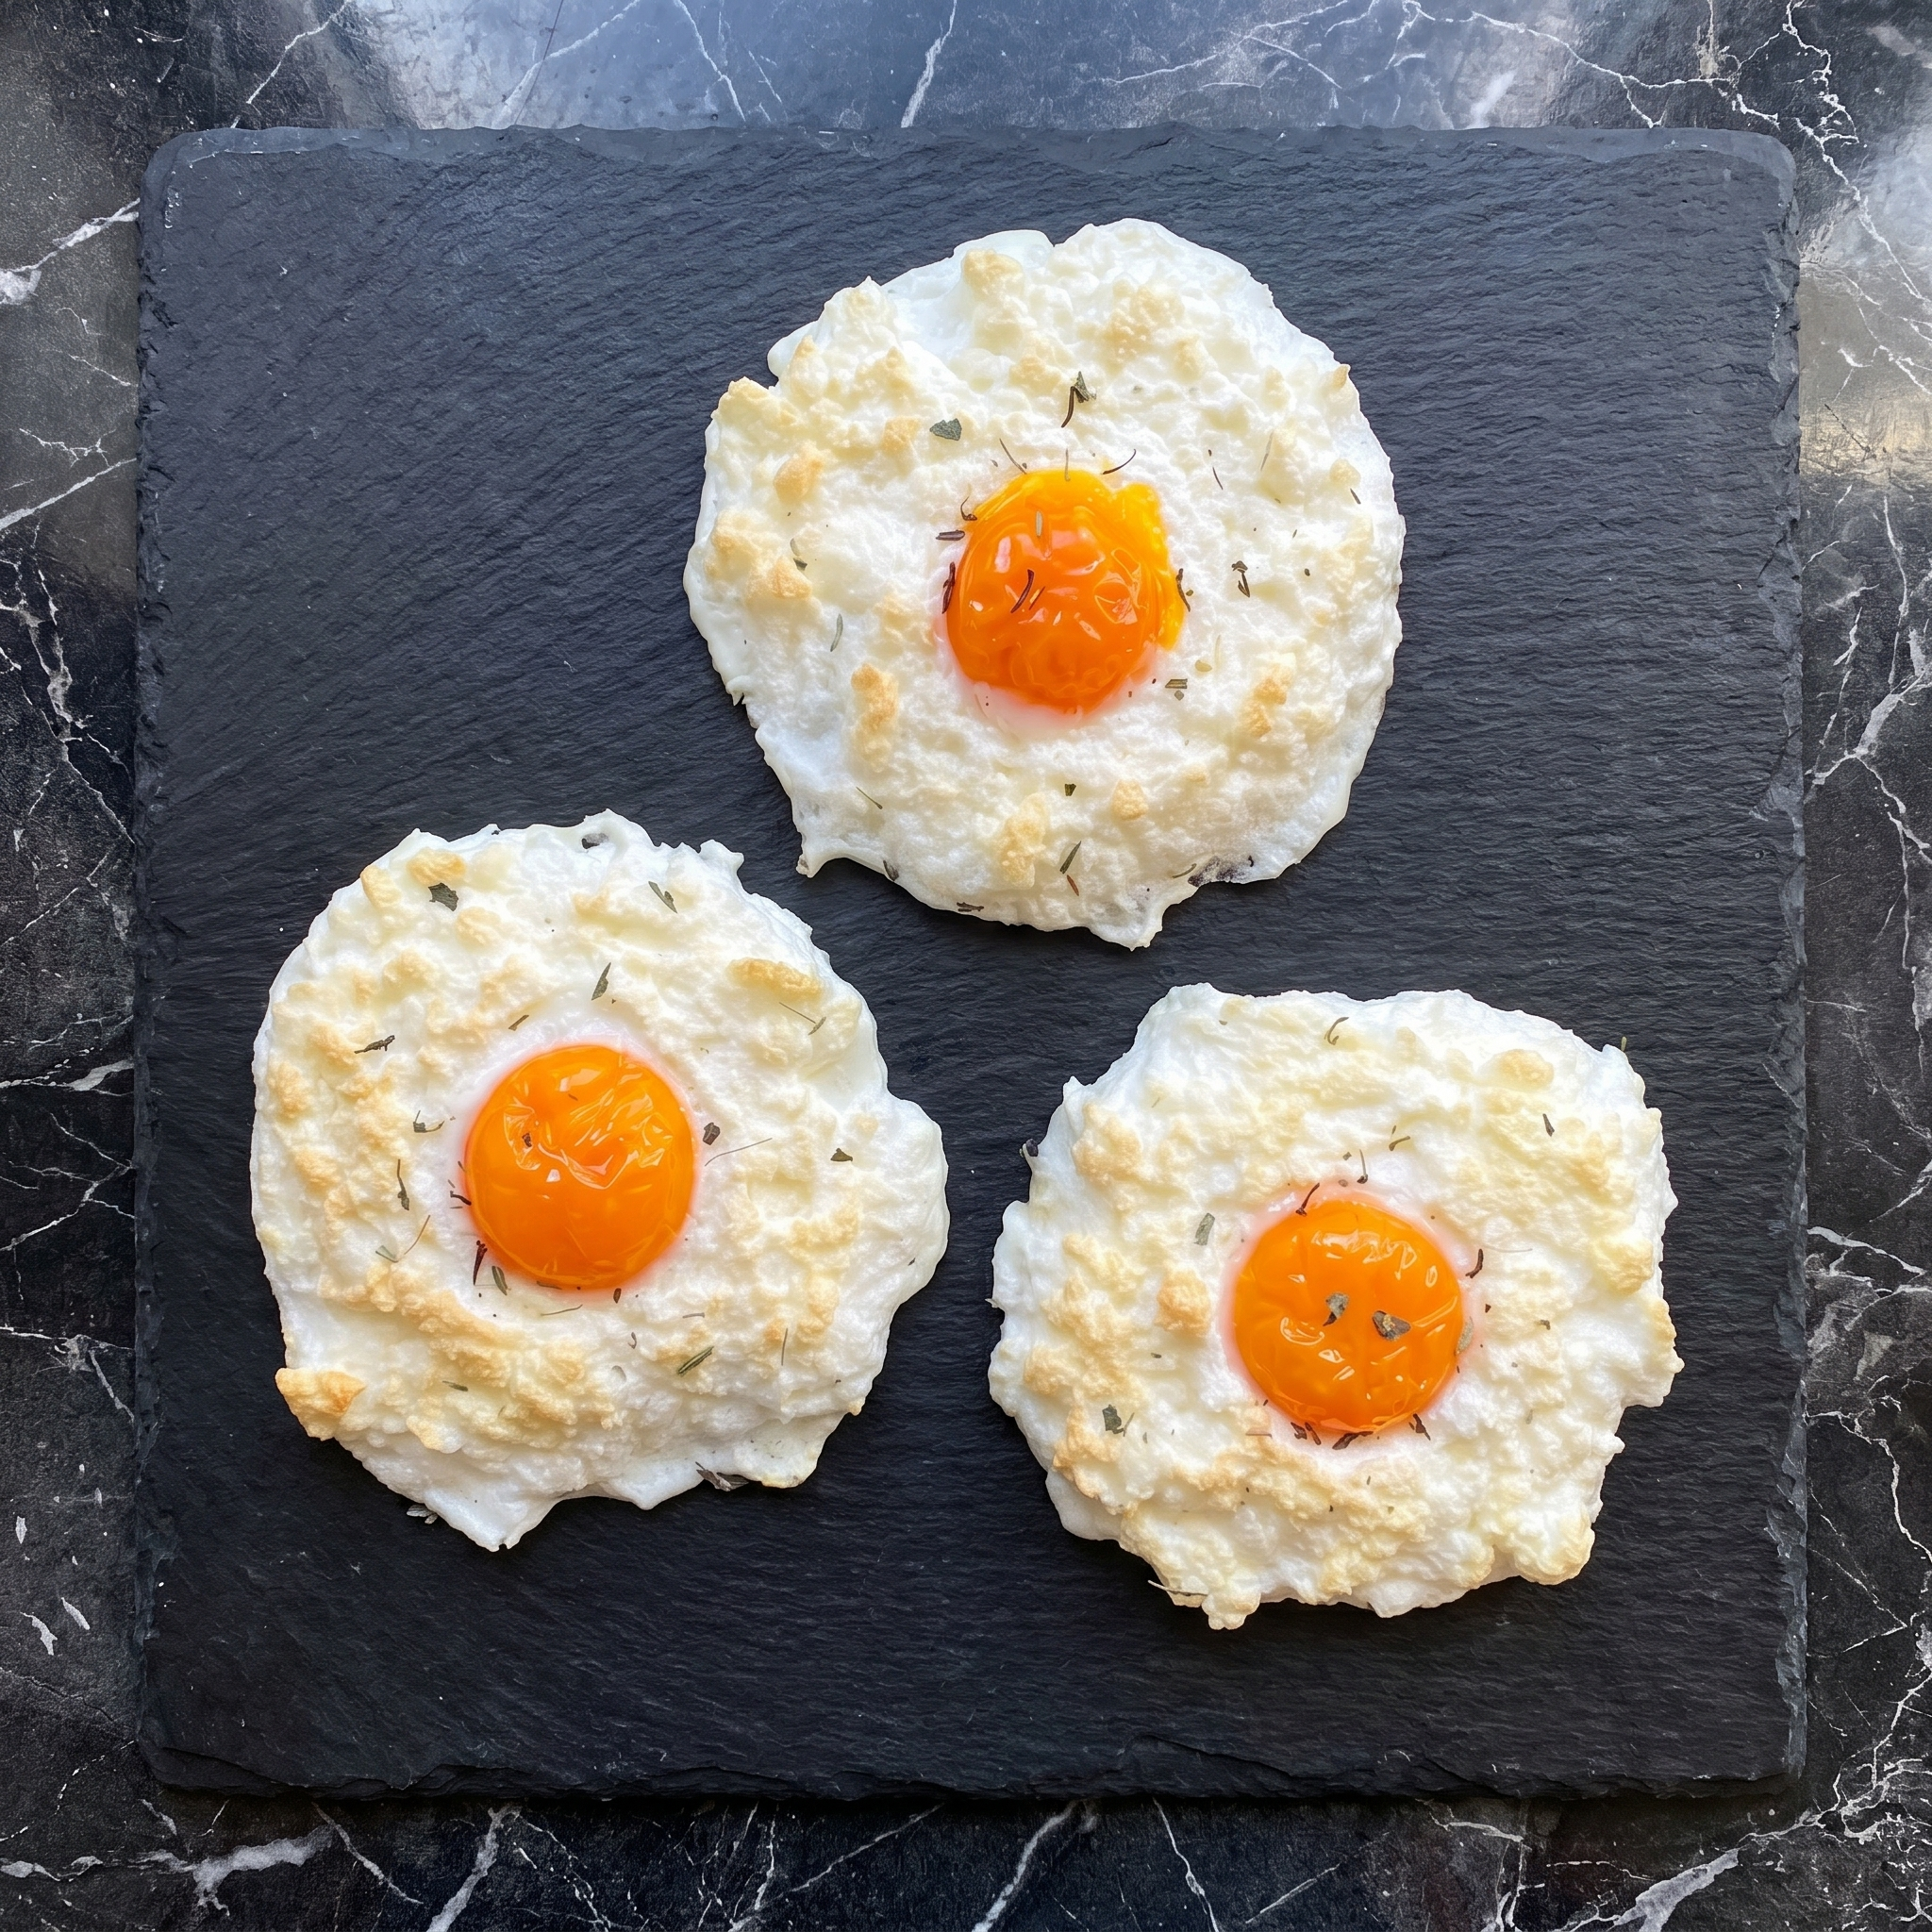
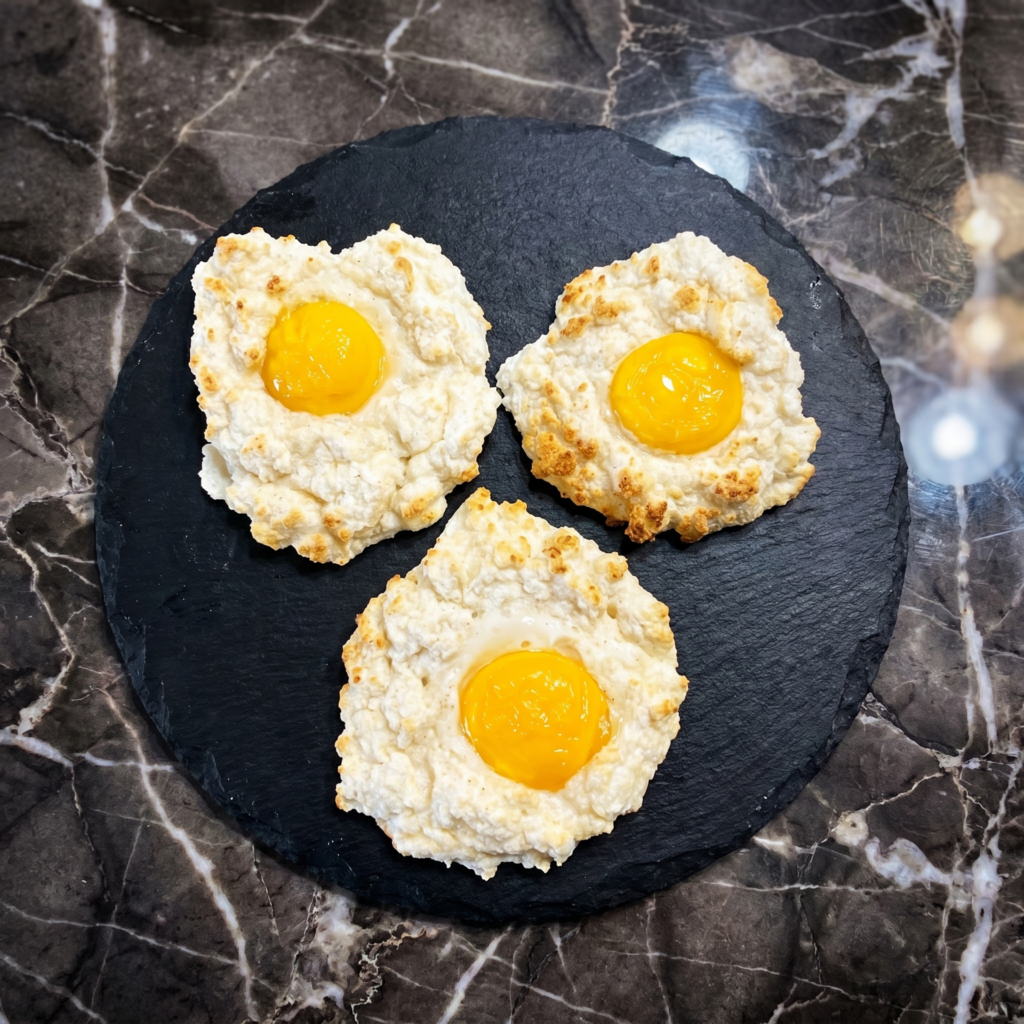
    Cloud eggs took over the internet for good reason. They’re ridiculous. They’re fun. And they turn plain eggs into something that looks like breakfast from a fairy tale.

    Whip the whites into stiff peaks. Pile them into clouds. Nestle the yolk in the center. Bake until golden. The result? Crispy, fluffy, dramatic clouds with a warm, runny heart. Break out your camera. Then break out the toast.

    Ingredients

    Serves 2.

    • 4 large eggs (separated into whites and yolks)
    • ¼ teaspoon cream of tartar (optional, but helps fluff)
    • Salt and black pepper, to taste
    • 2 tablespoons grated Parmesan or cheddar cheese (optional)
    • Fresh chives or parsley, for garnish
    • Toast or avocado toast, for serving

    Step-by-Step Instructions

    Step 1: Prep and Separate

    1. Preheat oven to 450°F (230°C). Line a baking sheet with parchment paper.
    2. Separate eggs carefully. Place each yolk in its own small bowl. (Don’t break them!)

    Step 2: Whip the Whites

    1. In a clean bowl, beat egg whites and cream of tartar until stiff peaks form. They should look like shaving cream.
    2. Gently fold in cheese, salt, and pepper if using.

    Step 3: Form the Clouds

    1. Scoop whipped whites into 4 mounds on the parchment paper.
    2. Use the back of a spoon to create a shallow well in the center of each mound (holds the yolk).

    Step 4: Bake the Whites

    1. Bake for 3 minutes until the clouds are lightly golden on the edges.
    2. Remove from oven. Carefully slide one yolk into each well.

    Step 5: Finish and Serve

    1. Return to oven and bake for 2-4 minutes longer. Whites should be golden, yolks still wobbly.
    2. Garnish with chives. Serve immediately with toast for dipping into the runny yolk.

    Summary

    Prep Time: 10 minutes | Cook Time: 5-7 minutes | Total Time: 15-17 minutes

    Yield: 4 cloud eggs (2 servings)

    Difficulty: Easy (keep those yolks intact!)

    Storage Notes

    Cloud eggs are not leftovers. The whites deflate. The yolks set. Eat them immediately or don’t bother. If you absolutely must, you can whip the whites ahead of time and refrigerate for a few hours. But honestly? Just make them fresh. It takes 15 minutes.

  • New York Cheesecake (The Big, Bold, No-Nonsense One)

    New York Cheesecake (The Big, Bold, No-Nonsense One)

    New York cheesecake doesn’t mess around. It’s not light. It’s not fluffy. It’s dense, rich, and creamy—like someone took a regular cheesecake and told it to go to the gym. No sour cream topping. No fruit swirls. Just pure, unapologetic cheesecake.

    This is the real deal. The one that stands tall on a plate. The one that needs nothing but a fork and a moment of silence. Let’s make it.

    Ingredients

    Serves 10-12.

    For the Crust:

    • 2 cups (200g) graham cracker crumbs
    • ¼ cup (50g) granulated sugar
    • ½ cup (115g) unsalted butter, melted

    For the Cheesecake Filling:

    • 40 oz (1.1kg) cream cheese, softened (five 8oz blocks, full-fat)
    • 1¾ cups (350g) granulated sugar
    • ¼ cup (30g) cornstarch
    • 4 large eggs, room temperature
    • 1 cup (240ml) sour cream, room temperature
    • 2 teaspoons vanilla extract
    • 2 teaspoons lemon juice

    Step-by-Step Instructions

    Step 1: Make the Crust

    1. Preheat oven to 375°F (190°C). Wrap outside of a 9-inch springform pan with foil.
    2. Mix crumbs, sugar, and butter. Press firmly into bottom and halfway up the sides.
    3. Bake for 10 minutes. Cool. Reduce oven to 325°F (160°C).

    Step 2: Make the Filling

    1. Beat cream cheese until completely smooth. No lumps. Take your time.
    2. Add sugar and cornstarch. Beat until combined.
    3. Add eggs one at a time. Mix on low—overmixing = cracks.
    4. Mix in sour cream, vanilla, and lemon juice until just combined.

    Step 3: Bake

    1. Pour filling into crust. Smooth the top.
    2. Place springform pan in a larger roasting pan. Add hot water to the roasting pan (water bath).
    3. Bake at 325°F for 60-70 minutes. Edges should be set, center still wobbly.
    4. Turn off oven. Crack door open. Cool inside for 1 hour.

    Step 4: Chill Completely

    1. Remove from water bath. Run a knife around the edge.
    2. Cool to room temperature, then refrigerate for at least 6 hours (overnight is better).
    3. Serve plain or with berries. Don’t you dare add caramel.

    Summary

    Prep Time: 30 minutes | Bake Time: 70 minutes | Cool/Chill: 7+ hours | Total Time: ~9 hours

    Yield: 10-12 slices

    Difficulty: Medium (water bath required)

    Storage Notes

    Refrigerate tightly covered for up to 7 days (yes, a whole week). Freeze for up to 3 months—wrap individual slices in plastic then foil. Thaw overnight in the fridge. Serve cold or let sit for 20 minutes. Room temperature New York cheesecake is a religious experience.

  • Crème Brûlée (And the Most Satisfying Crack You’ll Ever Hear)

    Crème Brûlée (And the Most Satisfying Crack You’ll Ever Hear)

    Crème brûlée sounds fancy. French name. Torches involved. But here’s the secret: it’s basically a really good vanilla pudding with a sugar hat. And you don’t need a blowtorch to make it. Your oven broiler does the job perfectly.

    Creamy custard. Real vanilla. That dramatic crack when your spoon breaks through. It’s impressive, romantic, and surprisingly hard to mess up. Let’s do this.

    Ingredients

    Serves 4.

    • 2 cups (480ml) heavy cream
    • 1 vanilla bean (or 2 teaspoons vanilla bean paste/extract)
    • 5 large egg yolks
    • ½ cup (100g) granulated sugar, plus more for topping
    • Pinch of salt
    • Boiling water (for the water bath)

    Step-by-Step Instructions

    Step 1: Infuse the Cream

    1. Preheat oven to 325°F (160°C).
    2. Heat cream in a saucepan until hot but not boiling. If using a vanilla bean, scrape the seeds into the cream and drop the pod in too. Let steep for 10 minutes.

    Step 2: Make the Custard

    1. Whisk egg yolks, sugar, and salt until pale and thick (about 2 minutes).
    2. Slowly pour warm cream into the yolk mixture while whisking constantly. Don’t scramble the eggs.
    3. Remove vanilla pod if using.

    Step 3: Bake in a Water Bath

    1. Place four ramekins in a baking dish. Divide custard between them.
    2. Pour boiling water into the baking dish until it reaches halfway up the ramekins.
    3. Bake for 30-35 minutes until edges are set but center still jiggles like Jell-O.

    Step 4: Chill and Caramelize

    1. Cool ramekins, then refrigerate for at least 4 hours (overnight is better).
    2. Sprinkle a thin, even layer of sugar over each custard.
    3. Melt sugar under a broiler or with a torch until amber and bubbly.
    4. Let the sugar harden for 2 minutes. Then crack away.

    Summary

    Prep Time: 15 minutes | Bake Time: 30-35 minutes | Chill Time: 4+ hours | Total Time: ~5 hours

    Yield: 4 servings

    Difficulty: Easy (patience required)

    Storage Notes

    Make the custard up to 3 days ahead—just keep it chilled without the sugar crust. Add the sugar and caramelize right before serving. Once bruleed, eat within 2 hours or the sugar gets soft. Do not freeze. The custard will weep and ruin the texture.

  • Cheese Ensaymada (The Fluffiest, Cheesiest Filipino Brioche You’ll Ever Meet)

    Cheese Ensaymada (The Fluffiest, Cheesiest Filipino Brioche You’ll Ever Meet)

    Ensaymada is what happens when brioche gets a Filipino makeover. Soft, fluffy, coiled into a beautiful spiral, then slathered with butter, showered with grated cheese, and dusted with sugar.

    It’s a labor of love, but that first pull-apart bite—warm, buttery, slightly sweet, salty from the cheese—will make every minute worth it. Perfect with coffee.

    Ingredients

    Makes 12 ensaymadas.

    For the Dough:

    • 4 cups (500g) bread flour
    • ½ cup (100g) sugar
    • 1 packet (2¼ tsp) instant yeast
    • 1 teaspoon salt
    • 4 large egg yolks
    • ¾ cup (180ml) warm milk
    • ½ cup (115g) unsalted butter, softened

    For the Topping:

    • ½ cup salted butter, softened (for spreading)
    • 1½ cups grated cheese (Edesa, sharp cheddar, or queso de bola)
    • ¼ cup sugar (for sprinkling)

    Step-by-Step Instructions

    Step 1: Make the Dough

    1. In a bowl, mix flour, sugar, yeast, and salt. Add egg yolks and warm milk. Mix until shaggy.
    2. Knead for 5 minutes. Add softened butter gradually. Knead 10-15 minutes until smooth and elastic. Let rise 1-2 hours until doubled.

    Step 2: Shape the Ensaymadas

    1. Punch down dough. Divide into 12 balls. Roll each into a long rope (about 15 inches).
    2. Flatten slightly. Spread with softened butter. Roll up into a coil. Place in greased muffin tins.

    Step 3: Second Rise

    1. Let rise 45-60 minutes until puffy.

    Step 4: Bake

    1. Preheat oven to 350°F (175°C). Bake for 15-18 minutes until golden brown.

    Step 5: Top and Serve

    1. While warm, brush generously with softened butter. Sprinkle with grated cheese and sugar. Serve immediately.

    Summary

    Prep Time: 30 minutes | Rise Time: 2-3 hours | Cook Time: 18 minutes

    Total Time: ~3 hours (mostly hands-off)

    Yield: 12 ensaymadas

    Difficulty: Medium (patience required)

    Storage Notes

    Room temp: Keeps 2 days in an airtight container.

    Fridge: Keeps 1 week. Reheat in oven at 300°F for 5 minutes (microwave = rubbery).

    Freezer (unbaked): Freeze shaped coils on a tray, then bag. Thaw overnight in fridge. Proof 1 hour, then bake.

    Freezer (baked, untopped): Freeze up to 2 months. Reheat at 350°F for 10 minutes, then add butter, cheese, and sugar.

  • Pumpkin Pie: Silky, Spiced, and Nobody Will Know It’s This Easy

    Pumpkin Pie: Silky, Spiced, and Nobody Will Know It’s This Easy

    Pumpkin pie gets a bad rap for being basic. But a good one? Silky, spiced, and perfect against a flaky crust—it’s a masterpiece. This recipe uses real pumpkin (canned is fine, we don’t judge) and a custard that sets like velvet. No water bath. No fancy techniques. Just a pie that disappears before the whipped cream runs out.

    Ingredients

    Makes one 9-inch pie (8 slices).

    For the Crust:

    • 1¼ cups all-purpose flour
    • ½ teaspoon salt
    • ½ cup (1 stick) cold unsalted butter, cubed
    • 3-4 tablespoons ice water

    For the Filling:

    • 1 can (15 oz) pumpkin purée (not pie filling)
    • 1 can (12 oz) evaporated milk
    • ¾ cup granulated sugar
    • 2 large eggs
    • 1 teaspoon cinnamon
    • ½ teaspoon ground ginger
    • ¼ teaspoon ground nutmeg
    • ¼ teaspoon ground cloves
    • ½ teaspoon salt

    Step-by-Step Instructions

    Step 1: Make the Crust

    1. Mix flour and salt. Cut in cold butter until pea-sized crumbs form.
    2. Add ice water, 1 tablespoon at a time, until dough comes together.
    3. Form into a disc, wrap, and chill for 30 minutes.
    4. Roll out and press into a 9-inch pie pan. Crimp edges.

    Step 2: Preheat and Par-Bake (Optional but Recommended)

    1. Preheat oven to 375°F (190°C).
    2. Line crust with parchment and fill with pie weights or dried beans.
    3. Bake for 10 minutes. Remove weights. Bake 5 more minutes.

    Step 3: Make the Filling

    1. In a bowl, whisk pumpkin, evaporated milk, sugar, eggs, spices, and salt until smooth.

    Step 4: Bake the Pie

    1. Pour filling into warm crust.
    2. Bake at 375°F for 50-60 minutes.
    3. Pie is done when edges are set but center still jiggles slightly like Jell-O.

    Step 5: Cool and Serve

    1. Cool completely on a wire rack (at least 2 hours).
    2. Serve with whipped cream. Cold or room temperature.

    Summary

    Prep Time: 20 minutes + 30 minutes chill | Cook Time: 1 hour 15 minutes | Cooling: 2 hours | Total Time: ~4 hours

    Yield: 8 slices

    Difficulty: Easy (patience for cooling)

    Storage Notes

    How to Store:

    Keep pumpkin pie in the fridge for up to 4 days. Cover loosely with foil or plastic wrap.

    Serving Temperature:

    Pumpkin pie is delicious cold, at room temperature, or gently warmed. For warm pie: microwave a slice for 15 seconds.

    Freezing:

    Freeze baked and cooled whole pie or slices for up to 2 months. Wrap tightly. Thaw overnight in the fridge.

    Pro Tips:

    Don’t use pumpkin pie filling—it’s pre-spiced and sweetened and will throw off the ratios. Par-baking the crust prevents a soggy bottom. And the center should still jiggle when you pull it from the oven; carryover heat finishes the job. Overbaked pumpkin pie = cracked, rubbery sadness.

  • Éclairs: Fancy French Pastry That’s Actually Easier Than You Think

    Éclairs: Fancy French Pastry That’s Actually Easier Than You Think

    Éclairs sound fancy. They look fancy. But here’s the secret: choux pastry is just flour, butter, eggs, and water—no yeast, no complicated folds. Pipe it, bake it until puffed and golden, then fill with silky vanilla pastry cream. Top with a crackly chocolate ganache. That’s it. Your friends will think you trained in Paris. Let them.

    Ingredients

    Makes 10-12 éclairs.

    For the Choux Pastry (Pâte à Choux):

    • ½ cup water
    • ½ cup whole milk
    • ½ cup (1 stick) unsalted butter, cubed
    • 1 tablespoon sugar
    • ¼ teaspoon salt
    • 1 cup all-purpose flour
    • 4 large eggs, at room temperature

    For the Pastry Cream (Crème Pâtissière):

    • 2 cups whole milk
    • ½ cup sugar
    • 4 egg yolks
    • ¼ cup cornstarch
    • 2 teaspoons vanilla extract
    • 2 tablespoons unsalted butter

    For the Chocolate Ganache:

    • ½ cup semi-sweet chocolate chips
    • ¼ cup heavy cream

    Step-by-Step Instructions

    Step 1: Make the Choux Pastry

    1. Preheat oven to 400°F (200°C). Line a baking sheet with parchment.
    2. In a saucepan, heat water, milk, butter, sugar, and salt until boiling.
    3. Reduce heat. Add flour all at once. Stir vigorously until dough forms a ball and pulls away from the sides.
    4. Transfer to a bowl. Let cool 5 minutes.
    5. Add eggs one at a time, mixing completely after each. Dough should be shiny and pipeable.

    Step 2: Pipe and Bake

    1. Pipe 4-inch logs onto the baking sheet.
    2. Bake for 20 minutes at 400°F, then reduce to 350°F (175°C) and bake 10-15 more minutes until deep golden.
    3. Poke a small hole in each to let steam escape. Cool completely.

    Step 3: Make the Pastry Cream

    1. Heat milk until steaming. Whisk sugar, yolks, and cornstarch in a bowl.
    2. Slowly pour hot milk into yolk mixture while whisking. Return to pan.
    3. Cook until thickened. Remove from heat. Stir in vanilla and butter. Chill completely.

    Step 4: Make the Ganache

    1. Heat cream until steaming. Pour over chocolate chips. Let sit 2 minutes. Stir until smooth.

    Step 5: Assemble

    1. Pipe pastry cream into éclairs through the poke holes or slice open.
    2. Dip tops in ganache. Let set for 15 minutes. Serve.

    Summary

    Prep Time: 45 minutes | Cook Time: 35 minutes | Cooling: 1 hour | Total Time: ~2.5 hours

    Yield: 10-12 éclairs

    Difficulty: Medium (choux technique matters)

    Storage Notes

    Best Eaten Fresh:

    Éclairs are happiest within 4-6 hours of filling. The pastry stays crisp; the cream stays silky.

    How to Store Components:

    Baked unfilled shells last 2 days in an airtight container at room temperature. Pastry cream keeps 3 days in the fridge. Fill just before serving.

    Freezing Shells:

    Freeze baked unfilled éclairs for up to 2 months. Re-crisp in a 350°F oven for 5 minutes before filling.

    Pro Tips:

    Don’t open the oven during baking—choux needs steady heat to puff. Poke steam holes immediately after baking to prevent sogginess. And use whole milk for pastry cream; skim won’t cut it.

  • Double Chocolate Muffins: Bakery Style, Deeply Chocolatey, Dangerously Easy

    Double Chocolate Muffins: Bakery Style, Deeply Chocolatey, Dangerously Easy

    Some muffins pretend to be healthy. These do not. Double chocolate muffins are dark, moist, and loaded with melting chocolate chunks. Bakery-style tall domes. Crackly tops. Deep cocoa flavor. No mixer needed, no fancy tricks—just a bowl, a whisk, and a serious chocolate craving. Breakfast? Dessert? Both. Eat warm with milk or coffee and feel zero guilt.

    Ingredients

    Makes 12 muffins.

    • 1¾ cups all-purpose flour
    • ¾ cup unsweetened cocoa powder
    • 1½ teaspoons baking powder
    • ½ teaspoon baking soda
    • ½ teaspoon salt
    • 2 large eggs
    • 1 cup granulated sugar
    • ½ cup brown sugar, packed
    • ½ cup vegetable oil
    • 1 cup buttermilk (or milk + 1 tablespoon vinegar)
    • 2 teaspoons vanilla extract
    • 1½ cups chocolate chips or chunks (semi-sweet or dark)

    Step-by-Step Instructions

    Step 1: Preheat and Prep

    1. Preheat oven to 425°F (220°C). Line a 12-cup muffin tin with liners.

    Step 2: Mix Dry Ingredients

    1. In a large bowl, whisk flour, cocoa powder, baking powder, baking soda, and salt.

    Step 3: Mix Wet Ingredients

    1. In another bowl, whisk eggs, both sugars, oil, buttermilk, and vanilla until smooth.

    Step 4: Combine and Fold

    1. Pour wet into dry. Mix until just combined—lumps are fine, don’t overmix.
    2. Fold in chocolate chips.

    Step 5: Bake Hot and Drop Temp

    1. Fill muffin liners all the way to the top (for tall domes).
    2. Bake at 425°F for 5 minutes, then reduce to 350°F (175°C) and bake 12-15 more minutes.
    3. Muffins are done when a toothpick comes out with a few moist crumbs.
    4. Cool in pan for 5 minutes, then transfer to a wire rack.

    Summary

    Prep Time: 15 minutes | Cook Time: 20 minutes | Total Time: 35 minutes

    Yield: 12 muffins

    Difficulty: Easy (don’t overmix)

    Storage Notes

    How to Store:

    Keep in an airtight container at room temperature for up to 4 days. Microwave for 10 seconds to bring back that fresh-baked warmth.

    Freezing:

    Freeze cooled muffins in a ziplock bag for up to 3 months. Thaw at room temperature or microwave for 20-30 seconds.

    Pro Tips:

    The high-then-low oven trick gives you those iconic bakery domes—don’t skip it. Use buttermilk for tenderness; if you don’t have any, add 1 tablespoon of white vinegar to regular milk and let sit for 5 minutes. And please, fill those liners to the top. Scant fillings make flat, sad muffins.

  • Homemade Chocolate Pop Tarts: Store-Bought Could Never

    Homemade Chocolate Pop Tarts: Store-Bought Could Never

    Remember pop tarts? The dry, crumbly, vaguely chocolate rectangles from a foil pouch? Yeah, these are nothing like that. Homemade chocolate pop tarts have a buttery, tender crust, a fudgy dark chocolate center, and a thick layer of chocolate icing on top. One bite and you’ll never go back to the boxed version. Plus, you get bragging rights. Let’s make pastry.

    Ingredients

    Makes 8 pop tarts.

    For the Crust:

    • 2 cups all-purpose flour
    • 1 tablespoon sugar
    • ½ teaspoon salt
    • 1 cup (2 sticks) cold unsalted butter, cubed
    • ¼ cup ice water (plus more as needed)

    For the Chocolate Filling:

    • ½ cup semi-sweet chocolate chips
    • 2 tablespoons heavy cream
    • 1 tablespoon unsalted butter

    For the Chocolate Icing:

    • 1 cup powdered sugar
    • 2 tablespoons cocoa powder
    • 2 tablespoons milk
    • Sprinkles (mandatory for authenticity)

    Step-by-Step Instructions

    Step 1: Make the Crust

    1. In a bowl, mix flour, sugar, and salt. Cut in cold butter until pea-sized crumbs form.
    2. Add ice water 1 tablespoon at a time until dough just comes together.
    3. Divide into two discs. Wrap and chill for 1 hour.

    Step 2: Make the Filling

    1. Microwave chocolate chips, cream, and butter in 15-second bursts until smooth. Let cool slightly.

    Step 3: Assemble the Pop Tarts

    1. Preheat oven to 375°F (190°C). Line a baking sheet with parchment.
    2. Roll out each dough disc into a 9×12 rectangle. Cut into eight 3×4 rectangles.
    3. Place 4 rectangles on the baking sheet. Spoon 1 tablespoon filling onto each, leaving a border.
    4. Top with remaining rectangles. Press edges with a fork to seal. Poke vent holes.

    Step 4: Bake

    1. Bake for 20-25 minutes until golden brown. Cool completely on a wire rack.

    Step 5: Ice and Sprinkle

    1. Whisk powdered sugar, cocoa powder, and milk until smooth.
    2. Spread icing over cooled pop tarts. Add sprinkles immediately.
    3. Let icing set for 15 minutes. Toast or eat at room temp.

    Summary

    Prep Time: 30 minutes + 1 hour chill | Cook Time: 25 minutes | Total Time: ~2 hours

    Yield: 8 pop tarts

    Difficulty: Medium (dough handling)

    Storage Notes

    How to Store:

    Keep in an airtight container at room temperature for up to 5 days. They actually stay pretty fresh.

    Freezing (Best Hack):

    Freeze unbaked assembled pop tarts on a tray, then transfer to a bag. Bake from frozen—add 5 minutes to bake time. Bake only what you want. This is the move.

    Toasting:

    Pop a baked pop tart in the toaster or toaster oven for 1-2 minutes to warm the filling. Yes, like the old days. But better.

    Pro Tip:

    Don’t overfill. Too much chocolate = blowouts in the oven. One tablespoon is plenty. Also, chill the assembled tarts for 15 minutes before baking—it prevents shrinkage and keeps the shape perfect.

  • Blueberry Cheesecake Muffins That Steal the Show

    Blueberry Cheesecake Muffins That Steal the Show

    Muffins are great. Muffins with a secret cheesecake core? Unforgettable.

    These Blueberry Cheesecake Muffins are soft, buttery, and packed with juicy blueberries. But the real magic is the creamy, tangy cheesecake filling hiding inside. Topped with crunchy streusel and a drizzle of glaze. One bowl. No mixer required. Let’s bake.

    Ingredients

    Makes 12 muffins.

    For the Streusel Topping:

    • ½ cup all-purpose flour
    • ¼ cup brown sugar
    • ¼ cup cold butter, cubed

    For the Cheesecake Filling:

    • 4 oz cream cheese, softened
    • 2 tablespoons sugar
    • 1 teaspoon vanilla extract

    For the Muffin Batter:

    • 1 ½ cups all-purpose flour
    • ½ cup sugar
    • 2 teaspoons baking powder
    • ½ teaspoon salt
    • 1 large egg
    • ½ cup milk
    • ⅓ cup vegetable oil
    • 1 teaspoon vanilla
    • 1 cup fresh or frozen blueberries

    Step-by-Step Instructions

    Step 1: Prep & Preheat

    1. Preheat oven to 375°F (190°C). Line a 12-cup muffin tin with paper liners.

    Step 2: Make the Streusel

    1. Mix flour and brown sugar. Cut in cold butter with a fork until crumbly. Set aside.

    Step 3: Make Cheesecake Filling

    1. Beat cream cheese, sugar, and vanilla until smooth. Set aside.

    Step 4: Make Muffin Batter

    1. Whisk flour, sugar, baking powder, and salt in a large bowl.
    2. In another bowl, whisk egg, milk, oil, and vanilla.
    3. Combine wet and dry ingredients until just mixed. Fold in blueberries gently.

    Step 5: Assemble the Muffins

    1. Fill each liner halfway with batter.
    2. Add a small scoop of cheesecake filling (about 1 teaspoon) in the center.
    3. Top with remaining batter until liners are ¾ full.
    4. Sprinkle streusel generously over each muffin.

    Step 6: Bake & Cool

    1. Bake for 18–20 minutes, until a toothpick comes out clean (except for the gooey center).
    2. Cool in the pan for 5 minutes, then transfer to a wire rack.

    Summary

    Prep Time: 15 minutes | Bake Time: 20 minutes | Total Time: 35 minutes

    Yield: 12 muffins | Difficulty: Easy

    Storage Notes

    Store in an airtight container at room temperature for up to 3 days. Refrigerate for up to 6 days (bring to room temp before eating). Freeze without glaze for up to 3 months.

  • Jalapeño Poppers (Spicy, Creamy, Bacon-Wrapped Bliss)

    Jalapeño Poppers (Spicy, Creamy, Bacon-Wrapped Bliss)

    Jalapeño poppers are the appetizer that fights back. A little spicy, a little sweet, a lot addicting.

    Fresh jalapeños stuffed with creamy, cheesy filling, then wrapped in bacon and baked until crispy. No deep frying. No mess. Just pure, poppable perfection.

    Ingredients

    Makes 16 poppers.

    • 8 fresh jalapeños
    • 4 oz (115g) cream cheese, softened
    • ½ cup shredded cheddar cheese
    • 2 green onions, finely chopped
    • ¼ tsp garlic powder
    • 8 slices bacon, cut in half

    Step-by-Step Instructions

    Step 1: Preheat and Prep

    1. Preheat oven to 400°F (200°C). Line a baking sheet with foil or parchment.

    Step 2: Prepare Jalapeños

    1. Cut jalapeños in half lengthwise. Remove seeds and membranes (wear gloves!).

    Step 3: Make Filling

    1. Mix cream cheese, cheddar, green onions, and garlic powder until smooth.

    Step 4: Stuff

    1. Fill each jalapeño half with cheese mixture.

    Step 5: Wrap with Bacon

    1. Wrap a half-slice of bacon around each stuffed jalapeño.
    2. Place seam-side down on baking sheet.

    Step 6: Bake

    1. Bake 15-20 minutes until bacon is crispy and filling is bubbly.
    2. Optional: Broil 1-2 minutes for extra crisp.

    Step 7: Serve

    1. Cool 5 minutes. Serve warm with ranch or blue cheese dressing.

    Summary

    Prep Time: 15 minutes | Cook Time: 20 minutes | Total Time: 35 minutes

    Yield: 16 poppers

    Difficulty: Easy

    Storage Notes

    Refrigerate Leftovers:

    Store in an airtight container for up to 3 days. Reheat in oven at 375°F for 5-7 minutes (not microwave—soggy bacon).

    Prep Ahead:

    Assemble poppers up to 1 day ahead. Cover and refrigerate. Bake when ready.

    Freeze Unbaked:

    Freeze on a tray, then transfer to a bag. Bake from frozen at 400°F for 20-25 minutes.

    Heat Warning:

    Wear gloves when handling jalapeños. Don’t touch your eyes. Seriously.

    Milder Version:

    Remove all seeds and membranes, or use mini sweet peppers instead.