Category: baking

  • Lemon Pepper Wings (Tangy, Buttery, and Crackly-Crisp)

    Lemon Pepper Wings (Tangy, Buttery, and Crackly-Crisp)

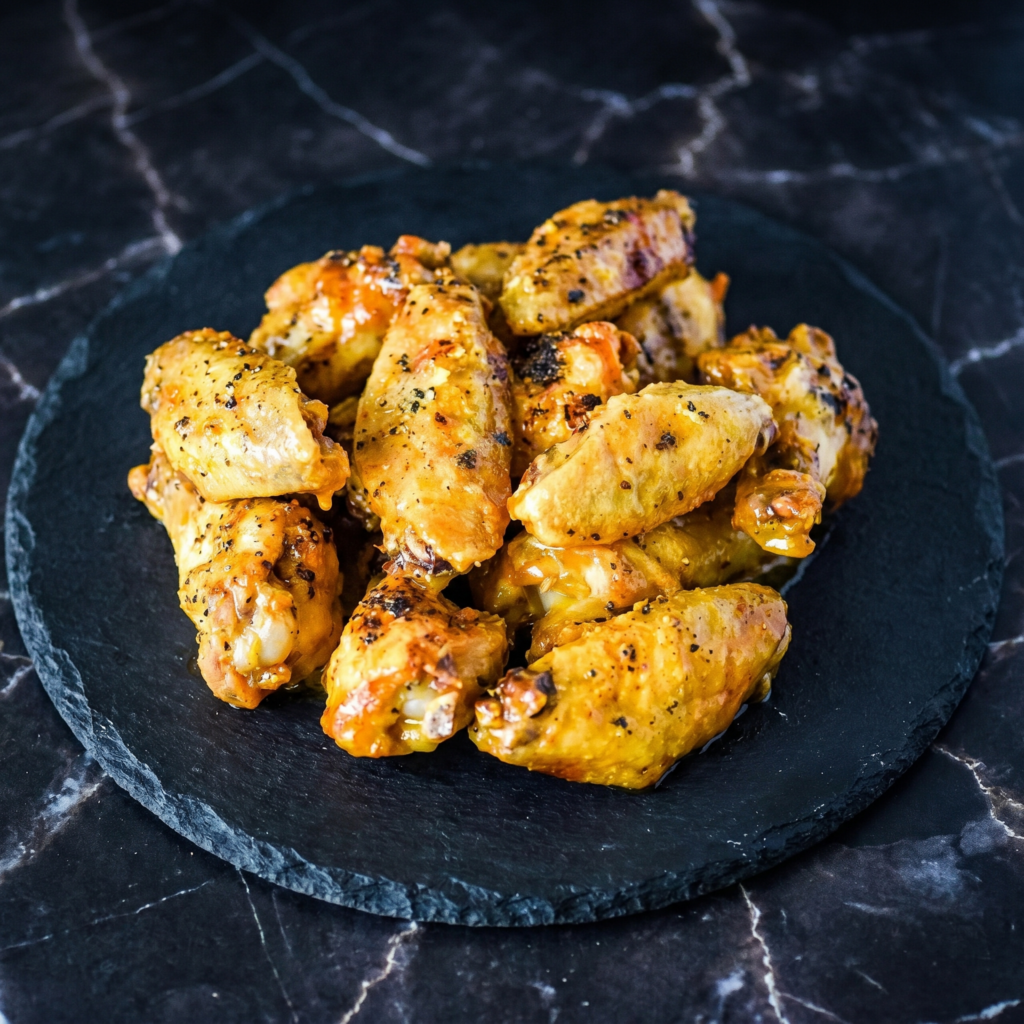
    Some wings shout. These wings whisper lemon zest and black pepper in your ear.

    Lemon pepper wings are a cult classic for a reason. Bright, buttery, peppery, and impossible to stop eating. This baked version skips the deep fryer but keeps the crackly-crisp skin. Tossed in a warm lemon butter glaze and finished with extra lemon zest. Atlanta would approve.

    Ingredients

    Serves 4 (about 20-24 wings).

    • 2 lbs (900g) chicken wings (drumettes and flats)
    • 1 tablespoon baking powder (NOT baking soda)
    • 1 teaspoon salt
    • 1 teaspoon lemon pepper seasoning (plus more for finishing)

    For the Lemon Butter Glaze:

    • 4 tablespoons butter, melted
    • Juice of 1 lemon (about 2 tablespoons)
    • 1 teaspoon lemon zest
    • 1 teaspoon lemon pepper seasoning
    • 1 clove garlic, minced (optional)

    Garnish:

    • Fresh parsley or extra lemon zest

    Step-by-Step Instructions

    Step 1: Prep the Wings

    1. Preheat oven to 425°F (220°C). Line a baking sheet with foil. Place a wire rack on top.
    2. Pat wings bone-dry with paper towels. This is non-negotiable for crispiness.
    3. Toss wings with baking powder, salt, and 1 teaspoon lemon pepper seasoning.

    Step 2: Bake Until Crackly

    1. Arrange wings on the wire rack in a single layer.
    2. Bake for 40-45 minutes, flipping halfway, until deep golden brown and crispy.

    Step 3: Make the Lemon Butter

    1. While wings bake, melt butter in a small bowl.
    2. Stir in lemon juice, lemon zest, lemon pepper, and garlic (if using).

    Step 4: Toss and Finish

    1. Place hot wings in a large bowl. Pour lemon butter over them.
    2. Toss until fully coated.
    3. Sprinkle with extra lemon pepper and fresh parsley or zest.
    4. Serve immediately with ranch, blue cheese, or alone (they’re that good).

    Summary

    Prep Time: 10 minutes | Cook Time: 45 minutes | Total Time: 55 minutes

    Yield: 20-24 wings

    Difficulty: Easy

    Storage Notes

    • Fridge: Leftovers keep for 3 days in an airtight container.
    • Reheat: Air fryer at 375°F for 5 minutes or oven at 400°F for 8 minutes.
    • Don’t microwave: You’ll lose the crispiness and gain sadness.
    • Make ahead: Bake wings plain. Reheat, then toss with fresh lemon butter.
  • Garlic Parmesan Wings (No Sauce, All Attitude)

    Garlic Parmesan Wings (No Sauce, All Attitude)

    Not everyone wants their wings dripping in sauce. Some of us want crunch. Some of us want garlic. Some of us want cheese.

    These Garlic Parmesan wings are for that crowd. Baked until shatteringly crisp, then tossed in melted butter, minced garlic, and a blizzard of Parmesan. No fryer. No mess. Just 30 minutes between you and the best dry-style wings of your life.

    Ingredients

    Serves 4 (about 20-24 wings).

    • 2 lbs (900g) chicken wings (drumettes and flats)
    • 1 tablespoon baking powder (NOT baking soda)
    • 1 teaspoon salt
    • ½ teaspoon black pepper
    • ½ teaspoon garlic powder

    For the Garlic Parmesan Coating:

    • 4 tablespoons butter, melted
    • 4 cloves garlic, minced
    • ½ cup finely grated Parmesan cheese
    • 2 tablespoons fresh parsley, chopped (optional)

    Step-by-Step Instructions

    Step 1: Prep the Wings

    1. Preheat oven to 425°F (220°C). Line a baking sheet with foil. Place a wire rack on top.
    2. Pat wings completely dry with paper towels.
    3. Toss wings with baking powder, salt, pepper, and garlic powder.

    Step 2: Bake Until Crispy

    1. Arrange wings on the wire rack in a single layer.
    2. Bake for 40-45 minutes, flipping halfway, until golden brown and crispy.

    Step 3: Make the Garlic Butter

    1. While wings bake, melt butter in a small pan.
    2. Add minced garlic and cook for 1 minute until fragrant. Don’t burn it.

    Step 4: Toss and Serve

    1. Place hot wings in a large bowl.
    2. Pour garlic butter over wings. Toss well.
    3. Sprinkle with Parmesan and parsley. Toss again.
    4. Serve immediately with ranch or blue cheese.

    Summary

    Prep Time: 10 minutes | Cook Time: 45 minutes | Total Time: 55 minutes

    Yield: 20-24 wings

    Difficulty: Easy

    Storage Notes

    • Fridge: Leftovers keep for 3 days. Reheat to restore crunch.
    • Reheat: Air fryer at 375°F for 5 minutes or oven at 400°F for 8 minutes.
    • Don’t microwave: They’ll turn into rubber.
    • Make ahead: Bake wings plain. Re-crisp, then toss with garlic butter and Parmesan.
  • Baked Parmesan Crusted Cod (So Flaky, So Cheesy, So 20 Minutes)

    Baked Parmesan Crusted Cod (So Flaky, So Cheesy, So 20 Minutes)

    Most people don’t cook fish at home because they’re scared. Scared of overcooking, scared of stinking up the kitchen, scared of it being boring.

    This baked Parmesan crusted cod laughs in the face of fear. It’s foolproof, fast, and legitimately delicious. A crunchy, cheesy, herby topping. A tender, flaky interior. Lemon on the side. Dinner in 20 minutes. You’re welcome.

    Ingredients

    Serves 4.

    • 4 cod fillets (about 5-6 oz / 150g each)
    • ½ cup grated Parmesan cheese
    • ¼ cup panko breadcrumbs
    • 2 tablespoons melted butter
    • 2 cloves garlic, minced
    • 1 teaspoon dried parsley
    • ½ teaspoon paprika
    • Salt and pepper to taste
    • Lemon wedges for serving

    Step-by-Step Instructions

    Step 1: Preheat and Prep

    1. Preheat oven to 400°F (200°C).
    2. Line a baking sheet with parchment paper or foil.
    3. Pat cod fillets completely dry with paper towels.

    Step 2: Make the Topping

    1. In a small bowl, mix Parmesan, panko, melted butter, garlic, parsley, paprika, salt, and pepper.

    Step 3: Top and Bake

    1. Place cod on the prepared baking sheet.
    2. Press the Parmesan mixture evenly onto each fillet.
    3. Bake for 10-12 minutes, until fish flakes easily with a fork and topping is golden.

    Step 4: Serve

    1. Squeeze fresh lemon over the top.
    2. Serve with roasted veggies, rice, or a simple salad.

    Summary

    Prep Time: 5 minutes | Cook Time: 12 minutes | Total Time: 17 minutes

    Yield: 4 servings

    Difficulty: Extremely Easy

    Storage Notes

    • Fridge: Leftovers keep for 2 days. Topping won’t stay crispy.
    • Reheat: Air fryer or oven at 350°F for 5 minutes. Skip the microwave.
    • Pro tip: This dish is best fresh. Only make what you’ll eat.
  • Stuffed Portobello Mushrooms (Meaty, Juicy, Meat-Free Winner)

    Stuffed Portobello Mushrooms (Meaty, Juicy, Meat-Free Winner)

    Portobellos are nature’s edible bowls.

    These are stuffed with spinach, cream cheese, Parmesan, and breadcrumbs. Bake until tender and golden. They’re hearty, flavorful, and nobody misses the meat. Plus: 10 minutes of prep.

    Ingredients

    Serves 4 as main, 8 as appetizer.

    • 4 large portobello mushrooms, stems removed
    • 2 tablespoons olive oil
    • ½ cup ricotta cheese
    • ¼ cup cream cheese, softened
    • ¼ cup grated Parmesan
    • ½ cup shredded mozzarella
    • 2 cups fresh spinach, chopped
    • 2 cloves garlic, minced
    • ¼ cup breadcrumbs (panko preferred)
    • Salt and black pepper to taste

    Step-by-Step Instructions

    Step 1: Prep Mushrooms

    1. Preheat oven to 375°F (190°C). Line a baking sheet with parchment.
    2. Wipe mushroom caps clean. Remove stems and scrape out gills with a spoon.
    3. Brush caps inside and out with olive oil. Season with salt and pepper.

    Step 2: Make Filling

    1. In a bowl, mix ricotta, cream cheese, Parmesan, mozzarella, spinach, and garlic.
    2. Season with salt and pepper.

    Step 3: Stuff

    1. Divide filling among mushroom caps. Press down gently.
    2. Sprinkle breadcrumbs on top.

    Step 4: Bake

    1. Bake 15-20 minutes until mushrooms are tender and tops are golden and bubbly.

    Step 5: Serve

    1. Let cool 5 minutes. Serve warm with a side salad or crusty bread.

    Summary

    Prep Time: 10 minutes | Cook Time: 20 minutes | Total Time: 30 minutes

    Yield: 4 servings

    Difficulty: Easy

    Storage Notes

    Refrigerate:

    Store cooked mushrooms in an airtight container for up to 3 days. Reheat at 350°F for 8-10 minutes. Not microwave-friendly (soggy mushrooms).

    Prep Ahead:

    Stuff mushrooms up to 1 day ahead. Cover and refrigerate. Add 5 minutes to bake time.

    Freeze Unbaked:

    Freeze on a tray, then transfer to a bag. Bake from frozen at 375°F for 25-30 minutes.

    Customize It:

    Add cooked sausage (for meat lovers), sun-dried tomatoes, or chopped artichoke hearts.

  • Potato Pavé (The Fancy Potato That’s Totally Worth It)

    Potato Pavé (The Fancy Potato That’s Totally Worth It)

    This potato sounds French. It is. But don’t run.

    Potato pavé is thinly sliced potatoes layered with cream and herbs, pressed overnight, then cut into bricks and fried until crispy. Crunchy outside. Velvety inside. Yes, it takes time. Yes, it’s worth it.

    Ingredients

    Serves 6-8 as side.

    • 3 lbs (1.4kg) russet or Yukon Gold potatoes
    • 1 cup heavy cream
    • 4 cloves garlic, minced
    • 2 tbsp fresh thyme (or rosemary)
    • 1 tsp salt
    • ½ tsp black pepper
    • 2 tbsp butter (for pressing pan)
    • Vegetable oil for frying

    Step-by-Step Instructions

    Step 1: Prep

    1. Preheat oven to 350°F (175°C). Line a loaf pan with parchment paper (overhang on sides).
    2. Peel potatoes. Slice paper-thin (use a mandoline, 1/16 inch).

    Step 2: Make Cream Mixture

    1. Mix cream, garlic, thyme, salt, and pepper in a bowl.

    Step 3: Layer

    1. Layer potatoes in the loaf pan, brushing/drizzling cream mixture every few layers.
    2. Press down firmly after every few layers. Fill to the top.

    Step 4: Bake and Press

    1. Cover with parchment. Weigh down with another loaf pan or foil-wrapped bricks.
    2. Bake for 1.5-2 hours until potatoes are tender and edges are brown.
    3. Cool completely. Refrigerate overnight (still weighted).

    Step 5: Slice and Fry

    1. Remove potato block from pan. Slice into 1-inch thick rectangles.
    2. Heat ¼ inch oil in a skillet over medium-high heat.
    3. Fry each brick until golden and crispy on both sides (2-3 minutes per side).

    Step 6: Serve

    1. Drain on paper towels. Sprinkle with salt. Serve immediately.

    Summary

    Prep Time: 30 minutes | Bake Time: 2 hours | Chill Time: Overnight | Fry Time: 10 minutes | Total Time: ~13 hours (mostly hands-off)

    Yield: 6-8 servings

    Difficulty: Medium (needs planning)

    Storage Notes

    Make Ahead Hero:

    Baked and pressed potato pavé keeps in the fridge for 4 days before frying. Fry when ready to serve.

    Freeze Sliced:

    Freeze unbaked slices on a tray. Bake from frozen at 350°F for 25 minutes.

    Reheat Leftover Fried Pavé:

    Oven at 375°F for 5-7 minutes (not microwave—soggy).

    Pro Tip:

    Don’t skip the overnight press. That weight is what gives pavé its dense, layered structure.

  • Beef Enchiladas (Roll, Smother, Bake, Devour)

    Beef Enchiladas (Roll, Smother, Bake, Devour)

    Enchiladas are the perfect math: beef + cheese + sauce + tortillas = happiness.

    These beef enchilatas come together fast, bake until bubbly, and taste like a hug from the inside out.

    Ingredients

    Serves 4–6. Makes 8 enchiladas.

    • 8 corn or flour tortillas (soft taco size)
    • 1 lb (450g) ground beef
    • 1 small onion, diced
    • 2 cloves garlic, minced
    • 2 cups (200g) shredded cheese (cheddar, Monterey Jack, or Mexican blend)
    • 1 can (10 oz / 300g) red enchilada sauce
    • 1 tablespoon oil
    • Salt, pepper, cumin, chili powder to taste

    Optional Toppings:

    • Sour cream, cilantro, diced onion, jalapeños, hot sauce

    Step-by-Step Instructions

    Step 1: Cook Filling

    1. Heat oil in a skillet over medium heat. Cook onion until soft, 3 minutes.
    2. Add ground beef and garlic. Cook until browned. Drain fat.
    3. Season with salt, pepper, cumin, and chili powder. Stir in ¼ cup enchilada sauce. Remove from heat.

    Step 2: Prep

    1. Preheat oven to 375°F (190°C).
    2. Spread ½ cup enchilada sauce on the bottom of a 9×13 baking dish.

    Step 3: Roll

    1. Warm tortillas to make them pliable (microwave 30 seconds wrapped in a damp towel).
    2. Place beef mixture and a handful of cheese down the center of each tortilla.
    3. Roll tightly and place seam-side down in the dish.

    Step 4: Smother & Bake

    1. Pour remaining enchilada sauce over the rolled tortillas.
    2. Sprinkle remaining cheese on top.
    3. Bake for 15–20 minutes until bubbly and cheese is golden.

    Step 5: Serve

    1. Let cool 5 minutes. Top with sour cream, cilantro, or whatever you love.

    Summary

    Prep Time: 15 minutes | Cook Time: 20 minutes | Total Time: 35 minutes

    Yield: 8 enchiladas (4–6 servings)

    Difficulty: Easy

    Storage Notes

    • Fridge: Store in an airtight container for up to 4 days. Reheat in oven or microwave.
    • Freezer: Freeze unbaked or baked for up to 2 months. Bake from frozen at 375°F for 30–35 minutes.

    Pro tip: Warm your tortillas before rolling — cold tortillas crack and break.

  • Pesto Pinwheels (The Easiest Party Trick You’ll Ever Learn)

    Pesto Pinwheels (The Easiest Party Trick You’ll Ever Learn)

    Need a last-minute appetizer that looks fancy? These.

    Puff pastry + pesto + cheese = golden, flaky spirals of joy. Five ingredients. One baking sheet. Everyone thinks you tried hard. You didn’t. That’s the beauty.

    Ingredients

    Makes 16 pinwheels.

    • 1 sheet puff pastry, thawed
    • ¼ cup pesto (store-bought or homemade)
    • ½ cup shredded mozzarella or Parmesan
    • 1 egg, beaten (for egg wash)
    • 2 tablespoons sun-dried tomatoes or pine nuts (optional)

    Step-by-Step Instructions

    Step 1: Preheat and Prep

    1. Preheat oven to 400°F (200°C). Line a baking sheet with parchment.

    Step 2: Roll and Spread

    1. Lightly flour a surface. Roll puff pastry into a 10×12-inch rectangle.
    2. Spread pesto evenly over pastry, leaving a ½-inch border.

    Step 3: Add Cheese

    1. Sprinkle mozzarella over pesto. Add sun-dried tomatoes or pine nuts if using.

    Step 4: Roll Tight

    1. Starting from a long edge, roll pastry into a tight log.
    2. Brush the edge with egg wash to seal. Chill log for 10 minutes (easier slicing).

    Step 5: Slice and Bake

    1. Slice log into ½-inch rounds. Place cut-side up on baking sheet.
    2. Brush tops with egg wash. Bake 12-15 minutes until golden and puffed.

    Step 6: Serve

    1. Cool 5 minutes. Serve warm or at room temperature.

    Summary

    Prep Time: 10 minutes | Chill Time: 10 minutes | Cook Time: 15 minutes | Total Time: 35 minutes

    Yield: 16 pinwheels

    Difficulty: Easy

    Storage Notes

    Store Baked:

    Keep in an airtight container for up to 2 days. Reheat at 350°F for 5 minutes to restore crispiness.

    Freeze Unbaked:

    Freeze sliced pinwheels on a tray, then transfer to a bag. Bake from frozen at 400°F for 15-18 minutes.

    Make Ahead:

    Roll the log up to 1 day ahead. Wrap tightly in plastic and refrigerate. Slice and bake when ready.

    Flavor Swaps:

    Try sun-dried tomato pesto, tapenade, or spicy red pepper spread instead of pesto.

  • Egg-Stuffed Bell Peppers (The Cutest Low-Carb Breakfast You’ll Ever Eat)

    Egg-Stuffed Bell Peppers (The Cutest Low-Carb Breakfast You’ll Ever Eat)

    Muffin tins are boring. Bell peppers are not.

    Slice them into rings. Crack an egg inside. Bake. What comes out is a colorful, cheese-topped, protein-packed breakfast that looks like you tried way harder than you did. Plus, you can hold it like a tiny breakfast donut.

    Ingredients

    Serves 2–4.

    • 2 large bell peppers (any color)
    • 4 large eggs
    • ¼ cup shredded cheddar, feta, or Mexican blend cheese
    • Salt and black pepper to taste
    • ¼ teaspoon garlic powder or smoked paprika (optional)
    • Fresh parsley or chives, for garnish
    • Hot sauce or salsa, for serving

    Step-by-Step Instructions

    Step 1: Preheat and Slice

    1. Preheat oven to 375°F (190°C). Line a baking sheet with parchment paper.
    2. Slice bell peppers into ½-inch thick rings. Remove seeds and membranes.
    3. You’ll get about 2–3 rings per pepper. Save the tops and bottoms for another use.

    Step 2: Arrange

    1. Place pepper rings on the baking sheet in a single layer.
    2. Lightly spray or brush inside of each ring with oil to prevent sticking.

    Step 3: Add the Eggs

    1. Crack one egg into each pepper ring. Try not to break the yolk.
    2. If egg white spills under the pepper, that’s fine—crispy edges are delicious.

    Step 4: Season and Bake

    1. Sprinkle with salt, pepper, and garlic powder or paprika.
    2. Top each with shredded cheese.
    3. Bake for 12–15 minutes until egg whites are set and yolks are to your liking.

    Step 5: Serve

    1. Let cool 2 minutes. Garnish with fresh herbs.
    2. Serve with hot sauce, salsa, or just eat them with your hands like the breakfast genius you are.

    Summary

    Prep Time: 5 minutes | Cook Time: 12–15 minutes | Total Time: 17–20 minutes

    Yield: 4 egg-stuffed rings | Difficulty: Easy

    Storage Notes

    Fridge: Store in an airtight container for up to 3 days. Reheat in air fryer at 350°F for 3 minutes or toaster oven.

    Microwave warning: It works, but the pepper gets soft. Acceptable for work lunches, not for brunch flexing.

    Meal prep: Slice pepper rings ahead and store in the fridge. Crack eggs fresh the morning of.

    Pro tip: Buy peppers with flat bottoms so the rings stand stable. Crooked peppers = spilled eggs.

  • Baked Egg Avocado Boats: The 15-Minute Breakfast That Went Viral

    Baked Egg Avocado Boats: The 15-Minute Breakfast That Went Viral

    Six ingredients. One sheet pan. Zero regrets.

    Halved avocados get cradled with an egg, sprinkled with cheese, and baked until the whites are set and the yolks are runny. It’s breakfast, lunch, or a snack that looks impressive but takes zero skill.

    Ingredients

    Serves 2.

    • 2 ripe but firm avocados
    • 4 small eggs (or 2 large if your avocados are huge)
    • ¼ cup shredded cheddar, parmesan, or feta
    • Salt and black pepper
    • Red pepper flakes or paprika (optional)
    • Fresh chives or parsley, for garnish

    Step-by-Step Instructions

    Step 1: Preheat & Prep

    1. Heat oven to 425°F (220°C). Line a baking sheet with parchment paper.
    2. Cut avocados in half and remove pits. Scoop out a little extra flesh to make room for the egg (about 1 tablespoon per half).

    Step 2: Crack the Eggs

    1. Place avocado halves cut-side up on the baking sheet. Crack one egg into each well. Some white may spill over – that’s fine.
    2. Season with salt and pepper.

    Step 3: Bake

    1. Bake for 12–15 minutes. For runny yolks, pull at 12 minutes. For firm yolks, go longer.
    2. In the last 2 minutes, sprinkle cheese on top.

    Step 4: Finish & Devour

    1. Garnish with red pepper flakes and fresh chives. Eat immediately with a spoon or fork.

    Summary

    Prep Time: 5 minutes | Cook Time: 12–15 minutes | Total Time: 15–20 minutes

    Yield: 2 servings (4 boats) | Difficulty: Foolproof

    Storage Notes

    Don’t store these. Avocados turn brown, eggs get rubbery. Make fresh and eat immediately.

    But you can prep: scoop avocado wells ahead and refrigerate. Crack eggs right before baking. That’s it.

  • Baked Eggs in Ham Cups: Breakfast in Crispy Pork Bowls

    Baked Eggs in Ham Cups: Breakfast in Crispy Pork Bowls

    Muffin tins aren’t just for muffins anymore.

    Press sliced ham into each cup. Crack in an egg. Bake. That’s it. The ham gets crispy like bacon. The egg cooks perfectly. You get a handheld breakfast cup that requires zero forks and makes you feel like a genius.

    Ingredients

    Serves 4 (makes 4 cups).

    • 4 slices deli ham (black forest or honey ham work great—not too thick)
    • 4 large eggs
    • Salt and black pepper
    • Optional toppings: shredded cheddar, chives, hot sauce, or paprika
    • Nonstick spray or butter for muffin tin

    Step-by-Step Instructions

    Step 1: Preheat and Prep

    1. Preheat oven to 375°F (190°C). Generously grease a standard 12-cup muffin tin (you’ll use 4 cups).

    Step 2: Make the Ham Cups

    1. Press one slice of ham into each greased muffin cup, gently molding it to form a cup shape. The edges will ruffle—that’s the crispy part.

    Step 3: Add the Egg

    1. Crack one egg into each ham cup. Season with salt and pepper. Add cheese or other toppings now if using.

    Step 4: Bake

    1. Bake for 12–15 minutes. For runny yolk: 12 minutes. For set yolk: 15–17 minutes. The ham edges should be dark and crispy.

    Step 5: Remove and Serve

    1. Run a knife around each cup to loosen. Lift out with a fork. Sprinkle with chives or hot sauce. Eat immediately.

    Summary

    Prep Time: 5 minutes | Cook Time: 12–15 minutes | Total Time: 20 minutes

    Yield: 4 servings (1 egg cup each)

    Difficulty: Easy (almost embarrassingly easy)

    Storage Notes

    Best Fresh, But Okay Leftover

    Ham cups are best straight from the oven when the ham is crispy. Leftovers? Store in the fridge for 2 days. Reheat in a toaster oven or air fryer at 350°F for 3–4 minutes. Microwave makes the ham sad and floppy.

    Meal Prep Move

    Bake a batch on Sunday. Reheat all week. Great for busy mornings.