Category: quick_meals

  • Chocolate Knots: Twisted, Gooey, Dangerously Good

    Chocolate Knots: Twisted, Gooey, Dangerously Good

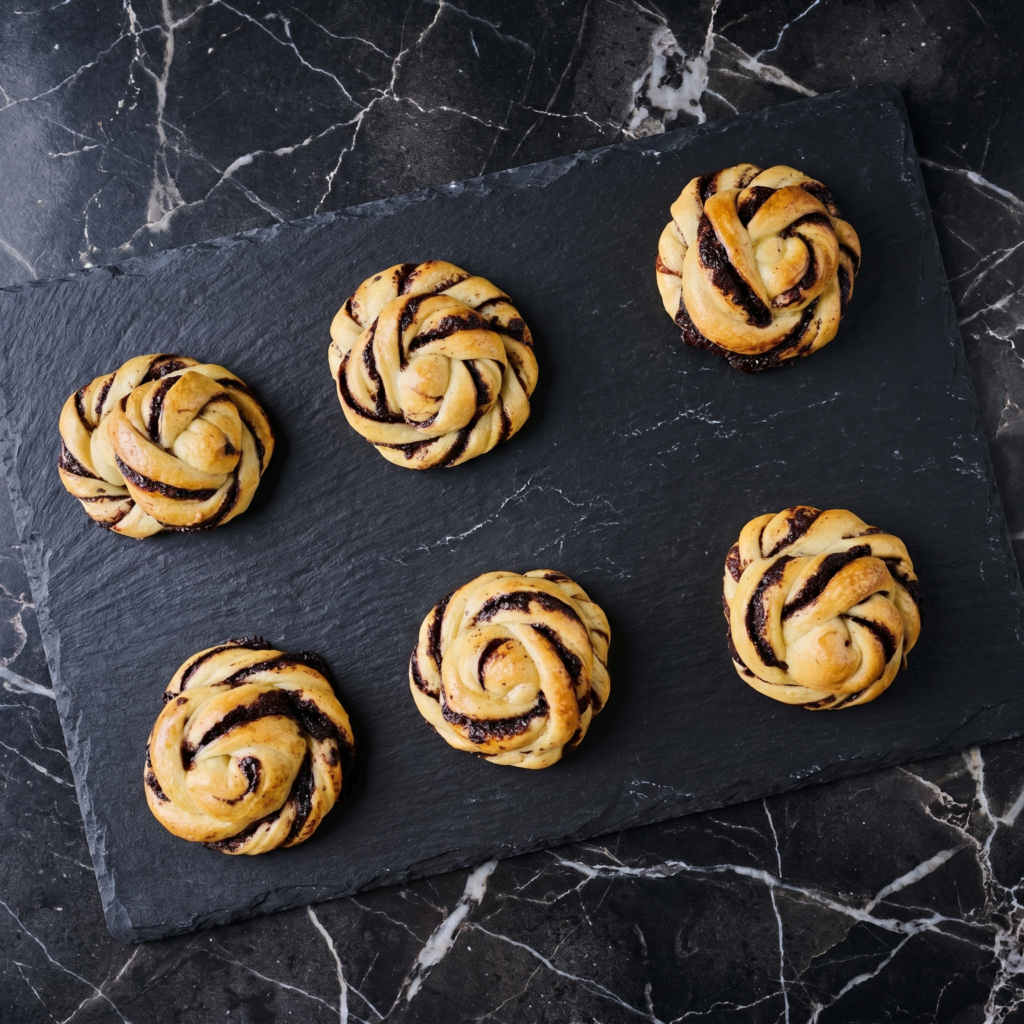
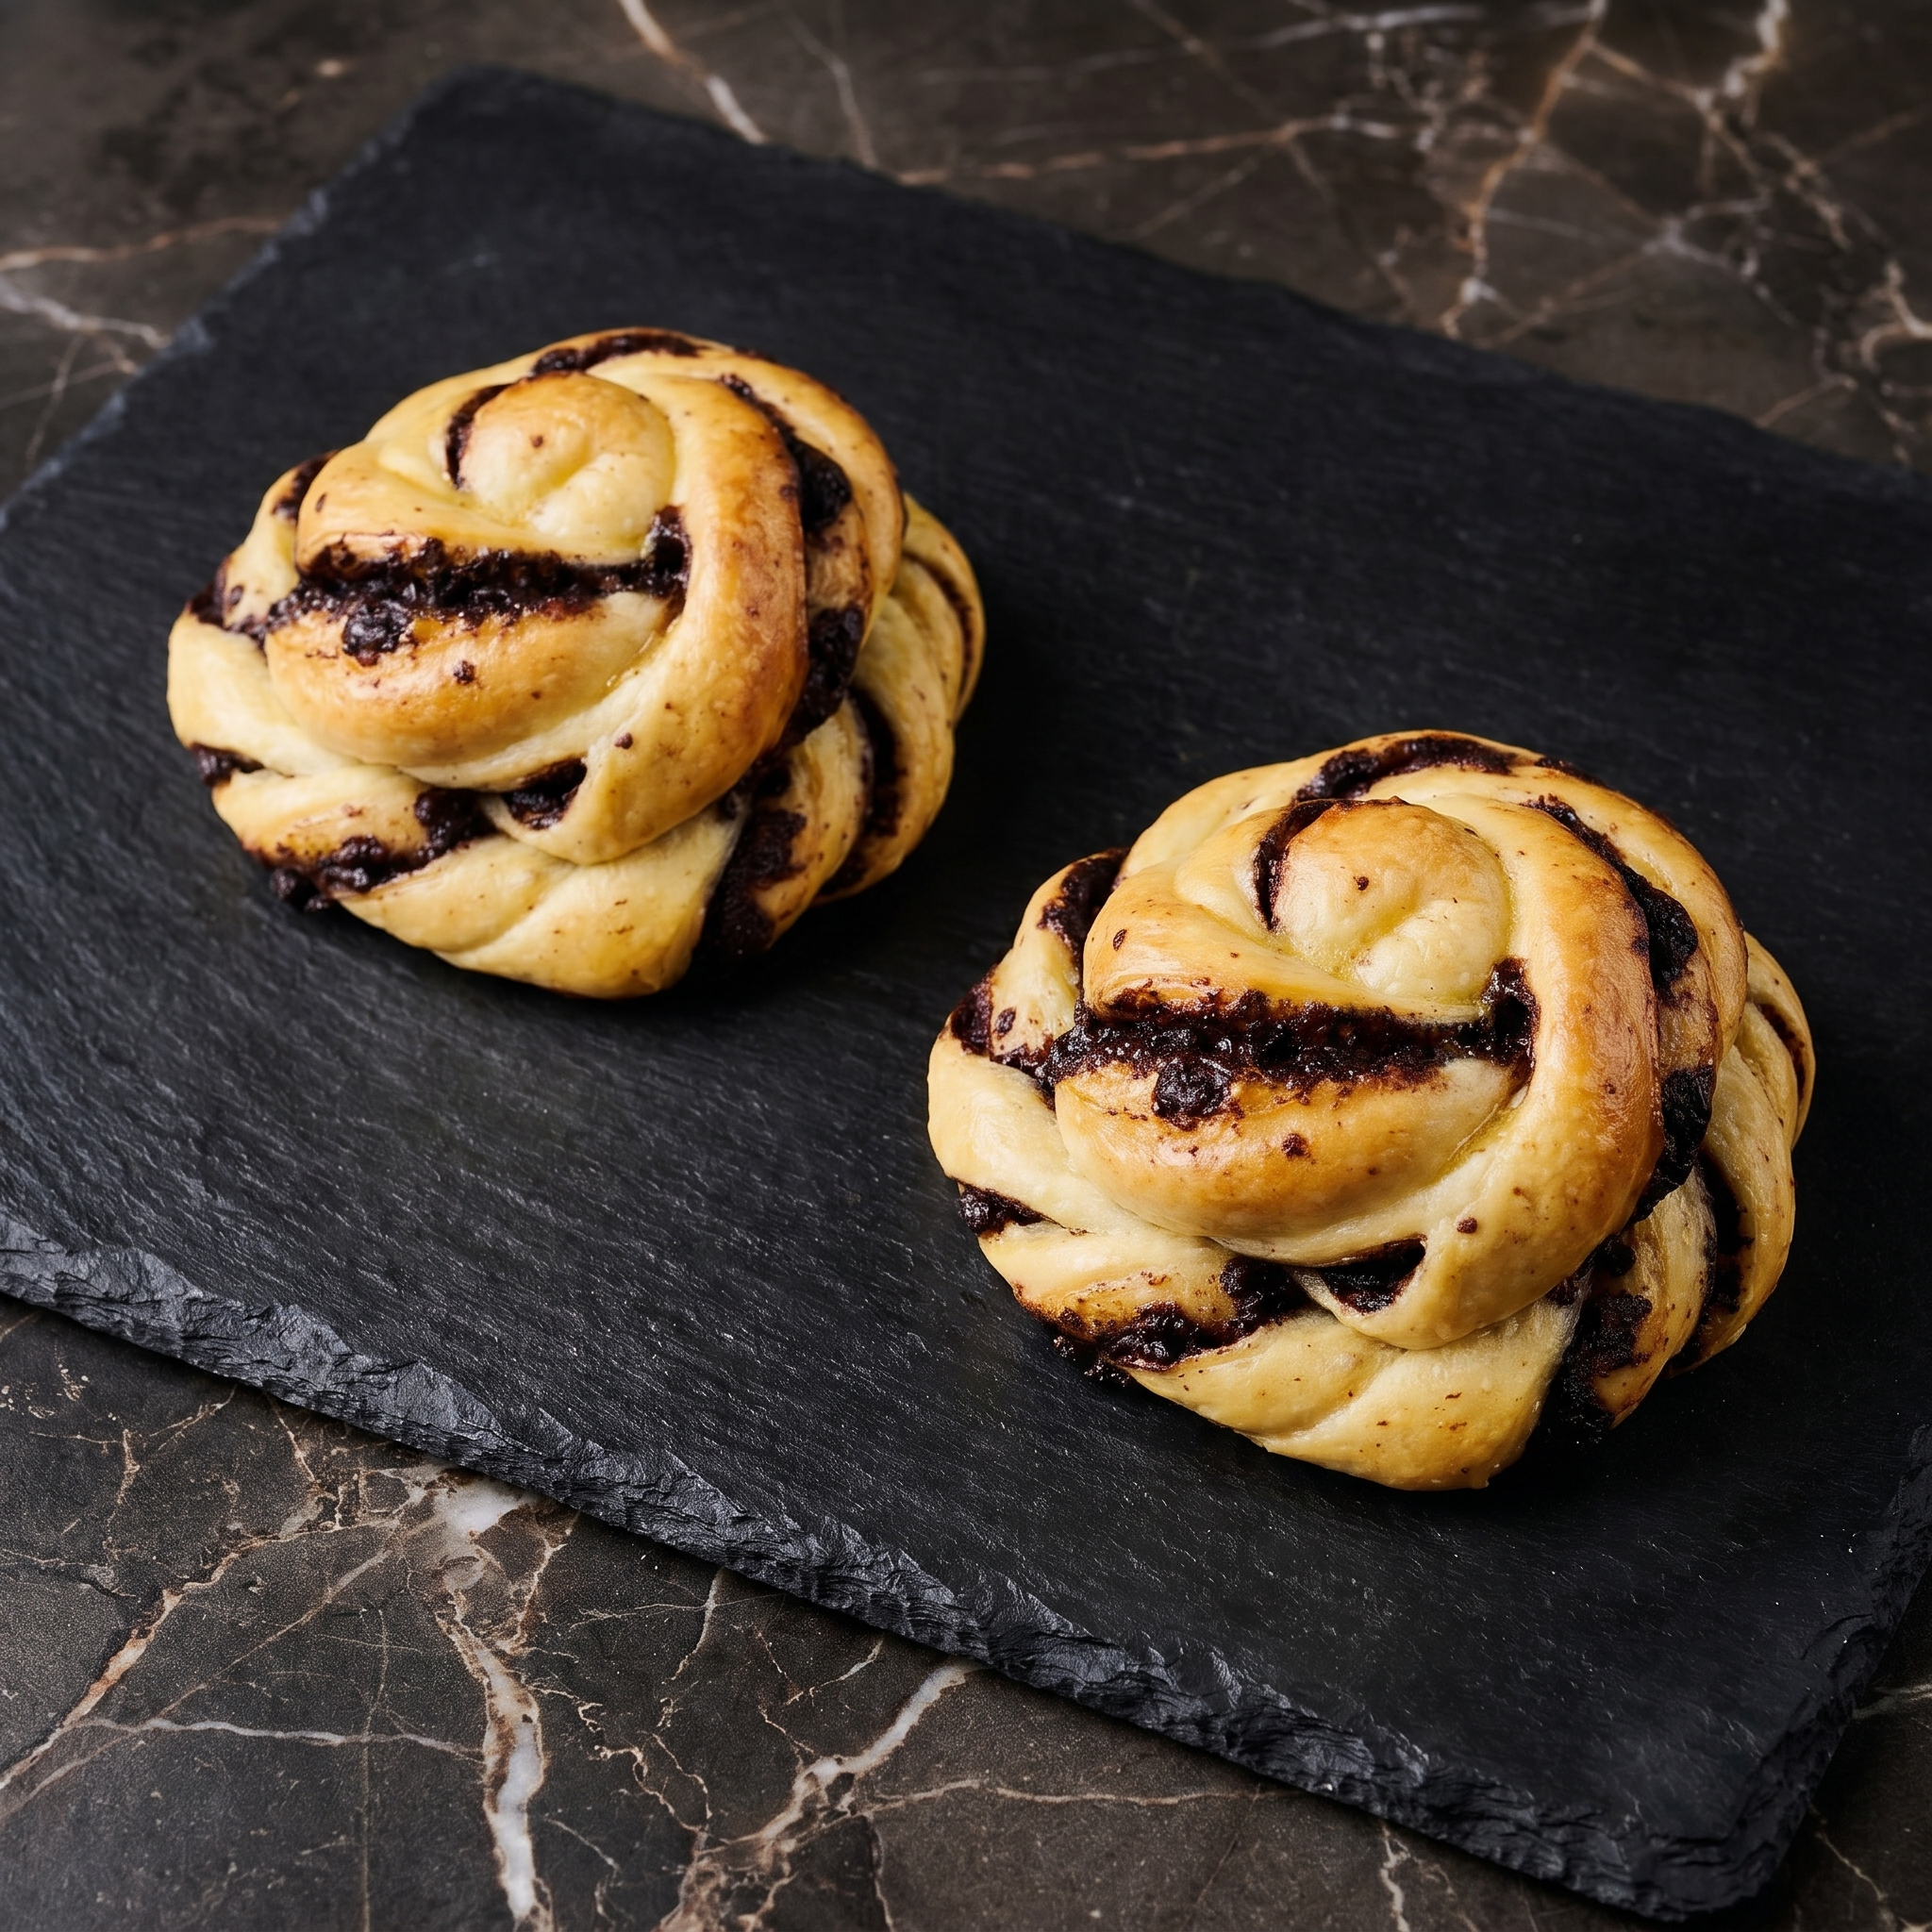
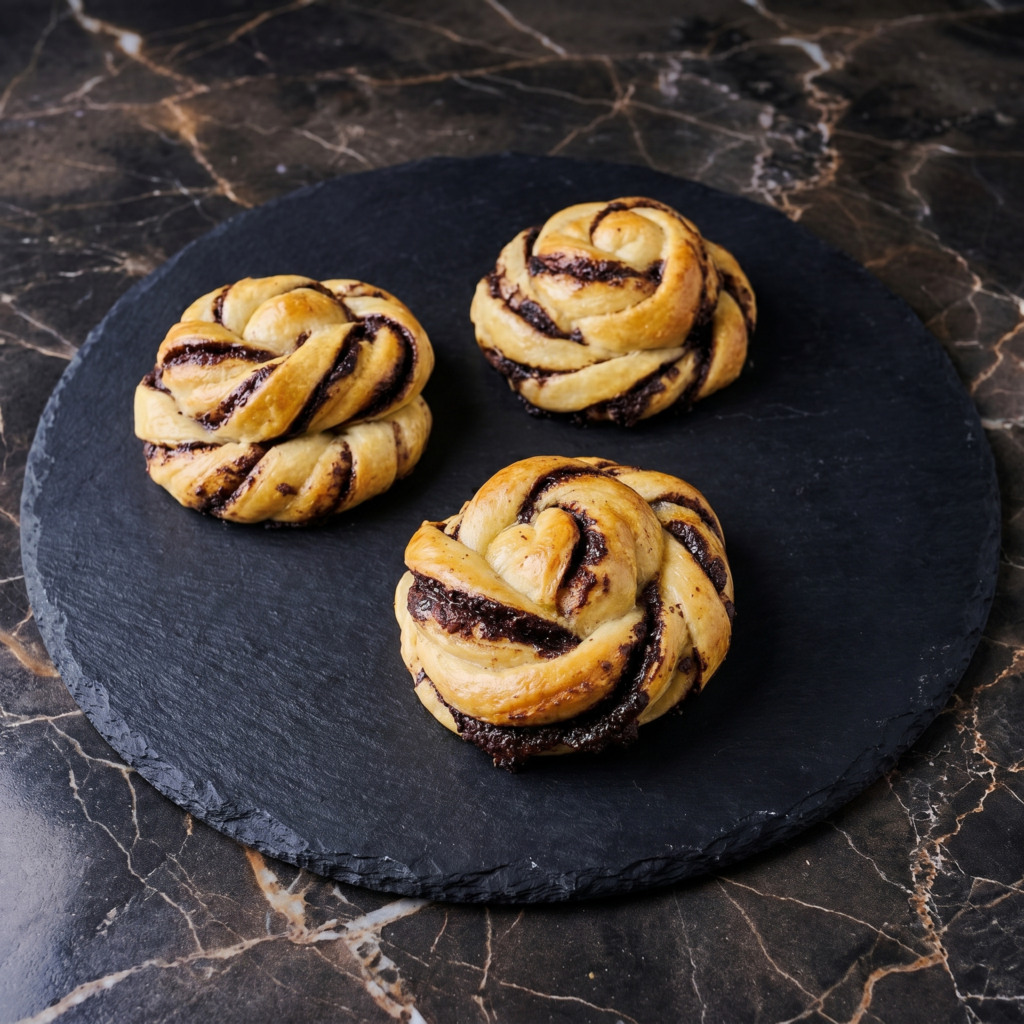
    Chocolate + puff pastry + a simple twist = happiness.

    These chocolate knots are flaky, buttery, and packed with warm, gooey chocolate. They take 20 minutes from start to finish and look like you tried way too hard. You didn’t. Let’s knot.

    Ingredients

    Makes 8 knots.

    • 1 sheet frozen puff pastry, thawed
    • ½ cup chocolate chips or chopped dark chocolate
    • 2 tablespoons unsalted butter, melted
    • 2 tablespoons sugar
    • 1 teaspoon cinnamon (optional)
    • Powdered sugar for dusting
    • 1 egg, beaten (for egg wash)

    Step-by-Step Instructions

    Step 1: Prep

    1. Preheat oven to 375°F (190°C). Line a baking sheet with parchment.
    2. Roll puff pastry into a 10×12-inch rectangle.

    Step 2: Fill

    1. Brush pastry with melted butter.
    2. Sprinkle with sugar and cinnamon (if using).
    3. Scatter chocolate chips evenly over the surface. Press in lightly.

    Step 3: Cut & Twist

    1. Cut pastry into 8 strips (each about 1.5 inches wide and 10 inches long).
    2. Gently twist each strip several times.
    3. Tie each twisted strip into a loose knot. Tuck ends underneath.

    Step 4: Bake & Dust

    1. Place knots on the baking sheet. Brush with beaten egg.
    2. Bake for 12-15 minutes until puffed and golden brown.
    3. Cool for 5 minutes. Dust generously with powdered sugar.
    4. Eat while chocolate is still warm and lava-like.

    Summary

    Prep Time: 8 minutes | Bake Time: 15 minutes | Total Time: 23 minutes

    Yield: 8 knots | Difficulty: Super Easy

    Storage Notes

    Best eaten day-of. Store leftovers in an airtight container for up to 2 days. Reheat in an air fryer at 350°F for 3-4 minutes or in an oven for 5 minutes. Never microwave—chocolate becomes napalm, pastry turns sad.

  • Homemade Naan: Bubble-y, Buttery, and Obsession-Worthy

    Homemade Naan: Bubble-y, Buttery, and Obsession-Worthy

    Store-bought naan is a sad, dry cracker pretending to be bread. Let’s fix that.

    This homemade naan is soft, chewy, blistered, and slathered in garlic butter. No tandoor? No problem. A regular skillet does the job. Ten minutes of work. Unlimited dipping potential.

    Ingredients

    Makes 6 large naan.

    For the Dough:

    • 2 cups all-purpose flour (plus more for dusting)
    • ½ cup plain yogurt (full-fat works best)
    • ¼ cup warm water
    • 2 tablespoons oil or melted butter
    • 1 teaspoon sugar
    • 1 teaspoon baking powder
    • ½ teaspoon baking soda
    • ½ teaspoon salt

    For the Garlic Butter Topping:

    • 3 tablespoons melted butter
    • 3 cloves garlic, minced
    • 2 tablespoons fresh cilantro, chopped (optional)

    Step-by-Step Instructions

    Step 1: Make the Dough

    1. In a large bowl, whisk flour, sugar, baking powder, baking soda, and salt.
    2. Add yogurt, warm water, and oil. Mix until a shaggy dough forms.
    3. Knead for 5-7 minutes until smooth and soft.
    4. Cover and rest for 30 minutes (or up to 2 hours).

    Step 2: Shape the Naan

    1. Divide dough into 6 equal balls.
    2. On a floured surface, roll each ball into a 6-8 inch oval or teardrop shape. Don’t make it too thin.

    Step 3: Cook on the Stovetop

    1. Heat a cast-iron skillet or heavy pan over high heat until screaming hot.
    2. Place one naan in the dry skillet. Cook for 1-2 minutes until bubbles appear on top.
    3. Flip and cook for another 1-2 minutes until dark blistered spots appear.
    4. Repeat with all naan.

    Step 4: Butter and Serve

    1. Mix melted butter and minced garlic.
    2. Brush hot naan with garlic butter. Sprinkle with cilantro.
    3. Serve warm with curry, hummus, or just eat it plain. No judgment.

    Summary

    Prep Time: 10 minutes | Rest Time: 30 minutes | Cook Time: 10 minutes

    Yield: 6 naan | Difficulty: Easy

    Storage Notes

    Store in an airtight container for up to 3 days. Freeze for up to 3 months. To reheat, spritz with water and warm in a skillet or air fryer at 350°F for 3 minutes. Microwaving works but kills the texture.

  • Chicken Caesar Wraps (The Lunch You’ll Actually Crave)

    Chicken Caesar Wraps (The Lunch You’ll Actually Crave)

    Caesar salad is great. But eating it with a fork? Boring. Wrapping it in a warm, toasty tortilla and taking it on a walk? Genius.

    This chicken Caesar wrap has it all: juicy chicken, crisp romaine, salty Parmesan, crunchy croutons, and that creamy, tangy Caesar dressing. Roll it up. Toast it if you’re fancy. Eat it with one hand while pretending to be productive.

    Ingredients

    Makes 2 large wraps.

    • 2 large flour tortillas (10-12 inch)
    • 2 cups cooked chicken (shredded or chopped, rotisserie works great)
    • 2 cups romaine lettuce, chopped
    • ½ cup shredded Parmesan cheese
    • ¼ cup Caesar dressing (plus more for drizzling)
    • ¼ cup croutons, crushed (for crunch)
    • Optional: black pepper, lemon wedge, anchovies (if you’re brave)

    Step-by-Step Instructions

    Step 1: Prep the Fillings

    1. In a large bowl, toss chicken, romaine, Parmesan, and Caesar dressing until coated.
    2. Add crushed croutons and toss gently (so they stay crunchy).

    Step 2: Warm the Tortilla

    1. Microwave tortillas for 10 seconds or warm in a dry skillet to make them pliable.

    Step 3: Assemble

    1. Spread a little extra Caesar dressing on the tortilla.
    2. Pile the chicken Caesar mixture in the center.

    Step 4: Roll It Tight

    1. Fold in the sides, then roll from the bottom up, tucking firmly.
    2. Should be snug but not bursting.

    Step 5: Toast (Optional But Great)

    1. Place wrap seam-side down in a dry skillet over medium heat.
    2. Toast for 1-2 minutes per side until golden and sealed.

    Step 6: Serve

    1. Slice in half on a diagonal. Serve with extra Caesar for dipping.

    Summary

    Prep Time: 10 minutes | Cook Time: 2 minutes (toasting optional) | Total Time: 10-12 minutes

    Yield: 2 wraps

    Difficulty: Easy

    Storage Notes

    • Fridge: Wrapped tightly in foil, keeps for 1 day. Lettuce will soften, croutons won’t stay crunchy.
    • Meal prep tip: Keep components separate (chicken, lettuce, dressing, croutons). Assemble fresh for best crunch.
    • Make ahead: Cook chicken up to 3 days in advance. Chop lettuce and store in a bag with a paper towel.
    • Crouton hack: Add them last or pack separately until you’re ready to eat.
  • Grilled Balsamic Chicken (Sweet, Tangy, and Smoky)

    Grilled Balsamic Chicken (Sweet, Tangy, and Smoky)

    Chicken breast has a reputation for being boring. This recipe exists to destroy that reputation.

    Sweet, tangy, garlicky balsamic marinade. Juicy, tender grilled chicken. Caramelized edges from the grill. This balsamic chicken makes zero sense for how easy it is. Throw it on a salad, stuff it in a sandwich, or eat it straight off the cutting board.

    Ingredients

    Serves 4.

    • 4 boneless, skinless chicken breasts (about 6 oz / 170g each)
    • ½ cup balsamic vinegar
    • ¼ cup olive oil
    • 2 tablespoons Dijon mustard
    • 2 tablespoons honey (or brown sugar)
    • 4 cloves garlic, minced
    • 1 teaspoon salt
    • ½ teaspoon black pepper
    • 1 teaspoon dried oregano (or rosemary)

    Step-by-Step Instructions

    Step 1: Make the Marinade

    1. In a bowl or zip-top bag, whisk balsamic vinegar, olive oil, Dijon, honey, garlic, salt, pepper, and oregano.

    Step 2: Marinate the Chicken

    1. Add chicken to the marinade. Coat well.
    2. Marinate for at least 30 minutes at room temp or up to 8 hours in the fridge.

    Step 3: Preheat the Grill

    1. Preheat grill to medium-high heat (about 400°F / 200°C).
    2. Remove chicken from marinade. Let excess drip off.

    Step 4: Grill

    1. Grill chicken for 5-7 minutes per side, until internal temp hits 165°F (74°C).
    2. Baste with leftover marinade during the last 2 minutes (only if it hasn’t touched raw chicken).

    Step 5: Rest and Serve

    1. Let chicken rest for 5 minutes before slicing.
    2. Serve with grilled veggies, rice, pasta, or on a salad.

    Summary

    Prep Time: 5 minutes + marinating | Cook Time: 12 minutes | Total Time: 20 minutes + marinating

    Yield: 4 servings

    Difficulty: Easy

    Storage Notes

    • Fridge: Cooked chicken keeps for 4 days in an airtight container.
    • Freezer: Marinate raw chicken and freeze for up to 3 months. Thaw in fridge before grilling.
    • Reheat: Skillet or oven at 325°F. Microwave works but dries it out.
    • Leftover magic: Slice over salads, add to wraps, or pile onto sandwiches.
  • Chimichangas (Deep-Fried Burritos = Best Idea Ever)

    Chimichangas (Deep-Fried Burritos = Best Idea Ever)

    Someone, somewhere, looked at a burrito and thought: “This needs to be fried.”

    That person was a genius. The chimichanga is a golden, crispy, shatteringly delicious masterpiece. A flour tortilla stuffed with seasoned meat, beans, and cheese, then fried until crackly-crunchy. Baked version included if you’re being healthy (no judgment… okay, a little).

    Ingredients

    Makes 6 chimichangas.

    • 6 large flour tortillas (burrito-size)
    • 1 lb (450g) ground beef (or shredded chicken)
    • 1 packet taco seasoning (or homemade)
    • ⅓ cup water
    • 1 can (15 oz) refried beans
    • 1 cup shredded Mexican cheese blend
    • Oil for frying (vegetable or canola)

    For Toppings:

    • Sour cream
    • Salsa or pico de gallo
    • Guacamole or sliced avocado
    • Shredded lettuce
    • Hot sauce

    Step-by-Step Instructions

    Step 1: Cook the Filling

    1. Brown ground beef in a skillet over medium-high heat. Drain grease.
    2. Add taco seasoning and water. Simmer 3 minutes until thickened.

    Step 2: Warm the Tortillas

    1. Microwave tortillas for 20 seconds or warm in a dry skillet. This prevents cracking.

    Step 3: Assemble

    1. Spread 2 tablespoons refried beans in the center of each tortilla.
    2. Top with seasoned beef and shredded cheese.
    3. Fold in the sides, then roll tightly from the bottom up.
    4. Secure with toothpicks if needed.

    Step 4: Fry or Bake

    1. Fry: Heat 1 inch oil to 350°F (175°C). Fry chimichangas seam-side down for 2-3 minutes per side until golden brown.
    2. Bake (healthier): Brush with oil. Bake at 425°F (220°C) for 15-20 minutes, flipping halfway.
    3. Air fry: 375°F (190°C) for 8-10 minutes.

    Step 5: Serve

    1. Remove toothpicks. Top with sour cream, salsa, guacamole, lettuce, and hot sauce.
    2. Eat with your hands. Napkins required.

    Summary

    Prep Time: 15 minutes | Cook Time: 15 minutes | Total Time: 30 minutes

    Yield: 6 chimichangas

    Difficulty: Easy

    Storage Notes

    • Fridge: Fried chimichangas keep for 3 days. They will lose crispiness.
    • Reheat: Air fryer at 375°F for 6-8 minutes or oven at 400°F for 10 minutes. No microwave (soggy disaster).
    • Freezer: Freeze uncooked, assembled chimichangas for up to 2 months. Fry or bake from frozen (add 5-10 minutes).
    • Pro tip: Bake or air fry for leftovers. Re-frying is messy.
  • Shrimp Tostadas (Crunchy, Citrusy, 15-Minute Magic)

    Shrimp Tostadas (Crunchy, Citrusy, 15-Minute Magic)

    Tostadas are what happens when tacos decide to get crispy and dramatic.

    These shrimp tostadas start with a crunchy fried corn tortilla. Then: creamy refried beans, zesty lime shrimp, crunchy cabbage, cool crema, and fresh avocado. No deep fryer needed (buy tostada shells or bake your own). Ready in 15 minutes. Messy in the best way.

    Ingredients

    Makes 6 tostadas (serves 3-4).

    • 6 tostada shells (store-bought or homemade)
    • 1 lb (450g) small or medium shrimp, peeled and deveined
    • 2 tablespoons olive oil
    • 3 cloves garlic, minced
    • 1 teaspoon chili powder
    • ½ teaspoon cumin
    • Juice of 2 limes (plus wedges for serving)
    • Salt and pepper to taste

    For Assembly:

    • 1 cup refried beans (canned or homemade), warmed
    • 1 cup shredded cabbage or slaw mix
    • ½ cup sour cream mixed with 2 tablespoons lime juice (lime crema)
    • 1 avocado, sliced
    • 1 tomato, diced
    • Hot sauce (optional)
    • Fresh cilantro and crumbled cotija or feta cheese

    Step-by-Step Instructions

    Step 1: Cook the Shrimp

    1. Pat shrimp dry. Season with salt, pepper, chili powder, and cumin.
    2. Heat olive oil in a skillet over medium-high heat.
    3. Add shrimp and garlic. Cook 2-3 minutes, flipping once, until pink and curled.
    4. Remove from heat. Squeeze lime juice over shrimp. Set aside.

    Step 2: Warm the Toppings

    1. Warm refried beans in a small pot or microwave.
    2. Make lime crema: stir sour cream and lime juice together.

    Step 3: Assemble

    1. Spread refried beans on each tostada shell.
    2. Top with shredded cabbage.
    3. Add lime shrimp, avocado slices, and diced tomato.
    4. Drizzle with lime crema and hot sauce.
    5. Sprinkle with cilantro and cotija cheese.

    Step 4: Serve

    1. Serve immediately with extra lime wedges.
    2. Eat fast before they get soggy. Your hands will be messy. Embrace it.

    Summary

    Prep Time: 10 minutes | Cook Time: 5 minutes | Total Time: 15 minutes

    Yield: 6 tostadas

    Difficulty: Easy

    Storage Notes

    • Fridge: Cooked shrimp keeps for 2 days. Store separately from shells and toppings.
    • Never assemble ahead: Tostadas get soggy FAST. Build fresh or set up a tostada bar.
    • Leftover shrimp: Great in tacos, salads, or rice bowls.
    • Make your own shells: Fry corn tortillas in ½ inch oil until crisp. Drain on paper towels.
  • Oven Roasted Turkey Leg (State Fair Vibes, No Crowd)

    Oven Roasted Turkey Leg (State Fair Vibes, No Crowd)

    Turkey legs don’t get enough love. Chicken wings get all the attention. But a giant, oven-roasted turkey leg? That’s a meal that makes you feel powerful.

    Crispy, seasoned skin. Meat so tender it falls off the bone. A simple herb and garlic rub. Roast low and slow, then crank the heat for crispy skin. One leg is dinner. Two legs? You’re a legend.

    Ingredients

    Serves 2 (2 legs).

    • 2 turkey legs (about 1-1.5 lbs / 450-680g each)
    • 2 tablespoons olive oil
    • 4 cloves garlic, minced
    • 1 tablespoon fresh rosemary, chopped (or 1 tsp dried)
    • 1 tablespoon fresh thyme leaves (or 1 tsp dried)
    • 1 teaspoon smoked paprika
    • 1 teaspoon salt
    • ½ teaspoon black pepper
    • ½ teaspoon onion powder
    • Optional: ½ cup chicken broth (for moisture)

    Step-by-Step Instructions

    Step 1: Preheat and Prep

    1. Preheat oven to 325°F (165°C).
    2. Pat turkey legs completely dry with paper towels.

    Step 2: Make the Rub

    1. In a small bowl, mix olive oil, garlic, rosemary, thyme, paprika, salt, pepper, and onion powder.
    2. Rub mixture all over turkey legs, under the skin if possible.

    Step 3: Roast Low and Slow

    1. Place legs in a roasting pan or baking dish. Add broth to the pan (optional, for moisture).
    2. Roast for 1 hour, basting with pan juices every 20 minutes.

    Step 4: Crisp the Skin

    1. Increase oven to 425°F (220°C).
    2. Roast for another 15-20 minutes until skin is golden brown and crispy.
    3. Internal temp should hit 165°F (74°C).

    Step 5: Rest and Serve

    1. Let rest for 10 minutes.
    2. Serve with mashed potatoes, roasted veggies, or just grab it with both hands like a cave person.

    Summary

    Prep Time: 10 minutes | Cook Time: 1 hour 20 minutes | Total Time: 1 hour 30 minutes

    Yield: 2 turkey legs

    Difficulty: Easy

    Storage Notes

    • Fridge: Leftover turkey leg keeps for 4 days. Remove meat from bone for easier storage.
    • Freezer: Shredded turkey meat freezes well for up to 3 months.
    • Reheat: Oven at 350°F for 10-15 minutes. Add a splash of broth to keep moist.
    • Leftover magic: Use in sandwiches, soups, tacos, or turkey pot pie.
  • Banh Mi (The Sandwich That Does It All)

    Banh Mi (The Sandwich That Does It All)

    Banh mi is what happens when French baguette meets Vietnamese flavor. Magic ensues.

    Crusty bread. Rich, garlicky pork. Tangy pickled carrots and daikon. Fresh cilantro. Spicy jalapeño. Rich mayo. Every bite hits every note. Build one today. Thank yourself later.

    Ingredients

    Serves 2.

    Quick Pickled Veggies:

    • ½ cup carrot, julienned
    • ½ cup daikon radish, julienned
    • ¼ cup rice vinegar
    • 2 tablespoons sugar
    • ¼ teaspoon salt

    For the Sandwich:

    • 1 Vietnamese baguette (or soft French roll)
    • ½ lb (225g) lemongrass pork or cold cuts (pâté, ham, headcheese)
    • 2 tablespoons mayo
    • Fresh cilantro sprigs
    • 1 jalapeño, thinly sliced
    • 2 tablespoons soy sauce (optional)

    Step-by-Step Instructions

    Step 1: Pickle Veggies

    1. Combine vinegar, sugar, and salt in a bowl. Stir to dissolve.
    2. Add carrot and daikon. Let sit 20 minutes (or overnight).

    Step 2: Warm the Meat

    1. If using cooked pork, warm it in a skillet with a splash of soy sauce.
    2. If using cold cuts, no heat needed.

    Step 3: Prep the Bread

    1. Slice baguette lengthwise, but not all the way through.
    2. Toast lightly (crispy outside, soft inside).

    Step 4: Assemble

    1. Spread mayo generously on both sides of bread.
    2. Layer meat, then pickled veggies, cilantro, and jalapeño.

    Step 5: Serve

    1. Close sandwich. Press gently. Slice in half. Eat immediately.

    Summary

    Prep Time: 10 minutes | Pickle Time: 20 minutes | Total Time: 30 minutes

    Yield: 2 sandwiches

    Difficulty: Easy

    Storage Notes

    Do Not Store Assembled

    Soggy bread = sad banh mi. Assemble right before eating.

    Prep Ahead:

    • Pickled veggies keep in the fridge for 2 weeks.
    • Cooked pork keeps for 4 days. Reheat before assembling.

    Vegan Option:

    Use tofu or seitan. Same pickled veggies. Same magic.

    Bread Substitute:

    No Vietnamese baguette? Use a soft hoagie roll. Not authentic, still delicious.

  • Cornish Pasties (A Handheld Meat Pie That Miners Got Right)

    Cornish Pasties (A Handheld Meat Pie That Miners Got Right)

    Cornish miners packed these for lunch because a pasty is basically edible Tupperware.

    Hearty beef, potatoes, onion, and rutabaga (swede) wrapped in a buttery, flaky crust. Crimp the edge like a handle—hold it, eat it, toss the dirty edge. Two hundred years of wisdom in one delicious pocket.

    Ingredients

    Makes 4 large pasties.

    For the Dough:

    • 3 cups (375g) all-purpose flour
    • 1 teaspoon salt
    • ½ cup (115g) cold unsalted butter, cubed
    • ½ cup (115g) cold lard or shortening
    • ½ cup (120ml) ice water

    For the Filling:

    • ½ lb (225g) beef sirloin or skirt steak, cut into ½-inch cubes
    • 1 medium potato, diced small
    • ½ small rutabaga (swede), diced small
    • ½ small onion, finely chopped
    • 1 teaspoon salt
    • ½ teaspoon black pepper
    • 1 egg, beaten (for egg wash)

    Step-by-Step Instructions

    Step 1: Make Dough

    1. Mix flour and salt. Cut in butter and lard until pea-sized crumbs form.
    2. Add ice water 1 tablespoon at a time until dough comes together.
    3. Divide into 4 balls. Wrap and chill 30 minutes.

    Step 2: Prep Filling

    1. In a bowl, combine beef, potato, rutabaga, and onion.
    2. Season with salt and pepper. Do NOT pre-cook anything.

    Step 3: Assemble

    1. Preheat oven to 400°F (200°C). Roll each dough ball into a 8-inch circle.
    2. Place ¾ cup filling on one half, leaving a border.
    3. Fold other half over. Crimp edges firmly.

    Step 4: Bake

    1. Brush with egg wash. Cut a small steam slit on top.
    2. Bake 45-50 minutes until deep golden brown.

    Step 5: Serve

    1. Cool 10 minutes. Eat warm or at room temperature.

    Summary

    Prep Time: 30 minutes | Chill Time: 30 minutes | Cook Time: 50 minutes | Total Time: ~2 hours

    Yield: 4 pasties

    Difficulty: Medium

    Storage Notes

    Refrigerate Baked:

    Store in an airtight container for up to 4 days. Reheat at 350°F for 15 minutes. Microwave makes crust sad.

    Freeze (Best Method):

    Freeze unbaked pasties on a tray, then wrap tightly. Bake from frozen at 375°F for 55-60 minutes.

    Traditional Note:

    Authentic Cornish pasties have the crimp on the side (not top). Fill is roughly ⅓ beef, ⅓ potato, ⅓ veg.

    No Rutabaga?

    Use carrot or turnip. Not the same, but still good.

  • Garlic Cheese Rolls (Stretchy, Buttery, Irresistible)

    Garlic Cheese Rolls (Stretchy, Buttery, Irresistible)

    Garlic bread is great. Garlic bread with a molten cheese center? That’s a life decision.

    These garlic cheese rolls are soft, stretchy, and dangerously addictive. Make a batch. Watch them vanish.

    Ingredients

    Makes 8 rolls.

    • 1 can (8-count) refrigerated biscuit dough or 8 homemade roll dough balls
    • 4 oz (115g) mozzarella cheese, cut into 8 cubes
    • 3 tablespoons melted butter
    • 3 cloves garlic, minced (or 1 teaspoon garlic powder)
    • 1 tablespoon fresh parsley, chopped (optional)
    • ¼ cup (25g) grated parmesan cheese (optional)

    Step-by-Step Instructions

    Step 1: Prep

    1. Preheat oven to 375°F (190°C). Grease a baking dish or line with parchment.
    2. In a small bowl, mix melted butter and minced garlic.

    Step 2: Stuff

    1. Flatten each dough ball into a small circle.
    2. Place a cheese cube in the center. Wrap dough around it. Pinch to seal.

    Step 3: Butter and Bake

    1. Arrange rolls seam-side down in the baking dish.
    2. Brush with half the garlic butter. Sprinkle with parmesan if using.
    3. Bake for 12–15 minutes until golden brown.

    Step 4: Finish

    1. Brush hot rolls with remaining garlic butter. Sprinkle with parsley.
    2. Let cool 3 minutes. Then pull one apart and watch the cheese stretch.

    Summary

    Prep Time: 5 minutes | Cook Time: 15 minutes | Total Time: 20 minutes

    Yield: 8 rolls

    Difficulty: Super Easy

    Storage Notes

    • Fridge: Store in an airtight container for up to 2 days. Reheat in microwave for 10–15 seconds or oven at 350°F for 5 minutes.
    • Freezer: Freeze baked rolls for up to 1 month. Reheat from frozen at 350°F for 8–10 minutes.

    Pro tip: Serve warm with marinara sauce for dipping. You’re welcome.