Category: quick_meals

  • Lobster Rolls (Butter, Bun, and a Pile of Lobster)

    Lobster Rolls (Butter, Bun, and a Pile of Lobster)

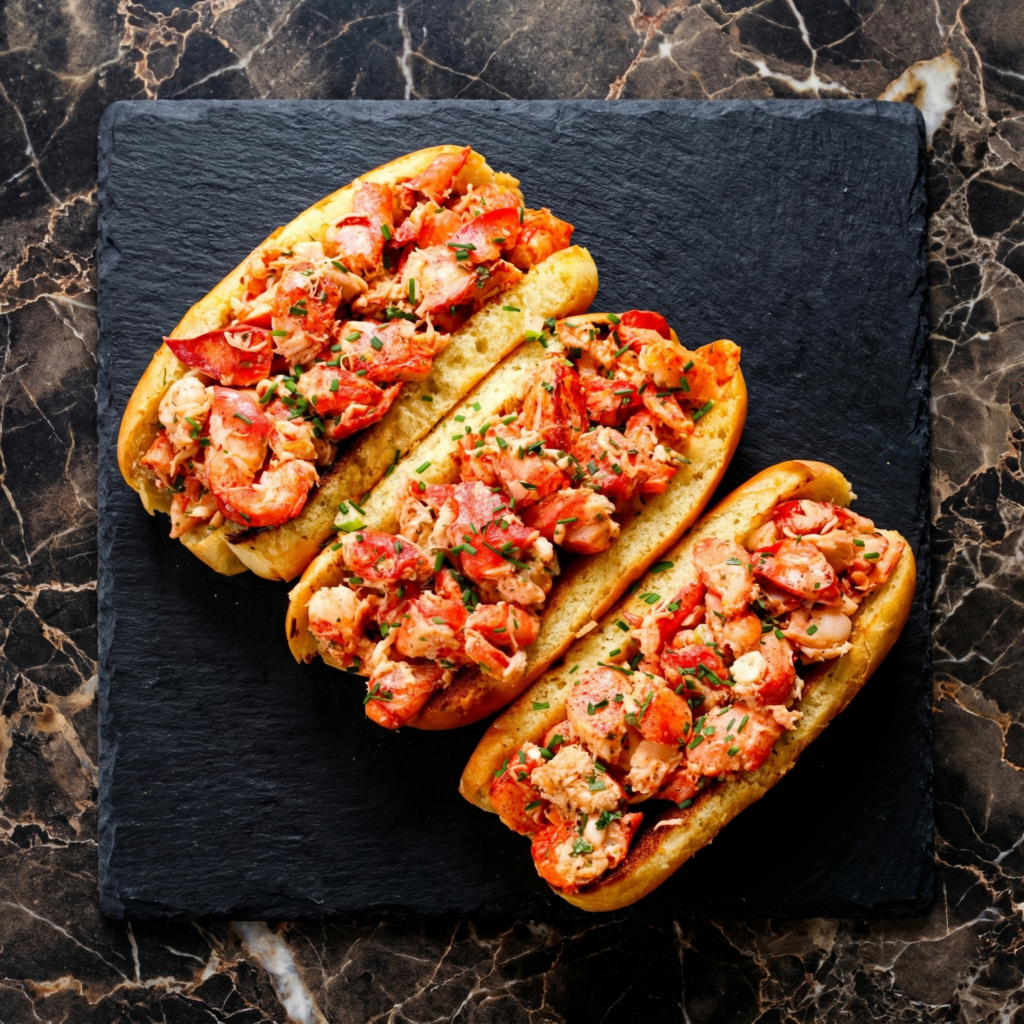
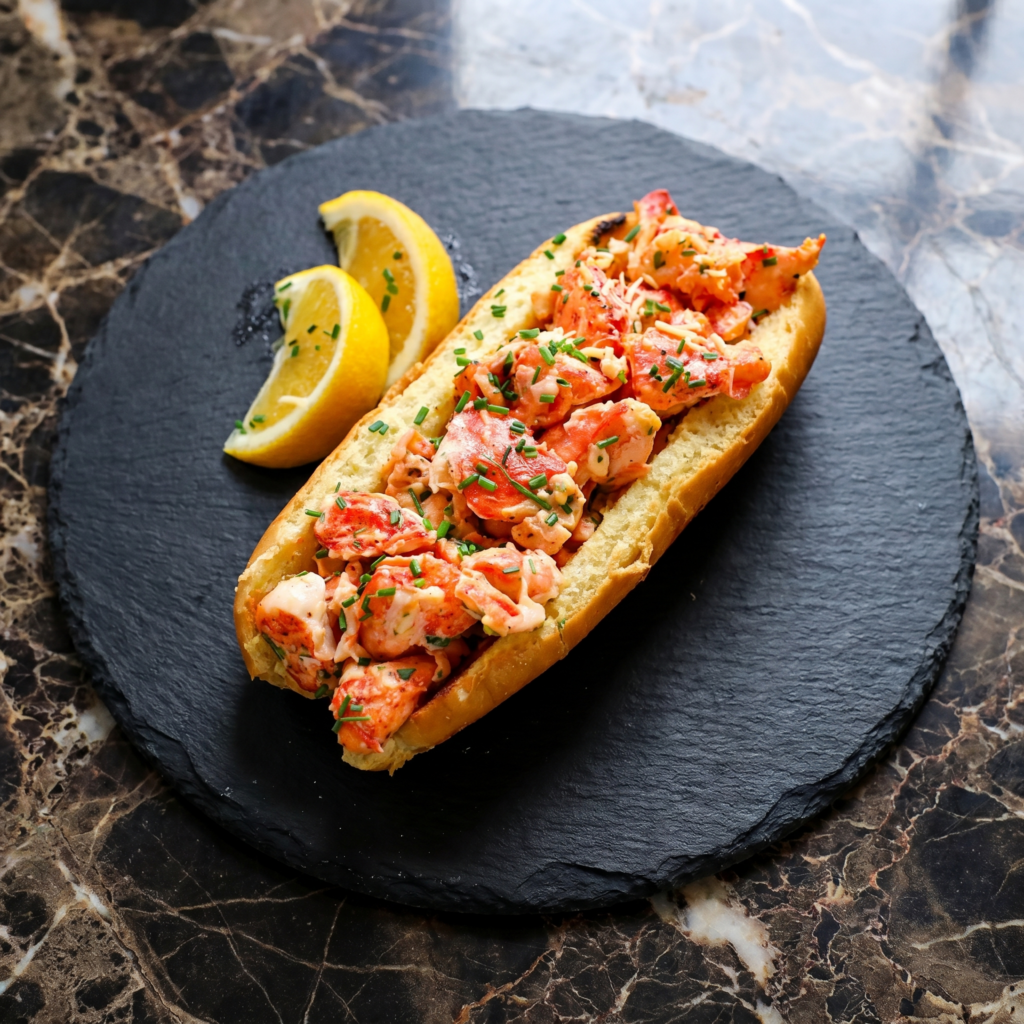
    There are two kinds of people: mayo people and butter people. This recipe is for the butter people. Connecticut style. Warm lobster. Hot butter. Toasted bun. No distractions.

    Chunks of sweet, briny lobster get gently warmed in melted butter, then piled high into a crispy, golden split-top bun. It’s simple. It’s luxurious. And it’s ready in 10 minutes.

    Ingredients

    Serves 2.

    • 1 lb (450g) cooked lobster meat (claws, knuckles, tails), chopped into chunks
    • 4 tablespoons (½ stick) unsalted butter
    • 2 split-top hot dog buns (or New England style buns)
    • 1 teaspoon lemon juice (optional)
    • Salt and pepper, to taste
    • Fresh chives or parsley, for garnish

    Step-by-Step Instructions

    Step 1: Toast the Buns

    1. Melt 2 tablespoons of butter in a skillet over medium heat.
    2. Place buns cut-side down in the skillet. Toast until golden brown and crispy (about 2 minutes). Set aside.

    Step 2: Warm the Lobster

    1. In the same skillet, melt remaining 2 tablespoons of butter.
    2. Add lobster chunks. Gently warm for 1-2 minutes—just until heated through. Do not overcook (rubber lobster is a crime).
    3. Season with salt, pepper, and lemon juice if using.

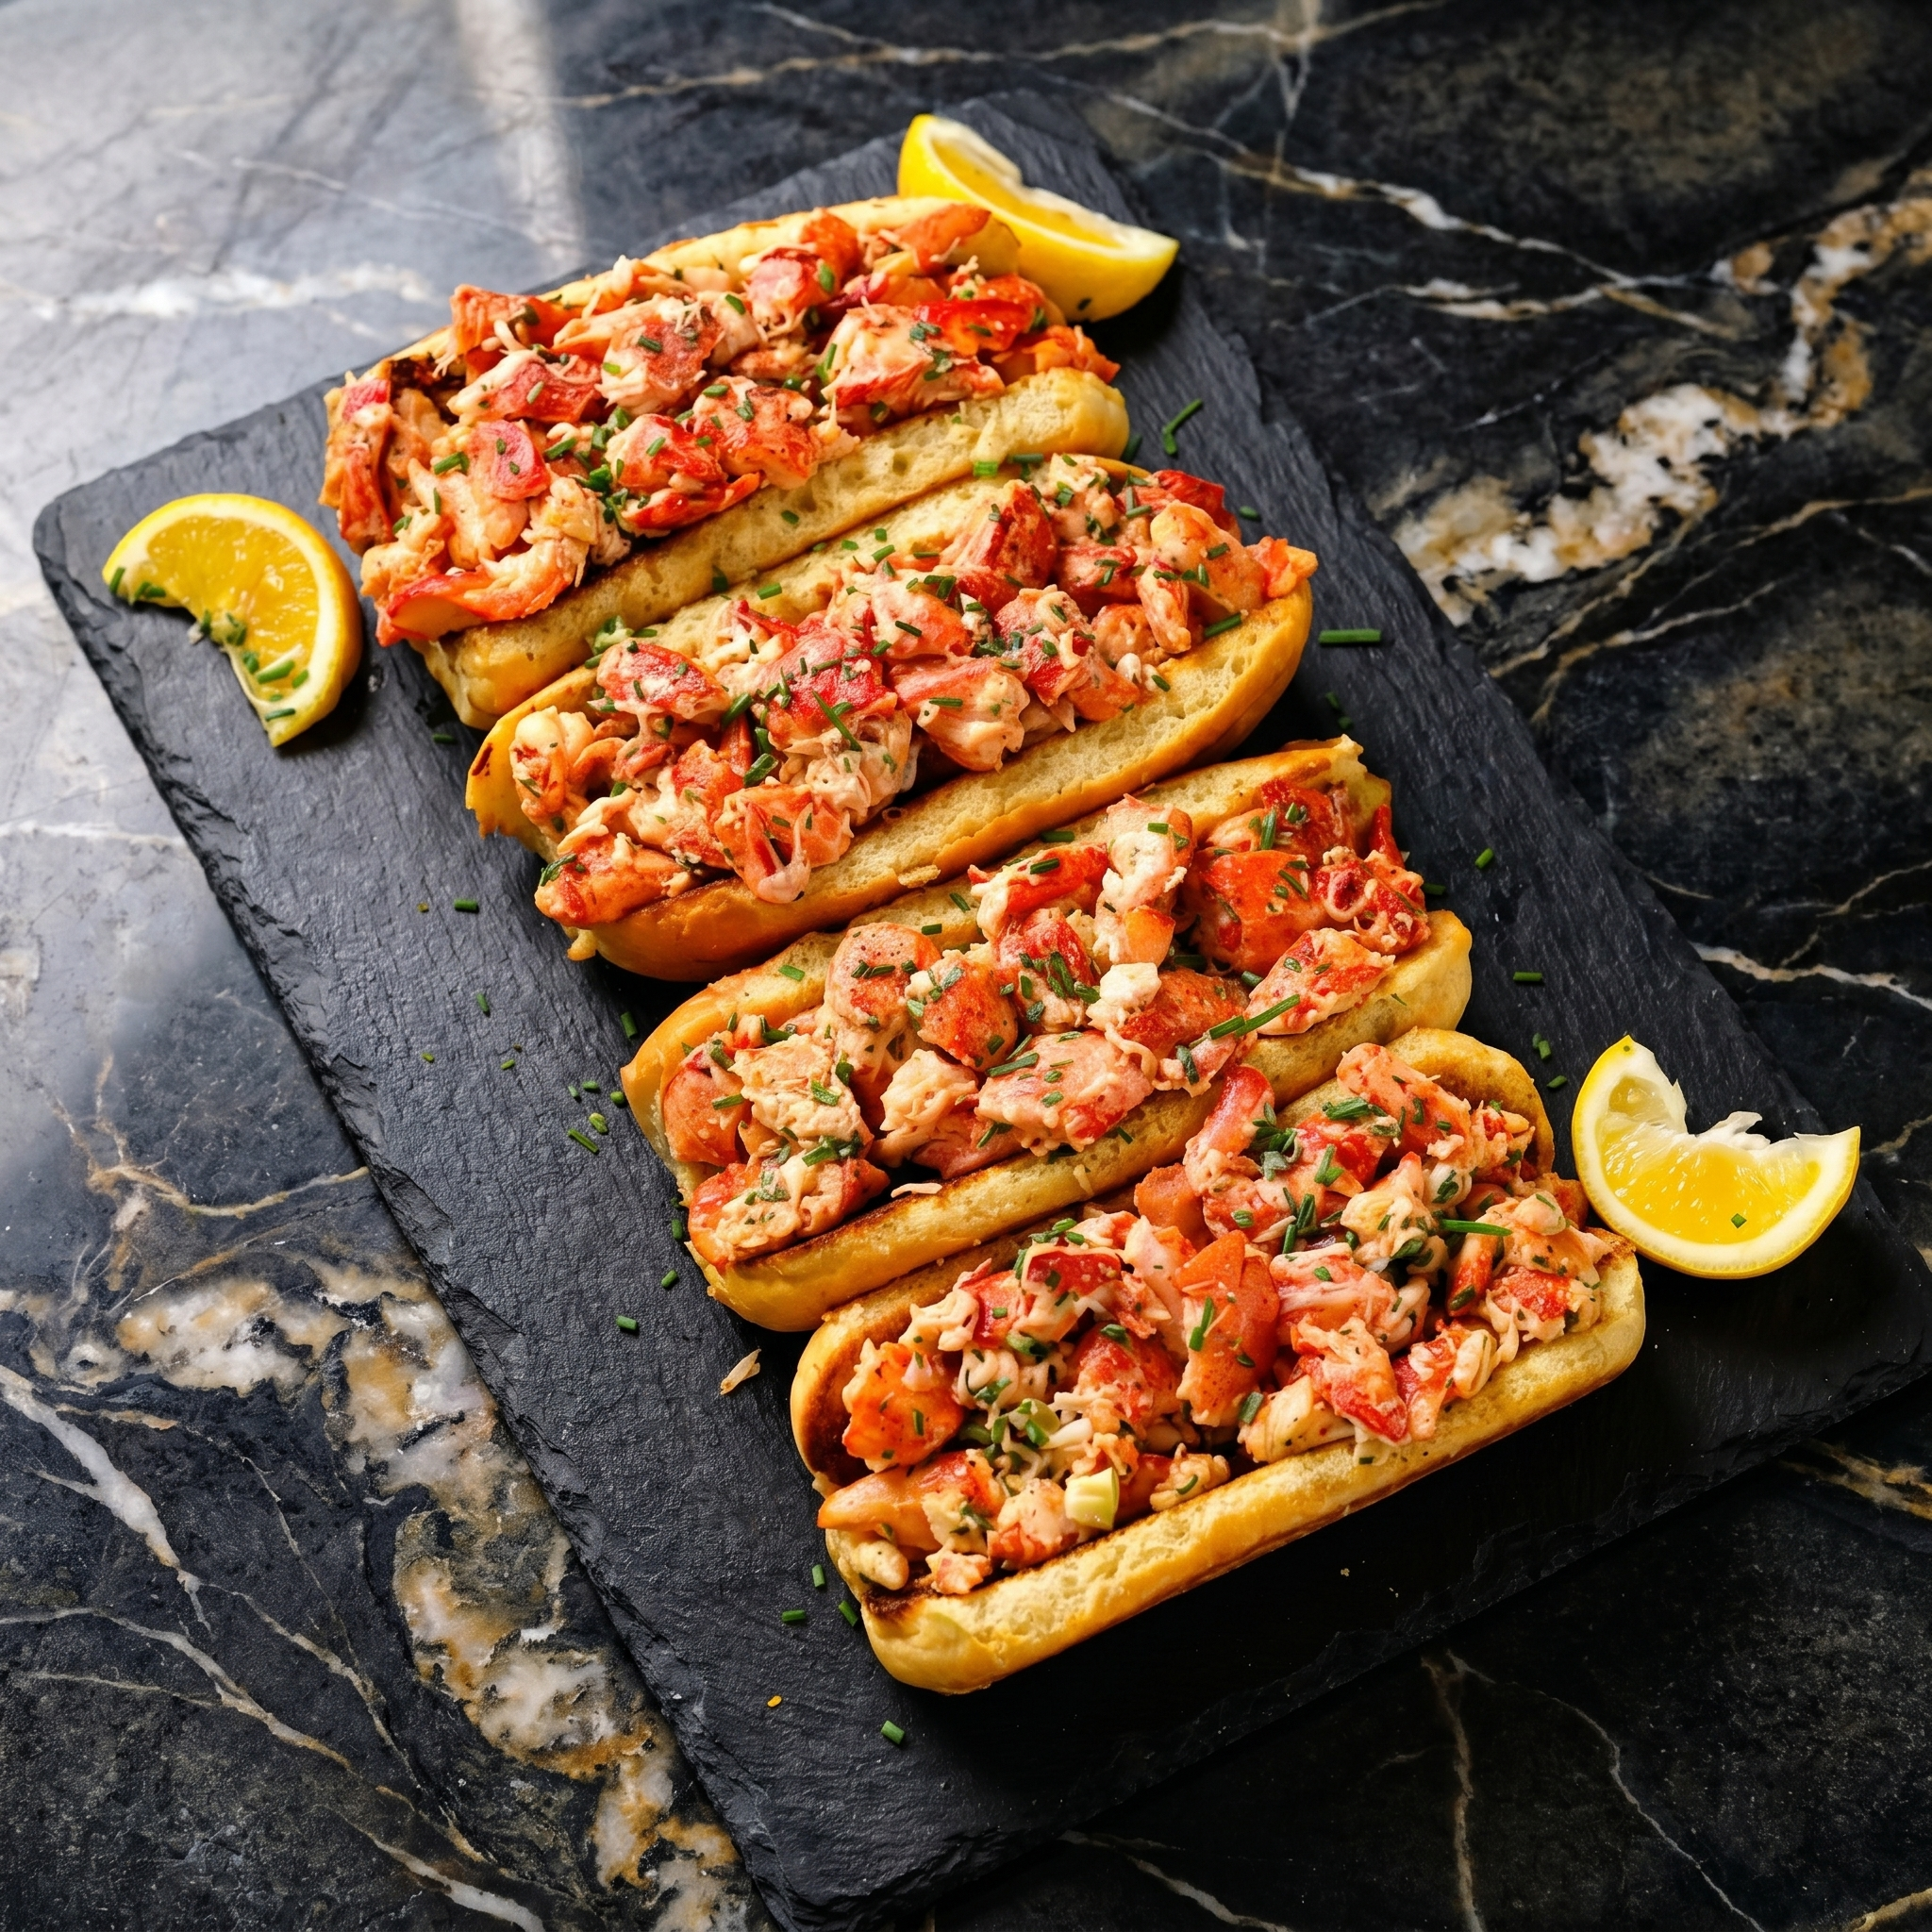
    Step 3: Assemble the Rolls

    1. Pile warm lobster into each toasted bun. Let it overflow. That’s the point.
    2. Drizzle any remaining butter from the pan over the top.
    3. Garnish with chives or parsley.

    Step 4: Serve Immediately

    1. Eat with napkins. Many napkins. Don’t share.

    Summary

    Prep Time: 5 mins | Cook Time: 5 mins | Total Time: 10 minutes

    Yield: 2 lobster rolls

    Difficulty: Easy

    Storage Notes

    Do not make lobster rolls ahead. The buns get soggy. The lobster gets sad. If you have leftover lobster (unlikely), store it in the fridge for 1 day and reheat gently in butter. Never microwave lobster. Just… don’t.

  • Crab Cakes (All Lump, No Fillers)

    Crab Cakes (All Lump, No Fillers)

    Bad crab cakes are a tragedy. Too much breadcrumb. Too little crab. Sad, mushy imposters. Not these. These are golden, crispy, and PACKED with jumbo lump crab. You’ll actually taste the crab—imagine that.

    Pan-fried to perfection. Lightly seasoned. Finished with a bright pop of lemon or a swipe of tangy remoulade. Let’s restore your faith in crab cakes.

    Ingredients

    Makes 6-8 crab cakes.

    • 1 lb (450g) jumbo lump crab meat, picked over for shells
    • ⅓ cup (40g) panko breadcrumbs
    • ¼ cup (60g) mayonnaise
    • 1 large egg, lightly beaten
    • 1 tablespoon Dijon mustard
    • 1 tablespoon Worcestershire sauce
    • 1 tablespoon fresh lemon juice
    • 1 teaspoon Old Bay seasoning
    • 2 tablespoons fresh parsley, chopped
    • 2 tablespoons butter or oil, for frying

    For Remoulade (Optional):

    • ¼ cup mayo + 1 tbsp hot sauce + 1 tsp capers + 1 tsp lemon juice

    Step-by-Step Instructions

    Step 1: Mix Gently

    1. In a large bowl, whisk mayo, egg, mustard, Worcestershire, lemon juice, Old Bay, and parsley.
    2. Gently fold in crab meat and panko. Be gentle—you want crab lumps, not crab paste.
    3. Cover and refrigerate for 30 minutes (this prevents falling apart).

    Step 2: Form the Cakes

    1. Shape mixture into 6-8 patties, about ½ inch thick. Don’t pack too tight.

    Step 3: Pan Fry

    1. Heat butter or oil in a skillet over medium-high heat.
    2. Cook crab cakes for 3-4 minutes per side until golden brown and crispy.
    3. Drain on paper towels.

    Step 4: Serve

    1. Serve hot with lemon wedges and remoulade. Eat with your hands. No judgment.

    Summary

    Prep Time: 15 mins + 30 mins chill | Cook Time: 8 mins | Total Time: ~1 hour

    Yield: 6-8 crab cakes

    Difficulty: Easy (handle gently)

    Storage Notes

    Store uncooked crab cakes in the fridge for up to 1 day. Cooked crab cakes last 3 days in the fridge. Reheat in a 350°F oven or air fryer for 5 minutes (not microwave—soggy sadness). Freeze uncooked patties for up to 3 months. Cook from frozen, adding 2 minutes per side.

  • Coconut Shrimp (Crunchy, Juicy, and Gone in 60 Seconds)

    Coconut Shrimp (Crunchy, Juicy, and Gone in 60 Seconds)

    Coconut shrimp is the ultimate crowd-pleaser. Sweet. Crunchy. Dippable. The kind of appetizer that disappears before it hits the table. And honestly? They’re stupidly easy to make at home.

    No deep fryer required. Just dredge, coat, bake (or fry), and watch people lose their minds. That orange marmalade dipping sauce? Mandatory. Let’s go.

    Ingredients

    Serves 4 as an appetizer.

    • 1 lb (450g) large shrimp, peeled and deveined (tails on)
    • ½ cup (65g) all-purpose flour
    • ½ teaspoon salt
    • ¼ teaspoon black pepper
    • 2 large eggs, beaten
    • 1 cup (80g) panko breadcrumbs
    • 1 cup (80g) sweetened shredded coconut
    • Cooking spray or oil for frying

    For the Dipping Sauce:

    • ½ cup (160g) orange marmalade
    • 2 tablespoons soy sauce
    • 1 teaspoon sriracha (optional, for heat)
    • 1 teaspoon rice vinegar

    Step-by-Step Instructions

    Step 1: Prep Your Stations

    1. Preheat oven to 400°F (200°C) if baking. Line a baking sheet with parchment.
    2. Set up three bowls: (1) flour + salt + pepper, (2) beaten eggs, (3) panko + coconut mixed together.

    Step 2: Dredge and Coat

    1. Pat shrimp dry. Dip each shrimp into flour, then egg, then coconut-panko mixture. Press gently so it sticks.
    2. Place on baking sheet. Repeat with all shrimp.

    Step 3: Cook

    1. Baking: Spray shrimp with cooking spray. Bake 10-12 minutes, flip halfway, until golden and crispy.
    2. Frying: Heat 1 inch of oil in a pan to 350°F (175°C). Fry shrimp 1-2 minutes per side until golden.

    Step 4: Make the Sauce

    1. Whisk marmalade, soy sauce, sriracha, and vinegar in a small bowl.

    Step 5: Serve

    1. Serve hot with sauce on the side. Watch them vanish.

    Summary

    Prep Time: 15 mins | Cook Time: 10-12 mins | Total Time: 25 mins

    Yield: 4 appetizer servings

    Difficulty: Easy

    Storage Notes

    Coconut shrimp is best eaten fresh. Leftovers get soggy. If you must, reheat in an air fryer at 375°F for 3-4 minutes or in the oven. Never microwave—rubber shrimp is sadness. Make extra sauce. It’s good on everything.

  • Red Velvet Cheesecake Bars (Swirled to Perfection)

    Red Velvet Cheesecake Bars (Swirled to Perfection)

    Can’t decide between red velvet cake and cheesecake? Good news: you don’t have to. These bars are both. A tender, tangy red velvet base swirled with a creamy cheesecake layer. Each bite gives you chocolatey red velvet and smooth, rich cream cheese.

    They’re easy. They’re gorgeous. And they slice into perfect little squares of happiness. Bake them for holidays, parties, or just because it’s Tuesday.

    Ingredients

    Makes 16 bars.

    For the Red Velvet Layer:

    • ½ cup (115g) unsalted butter, softened
    • ¾ cup (150g) granulated sugar
    • 1 large egg, room temp
    • 1 tsp vanilla extract
    • 1 tbsp red food coloring (or 2 tsp beet powder for natural)
    • 1 cup (125g) all-purpose flour
    • 2 tbsp cocoa powder
    • ¼ tsp salt
    • ¼ cup (60ml) buttermilk
    • 1 tsp white vinegar
    • ½ tsp baking soda

    For the Cheesecake Swirl:

    • 8 oz (225g) cream cheese, softened
    • ¼ cup (50g) granulated sugar
    • 1 large egg yolk
    • ½ tsp vanilla extract

    Step-by-Step Instructions

    Step 1: Prep

    1. Preheat oven to 350°F (175°C). Line an 8×8 inch pan with parchment paper.

    Step 2: Make Red Velvet Batter

    1. Beat butter and sugar until fluffy. Add egg, vanilla, and red coloring.
    2. Whisk flour, cocoa, salt in a separate bowl.
    3. Mix buttermilk with vinegar and baking soda (it will fizz!).
    4. Alternate adding dry and wet ingredients to butter mixture. Mix just until combined.

    Step 3: Make Cheesecake Swirl

    1. Beat cream cheese and sugar until smooth. Add egg yolk and vanilla.

    Step 4: Swirl and Bake

    1. Spread red velvet batter into the pan.
    2. Dollop cheesecake mixture on top in spoonfuls.
    3. Use a knife to swirl them together (don’t over-swirl or it turns muddy).
    4. Bake for 25-30 minutes until a toothpick comes out clean.

    Step 5: Cool and Slice

    1. Cool completely in pan, then refrigerate for 1 hour.
    2. Lift out using parchment. Slice into 16 bars. Serve cold or at room temp.

    Summary

    Prep Time: 15 mins | Bake Time: 30 mins | Chill: 1 hour | Total: ~1.5 hours

    Yield: 16 bars

    Difficulty: Easy

    Storage Notes

    Store in the fridge for up to 5 days. These actually taste better cold. Freeze for up to 3 months—wrap individually. Thaw in the fridge overnight. Do not leave out on the counter (cream cheese needs chill).

  • Fried Oysters: Golden, Briny, Crunchy Little Clouds from the Sea

    Fried Oysters: Golden, Briny, Crunchy Little Clouds from the Sea

    Fried oysters are the seafood appetizer that disappears fastest. A light, crunchy cornmeal crust gives way to a warm, briny, barely-cooked center that tastes like the ocean in the best way. No rubbery over-frying here. Just quick, hot, and golden. Pile them on a po’boy, tuck into a salad, or eat them straight off the cooling rack with remoulade and lemon. Let’s fry.

    Ingredients

    Serves 4 as an appetizer (about 24 oysters).

    For the Oysters:

    • 24 shucked oysters, drained (about 12 oz)
    • 1 cup buttermilk
    • 1 cup cornmeal (fine or medium grind)
    • ½ cup all-purpose flour
    • 1 teaspoon Cajun or Old Bay seasoning
    • ½ teaspoon garlic powder
    • ½ teaspoon paprika
    • Salt and black pepper
    • Neutral oil for frying

    For the Remoulade (Optional):

    • ½ cup mayonnaise
    • 1 tablespoon creole or yellow mustard
    • 1 tablespoon hot sauce
    • 1 teaspoon paprika
    • 1 teaspoon lemon juice
    • 1 garlic clove, minced

    Step-by-Step Instructions

    Step 1: Soak the Oysters

    1. Place drained oysters in a bowl. Cover with buttermilk.
    2. Let soak for 15-30 minutes (this tenderizes and removes any fishy taste).

    Step 2: Make the Coating

    1. In a shallow dish, mix cornmeal, flour, Cajun seasoning, garlic powder, paprika, salt, and pepper.

    Step 3: Dredge the Oysters

    1. Remove oysters from buttermilk, letting excess drip off.
    2. Drop into cornmeal mixture. Toss gently to coat completely.
    3. Place on a wire rack while you heat the oil.

    Step 4: Fry Hot and Fast

    1. Heat 2 inches of oil to 375°F (190°C).
    2. Fry oysters in small batches for 60-90 seconds until golden brown.
    3. Do not crowd—oysters release moisture and will drop the temperature.
    4. Drain on a wire rack (paper towels trap steam and ruin crispiness).

    Step 5: Serve Immediately

    1. Squeeze fresh lemon over hot oysters. Serve with remoulade, cocktail sauce, or hot sauce.
    2. Po’boy option: pile into a toasted French roll with lettuce, tomato, pickles, and remoulade.

    Summary

    Prep Time: 20 minutes | Cook Time: 5 minutes | Total Time: 25 minutes

    Yield: 24 oysters (4 appetizer servings)

    Difficulty: Medium (oil temp control is key)

    Storage Notes

    Best Eaten Immediately:

    Fried oysters have a 10-minute window of glory. After that, the crust softens and the magic fades.

    Leftovers (Rare):

    Reheat in an air fryer at 400°F (200°C) for 2-3 minutes or in a hot oven on a wire rack. Never microwave—rubbery oysters are a tragedy.

    Make-Ahead Hack:

    Bread the oysters up to 2 hours ahead and keep them on a wire rack in the fridge. Fry right before serving.

    Pro Tips:

    Pat oysters dry before buttermilk soak for better coating adhesion. Use a thermometer for oil—too cool = greasy, too hot = burnt outside/raw inside. And don’t skip the wire rack drain; it’s the difference between crispy and soggy.

  • Fried Boudin Balls: Louisiana’s Crispy, Spicy, Porky Little Orbs of Joy

    Fried Boudin Balls: Louisiana’s Crispy, Spicy, Porky Little Orbs of Joy

    Boudin balls are what happen when Louisiana decides to deep-fry perfection. Boudin is already amazing—a spicy mix of pork, rice, and Cajun seasonings stuffed in a sausage casing. But rolling that filling into balls, breading them, and frying until crispy? That’s next-level. The outside shatters. The inside stays soft, creamy, and packed with smoky heat. Dip in remoulade or hot sauce and pretend you’re in Lafayette.

    Ingredients

    Makes about 20 boudin balls (serves 4-6 as an appetizer).

    For the Boudin (or Buy Pre-Made):

    • 1 lb pork shoulder, cut into chunks
    • 1 cup chicken liver (optional but traditional)
    • 1 cup white rice, cooked
    • 1 onion, finely chopped
    • 3 garlic cloves, minced
    • 2 green onions, chopped
    • 1 teaspoon Cajun seasoning
    • ½ teaspoon cayenne pepper
    • ½ teaspoon black pepper
    • 1 teaspoon salt
    • 1 cup chicken broth

    For the Breading & Frying:

    • 1 cup all-purpose flour
    • 2 large eggs, beaten
    • 1½ cups panko breadcrumbs or fine breadcrumbs
    • Neutral oil for frying

    Step-by-Step Instructions

    Step 1: Make the Boudin (or Skip)

    1. Simmer pork and livers in broth with onion, garlic, and seasonings until tender, about 1 hour.
    2. Remove meat, reserving broth. Shred or finely chop meat.
    3. In a bowl, mix meat with cooked rice, green onions, and enough reserved broth to make a moist, stuffing-like consistency.
    4. Alternatively: buy 1½ lbs pre-made boudin sausage and remove the casing.

    Step 2: Form the Balls

    1. Scoop boudin mixture and roll into 1.5-inch balls (about golf-ball size).
    2. Place on a parchment-lined tray.

    Step 3: Set Up Breading Station

    1. Three bowls: flour in one, beaten eggs in second, breadcrumbs in third.
    2. Roll each boudin ball in flour, then egg, then breadcrumbs.

    Step 4: Fry Until Golden

    1. Heat 2 inches of oil to 350°F (175°C).
    2. Fry balls in batches for 3-4 minutes until deep golden brown and crispy.
    3. Drain on a wire rack.

    Step 5: Serve Hot

    1. Serve immediately with remoulade sauce, hot sauce, or Cajun ranch. Don’t burn your mouth (but you will anyway).

    Summary

    Prep Time: 30 minutes | Cook Time: 20 minutes | Total Time: 50 minutes (plus optional simmer time)

    Yield: 20 balls (4-6 servings)

    Difficulty: Medium (rolling and breading takes practice)

    Storage Notes

    How to Store:

    Keep fried boudin balls in an airtight container in the fridge for up to 3 days.

    Reheating (Crucial):

    Reheat in an air fryer at 375°F (190°C) for 4-5 minutes or in an oven on a wire rack at 400°F for 8-10 minutes. Microwave = soggy, sad balls. Don’t do it.

    Freezing (Best Hack):

    Freeze unbreaded or breaded balls on a tray until solid, then transfer to a freezer bag. Fry directly from frozen—add 1-2 minutes to cook time. Freeze for up to 3 months.

    Pro Tip:

    Double-bread for extra crunch: flour → egg → breadcrumbs → egg → breadcrumbs again. Your taste buds will thank you.

  • Birria Tacos: Dip, Sizzle, Sink Into Beefy, Cheesy Bliss

    Birria Tacos: Dip, Sizzle, Sink Into Beefy, Cheesy Bliss

    Birria tacos are not a drill. You braise beef low and slow in a spicy, smoky chile broth until it falls apart. Then you dip corn tortillas in the orange-red fat that floats on top, griddle them until crispy, stuff them with shredded beef and melty cheese, and fry them again. The final move? Dunk the whole crispy, cheesy thing into warm consommé. Your life changes. Let’s go.

    Ingredients

    Serves 6-8 (about 16 tacos).

    For the Meat & Broth:

    • 3 lbs beef chuck roast, cut into large chunks
    • 4 dried guajillo chiles, stems and seeds removed
    • 2 dried ancho chiles, stems and seeds removed
    • 4 garlic cloves
    • 1 white onion, quartered
    • 2 tomatoes, roasted or boiled
    • 1 tablespoon cumin
    • 1 tablespoon dried oregano
    • 1 teaspoon black pepper
    • 1 teaspoon ground cloves (optional)
    • 6 cups beef broth
    • 2 bay leaves

    For the Tacos:

    • 16 corn tortillas
    • 2 cups shredded Oaxaca or mozzarella cheese
    • Chopped cilantro and white onion for garnish
    • Lime wedges

    Step-by-Step Instructions

    Step 1: Make the Chile Sauce

    1. Toast dried chiles in a dry pan for 30 seconds per side. Cover with hot water and soak for 15 minutes.
    2. Blend soaked chiles with garlic, onion, tomatoes, cumin, oregano, pepper, cloves, and 1 cup beef broth until smooth. Strain if desired.

    Step 2: Braise the Beef

    1. Season beef chunks with salt. Sear in a hot pot until browned on all sides.
    2. Pour in chile sauce and remaining beef broth. Add bay leaves.
    3. Bring to a simmer. Cover and cook at 325°F (160°C) for 3-4 hours, or until beef shreds easily.

    Step 3: Shred and Skim

    1. Remove beef and shred with two forks. Strain the broth (consommé).
    2. Skim the orange-red fat off the top of the consommé—this is liquid gold for dipping tortillas.

    Step 4: Assemble the Tacos

    1. Dip each tortilla into the reserved fat.
    2. Place on a hot griddle or skillet. Add shredded beef and cheese.
    3. Fold in half. Cook until crispy and cheese melts, about 2 minutes per side.

    Step 5: Serve with Consommé

    1. Serve tacos with warm consommé in a cup for dipping. Top with cilantro, onion, and a squeeze of lime.

    Summary

    Prep Time: 30 minutes | Cook Time: 4 hours | Total Time: 4.5 hours

    Yield: 16 tacos (6-8 servings)

    Difficulty: Medium (time-heavy, technique-light)

    Storage Notes

    How to Store:

    Keep shredded beef and consommé separately in airtight containers in the fridge for up to 5 days. The flavor actually deepens overnight.

    Freezing:

    Freeze beef and consommé together for up to 3 months. Thaw overnight in the fridge before reheating.

    Reheating:

    Reheat consommé on the stovetop. For leftover assembled tacos (unlikely), re-crisp in a dry skillet for 1-2 minutes per side. Never microwave tacos—soggy tragedy.

    Meal Prep Dream:

    Make the full batch of birria on Sunday. Eat tacos all week. Just dip tortillas, fill, and griddle fresh each night. Takes 5 minutes.

  • The Cuban Sandwich: Pressed, Toasty, and Packed with Porky Perfection

    The Cuban Sandwich: Pressed, Toasty, and Packed with Porky Perfection

    The Cuban sandwich is a masterpiece of compression. Take crusty bread, layer it with mojo-marinated pork, ham, Swiss cheese, pickles, and mustard—then smash it in a hot press until the cheese melts into every crevice and the bread turns golden and shattery. This is the sandwich that made Miami famous. No press? A heavy skillet and a brick work fine.

    Ingredients

    Serves 2 sandwiches.

    • 1 loaf Cuban bread (or French/Italian loaf, about 12 inches)
    • 4 tablespoons yellow mustard
    • 6 oz roasted pork (Cuban mojo pork is ideal, leftover pulled pork works)
    • 6 oz sliced ham
    • 6 slices Swiss cheese
    • 12 dill pickle slices
    • 2 tablespoons butter, softened

    Step-by-Step Instructions

    Step 1: Prep the Bread

    1. Slice the loaf in half lengthwise, then into two sandwich-length portions.
    2. Open each sandwich. Spread mustard generously on both inner sides.

    Step 2: Layer the Fillings

    1. Bottom bread: Swiss cheese, roasted pork, ham, pickles, more Swiss cheese.
    2. Top with the second piece of bread, mustard-side down.
    3. Press down firmly to compact.

    Step 3: Butter and Press

    1. Spread softened butter on the outside of both bread halves.
    2. Heat a large skillet or griddle over medium heat.
    3. Place sandwich in the pan. Place another heavy skillet or a foil-wrapped brick on top to weigh it down.
    4. Cook for 3-4 minutes until bottom is golden and crispy.
    5. Flip, re-weight, and cook 3-4 more minutes until flat, toasted, and cheese is oozing.

    Step 4: Slice and Serve

    1. Cut each sandwich diagonally. Serve with plantain chips or a pickle spear.

    Summary

    Prep Time: 10 minutes | Cook Time: 8 minutes | Total Time: 18 minutes

    Yield: 2 sandwiches

    Difficulty: Easy (press weight required)

    Storage Notes

    Eat Fresh or Cry:

    A pressed Cuban sandwich is a live creature. Eat it immediately. Storing turns the crispy bread into a chewy, sad flapjack.

    Make-Ahead Components:

    Roast the pork up to 3 days ahead. Slice ham and cheese. Assemble and press when hungry.

    Reheating Leftovers (Not Recommended):

    If you must: re-press in a dry skillet over medium-low heat for 2 minutes per side. Never microwave (rubber pickles = tragedy).

    Pro Tip:

    Authentic Cuban bread is light and slightly crispy. If you can’t find it, French bread works—just avoid anything too dense or artisan. The press needs to flatten, not crush.

  • Japanese Fruit Sando: Cream, Strawberries, and Pure Joy Between Bread

    Japanese Fruit Sando: Cream, Strawberries, and Pure Joy Between Bread

    The fruit sando is Japan’s greatest humble snack. No toasting. No savory fillings. Just impossibly soft milk bread, lightly sweetened whipped cream, and jewel-bright fruit. Slice it open and the cross-section looks like edible art. This is breakfast, dessert, and a serotonin boost all at once.

    Ingredients

    Serves 2 sandwiches (4 slices).

    • 4 slices shokupan (Japanese milk bread) or soft white bread
    • 1 cup heavy cream (35% fat or higher)
    • 2 tablespoons powdered sugar
    • ½ teaspoon vanilla extract
    • 6-8 large strawberries (or kiwi, mandarin, mixed berries)

    Step-by-Step Instructions

    Step 1: Whip the Cream

    1. Chill a bowl and beaters in the fridge for 10 minutes.
    2. Pour cold heavy cream, powdered sugar, and vanilla into the bowl.
    3. Whip until stiff peaks form (like spreadable frosting, not butter).

    Step 2: Prep the Fruit

    1. Wash and completely dry strawberries. Remove stems.
    2. For a perfect cross-section, slice off the green tops and pat dry again.
    3. Arrange fruit in a single row (this matters for the money shot).

    Step 3: Assemble the Sando

    1. Lay out two slices of bread. Spread a thick layer of whipped cream on each.
    2. Place fruit in a straight line down the center of one slice.
    3. Pile more cream on top of the fruit (fill all gaps).
    4. Top with the second slice, cream-side down.

    Step 4: Press and Wrap

    1. Gently press down. Wrap the sandwich tightly in plastic wrap.
    2. Refrigerate for at least 30 minutes (this sets the shape).
    3. Unwrap. Slice in half with a sharp knife through the fruit line.
    4. Marvel at the cross-section. Eat immediately.

    Summary

    Prep Time: 15 minutes | Chill Time: 30 minutes | Total Time: 45 minutes

    Yield: 2 sandwiches

    Difficulty: Easy (whipping cream is the only skill)

    Storage Notes

    Best Eaten Same Day:

    Fruit sandos are fresh-only magic. The bread absorbs moisture from the cream and gets soggy overnight.

    Make-Ahead (Sort Of):

    Assemble and wrap tightly in plastic. Refrigerate for up to 4 hours. Slice right before serving.

    Pro Tips:

    Use a serrated knife for clean slices. Wipe the blade between cuts. For the prettiest result, choose fruit that’s all the same height (trim strawberry tops flat). Shokupan is ideal—it’s squishy, slightly sweet, and crustless. Find it at Asian grocery stores.

  • S’mores Hand Pies (Campfire Vibes, Zero Tent Required)

    S’mores Hand Pies (Campfire Vibes, Zero Tent Required)

    S’mores are great. S’mores you can eat on your couch? Even better.

    These hand pies pack all the campfire classics—chocolate, marshmallow, graham cracker crumbs—into a flaky, golden crust. Baked, not fried. Messy in the best way. Eat them warm with a glass of milk.

    Ingredients

    Makes 8 hand pies.

    • 2 refrigerated pie crusts (or homemade)
    • ½ cup chocolate chips or chopped chocolate bar
    • 8 large marshmallows (or 1 cup mini marshmallows)
    • ¼ cup graham cracker crumbs (plus more for topping)
    • 1 egg, beaten (for egg wash)
    • 1 tablespoon coarse sugar (optional, for sparkle)

    Step-by-Step Instructions

    Step 1: Preheat Oven

    1. Preheat to 375°F (190°C). Line a baking sheet with parchment paper.

    Step 2: Cut the Dough

    1. Unroll pie crusts. Use a 4-inch round cutter (or a wide mug) to cut 8 circles from each crust (16 total).

    Step 3: Fill the Pies

    1. Place 8 circles on the baking sheet. Sprinkle each with graham cracker crumbs.
    2. Top with chocolate chips and 1 large marshmallow (or mini marshmallows).

    Step 4: Seal and Crimp

    1. Place another dough circle on top. Press edges with a fork to seal. Cut small slits on top for steam.

    Step 5: Egg Wash and Bake

    1. Brush tops with beaten egg. Sprinkle with coarse sugar and extra graham crumbs.
    2. Bake for 15-18 minutes until golden brown and marshmallow is oozing.

    Step 6: Cool Slightly and Devour

    1. Let cool 5 minutes (the filling is lava-hot). Serve warm.

    Summary

    Prep Time: 15 minutes | Cook Time: 18 minutes | Total Time: 33 minutes

    Yield: 8 hand pies

    Difficulty: Easy

    Storage Notes

    Room temp: Keeps 2 days in an airtight container. Reheat in oven at 350°F for 5 minutes to re-crisp.

    Freezer (unbaked): Freeze assembled pies on a tray, then bag. Bake from frozen at 375°F for 20-22 minutes.

    Freezer (baked): Freeze up to 2 months. Reheat at 350°F for 8-10 minutes.

    Microwave warning: Just don’t. Soggy crust = sad s’mores.