Category: quick_meals

  • Beijing Beef That Crushes Panda Express (Sweet, Tangy, Crispy)

    Beijing Beef That Crushes Panda Express (Sweet, Tangy, Crispy)

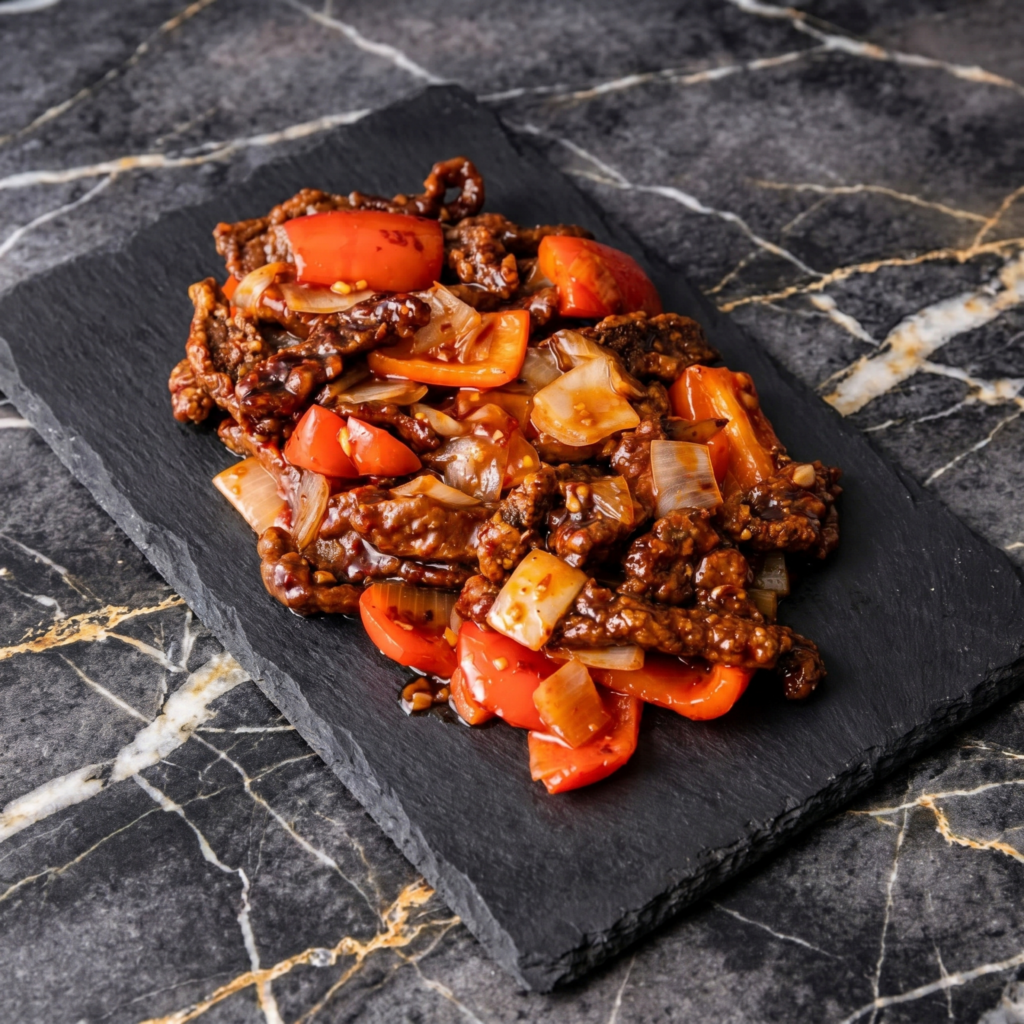
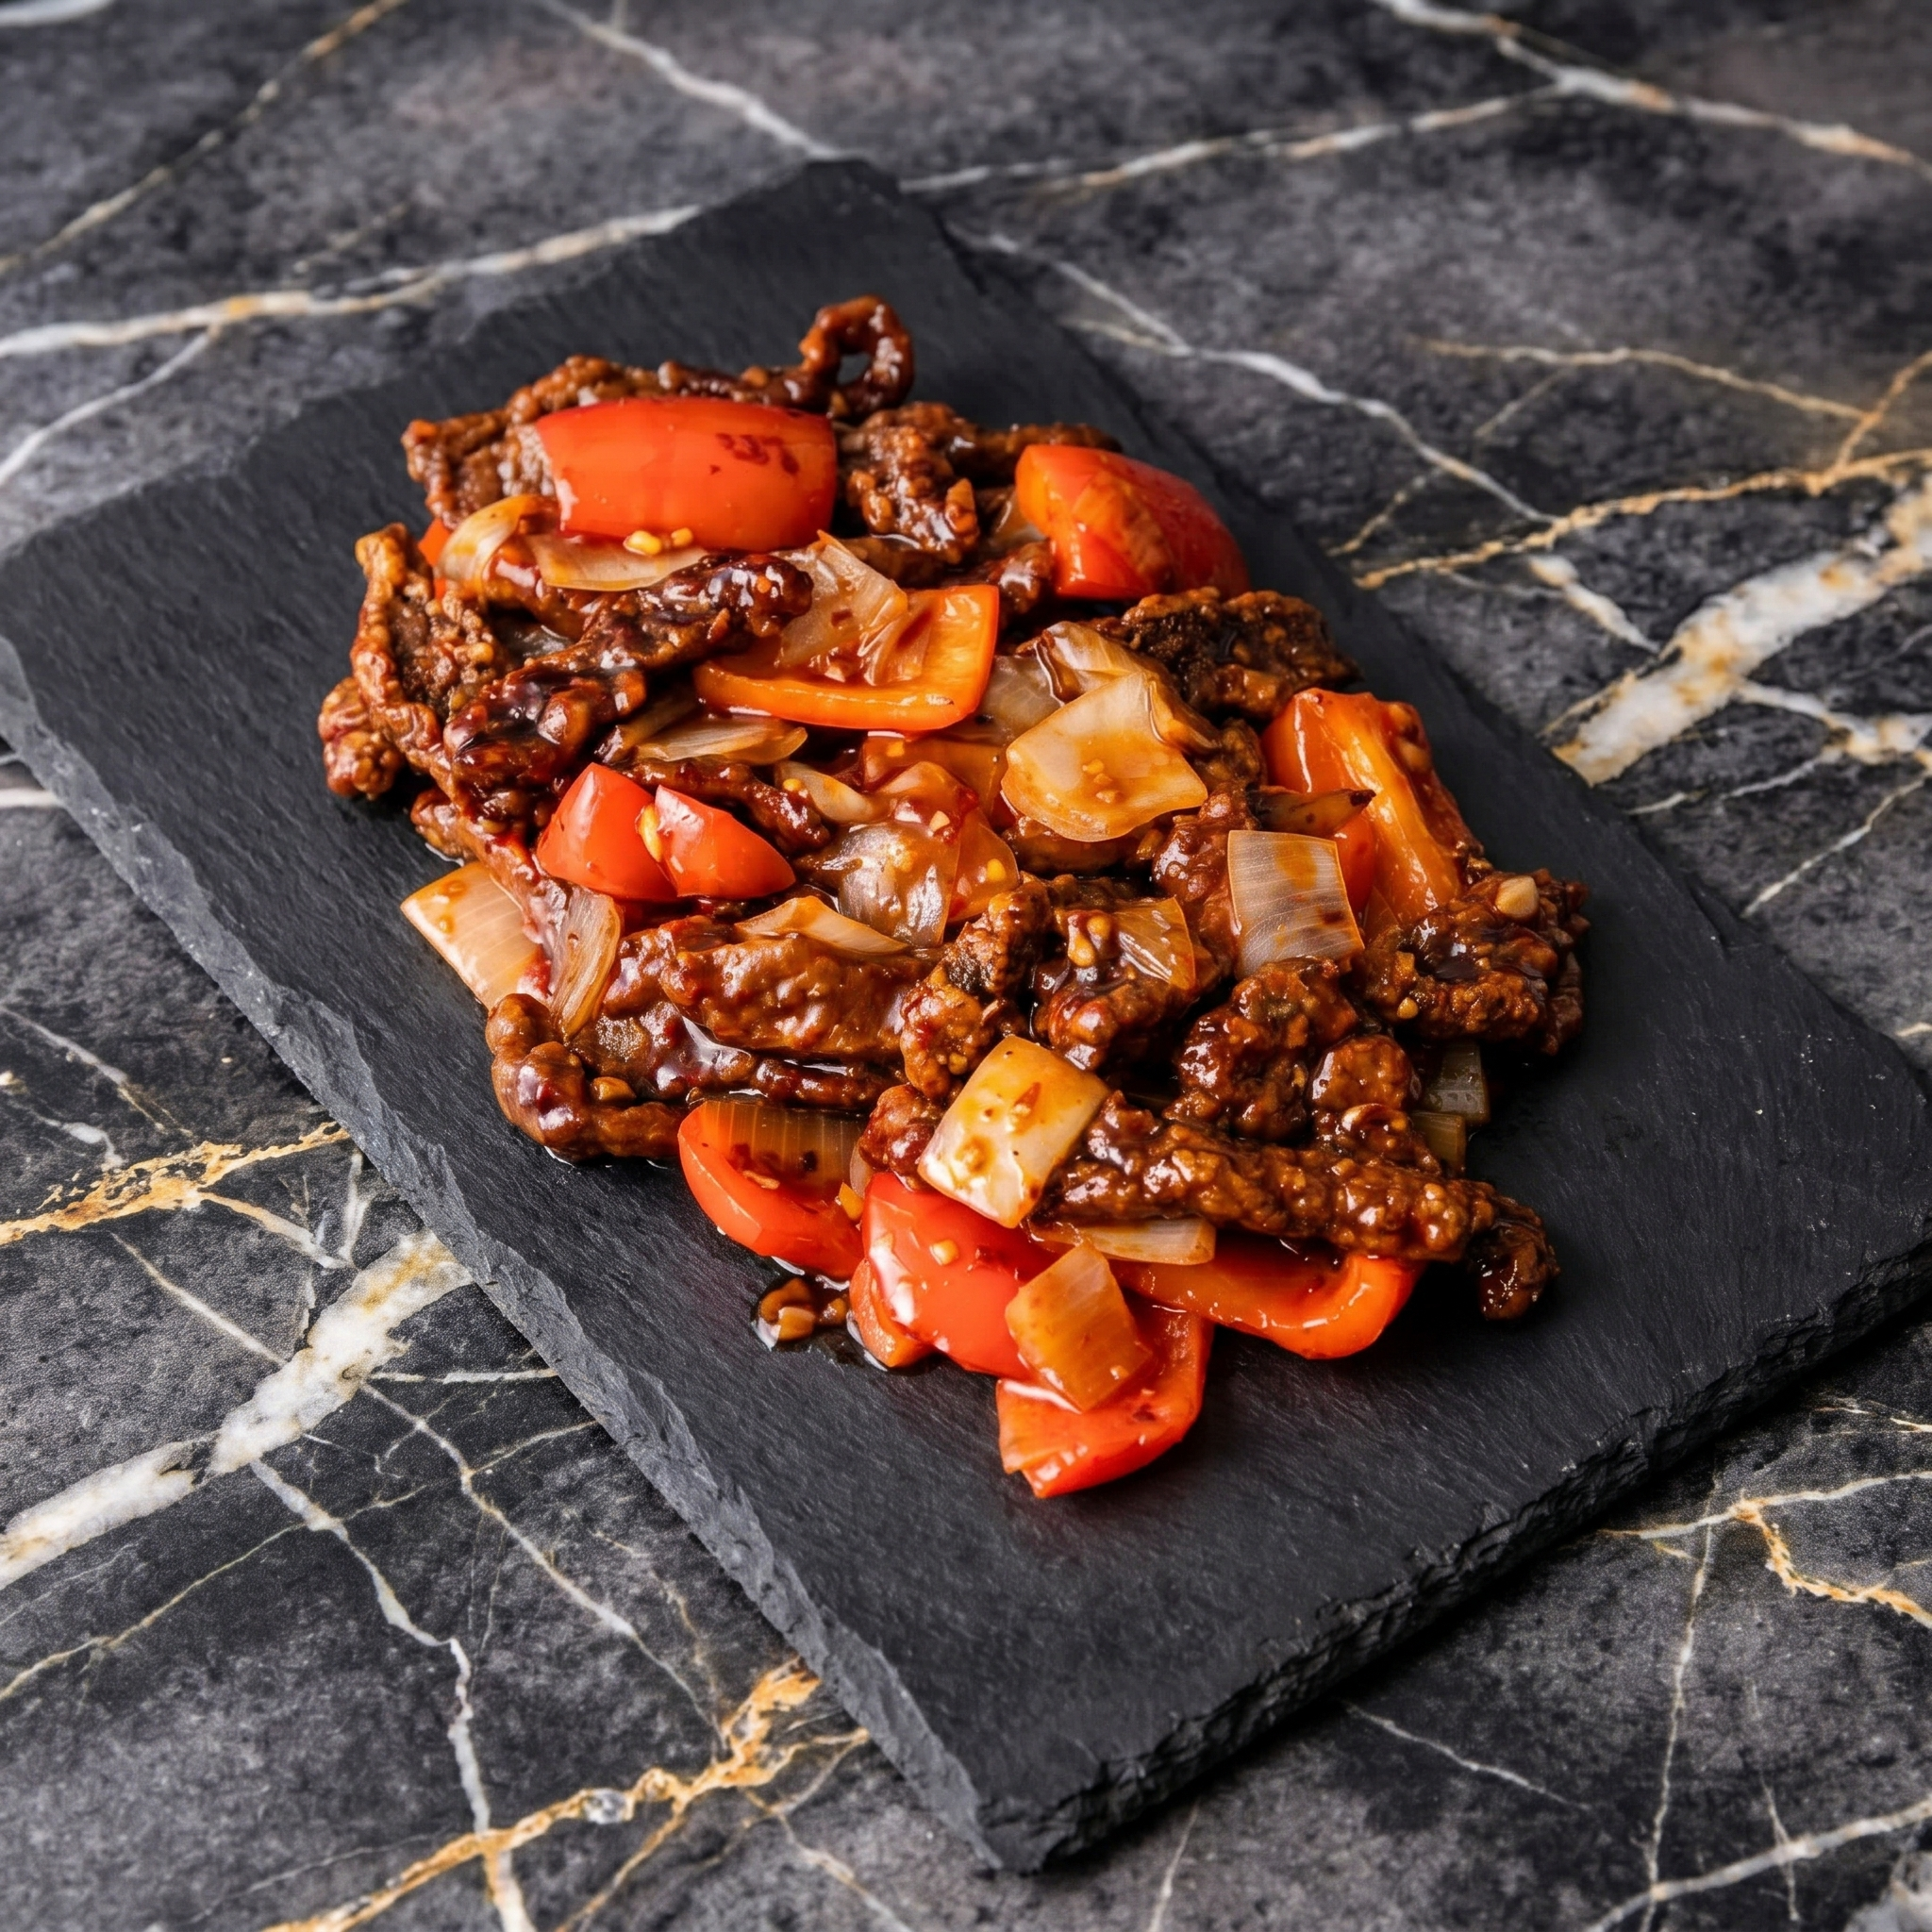
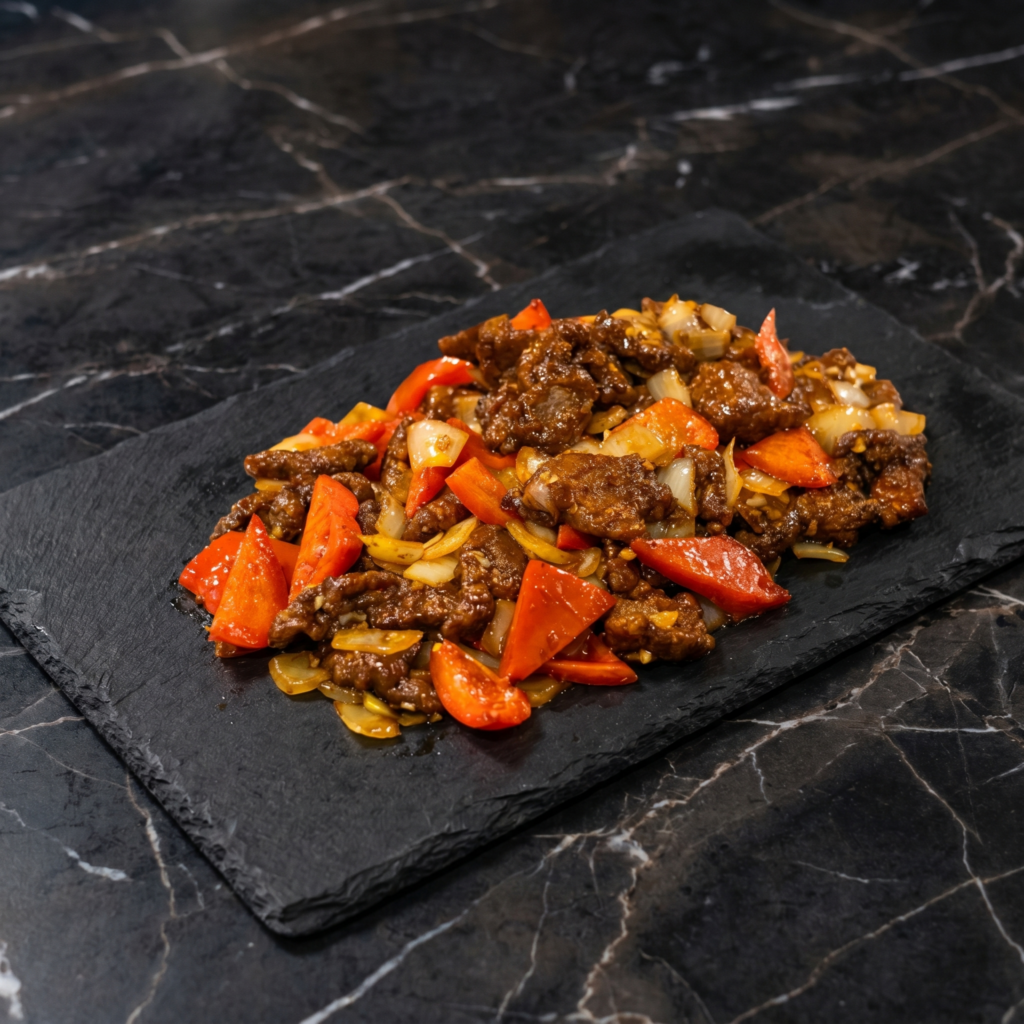
    Beijing beef is the unsung hero of the Panda Express menu—crispy, saucy, sweet, with a little tangy kick. This homemade version skips the mystery ingredients and delivers that same craveable crunch in 20 minutes. No drive-through required.

    Ingredients

    Serves 3-4.

    For the Beef & Batter:

    • 1 lb flank steak or sirloin, thinly sliced against the grain
    • ½ cup cornstarch
    • ¼ cup flour
    • 1 egg
    • Oil for frying

    For the Sauce:

    • ¼ cup hoisin sauce
    • 2 tablespoons rice vinegar
    • 2 tablespoons brown sugar
    • 2 tablespoons soy sauce
    • 1 tablespoon ketchup
    • 1 teaspoon sriracha (optional)
    • 2 cloves garlic, minced

    For the Stir Fry:

    • 1 red bell pepper, sliced
    • 1 green bell pepper, sliced
    • ½ onion, sliced

    Step-by-Step Instructions

    Step 1: Batter the Beef

    1. Toss sliced beef with cornstarch, flour, and egg until fully coated.

    Step 2: Fry Until Crispy

    1. Heat 1 inch of oil in a wok or deep pan to 350°F.
    2. Fry beef in batches for 3-4 minutes until golden and crispy.
    3. Drain on paper towels.

    Step 3: Make the Sauce

    1. In a bowl, whisk hoisin, rice vinegar, brown sugar, soy sauce, ketchup, sriracha, and garlic.

    Step 4: Stir Fry Veggies

    1. Pour out all but 1 tablespoon of oil from the wok.
    2. Stir fry bell peppers and onion for 1-2 minutes until slightly charred but still crunchy.

    Step 5: Toss Everything Together

    1. Add sauce to the wok and cook for 30 seconds until bubbling.
    2. Add crispy beef and toss quickly to coat—don’t overmix or you’ll lose the crunch.
    3. Serve immediately over rice.

    Summary

    Prep Time: 10 minutes | Cook Time: 12 minutes | Total Time: 22 minutes

    Yield: 3-4 servings

    Difficulty: Easy-Medium

    Storage Notes

    Beijing beef loses crispiness within hours—best eaten fresh. Leftovers can be refrigerated for 2 days. Reheat in an air fryer at 375°F for 5 minutes or in a hot dry skillet. Never microwave unless you like sad, soggy beef.

  • Cornish Pasties: A Handheld Savory Pocket (No Mining Helmet Required)

    Cornish Pasties: A Handheld Savory Pocket (No Mining Helmet Required)

    Before energy bars and drive-thrus, there was the Cornish pasty. Miners in Cornwall needed a hearty, handheld meal that could survive a dark, dusty shift—and wouldn’t poison them with arsenic from their fingers. So they held the crimped crust like a handle and ate the rest. Genius.

    Today, you get the same flaky, golden pocket packed with beef, potato, onion, and rutabaga (swede, if you’re fancy). It’s savory, satisfying, and surprisingly easy to make at home. No tin mine required.

    Ingredients

    Makes 4 pasties.

    For the Dough:

    • 3 cups (375g) all-purpose flour
    • 1 cup (225g) cold unsalted butter, cubed
    • ½ cup (120ml) ice water
    • 1 teaspoon salt

    For the Filling:

    • ½ lb (225g) beef skirt or sirloin, finely chopped (not ground)
    • 1 medium potato, diced small (¼-inch)
    • ½ small rutabaga (swede), diced small
    • ½ medium onion, finely chopped
    • Salt and black pepper to taste
    • 1 egg, beaten (for egg wash)

    Step-by-Step Instructions

    Step 1: Make the Dough

    1. Mix flour and salt. Cut in cold butter until it looks like coarse crumbs.
    2. Add ice water gradually, mixing until dough just comes together. Don’t overwork.
    3. Divide into 4 balls, flatten into discs, wrap, and chill 30 minutes.

    Step 2: Prep the Filling

    1. Chop beef into small cubes (¼-inch). Do the same with potato, rutabaga, and onion.
    2. Mix everything in a bowl. Season generously with salt and pepper. That’s it—no pre-cooking.

    Step 3: Assemble the Pasties

    1. Roll each dough disc into an 8-inch circle.
    2. Place a generous ½ cup of filling on one half, leaving a border.
    3. Add a small pat of butter on top (secret to moist filling).
    4. Fold the empty half over. Crimp the edge firmly—twist or flute it like a rope.

    Step 4: Bake

    1. Place pasties on a parchment-lined baking sheet. Cut two small slits on top for steam.
    2. Brush with beaten egg.
    3. Bake at 400°F (200°C) for 45–50 minutes, until deep golden brown.

    Step 5: Cool and Eat

    1. Let rest 10 minutes. Hold the crimped edge, bite the other end, and pretend you’re in Cornwall.

    Summary

    Prep Time: 30 minutes (plus 30 min chill) | Cook Time: 50 minutes | Total Time: 1 hour 50 minutes

    Yield: 4 pasties

    Difficulty: Medium

    Storage Notes

    How to Store:

    • Fridge: Baked pasties keep 3–4 days. Reheat in oven (not microwave) to keep crust crisp.
    • Freezer (unbaked): Freeze assembled pasties on a tray, then wrap tightly. Bake from frozen, adding 15–20 minutes.
    • Freezer (baked): Cool completely, wrap, freeze up to 3 months. Reheat at 350°F for 20 minutes.

    Pro Tip:

    Don’t skip the rutabaga. Traditional Cornish pasties require it by law (seriously—it has protected status).

  • Curry Pan: Japan’s Crunchy, Curry-Filled Donut (No Deep Fryer Fear)

    Curry Pan: Japan’s Crunchy, Curry-Filled Donut (No Deep Fryer Fear)

    Imagine a soft dinner roll. Now imagine it’s stuffed with rich, mildly spiced Japanese curry, rolled in panko, and fried until golden and crunchy. That’s curry pan—a vending machine legend and convenience store hero in Japan.

    It’s savory, sweet, crunchy, and fluffy all at once. And no, you don’t need a deep fryer. A pot with oil works fine. Just don’t wear white.

    Ingredients

    Makes 6 curry pan.

    For the Dough:

    • 2 cups (250g) bread flour
    • 2 tablespoons sugar
    • ½ teaspoon salt
    • 1 teaspoon instant yeast
    • ½ cup (120ml) warm milk
    • 1 egg
    • 1 tablespoon unsalted butter, softened

    For the Filling & Coating:

    • 1 cup leftover Japanese curry (thick, not watery)
    • 1 cup panko breadcrumbs
    • 1 egg (for egg wash)
    • 2 cups vegetable oil (for frying)

    Step-by-Step Instructions

    Step 1: Make the Dough

    1. Mix flour, sugar, salt, and yeast. Add warm milk and egg. Knead until combined.
    2. Add softened butter. Kneat 8–10 minutes until smooth.
    3. Let rise 1 hour, until doubled.

    Step 2: Prep the Curry

    1. Your curry must be THICK. If it’s runny, chill it. You need a scoopable paste, not soup.
    2. Divide chilled curry into 6 balls (about 2 tablespoons each).

    Step 3: Assemble

    1. Punch down dough. Divide into 6 pieces.
    2. Flatten each into a 4-inch circle.
    3. Place a curry ball in the center. Fold edges over and pinch tightly to seal.
    4. Roll each into a smooth ball.

    Step 4: Coat and Fry

    1. Brush each ball with beaten egg. Roll in panko until fully covered.
    2. Heat oil to 340°F (170°C). Fry 2–3 at a time, 2–3 minutes per side, until dark golden.
    3. Drain on paper towels.

    Step 5: Serve Hot

    1. Eat immediately. The contrast of crunchy outside, soft bread, and warm curry is magic. Burn your mouth happily.

    Summary

    Prep Time: 20 minutes | Rise Time: 1 hour | Cook Time: 15 minutes | Total Time: 1 hour 35 minutes

    Yield: 6 curry pan

    Difficulty: Medium

    Storage Notes

    How to Store:

    • Best eaten fresh. Curry pan is a crispy-first, ask-questions-later situation.
    • Fridge: Not recommended. Bread gets sad.
    • Reheat: Air fryer at 350°F for 3–4 minutes. Microwave will make it soggy (don’t do it).
    • Freeze (unfried): Assemble and coat, then freeze on a tray. Fry from frozen, adding 1–2 minutes.

    Pro Tip:

    Use leftover curry from yesterday. It’s thicker and easier to handle. Plus, zero waste.

  • Crispy Onion Strings: The Topping That Steals the Show

    Crispy Onion Strings: The Topping That Steals the Show

    You know those crispy little onion things on green bean casserole? Imagine those, but infinitely better. Thinner. Crispier. More flavorful. These onion strings take 15 minutes and make everything better—burgers, steaks, salads, your life.

    Fair warning: They vanish fast.

    Ingredients

    Serves 4 as a topping (or 2 as a snack).

    • 1 large yellow or sweet onion
    • 1 cup buttermilk (or regular milk + 1 teaspoon vinegar)
    • 1 cup all-purpose flour
    • ½ teaspoon salt
    • ½ teaspoon black pepper
    • ½ teaspoon paprika
    • ¼ teaspoon garlic powder
    • Vegetable oil (for frying)

    Step-by-Step Instructions

    Step 1: Slice and Soak

    1. Slice onion paper-thin (use a mandoline if you have one).
    2. Soak in buttermilk for 10 minutes. This tames the bite and helps coating stick.

    Step 2: Make the Coating

    1. Mix flour, salt, pepper, paprika, and garlic powder in a bowl.

    Step 3: Dredge

    1. Grab a handful of onion strings from buttermilk. Let excess drip off.
    2. Toss in flour mixture until fully separated and coated.

    Step 4: Fry

    1. Heat 1 inch of oil in a pot to 375°F (190°C).
    2. Fry in small batches for 1-2 minutes until golden brown.
    3. Drain on paper towels. Sprinkle with extra salt immediately.

    Summary

    Prep Time: 10 minutes | Cook Time: 5 minutes | Total Time: 15 minutes

    Yield: About 2 cups of onion strings

    Difficulty: Easy

    Storage Notes

    How to Store:

    • Same day only. These are best fresh and crispy. They get sad overnight.
    • Reheat trick: Air fryer at 350°F for 2-3 minutes brings some crunch back. Microwave? Never.
    • Make ahead: Slice and soak onions up to 2 hours before frying. Fry right before serving.

    Pro Tip:

    Thin slices are everything. Thick slices = raw centers. Use a mandoline or a very sharp knife. Also, don’t overcrowd the pot—it drops the oil temp and makes greasy strings.

  • Lemon Garlic Chicken Thighs: Bright, Juicy, 10-Minute Prep

    Lemon Garlic Chicken Thighs: Bright, Juicy, 10-Minute Prep

    Chicken breasts are boring. Chicken thighs are heroes. They’re juicier, more forgiving, and packed with flavor. Add bright lemon and lots of garlic, and you’ve got dinner in under 30 minutes.

    One skillet. Five minutes of prep. Zero dry chicken.

    Ingredients

    Serves 4.

    • 6 bone-in, skin-on chicken thighs
    • 1 teaspoon salt
    • ½ teaspoon black pepper
    • 1 tablespoon olive oil
    • 6 garlic cloves, smashed or minced
    • ¼ cup lemon juice (about 2 lemons)
    • 1 tablespoon lemon zest
    • ½ cup chicken broth
    • 2 tablespoons butter
    • 2 tablespoons fresh parsley or thyme (optional)

    Step-by-Step Instructions

    Step 1: Season and Sear

    1. Pat chicken thighs dry. Season both sides with salt and pepper.
    2. Heat oil in a large skillet over medium-high heat. Place chicken skin-side down.
    3. Sear 5-6 minutes until skin is golden and crispy. Flip and cook 2 more minutes. Remove and set aside.

    Step 2: Make the Sauce

    1. Lower heat to medium. Add garlic, cook 30 seconds until fragrant.
    2. Add lemon juice, lemon zest, and chicken broth. Scrape up brown bits.
    3. Simmer 2-3 minutes. Stir in butter until melted.

    Step 3: Finish Chicken

    1. Return chicken to skillet, skin-side up. Spoon sauce over the top.
    2. Simmer 8-10 minutes until chicken hits 165°F (74°C) internal.

    Step 4: Serve

    1. Sprinkle with parsley or thyme. Serve with rice, roasted potatoes, or crusty bread to soak up the sauce.

    Summary

    Prep Time: 5 minutes | Cook Time: 20 minutes | Total Time: 25 minutes

    Yield: 6 thighs (4 servings)

    Difficulty: Easy

    Storage Notes

    How to Store:

    • Fridge: Keeps 3-4 days. Reheat in skillet or oven at 350°F for 10 minutes.
    • Freezer (cooked): Up to 3 months. Thaw overnight, reheat in oven.
    • Meal prep: Make sauce and sear chicken ahead. Finish in skillet day-of.

    Pro Tip:

    Pat the skin DRY before searing. Moisture is the enemy of crispiness. Also, don’t crowd the pan—chicken needs room to brown. Do two batches if needed.

  • Teriyaki Chicken Skewers: Sweet, Sticky, Better Than Takeout

    Teriyaki Chicken Skewers: Sweet, Sticky, Better Than Takeout

    Chicken on sticks. Sweet, garlicky, sticky glaze. What’s not to love? Teriyaki chicken skewers come together fast, cook faster, and disappear fastest. No fancy ingredients. No complicated steps.

    Just juicy chicken and that glossy, addictive sauce.

    Ingredients

    Makes 8-10 skewers (serves 4).

    For the Skewers:

    • 1.5 lbs (675g) boneless, skinless chicken thighs (or breasts)
    • 2 green onions, sliced (for garnish)
    • 1 teaspoon sesame seeds (optional)

    For the Teriyaki Sauce:

    • ½ cup soy sauce
    • ¼ cup water
    • ¼ cup brown sugar
    • 2 tablespoons mirin (or honey + 1 tbsp rice vinegar)
    • 2 garlic cloves, minced
    • 1 teaspoon ginger, grated
    • 1 tablespoon cornstarch + 2 tablespoons water (slurry)

    Step-by-Step Instructions

    Step 1: Make the Sauce

    1. Combine soy sauce, water, brown sugar, mirin, garlic, and ginger in a small pot.
    2. Simmer 3 minutes. Add cornstarch slurry. Stir until thick (1 minute).
    3. Reserve half the sauce for serving. Use the other half for basting.

    Step 2: Prep Skewers

    1. Cut chicken into 1-inch chunks. Thread onto skewers (metal or soaked bamboo).

    Step 3: Grill or Broil

    1. Grill: Medium-high heat. Cook 3-4 minutes per side, basting with sauce.
    2. Broiler: Place skewers on foil-lined tray. Broil 4 minutes, flip and baste, broil 3 more minutes.

    Step 4: Finish

    1. Brush with reserved sauce. Top with green onions and sesame seeds. Serve with rice.

    Summary

    Prep Time: 10 minutes | Cook Time: 10 minutes | Total Time: 20 minutes

    Yield: 8-10 skewers

    Difficulty: Easy

    Storage Notes

    How to Store:

    • Fridge: Keeps 3-4 days. Reheat in skillet or air fryer (not microwave).
    • Freezer (uncooked, skewered): Freeze on a tray, then bag. Cook from frozen, add 2-3 minutes per side.
    • Freezer (cooked): Up to 2 months. Reheat at 350°F for 10 minutes.

    Pro Tip:

    Use chicken thighs. Breasts work, but thighs stay juicy even if you overcook them slightly. Also, reserve half the sauce—using raw basting sauce that touched chicken is a no-go.

  • Stuffed Portobello Mushrooms (So Meaty, You Won’t Miss the Meat)

    Stuffed Portobello Mushrooms (So Meaty, You Won’t Miss the Meat)

    Portobello mushrooms are nature’s burger buns, pizza crusts, and now—stuffing vessels. This recipe takes the meaty, umami-rich caps and fills them with a simple mix of cheese, garlic, and breadcrumbs. It’s vegetarian comfort food that actually satisfies. Twenty minutes, one pan, zero regrets.

    Ingredients

    Serves 4 as a main, 8 as a side.

    • 4 large portobello mushrooms, stems removed
    • 2 tablespoons olive oil, divided
    • 3 cloves garlic, minced
    • ½ cup breadcrumbs (panko preferred)
    • ½ cup grated Parmesan cheese
    • ½ cup shredded mozzarella cheese
    • 2 tablespoons fresh parsley, chopped
    • Salt and black pepper

    Step-by-Step Instructions

    Step 1: Prep the Mushrooms

    1. Preheat oven to 400°F (200°C).
    2. Gently wipe mushrooms clean with a damp paper towel. Don’t rinse them—they soak up water like sponges.
    3. Remove stems (save for another use or chop into the filling).
    4. Using a spoon, scrape out the dark gills if desired (optional, but prevents dark liquid).

    Step 2: Roast the Caps

    1. Brush mushroom caps with 1 tablespoon olive oil inside and out.
    2. Place gill-side up on a baking sheet. Sprinkle with salt and pepper.
    3. Roast for 5 minutes to release moisture.

    Step 3: Make the Filling

    1. In a bowl, combine breadcrumbs, Parmesan, mozzarella, garlic, parsley, remaining olive oil, and a pinch of pepper.
    2. Mix until crumbs are evenly moistened.

    Step 4: Stuff and Bake

    1. Remove mushrooms from oven. Pour out any liquid collected in the caps.
    2. Divide filling evenly among the four caps, pressing gently.
    3. Bake for 10-12 minutes until tops are golden and mushrooms are tender.

    Step 5: Serve Hot

    1. Let rest for 2 minutes. Garnish with extra parsley.
    2. Serve as a main with a side salad or as a hearty appetizer.

    Summary

    Prep Time: 8 minutes | Cook Time: 17 minutes | Total Time: 25 minutes

    Yield: 4 main or 8 side servings

    Difficulty: Easy

    Storage Notes

    Store leftovers in an airtight container for up to 3 days. Reheat in a 375°F oven for 5-7 minutes (microwave makes them soggy). These are not freezer-friendly—the mushrooms become watery when thawed.

  • Garlic Bread (The Only Side Dish That Steals the Show)

    Garlic Bread (The Only Side Dish That Steals the Show)

    Garlic bread is not a side dish. It’s the main event.

    Butter. Garlic. Parsley. Toasty bread. That’s it. That’s the recipe. Ten minutes from start to plate. Crispy edges. Soft, buttery center. Pasta is just the excuse.

    Ingredients

    Serves 4.

    • 1 loaf French or Italian bread (about 12 inches)
    • ½ cup (115g) unsalted butter, softened
    • 4 cloves garlic, minced (or 1 tablespoon garlic paste)
    • 2 tablespoons fresh parsley, finely chopped
    • ¼ teaspoon salt
    • Optional: ¼ cup grated Parmesan cheese, pinch of red pepper flakes

    Step-by-Step Instructions

    Step 1: Prep

    1. Preheat oven to 400°F (200°C). Line a baking sheet with parchment.
    2. Slice bread in half horizontally (like a hot dog bun).

    Step 2: Make Garlic Butter

    1. Mix softened butter, minced garlic, parsley, and salt in a small bowl.
    2. Spread generously on both cut sides of the bread.

    Step 3: Bake

    1. Place bread on baking sheet, butter side up.
    2. Bake for 8-10 minutes until edges are golden and crispy.
    3. Optional: Broil for 1 extra minute for extra crunch.

    Step 4: Serve

    1. Slice into pieces. Sprinkle with Parmesan if using. Serve hot. Fight over the crispy ends.

    Summary

    Prep Time: 5 minutes | Cook Time: 10 minutes | Total Time: 15 minutes

    Yield: 4 servings

    Difficulty: Super Easy

    Storage Notes

    Best fresh. But leftovers keep in the fridge for 2 days.

    Reheat: Air fryer at 350°F for 3 minutes or oven at 375°F for 5 minutes. Microwave makes it rubbery—don’t do it.

    Make garlic butter ahead: Keeps in the fridge for 1 week or freezer for 3 months.

  • Chicken Katsu: Crispy and Juicy, Japanese Comfort Food

    Chicken Katsu: Crispy and Juicy, Japanese Comfort Food

    Chicken katsu is pure comfort. A tender chicken cutlet, coated in crispy panko breadcrumbs, fried until golden, and served with a sweet-tangy tonkatsu sauce that cuts through the richness. It’s the dish that makes you close your eyes after the first bite—crunch, then juicy, then that sauce.

    This recipe keeps things simple but perfect. Pound the chicken thin. Dredge in flour, egg, and panko. Fry until golden. Serve with shredded cabbage and a mountain of rice. It’s weeknight-friendly, crowd-pleasing, and guaranteed to disappear fast. Katsu night? Best night.

    Ingredients

    Serves 4.

    For the Chicken:

    • 4 boneless, skinless chicken breasts (about 6 oz each)
    • Salt and black pepper, to taste
    • ½ cup all-purpose flour
    • 2 large eggs, beaten
    • 1½ cups panko breadcrumbs
    • Neutral oil, for frying (vegetable, canola, or peanut)

    For the Tonkatsu Sauce:

    • ¼ cup ketchup
    • 2 tbsp Worcestershire sauce
    • 1 tbsp soy sauce
    • 1 tbsp sugar
    • 1 tsp Dijon mustard (optional)

    For Serving:

    • Steamed white rice
    • Shredded cabbage (green or napa)
    • Lemon wedges
    • Japanese mayonnaise (optional)

    Step-by-Step Instructions

    Step 1: Prep the Chicken

    1. Place chicken breasts between two sheets of plastic wrap or parchment paper.
    2. Using a meat mallet or rolling pin, pound to an even ½-inch thickness.
    3. Season both sides with salt and pepper.

    Step 2: Set Up Dredging Station

    1. Place flour in a shallow dish.
    2. Place beaten eggs in a second shallow dish.
    3. Place panko in a third shallow dish.

    Step 3: Bread the Chicken

    1. Dredge each chicken breast in flour, shaking off excess.
    2. Dip into beaten eggs, letting excess drip off.
    3. Coat in panko, pressing firmly to adhere.
    4. Place breaded cutlets on a wire rack and let rest for 10 minutes. This helps the coating set.

    Step 4: Make the Tonkatsu Sauce

    1. In a small bowl, whisk together ketchup, Worcestershire sauce, soy sauce, sugar, and mustard (if using).
    2. Set aside for flavors to meld.

    Step 5: Fry the Chicken

    1. Heat ½ inch of oil in a large skillet over medium-high heat to 350°F (175°C).
    2. Carefully place cutlets in the skillet (work in batches to avoid crowding). Cook for 3-4 minutes per side until golden brown and cooked through.
    3. Transfer to a wire rack to drain. (Paper towels trap steam and soften the crust.)

    Step 6: Serve Katsu-Style

    1. Slice each chicken katsu into 1-inch strips.
    2. Serve over steamed rice with a pile of shredded cabbage alongside.
    3. Drizzle with tonkatsu sauce and Japanese mayonnaise if desired. Add a lemon wedge for squeezing.
    4. Take a bite. Crispy, juicy, saucy perfection. This is katsu.

    Summary

    Prep Time: 15 minutes | Cook Time: 10 minutes | Total Time: 25 minutes

    Yield: 4 servings

    Difficulty: Crispy, easy, satisfying

    Storage Notes

    Leftovers:

    Store in an airtight container in the fridge for up to 3 days. The coating will soften but still tastes great.

    Reheating (Bring Back the Crunch):

    Oven or air fryer (best): 375°F for 5-7 minutes until hot and crispy. Skillet: Reheat in a dry pan over medium heat, flipping once. Microwave: Not recommended—makes it soggy.

    Freezer-Friendly:

    Freeze uncooked, breaded cutlets on a baking sheet, then transfer to a zip-top bag for up to 3 months. Fry from frozen—add 2-3 minutes to cooking time. No need to thaw.

    Make Ahead:

    Bread cutlets up to 4 hours in advance and refrigerate. Fry just before serving for maximum crispiness.

  • Pesto Pasta: Fresh and Vibrant, 15-Minute Perfection

    Pesto Pasta: Fresh and Vibrant, 15-Minute Perfection

    Pesto pasta is the definition of simple perfection. Fresh basil, pine nuts, garlic, Parmesan, and olive oil—whirled together into a vibrant green sauce that turns plain pasta into something extraordinary. It’s bright, it’s nutty, it’s garlicky, and it comes together faster than delivery.

    This recipe uses classic ingredients, but the method is flexible. Use a mortar and pestle for tradition, or a food processor for speed. Toss with any pasta you love, add a handful of cherry tomatoes or grilled chicken if you like, and dinner is done. Fifteen minutes from craving to plate.

    Ingredients

    Serves 4.

    For the Pesto:

    • 2 cups fresh basil leaves (about 2 large bunches), packed
    • ½ cup freshly grated Parmesan cheese
    • ⅓ cup pine nuts (or walnuts, almonds, or pistachios)
    • 2 cloves garlic, peeled
    • ½ cup extra virgin olive oil
    • ½ tsp salt, or to taste
    • ¼ tsp black pepper
    • 1 tbsp fresh lemon juice (optional, prevents browning)

    For the Pasta:

    • 12 oz pasta (spaghetti, linguine, fettuccine, or your favorite)
    • ¼ cup reserved pasta water
    • Extra Parmesan, for serving

    Optional Add-Ins:

    • Cherry tomatoes, halved
    • Grilled chicken or shrimp
    • Burrata or fresh mozzarella
    • Toasted pine nuts, for garnish
    • Red pepper flakes, for heat

    Step-by-Step Instructions

    Step 1: Cook the Pasta

    1. Bring a large pot of salted water to a boil.
    2. Cook pasta according to package directions until al dente.
    3. Reserve ½ cup of pasta water before draining. Drain pasta and set aside.

    Step 2: Make the Pesto

    1. While pasta cooks, combine basil, Parmesan, pine nuts, and garlic in a food processor.
    2. Pulse until roughly chopped.
    3. With the motor running, slowly drizzle in olive oil until smooth.
    4. Add salt, pepper, and lemon juice (if using). Pulse to combine.
    5. Taste and adjust seasoning—more salt, more cheese, or more garlic as desired.

    Step 3: Combine Pasta and Pesto

    1. Return drained pasta to the pot or a large bowl.
    2. Add the pesto and toss to coat. Start with about ⅔ of the pesto and add more to taste.
    3. Add reserved pasta water a little at a time until the sauce is silky and clings to the pasta.

    Step 4: Add Optional Toppings

    1. If using cherry tomatoes, grilled chicken, or other add-ins, fold them in now.
    2. Sprinkle with extra Parmesan and toasted pine nuts.

    Step 5: Serve Immediately

    1. Transfer to bowls or a serving platter.
    2. Garnish with fresh basil leaves and a drizzle of olive oil.
    3. Take a bite. Bright, nutty, garlicky perfection. Simple food at its finest.

    Summary

    Prep Time: 10 minutes | Cook Time: 10 minutes | Total Time: 20 minutes

    Yield: 4 servings

    Difficulty: Fast, fresh, foolproof

    Storage Notes

    Leftovers:

    Store in an airtight container in the fridge for up to 3 days. The color may darken, but the flavor remains delicious.

    Reheating:

    Skillet (best): Reheat gently over medium-low heat with a splash of water or olive oil to loosen the sauce. Microwave: 1-2 minutes at reduced power—add a splash of water before heating.

    Make Ahead (Pesto):

    Pesto can be made up to 1 week in advance and stored in the fridge with a thin layer of olive oil on top to prevent browning. Freeze pesto in ice cube trays for up to 3 months—pop out a cube whenever you need a quick sauce.