Category: quick_meals

  • Sausage and Egg Sandwich: The Ultimate Breakfast Sandwich

    Sausage and Egg Sandwich: The Ultimate Breakfast Sandwich

    The breakfast sandwich is a morning ritual. It’s the thing you crave on sleepy weekends, the grab-and-go hero that makes getting out of bed worth it. But the drive-thru version? It’s fine. The homemade version? It’s transcendent.

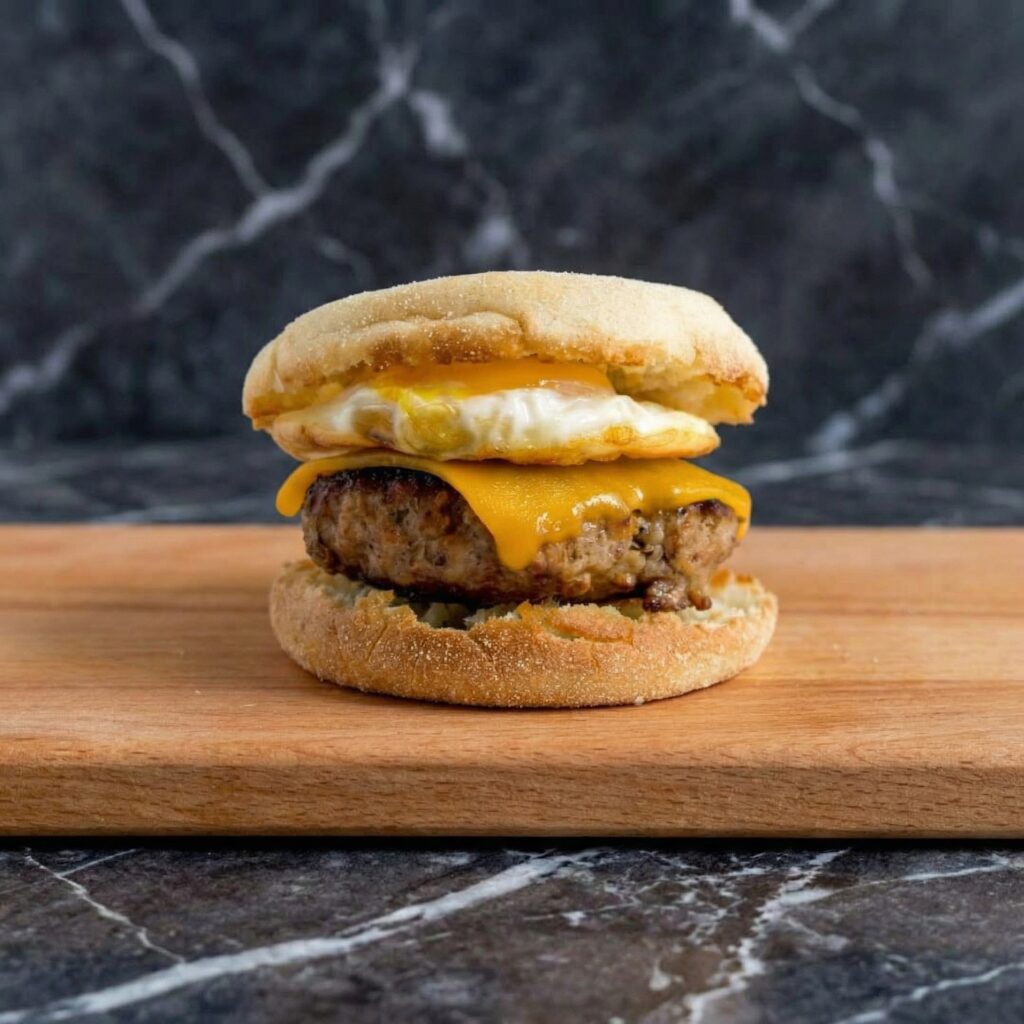
    This is the breakfast sandwich of your dreams. A juicy, perfectly seasoned sausage patty. A fried egg with a golden, crispy-edged white and a yolk that runs like liquid gold. Melted American cheese doing its creamy, clingy thing. All tucked into a buttered, griddled English muffin that’s crisp on the outside and soft inside. Fifteen minutes. One skillet. Breakfast is served.

    Ingredients

    Serves 2.

    For the Sausage Patties (or use store-bought):

    • ½ lb ground pork
    • ½ tsp salt
    • ½ tsp black pepper
    • ½ tsp fennel seeds, crushed
    • ¼ tsp sage
    • ¼ tsp garlic powder
    • ¼ tsp onion powder
    • ⅛ tsp red pepper flakes (optional)

    For the Sandwich:

    • 2 English muffins, split
    • 2 tbsp butter, softened
    • 2 large eggs
    • 2 slices American cheese (or cheddar, provolone, or Swiss)
    • Salt and black pepper, to taste
    • Optional toppings: avocado slices, hot sauce, spinach, or tomato

    Step-by-Step Instructions

    Step 1: Make the Sausage Patties

    1. In a small bowl, combine ground pork, salt, pepper, fennel seeds, sage, garlic powder, onion powder, and red pepper flakes (if using). Mix until just combined—don’t overwork.
    2. Divide mixture into 2 equal portions. Shape each into a patty slightly wider than your English muffins (they’ll shrink as they cook).
    3. If using store-bought sausage patties, skip to step 2.

    Step 2: Cook the Sausage Patties

    1. Heat a large skillet or griddle over medium heat. Add sausage patties.
    2. Cook for 3-4 minutes per side until golden brown and cooked through (internal temp 160°F). Remove to a plate and tent loosely with foil.

    Step 3: Toast the English Muffins

    1. Wipe the skillet clean. Butter the cut sides of each English muffin half.
    2. Place muffins buttered-side down in the skillet over medium heat. Cook for 2-3 minutes until golden brown and crisp. Set aside.

    Step 4: Fry the Eggs

    1. In the same skillet, crack the eggs into the pan. Season with salt and pepper.
    2. Cook for 2-3 minutes until the whites are set and the edges are slightly crispy. For a runny yolk (recommended), do not flip. For over-easy, flip carefully and cook for 1 more minute.
    3. During the last minute, place a slice of American cheese on each sausage patty to melt (or place directly on the eggs).

    Step 5: Assemble the Sandwich

    1. Place the bottom half of each English muffin on a plate.
    2. Top with the cheesy sausage patty, then the fried egg, and any additional toppings.
    3. Close with the top half of the English muffin. Press down gently.

    Step 6: Serve Immediately

    1. Serve hot with a side of fruit, hash browns, or just as-is.
    2. Take a bite. The yolk runs. The cheese stretches. The sausage is juicy. This is the breakfast sandwich you’ve been waiting for.

    Summary

    Prep Time: 5 minutes | Cook Time: 15 minutes | Total Time: 20 minutes

    Yield: 2 sandwiches

    Difficulty: Easy breakfast perfection

    Storage Notes

    Leftovers:

    These sandwiches are best eaten fresh. If you have leftovers, store in an airtight container in the fridge for up to 2 days.

    Reheating:

    Skillet (best): Reheat over medium-low heat, covered, for 3-4 minutes until warmed through. Air fryer: 350°F for 3-4 minutes. Microwave: 45-60 seconds—the muffin will be softer but still tasty.

    Make Ahead:

    Cook sausage patties up to 3 days in advance and refrigerate. Assemble and cook eggs fresh for best results.

    Freezer-Friendly:

    Assemble fully cooked sandwiches, wrap tightly in foil, and freeze for up to 3 months. Reheat from frozen in a 350°F oven for 15-20 minutes or in the microwave for 2-3 minutes.

    Pro Tips for Breakfast Sandwich Greatness:

    • Season the sausage yourself. Store-bought works, but homemade is juicier and more flavorful.
    • Don’t overwork the sausage. Mix just until combined—overworking makes tough patties.
    • Butter and toast the muffins. This creates a barrier against sogginess and adds flavor.
    • Cook eggs with crispy edges. The contrast of crispy lace and runny yolk is perfection.
    • Melt the cheese on the sausage or egg. Residual heat creates that gooey, stretchy texture.
    • Assemble just before serving. This prevents the muffin from getting soggy.

  • Thai Egg Rolls, Better Than Takeout

    Thai Egg Rolls, Better Than Takeout

    Thai egg rolls are the appetizer that disappears first. Crispy, golden wrappers shattering to reveal a savory filling of ground pork, cabbage, carrots, and glass noodles, perfumed with garlic, white pepper, and a hint of fish sauce. They’re the reason you order extra at Thai restaurants—and now you can make them at home.

    The filling comes together quickly. The wrapping takes a little practice but becomes second nature. And the frying? That’s where the magic happens. Serve them with a sweet and tangy dipping sauce, and watch your guests hover by the platter. These are worth every minute.

    Ingredients

    Makes about 20-24 egg rolls.

    For the Filling:

    • ½ lb ground pork (or ground chicken, turkey, or tofu)
    • 2 cups green cabbage, finely shredded
    • 1 cup carrots, julienned or grated
    • ½ cup glass noodles (cellophane noodles), soaked in warm water until soft, then chopped
    • 3 cloves garlic, minced
    • 2 green onions, thinly sliced
    • 2 tbsp fish sauce
    • 1 tbsp oyster sauce
    • 1 tsp sugar
    • ½ tsp white pepper (black pepper works too)
    • 1 tbsp vegetable oil (for sautéing)

    For the Egg Rolls:

    • 20-24 egg roll wrappers (square, about 6-7 inches)
    • 1 egg, beaten (for sealing)
    • Neutral oil, for frying (vegetable, canola, or peanut)

    For the Dipping Sauce:

    • ½ cup sweet chili sauce (store-bought or homemade)
    • 2 tbsp rice vinegar
    • 1 tbsp fish sauce
    • 1 tbsp lime juice
    • 1 clove garlic, minced
    • 1 tsp chili flakes (optional)

    For Serving:

    • Fresh cilantro or mint, for garnish
    • Lime wedges

    Step-by-Step Instructions

    Step 1: Soak the Glass Noodles

    1. Place glass noodles in a bowl and cover with warm water. Let soak for 10-15 minutes until softened.
    2. Drain, squeeze out excess water, and roughly chop into 1-2 inch pieces. Set aside.

    Step 2: Cook the Filling

    1. Heat vegetable oil in a large skillet or wok over medium-high heat.
    2. Add garlic and cook for 30 seconds until fragrant.
    3. Add ground pork and cook, breaking it up with a spoon, until browned and cooked through, about 4-5 minutes.
    4. Add cabbage and carrots. Stir-fry for 2-3 minutes until vegetables begin to soften.
    5. Add soaked glass noodles, fish sauce, oyster sauce, sugar, and white pepper. Stir-fry for 1-2 minutes until everything is well combined and heated through.
    6. Stir in green onions. Remove from heat and let filling cool completely before wrapping. (This is important—hot filling can tear the wrappers.)

    Step 3: Prepare Wrappers and Sealant

    1. Beat the egg in a small bowl with 1 tablespoon of water. This is your glue for sealing.
    2. Lay an egg roll wrapper on a clean surface with one corner pointing toward you (diamond orientation).

    Step 4: Assemble the Egg Rolls

    1. Place about 2 tablespoons of filling in the center of the wrapper, shaping it into a log.
    2. Fold the bottom corner up over the filling, tucking it snugly.
    3. Fold in the left and right corners, like an envelope.
    4. Roll tightly toward the top corner, keeping the roll straight.
    5. Brush the top corner with beaten egg and press to seal. The seam should be on the bottom.
    6. Place finished egg rolls on a baking sheet, seam-side down, and keep covered with a damp towel to prevent drying.

    Step 5: Heat the Oil

    1. Pour oil into a heavy-bottomed pot or Dutch oven to a depth of 2-3 inches.
    2. Heat oil to 350°F (175°C). Use a thermometer for accuracy.

    Step 6: Fry the Egg Rolls

    1. Working in batches (don’t crowd the pot), carefully lower egg rolls into the hot oil, seam-side down to start.
    2. Fry for 3-4 minutes, turning occasionally, until golden brown and crispy all over.
    3. Remove with a slotted spoon and drain on a wire rack (not paper towels—paper towels trap steam and soften the crust).

    Step 7: Make the Dipping Sauce

    1. In a small bowl, whisk together sweet chili sauce, rice vinegar, fish sauce, lime juice, minced garlic, and chili flakes (if using).
    2. Set aside for flavors to meld.

    Step 8: Serve Immediately

    1. Arrange crispy egg rolls on a platter with fresh herbs and lime wedges.
    2. Serve with the sweet and tangy dipping sauce.
    3. Take a bite. Hear that crunch. Taste the savory filling. You just made the best egg rolls of your life.

    Summary

    Prep Time: 30 minutes | Cook Time: 20 minutes | Total Time: 50 minutes

    Yield: 20-24 egg rolls

    Difficulty: Worth the effort

    Storage Notes

    Leftovers:

    Store cooked egg rolls in an airtight container in the fridge for up to 3 days. They lose crispiness but can be reheated.

    Reheating (Bring Back the Crunch):

    Oven or air fryer (best): 375°F for 5-7 minutes until hot and crispy. Skillet: Reheat in a dry pan over medium heat. Microwave: Not recommended—makes them soggy.

    Freezer-Friendly (Meal Prep Dream):

    Freeze uncooked, assembled egg rolls in a single layer on a baking sheet. Once frozen, transfer to a zip-top bag for up to 3 months. Fry from frozen—add 1-2 minutes to cooking time. No need to thaw.

    Make Ahead:

    Filling can be made up to 3 days in advance and refrigerated. Assemble and fry just before serving for maximum crispiness.

  • Homemade Chicken Nuggets: Better Than Fast Food and Ready in 20

    Homemade Chicken Nuggets: Better Than Fast Food and Ready in 20

    Chicken nuggets have a special place in our hearts. They’re the childhood favorite, the picky-eater pleaser, the thing you order without thinking at the drive-thru. But homemade nuggets? They’re a revelation. Real chicken breast. A crispy, seasoned crust. Juicy on the inside, golden on the outside. No mystery meat. No regrets.

    These nuggets come together faster than you think. A simple dredge in seasoned flour, a dip in egg, and a coat of panko breadcrumbs.

    Bake them for a healthier version, or fry them for that deep golden crunch. Either way, they’re about to become your new weeknight hero. Serve with ketchup, honey mustard, or your favorite dipping sauce—and watch them disappear.

    Ingredients

    Serves 4.

    For the Nuggets:

    • 1½ lbs boneless, skinless chicken breasts (about 2 large)
    • 1 cup all-purpose flour
    • 1 tsp garlic powder
    • 1 tsp paprika
    • ½ tsp salt
    • ½ tsp black pepper
    • 2 large eggs, beaten
    • 1½ cups panko breadcrumbs
    • ¼ cup grated Parmesan cheese (optional, for extra flavor)
    • Cooking spray or neutral oil (for baking or frying)

    For Serving:

    • Ketchup
    • Honey mustard
    • Ranch dressing
    • BBQ sauce
    • Spicy mayo

    Step-by-Step Instructions

    Step 1: Prep the Chicken

    1. Cut chicken breasts into 1½-inch bite-sized pieces. Try to make them uniform for even cooking.
    2. Pat chicken pieces dry with paper towels. This helps the coating stick.

    Step 2: Set Up Dredging Station

    1. In a shallow dish, combine flour, garlic powder, paprika, salt, and pepper.
    2. In a second shallow dish, beat the eggs.
    3. In a third shallow dish, combine panko breadcrumbs and Parmesan cheese (if using).

    Step 3: Coat the Nuggets

    1. Dredge each chicken piece in the flour mixture, shaking off excess.
    2. Dip into beaten eggs, letting excess drip off.
    3. Coat in panko mixture, pressing gently to adhere.
    4. Place coated nuggets on a wire rack or baking sheet. Let rest for 10 minutes if time allows—this helps the coating set.

    Step 4: Choose Your Cooking Method

    1. Baking method (healthier): Preheat oven to 425°F (220°C). Place nuggets on a wire rack over a baking sheet. Spray generously with cooking spray. Bake for 10-12 minutes, flip, and bake another 5-7 minutes until golden and cooked through (internal temp 165°F).
    2. Frying method (crispier): Heat ½ inch of oil in a large skillet over medium-high heat to 350°F. Fry nuggets in batches for 2-3 minutes per side until golden brown and cooked through. Drain on paper towels.
    3. Air fryer method (best of both): Preheat air fryer to 400°F. Place nuggets in a single layer, spray with oil, and cook for 8-10 minutes, flipping halfway, until crispy and cooked through.

    Step 5: Serve Immediately

    1. Arrange nuggets on a platter with your favorite dipping sauces.
    2. Garnish with fresh parsley if desired.
    3. Take a bite. Crispy coating, juicy chicken, pure satisfaction. You’ll never buy frozen nuggets again.

    Summary

    Prep Time: 15 minutes | Cook Time: 15 minutes | Total Time: 30 minutes

    Yield: 4 servings (about 20-25 nuggets)

    Difficulty: Kid-friendly easy

    Storage Notes

    Leftovers:

    Store in an airtight container in the fridge for up to 3 days. Nuggets will lose crispiness but still taste great.

    Reheating (Bring Back the Crunch):

    Oven or air fryer (best): 375°F for 5-7 minutes until hot and crispy. Skillet: Reheat in a dry pan over medium heat, flipping once. Microwave: Works in a pinch but will be softer.

    Freezer-Friendly (Meal Prep Dream):

    These freeze beautifully! Arrange uncooked, coated nuggets on a baking sheet in a single layer. Freeze until solid, then transfer to a zip-top bag for up to 3 months. Cook from frozen—add 3-5 minutes to baking time or 1-2 minutes to frying time.

    Make Ahead:

    Coat nuggets up to 4 hours in advance and refrigerate on a wire rack. Cook just before serving for maximum crispiness.

  • Baked Potato Wedges

    Baked Potato Wedges

    Potato wedges are the unsung heroes of the potato world. Thicker than fries, crispier than roasted potatoes, and infinitely dippable. They’re the side dish that makes burgers better, the snack that disappears at parties, and the weeknight dinner companion that asks for very little but delivers everything.

    The secret to crispy baked wedges isn’t complicated. Soak them to remove starch. Season them generously. Give them space on a hot baking sheet. The result? Wedges that are golden and crunchy on the outside, soft and fluffy on the inside. No deep fryer needed. Just potatoes, oil, seasoning, and a little oven magic.

    Ingredients

    Serves 4.

    For the Wedges:

    • 4 large russet potatoes (about 2-2½ lbs)
    • 3 tbsp olive oil or avocado oil
    • 1 tsp garlic powder
    • 1 tsp smoked paprika
    • ½ tsp onion powder
    • ½ tsp salt (or more to taste)
    • ¼ tsp black pepper
    • ¼ tsp cayenne pepper (optional, for heat)
    • Fresh parsley, chopped (for garnish)

    For Serving (Optional):

    • Ketchup
    • Ranch dressing
    • Garlic aioli
    • Spicy mayo
    • Parmesan cheese, grated

    Step-by-Step Instructions

    Step 1: Prep the Potatoes

    1. Preheat oven to 425°F (220°C). Line a large baking sheet with parchment paper or foil for easy cleanup.
    2. Scrub potatoes clean. Cut each potato in half lengthwise, then cut each half into 3-4 wedges (about 1-inch thick at the widest part). Try to keep them uniform for even cooking.

    Step 2: Soak the Wedges (The Secret to Crispy)

    1. Place potato wedges in a large bowl and cover with cold water. Let soak for 30 minutes (or up to 2 hours). This removes excess starch, which helps them crisp up in the oven.
    2. Drain and pat wedges completely dry with paper towels. Any moisture left will create steam instead of crispiness.

    Step 3: Season the Wedges

    1. Return dried wedges to the bowl. Drizzle with oil and toss to coat evenly.
    2. In a small bowl, combine garlic powder, smoked paprika, onion powder, salt, pepper, and cayenne (if using).
    3. Sprinkle the seasoning mixture over the wedges and toss until every wedge is well coated.

    Step 4: Arrange on Baking Sheet

    1. Arrange wedges on the prepared baking sheet in a single layer, skin-side down. Don’t crowd them—give each wedge some space for air to circulate. Use two baking sheets if needed.

    Step 5: Bake to Crispy Perfection

    1. Bake for 20 minutes. Remove from oven and flip each wedge using tongs.
    2. Return to oven and bake for another 15-20 minutes until the wedges are golden brown, crispy on the edges, and easily pierced with a fork.
    3. For extra crispiness, broil for the final 2-3 minutes—watch closely to prevent burning.

    Step 6: Serve Immediately

    1. Transfer wedges to a serving platter. Sprinkle with fresh parsley and an extra pinch of salt.
    2. Serve with your favorite dipping sauces.
    3. Take a bite. Crispy exterior, fluffy interior, perfectly seasoned. You won’t miss the fryer.

    Summary

    Prep Time: 15 minutes + soaking | Cook Time: 35-40 minutes | Total Time: 1 hour

    Yield: 4 servings

    Difficulty: Easy, crispy, addictive

    Storage Notes

    Leftovers:

    Store in an airtight container in the fridge for up to 3 days. They’ll lose crispiness but still taste great.

    Reheating (Bring Back the Crunch):

    Oven or air fryer (best): 400°F for 5-8 minutes until hot and crispy. Skillet: Reheat in a dry pan over medium heat, flipping occasionally. Microwave: Not recommended—makes them soggy.

    Make Ahead:

    Soak and cut wedges up to 24 hours in advance. Store in a bowl of cold water in the fridge. Drain, dry, and season just before baking.

    Pro Tips for Baked Wedge Greatness:

    • Russet potatoes are essential. Their high starch content gives you that fluffy interior and crispy exterior.
    • Don’t skip the soak. Removing excess starch is the key to crispiness. 30 minutes minimum—2 hours is even better.
    • Dry them thoroughly. Moisture creates steam, and steam creates soft wedges. Pat them completely dry.
    • Don’t crowd the pan. Overcrowding traps steam and prevents crisping. Use two baking sheets if needed.
    • Flip halfway through. Flipping ensures even browning on both sides.
    • Skin-side down to start. Placing wedges skin-side down helps them hold their shape and prevents sticking.
    • Use high heat. 425°F is the sweet spot—hot enough to crisp without burning.
    • Season immediately after baking. A final sprinkle of salt while they’re hot makes a big difference.
  • Chicken Satay: Juicy Skewers with the Best Peanut Sauce Ever

    Chicken Satay: Juicy Skewers with the Best Peanut Sauce Ever

    Chicken satay is the dish that disappears first at every party. Little skewers of juicy, golden-charred chicken, marinated in all the good stuff—turmeric, coconut milk, lemongrass—and served with a peanut sauce so good you’ll want to drink it.

    The magic is in the marinade. It tenderizes the chicken, infuses it with warm spices, and helps it get those beautiful grill marks. Then comes the dipping sauce: creamy, slightly spicy, a little sweet, with a hit of lime to brighten everything up. Fire up the grill (or a grill pan) and get ready to be the most popular person at the table.

    Ingredients

    Serves 4 as an appetizer, 2 as a main.

    For the Chicken:

    • 1.5 lbs boneless, skinless chicken thighs (or breasts, but thighs are juicier)
    • 2 tbsp soy sauce
    • 2 tbsp fish sauce
    • 2 tbsp brown sugar
    • ½ cup coconut milk
    • 1 tbsp turmeric
    • 1 tbsp curry powder
    • 2 cloves garlic, minced
    • 1 stalk lemongrass, tender inner part only, finely minced (or 2 tbsp frozen lemongrass paste)
    • Wooden skewers, soaked in water for 30 minutes

    For the Peanut Sauce:

    • ½ cup creamy peanut butter
    • ½ cup coconut milk
    • 2 tbsp red curry paste
    • 2 tbsp brown sugar
    • 1 tbsp soy sauce
    • 1 tbsp lime juice
    • 2 tbsp water (to thin, as needed)

    For Serving:

    • Lime wedges
    • Fresh cilantro
    • Chopped peanuts
    • Cucumber salad (sliced cucumbers, red onion, rice vinegar, sugar, salt)

    Step-by-Step Instructions

    Step 1: Cut and Skewer

    1. Slice chicken thighs lengthwise into long, thin strips (about 1-inch wide). This helps them cook quickly and evenly on skewers.
    2. Thread each strip onto a soaked wooden skewer, weaving back and forth so it stays flat. Don’t pack them too tight—you want air to circulate.

    Step 2: Make the Magic Marinade

    1. In a bowl, whisk together soy sauce, fish sauce, brown sugar, coconut milk, turmeric, curry powder, garlic, and lemongrass.
    2. Place skewers in a dish or zip-top bag and pour the marinade over. Make sure every piece is coated.
    3. Cover and refrigerate for at least 1 hour (overnight is even better).

    Step 3: Whip Up the Peanut Sauce

    1. While chicken marinates, make the sauce. In a small saucepan over medium-low heat, combine peanut butter, coconut milk, red curry paste, brown sugar, and soy sauce.
    2. Whisk until smooth and warm. Add lime juice and thin with water until it’s thick but pourable (like heavy cream).
    3. Taste and adjust—more lime for brightness, more sugar for sweetness, more curry paste for heat. Set aside.

    Step 4: Grill Time

    1. Heat your grill, grill pan, or outdoor grill to medium-high. Brush grates with a little oil to prevent sticking.
    2. Remove skewers from marinade (let excess drip off). Grill for 3-4 minutes per side until the chicken is cooked through and has those gorgeous char marks.
    3. Don’t walk away—chicken thighs cook fast, and you want juicy, not dry.

    Step 5: Rest and Serve

    1. Transfer skewers to a plate and let them rest for 5 minutes. This keeps them juicy.
    2. Arrange on a platter with a bowl of warm peanut sauce for dipping.
    3. Sprinkle with chopped peanuts and fresh cilantro. Serve with lime wedges and cucumber salad on the side.
    4. Watch people grab three skewers at once. It’s fine. Make more next time.

    Summary

    Prep Time: 20 minutes (plus marinating) | Cook Time: 8 minutes | Total Time: 1.5 hours (mostly hands-off)

    Yield: 8-10 skewers

    Difficulty: Easy enough for a BBQ

    Storage Notes

    Leftovers:

    Store cooked skewers in an airtight container in the fridge for up to 3 days. Keep peanut sauce separate—it thickens when chilled.

    Reheating:

    Skillet or grill pan over medium heat for 2-3 minutes per side brings back the char and warmth. Microwave works but loses the texture. Peanut sauce can be gently reheated with a splash of water or coconut milk to thin it out.

    Make Ahead:

    Marinate chicken up to 24 hours in advance. Peanut sauce keeps in the fridge for a week—great for veggies, spring rolls, or just eating with a spoon.

    Freezer-Friendly:

    Freeze uncooked marinated skewers for up to 3 months. Thaw overnight in the fridge and grill as directed. You’re always 20 minutes away from satay night.

  • Gyudon (Japanese Beef Bowl)

    Gyudon (Japanese Beef Bowl)

    There are some meals that feel like a warm hug in a bowl. Gyudon is exactly that. It’s the kind of thing you crave on a cold evening or a busy weeknight when you need something satisfying fast. Thinly shaved beef, sweet onions, and a deeply savory sauce all mingling together over a bed of fluffy rice.

    In Japan, it’s the ultimate fast food—chains like Yoshinoya built empires on this bowl. But homemade gyudon? It’s even better. You control the sauce, the ratio of beef to onions, and exactly how much of that broth you want to soak into your rice. Twenty minutes, one pan, and dinner is served.

    Ingredients

    Serves 2 hungry humans.

    For the Bowl:

    • 1 lb thinly sliced beef (ribeye, sirloin, or shaved beef—freeze for 30 minutes to slice easier)
    • 1 large yellow or white onion, thinly sliced
    • 2 cups cooked Japanese short-grain rice (warm, for serving)
    • 2 green onions, sliced (for garnish)
    • Pickled red ginger (beni shoga or gari), for serving
    • Optional: Toasted sesame seeds, nori strips

    For the Sauce:

    • ½ cup dashi (or ½ cup water + ½ tsp dashi powder)
    • 3 tbsp soy sauce
    • 2 tbsp mirin
    • 1 tbsp sake (or dry white wine)
    • 1 tbsp sugar

    Step-by-Step Instructions

    Step 1: Prep Your Beef

    1. If your beef isn’t pre-shaved, pop it in the freezer for 30-60 minutes. A partially frozen piece slices much thinner and easier. Aim for paper-thin slices—they’ll cook in seconds and stay tender.

    Step 2: Mix the Sauce

    1. In a small bowl or measuring cup, combine dashi, soy sauce, mirin, sake, and sugar. Stir until the sugar dissolves. Taste it—it should be savory with a hint of sweetness.

    Step 3: Simmer the Onions

    1. Pour the sauce into a medium skillet or pan. Add the sliced onions in a single layer.
    2. Bring to a simmer over medium heat and cook for 3-4 minutes until the onions start to soften and become translucent.

    Step 4: Add the Beef

    1. Spread the beef slices over the onions, separating them so they cook evenly. Don’t stir too much at first—let the beef sit in the simmering liquid to cook through.
    2. Cook for 2-3 minutes until the beef is no longer pink. Use chopsticks or tongs to gently turn and separate the slices. Simmer another minute or two—the sauce will reduce slightly and coat everything beautifully.

    Step 5: Rest (Yes, Really)

    1. Turn off the heat and let everything sit for 2-3 minutes. This allows the flavors to meld and the beef to soak up all that goodness.

    Step 6: Assemble Your Bowl

    1. Scoop warm rice into two deep bowls. Spoon the beef and onion mixture over the top, letting some of that precious sauce cascade down into the rice.
    2. Garnish with green onions, sesame seeds, and a small pile of pickled red ginger on the side. The ginger cuts through the richness and adds a bright, tangy pop.

    Step 7: Slurp and Smile

    1. Mix everything together so the rice gets coated in that savory sauce. Take a big bite. Close your eyes. You’re in a cozy Tokyo diner now.

    Summary

    Prep Time: 5 minutes | Cook Time: 15 minutes | Total Time: 20 minutes

    Yield: 2 servings

    Difficulty: Weeknight hero

    Storage Notes

    Leftovers:

    Store beef and onions in an airtight container in the fridge for up to 3 days. Keep rice separate to avoid sogginess.

    Reheating:

    Gently reheat the beef mixture in a small pan with a splash of water or dashi to refresh the sauce. Microwave works, but stovetop brings back the texture.

    Make It Ahead:

    You can double the batch and freeze the beef mixture (without rice) for up to 2 months. Thaw overnight in the fridge, reheat, and make fresh rice. Instant comfort on demand.

    Pro Tip:

    Top with a soft-poached or onsen egg for the ultimate experience. The runny yolk mixing with the sauce and rice? Perfection.

  • Garlic Butter Lobster Tail: Fancy Dinner, Zero Stress

    Garlic Butter Lobster Tail: Fancy Dinner, Zero Stress

    Lobster tail has this reputation. It’s the fancy thing you order on special occasions, the meal that feels like a celebration. But here’s the secret: it’s one of the easiest things you can make in your own kitchen. Like, embarrassingly easy.

    This version is all about the garlic butter. Lots of it. You’ll slather it on, broil until the meat is tender and the edges are slightly caramelized, and then you’ll have more of that butter for dipping. Serve with a simple salad, some crusty bread, and a bottle of something bubbly. Special occasion or not, you deserve this.

    Ingredients

    Serves 2 (or 1 very happy person).

    For the Lobster:

    • 2 lobster tails (about 5-6 oz each), fresh or frozen and thawed
    • 4 tbsp unsalted butter, melted
    • 3 cloves garlic, minced (or grated on a microplane)
    • 1 tbsp fresh lemon juice
    • 1 tsp lemon zest
    • 1 tbsp fresh parsley, finely chopped
    • ½ tsp paprika (sweet or smoked both work)
    • Salt and pepper, to taste

    For Serving:

    • Lemon wedges
    • Melted butter for dipping (because why not?)
    • Fresh parsley for garnish

    Step-by-Step Instructions

    Step 1: Thaw (If Needed)

    1. If using frozen lobster tails, thaw them overnight in the fridge or place them in a bowl of cold water for 30-60 minutes. Pat dry with paper towels.

    Step 2: Butterfly That Tail

    1. Place a lobster tail on a cutting board, shell-side up. Using sturdy kitchen shears, cut lengthwise down the center of the hard shell, stopping before the tail fin.
    2. Carefully pull the shell apart slightly to expose the meat.
    3. Gently lift the meat up and out of the shell, keeping it attached at the base near the fin. Press the meat on top of the shell. This is called “butterflying” and makes for a gorgeous presentation.
    4. Repeat with the second tail.

    Step 3: Make the Magic Butter

    1. In a small bowl, combine the melted butter, minced garlic, lemon juice, lemon zest, parsley, paprika, and a pinch of salt and pepper. Stir to combine. Try not to drink it.

    Step 4: Slather and Rest

    1. Place the butterflied lobster tails on a baking sheet or in an oven-safe skillet.
    2. Spoon half the garlic butter over the exposed meat, making sure it gets into every crevice. Let them sit at room temperature for 10-15 minutes while you preheat the oven.

    Step 5: Broil to Perfection

    1. Preheat your broiler to high and position a rack about 6-8 inches from the heat source.
    2. Broil the lobster tails for 5-8 minutes, depending on size. The meat should be opaque and firm to the touch, and the edges should be starting to brown and bubble.
    3. Watch closely—lobster goes from perfect to overcooked in seconds. An internal temperature of 140°F is your target.

    Step 6: Butter Bath, Round Two

    1. Remove from the oven and immediately spoon the remaining garlic butter over the hot lobster. The residual heat will melt it into all the right places.
    2. Garnish with fresh parsley and lemon wedges.

    Step 7: Serve and Swoon

    1. Serve immediately with extra melted butter on the side, because you’re not a monster.
    2. Squeeze lemon over everything. Take a photo. Take a bite. Realize you’re now the person who makes lobster at home on a Tuesday.

    Summary

    Prep Time: 10 minutes | Cook Time: 8 minutes | Total Time: 18 minutes

    Yield: 2 servings

    Difficulty: Surprisingly easy

    Storage Notes

    Leftovers (Rare, But Possible):

    Store leftover lobster meat in an airtight container in the fridge for up to 2 days. It’s best enjoyed immediately, but we get it—life happens.

    Reheating:

    The microwave is not your friend here—it turns lobster into rubber. Gently reheat in a buttered skillet over low heat just until warmed through, or enjoy cold on a salad or in lobster rolls the next day.

    Pro Tip:

    Make extra garlic butter. It keeps in the fridge for weeks and makes everything better—steak, veggies, bread, your morning scrambled eggs. You’re welcome.

  • Birria Tacos: The Legendary, Dip-Worthy Slow-Cooked Sensation

    Birria Tacos: The Legendary, Dip-Worthy Slow-Cooked Sensation

    Have you ever taken a bite of something and immediately understood the hype? That’s birria tacos. They’ve taken over menus and social feeds for good reason: tender, shredded beef bathed in a deep, smoky, slightly spicy chile broth, all stuffed into a tortilla that’s been fried in that same liquid gold until crispy. And then? You dip it.

    The consommé on the side isn’t just broth—it’s the soul of the dish. Rich, complex, and meant for dunking. This recipe walks you through the whole process, from simmering the beef to assembling the crispiest tacos. Yes, it takes time. No, you won’t regret a single minute.

    Ingredients

    Serves 6-8 (or 4 very hungry people).

    For the Birria (Beef and Braise):

    • 3 lbs beef chuck or brisket, cut into large chunks
    • 2 lbs beef short ribs (optional, but adds richness)
    • 4 dried guajillo chiles, stems and seeds removed
    • 2 dried ancho chiles, stems and seeds removed
    • 2 dried chiles de árbol (optional, for heat)
    • 1 onion, quartered
    • 5 garlic cloves, peeled
    • 2 tomatoes, quartered
    • 1 tbsp cumin seeds
    • 1 tbsp Mexican oregano
    • 4 whole cloves
    • 1 cinnamon stick
    • 2 bay leaves
    • 4 cups beef broth
    • 2 tbsp apple cider vinegar
    • Salt and pepper, to taste

    For the Tacos:

    • Corn tortillas (white or yellow)
    • 2 cups Oaxaca cheese or mozzarella, shredded
    • 1 white onion, finely chopped
    • Fresh cilantro, chopped
    • Lime wedges

    Step-by-Step Instructions

    Step 1: Prep the Chiles

    1. Toast the dried chiles in a dry skillet over medium heat for 20-30 seconds per side until fragrant. Don’t burn them or they’ll turn bitter.
    2. Place them in a bowl, cover with hot water, and let soak for 20 minutes until softened.

    Step 2: Make the Sauce

    1. In that same skillet, toast the cumin seeds, oregano, and cloves for 1 minute until fragrant.
    2. Transfer soaked chiles, toasted spices, onion, garlic, tomatoes, and 1 cup of the chile soaking water to a blender. Blend until completely smooth.
    3. Strain the sauce through a fine-mesh sieve into a bowl—this ensures a silky consommé later.

    Step 3: Sear the Beef

    1. Season beef chunks generously with salt and pepper. Heat a large Dutch oven over medium-high heat with a splash of oil.
    2. Sear the beef in batches until deeply browned on all sides. Don’t crowd the pan—browning equals flavor.
    3. Remove beef and set aside.

    Step 4: Braise Low and Slow

    1. Pour the chile sauce into the pot, scraping up any browned bits. Add beef broth, apple cider vinegar, bay leaves, and cinnamon stick. Stir to combine.
    2. Return the beef to the pot. Bring to a simmer, then cover and transfer to a 325°F oven (or keep on stovetop over lowest heat).
    3. Cook for 3-4 hours until the beef is fall-apart tender. Check occasionally and add more broth if needed.

    Step 5: Separate Meat and Magic

    1. Remove beef from the pot and shred with two forks. Discard any bones.
    2. Strain the braising liquid—this is your consommé. Skim excess fat, but save some for frying tacos.
    3. Season consommé with salt to taste. Keep warm for dipping.

    Step 6: Assemble the Tacos

    1. Dip each corn tortilla into the reserved fat or consommé (this is the secret to flavor and crispiness).
    2. Place tortilla in a hot skillet over medium heat. Top with shredded cheese, then a generous pile of shredded beef.
    3. Fold in half and press gently. Cook 2-3 minutes per side until crispy and golden, and the cheese is gloriously melted.

    Step 7: Serve with Style

    1. Arrange tacos on a plate with a bowl of warm consommé on the side for dipping.
    2. Top with chopped onion and cilantro. Serve with lime wedges for squeezing.
    3. Dip. Bite. Swoon. Repeat until every last taco and drop of consommé is gone.

    Summary

    Prep Time: 30 minutes | Cook Time: 3-4 hours | Total Time: 4ish hours of patience

    Yield: 12-15 tacos

    Difficulty: Weekend project (worth every second)

    Storage Notes

    Leftovers (If You’re Lucky):

    Store shredded beef and consommé separately in airtight containers in the fridge for up to 5 days. The flavors actually get better overnight.

    Freezer-Friendly:

    Both the shredded beef and consommé freeze beautifully for up to 3 months. Thaw overnight in the fridge before reheating.

    Reheating:

    Warm the consommé on the stovetop. For tacos, reheat the shredded beef in a pan with a splash of consommé, then assemble fresh tortillas. Leftover assembled tacos can be crisped back up in a dry skillet.

    Pro Tip:

    Make a double batch. You’ll thank yourself next month when you’re one pot away from taco heaven.

  • Crispy Spinach Cheese Borek: Flaky, Cheesy, and Utterly Irresistible

    Crispy Spinach Cheese Borek: Flaky, Cheesy, and Utterly Irresistible

    Let me introduce you to borek: the flaky, golden, stuffed pastry that makes everything in life feel a little bit better. This spinach and cheese version is the one you’ll make on repeat. It’s crisp on the outside, warm and gooey on the inside, and absolutely piled high with garlicky spinach and two kinds of cheese.

    The best part? It looks like you spent all day in the kitchen, but store-bought phyllo does the heavy lifting. You just layer, fill, roll (or stack), brush with butter, and bake until golden brown. Whether you serve it for brunch, as an appetizer, or with a side salad for a light dinner, this borek is pure magic.

    Ingredients

    Serves 4-6 as an appetizer, 2-3 as a main.

    For the Filling:

    • 10 oz (300g) frozen spinach, thawed and squeezed absolutely dry
    • 1 cup (200g) feta cheese, crumbled
    • 1 cup (100g) mozzarella cheese, shredded (or use halloumi for a saltier bite)
    • 1 small onion, finely chopped
    • 2 cloves garlic, minced
    • 2 tbsp olive oil
    • 1 egg, lightly beaten
    • Salt and black pepper to taste (go easy on salt—feta is salty)
    • Fresh dill or parsley, chopped (optional, but brightens everything up)

    For the Assembly:

    • 1 package phyllo dough, thawed (about 12-16 sheets)
    • ½ cup (1 stick) unsalted butter, melted
    • ¼ cup olive oil (mixed with butter for easier brushing)
    • Sesame seeds and nigella seeds (optional, for topping)

    Step-by-Step Instructions

    Step 1: Squeeze That Spinach

    1. Thaw your frozen spinach completely, then transfer to a clean kitchen towel. Gather the towel and wring it out over the sink like your life depends on it. Get every last drop of water out—soggy spinach is the enemy of crisp borek.

    Step 2: Make the Filling

    1. Heat olive oil in a small pan over medium heat. Sauté the onion until soft and translucent, about 5 minutes. Add garlic and cook another minute until fragrant. Let cool slightly.
    2. In a bowl, combine the squeezed spinach, sautéed onion and garlic, feta, mozzarella, beaten egg, and fresh herbs if using. Mix well. Season with pepper (and salt only if needed).

    Step 3: Phyllo Prep 101

    1. Preheat your oven to 375°F (190°C).
    2. Combine melted butter and olive oil in a small bowl. This mixture brushes more easily than butter alone.
    3. Unroll your phyllo dough and cover it with a slightly damp kitchen towel. Phyllo dries out in seconds and becomes brittle—keep it covered while you work.

    Step 4: Layer and Fill (Two Ways)

    1. For a rolled borek: Place one sheet of phyllo on your work surface. Brush with butter mixture. Top with another sheet, brush again. Repeat for 4-5 layers. Spoon filling along one long edge, roll tightly, and curl into a spiral or coil in your baking dish.
    2. For a stacked borek (easier!): Brush a baking dish with butter. Lay one sheet of phyllo in the dish, letting edges hang over. Brush with butter. Repeat with 4-5 sheets, brushing each layer. Spread filling evenly over the top. Fold the overhanging edges inward, then layer 4-5 more buttered sheets on top, tucking in edges.

    Step 5: Score and Seed

    1. Brush the top generously with the butter mixture.
    2. Using a sharp knife, score the top layers into serving pieces (don’t cut all the way through if stacking).
    3. Sprinkle with sesame seeds and nigella seeds if using—they add amazing texture and flavor.

    Step 6: Bake to Golden Glory

    1. Bake for 35-45 minutes until the top is deeply golden brown and crisp. If it’s browning too fast, tent loosely with foil.
    2. Let it rest for at least 10 minutes before cutting. This is crucial—the filling sets and you won’t burn your mouth.
    3. Serve warm or at room temperature with a squeeze of lemon and maybe some yogurt on the side. Watch people fight over the last piece.

    Summary

    Prep Time: 20 minutes | Cook Time: 40 minutes | Total Time: 1 hour

    Yield: 4-6 appetizer servings

    Difficulty: Easier than it looks

    Storage Notes

    Leftovers:

    Store in an airtight container in the fridge for up to 4 days. The phyllo will soften slightly, but reheating brings back the crunch.

    Reheating:

    Pop it back in a 350°F oven for 5-10 minutes until crisp again. The microwave works but makes the phyllo sad and chewy—avoid if possible.

    Freezer-Friendly:

    You can freeze baked borek! Let it cool completely, wrap tightly in foil, and freeze for up to 3 months. Reheat from frozen in a 350°F oven until warmed through and crisp. You can also freeze unbaked assembled borek—just add 10-15 minutes to the bake time.

  • Fresh, Bright, and Irresistible: How to Make Classic Tomato Bruschetta

    Fresh, Bright, and Irresistible: How to Make Classic Tomato Bruschetta

    When it comes to simple yet unforgettable appetizers, tomato bruschetta stands out as a timeless favorite.

    This classic Italian dish combines toasted bread with fresh tomatoes, garlic, olive oil, and herbs to create a bite that is both refreshing and deeply flavorful.

    With just a handful of high-quality ingredients, you can prepare an appetizer that feels elegant, rustic, and perfect for almost any occasion.

    Whether you’re hosting a dinner party, preparing a quick snack, or looking for a light summer appetizer, tomato bruschetta delivers bold flavor with minimal effort.

    The secret lies in using ripe tomatoes, good olive oil, and properly toasted bread that provides the perfect crunchy base.

    In this step-by-step guide, you’ll learn how to make authentic tomato bruschetta that tastes like it came straight from an Italian kitchen.


    What Makes Bruschetta Special

    The word bruschetta comes from the Italian word bruscare, which means “to toast” or “to char.”

    Traditionally, bruschetta refers to grilled bread rubbed with garlic and topped with simple ingredients.

    The most popular version features fresh tomatoes, but the beauty of bruschetta is its versatility.

    While toppings can vary, the foundation always remains the same: crisp bread paired with fresh, vibrant ingredients.


    Ingredients

    To make about 8–10 pieces of tomato bruschetta, you will need:

    • 1 baguette or rustic Italian bread
    • 4 ripe Roma or vine tomatoes
    • 2 cloves garlic
    • 3 tablespoons extra virgin olive oil
    • 1 tablespoon balsamic vinegar (optional)
    • ¼ cup fresh basil leaves, chopped
    • Salt to taste
    • Freshly ground black pepper

    Optional additions:

    • Fresh mozzarella
    • Parmesan cheese
    • Red pepper flakes

    Using fresh, high-quality ingredients makes a huge difference in the final flavor of this dish.


    Step 1: Prepare the Tomatoes

    Start by washing the tomatoes thoroughly.

    Dice them into small cubes, removing excess seeds and juice if necessary.

    Too much liquid can make the bruschetta soggy, so draining the tomatoes slightly helps maintain the perfect texture.

    Place the diced tomatoes into a medium mixing bowl.


    Step 2: Add Flavor to the Tomato Mixture

    Finely mince one clove of garlic and add it to the bowl of tomatoes.

    Next, pour in the olive oil and balsamic vinegar if using. The olive oil adds richness while the vinegar introduces a subtle tang that enhances the tomatoes.

    Add the chopped basil, a pinch of salt, and freshly ground black pepper.

    Gently stir the mixture until everything is well combined.


    Step 3: Let the Mixture Marinate

    Allow the tomato mixture to sit at room temperature for about 10–15 minutes.

    This short resting time lets the flavors blend together beautifully.

    The tomatoes release natural juices that mix with the olive oil and garlic, creating a light and flavorful dressing.


    Step 4: Slice the Bread

    While the tomatoes are marinating, slice the baguette into ½-inch thick pieces.

    Cut the slices at a slight diagonal to create larger surfaces for the toppings.

    Arrange the slices in a single layer on a baking sheet.


    Step 5: Toast the Bread

    Preheat your oven to 375°F (190°C).

    Lightly brush each slice of bread with olive oil. This step helps the bread develop a golden, crisp texture while adding extra flavor.

    Place the baking sheet in the oven and toast the bread for about 8–10 minutes, or until the edges turn golden and crunchy.

    Alternatively, you can toast the bread on a grill or in a skillet for a slightly smoky flavor.


    Step 6: Rub the Bread with Garlic

    Once the bread is toasted, remove it from the oven and let it cool slightly.

    Take the remaining clove of garlic and gently rub it across the warm surface of each slice of bread.

    The heat of the bread releases the garlic’s natural oils, infusing the toast with subtle flavor without overpowering the dish.

    This traditional step is what gives authentic bruschetta its signature aroma.


    Step 7: Assemble the Bruschetta

    Using a spoon, scoop the tomato mixture onto each slice of toasted bread.

    Be generous with the topping, but avoid adding too much liquid from the bowl. You want the bread to stay crisp rather than soggy.

    Spread the tomatoes evenly across the surface of each slice.


    Step 8: Optional Additions

    If you want to elevate your bruschetta even further, consider adding a few optional ingredients.

    Fresh mozzarella cubes can bring creamy richness, while a sprinkle of grated Parmesan adds a salty, savory note.

    For a touch of heat, sprinkle a pinch of red pepper flakes on top.


    Step 9: Final Drizzle

    For extra flavor and presentation, lightly drizzle a little more olive oil over the assembled bruschetta.

    Some people also enjoy adding a small drizzle of balsamic glaze for sweetness and visual contrast.

    This finishing touch enhances both taste and appearance.


    Step 10: Serve Immediately

    Tomato bruschetta is best enjoyed fresh. Serve it immediately after assembling to keep the bread crisp and the topping vibrant.

    Arrange the pieces on a serving platter and garnish with additional basil leaves if desired.

    The combination of crunchy bread, juicy tomatoes, and fragrant herbs makes each bite refreshing and satisfying.


    Tips for Perfect Bruschetta

    Choose ripe tomatoes. Fresh, juicy tomatoes provide the best flavor.

    Use good olive oil. High-quality extra virgin olive oil greatly improves the taste.

    Toast the bread well. Crisp bread prevents sogginess and adds texture.

    Don’t assemble too early. Add the topping just before serving for the best results.


    Serving Ideas

    Tomato bruschetta pairs wonderfully with many dishes. Try serving it with:

    • Pasta dishes
    • Grilled chicken or seafood
    • Antipasto platters
    • Fresh salads

    It also works beautifully as a light appetizer alongside a glass of wine.


    Final Thoughts

    Tomato bruschetta proves that simple ingredients can create extraordinary flavor.

    With ripe tomatoes, fragrant basil, garlic, and perfectly toasted bread, this classic appetizer delivers freshness and elegance in every bite.

    It’s quick to prepare, visually appealing, and incredibly satisfying, making it ideal for everything from casual gatherings to formal dinners.

    Once you master this recipe, you’ll have a go-to appetizer that never fails to impress.

    Serve it fresh, share it with friends and family, and enjoy a taste of rustic Italian cooking right at home.