Category: quick_meals

  • Filipino Style Spaghetti: Sweet and Savory, Jollibee-Style Magic

    Filipino Style Spaghetti: Sweet and Savory, Jollibee-Style Magic

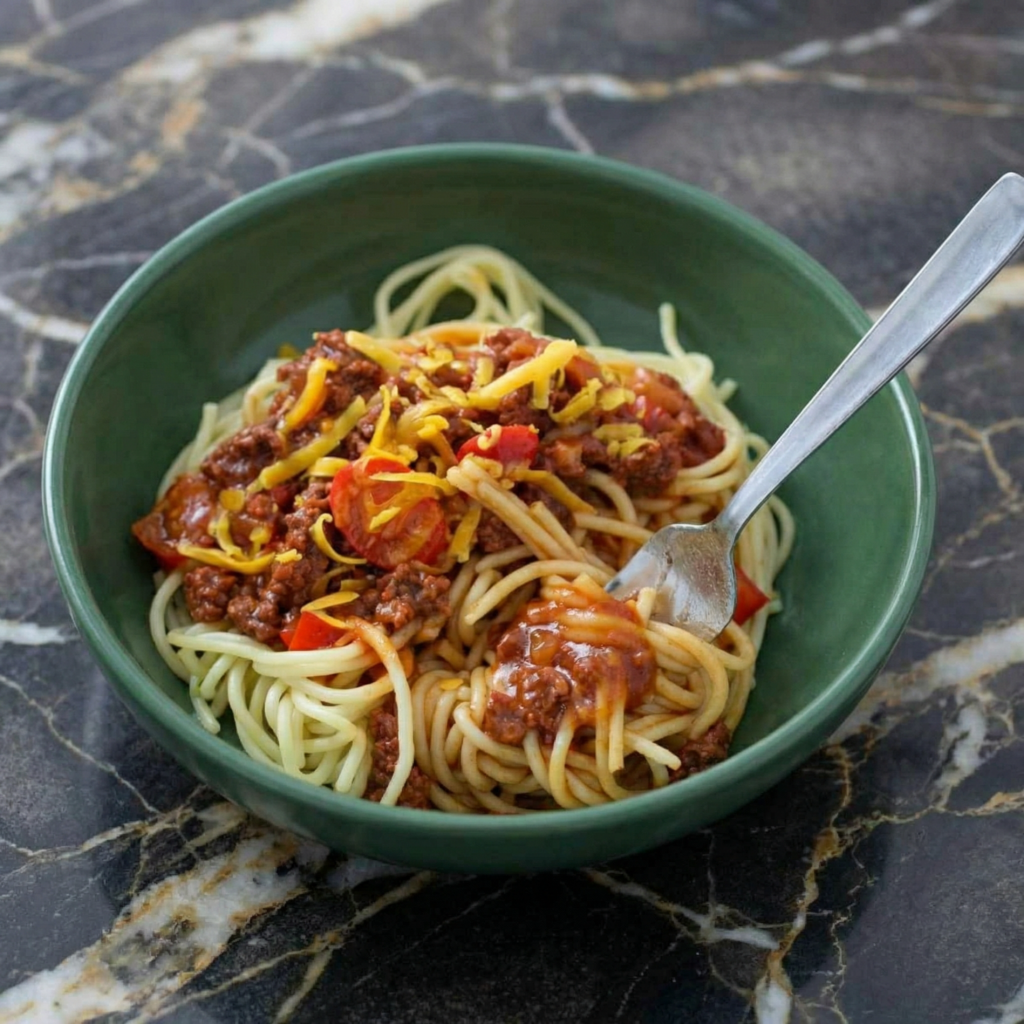
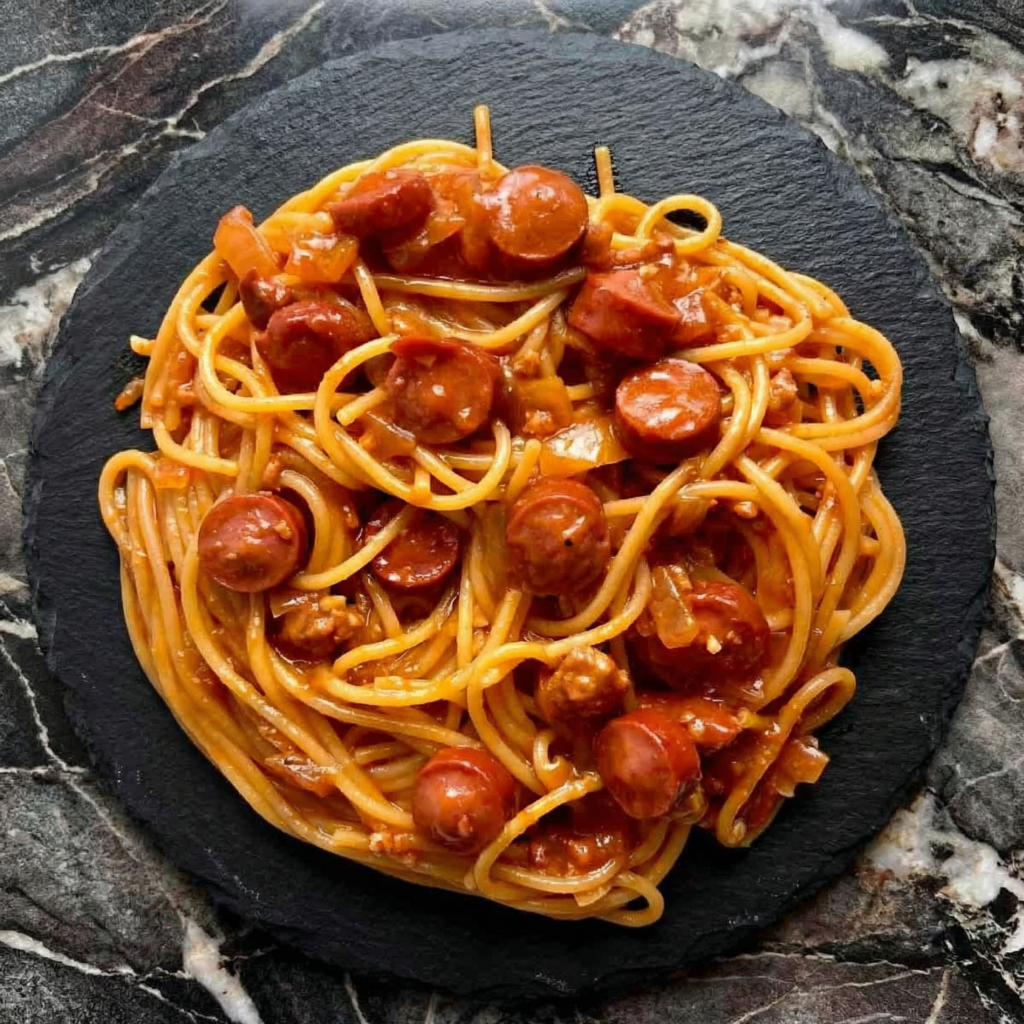
    Filipino spaghetti is not Italian spaghetti. It’s something else entirely—and that’s exactly what makes it so beloved. Sweet, savory, and unapologetically unique, this dish is the star of every Filipino birthday party, holiday celebration, and Jollibee run.

    It’s spaghetti with ground beef, sliced hot dogs, a sauce sweetened with banana ketchup, and a generous topping of melted cheese.

    If you’ve never had it, prepare to be surprised. If you grew up with it, you’re already craving it. This recipe recreates that iconic Jollibee-style flavor at home—the perfect balance of sweet, savory, and cheesy. Make it for a crowd, because one batch is never enough.

    Ingredients

    Serves 6-8.

    For the Sauce:

    • 1 tbsp vegetable oil
    • 4 cloves garlic, minced
    • 1 onion, finely chopped
    • 1 lb ground beef (80/20)
    • 4-6 hot dogs (Filipino-style or beef franks), sliced diagonally
    • 1 cup banana ketchup (Jufran or UFC brand)
    • 1 cup tomato sauce
    • ¼ cup tomato paste
    • 1 cup beef broth or water
    • 2 tbsp brown sugar (adjust to taste)
    • 1 tbsp soy sauce
    • ½ tsp black pepper
    • 1 red bell pepper, diced (optional)
    • 1 carrot, finely diced (optional, adds natural sweetness)

    For the Pasta and Topping:

    • 1 lb spaghetti or Filipino-style pasta
    • 1 cup shredded cheddar cheese (or Eden cheese if available)
    • ¼ cup grated Parmesan cheese
    • Hot dogs, sliced (extra for garnish)

    For Serving:

    • More shredded cheddar cheese
    • Toasted garlic bits (optional)
    • Chopped fresh parsley or spring onions

    Step-by-Step Instructions

    Step 1: Cook the Pasta

    1. Bring a large pot of salted water to a boil.
    2. Cook spaghetti according to package directions until al dente.
    3. Drain and set aside. Toss with a little oil to prevent sticking if needed.

    Step 2: Sauté Aromatics and Meat

    1. Heat oil in a large pot or Dutch oven over medium-high heat.
    2. Add garlic and onion. Cook until softened, about 2-3 minutes.
    3. Add ground beef. Cook, breaking up with a spoon, until browned and cooked through, about 5-7 minutes.
    4. Add sliced hot dogs and cook for 2 minutes until lightly browned.
    5. Add optional vegetables (bell pepper, carrot) and cook for 2 minutes.

    Step 3: Build the Sauce

    1. Add banana ketchup, tomato sauce, tomato paste, beef broth, brown sugar, soy sauce, and black pepper. Stir to combine.
    2. Bring to a simmer, then reduce heat to low. Cover and cook for 15-20 minutes, stirring occasionally, until sauce thickens and flavors meld.
    3. Taste and adjust sweetness—add more sugar if desired. Filipino spaghetti is traditionally quite sweet.

    Step 4: Combine Pasta and Sauce

    1. Add cooked spaghetti to the sauce. Toss until every strand is coated.
    2. If the sauce is too thick, add a splash of pasta water to loosen.

    Step 5: Cheese Topping

    1. Transfer spaghetti to a serving platter or individual bowls.
    2. Sprinkle generously with shredded cheddar cheese. The cheese should melt slightly from the heat of the pasta.
    3. Add grated Parmesan for extra flavor.

    Step 6: Serve and Enjoy

    1. Garnish with extra sliced hot dogs, toasted garlic bits, or fresh parsley.
    2. Serve hot. Take a bite. Sweet, savory, cheesy—this is the taste of Filipino celebrations.

    Summary

    Prep Time: 15 minutes | Cook Time: 35 minutes | Total Time: 50 minutes

    Yield: 6-8 servings

    Difficulty: Easy, nostalgic, crowd-pleasing

    Storage Notes

    Leftovers:

    Store in an airtight container in the fridge for up to 5 days. The flavors meld beautifully overnight.

    Reheating:

    Skillet (best): Reheat over medium heat with a splash of water or broth to loosen sauce. Microwave: 2-3 minutes, stirring halfway. Add fresh cheese on top after reheating.

    Make Ahead:

    Sauce can be made up to 3 days in advance. Cook pasta fresh when ready to serve, or combine and refrigerate for quick reheating.

    Freezer-Friendly:

    Freeze sauce (without pasta) for up to 3 months. Thaw overnight and cook fresh pasta. Fully assembled spaghetti can also be frozen for up to 2 months.

  • Beef Bulgogi: Sweet and Savory, Korean BBQ at Home

    Beef Bulgogi: Sweet and Savory, Korean BBQ at Home

    Bulgogi is Korea’s gift to the world. Thinly sliced beef marinated in a sweet-savory soy sauce blend with Asian pear, garlic, and sesame, then grilled until caramelized and smoky. It’s sweet. It’s savory. It’s slightly smoky. And it’s the kind of meal that brings everyone to the table.

    The magic is in the marinade. Soy sauce provides saltiness. Sugar and pear add sweetness and tenderize the meat. Garlic, ginger, and sesame build depth. And that quick sear over high heat creates those irresistible caramelized edges. Serve it with rice, lettuce wraps, and kimchi, and you’ve got a Korean BBQ feast at home.

    Ingredients

    Serves 4.

    For the Bulgogi:

    • 1½ lbs beef ribeye or sirloin, thinly sliced (ask your butcher or freeze slightly for easier slicing)
    • ½ Asian pear (or regular pear or apple), grated
    • ¼ cup soy sauce
    • 2 tbsp brown sugar
    • 1 tbsp honey
    • 1 tbsp mirin (or rice wine)
    • 1 tbsp sesame oil
    • 4 cloves garlic, minced
    • 1 tsp ginger, grated
    • ½ tsp black pepper
    • 2 tbsp vegetable oil, for cooking
    • 1 onion, thinly sliced
    • 2 green onions, cut into 2-inch pieces
    • Toasted sesame seeds, for garnish

    For Serving:

    • Steamed white rice
    • Lettuce leaves (red leaf, butter, or romaine)
    • Kimchi
    • Ssamjang (Korean dipping paste)
    • Garlic slices, fresh or pickled
    • Jalapeño or chili slices

    Step-by-Step Instructions

    Step 1: Prep the Beef

    1. Place beef in the freezer for 30-60 minutes until firm but not frozen solid. This makes slicing easier.
    2. Slice beef across the grain into thin strips (about ⅛-inch thick). For ribeye, aim for 2-inch long pieces.

    Step 2: Make the Marinade

    1. In a large bowl, combine grated pear, soy sauce, brown sugar, honey, mirin, sesame oil, garlic, ginger, and black pepper.
    2. Whisk until sugar is dissolved. The marinade should be thick and fragrant.

    Step 3: Marinate the Beef

    1. Add beef to the marinade and toss to coat every piece.
    2. Add sliced onion and green onions. Mix well.
    3. Cover and refrigerate for at least 1 hour (4 hours is better, overnight is ideal).

    Step 4: Cook the Bulgogi

    1. Heat a large skillet or cast-iron pan over high heat until very hot. Add vegetable oil.
    2. Working in batches (don’t crowd the pan), add beef in a single layer. Cook undisturbed for 1-2 minutes until caramelized and slightly charred.
    3. Flip and cook another 1-2 minutes until beef is cooked through and edges are caramelized.
    4. Add any remaining marinade and cook for another minute, letting it thicken and coat the meat.
    5. Transfer to a serving platter and sprinkle with sesame seeds.

    Step 5: Serve Korean BBQ Style

    1. Place bulgogi in the center of the table with bowls of rice, lettuce leaves, kimchi, and ssamjang.
    2. To eat: take a lettuce leaf, add a bit of rice, some bulgogi, a dab of ssamjang, garlic slice, and chili. Wrap and enjoy.
    3. Take a bite. Sweet, savory, smoky. This is Korean BBQ perfection.

    Summary

    Prep Time: 20 minutes + marinating | Cook Time: 10 minutes | Total Time: 1.5 hours (mostly hands-off)

    Yield: 4 servings

    Difficulty: Easy, fast, delicious

    Storage Notes

    Leftovers:

    Store in an airtight container in the fridge for up to 3 days. Bulgogi tastes great cold or reheated.

    Reheating:

    Skillet (best): Reheat over high heat for 1-2 minutes to recaramelize edges. Microwave: 1-2 minutes—will soften but still delicious.

    Make Ahead:

    Marinate beef up to 24 hours in advance. Cook just before serving for best texture.

    Freezer-Friendly:

    Freeze raw, marinated beef in a zip-top bag for up to 3 months. Thaw overnight in the fridge before cooking.

  • Kalua Pork: Slow-Cooked Hawaiian Classic

    Kalua Pork: Slow-Cooked Hawaiian Classic

    Kalua pork is the soul of Hawaiian cuisine. Traditionally, it’s made by roasting a whole pig in an underground oven called an imu—a pit filled with hot rocks and covered with banana leaves, where the pork cooks for hours until it’s fall-apart tender and infused with smoky flavor. It’s the centerpiece of luau feasts, the taste of celebration, the taste of the islands.

    This version brings that magic to your kitchen. A slow cooker or oven, a few simple ingredients, and patience are all you need. The pork is seasoned simply with sea salt and liquid smoke, then cooked low and slow until it shreds with a fork. Serve it with cabbage and rice, pile it on sandwiches, or stuff it into tacos. It’s easy, it’s versatile, and it tastes like Hawaii.

    Ingredients

    Serves 8-10.

    For the Pork:

    • 4-5 lbs pork shoulder (pork butt) or picnic roast
    • 1½ tbsp Hawaiian sea salt or coarse sea salt
    • 2 tbsp liquid smoke (hickory or mesquite)
    • 6-8 cloves garlic, sliced into thin slivers (optional)
    • ½ cup water or chicken broth (for slow cooker)

    For Serving:

    • 1 head green cabbage, thinly sliced
    • Steamed white rice (jasmine or short-grain)
    • Hawaiian sea salt, for finishing
    • Optional: Macaroni salad (classic Hawaiian plate lunch side)

    Optional Serving Ideas:

    • Hawaiian sweet rolls for sliders
    • Corn or flour tortillas for tacos
    • Brioche buns for sandwiches
    • Pineapple salsa or mango salsa

    Step-by-Step Instructions

    Step 1: Prep the Pork

    1. Rinse pork shoulder and pat completely dry with paper towels.
    2. Using a sharp knife, make deep slits all over the pork (about 1 inch deep and 1 inch apart).
    3. If using garlic, insert a sliver of garlic into each slit. This adds subtle flavor throughout the meat.
    4. Rub the pork all over with Hawaiian sea salt, getting it into the slits and crevices.
    5. Drizzle liquid smoke over the pork and rub to coat evenly.

    Step 2: Choose Your Cooking Method

    Slow Cooker Method (Easiest):

    1. Place pork in the slow cooker, fat side up. Add water or broth to the bottom.
    2. Cover and cook on LOW for 10-12 hours or on HIGH for 6-8 hours, until pork is fall-apart tender.
    3. Carefully remove pork from slow cooker. Shred with two forks, discarding any large fat pieces.
    4. Optional: Spread shredded pork on a baking sheet and broil for 3-5 minutes for crispy edges.

    Oven Method (Traditional):

    1. Preheat oven to 300°F (150°C).
    2. Place pork in a roasting pan or Dutch oven, fat side up. Add water to the bottom (about ½ inch deep).
    3. Cover tightly with foil or a lid. Roast for 5-6 hours until pork is fall-apart tender.
    4. Remove from oven, let rest 20 minutes, then shred with two forks.

    Instant Pot Method (Fastest):

    1. Place pork in Instant Pot with water. Cook on HIGH pressure for 90 minutes.
    2. Allow natural release for 15-20 minutes. Remove, shred, and optionally broil for crispy edges.

    Step 3: Prepare the Cabbage (Optional but Traditional)

    1. While pork cooks, thinly slice cabbage.
    2. After shredding pork, toss cabbage with a few tablespoons of the cooking liquid and a pinch of salt.
    3. Cover and cook in the microwave for 3-4 minutes, or sauté in a skillet until wilted but still slightly crunchy.

    Step 4: Serve Island Style

    1. Serve shredded kalua pork over steamed white rice.
    2. Add a pile of wilted cabbage alongside.
    3. Garnish with a sprinkle of Hawaiian sea salt.
    4. For a classic Hawaiian plate lunch, add a scoop of macaroni salad.
    5. Take a bite. Smoky, salty, tender. You’re in Hawaii now.

    Summary

    Prep Time: 10 minutes | Cook Time: 6-12 hours (depending on method) | Total Time: Hands-off perfection

    Yield: 8-10 servings

    Difficulty: Set it and forget it

    Storage Notes

    Leftovers:

    Store in an airtight container in the fridge for up to 5 days. Kalua pork tastes even better the next day as flavors meld.

    Reheating:

    Skillet (best): Reheat with a splash of cooking liquid over medium heat. Microwave: 1-2 minutes, covered to retain moisture. Oven: 350°F for 10-15 minutes covered.

    Freezer-Friendly:

    Kalua pork freezes beautifully! Store shredded pork in zip-top bags or airtight containers for up to 3 months. Thaw overnight in the fridge before reheating.

    Make Ahead:

    This is the ultimate make-ahead meal. Cook a day or two ahead, shred, and refrigerate. The flavors only get better with time.

  • Coxinha (Brazilian Chicken Croquettes)

    Coxinha (Brazilian Chicken Croquettes)

    Coxinha are Brazil’s gift to the snack world. Tear-drop shaped croquettes with a creamy, shredded chicken filling, often wrapped around a nugget of catupiry cheese, then breaded and fried until golden and crisp. They’re the star of every Brazilian party, the snack that disappears first, the thing you crave when you’re homesick for Brazil—even if you’ve never been.

    Making coxinha at home is a labor of love, but it’s deeply satisfying. The dough is a simple, velvety chicken-flavored pastry. The filling is rich and creamy. And that shape? It’s iconic. With a little practice, you’ll be shaping perfect coxinhas that rival any Brazilian bakery. Make a batch for your next gathering and watch them vanish.

    Ingredients

    Makes about 20-24 coxinhas.

    For the Filling:

    • 1 lb boneless, skinless chicken breast (about 2 breasts)
    • 1 onion, quartered
    • 2 cloves garlic, smashed
    • 2 bay leaves
    • Salt, to taste
    • 2 tbsp olive oil
    • ½ onion, finely chopped
    • 2 cloves garlic, minced
    • ½ cup tomato sauce or 2 tbsp tomato paste
    • ¼ cup cream cheese or catupiry cheese (Brazilian creamy cheese)
    • ¼ cup fresh parsley, chopped
    • Salt and black pepper, to taste
    • Optional: 20-24 small cubes of catupiry or mozzarella for stuffing centers

    For the Dough:

    • 2 cups chicken broth (from cooking the chicken)
    • 2 cups all-purpose flour
    • 2 tbsp butter
    • ½ tsp salt

    For the Breading and Frying:

    • 2 large eggs, beaten
    • 2 cups panko breadcrumbs (or regular breadcrumbs)
    • Neutral oil, for frying (vegetable, canola, or peanut)

    For Serving:

    • Lime wedges
    • Hot sauce

    Step-by-Step Instructions

    Step 1: Cook the Chicken

    1. Place chicken breasts in a pot with quartered onion, smashed garlic, bay leaves, and salt. Cover with water.
    2. Bring to a boil, then reduce heat and simmer for 15-20 minutes until chicken is cooked through.
    3. Remove chicken and reserve 2 cups of the broth for the dough. Let chicken cool.

    Step 2: Make the Filling

    1. Shred cooled chicken finely with two forks.
    2. In a skillet, heat olive oil over medium heat. Add chopped onion and cook until softened, about 3 minutes.
    3. Add minced garlic and cook for 30 seconds until fragrant.
    4. Add tomato sauce or paste and cook for 2 minutes.
    5. Add shredded chicken, stir to combine, and cook for 3-4 minutes.
    6. Remove from heat. Stir in cream cheese (or catupiry) and parsley. Season with salt and pepper.
    7. Let filling cool completely. If using cheese centers, cube cheese and set aside.

    Step 3: Make the Dough

    1. In a large saucepan, combine reserved chicken broth, butter, and salt. Bring to a boil.
    2. Add flour all at once and stir vigorously with a wooden spoon. The dough will come together into a ball.
    3. Cook for 2-3 minutes, stirring constantly, until the dough pulls away from the sides of the pan and forms a smooth ball.
    4. Transfer to a bowl and let cool until handleable.

    Step 4: Shape the Coxinhas

    1. Lightly oil your hands to prevent sticking. Take a portion of dough (about 1½ tablespoons) and flatten into a disc.
    2. Place a spoonful of filling in the center. If using cheese centers, place a cheese cube inside the filling.
    3. Carefully wrap the dough around the filling, sealing completely. Shape into a tear-drop (pear shape) with a pointed end.
    4. Place shaped coxinhas on a baking sheet. Repeat with remaining dough and filling.
    5. Refrigerate for 30 minutes to firm up (this helps the breading adhere).

    Step 5: Bread the Coxinhas

    1. Set up a breading station: beaten eggs in one bowl, panko in another.
    2. Dip each coxinha in beaten egg, letting excess drip off.
    3. Roll in panko, pressing gently to adhere. Coat evenly.
    4. Return to baking sheet and refrigerate for another 15-30 minutes (optional but helpful).

    Step 6: Fry the Coxinhas

    1. Pour oil into a heavy-bottomed pot or Dutch oven to a depth of 2-3 inches.
    2. Heat oil to 350°F (175°C). Use a thermometer for accuracy.
    3. Working in batches, carefully lower coxinhas into the hot oil. Don’t crowd the pot.
    4. Fry for 3-4 minutes, turning occasionally, until golden brown and crispy all over.
    5. Remove with a slotted spoon and drain on a wire rack (not paper towels).

    Step 7: Serve Immediately

    1. Arrange coxinhas on a platter. Serve with lime wedges and hot sauce.
    2. Take a bite. Crispy, golden shell. Creamy, savory filling. This is Brazil in a bite.

    Summary

    Prep Time: 45 minutes | Cook Time: 20 minutes | Chill Time: 1 hour | Total Time: 2 hours

    Yield: 20-24 coxinhas

    Difficulty: Labor of love (worth every minute)

    Storage Notes

    Leftovers:

    Store cooked coxinhas in an airtight container in the fridge for up to 3 days. Reheat to restore crispiness.

    Reheating (Bring Back the Crunch):

    Oven or air fryer (best): 375°F for 5-7 minutes until hot and crispy. Microwave: Not recommended—makes them soggy.

    Freezer-Friendly (The Dream):

    Freeze uncooked, breaded coxinhas on a baking sheet until solid, then transfer to a zip-top bag for up to 3 months. Fry from frozen—add 1-2 minutes to cooking time. No need to thaw.

    Make Ahead:

    Filling can be made up to 3 days in advance. Dough can be made a day ahead and refrigerated. Shape and fry just before serving for maximum crispiness.

  • Lobster Thermidor: The Ultimate French Classic

    Lobster Thermidor: The Ultimate French Classic

    Lobster Thermidor sounds like a dish from another era—and it is. Created in 1890s Paris to celebrate a play, it became the ultimate symbol of French culinary elegance. Lobster meat bathed in a velvety brandy-cream sauce, perfumed with mustard and tarragon, then stuffed back into the shell and gratinéed under the broiler. It’s decadent. It’s dramatic. And it’s surprisingly achievable at home.

    This version breaks down the classic technique into manageable steps. Cook the lobster. Make the sauce. Stuff and broil. The result is a dish that feels like a celebration—whether it’s an anniversary, a milestone, or just a Tuesday when you feel like treating yourself. Serve with Champagne and savor every bite.

    Ingredients

    Serves 2.

    For the Lobster:

    • 2 live lobsters (1½-2 lbs each), or 4 lobster tails
    • Salt, for boiling water

    For the Sauce:

    • 4 tbsp unsalted butter, divided
    • 1 shallot, finely chopped
    • 1 tbsp fresh tarragon, finely chopped (plus extra for garnish)
    • 2 tbsp brandy or cognac
    • ½ cup dry white wine
    • 1 cup heavy cream
    • 1 tbsp Dijon mustard
    • 1 tsp lemon juice
    • Salt and white pepper, to taste
    • Pinch of cayenne pepper (optional)

    For the Topping:

    • ½ cup grated Parmesan cheese or Gruyère
    • 2 tbsp panko breadcrumbs (optional, for extra crunch)

    For Garnish:

    • Fresh parsley or tarragon
    • Lemon wedges

    Step-by-Step Instructions

    Step 1: Cook the Lobster

    1. Bring a large pot of salted water to a rolling boil.
    2. Plunge lobsters head-first into the water. Cover and cook for 8-10 minutes (about 1 minute per ounce).
    3. Remove and transfer to an ice bath to stop cooking. Let cool completely.

    Step 2: Remove the Meat

    1. Twist off the claws and tails. Crack claws with a nutcracker or the back of a knife to remove meat.
    2. Cut the tail shell lengthwise along the underside. Gently remove the tail meat in one piece.
    3. Remove and discard the dark intestinal vein. Chop the lobster meat into bite-sized chunks.
    4. Clean the tail shells and reserve them for serving. Set the meat aside.

    Step 3: Make the Sauce

    1. In a large skillet, melt 2 tbsp butter over medium heat. Add shallot and cook until softened, about 2 minutes.
    2. Add tarragon and cook for 30 seconds until fragrant.
    3. Add brandy and carefully ignite to flambé (or simply simmer for 1-2 minutes to burn off alcohol).
    4. Add white wine and simmer until reduced by half, about 3 minutes.
    5. Add heavy cream, Dijon mustard, lemon juice, salt, white pepper, and cayenne. Simmer until sauce thickens enough to coat the back of a spoon, about 5-7 minutes.
    6. Remove from heat. Whisk in remaining 2 tbsp butter until melted and glossy.

    Step 4: Combine Lobster and Sauce

    1. Add chopped lobster meat to the sauce. Gently fold to coat.
    2. Spoon the lobster mixture back into the reserved tail shells. Mound it slightly for an elegant presentation.

    Step 5: Top and Broil

    1. Preheat broiler to high with a rack 6 inches from the heat source.
    2. Sprinkle filled shells with Parmesan (and panko if using).
    3. Place shells on a baking sheet. Broil for 2-4 minutes until golden, bubbly, and lightly charred in spots. Watch closely to prevent burning.

    Step 6: Serve Immediately

    1. Transfer shells to a serving platter. Garnish with fresh tarragon or parsley and lemon wedges.
    2. Serve immediately with crusty bread to soak up any extra sauce.
    3. Take a bite. Rich, creamy, luxurious. This is French cooking at its most indulgent.

    Summary

    Prep Time: 20 minutes | Cook Time: 30 minutes | Total Time: 50 minutes

    Yield: 2 servings

    Difficulty: Special occasion spectacular

    Storage Notes

    Leftovers (Rare, But Possible):

    Lobster Thermidor is best enjoyed fresh. If you have leftovers, store in an airtight container in the fridge for up to 2 days. The sauce may separate slightly upon reheating.

    Reheating:

    Oven (best): 350°F for 8-10 minutes until warmed through. Microwave: 1-2 minutes at reduced power, but expect a softer texture. Do not reheat under the broiler—the cheese may burn before the interior warms.

    Make Ahead:

    You can cook the lobster and prepare the sauce up to 1 day in advance. Store lobster meat and sauce separately in the refrigerator. Combine, fill shells, and broil just before serving.

    What to Serve With Lobster Thermidor:

    • Crusty baguette (essential for sauce)
    • Steamed asparagus or green beans
    • Buttered new potatoes
    • Simple green salad with lemon vinaigrette
    • Champagne or white Burgundy (Chardonnay)

  • Char Siu Bao (Fluffy BBQ Pork Buns)

    Char Siu Bao (Fluffy BBQ Pork Buns)

    Char siu bao are the dim sum classic that everyone fights over. Soft, pillowy steamed buns, cloud-like and slightly sweet, wrapped around a filling of sticky, savory, caramelized BBQ pork. One bite, and you understand why people wait in line at dim sum restaurants for these little bundles of joy.

    Making them at home is a labor of love—but it’s deeply satisfying. The dough comes together like a dream. The filling is simple but packed with flavor. And the moment you lift the lid of the steamer to reveal those glossy, perfect buns? Pure magic. Make a batch, invite friends over, and pretend you’re in a Chinatown teahouse.

    Ingredients

    Makes 12 buns.

    For the Char Siu (BBQ Pork):

    • 1 lb pork shoulder or pork butt (or pre-made char siu from a Chinese BBQ shop)
    • 2 tbsp hoisin sauce
    • 1 tbsp soy sauce
    • 1 tbsp oyster sauce
    • 1 tbsp honey
    • 1 tbsp sugar
    • 1 tsp five-spice powder
    • 1 tsp sesame oil
    • 2 cloves garlic, minced
    • 1 tsp red food coloring or red yeast rice powder (optional, for color)

    For the Filling:

    • 1 cup prepared char siu, finely diced
    • 1 shallot, finely chopped
    • 1 tbsp oil
    • 2 tbsp oyster sauce
    • 1 tbsp soy sauce
    • 1 tbsp hoisin sauce
    • 1 tbsp sugar
    • ½ cup water
    • 1 tbsp cornstarch mixed with 2 tbsp water (slurry)

    For the Dough:

    • 2 cups all-purpose flour, plus more for dusting
    • ½ cup cake flour (or all-purpose flour substitute)
    • 2 tsp baking powder
    • 3 tbsp sugar
    • ½ tsp salt
    • ¾ cup warm water (110°F)
    • 1 tbsp vegetable oil
    • 1 tsp active dry yeast

    Step-by-Step Instructions

    Step 1: Make the Char Siu (or Use Store-Bought)

    1. If using store-bought char siu, skip to Step 2.
    2. Combine hoisin, soy sauce, oyster sauce, honey, sugar, five-spice powder, sesame oil, garlic, and food coloring (if using) in a bowl.
    3. Marinate pork for at least 4 hours or overnight in the refrigerator.
    4. Preheat oven to 400°F (200°C). Roast pork on a wire rack for 20-25 minutes, flipping halfway, until caramelized and cooked through.
    5. Let cool, then finely dice. Set aside 1 cup for the filling.

    Step 2: Make the Filling

    1. Heat oil in a skillet over medium heat. Add shallot and cook until softened, about 2 minutes.
    2. Add diced char siu and stir-fry for 1-2 minutes.
    3. Add oyster sauce, soy sauce, hoisin sauce, sugar, and water. Stir to combine.
    4. Bring to a simmer, then add cornstarch slurry. Cook until thickened, about 1 minute.
    5. Remove from heat and let cool completely. The filling should be thick and glossy.

    Step 3: Make the Dough

    1. In a small bowl, combine warm water, sugar, and yeast. Let sit for 5-10 minutes until foamy.
    2. In a large bowl, whisk together all-purpose flour, cake flour, baking powder, and salt.
    3. Add yeast mixture and oil. Stir until a shaggy dough forms.
    4. Knead on a lightly floured surface for 8-10 minutes until smooth and elastic.
    5. Place in a lightly oiled bowl, cover, and let rise in a warm place for 1-2 hours until doubled in size.

    Step 4: Shape the Buns

    1. Punch down dough and knead briefly. Divide into 12 equal pieces (about 1.5 oz each).
    2. Roll each piece into a ball, then flatten into a 4-inch circle. The edges should be thinner than the center.
    3. Place 1-2 tablespoons of filling in the center.
    4. Gather edges and pleat to seal, pinching the top closed. Place seam-side down on a square of parchment paper.
    5. Repeat with remaining dough and filling.

    Step 5: Second Rise

    1. Place buns in a steamer basket or on a baking sheet, leaving space between them.
    2. Cover and let rise for 30-45 minutes until slightly puffed.

    Step 6: Steam the Buns

    1. Fill a wok or large pot with water and bring to a simmer.
    2. Place steamer basket over the water. Steam buns in batches for 12-15 minutes.
    3. Do not open the lid during steaming—the steam keeps the buns fluffy.
    4. After steaming, turn off heat and let buns sit for 5 minutes before opening the lid to prevent collapsing.

    Step 7: Serve Immediately

    1. Remove buns from steamer and serve warm.
    2. Take a bite. Fluffy, cloud-like dough. Sweet, savory, sticky pork filling. This is dim sum heaven.

    Summary

    Prep Time: 45 minutes + marinating/rising | Cook Time: 30 minutes | Total Time: 4 hours (mostly hands-off)

    Yield: 12 buns

    Difficulty: Labor of love (so worth it)

    Storage Notes

    Leftovers:

    Store steamed buns in an airtight container in the fridge for up to 3 days. Reheat by steaming for 5 minutes until fluffy again.

    Freezer-Friendly (The Dream):

    Freeze uncooked, shaped buns on a baking sheet until solid, then transfer to a zip-top bag for up to 3 months. Steam from frozen—add 3-5 minutes to steaming time. No need to thaw. Steamed buns can also be frozen after cooking and reheated by steaming.

    Reheating:

    Steamer (best): Reheat for 5-7 minutes until fluffy and warmed through. Microwave: 30-45 seconds wrapped in a damp paper towel—this helps keep them soft. Oven: Not recommended—they’ll dry out.

    Make Ahead:

    Filling can be made up to 3 days in advance and refrigerated. Dough is best made fresh, but shaped buns can be refrigerated overnight for the second rise before steaming.

  • Pork Egg Rolls: Crispy, Savory and Better Than Takeout

    Pork Egg Rolls: Crispy, Savory and Better Than Takeout

    Egg rolls are the appetizer that makes takeout worth the wait. That first crack of crispy, golden wrapper giving way to a savory, steaming filling of pork and cabbage. But homemade egg rolls? They’re a revelation. Crispier. Filling-ier. And you control exactly what goes inside.

    This recipe keeps things classic: ground pork, shredded cabbage, carrots, and a few pantry staples. The filling comes together quickly. The wrapping takes a little practice but becomes second nature. And the frying? That’s where the magic happens. Serve them with sweet and sour sauce or hot mustard, and watch them vanish.

    Ingredients

    Makes about 20-24 egg rolls.

    For the Filling:

    • 1 lb ground pork
    • 3 cups green cabbage, finely shredded
    • 1 cup carrots, julienned or grated
    • 3 cloves garlic, minced
    • 1 tbsp fresh ginger, grated
    • 2 green onions, thinly sliced
    • 2 tbsp soy sauce
    • 1 tbsp oyster sauce
    • 1 tsp sesame oil
    • 1 tsp sugar
    • ½ tsp white pepper (or black pepper)
    • 1 tbsp vegetable oil (for sautéing)

    For the Egg Rolls:

    • 20-24 egg roll wrappers (square, about 6-7 inches)
    • 1 egg, beaten (for sealing)
    • Neutral oil, for frying (vegetable, canola, or peanut)

    For Serving:

    • Sweet and sour sauce
    • Hot mustard
    • Soy sauce
    • Pickled ginger (optional)

    Step-by-Step Instructions

    Step 1: Cook the Filling

    1. Heat vegetable oil in a large skillet or wok over medium-high heat.
    2. Add ground pork and cook, breaking it up with a spoon, until browned and cooked through, about 5-6 minutes.
    3. Add garlic and ginger. Cook for 30 seconds until fragrant.
    4. Add cabbage and carrots. Stir-fry for 2-3 minutes until vegetables begin to soften.
    5. Add soy sauce, oyster sauce, sesame oil, sugar, and white pepper. Stir to combine.
    6. Cook for another 2-3 minutes until vegetables are tender and liquid has evaporated.
    7. Stir in green onions. Remove from heat and let filling cool completely before wrapping. (Hot filling can tear the wrappers.)

    Step 2: Prepare Wrappers and Sealant

    1. Beat the egg in a small bowl with 1 tablespoon of water. This is your glue for sealing.
    2. Lay an egg roll wrapper on a clean surface with one corner pointing toward you (diamond orientation).

    Step 3: Assemble the Egg Rolls

    1. Place about 2-3 tablespoons of filling in the center of the wrapper, shaping it into a log.
    2. Fold the bottom corner up over the filling, tucking it snugly.
    3. Fold in the left and right corners, like an envelope.
    4. Roll tightly toward the top corner, keeping the roll straight.
    5. Brush the top corner with beaten egg and press to seal. The seam should be on the bottom.
    6. Place finished egg rolls on a baking sheet, seam-side down, and keep covered with a damp towel to prevent drying.

    Step 4: Heat the Oil

    1. Pour oil into a heavy-bottomed pot or Dutch oven to a depth of 2-3 inches.
    2. Heat oil to 350°F (175°C). Use a thermometer for accuracy.

    Step 5: Fry the Egg Rolls

    1. Working in batches (don’t crowd the pot), carefully lower egg rolls into the hot oil, seam-side down to start.
    2. Fry for 3-4 minutes, turning occasionally, until golden brown and crispy all over.
    3. Remove with a slotted spoon and drain on a wire rack (not paper towels—paper towels trap steam and soften the crust).

    Step 6: Serve Immediately

    1. Arrange crispy egg rolls on a platter with sweet and sour sauce and hot mustard.
    2. Garnish with sliced green onions or sesame seeds if desired.
    3. Take a bite. Hear that crunch. Taste the savory filling. You just made the best egg rolls of your life.

    Summary

    Prep Time: 25 minutes | Cook Time: 20 minutes | Total Time: 45 minutes

    Yield: 20-24 egg rolls

    Difficulty: Worth the effort

    Storage Notes

    Leftovers:

    Store cooked egg rolls in an airtight container in the fridge for up to 3 days. They’ll lose crispiness but can be reheated.

    Reheating (Bring Back the Crunch):

    Oven or air fryer (best): 375°F for 5-7 minutes until hot and crispy. Skillet: Reheat in a dry pan over medium heat. Microwave: Not recommended—makes them soggy.

    Freezer-Friendly (Meal Prep Dream):

    Freeze uncooked, assembled egg rolls in a single layer on a baking sheet. Once frozen, transfer to a zip-top bag for up to 3 months. Fry from frozen—add 1-2 minutes to cooking time. No need to thaw.

    Make Ahead:

    Filling can be made up to 3 days in advance and refrigerated. Assemble and fry just before serving for maximum crispiness.

    What to Serve With Pork Egg Rolls:

    • Fried rice (pork, shrimp, or vegetable)
    • Lo mein or chow mein
    • Hot and sour soup or egg drop soup
    • Steamed dumplings or potstickers
    • Simple cucumber salad
    • Cold beer or jasmine tea

    Egg Roll vs. Spring Roll:

    Egg rolls use a thicker, wheat-based wrapper that bubbles and crisps when fried, creating that signature crunchy texture. Spring rolls use a thinner, lighter wrapper (often rice-based) that’s more delicate. Both are delicious, but egg rolls are the classic American-Chinese takeout favorite with that satisfying crunch.

  • Pajeon (Korean Scallion Pancake)

    Pajeon (Korean Scallion Pancake)

    Pajeon is Korea’s answer to the pancake question—and it’s not sweet. It’s savory, crispy, packed with fresh scallions, and served with a tangy soy dipping sauce that makes every bite sing. It’s the kind of food that brings people to the table, perfect for sharing, and dangerously easy to eat.

    The magic is in the texture: crispy, lacy edges giving way to a tender, scallion-studded center. A simple batter, a hot pan, and plenty of oil create that signature crunch. Serve it as an appetizer, a snack with drinks, or a light meal with rice and kimchi. Once you start, it’s hard to stop.

    Ingredients

    Serves 2-4 (makes 2 pancakes).

    For the Pancake:

    • 1 cup all-purpose flour
    • ½ cup cornstarch or potato starch (for extra crispiness)
    • 1 cup cold water
    • 1 large egg, beaten
    • 1 tsp salt
    • ½ tsp sugar
    • 1 bunch scallions (about 8-10), cut into 2-inch lengths
    • Neutral oil, for frying (vegetable or canola)

    Optional Add-Ins:

    • ½ cup seafood (shrimp, squid, mussels), chopped
    • ½ cup kimchi, chopped (squeeze out excess liquid)
    • ¼ cup carrots, julienned
    • 1 fresh red chili, thinly sliced
    • ¼ cup zucchini, thinly sliced

    For the Dipping Sauce:

    • ¼ cup soy sauce
    • 1 tbsp rice vinegar
    • 1 tbsp water
    • 1 tsp sugar
    • ½ tsp gochugaru (Korean red pepper flakes) or regular red pepper flakes
    • 1 tsp sesame oil
    • 1 clove garlic, minced
    • 1 tbsp chopped scallion (optional)
    • ½ tsp toasted sesame seeds (optional)

    Step-by-Step Instructions

    Step 1: Make the Dipping Sauce

    1. In a small bowl, combine soy sauce, rice vinegar, water, sugar, gochugaru, sesame oil, garlic, scallion, and sesame seeds.
    2. Stir until sugar dissolves. Set aside to let flavors meld.

    Step 2: Make the Batter

    1. In a large bowl, whisk together flour, cornstarch, salt, and sugar.
    2. Add cold water and beaten egg. Whisk until just combined—a few lumps are okay. Do not overmix.
    3. The batter should be thin and pourable, like heavy cream. If too thick, add a tablespoon of water at a time.

    Step 3: Prepare the Scallions

    1. Wash and dry scallions thoroughly. Cut into 2-inch lengths. Pat dry—excess water can make the pancake soggy.
    2. If using add-ins (seafood, kimchi, vegetables), prepare them now and have them ready.

    Step 4: Heat the Pan

    1. Heat a large non-stick skillet or cast-iron pan over medium-high heat.
    2. Add 2-3 tablespoons of oil—enough to generously coat the bottom. The oil is key to crispy edges.

    Step 5: First Pancake

    1. Pour half the batter into the hot pan, tilting to spread into a thin, even round.
    2. Immediately scatter half the scallions (and any add-ins) evenly over the batter. Press them in gently with a spatula so they adhere.
    3. Cook for 3-4 minutes until the bottom is golden brown and crispy. Peek at the edges to check.
    4. Flip carefully using a wide spatula. Add another tablespoon of oil around the edges if needed.
    5. Cook for another 3-4 minutes until the second side is golden and crispy and the pancake is cooked through.

    Step 6: Second Pancake

    1. Repeat with remaining batter, scallions, and add-ins. Add more oil as needed between pancakes.

    Step 7: Serve Immediately

    1. Transfer pajeon to a cutting board and cut into wedges.
    2. Serve hot with the dipping sauce on the side.
    3. Take a bite. Crispy edges, tender center, bursts of scallion. Dip in the tangy sauce. This is Korean comfort food at its best.

    Summary

    Prep Time: 10 minutes | Cook Time: 15 minutes | Total Time: 25 minutes

    Yield: 2 pancakes (serves 2-4)

    Difficulty: Crispy, easy, addictive

    Storage Notes

    Leftovers:

    Store in an airtight container in the fridge for up to 2 days. The texture will soften but still tastes great.

    Reheating (Bring Back the Crunch):

    Skillet (best): Reheat in a dry pan over medium heat for 2-3 minutes per side until crispy. Air fryer: 375°F for 3-4 minutes. Oven: 400°F for 5-7 minutes on a wire rack. Microwave: Not recommended—makes it soggy.

    Make Ahead:

    Mix the batter up to 2 hours in advance and refrigerate. Stir before using. The pancake is best cooked fresh and served immediately for maximum crispiness.

    What to Serve With Pajeon:

    • Makgeolli (Korean rice wine)—the classic pairing
    • Soju or beer
    • Steamed rice
    • Kimchi (the essential Korean side dish)
    • Pickled vegetables
    • Doenjang jjigae (soybean paste stew)

  • Tamagoyaki (Japanese Rolled Omelette)

    Tamagoyaki (Japanese Rolled Omelette)

    Tamagoyaki is the Japanese omelette that looks like art. Thin layers of seasoned egg, rolled into a perfect golden log, sliced to reveal a beautiful spiral of tender, slightly sweet custard. It’s served for breakfast, tucked into bento boxes, draped over sushi rice, and admired for its delicate beauty.

    The technique takes practice—but that’s part of the joy. Each roll teaches you something. The first few might be rustic, but with a little patience (and a rectangular pan), you’ll be making restaurant-quality tamagoyaki that tastes as good as it looks. Sweet, savory, and deeply satisfying.

    Ingredients

    Serves 2 (makes 1 roll).

    For the Tamagoyaki:

    • 3 large eggs
    • 2 tbsp dashi (or 2 tbsp water + ¼ tsp dashi powder)
    • 1 tsp soy sauce
    • 1 tsp mirin
    • ½ tsp sugar
    • Pinch of salt
    • Neutral oil, for cooking (vegetable or canola)

    Optional Additions:

    • Chopped green onions
    • Finely chopped nori (seaweed)
    • Grated cheese
    • Cooked shrimp or salmon flakes

    For Serving:

    • Grated daikon radish (optional)
    • Soy sauce for dipping
    • Fresh parsley or shiso leaf

    Step-by-Step Instructions

    Step 1: Make the Egg Mixture

    1. In a small bowl, combine dashi, soy sauce, mirin, sugar, and salt. Stir until sugar dissolves.
    2. Crack eggs into a separate bowl. Using chopsticks or a fork, stir eggs in a cutting motion (not whisking) to combine whites and yolks without incorporating too much air. You want a smooth, uniform mixture.
    3. Pour the seasoned liquid into the eggs and gently mix until combined. Strain through a fine-mesh sieve if you want an ultra-smooth texture (optional but recommended).

    Step 2: Heat the Pan

    1. Heat a rectangular tamagoyaki pan (or small non-stick skillet) over medium-low heat.
    2. Lightly oil the pan using a paper towel or brush. You’ll need to re-oil between each layer.

    Step 3: First Layer

    1. Pour a thin layer of egg mixture into the pan, tilting to cover the bottom evenly. Use about ⅓ of the mixture.
    2. Cook until the edges are set and the surface is slightly runny, about 30-45 seconds.
    3. Using chopsticks or a spatula, gently roll the egg from one end to the other. Push the rolled egg to the far side of the pan.

    Step 4: Second Layer

    1. Re-oil the empty side of the pan. Pour another thin layer of egg mixture, tilting to cover the bottom.
    2. Lift the existing roll slightly to let uncooked egg flow underneath.
    3. Cook until set, then roll again, wrapping the new layer around the existing roll.
    4. Push the roll back to the far side of the pan.

    Step 5: Remaining Layers

    1. Repeat the process with the remaining egg mixture (usually 2-3 more layers).
    2. After each roll, gently press the tamagoyaki with a spatula to shape it into a neat rectangular log.
    3. If adding fillings like green onions, sprinkle them on before rolling each layer.

    Step 6: Shape and Rest

    1. Once all egg mixture is used, press the tamagoyaki gently with the spatula to create a uniform rectangular shape.
    2. Transfer to a bamboo sushi mat or a piece of plastic wrap and roll to tighten. Let rest for 5 minutes to set the shape.

    Step 7: Slice and Serve

    1. Slice the tamagoyaki into ½-inch thick pieces.
    2. Arrange on a plate with grated daikon and soy sauce for dipping.
    3. Take a bite. Tender, layered, sweet-savory perfection. You’ve just mastered Japanese home cooking.

    Summary

    Prep Time: 5 minutes | Cook Time: 10 minutes | Total Time: 15 minutes

    Yield: 1 roll (serves 2)

    Difficulty: Practice makes perfect

    Storage Notes

    Leftovers:

    Store tamagoyaki in an airtight container in the fridge for up to 3 days. It’s delicious cold or at room temperature—perfect for bento boxes.

    Reheating:

    Skillet (gentle): Reheat over low heat for 1-2 minutes per side. Microwave: 20-30 seconds at reduced power—be careful not to overcook. Cold tamagoyaki is traditional in bento and equally delicious.

    Make Ahead:

    Tamagoyaki can be made a day in advance and stored in the fridge. Slice just before serving. It’s a staple of Japanese bento lunches precisely because it keeps so well.

    What to Serve With Tamagoyaki:

    • Steamed rice and miso soup (traditional Japanese breakfast)
    • As a topping for sushi rice (tamago nigiri)
    • In a bento box with pickled vegetables and grilled fish
    • As a side dish for ramen or udon
    • With grated daikon and soy sauce as an appetizer
    • Cold, as a snack or picnic food

  • Spinach Feta Omelette: Fluffy and Fresh, 10-Minute Breakfast

    Spinach Feta Omelette: Fluffy and Fresh, 10-Minute Breakfast

    The spinach feta omelette is the breakfast that makes you feel like you have your life together. It’s elegant enough for a brunch gathering, simple enough for a Tuesday morning, and packed with protein to keep you going until lunch. Creamy, tangy feta. Tender, garlicky spinach. All wrapped in a light, fluffy egg blanket.

    The key is technique: a non-stick pan, medium heat, and patience. Let the eggs set before you add the filling. Fold gently. Serve immediately. Ten minutes from start to finish, and you’ve got a breakfast that rivals any café.

    Ingredients

    Serves 1 (easily doubled).

    For the Omelette:

    • 3 large eggs
    • 1 tbsp milk or water (optional, for fluffiness)
    • Salt and black pepper, to taste
    • 1 tbsp butter or olive oil
    • 2 cups fresh spinach, roughly chopped
    • 1 clove garlic, minced (optional)
    • ¼ cup crumbled feta cheese
    • Fresh dill or parsley, for garnish (optional)

    Optional Additions:

    • Red pepper flakes for heat
    • Cherry tomatoes, halved
    • Mushrooms, sliced
    • Red onion, thinly sliced
    • Avocado, for serving

    Step-by-Step Instructions

    Step 1: Sauté the Spinach

    1. In a small non-stick skillet (8 or 10-inch), heat ½ tbsp butter or olive oil over medium heat.
    2. Add minced garlic (if using) and cook for 30 seconds until fragrant.
    3. Add spinach and cook for 1-2 minutes until wilted. Season with a pinch of salt.
    4. Remove spinach to a plate and wipe the skillet clean.

    Step 2: Whisk the Eggs

    1. In a small bowl, whisk eggs with milk (if using), salt, and pepper until frothy and pale yellow. Whisk vigorously for at least 30 seconds—this creates a fluffy omelette.

    Step 3: Cook the Omelette

    1. Return the skillet to medium heat. Add remaining butter or oil and swirl to coat.
    2. Pour in the eggs. Let them sit undisturbed for 30-45 seconds until the edges begin to set.
    3. Using a spatula, gently push the cooked edges toward the center, tilting the pan to let uncooked egg flow to the edges. Repeat until the eggs are mostly set but still slightly soft on top, about 2-3 minutes.

    Step 4: Add the Filling

    1. Sprinkle the sautéed spinach and crumbled feta over half of the omelette.
    2. If using additional toppings (tomatoes, mushrooms), add them now.

    Step 5: Fold and Finish

    1. Using a spatula, gently fold the empty half of the omelette over the filling.
    2. Let it cook for 30-60 seconds to melt the feta and warm the filling.
    3. Slide onto a plate.

    Step 6: Serve Immediately

    1. Garnish with fresh dill or parsley. Add red pepper flakes for heat if desired.
    2. Serve with toast, avocado, or a side of fresh fruit.
    3. Take a bite. Fluffy eggs, creamy feta, tender spinach. Breakfast is served.

    Summary

    Prep Time: 5 minutes | Cook Time: 8 minutes | Total Time: 13 minutes

    Yield: 1 serving

    Difficulty: Easy, elegant, fast

    Storage Notes

    Leftovers:

    Omelettes are best eaten fresh. If you have leftovers, store in an airtight container in the fridge for up to 2 days.

    Reheating:

    Skillet (best): Reheat gently over medium-low heat for 1-2 minutes per side. Microwave: 30-45 seconds at reduced power—the texture will be slightly softer but still delicious.

    Make Ahead:

    Sauté the spinach up to 3 days in advance and refrigerate. Whisk and cook eggs fresh for best results.

    Pro Tips for Omelette Greatness:

    • Whisk eggs vigorously. At least 30 seconds of whisking incorporates air for a fluffy texture.
    • Use medium heat, not high. High heat burns the eggs before they set properly. Low and slow is the way.
    • Let the edges set before pushing. Patience is key—don’t rush the first 30-45 seconds.
    • Non-stick pan is essential. A good non-stick skillet makes flipping and folding effortless.
    • Add milk or water for fluffiness. A tablespoon of liquid creates steam that lightens the eggs.
    • Don’t overfill. Too much filling makes the omelette hard to fold and prone to breaking.
    • Fold and serve immediately. Omelettes wait for no one—they’re at their peak right out of the pan.