Blog

  • Blackened Cajun Shrimp: Bold and Spicy

    Blackened Cajun Shrimp: Bold and Spicy

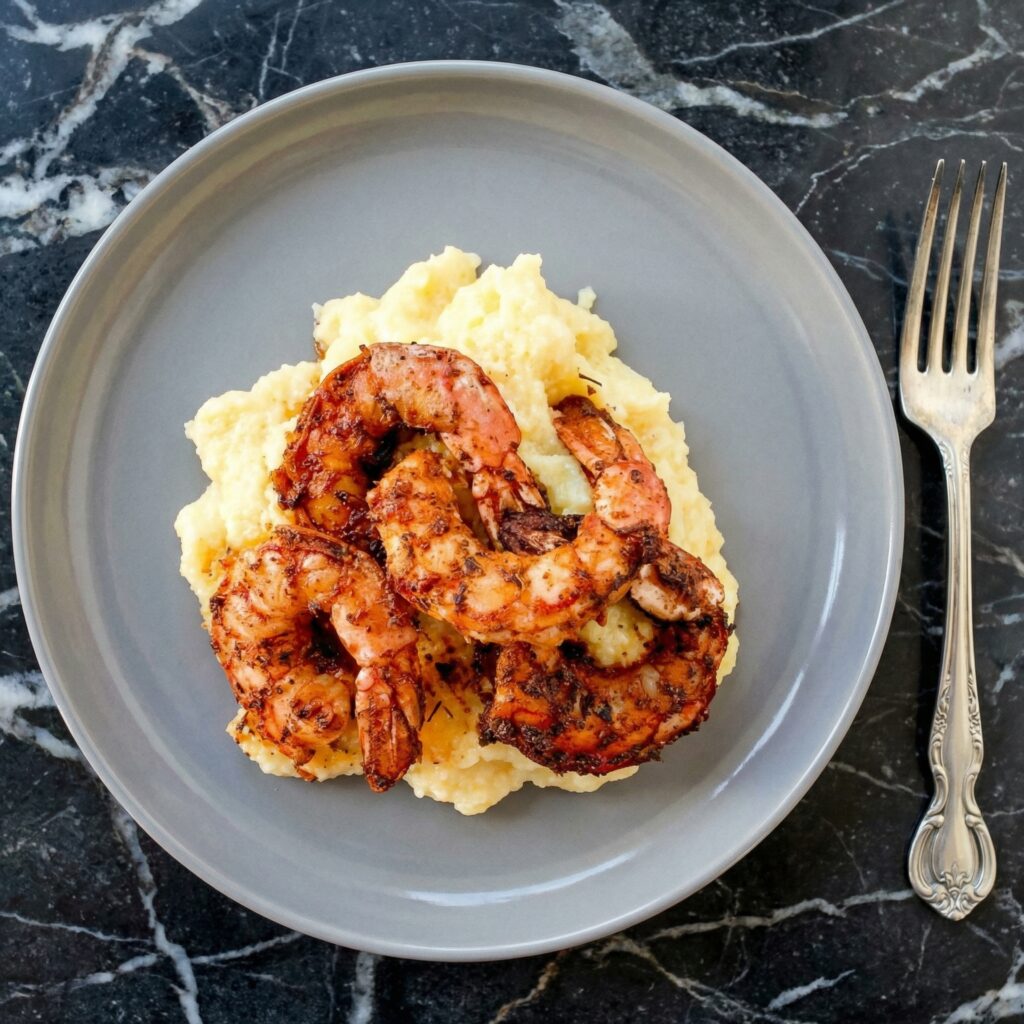
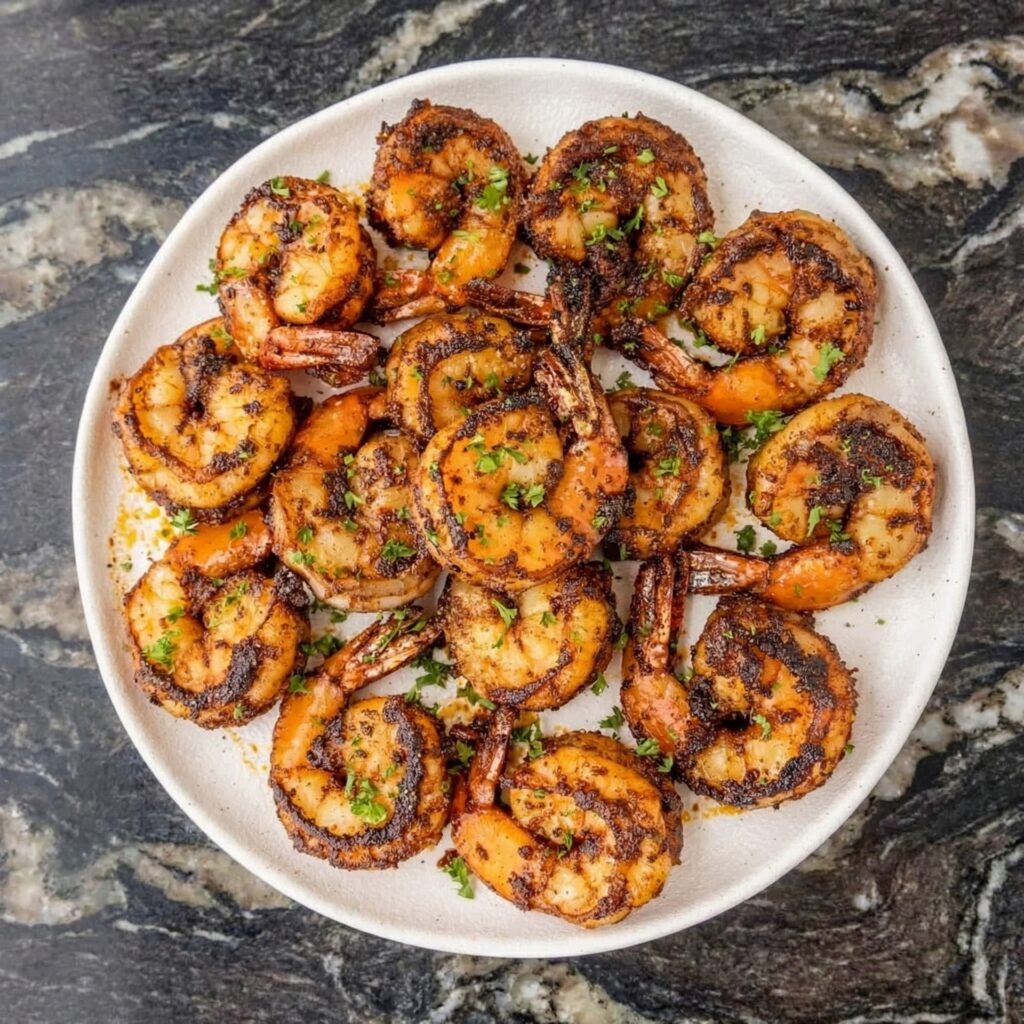
    Blackened shrimp is proof that big flavor doesn’t require big effort. A bold, smoky Cajun spice blend. A screaming-hot skillet. Two minutes per side. That’s it. The spice creates a dark, flavorful crust that’s not burnt—it’s blackened. There’s a difference, and it’s delicious.

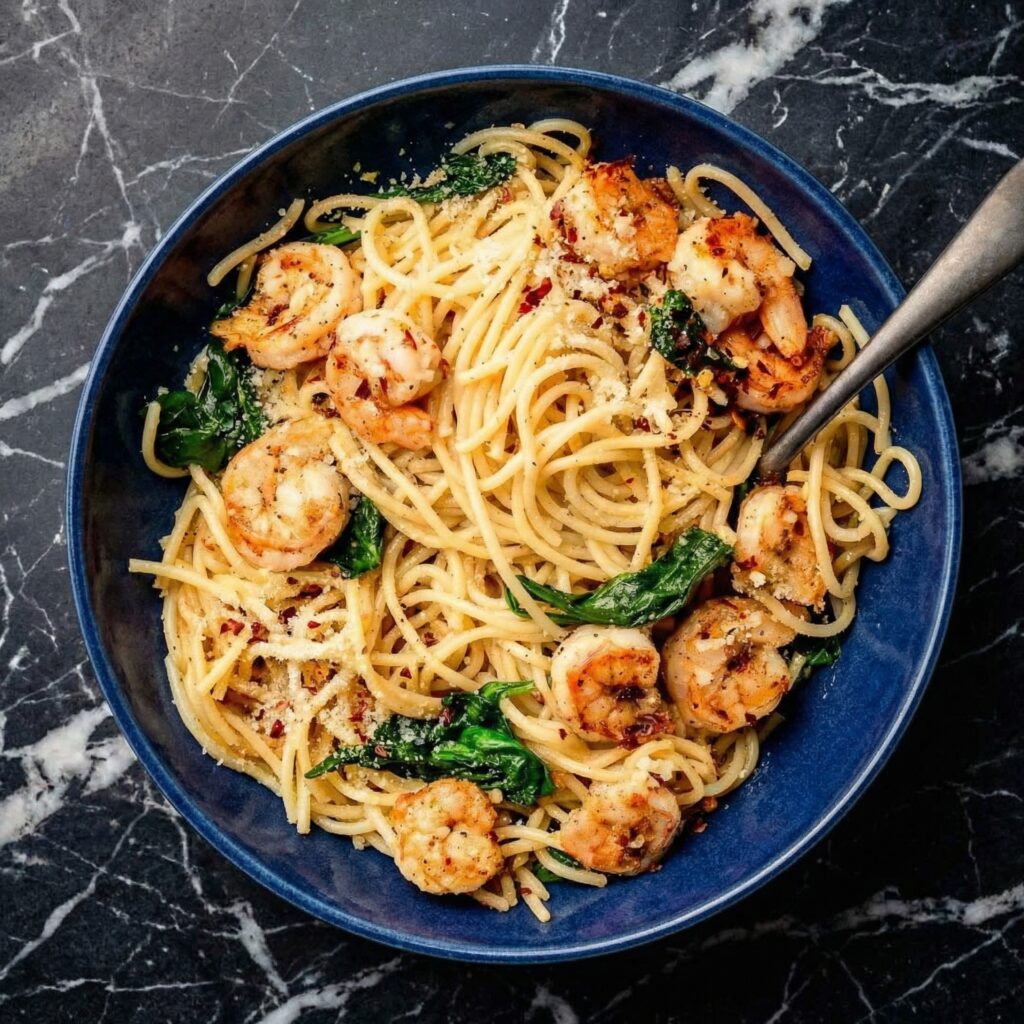
    These shrimp are the ultimate weeknight hero. Serve them over rice, tucked into tacos, piled on a salad, or just eaten straight from the pan with your fingers (no judgment). From start to finish, you’re looking at 10 minutes. Cajun dinner? Done.

    Ingredients

    Serves 4.

    For the Blackened Shrimp:

    • 1½ lbs large shrimp, peeled and deveined (tails on or off)
    • 2 tbsp olive oil or avocado oil (high smoke point)
    • 2 tbsp unsalted butter (optional, for extra richness)
    • Lemon wedges, for serving
    • Fresh parsley, for garnish

    For the Cajun Spice Blend:

    • 1 tbsp smoked paprika
    • 1 tsp garlic powder
    • 1 tsp onion powder
    • 1 tsp dried oregano
    • 1 tsp dried thyme
    • ½ tsp cayenne pepper (adjust to your heat preference)
    • ½ tsp black pepper
    • ½ tsp salt
    • ¼ tsp white pepper (optional, adds depth)

    Step-by-Step Instructions

    Step 1: Make the Cajun Spice Blend

    1. In a small bowl, combine smoked paprika, garlic powder, onion powder, oregano, thyme, cayenne, black pepper, salt, and white pepper (if using).
    2. Mix well. Store any extra in an airtight jar—it’s great on chicken, fish, and vegetables too.

    Step 2: Prep the Shrimp

    1. Pat shrimp completely dry with paper towels. This is crucial for getting a good sear.
    2. Place shrimp in a bowl and drizzle with 1 tbsp oil. Toss to coat.
    3. Sprinkle the Cajun spice blend generously over the shrimp. Toss until every shrimp is well coated. You want a thick layer of spice—that’s what creates the blackened crust.

    Step 3: Heat the Skillet

    1. Heat a large cast-iron skillet or heavy-bottomed pan over medium-high heat until it’s ripping hot. It should be almost smoking.
    2. Add the remaining 1 tbsp oil (and butter if using) to the pan.

    Step 4: Sear the Shrimp

    1. Add shrimp to the skillet in a single layer. Don’t crowd the pan—work in batches if needed.
    2. Cook undisturbed for 1½-2 minutes until the underside is deeply darkened and crispy. The spice should look blackened, not burnt.
    3. Flip and cook another 1-2 minutes until shrimp are opaque, curled, and cooked through.
    4. Remove immediately to a plate—they continue cooking off the heat.

    Step 5: Serve and Devour

    1. Squeeze fresh lemon juice over the hot shrimp. Garnish with parsley.
    2. Serve over rice, in tacos, on a salad, or straight from the plate.
    3. Take a bite. Feel the heat. Smile. You just made Louisiana in your kitchen.

    Summary

    Prep Time: 5 minutes | Cook Time: 5 minutes | Total Time: 10 minutes

    Yield: 4 servings

    Difficulty: Fast, fiery, foolproof

    Storage Notes

    Leftovers:

    Store in an airtight container in the fridge for up to 2 days. Shrimp are best fresh but make excellent leftovers for salads or tacos.

    Reheating:

    Skillet (best): Reheat over medium heat for 1 minute per side. Air fryer: 350°F for 2-3 minutes. Microwave: 20-30 seconds at reduced power—watch carefully to avoid rubbery shrimp.

    Make Ahead:

    Mix the Cajun spice blend up to 3 months in advance. Prep shrimp up to 24 hours ahead and keep refrigerated. Season and cook just before serving.

  • Garlic Butter Herb Shrimp Pasta: Restaurant-Worthy in 20 Minutes

    Garlic Butter Herb Shrimp Pasta: Restaurant-Worthy in 20 Minutes

    Garlic butter shrimp pasta is the ultimate quick-fancy meal. The kind of dish that makes you feel like a chef, even when you’re in sweatpants on a Wednesday. Succulent shrimp, seared until golden, then tossed with al dente pasta in a sauce that’s pure magic—butter, garlic, white wine, lemon, and a shower of fresh herbs.

    It looks like something you’d order at a nice Italian restaurant. It tastes like something you’d pay too much for. But it comes together in about 20 minutes, uses one pan, and requires zero special skills. This is the recipe that makes you look like a pro.

    Ingredients

    Serves 4.

    For the Pasta:

    • 12 oz linguine or fettuccine (or any long pasta)
    • 1 lb large shrimp, peeled and deveined (tails on or off)
    • Salt and black pepper, to taste
    • 4 tbsp unsalted butter, divided
    • 2 tbsp olive oil
    • 6 cloves garlic, minced
    • ½ cup dry white wine (or chicken broth)
    • ½ cup pasta water, reserved
    • 2 tbsp fresh lemon juice
    • 1 tsp lemon zest
    • ¼ cup fresh parsley, finely chopped
    • 2 tbsp fresh basil, chopped (optional)
    • Red pepper flakes, to taste (optional)
    • Freshly grated Parmesan cheese, for serving

    Step-by-Step Instructions

    Step 1: Cook the Pasta

    1. Bring a large pot of salted water to a boil. Cook pasta according to package directions until al dente.
    2. Reserve ½ cup of pasta water before draining. Drain pasta and set aside.

    Step 2: Prep the Shrimp

    1. Pat shrimp completely dry with paper towels. Season generously with salt and pepper on both sides.

    Step 3: Sear the Shrimp

    1. In a large skillet over medium-high heat, melt 2 tbsp butter with olive oil until shimmering.
    2. Add shrimp in a single layer. Cook for 1-2 minutes per side until pink, curled, and just cooked through. Don’t overcrowd—work in batches if needed.
    3. Remove shrimp to a plate and set aside.

    Step 4: Make the Garlic Butter Sauce

    1. Reduce heat to medium. Add remaining 2 tbsp butter to the same skillet.
    2. Add garlic and cook for 30-60 seconds until fragrant—don’t let it burn.
    3. Pour in white wine and scrape up any browned bits from the bottom. Let it simmer for 2-3 minutes until slightly reduced.
    4. Add lemon juice, lemon zest, and red pepper flakes (if using). Stir to combine.

    Step 5: Toss the Pasta

    1. Add the cooked pasta to the skillet. Toss to coat in the sauce.
    2. Add reserved pasta water a little at a time until the sauce is silky and clings to the pasta.
    3. Return shrimp to the skillet and toss gently to warm through, about 1 minute.

    Step 6: Finish and Serve

    1. Remove from heat. Stir in fresh parsley and basil.
    2. Taste and adjust seasoning with salt, pepper, or more lemon.
    3. Serve immediately in warm bowls. Top with freshly grated Parmesan and an extra sprinkle of herbs.
    4. Take a bite. Let the garlic butter coat your soul. You just made a restaurant-worthy dish in 20 minutes.

    Summary

    Prep Time: 10 minutes | Cook Time: 15 minutes | Total Time: 25 minutes

    Yield: 4 servings

    Difficulty: Date night easy

    Storage Notes

    Leftovers:

    Store in an airtight container in the fridge for up to 2 days. Shrimp can become rubbery when reheated, so it’s best enjoyed fresh.

    Reheating:

    Skillet (best): Reheat gently over low heat with a splash of water or broth to loosen the sauce. Microwave: 30-60 seconds at reduced power—watch carefully to avoid overcooking the shrimp.

    Make Ahead:

    Prep shrimp (peel and devein) up to 24 hours in advance. Make the sauce base without pasta and refrigerate. Cook pasta and finish fresh for best results.

    Pro Tips for Shrimp Pasta Greatness:

    • Pat shrimp dry. Dry shrimp = good sear. Wet shrimp = steamed shrimp.
    • Don’t overcook the shrimp. They cook in 1-2 minutes per side. Overcooked shrimp are rubbery and sad.
    • Reserve pasta water. The starchy water is liquid gold—it helps the sauce cling to the pasta and adds silky texture.
    • Use fresh garlic. Lots of it. This is garlic butter pasta—don’t skimp.
    • Cook pasta al dente. It will continue cooking slightly in the sauce. Slightly undercook it by 1 minute.
    • Finish with fresh herbs. Parsley and basil add brightness and freshness that dried herbs can’t match.
    • Don’t skip the lemon. Acid balances the richness of the butter and wakes up all the flavors.
  • Parmesan Crusted Cod: the Perfect 20-Minute Dinner

    Parmesan Crusted Cod: the Perfect 20-Minute Dinner

    Parmesan crusted cod is the kind of dinner that feels fancy but is secretly one of the easiest things you’ll ever make. Flaky white fish, topped with a golden, crispy crust of Parmesan, panko, and herbs—it’s like a fish stick grew up and got sophisticated.

    The crust is everything: buttery, savory, with a satisfying crunch that gives way to tender, perfectly cooked cod. And it all comes together in a single pan in about 20 minutes. Serve it with roasted vegetables, a simple salad, or a pile of lemony potatoes. This one’s going into heavy rotation.

    Ingredients

    Serves 4.

    For the Cod:

    • 4 cod fillets (6 oz each, about 1½ inches thick)
    • Salt and black pepper, to taste
    • 2 tbsp olive oil or melted butter (for drizzling)
    • Lemon wedges, for serving
    • Fresh parsley, for garnish

    For the Parmesan Crust:

    • ½ cup panko breadcrumbs
    • ½ cup freshly grated Parmesan cheese
    • 2 tbsp fresh parsley, finely chopped
    • 2 cloves garlic, minced
    • 1 tsp lemon zest
    • ½ tsp paprika (optional, for color)
    • ¼ tsp salt
    • ¼ tsp black pepper
    • 3 tbsp melted butter

    Step-by-Step Instructions

    Step 1: Preheat and Prep

    1. Preheat your oven to 400°F (200°C). Line a baking sheet with parchment paper or lightly grease a baking dish.
    2. Pat cod fillets completely dry with paper towels. Season both sides with salt and pepper.

    Step 2: Make the Parmesan Crust

    1. In a small bowl, combine panko, Parmesan, parsley, garlic, lemon zest, paprika, salt, and pepper.
    2. Pour in melted butter and stir until everything is evenly moistened. The mixture should hold together slightly when pressed.

    Step 3: Top the Cod

    1. Place cod fillets on the prepared baking sheet. Brush each fillet with olive oil or drizzle with melted butter.
    2. Divide the Parmesan mixture evenly among the fillets, pressing it gently onto the top of each piece so it adheres.

    Step 4: Bake to Perfection

    1. Bake for 12-15 minutes, depending on thickness, until the fish is opaque and flakes easily with a fork and the crust is golden and crispy.
    2. If the crust needs more color, switch to broil for the final 1-2 minutes—watch closely to prevent burning.

    Step 5: Serve Immediately

    1. Transfer to plates. Garnish with fresh parsley and serve with lemon wedges for squeezing.
    2. Serve alongside roasted asparagus, green beans, or a simple arugula salad.
    3. Take a bite. Hear that crunch. Savor the flaky fish beneath. This is how dinner should be.

    Summary

    Prep Time: 8 minutes | Cook Time: 12-15 minutes | Total Time: 20 minutes

    Yield: 4 servings

    Difficulty: Weeknight easy

    Storage Notes

    Leftovers:

    Store in an airtight container in the fridge for up to 2 days. The crust will soften, but the flavor remains.

    Reheating (Bring Back the Crunch):

    Oven or air fryer (best): 375°F for 5-7 minutes until heated through and crust re-crisps. Skillet: Reheat in a dry pan over medium heat, flipping once. Microwave: Avoid—it makes the crust soggy.

    Make Ahead:

    Mix the Parmesan crust mixture up to 3 days in advance and refrigerate. Assemble and bake just before serving for maximum crispiness.

    Pro Tips for Parmesan Crusted Cod Greatness:

    • Pat the fish dry. Moisture prevents the crust from adhering and crisping properly.
    • Use fresh Parmesan. Pre-shredded cheese contains anti-caking agents that affect melting and browning. Grate your own.
    • Panko is non-negotiable. Japanese breadcrumbs are lighter and crispier than regular breadcrumbs.
    • Press the crust gently. Pressing helps it stick so it doesn’t fall off after baking.
    • Don’t overcook the cod. Cod is done when it’s opaque and flakes easily with a fork. Overcooked fish is dry and sad.
    • Broil for extra crunch. A minute under the broiler at the end gives you that deep golden, crispy top.
  • Spinach Ricotta Stuffed Lasagna Rolls: Individual Bites of Heaven

    Spinach Ricotta Stuffed Lasagna Rolls: Individual Bites of Heaven

    Lasagna is glorious, but lasagna rolls? They’re something else. Each one is a perfectly portioned spiral of tender pasta, creamy spinach-ricotta filling, and melty cheese—like a little gift wrapped just for you. No messy slicing, no fighting over the corner piece (though that’s still a valid debate).

    These rolls have all the comfort of traditional lasagna but come together faster and look stunning on the plate. Make them for a weeknight dinner, a dinner party, or meal prep for the week. They freeze beautifully, reheat like a dream, and will make you wonder why you ever made lasagna any other way.

    Ingredients

    Serves 4-6 (makes 10-12 rolls).

    For the Lasagna Rolls:

    • 12 lasagna noodles (about 1 box)
    • 15 oz (425g) whole milk ricotta cheese
    • 10 oz (300g) frozen spinach, thawed and squeezed completely dry
    • 1 cup grated Parmesan cheese, divided
    • 1 large egg, lightly beaten
    • 2 cloves garlic, minced
    • ¼ tsp freshly grated nutmeg
    • ½ tsp salt
    • ¼ tsp black pepper
    • 2 cups shredded mozzarella cheese, divided

    For the Sauce:

    • 24 oz (680g) marinara sauce (jarred or homemade)
    • 1 tbsp olive oil
    • 2 cloves garlic, minced (optional)
    • Fresh basil, for garnish

    Step-by-Step Instructions

    Step 1: Cook the Noodles

    1. Bring a large pot of salted water to a boil. Cook lasagna noodles according to package directions until al dente (about 1 minute less than the box says—they’ll finish cooking in the oven).
    2. Drain and lay noodles flat on a parchment-lined baking sheet to prevent sticking. Drizzle with a tiny bit of oil if needed.

    Step 2: Make the Filling

    1. Thaw frozen spinach completely. Place in a clean kitchen towel and wring out every drop of water. Squeeze like your life depends on it—wet spinach = soggy rolls.
    2. In a large bowl, combine ricotta, squeezed spinach, ½ cup Parmesan, egg, garlic, nutmeg, salt, and pepper. Mix until well combined. Taste and adjust seasoning.

    Step 3: Prep the Sauce

    1. In a small saucepan, warm marinara sauce with olive oil and minced garlic (if using). Simmer for 5 minutes to meld flavors.
    2. Spread 1 cup of the sauce evenly over the bottom of a 9×13-inch baking dish.

    Step 4: Assemble the Rolls

    1. Lay a lasagna noodle flat on a clean surface. Spread about 2-3 tablespoons of the ricotta mixture evenly over the noodle, leaving a small border at the edges.
    2. Sprinkle with a little shredded mozzarella.
    3. Carefully roll the noodle up from one short end to form a tight spiral. Place seam-side down in the prepared baking dish.
    4. Repeat with remaining noodles and filling.

    Step 5: Top and Bake

    1. Pour the remaining marinara sauce over the rolls, spreading to cover them completely.
    2. Sprinkle with remaining mozzarella cheese and remaining ½ cup Parmesan.
    3. Cover with foil and bake at 375°F (190°C) for 25 minutes.
    4. Remove foil and bake another 10-15 minutes until cheese is melted, bubbly, and golden in spots.

    Step 6: Rest and Serve

    1. Let the rolls rest for 10 minutes before serving. This allows them to set up so you get clean, beautiful rolls.
    2. Garnish with fresh basil. Serve with a simple green salad and crusty bread.
    3. Take a bite. Let the cheese stretch. You’ve just made the coziest Italian comfort food imaginable.

    Summary

    Prep Time: 25 minutes | Cook Time: 35 minutes | Total Time: 1 hour

    Yield: 10-12 rolls (serves 4-6)

    Difficulty: Easier than traditional lasagna

    Storage Notes

    Leftovers:

    Store in an airtight container in the fridge for up to 4 days. The flavors meld beautifully overnight.

    Reheating:

    Oven (best): Cover with foil and bake at 350°F for 15-20 minutes. Microwave: Individual rolls in 60-90 seconds—cover with a damp paper towel to prevent drying out.

    Freezer-Friendly (Meal Prep Dream):

    Assemble rolls in the baking dish but don’t bake. Cover tightly with plastic wrap and foil, freeze for up to 3 months. To bake from frozen: remove plastic wrap, cover with foil, and bake at 375°F for 45-50 minutes. Remove foil and bake another 10-15 minutes until bubbly.

    Make Ahead:

    Assemble the rolls up to 24 hours in advance and refrigerate. Add 10-15 minutes to the bake time when cooking from cold.

    Pro Tips for Lasagna Roll Greatness:

    • Squeeze that spinach. Excess moisture is the enemy of creamy filling. Get it as dry as possible.
    • Don’t overcook the noodles. Cook until al dente—they’ll soften more during baking. Overcooked noodles tear when rolling.
    • Lay noodles flat. After draining, lay them in a single layer on a baking sheet. If they stick, a light drizzle of oil helps.
    • Spread filling evenly. Too much filling = bursting rolls. Too little = sad rolls. Aim for a thin, even layer.
    • Roll tight but not too tight. Firm enough to hold shape, but leave room for the filling to expand.
    • Seam-side down. Placing rolls seam-side down keeps them from unrolling during baking.
    • Rest before serving. 10 minutes lets the rolls set up for clean, beautiful portions.
  • Thai Basil Chicken: 15-Minute Flavor Explosion

    Thai Basil Chicken: 15-Minute Flavor Explosion

    If you’ve ever been to Thailand, you know pad kra pao. It’s the sizzling, fragrant, spicy stir-fry that vendors cook up on street corners, the smell of garlic and chilies hitting you before you even see the cart. Chicken wok-tossed with mountains of Thai basil, served over rice with a fried egg that has crispy, lacy edges and a runny yolk.

    This is the real deal. It’s fast, it’s fiery, and it’s deeply satisfying. The secret is the sauce—a balance of fish sauce, oyster sauce, and a touch of sugar—and the basil. Holy basil is traditional, but Thai basil works beautifully. Make it once, and you’ll understand why it’s Thailand’s national comfort food.

    Ingredients

    Serves 2-3.

    For the Stir Fry:

    • 1 lb chicken (or pork, beef, or tofu)
    • 6-8 Thai bird chilies, thinly sliced (adjust to your heat tolerance)
    • 5 cloves garlic, minced
    • 1 shallot, thinly sliced
    • 2 cups fresh holy basil or Thai basil leaves (packed—don’t skimp)
    • 2 tbsp neutral oil (vegetable or avocado)
    • Jasmine rice, for serving
    • 2-3 fried eggs, for topping (crispy edges, runny yolks)

    For the Sauce:

    • 2 tbsp fish sauce
    • 1 tbsp oyster sauce
    • 1 tbsp soy sauce (or dark soy for color)
    • 1 tsp sugar (palm sugar is traditional, but brown or white works)
    • 2 tbsp water

    For Serving:

    • Fresh cilantro, for garnish (optional)
    • Lime wedges
    • Extra fish sauce and chili flakes, on the side

    Step-by-Step Instructions

    Step 1: Make the Sauce

    1. In a small bowl, whisk together fish sauce, oyster sauce, soy sauce, sugar, and water. Set aside.

    Step 2: Prep the Aromatics

    1. Using a mortar and pestle (or just a knife), roughly pound or chop the chilies, garlic, and shallot together until they form a coarse paste. This releases more flavor than chopping separately.

    Step 3: Cook the Aromatics

    1. Heat oil in a wok or large skillet over high heat until smoking.
    2. Add the chili-garlic-shallot paste and stir-fry for 30 seconds until incredibly fragrant. Open a window—this is powerful stuff.

    Step 4: Brown the Chicken

    1. Add chicken to the wok. Break it up with a spatula and cook, without stirring too much, until it starts to brown and caramelize, about 3-4 minutes.
    2. Let it get crispy edges—this adds texture and flavor.

    Step 5: Add the Sauce

    1. Pour the sauce over the chicken. Stir-fry for 1-2 minutes until the sauce reduces and coats the meat.

    Step 6: Add the Basil

    1. Turn off the heat. Add all the basil leaves and stir until they wilt from the residual heat. The basil should be fragrant and slightly wilted, not completely cooked down.

    Step 7: Fry the Eggs

    1. In a separate pan, fry eggs in hot oil until the edges are crispy and lacy and the yolks are still runny. Season with a pinch of salt.

    Step 8: Assemble and Serve

    1. Scoop jasmine rice into bowls. Top with the Thai basil chicken.
    2. Place a fried egg on top of each bowl, letting that golden yolk get ready to spill.
    3. Garnish with fresh cilantro if desired and serve with lime wedges.
    4. Break the yolk. Let it run into the chicken and rice. Take a bite. Close your eyes. You’re on a Bangkok street corner now.

    Summary

    Prep Time: 5 minutes | Cook Time: 10 minutes | Total Time: 15 minutes

    Yield: 2-3 servings

    Difficulty: Street food easy

    Storage Notes

    Leftovers:

    Store in an airtight container in the fridge for up to 3 days. The flavors meld beautifully overnight. Store egg separately if possible—it’s best made fresh.

    Reheating:

    Skillet or wok (best): Reheat over medium-high heat with a splash of water to revive the sauce. Microwave: Works in a pinch—cover with a damp paper towel to prevent drying out. Make a fresh egg to top.

    Make Ahead:

    Mix the sauce up to a week ahead. Prep the chili-garlic paste up to 2 days ahead. The stir-fry itself is best made fresh—it takes 10 minutes!

    Pro Tips for Pad Kra Pao Greatness:

    • Holy basil is the real deal. If you can find it at an Asian market, use it. It has a peppery, slightly spicy flavor that’s irreplaceable. Thai basil (with purple stems) is a great substitute. Sweet Italian basil will work in a pinch but won’t have the same kick.
    • Don’t skimp on the basil. The recipe calls for 2 cups packed—that’s not a garnish, it’s a main ingredient.
    • High heat is essential. A screaming-hot wok gives you that smoky, caramelized flavor. Don’t be afraid of a little smoke.
    • Crispy egg is non-negotiable. The runny yolk becomes the sauce. Fry it in plenty of oil until the edges are lacy and crisp.
    • Adjust the heat. Thai bird chilies are no joke. Start with fewer if you’re sensitive, and serve with extra chili flakes on the side.
    • Pound the aromatics. Using a mortar and pestle (or a rough chop) releases more oils than a fine mince. It’s worth the extra minute.

    Variations:

    • Pad kra pao pork: Use ground pork instead of chicken—it’s the traditional version.
    • Pad kra pao beef: Use ground beef for a richer flavor.
    • Pad kra pao tofu: Use crumbled firm tofu for a vegetarian version. Add a splash more soy sauce to compensate for the missing fish sauce.
    • Seafood version: Use chopped shrimp or squid—cook quickly and don’t overcook.
    • Crispy pork version: Top with crispy fried pork belly (moo grob) for next-level indulgence.
    • Extra vegetables: Add green beans, bell peppers, or bamboo shoots for more texture.

    What to Serve With It:

    • Jasmine rice (essential)
    • Fried egg (essential)
    • Cucumber slices (for freshness)
    • Nam pla prik (fish sauce with fresh chilies) on the side
    • Ice-cold Thai iced tea or Singha beer

    Holy Basil vs. Thai Basil vs. Sweet Basil:

    Holy basil (kra pao): Peppery, slightly spicy, with purple-tinged leaves. The authentic choice. Thai basil: Anise-like flavor, purple stems. Great substitute. Sweet basil: Mild, slightly sweet. Works in a pinch but won’t have that signature kick.

  • Udon Stir Fry: Chewy Noodles and Bold Sauce

    Udon Stir Fry: Chewy Noodles and Bold Sauce

    Udon noodles are comfort in carbohydrate form—thick, bouncy, and impossibly satisfying. When you toss them in a hot wok with crisp vegetables, a punchy stir-fry sauce, and whatever protein you have on hand, magic happens. Fast, flavorful, and deeply slurpable.

    This stir fry comes together in the time it takes to order delivery. The sauce is a perfect balance of savory, sweet, and umami. The noodles soak up every drop. And it’s endlessly adaptable—chicken, shrimp, tofu, or just vegetables. Make it once, and it’ll be in your weeknight rotation forever.

    Ingredients

    Serves 2-3.

    For the Noodles and Stir Fry:

    • 2 packs (about 14 oz) fresh or frozen udon noodles (or dried)
    • 2 tbsp neutral oil (vegetable, avocado, or canola)
    • 1 lb chicken breast or thighs, thinly sliced (or shrimp, beef, or tofu)
    • 1 bell pepper, thinly sliced
    • 1 carrot, julienned or thinly sliced
    • 1 cup snap peas or broccoli florets
    • 2 green onions, sliced (white and green parts separated)
    • 2 cloves garlic, minced
    • 1 tbsp ginger, grated
    • Sesame seeds, for garnish

    For the Stir Fry Sauce:

    • ¼ cup soy sauce (low sodium preferred)
    • 2 tbsp oyster sauce
    • 1 tbsp mirin (or honey)
    • 1 tbsp sesame oil
    • 1 tsp brown sugar
    • ½ tsp red pepper flakes (optional, for heat)
    • ¼ cup water or chicken broth
    • 1 tbsp cornstarch (for thickening)

    Step-by-Step Instructions

    Step 1: Prep the Noodles

    1. If using fresh or frozen udon, cook according to package directions (usually 1-2 minutes in boiling water). Drain, rinse with cold water to stop cooking, and toss with a tiny bit of oil to prevent sticking. Set aside.
    2. If using dried udon, cook until al dente, then drain and rinse.

    Step 2: Make the Sauce

    1. In a small bowl, whisk together soy sauce, oyster sauce, mirin, sesame oil, brown sugar, red pepper flakes, water, and cornstarch until smooth. Set aside.

    Step 3: Cook the Protein

    1. Heat 1 tbsp oil in a wok or large skillet over high heat. Add chicken (or your protein) in a single layer. Cook undisturbed for 2-3 minutes until browned, then flip and cook another 2-3 minutes until cooked through.
    2. Remove chicken to a plate and set aside.

    Step 4: Stir Fry the Vegetables

    1. Add remaining oil to the wok. Toss in garlic, ginger, and white parts of green onions. Stir-fry for 30 seconds until fragrant.
    2. Add bell pepper, carrot, and snap peas. Stir-fry for 2-3 minutes until vegetables are crisp-tender.

    Step 5: Combine Everything

    1. Return chicken to the wok. Add the cooked udon noodles.
    2. Pour the sauce over everything and toss vigorously to combine. Cook for 1-2 minutes until the sauce thickens and coats every strand of noodle.

    Step 6: Garnish and Serve

    1. Stir in the green parts of the green onions.
    2. Transfer to bowls. Sprinkle with sesame seeds and an extra drizzle of sesame oil if desired.
    3. Serve immediately. Slurp loudly. It’s a compliment to the chef.

    Summary

    Prep Time: 10 minutes | Cook Time: 10 minutes | Total Time: 20 minutes

    Yield: 2-3 servings

    Difficulty: Faster than takeout

    Storage Notes

    Leftovers:

    Store in an airtight container in the fridge for up to 3 days. The noodles will absorb sauce overnight, making leftovers even more flavorful.

    Reheating:

    Skillet or wok (best): Reheat over medium-high heat with a splash of water or soy sauce to loosen the sauce. Microwave: Works in a pinch—cover with a damp paper towel to prevent drying out.

    Make Ahead:

    Prep all vegetables and sauce up to 2 days ahead. Cook noodles just before stir-frying for best texture. The whole dish comes together in minutes when everything is ready to go.

    Pro Tips for Udon Greatness:

    • High heat is non-negotiable. A screaming-hot wok gives you that smoky “wok hei” flavor. Don’t crowd the pan—work in batches if needed.
    • Prep everything first. Stir-frying moves fast. Have all ingredients measured and ready before you turn on the heat.
    • Don’t overcook the noodles. They’ll continue cooking in the wok. Slightly undercook them if boiling separately.
    • Cornstarch is the secret. It thickens the sauce so it clings to the noodles instead of pooling at the bottom.
    • Fresh udon is best. If you can find fresh or frozen udon in the refrigerated section, grab it. Dried works, but the texture won’t be as bouncy.

    Variations:

    • Vegetarian: Skip the chicken, use tofu or mushrooms, and substitute oyster sauce with vegetarian mushroom sauce or extra soy sauce.
    • Spicy udon: Add extra red pepper flakes, sriracha, or gochujang to the sauce.
    • Shrimp udon: Substitute chicken with shrimp—add during the last minute of vegetable stir-fry.
    • Beef udon: Use thinly sliced beef (like shabu-shabu or ribeye). Sear quickly and remove before vegetables.
    • Mushroom udon: Add shiitake or king oyster mushrooms for extra umami.
    • Curry udon: Add a teaspoon of curry powder to the sauce for Japanese curry flavor.

    Quick Sauce Swaps:

    • Teriyaki style: Use teriyaki sauce instead of the stir-fry sauce.
    • Peanut style: Add 2 tbsp peanut butter and a splash of rice vinegar to the sauce.
    • Garlic sesame: Double the garlic and add an extra drizzle of sesame oil at the end.
  • Pineapple Fried Rice: Sweet, Savory and Served in a Pineapple

    Pineapple Fried Rice: Sweet, Savory and Served in a Pineapple

    Pineapple fried rice is what happens when savory meets sweet and they decide to throw a party. Fragrant jasmine rice, wok-tossed with juicy chunks of pineapple, plump shrimp, crunchy cashews, and a whisper of curry powder—all served in a hollowed-out pineapple that doubles as the coolest bowl you’ll ever eat from.

    This Thai street food classic hits every note: sweet from the pineapple, savory from the fish sauce and soy, nutty from the cashews, and a little heat from the curry. It’s the kind of meal that feels like a celebration, even if it’s just Tuesday night. And yes, you can absolutely serve it in a pineapple. You only live once.

    Ingredients

    Serves 2-3 hungry people.

    For the Fried Rice:

    • 1 large ripe pineapple (or 2 cups fresh pineapple chunks)
    • 3 cups cooked jasmine rice, preferably day-old and cold
    • 2 tbsp neutral oil (vegetable or avocado)
    • ½ lb large shrimp, peeled and deveined (or chicken, or tofu)
    • 2 cloves garlic, minced
    • 1 shallot, thinly sliced
    • 1 red bell pepper, diced
    • ½ cup frozen peas and carrots (or fresh)
    • 2 green onions, sliced (white and green parts separated)
    • ½ cup roasted cashews
    • 2 eggs, lightly beaten (optional, but classic)

    For the Sauce:

    • 2 tbsp fish sauce
    • 1 tbsp soy sauce (or tamari)
    • 1 tbsp oyster sauce
    • 1 tsp curry powder
    • 1 tsp sugar

    For Serving:

    • Fresh cilantro, chopped
    • Lime wedges
    • Red pepper flakes or Sriracha (optional)

    Step-by-Step Instructions

    Step 1: Prep the Pineapple

    1. If using a whole pineapple for serving: slice it in half lengthwise through the leaves (so both halves have a leafy top). Using a knife, cut around the edges and scoop out the flesh with a spoon. Reserve the pineapple boats for serving.
    2. Chop the pineapple flesh into bite-sized chunks. You’ll need about 2 cups. Set aside.

    Step 2: Make the Sauce

    1. In a small bowl, whisk together fish sauce, soy sauce, oyster sauce, curry powder, and sugar. Set aside.

    Step 3: Scramble the Eggs (Optional)

    1. Heat a wok or large skillet over medium-high heat. Add a splash of oil. Pour in beaten eggs and scramble until just set. Remove to a plate.

    Step 4: Cook the Shrimp

    1. Add 1 tbsp oil to the wok. Add shrimp in a single layer and cook for 1-2 minutes per side until pink and curled. Remove and set aside.

    Step 5: Stir-Fry the Aromatics

    1. Add remaining oil to the wok. Toss in garlic, shallot, and white parts of green onions. Stir-fry for 30 seconds until fragrant.
    2. Add bell pepper and peas/carrots. Stir-fry for 1-2 minutes until slightly tender.

    Step 6: Add the Rice

    1. Add the cold rice to the wok, breaking up any clumps with your spatula. Toss to combine with the vegetables.
    2. Pour the sauce over the rice and stir-fry for 2-3 minutes until everything is well coated and the rice is heated through.

    Step 7: Add the Good Stuff

    1. Add the pineapple chunks, cooked shrimp, scrambled eggs, and cashews. Toss gently to combine and heat through, about 1-2 minutes.
    2. Stir in the green parts of the green onions. Taste and adjust seasoning—more fish sauce for salt, more lime for brightness.

    Step 8: Serve in Style

    1. Spoon the fried rice into your hollowed-out pineapple halves (or regular bowls, no judgment).
    2. Top with fresh cilantro and serve with lime wedges for squeezing.
    3. Add red pepper flakes or Sriraja if you like heat.
    4. Take a bite. Let the sweet pineapple and savory rice dance on your tongue. Pretend you’re on a beach in Thailand. You deserve this.

    Summary

    Prep Time: 15 minutes | Cook Time: 15 minutes | Total Time: 30 minutes

    Yield: 2-3 servings

    Difficulty: Wok it out

    Storage Notes

    Leftovers:

    Store in an airtight container in the fridge for up to 3 days. The flavors actually meld and get even better overnight.

    Reheating:

    Wok or skillet (best): Reheat over medium-high heat, adding a splash of water or soy sauce to revive the moisture. Microwave: Works in a pinch—cover with a damp paper towel to prevent drying out.

    Make Ahead:

    Cook rice a day ahead and refrigerate. Cold, day-old rice is essential for good fried rice—fresh rice turns to mush. Prep all ingredients ahead of time for a quick weeknight stir-fry.

    Pro Tips for Fried Rice Greatness:

    • Day-old rice is non-negotiable. Fresh rice is too moist and will clump. Spread it on a baking sheet in the fridge overnight for best results.
    • High heat is your friend. A screaming-hot wok gives you that smoky “wok hei” flavor. Don’t crowd the pan—work in batches if needed.
    • Prep everything before you start. Stir-frying moves fast. Have all ingredients measured and ready to go.
    • Don’t skip the curry powder. It’s subtle but gives that signature Thai yellow hue and warm flavor.
    • Cashews add crunch. Add them at the end so they stay crispy.

    Variations:

    • Chicken pineapple fried rice: Substitute shrimp with diced chicken breast.
    • Tofu version (vegetarian): Use firm tofu instead of shrimp, and substitute fish sauce with soy sauce.
    • Spicy version: Add fresh Thai bird chilies or extra red pepper flakes.
    • Bacon pineapple fried rice: Add crispy bacon for smoky saltiness.
    • Curry powder boost: Add an extra teaspoon for more intense curry flavor.

    Pineapple Boat Pro Tip:

    If using a pineapple boat, you can briefly heat the hollowed-out shells in the oven at 300°F for 5 minutes before filling. This warms the pineapple and adds a touch of sweetness to the rice that goes in. Just be careful—they get hot!

  • Eggs Florentine: The Brunch Classic You Need to Master

    Eggs Florentine: The Brunch Classic You Need to Master

    There’s something about eggs florentine. Maybe it’s the way the creamy, lemony hollandaise pools over a perfectly poached egg. Maybe it’s the moment that golden yolk spills out, mingling with the tender spinach and crisp English muffin. Or maybe it’s just that it feels like a celebration, even if you’re eating it in your pajamas on a Tuesday.

    Eggs Benedict gets all the glory, but florentine—with its bed of garlicky sautéed spinach—is the vegetarian version that might actually be better. And yes, you can make hollandaise without a meltdown. I’ll show you how.

    Ingredients

    Serves 2 (or 1 very hungry bruncher).

    For the Poached Eggs:

    • 4 large eggs, as fresh as possible
    • 1 tbsp white vinegar (helps the whites set)
    • Salt, for the water

    For the Spinach:

    • 8 oz fresh spinach (about 8 cups, packed)
    • 1 tbsp butter
    • 1 clove garlic, minced
    • Salt and pepper, to taste
    • Pinch of nutmeg (optional, but classic)

    For the Hollandaise Sauce:

    • ½ cup unsalted butter (1 stick)
    • 3 large egg yolks
    • 1 tbsp fresh lemon juice
    • ½ tsp salt
    • Pinch of cayenne or white pepper
    • 1 tsp water (for blending)

    For the Base:

    • 2 English muffins, split and toasted
    • Fresh chives or parsley, for garnish
    • Paprika, for dusting (optional)

    Step-by-Step Instructions

    Step 1: Make the Hollandaise (First—Trust Me)

    1. Melt butter in a small saucepan until hot and bubbly (but not browned). Keep warm.
    2. In a blender, combine egg yolks, lemon juice, salt, cayenne, and water. Blend for 5 seconds to combine.
    3. With the blender running on low, slowly drizzle in the hot butter in a thin stream. The sauce will thicken and emulsify into a creamy, silky hollandaise.
    4. Taste and adjust seasoning. Keep warm (but not hot—it can break) by setting the blender cup in a bowl of warm water.

    Step 2: Sauté the Spinach

    1. In a large skillet over medium heat, melt butter. Add garlic and cook for 30 seconds until fragrant.
    2. Add spinach in handfuls, stirring until wilted. Season with salt, pepper, and a pinch of nutmeg.
    3. Remove from heat and set aside. Squeeze out any excess liquid if needed.

    Step 3: Toast the Muffins

    1. Split English muffins and toast until golden and crisp. Set aside.

    Step 4: Poach the Eggs

    1. Fill a medium saucepan with about 3 inches of water. Add a pinch of salt and the vinegar. Bring to a gentle simmer (not a rolling boil—tiny bubbles only).
    2. Crack each egg into a small ramekin or cup. Swirl the water with a spoon to create a gentle vortex, then carefully slide the egg into the center. The swirling helps the white wrap around the yolk.
    3. Poach for 3-4 minutes for a runny yolk. Remove with a slotted spoon and drain on a paper towel.

    Step 5: Assemble

    1. Place toasted English muffin halves on plates. Top each with a generous pile of sautéed spinach.
    2. Carefully place a poached egg on top of each mound of spinach.
    3. Ladle warm hollandaise sauce over each egg. Let it cascade down the sides.

    Step 6: Garnish and Serve

    1. Sprinkle with fresh chives or parsley. Dust with a little paprika if desired.
    2. Serve immediately with a knife and fork (and extra napkins).
    3. Cut into that egg. Watch the yolk run. Take a bite that includes muffin, spinach, egg, and sauce all at once. This is brunch royalty.

    Summary

    Prep Time: 10 minutes | Cook Time: 20 minutes | Total Time: 30 minutes

    Yield: 2 servings

    Difficulty: Brunch flex

    Storage Notes

    Leftovers (Rare, But Possible):

    Eggs Florentine is best eaten immediately—poached eggs and hollandaise don’t reheat well. If you have leftover components, store separately in the fridge for up to 1 day.

    Reheating:

    Hollandaise: Gently warm in a bowl set over warm water, whisking constantly. Never microwave—it will break and scramble. Spinach: Reheat in a small skillet. Eggs: Best to poach fresh.

    Make Ahead Tips:

    • Hollandaise: Can be made up to 1 hour ahead and kept warm in a thermos or bowl over warm water.
    • Spinach: Can be sautéed a day ahead and reheated.
    • Poached eggs: Can be poached up to 1 day ahead, stored in cold water in the fridge, and reheated in simmering water for 30 seconds before serving.

    Pro Tips for Hollandaise Success:

    • Use the blender method. It’s foolproof and eliminates the risk of scrambled eggs.
    • Butter should be hot but not browned. Hot butter cooks the yolks just enough to thicken.
    • Keep it warm, not hot. Too much heat will break the emulsion.
    • If it breaks, fix it. Start with a fresh yolk and a teaspoon of warm water, then slowly whisk in the broken sauce. Rescue mission complete.

    Pro Tips for Poached Eggs:

    • Fresh eggs are essential. The whites hold together better.
    • Vinegar helps. It helps the egg whites coagulate faster.
    • Don’t boil. A gentle simmer is all you need—violent bubbles will shred your eggs.
    • Strain if you’re fancy. Crack each egg into a fine-mesh sieve to remove the watery whites. You’ll get perfect, compact poached eggs every time.

    Variations:

    • Eggs Benedict: Replace spinach with Canadian bacon or ham.
    • Eggs Royale: Add smoked salmon under the spinach.
    • Eggs Blackstone: Add a slice of tomato and crispy bacon.
    • Mushroom Florentine: Sauté mushrooms with the spinach.
  • The Ultimate Loaded Baked Potato

    The Ultimate Loaded Baked Potato

    The baked potato is humble. The loaded baked potato? That’s a star. A perfectly baked potato with a crispy, salty skin and a fluffy, steam-in-the-oven interior, split open and stuffed with all the good stuff—melty cheddar, crispy bacon, cool sour cream, and fresh chives.

    This is the kind of meal that asks very little of you but delivers everything. It’s a blank canvas for whatever you have in the fridge, but the classics are classic for a reason. Butter, cheese, bacon, and a dollop of sour cream. Maybe some broccoli if you’re feeling virtuous. Dinner is served.

    Ingredients

    Serves 4.

    For the Potatoes:

    • 4 large russet potatoes (the best for baking—high starch = fluffy interior)
    • 1 tbsp olive oil (for rubbing)
    • 1 tsp coarse salt (for the skin)

    For the Toppings Bar:

    • 1½ cups shredded sharp cheddar cheese
    • 8 slices bacon, cooked crispy and crumbled
    • 1 cup sour cream
    • 4 tbsp unsalted butter (1 tbsp per potato, minimum)
    • ¼ cup fresh chives or green onions, chopped
    • Salt and black pepper, to taste

    Optional Toppings (Because Why Not?):

    • Steamed broccoli florets
    • Chili (for a fully loaded meal)
    • Pickled jalapeños
    • Hot sauce
    • Extra cheese (always extra cheese)

    Step-by-Step Instructions

    Step 1: Preheat and Prep

    1. Preheat your oven to 400°F (200°C). Scrub potatoes clean and dry thoroughly.
    2. Poke each potato several times with a fork. This lets steam escape so they don’t explode in your oven.
    3. Rub each potato with olive oil and sprinkle generously with coarse salt. The oil helps the skin crisp up; the salt makes it delicious.

    Step 2: Bake the Potatoes

    1. Place potatoes directly on the oven rack (with a baking sheet on the rack below to catch any drips). This allows air to circulate and gives you crispy skin all around.
    2. Bake for 50-60 minutes until the skin is crisp and a knife slides in easily with no resistance.
    3. For extra fluffy potatoes, let them rest for 10 minutes before handling.

    Step 3: Prep the Toppings

    1. While potatoes bake, cook your bacon until crispy, then crumble or chop.
    2. Shred the cheese (freshly shredded melts better than pre-shredded).
    3. Chop your chives and set up a toppings bar if serving family-style.

    Step 4: Open and Fluff

    1. Transfer hot potatoes to a plate. Using a sharp knife, slice each potato lengthwise down the middle, but not all the way through—you want to open it like a book.
    2. Gently squeeze the ends to push the potato open and expose the fluffy interior.
    3. Use a fork to fluff the inside, breaking it up a bit. This creates more surface area for butter and toppings.

    Step 5: Build Your Masterpiece

    1. Drop a pat of butter into each potato and let it melt into the fluffy interior. Sprinkle with a pinch of salt and pepper.
    2. Pile on the shredded cheddar—it will melt from the residual heat.
    3. Sprinkle with crispy bacon and fresh chives.
    4. Top with a generous dollop of sour cream.

    Step 6: Serve Immediately

    1. Serve hot with extra toppings on the side for those who want more.
    2. Take a bite that includes crispy skin, fluffy potato, melted cheese, and bacon all at once. Close your eyes. This is peak comfort.

    Summary

    Prep Time: 10 minutes | Cook Time: 60 minutes | Total Time: 1 hour 10 minutes

    Yield: 4 servings

    Difficulty: Embarrassingly easy

    Storage Notes

    Leftovers:

    Store leftover baked potatoes (without toppings) in the fridge for up to 4 days. Store toppings separately.

    Reheating:

    Oven method (best): 350°F for 15-20 minutes until heated through and skin re-crisps. Air fryer: 375°F for 5-7 minutes. Microwave: Works in a pinch, but skin will be soft. Split, add butter, and reheat in 60-second bursts.

    Make Ahead:

    You can bake potatoes up to 2 days in advance. Store in the fridge, then reheat in a 400°F oven for 10-15 minutes before serving. Or use leftovers for twice-baked potatoes—just scoop out the insides, mix with toppings, stuff back in, and bake until golden.

    Pro Tips for Potato Perfection:

    • Russets are non-negotiable. Waxy potatoes (red, Yukon) won’t give you that fluffy interior.
    • Salt the skin. It’s not just for show—it seasons the potato and helps the skin crisp.
    • Don’t wrap in foil. Foil steams the potato instead of baking it. You want dry heat for crispy skin.
    • Use a wire rack or oven rack. Air circulation is key to even cooking.
    • Freshly shredded cheese melts better. Anti-caking agents in pre-shredded cheese mess with meltability.

    Potato Bar Party Idea:

    Set up a loaded potato bar for your next gathering. Bake a bunch of potatoes, keep them warm in a low oven, and set out bowls of toppings: cheeses, bacon, sour cream, chives, broccoli, chili, pulled pork, pickled jalapeños, hot sauces. Let everyone build their own masterpiece. It’s interactive, delicious, and way easier than catering to individual preferences.

  • Buffalo Wings: Crispy and Saucy

    Buffalo Wings: Crispy and Saucy

    Buffalo wings are a beautiful thing. Not complicated, not fancy—just chicken, heat, butter, and time. The goal is simple: wings so crispy they crunch when you bite into them, coated in a sauce that’s equal parts tangy, buttery, and spicy, with enough residual heat to make you reach for a cold beer.

    The secret is in the technique. A steam-and-bake method (or a double fry, if you’re feeling ambitious) ensures the skin renders and crisps without burning. Then comes the sauce—a simple emulsion of Frank’s RedHot and butter that’s greater than the sum of its parts. Toss, serve with celery and blue cheese, and watch them disappear.

    Ingredients

    Serves 4 as an appetizer (or 2 as a meal).

    For the Wings:

    • 2 lbs chicken wings, split into drums and flats (tip removed or saved for stock)
    • 1 tbsp baking powder (NOT baking soda—this is crucial for crispiness)
    • 1 tsp salt
    • 1 tsp garlic powder
    • ½ tsp black pepper
    • Neutral oil, for frying (if frying—skip for baking method)

    For the Buffalo Sauce:

    • ½ cup Frank’s RedHot Original hot sauce (the classic, don’t substitute)
    • ⅓ cup unsalted butter, cut into cubes
    • 1 tbsp white vinegar (optional, for extra tang)
    • ½ tsp Worcestershire sauce
    • ¼ tsp cayenne (optional, for extra heat)

    For Serving:

    • Blue cheese dressing (homemade or quality store-bought)
    • Celery sticks
    • Carrot sticks (optional)
    • Extra hot sauce, for those who like pain

    Step-by-Step Instructions

    Step 1: Prep the Wings

    1. Pat wings completely dry with paper towels. Moisture is the enemy of crispiness.
    2. In a large bowl, combine baking powder, salt, garlic powder, and black pepper. Toss wings in the mixture until evenly coated. This baking powder trick is the secret to oven-crispy wings.

    Step 2: Choose Your Method

    1. Oven Method (Easier): Place wings on a wire rack set over a baking sheet. Refrigerate uncovered for at least 1 hour (up to 24) to dry out the skin. Bake at 400°F for 40-50 minutes, flipping halfway, until golden and crispy.
    2. Frying Method (Classic): Heat 2 inches of oil in a deep pot to 375°F. Fry wings in batches for 10-12 minutes until golden and cooked through. Drain on a wire rack.
    3. Air Fryer Method (Best of Both): Place wings in air fryer basket in single layer. Cook at 380°F for 12 minutes, flip, then 12 minutes more at 400°F until extra crispy.

    Step 3: Make the Buffalo Sauce

    1. While wings cook, combine hot sauce and butter in a small saucepan over low heat. Whisk until butter is melted and sauce is smooth.
    2. Stir in vinegar and Worcestershire sauce. Keep warm.

    Step 4: Sauce the Wings

    1. Place cooked wings in a large bowl. Pour about half the sauce over them and toss to coat. Add more sauce as needed—you want them well-coated but not drowning.
    2. Reserve extra sauce for dipping (or double-dipping, we don’t judge).

    Step 5: Serve Immediately

    1. Arrange wings on a platter with celery sticks and a bowl of blue cheese dressing.
    2. Sprinkle with a little extra salt or cayenne if desired.
    3. Serve with plenty of napkins and cold beer. This is not finger food—it’s whole-hand food.
    4. Take a bite. Feel that crunch. Let the sauce run down your chin. This is Buffalo.

    Summary

    Prep Time: 15 minutes + drying time | Cook Time: 40-50 minutes | Total Time: 1 hour (mostly hands-off)

    Yield: 2 lbs wings (serves 4 as appetizer)

    Difficulty: Game-day essential

    Storage Notes

    Leftovers:

    Store leftover wings (without sauce) in an airtight container in the fridge for up to 3 days. Store sauce separately.

    Reheating (Bring Back the Crunch):

    Oven: 375°F for 10-15 minutes on a wire rack. Air fryer: 375°F for 5-7 minutes. Toss with warmed sauce after reheating.

    Never microwave wings—they become sad, soggy, rubbery versions of their former glory.

    Make Ahead:

    You can dry the wings (tossed in baking powder mixture) in the fridge for up to 24 hours before cooking. This makes them even crispier. Sauce can be made ahead and gently reheated.

    Freezer-Friendly:

    Freeze cooked, unsauced wings for up to 3 months. Reheat from frozen in a 400°F oven until hot and crispy, then toss with fresh sauce.

    Pro Tips for Wing Greatness:

    • Baking powder, not soda. Baking soda will make them taste metallic. Trust the recipe.
    • Dry those wings. Pat them dry before anything else. More drying = more crispy.
    • Frank’s is the law. Other hot sauces won’t give you that classic Buffalo flavor. Don’t argue with tradition.
    • Butter matters. Real butter, not margarine. It emulsifies with the hot sauce into silky perfection.
    • Toss twice, eat once. Coat well, but don’t drown. You want crispy wings with sauce, not saucy wings with crunch.
    • Blue cheese, not ranch. In Buffalo, this is a religious debate with a clear answer. Blue cheese.