Blog

  • Buffalo Chicken Sliders

    Buffalo Chicken Sliders

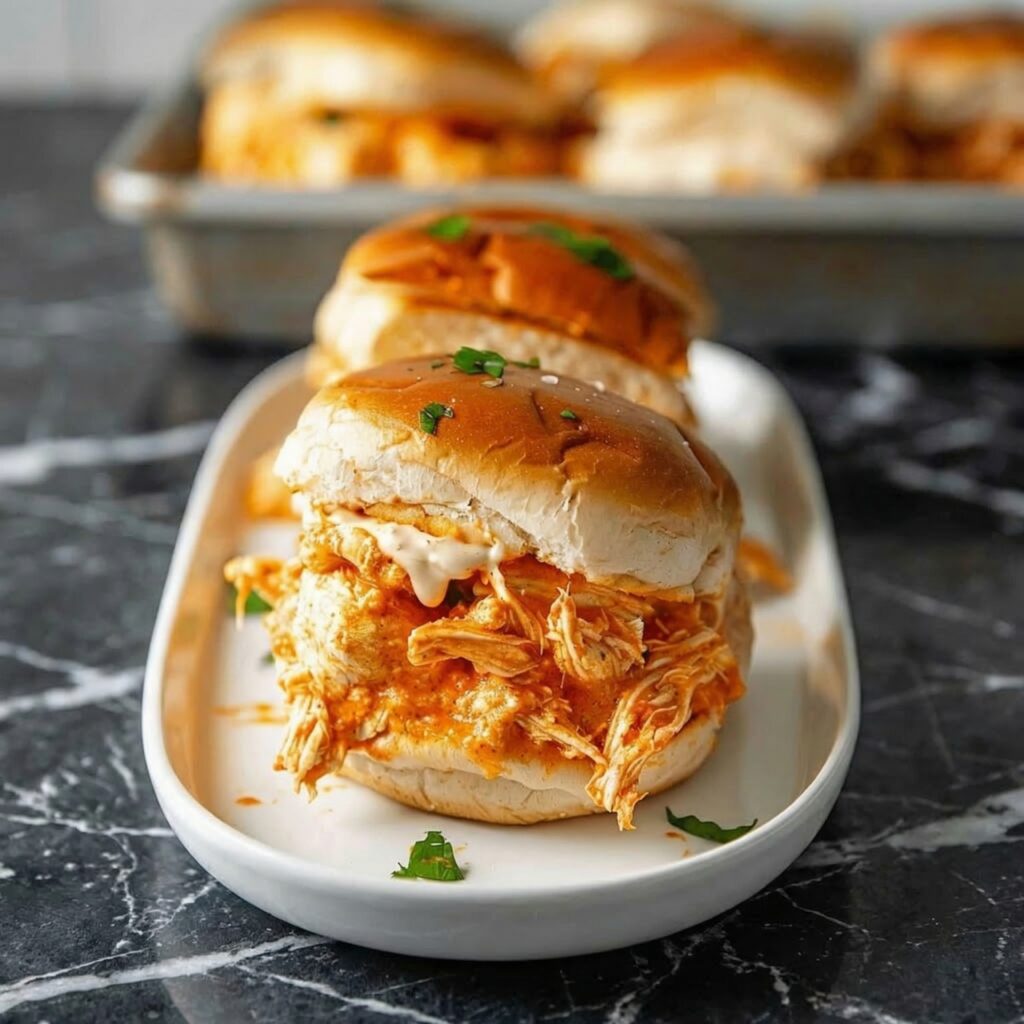
    These aren’t your average sliders. We’re talking about tender, juicy shredded chicken, drenched in a perfectly balanced homemade buffalo sauce that’s equal parts buttery and spicy.

    It’s piled high onto soft, sweet Hawaiian rolls, blanketed with gooey provolone cheese, and baked until the tops are buttery and the edges are gloriously crisp. The combination of spicy, creamy, sweet, and savory is absolutely irresistible. Get ready to make a lot of these, because one batch is never enough.

    Ingredients

    Serves 6-8 (makes 12 sliders).

    For the Buffalo Chicken:

    • 2 lbs (about 3 large) boneless, skinless chicken breasts
    • 1 teaspoon garlic powder
    • 1 teaspoon onion powder
    • ½ teaspoon salt
    • ¼ teaspoon black pepper
    • 1 tablespoon olive oil
    • ½ cup (120ml) Frank’s RedHot Original hot sauce (or your favorite buffalo-style sauce)
    • ¼ cup (60g) unsalted butter, cubed
    • 1 tablespoon honey (optional, to balance the heat)

    For the Sliders:

    • 1 package (12-count) Hawaiian sweet rolls (like King’s Hawaiian)
    • 12 slices provolone cheese (or 2 cups shredded mozzarella/cheddar blend)
    • ¼ cup (60g) unsalted butter, melted
    • 1 tablespoon honey
    • 1 teaspoon garlic powder
    • 1 teaspoon dried parsley flakes
    • Optional: Crumbled blue cheese or ranch dressing for serving/drizzling

    Step-by-Step Instructions

    Step 1: Cook and Shred the Chicken

    1. Preheat your oven to 375°F (190°C).
    2. Place the chicken breasts in a baking dish. Drizzle with olive oil and season generously with garlic powder, onion powder, salt, and pepper. Toss to coat.
    3. Bake for 20-25 minutes, or until the chicken is cooked through and reaches an internal temperature of 165°F (74°C). The exact time will depend on the thickness of your breasts.
    4. Let the chicken rest for 5-10 minutes, then use two forks to shred it into bite-sized pieces. (Alternatively, you can use a stand mixer with a paddle attachment on low speed to shred it in seconds!)

    Step 2: Make the Buffalo Sauce

    1. While the chicken bakes, make the sauce. In a small saucepan over low heat, combine the hot sauce and cubed butter. Stir frequently until the butter is melted and the sauce is smooth.
    2. Whisk in the honey (if using). Remove from heat.

    Step 3: Combine Chicken and Sauce

    1. Place the shredded chicken in a large bowl. Pour about ¾ of the buffalo sauce over the chicken and toss well to coat. You want it generously sauced, but not swimming in it. Reserve the remaining sauce for brushing on top.

    Step 4: Assemble the Sliders

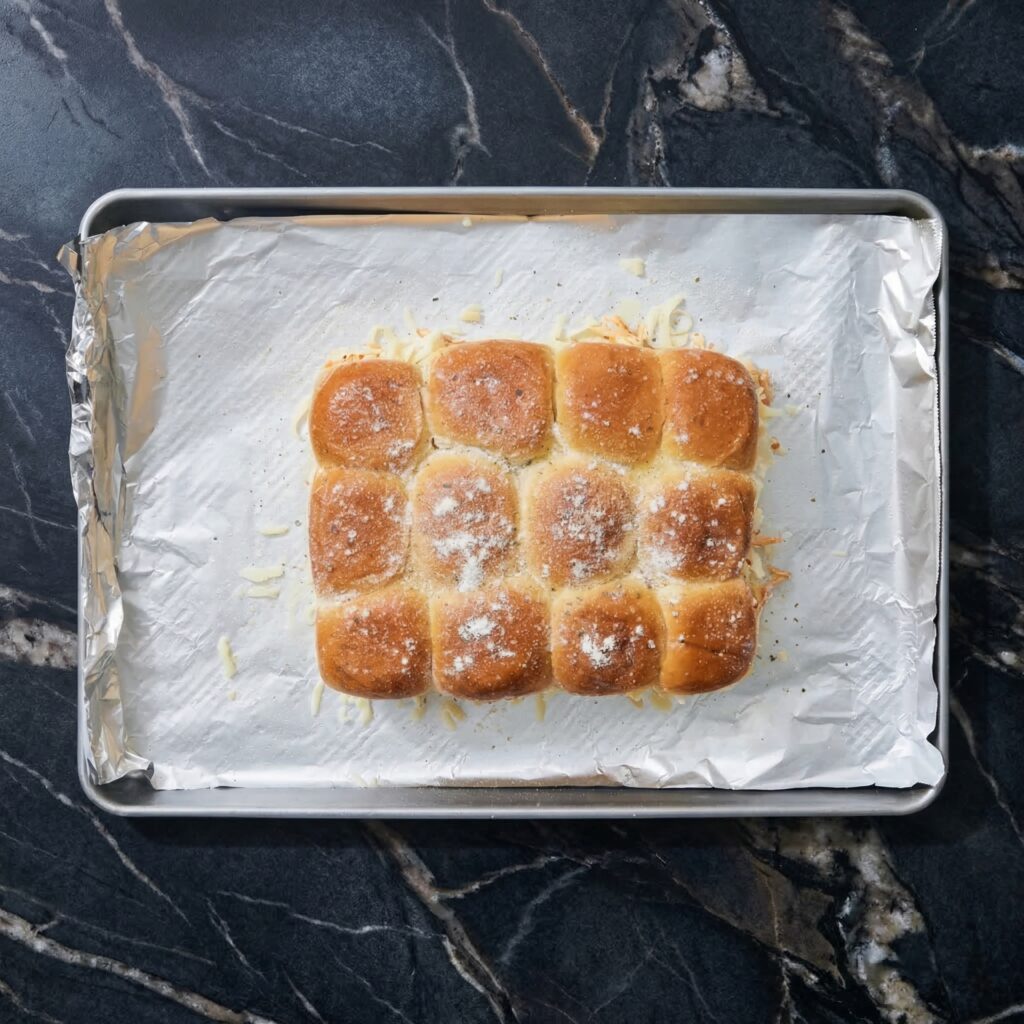
    1. Without separating the individual rolls, slice the entire slab of Hawaiian rolls in half horizontally. Place the bottom half of the rolls in a 9×13 inch baking dish (or on a parchment-lined baking sheet).
    2. Place the cheese slices evenly over the bottom layer of rolls, overlapping slightly to cover completely. This creates a cheesy barrier that helps keep the rolls from getting soggy.
    3. Pile the buffalo chicken mixture evenly over the cheese.
    4. Place the top half of the rolls over the chicken to create a complete “slab” of sandwiches.

    Step 5: The Famous Buttery Topping

    1. In a small bowl, whisk together the melted butter, honey, garlic powder, and dried parsley.
    2. Generously brush this mixture all over the tops of the rolls. Don’t be shy—let it soak into the crevices.
    3. If you have any reserved buffalo sauce, you can also drizzle a little over the top for extra kick.

    Step 6: Bake to Golden Perfection

    1. Cover the dish loosely with aluminum foil (to prevent the tops from burning before the insides are hot).
    2. Bake at 350°F (175°C) for 15 minutes.
    3. Remove the foil and bake for another 5-10 minutes, until the tops are golden brown and the edges are just starting to get crispy.

    Step 7: Serve Immediately

    1. Let the sliders rest for 5 minutes before using a sharp knife to cut between the rolls and separate them into individual sliders.
    2. Serve hot with extra buffalo sauce, ranch dressing, or blue cheese crumbles on the side for dipping. Prepare for them to disappear instantly.

    Summary

    Prep Time: 20 minutes | Cook Time: 30 minutes (for chicken) + 25 minutes (for assembly) | Total Time: About 1 hour 15 minutes

    Yield: 12 sliders (serves 4-6 as a meal, 8-10 as an appetizer)

    Difficulty: Easy

    Storage and Make-Ahead Tips

    How to Store Leftovers:

    Store any leftover sliders in an airtight container in the refrigerator for up to 3 days. The flavors will meld, but the buns may lose some of their crispness.

    Reheating:

    For best results, reheat in a 350°F oven for 5-10 minutes, or in an air fryer for 2-3 minutes to help re-crisp the tops. The microwave works in a pinch but will make the buns softer.

    Make-Ahead for Parties:

    You can prepare the buffalo chicken up to 2 days in advance and store it in the refrigerator. When you’re ready to serve, simply assemble the sliders (bring the chicken to room temperature or warm it slightly for easier spreading), add the buttery topping, and bake as directed.

    Freezing Instructions:

    Assemble the sliders completely (but do not bake) in a freezer-safe aluminum foil pan. Wrap tightly with plastic wrap and foil. Freeze for up to 3 months. To bake from frozen, remove the plastic wrap, cover with foil, and bake at 350°F for 30 minutes. Remove the foil and bake for another 5-10 minutes until hot and golden.

  • Spinach and Ricotta Stuffed Shells: The Ultimate Comfort Hug

    Spinach and Ricotta Stuffed Shells: The Ultimate Comfort Hug

    There are certain dishes that feel like a hug in a baking dish. This is one of them. These Spinach and Ricotta Stuffed Shells are pure, unadulterated comfort—tender pasta pillows cradling a dreamy, creamy filling of ricotta, spinach, and three kinds of cheese, all swimming in a rustic tomato sauce.

    This is the meal you make for a new mom, a grieving friend, or just for yourself on a chilly Sunday evening. It’s hearty enough to satisfy the biggest appetites, yet it’s completely vegetarian.

    Ingredients

    Serves 4-6.

    For the Shells & Filling:

    • 1 box (12 oz / 340g) jumbo pasta shells
    • 2 tablespoons olive oil
    • 15 oz (425g) whole milk ricotta cheese
    • 10 oz (280g) frozen chopped spinach, thawed and squeezed completely dry
    • 2 cups (200g) shredded mozzarella cheese, divided
    • ½ cup (50g) grated Parmesan cheese, plus more for topping
    • 1 large egg, lightly beaten
    • 2 cloves garlic, minced
    • ½ teaspoon salt
    • ¼ teaspoon black pepper
    • ¼ teaspoon ground nutmeg (freshly grated is amazing)

    For the Sauce & Assembly:

    • 3 cups (720ml) your favorite marinara or tomato sauce (jarred is fine, homemade is divine)
    • Fresh basil leaves, for garnish

    Step-by-Step Instructions

    Step 1: Cook the Pasta Shells

    1. Bring a large pot of generously salted water to a rolling boil. (The water should taste like the sea!)
    2. Add the jumbo shells and cook according to package directions until they are al dente. It’s crucial not to overcook them, as they’ll continue to cook in the oven. Aim for the firmer side of al dente.
    3. Drain the shells and rinse with cool water to stop the cooking process. Toss them gently with a drizzle of olive oil to prevent them from sticking together. Set aside.

    Step 2: Prepare the Spinach & Ricotta Filling

    1. The most important step for the filling: squeeze every last drop of water out of your thawed spinach. Place it in a clean kitchen towel, gather the ends, and wring it out over the sink. You’ll be amazed at how much liquid comes out. This prevents soggy shells.
    2. In a large bowl, combine the well-drained ricotta, squeezed spinach, 1 cup of the shredded mozzarella, the Parmesan cheese, beaten egg, minced garlic, salt, pepper, and nutmeg.
    3. Mix until everything is thoroughly combined. Give it a taste and adjust seasoning if needed.

    Step 3: Assemble the Stuffed Shells

    1. Preheat your oven to 375°F (190°C).
    2. Spread 1 ½ cups of your marinara sauce evenly over the bottom of a 9×13 inch baking dish. This prevents the shells from sticking and adds a saucier base.
    3. Now for the fun part: take a cooked shell in one hand and use a small spoon or a piping bag (a zip-top bag with the corner snipped off works great!) to carefully fill each shell with the ricotta mixture. Don’t overstuff, or they’ll burst.
    4. Place each filled shell, opening-side up, in the baking dish, nestled snugly together in a single layer.
    5. Once all the shells are in the dish, pour the remaining 1 ½ cups of marinara sauce over and around them. Try to cover most of the shells, but a few peeking out is fine.

    Step 4: Bake to Bubbly Perfection

    1. Sprinkle the remaining 1 cup of mozzarella cheese generously over the top of the shells. Finish with an extra dusting of Parmesan cheese.
    2. Cover the baking dish tightly with aluminum foil. This traps steam and ensures the shells cook through without drying out.
    3. Bake for 30 minutes, covered.
    4. Remove the foil and bake for another 10-15 minutes, until the cheese is melted, bubbly, and just starting to turn golden brown in spots.

    Step 5: Rest and Serve

    1. Let the dish rest for at least 10 minutes before serving. This allows the filling to set up slightly so the shells hold their shape better when you serve them.
    2. Garnish with fresh basil leaves and an extra sprinkle of Parmesan. Serve hot and watch them disappear.

    Summary

    Prep Time: 30 minutes | Cook Time: 45 minutes | Rest Time: 10 minutes | Total Time: 1 hour 25 minutes

    Yield: 4-6 servings

    Difficulty: Easy

    Storage and Make-Ahead Tips

    How to Store Leftovers:

    Store any leftover stuffed shells in an airtight container in the refrigerator for up to 4 days. They reheat beautifully.

    Reheating:

    For best results, reheat individual portions in the microwave, or place the shells in an oven-safe dish with a splash of water or extra sauce, cover with foil, and warm in a 350°F oven for 15-20 minutes.

    Freezing Instructions (The Ultimate Make-Ahead):

    Stuffed shells are a freezer hero. Assemble the entire dish in a freezer-safe baking dish (aluminum foil pans are perfect for this), but do not bake it. Cover tightly with a layer of plastic wrap and then a layer of aluminum foil. Freeze for up to 3 months.

    To bake from frozen, remove the plastic wrap, re-cover with foil, and bake at 375°F for 55-65 minutes, removing the foil for the last 10-15 minutes to brown the cheese. You can also thaw in the refrigerator overnight and then bake as directed.

    Make-Ahead for a Stress-Free Dinner:

    You can assemble the stuffed shells up to 24 hours in advance. Simply prepare the recipe through Step 3, cover the unbaked dish tightly with plastic wrap, and store it in the refrigerator.

    When you’re ready to eat, let it sit on the counter while the oven preheats (to take the chill off), then bake as directed, adding 5-10 minutes to the covered baking time.

  • The “Sunday Sauce” Pappardelle with Beef Ragu

    The “Sunday Sauce” Pappardelle with Beef Ragu

    Close your eyes and imagine this: It’s a quiet Sunday afternoon. A big pot is simmering on the stove, filling your entire home with the warm, intoxicating scent of red wine, garlic, and herbs.

    The beef has been bubbling away for hours, transforming from a tough cut into spoonably tender strands of flavor. This is the magic of a true beef ragu.

    Ingredients

    Serves 4-6 generously.

    For the Beef Ragu:

    • 2 lbs (900g) beef chuck roast, cut into 2-inch chunks
    • 2 tablespoons olive oil
    • 1 large yellow onion, finely chopped
    • 2 celery stalks, finely chopped
    • 2 large carrots, finely chopped
    • 4-5 garlic cloves, minced
    • 2 tablespoons tomato paste
    • 1 ½ cups dry red wine (like Chianti, Merlot, or Cabernet Sauvignon)
    • 1 can (28 oz) crushed San Marzano tomatoes
    • 1 cup beef broth
    • 2 sprigs fresh rosemary
    • 2 sprigs fresh thyme (or 1 tsp dried thyme)
    • 2 bay leaves
    • Salt and freshly ground black pepper, to taste

    For Serving:

    • 1 lb (450g) dried pappardelle pasta (or fresh, if you’re feeling ambitious)
    • 1 cup freshly grated Parmesan cheese, plus more for serving
    • 2 tablespoons unsalted butter (optional, for extra richness)
    • Fresh parsley or basil, chopped, for garnish

    Step-by-Step Instructions

    Step 1: Sear the Beef (The Flavor Foundation)

    1. Pat the beef chunks completely dry with paper towels. This is crucial for getting a good sear. Season generously all over with salt and pepper.
    2. In a large Dutch oven or heavy-bottomed pot, heat the olive oil over medium-high heat until it shimmers.
    3. Working in batches to avoid crowding the pan (crowding will steam the meat instead of browning it), add the beef chunks in a single layer. Sear for 3-4 minutes per side, until a deep golden-brown crust forms. Transfer the browned beef to a plate and set aside.

    Step 2: Build the Soffritto

    1. Reduce the heat to medium. In the same pot, add the chopped onion, carrot, and celery. Sauté for 5-7 minutes, scraping up any browned bits (fond) from the bottom of the pot with a wooden spoon, until the vegetables have softened.
    2. Add the minced garlic and cook for another minute until fragrant.
    3. Stir in the tomato paste and cook for 2-3 minutes, letting it caramelize slightly to deepen its flavor.

    Step 3: Deglaze and Braise

    1. Pour in the red wine, scraping the bottom of the pot to release any remaining fond. Let the wine bubble and reduce by about half, which should take 3-5 minutes.
    2. Add the crushed tomatoes, beef broth, rosemary sprigs, thyme sprigs, and bay leaves. Stir to combine.
    3. Return the browned beef and any accumulated juices on the plate to the pot. Bring the sauce to a gentle simmer.
    4. Cover the pot with a tight-fitting lid and transfer it to a preheated 325°F (160°C) oven. Alternatively, you can leave it on the stovetop over the lowest possible heat.
    5. Braise for 2.5 to 3 hours, or until the beef is fall-apart tender and can be easily shredded with a fork.

    Step 4: Shred and Finish the Ragu

    1. Carefully remove the pot from the oven. Using tongs or a slotted spoon, transfer the beef chunks to a cutting board. Discard the herb sprigs and bay leaves.
    2. Use two forks to shred the beef into bite-sized pieces, discarding any large pieces of fat.
    3. Return the shredded beef to the pot with the sauce. If the sauce seems thin, simmer it on the stovetop uncovered for 10-15 minutes to reduce it to your desired consistency. Taste and adjust seasoning with salt and pepper.

    Step 5: Cook the Pasta and Serve

    1. About 20 minutes before serving, bring a large pot of generously salted water to a rolling boil. (The water should taste like the sea!)
    2. Cook the pappardelle according to package directions until al dente. Before draining, reserve about 1 cup of the starchy pasta water.
    3. Drain the pasta and return it to the pot. Add several large spoonfuls of the beef ragu and a splash of the reserved pasta water. Toss vigorously over low heat to coat the pasta; the starch in the water will help the sauce cling to the noodles.
    4. If using, toss in the butter and ½ cup of the grated Parmesan until melted and glossy.
    5. Serve immediately in warm bowls, topped with an extra ladle of ragu, a generous sprinkle of Parmesan, and a garnish of fresh parsley or basil.

    Summary

    Prep Time: 30 minutes | Cook Time: 3 hours | Total Time: 3 hours 30 minutes

    Yield: 4-6 servings

    Difficulty: Intermediate

    Storage and Make-Ahead Tips

    How to Store:

    Store leftover ragu (sauce and meat only, not the pasta) in an airtight container in the refrigerator for up to 4 days. The flavor will actually deepen and improve over this time.

    Can You Freeze It?

    Absolutely! This ragu is a freezer superstar. Let the sauce cool completely, then transfer it to freezer-safe bags or containers. It will keep beautifully for up to 3 months. Thaw overnight in the refrigerator before reheating gently on the stovetop with a splash of water or broth.

    Pro Tip for Leftovers:

    Always cook fresh pasta to serve with your leftover ragu. Storing the pasta mixed with the sauce will result in mushy noodles. Keep them separate for the best next-day experience.

  • Golden, Nook-and-Cranny Perfection: How to Make Homemade Sourdough English Muffins

    Golden, Nook-and-Cranny Perfection: How to Make Homemade Sourdough English Muffins

    Few breakfast foods are as satisfying as a warm English muffin fresh from the skillet. With their crisp golden exterior and soft interior full of signature “nooks and crannies,” English muffins are perfect for butter, jam, eggs, or even a classic breakfast sandwich.

    Making them with sourdough starter elevates the flavor even further, adding a subtle tang and a deeper, more complex taste.

    Unlike many breads, English muffins are not baked in the oven. Instead, they are cooked on a griddle or skillet, which creates their signature texture and lightly toasted crust.

    While they may seem like a bakery specialty, they are actually simple to prepare at home with a little patience and a good sourdough starter.

    In this guide, you’ll learn exactly how to make soft, flavorful sourdough English muffins step by step, from mixing the dough to cooking them to golden perfection.


    Why Use Sourdough?

    Sourdough adds several benefits to English muffins.

    First, it provides a gentle tang that balances beautifully with the richness of butter or sweet toppings. Second, the fermentation improves the dough’s texture, helping create the airy pockets that make English muffins so unique. Finally, it’s a great way to use up extra sourdough starter or discard.

    The result is a homemade breakfast bread that tastes far better than most store-bought versions.


    Ingredients

    To make about 8–10 sourdough English muffins, you will need:

    • 1 cup active sourdough starter
    • 1 cup warm milk
    • 2 cups all-purpose flour
    • 1 tablespoon sugar or honey
    • 1 teaspoon salt
    • 1 tablespoon softened butter
    • ½ teaspoon baking soda
    • Cornmeal for dusting

    These simple pantry ingredients come together to create a soft, slightly tangy dough that cooks beautifully on the stovetop.


    Step 1: Mix the Dough

    In a large mixing bowl, combine the sourdough starter, warm milk, and sugar or honey. Stir until the mixture is smooth.

    Next, add the flour, salt, and softened butter. Mix everything together until a soft dough forms. The dough should feel slightly sticky but manageable.

    If the dough seems too wet, add a tablespoon of flour at a time until it holds together.


    Step 2: Knead the Dough

    Transfer the dough to a lightly floured surface and knead it for about 5–7 minutes.

    Kneading helps develop gluten, which gives the muffins structure and helps them rise properly.

    The finished dough should be soft, smooth, and slightly elastic.


    Step 3: First Rise

    Place the kneaded dough into a lightly greased bowl.

    Cover it with plastic wrap or a clean kitchen towel and let it rise at room temperature for 4–6 hours, or until it doubles in size.

    Because sourdough rises more slowly than yeast-based dough, patience is key. This slow fermentation is what develops the rich flavor.


    Step 4: Add the Baking Soda

    Once the dough has risen, gently press it down to release excess air.

    Sprinkle the baking soda over the dough and knead lightly for a minute or two to incorporate it evenly.

    The baking soda reacts with the sourdough’s natural acidity and gives the muffins an extra lift during cooking.


    Step 5: Roll Out the Dough

    Turn the dough onto a lightly floured surface.

    Use a rolling pin to roll it out to about ½ inch thick.

    This thickness ensures the muffins cook evenly while developing their signature interior texture.


    Step 6: Cut the Muffins

    Using a round cutter, biscuit cutter, or drinking glass, cut circles from the dough.

    Place the cut rounds onto a baking sheet that has been generously dusted with cornmeal.

    The cornmeal prevents sticking and gives English muffins their classic slightly crunchy base.

    Gather any leftover dough scraps, reroll them, and cut additional muffins.


    Step 7: Second Rise

    Cover the cut muffins loosely with a kitchen towel.

    Allow them to rest and rise for 30–45 minutes. During this time they will puff slightly and become lighter in texture.

    This short second rise helps create the airy interior.


    Step 8: Preheat the Skillet

    Place a large skillet, cast iron pan, or griddle over medium-low heat.

    Lightly grease the surface with butter or oil.

    Cooking at moderate heat is important so the muffins cook through without burning on the outside.


    Step 9: Cook the English Muffins

    Place several muffins in the skillet, leaving space between them.

    Cook for about 6–8 minutes per side, turning carefully with a spatula.

    The muffins should develop a deep golden crust while the inside cooks through slowly.

    If the muffins brown too quickly, reduce the heat slightly.

    When done, they should feel firm on the outside but soft when gently pressed.


    Step 10: Cool and Split

    Transfer the cooked muffins to a wire rack to cool for about 10 minutes.

    For the best texture, split the muffins using a fork rather than a knife. Insert the fork around the edges and gently pull the halves apart.

    This technique preserves the famous “nooks and crannies” that hold melted butter and toppings perfectly.


    Tips for Perfect Sourdough English Muffins

    Cook on medium-low heat. This prevents burning while allowing the centers to cook completely.

    Use cornmeal generously. It keeps the dough from sticking and adds traditional texture.

    Split with a fork. This maintains the airy interior rather than compressing it.

    Be patient with fermentation. Longer rising times create better flavor.


    Serving Ideas

    Sourdough English muffins are incredibly versatile.

    They are delicious when served with:

    • Butter and jam
    • Honey or maple syrup
    • Peanut butter
    • Fried eggs and bacon
    • Avocado and poached eggs

    They also make an excellent base for breakfast sandwiches or mini pizzas.


    Final Thoughts

    Homemade sourdough English muffins are a wonderful way to bring bakery-quality bread into your kitchen.

    With their golden crust, soft interior, and signature tangy flavor, they offer a delicious upgrade from store-bought versions.

    While the process requires a little time, most of it is hands-off fermentation that develops incredible flavor. Once you taste a warm sourdough English muffin fresh from the skillet, you’ll understand why this classic breakfast bread has remained a favorite for generations.

    Toast one, add a generous spread of butter, and enjoy the comforting flavor of homemade sourdough goodness.

  • Golden Fairground Favorite: How to Make Perfect Homemade Corn Dogs

    Golden Fairground Favorite: How to Make Perfect Homemade Corn Dogs

    Few foods bring the same nostalgic joy as a freshly fried corn dog.

    With its crispy golden cornmeal batter and juicy hot dog center, this classic treat has been a staple at fairs, carnivals, and ballparks for decades.

    That satisfying crunch followed by a savory bite makes corn dogs irresistible for both kids and adults alike.

    The good news is that you don’t have to wait for a trip to the fair to enjoy them.

    Making corn dogs at home is surprisingly simple and incredibly rewarding. With the right batter and frying technique, you can achieve that iconic crispy coating and perfectly cooked center right in your own kitchen.

    In this step-by-step guide, you’ll learn exactly how to make delicious homemade corn dogs that are golden, crunchy, and bursting with flavor.


    What Makes Corn Dogs So Special

    Corn dogs are essentially hot dogs coated in a thick cornmeal batter and deep-fried until golden brown. The batter creates a slightly sweet, crispy crust that contrasts beautifully with the salty, savory hot dog inside.

    The combination of textures—crispy outside and juicy inside—is what makes corn dogs so satisfying. Plus, the wooden stick makes them easy to hold and fun to eat.


    Ingredients

    To make about 8 corn dogs, you will need:

    • 8 hot dogs
    • 8 wooden skewers or corn dog sticks
    • 1 cup yellow cornmeal
    • 1 cup all-purpose flour
    • 2 tablespoons sugar
    • 1 tablespoon baking powder
    • ½ teaspoon salt
    • 1 cup milk
    • 1 large egg
    • 1 tablespoon vegetable oil
    • Oil for frying (vegetable or canola works well)

    Optional for serving:

    • Ketchup
    • Mustard
    • Honey mustard
    • Spicy mayo

    Using good-quality hot dogs and fresh cornmeal will make a noticeable difference in flavor.


    Step 1: Prepare the Hot Dogs

    Start by removing the hot dogs from their packaging and patting them dry with paper towels.

    Moisture on the surface can prevent the batter from sticking properly, so this step is important for achieving a smooth coating.

    Insert a wooden skewer or corn dog stick into each hot dog, pushing it about halfway through so it holds firmly.

    Set the prepared hot dogs aside while you make the batter.


    Step 2: Heat the Oil

    Pour about 2–3 inches of frying oil into a deep pot or heavy skillet.

    Heat the oil to 350°F (175°C). Maintaining the correct oil temperature is essential for achieving a crispy crust without making the corn dogs greasy.

    If you don’t have a thermometer, you can test the oil by dropping a small amount of batter into it. If it sizzles and rises to the surface, the oil is ready.


    Step 3: Make the Cornmeal Batter

    In a large mixing bowl, combine the cornmeal, flour, sugar, baking powder, and salt.

    Whisk the dry ingredients together until evenly blended.

    In a separate bowl, whisk together the milk, egg, and vegetable oil.

    Pour the wet ingredients into the dry ingredients and stir until a thick, smooth batter forms.

    The batter should be thick enough to cling to the hot dogs without dripping off too quickly.


    Step 4: Transfer Batter to a Tall Glass

    For easier coating, pour the batter into a tall drinking glass or jar.

    This trick allows you to dip the hot dogs straight down into the batter, ensuring a more even coating from top to bottom.

    It also helps prevent messy spills and uneven layers.


    Step 5: Lightly Dust the Hot Dogs

    Before dipping the hot dogs into the batter, lightly roll them in a small amount of flour.

    This thin flour coating helps the batter stick better during frying and prevents it from sliding off.

    Shake off any excess flour before dipping.


    Step 6: Dip the Hot Dogs in Batter

    Hold each skewered hot dog by the stick and dip it vertically into the batter.

    Rotate slightly as you lift it out to ensure the entire hot dog is coated evenly.

    Allow any excess batter to drip off briefly before frying.


    Step 7: Fry the Corn Dogs

    Carefully lower the battered hot dog into the hot oil.

    Fry one or two corn dogs at a time to avoid overcrowding the pot, which can lower the oil temperature.

    Cook each corn dog for about 3–4 minutes, turning occasionally until the batter becomes deep golden brown and crisp.

    The corn dog should float slightly when it’s nearly done.


    Step 8: Drain Excess Oil

    Use tongs or a slotted spoon to remove the corn dog from the oil.

    Place it on a plate lined with paper towels to absorb any excess oil.

    Allow it to cool slightly before serving, as the inside will be very hot.

    Repeat the frying process with the remaining hot dogs.


    Step 9: Serve with Your Favorite Dips

    Corn dogs are traditionally served with simple dipping sauces.

    Arrange them on a serving plate and offer ketchup, mustard, or honey mustard on the side.

    For something different, try dipping them in spicy mayo, barbecue sauce, or even cheese sauce.


    Tips for Perfect Corn Dogs

    Follow these tips to get the best results every time:

    Use thick batter. A thicker batter creates the signature fluffy cornmeal coating.

    Maintain oil temperature. Oil that’s too cool will make the batter greasy, while oil that’s too hot can burn the outside.

    Fry in small batches. This helps maintain consistent cooking and crisp texture.

    Pat hot dogs dry. Removing moisture helps the batter adhere properly.


    Fun Variations

    Once you’ve mastered classic corn dogs, you can experiment with different versions.

    Try these ideas:

    • Cheese-stuffed corn dogs using mozzarella or cheddar
    • Mini corn dog bites made with sliced hot dogs
    • Spicy corn dogs with jalapeños in the batter
    • Sweet honey batter for a slightly sweeter crust

    These variations can make corn dogs even more exciting for parties or family meals.


    Final Thoughts

    Homemade corn dogs bring the fun and flavor of a fair right into your kitchen. With their crispy golden coating and juicy hot dog center, they’re the perfect combination of savory and satisfying.

    Best of all, they’re easy to make with simple ingredients and a few basic techniques. Once you try making corn dogs at home, you’ll discover just how delicious and fun they can be.

    Serve them hot with your favorite dipping sauces, share them with family and friends, and enjoy a timeless comfort food that never goes out of style.

  • Fudgy Brownies

    Fudgy Brownies

    Let’s talk about brownies. Not cakey brownies, not borderline-brownie muffins, but the real deal: dense, fudgy, intensely chocolate brownies with that iconic crackly, paper-thin top that shatters ever so slightly when you bite into them.

    This is that recipe. The one you’ll come back to again and again, the one that disappears from bake sales in minutes, the one that friends will beg you to share. Made with cocoa powder for that deep chocolate flavor and a technique that guarantees that beautiful crackly crust, these brownies are pure perfection.

    They’re rich without being overwhelming, fudgy without being underbaked, and absolutely deadly with a glass of cold milk. Let’s bake the best brownies of your life.

    Ingredients

    Yields 16 brownies (8×8 inch pan).

    For the Brownies:

    • ¾ cup (170g) unsalted butter
    • 1 ¼ cups (250g) granulated sugar
    • ¾ cup (75g) unsweetened cocoa powder (Dutch-process recommended)
    • ½ teaspoon salt
    • 2 large eggs, cold
    • 1 teaspoon vanilla extract
    • ¾ cup (95g) all-purpose flour
    • ¼ teaspoon baking powder (optional, for slightly cakier brownies)

    Optional Add-Ins:

    • 1 cup (175g) semi-sweet chocolate chips or chunks
    • ½ cup chopped walnuts or pecans
    • Flaky sea salt for sprinkling

    Step-by-Step Instructions

    1. Preheat and Prepare:

    1. Preheat your oven to 350°F (175°C). Line an 8×8 inch baking pan with parchment paper, leaving overhang on two opposite sides for easy removal. Lightly grease the parchment.

    2. Melt the Butter:

    1. In a medium saucepan over low heat, melt the butter completely. Remove from heat as soon as it’s melted.
    2. Add the sugar, cocoa powder, and salt to the warm melted butter. Whisk vigorously until everything is combined and the mixture looks like a thick, grainy paste. It will be quite thick—this is normal.
    3. Let the mixture cool for 2-3 minutes. It should be warm but not hot to the touch. This is important so you don’t scramble the eggs.

    3. Add the Eggs and Vanilla:

    1. Add the cold eggs one at a time, whisking vigorously after each addition. The mixture will go from thick and pasty to smooth, glossy, and beautifully fudgy. This is where that crackly top magic starts to happen!
    2. Whisk in the vanilla extract.

    4. Add the Flour:

    1. Sprinkle the flour (and baking powder if using) over the chocolate mixture.
    2. Fold gently with a spatula until just combined. Be careful not to overmix. If you’re adding chocolate chips or nuts, fold them in now.
    3. The batter will be thick, fudgy, and glossy—exactly what you want.

    5. Bake:

    1. Pour the batter into the prepared pan and spread it into an even layer.
    2. If desired, sprinkle a few extra chocolate chips or a pinch of flaky sea salt on top.
    3. Bake for 25-30 minutes, until a toothpick inserted into the center comes out with a few moist crumbs (not wet batter). The edges should look set and the top should be crackly and shiny.
    4. Let the brownies cool completely in the pan on a wire rack. This is important for clean slices and the perfect fudgy texture.

    6. Slice and Serve:

    1. Once completely cool, use the parchment overhang to lift the entire block of brownies onto a cutting board.
    2. Slice into 16 squares with a sharp knife, wiping the blade clean between cuts for neat edges.
    3. Serve at room temperature. Store leftovers in an airtight container.

    Summary

    Prep Time: 10 minutes | Bake Time: 25-30 minutes | Cooling Time: 1 hour | Total Time: 1 hour 40 minutes

    Yield: 16 brownies

    Difficulty: Easy

    Storage and Make-Ahead Tips

    How to Store:

    Store brownies in an airtight container at room temperature for up to 5 days. Place a piece of parchment paper between layers to prevent sticking. They actually get even fudgier the next day!

    Can You Freeze Brownies?

    Absolutely! Brownies freeze beautifully. Wrap individual brownies or the whole slab tightly in plastic wrap, then in foil, and place in a freezer bag. Freeze for up to 3 months. Thaw at room temperature.

    Freezing Brownie Batter:

    You can freeze the brownie batter in the pan. Prepare the batter, pour into the parchment-lined pan, cover tightly with plastic wrap and foil, and freeze for up to 3 months. Bake from frozen, adding 5-10 minutes to the baking time.

    Make-Ahead for Parties:

    Brownies are actually better the next day. Make them a day ahead, store at room temperature, and slice just before serving.

    Reviving Stale Brownies:

    If your brownies have been around for a few days and are starting to dry out, microwave them for 10-15 seconds. They’ll taste almost freshly baked!

  • Perfect Blondies

    Perfect Blondies

    Brownies get all the attention, but let’s take a moment to appreciate their equally delicious cousin: the blondie. Where brownies are deep, dark, and intense, blondies are buttery, caramel-y, and just pure comfort in bar form.

    These perfect blondies are everything you want them to be—chewy around the edges, soft and tender in the middle, with that unmistakable brown sugar and butter flavor that reminds you of the best chocolate chip cookie you’ve ever had.

    Load them up with chocolate chips, nuts, or anything else your heart desires. They come together in one bowl with no mixer required, and they disappear just as fast as you can bake them. Let’s give blondies the spotlight they deserve.

    Ingredients

    Yields 16 blondies (8×8 inch pan).

    For the Blondies:

    • ½ cup (115g) unsalted butter, melted and slightly cooled
    • 1 cup (200g) light brown sugar, packed
    • 1 large egg, at room temperature
    • 1 teaspoon vanilla extract
    • 1 cup (125g) all-purpose flour
    • ½ teaspoon baking powder
    • ¼ teaspoon baking soda
    • ½ teaspoon salt

    Optional Add-Ins (Choose Your Adventure):

    • 1 cup (175g) semi-sweet or milk chocolate chips
    • ½ cup chopped walnuts or pecans
    • ½ cup white chocolate chips
    • ½ cup butterscotch chips
    • ½ cup dried cranberries or cherries
    • Flaky sea salt for sprinkling

    Step-by-Step Instructions

    1. Preheat and Prepare:

    1. Preheat your oven to 350°F (175°C). Line an 8×8 inch baking pan with parchment paper, leaving overhang on two opposite sides for easy removal. Lightly grease the parchment.

    2. Combine Wet Ingredients:

    1. In a large bowl, combine the melted butter and brown sugar. Whisk until smooth and well combined, with no lumps of brown sugar remaining.
    2. Add the egg and vanilla extract. Whisk vigorously until the mixture is smooth, glossy, and slightly lighter in color, about 30-60 seconds.

    3. Add Dry Ingredients:

    1. Add the flour, baking powder, baking soda, and salt to the bowl.
    2. Fold gently with a spatula until just combined and no streaks of flour remain. Do not overmix.
    3. Fold in your desired add-ins (chocolate chips, nuts, etc.), reserving a handful to press into the top if desired.

    4. Bake:

    1. Spread the batter evenly into the prepared pan. It will be thick—use a spatula to press it into the corners.
    2. If reserved, press a few extra chocolate chips into the top of the batter for a bakery-style look.
    3. Bake for 20-25 minutes, until the edges are golden brown and a toothpick inserted into the center comes out clean or with a few moist crumbs. The center should still look slightly soft.
    4. Let the blondies cool completely in the pan on a wire rack. This is important for clean slices.

    5. Slice and Serve:

    1. Once completely cool, use the parchment overhang to lift the entire block of blondies onto a cutting board.
    2. Slice into 16 squares with a sharp knife, wiping the blade clean between cuts for neat edges.
    3. Serve at room temperature. Store leftovers in an airtight container.

    Summary

    Prep Time: 10 minutes | Bake Time: 20-25 minutes | Cooling Time: 1 hour | Total Time: 1 hour 35 minutes

    Yield: 16 blondies

    Difficulty: Super Easy

    Storage and Make-Ahead Tips

    How to Store:

    Store blondies in an airtight container at room temperature for up to 5 days. Place parchment paper between layers to prevent sticking. They actually get even better after a day or two!

    Can You Freeze Blondies?

    Absolutely! Blondies freeze beautifully. Wrap individual blondies or the whole slab tightly in plastic wrap, then in foil, and place in a freezer bag. Freeze for up to 3 months. Thaw at room temperature.

    Freezing Blondie Batter:

    You can freeze the batter in the pan. Prepare the batter, spread it into the parchment-lined pan, cover tightly with plastic wrap and foil, and freeze for up to 3 months. Bake from frozen, adding 5-10 minutes to the baking time.

    Make-Ahead for Parties:

    Blondies are perfect for making ahead. Bake them a day or two before your event, store at room temperature, and slice just before serving. The flavor actually improves over time.

    Reviving Stale Blondies:

    If your blondies have been around for a few days and are starting to dry out, microwave them for 10-15 seconds. They’ll taste almost freshly baked!

  • Classic Coffee Cake

    Classic Coffee Cake

    Let’s clear something up right away: coffee cake doesn’t actually have coffee in it. It’s called coffee cake because it’s meant to be enjoyed alongside a hot cup of coffee—and honestly, is there a better pairing in the world?

    This classic coffee cake is everything you want it to be. A tender, buttery sour cream cake forms the base, with a ribbon of cinnamon sugar running through the middle and an absolutely generous layer of buttery streusel crumb on top.

    It’s not too sweet, perfectly moist, and that crumb topping? It’s the kind you’ll find yourself picking off piece by piece. Whether it’s for breakfast, brunch, or a midday treat, this cake will make your coffee taste better.

    Ingredients

    Makes one 9-inch square or round cake (9-12 servings).

    For the Streusel Topping & Filling:

    • 1 cup (125g) all-purpose flour
    • ¾ cup (150g) light brown sugar, packed
    • 2 teaspoons ground cinnamon
    • ¼ teaspoon salt
    • ½ cup (115g) unsalted butter, melted
    • 1 teaspoon vanilla extract
    • ¾ cup chopped walnuts or pecans (optional)

    For the Coffee Cake:

    • 1 ½ cups (190g) all-purpose flour
    • 1 teaspoon baking powder
    • ½ teaspoon baking soda
    • ½ teaspoon salt
    • ½ cup (115g) unsalted butter, softened
    • ¾ cup (150g) granulated sugar
    • 2 large eggs, at room temperature
    • 1 ½ teaspoons vanilla extract
    • 1 cup (240g) sour cream, at room temperature

    Step-by-Step Instructions

    1. Preheat and Prepare:

    1. Preheat your oven to 350°F (175°C). Grease a 9-inch square baking pan or 9-inch round springform pan. If using a square pan, line with parchment paper leaving overhang for easy removal.

    2. Make the Streusel:

    1. In a medium bowl, whisk together the flour, brown sugar, cinnamon, and salt.
    2. Pour in the melted butter and vanilla extract. Stir with a fork until the mixture forms clumps and resembles wet sand. If using nuts, stir them in now.
    3. Set aside. This will serve as both your filling and your topping.

    3. Make the Cake Batter:

    1. In a medium bowl, whisk together the flour, baking powder, baking soda, and salt. Set aside.
    2. In a large bowl, beat the softened butter and granulated sugar together with an electric mixer until light and fluffy, about 2-3 minutes. Scrape down the sides as needed.
    3. Add the eggs one at a time, beating well after each addition. Scrape down the bowl again.
    4. Beat in the vanilla extract.
    5. With the mixer on low speed, add half of the flour mixture, mixing until just combined. Add all of the sour cream, then the remaining flour mixture. Mix until just combined and no streaks of flour remain. Do not overmix.

    4. Assemble the Cake:

    1. Spread half of the cake batter evenly into the prepared pan. It will be a thick layer—use an offset spatula to spread it to the edges.
    2. Sprinkle about half of the streusel mixture evenly over the batter. This will be the cinnamon swirl layer.
    3. Carefully spread the remaining batter over the streusel layer. This takes a little patience—drop spoonfuls of batter over the streusel and gently spread to cover as best you can. It doesn’t have to be perfect.
    4. Sprinkle the remaining streusel evenly over the top, pressing it gently so it adheres.

    5. Bake:

    1. Bake for 35-45 minutes, until a toothpick inserted into the center comes out clean or with a few moist crumbs.
    2. If the top is browning too quickly, tent loosely with foil for the last 10-15 minutes.
    3. Let the cake cool in the pan on a wire rack for at least 30 minutes before serving. It can be served warm or at room temperature.

    6. Serve:

    1. Slice and serve with a hot cup of coffee. The cake is delicious on its own, but a dusting of powdered sugar or a drizzle of simple glaze is always welcome.

    Summary

    Prep Time: 20 minutes | Bake Time: 35-45 minutes | Cooling Time: 30 minutes | Total Time: 1 hour 30 minutes

    Yield: 9-inch cake (9-12 servings)

    Difficulty: Easy

    Storage and Make-Ahead Tips

    How to Store:

    Store coffee cake tightly covered at room temperature for up to 4 days. The streusel will soften slightly over time, which is part of its charm. You can also store in the refrigerator, but bring to room temperature before serving.

    Can You Freeze Coffee Cake?

    Absolutely! Coffee cake freezes beautifully. Wrap the cooled cake (whole or in slices) tightly in plastic wrap, then in foil, and place in a freezer bag. Freeze for up to 3 months. Thaw at room temperature.

    Make-Ahead for Brunch:

    Coffee cake is perfect for making ahead. Bake it a day before, store at room temperature, and it’ll be ready to serve. The flavors actually meld and deepen overnight.

    Freezing Unbaked:

    You can assemble the entire cake in the pan, cover tightly, and freeze for up to 3 months. Bake from frozen, adding 10-15 minutes to the baking time.

    Reviving Day-Old Coffee Cake:

    If your coffee cake is a day or two old, warm individual slices in the microwave for 10-15 seconds. It’ll taste almost freshly baked!

  • Perfect Chocolate Chip Cookies (Soft, Chewy & Loaded with Chips)

    Perfect Chocolate Chip Cookies (Soft, Chewy & Loaded with Chips)

    Let’s be honest—the world does not need another chocolate chip cookie recipe. But it does need *this* one. After countless batches, dozens of tweaks, and more taste tests than I care to admit, I’ve finally landed on what I truly believe is the perfect chocolate chip cookie.

    What makes these so special? They have that ideal contrast—edges that are golden and slightly crisp, centers that are soft, chewy, and almost doughy (in the best way possible).

    They’re loaded with chocolate in every bite, have a hint of salt to balance the sweetness, and they stay soft for days. Whether you’re a classic purist or someone who loves a good bakery-style jumbo cookie, this recipe is about to become your new favorite.

    Ingredients

    Yields 14-16 large cookies.

    For the Cookies:

    • 2 ¼ cups (280g) all-purpose flour
    • 1 teaspoon baking soda
    • 1 ½ teaspoons cornstarch
    • ½ teaspoon salt
    • ¾ cup (170g) unsalted butter, melted and slightly cooled
    • ¾ cup (150g) light brown sugar, packed
    • ½ cup (100g) granulated sugar
    • 1 large egg + 1 egg yolk, at room temperature
    • 2 teaspoons vanilla extract
    • 2 cups (340g) semi-sweet chocolate chips (or chopped chocolate bar)

    Optional Toppings:

    • Flaky sea salt, for sprinkling
    • Extra chocolate chips for pressing into tops

    Step-by-Step Instructions

    1. Whisk Dry Ingredients:

    1. In a medium bowl, whisk together the flour, baking soda, cornstarch, and salt. Set aside.

    2. Combine Wet Ingredients:

    1. In a large bowl, whisk together the melted butter, brown sugar, and granulated sugar until well combined and no lumps remain.
    2. Add the egg, egg yolk, and vanilla extract. Whisk vigorously for about 30-60 seconds until the mixture becomes smooth, glossy, and slightly lighter in color. This step is important—it helps create that chewy texture!

    3. Bring It Together:

    1. Pour the dry ingredients into the wet ingredients. Fold with a rubber spatula until just combined and no streaks of flour remain. Be careful not to overmix.
    2. Gently fold in the chocolate chips, reserving a handful to press into the tops of the cookies later.
    3. The dough will be soft and slightly sticky. That’s exactly what you want.

    4. Chill the Dough (Crucial Step!):

    1. Cover the bowl tightly with plastic wrap and refrigerate for at least 2 hours, or up to 3 days. Chilling is non-negotiable—it prevents spreading, deepens the flavor, and creates that perfect texture.
    2. If you’re in a hurry, you can chill for 1 hour, but 2+ hours is better. Overnight is best.

    5. Preheat and Prep:

    1. When ready to bake, preheat your oven to 350°F (175°C). Line two baking sheets with parchment paper or silicone baking mats.

    6. Scoop and Bake:

    1. Scoop the chilled dough into large balls (about 3 tablespoons each). I recommend using a cookie scoop for even sizing.
    2. Place them on the prepared baking sheets, spacing about 3 inches apart.
    3. Press a few extra chocolate chips into the tops of each dough ball—this makes them look bakery-style and beautiful.
    4. Bake for 10-12 minutes, until the edges are golden brown and the centers still look slightly soft and underdone.
    5. Let the cookies cool on the baking sheet for 10 minutes. They will continue to bake and set up during this time.
    6. Transfer to a wire rack to cool completely, or enjoy warm with a glass of cold milk.

    Summary

    Prep Time: 15 minutes | Chill Time: 2 hours (minimum) | Bake Time: 12 minutes | Total Time: 2 hours 30 minutes

    Yield: 14-16 large cookies

    Difficulty: Easy

    Storage and Make-Ahead Tips

    How to Store:

    Store baked cookies in an airtight container at room temperature for up to 5 days. Place a slice of white bread in the container to keep them extra soft—the cookies will absorb moisture from the bread.

    Can You Freeze the Dough?

    Absolutely! This is my favorite make-ahead trick. Scoop the dough into balls and place them on a parchment-lined baking sheet. Freeze until solid, then transfer the frozen dough balls to a freezer bag. Bake from frozen, adding 1-2 minutes to the baking time. Fresh cookies anytime!

    Freezing Baked Cookies:

    Baked cookies freeze beautifully. Place them in a single layer in a freezer-safe container with parchment between layers. Freeze for up to 3 months. Thaw at room temperature or warm gently in the microwave for a few seconds.

    Make-Ahead Dough:

    The dough can be refrigerated for up to 3 days before baking. In fact, longer chilling (24-72 hours) develops even more flavor. Just let it sit at room temperature for 10-15 minutes to soften slightly before scooping.

  • Ultimate Moist Banana Bread (The Only Recipe You’ll Ever Need)

    Ultimate Moist Banana Bread (The Only Recipe You’ll Ever Need)

    We all have that moment—you know, when the bananas on your counter have turned completely brown and spotty, and you’re wondering what to do with them. That, my friend, is the universe telling you it’s time to make banana bread.

    This recipe has been in my family for years, and it’s the one I come back to again and again. It produces a loaf that’s incredibly moist, deeply flavored with sweet bananas, and topped with a slightly crunchy, caramelized crust that is simply perfection.

    It’s not fancy or complicated—just simple, honest, soul-warming banana bread that never disappoints. Whether you’re a seasoned baker or making banana bread for the first time, this recipe is about to become your go-to.

    Ingredients

    Makes 1 loaf (9×5 inch loaf pan).

    For the Banana Bread:

    • 1 ¾ cups (220g) all-purpose flour
    • 1 teaspoon baking soda
    • ½ teaspoon salt
    • ½ teaspoon ground cinnamon (optional, but highly recommended)
    • ½ cup (115g) unsalted butter, softened
    • ¾ cup (150g) granulated sugar
    • ¼ cup (50g) light brown sugar, packed
    • 2 large eggs, at room temperature
    • 2 teaspoons vanilla extract
    • 4 medium very ripe bananas, mashed (about 1 ½ cups)
    • ¼ cup (60g) sour cream or plain Greek yogurt, at room temperature

    Optional Add-Ins:

    • ½ cup chopped walnuts or pecans
    • ½ cup chocolate chips
    • 1 tablespoon turbinado sugar (for sprinkling on top)

    Step-by-Step Instructions

    1. Preheat and Prepare:

    1. Preheat your oven to 350°F (175°C). Grease a 9×5 inch loaf pan and line with parchment paper, leaving overhang on the long sides for easy removal.

    2. Combine Dry Ingredients:

    1. In a medium bowl, whisk together the flour, baking soda, salt, and cinnamon (if using). Set aside.

    3. Cream Butter and Sugars:

    1. In a large bowl, beat the softened butter, granulated sugar, and brown sugar together with an electric mixer until light and fluffy, about 2-3 minutes.

    4. Add Wet Ingredients:

    1. Add the eggs one at a time, beating well after each addition. Scrape down the sides of the bowl.
    2. Beat in the vanilla extract.
    3. Add the mashed bananas and sour cream, and mix until combined. The mixture may look slightly curdled—that’s perfectly normal.

    5. Combine Wet and Dry:

    1. Gradually add the dry ingredients to the wet ingredients, mixing on low speed or folding with a spatula until just combined. Do not overmix—a few streaks of flour are fine.
    2. If adding nuts or chocolate chips, fold them in gently now.

    6. Bake:

    1. Pour the batter into the prepared loaf pan and spread it evenly.
    2. If desired, sprinkle turbinado sugar over the top for a crunchy crust.
    3. Bake for 55-65 minutes, until a toothpick inserted into the center comes out clean or with just a few moist crumbs.
    4. If the top is browning too quickly, tent loosely with foil for the last 15-20 minutes.

    7. Cool and Serve:

    1. Let the banana bread cool in the pan for 15-20 minutes.
    2. Use the parchment overhang to lift the loaf onto a wire rack to cool completely before slicing. I know it’s hard to wait, but this prevents the bread from becoming gummy!

    Summary

    Prep Time: 15 minutes | Bake Time: 55-65 minutes | Cooling Time: 20 minutes | Total Time: 1 hour 30 minutes

    Yield: 1 loaf (10-12 slices)

    Difficulty: Easy

    Storage and Make-Ahead Tips

    How to Store:

    Wrap banana bread tightly in plastic wrap or store in an airtight container at room temperature for up to 4 days. The moisture actually improves over the first day or two!

    Can You Freeze It?

    Absolutely! Banana bread freezes beautifully. Wrap the cooled loaf (or individual slices) tightly in plastic wrap, then in foil, and place in a freezer bag. Freeze for up to 3 months. Thaw at room temperature or warm slices in the microwave for 15-20 seconds.

    Make-Ahead for Gifts or Events:

    Banana bread is actually better the next day, making it perfect for making ahead. Bake a day or two before you need it and store at room temperature.

    Using Overripe Bananas:

    If you have bananas that are too ripe to use now, peel them and freeze in a zip-top bag. Thaw and use directly in banana bread—they’ll be even softer and more flavorful!