Blog

  • Chicken and Waffles: The Sweet, Savory, Fried Chicken Dream

    Chicken and Waffles: The Sweet, Savory, Fried Chicken Dream

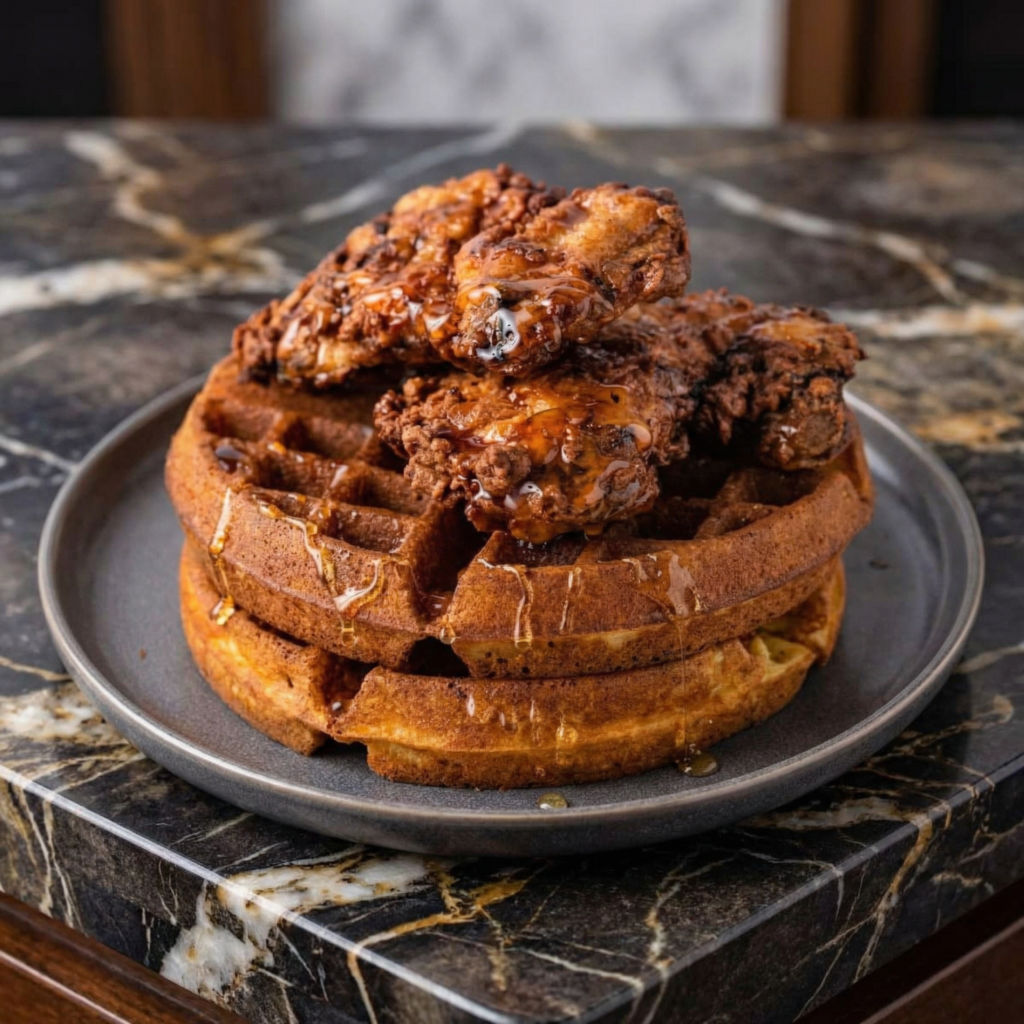
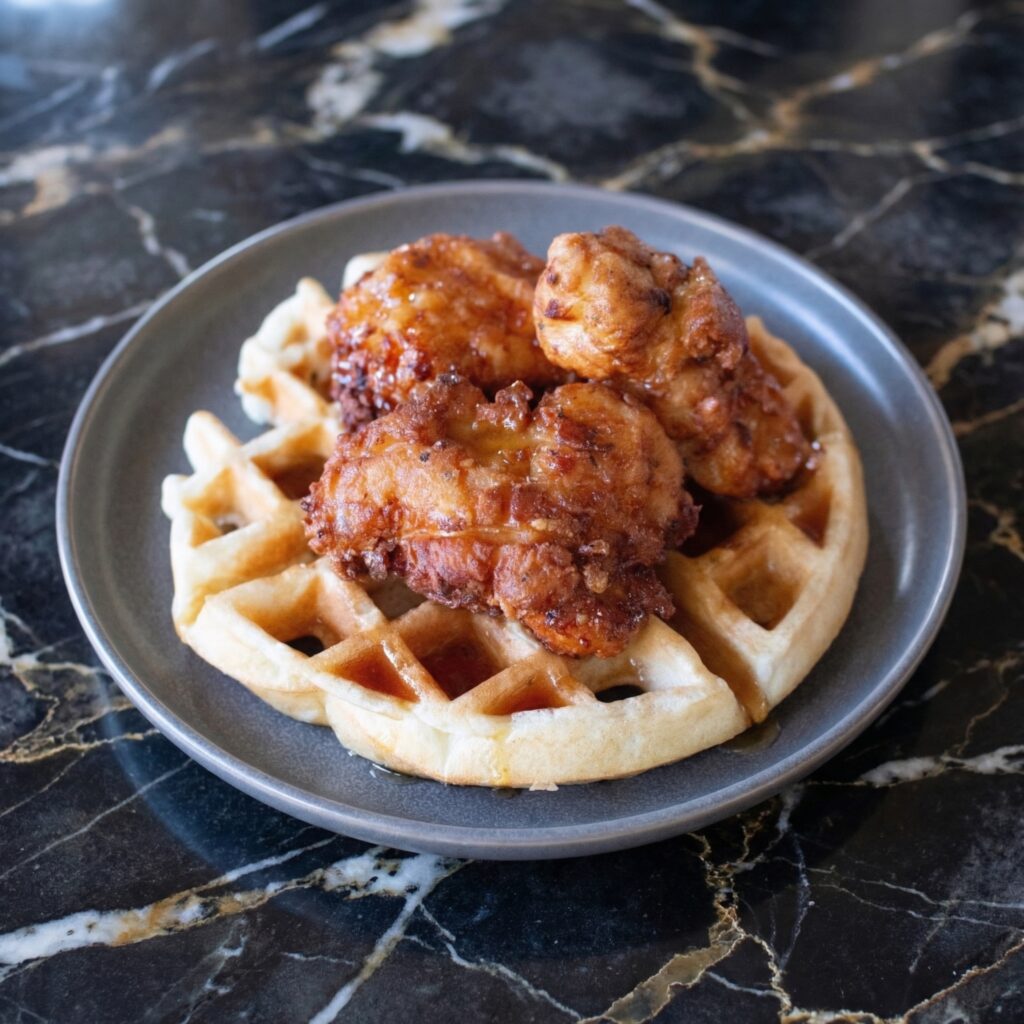
    Chicken and waffles is the kind of dish that makes you question why we ever decided to separate breakfast and dinner. On one side: crispy, juicy fried chicken with a seasoned crust that shatters when you bite into it. On the other: a light, fluffy waffle with crisp edges, ready to catch every drop of maple syrup.

    Together, they’re magic. The sweetness of the syrup mingling with the savory, peppery chicken. The crunch of the crust against the tender waffle. A little hot sauce to cut through it all. This is the meal you make when you want to impress someone—or when you just want to impress yourself on a lazy Sunday morning.

    Ingredients

    Serves 4 (or 2 very hungry people).

    For the Fried Chicken:

    • 8 chicken thighs or drumsticks (bone-in, skin-on for maximum flavor)
    • 2 cups buttermilk
    • 2 tbsp hot sauce (Frank’s or Tabasco)
    • 2 cups all-purpose flour
    • 1 tbsp cornstarch (for extra crunch)
    • 1 tsp smoked paprika
    • 1 tsp garlic powder
    • 1 tsp onion powder
    • 1 tsp cayenne pepper (adjust to your heat tolerance)
    • 1 tsp black pepper
    • 1 tsp salt
    • Neutral oil, for frying (vegetable or peanut)

    For the Waffles:

    • 2 cups all-purpose flour
    • 2 tbsp sugar
    • 1 tbsp baking powder
    • ½ tsp salt
    • 2 large eggs, separated
    • 1½ cups buttermilk
    • ½ cup melted butter, plus more for brushing
    • 1 tsp vanilla extract

    For Serving:

    • Warm maple syrup (grade A or B, both are delicious)
    • Hot sauce (for that sweet-heat combo)
    • Flaky salt (optional, but trust me)
    • Fresh herbs like thyme or parsley for garnish

    Step-by-Step Instructions

    Step 1: Brine the Chicken

    1. In a large bowl, whisk together buttermilk and hot sauce. Add chicken pieces, turning to coat. Cover and refrigerate for at least 4 hours (overnight is ideal). This tenderizes and flavors the meat.

    Step 2: Make the Waffle Batter

    1. In a large bowl, whisk together flour, sugar, baking powder, and salt.
    2. In a separate bowl, whisk egg yolks, buttermilk, melted butter, and vanilla.
    3. Pour wet ingredients into dry and stir until just combined. Lumps are okay—don’t overmix.
    4. In a clean bowl, beat egg whites until stiff peaks form. Gently fold into the batter. This makes waffles light and crispy.

    Step 3: Prepare the Chicken Dredge

    1. In a shallow dish, combine flour, cornstarch, paprika, garlic powder, onion powder, cayenne, black pepper, and salt. Mix well.
    2. Remove chicken from buttermilk, letting excess drip off. Dredge each piece in the flour mixture, pressing firmly to adhere. Place on a wire rack and let rest 15 minutes (this helps coating stick).

    Step 4: Fry the Chicken

    1. Heat about 2 inches of oil in a deep Dutch oven or heavy pot to 350°F (175°C).
    2. Working in batches, carefully lower chicken into the oil. Don’t crowd the pot.
    3. Fry for 10-12 minutes, turning occasionally, until golden brown and cooked through (internal temp 165°F).
    4. Transfer to a wire rack set over a baking sheet. Sprinkle with a little salt while hot.

    Step 5: Make the Waffles

    1. While chicken rests, preheat your waffle iron according to manufacturer’s instructions. Brush with melted butter.
    2. Pour batter onto the hot iron and cook until golden and crisp. Keep waffles warm in a 200°F oven while you cook the rest.

    Step 6: Assemble the Masterpiece

    1. Place a waffle on a plate. Top with a piece (or two) of fried chicken.
    2. Drizzle generously with warm maple syrup. Add a few dashes of hot sauce for that perfect sweet-heat balance.
    3. Sprinkle with flaky salt and fresh herbs if using.

    Step 7: Serve and Swoon

    1. Serve immediately, preferably with extra syrup and hot sauce on the table.
    2. Take a bite that includes chicken, waffle, and syrup all at once. Close your eyes. You’ve achieved culinary nirvana.

    Summary

    Prep Time: 30 minutes + marinating | Cook Time: 30 minutes | Total Time: 1 hour + patience

    Yield: 4 servings

    Difficulty: Weekend brunch hero

    Storage Notes

    Leftovers (If You’re Lucky):

    Store chicken and waffles separately in airtight containers in the fridge for up to 3 days. Waffles can be stored in a zip-top bag at room temperature for 2 days or frozen.

    Reheating:

    For chicken: Oven at 375°F for 10-15 minutes brings back the crispiness. Air fryer at 375°F for 5-7 minutes is even better.

    For waffles: Pop them in the toaster or toaster oven for a quick refresh. Oven works too.

    Never microwave either—soggy chicken and rubbery waffles are crimes against humanity.

    Make Ahead:

    Marinate chicken up to 24 hours in advance. Make waffle batter the night before and keep refrigerated (whites folded in just before cooking). Fry chicken just before serving for maximum crunch.

    Freezer-Friendly:

    Freeze cooked chicken and waffles separately for up to 3 months. Reheat directly from frozen in a 375°F oven until hot and crispy (about 20 minutes).

    Pro Tips:

    • Buttermilk is non-negotiable. It tenderizes the chicken and adds flavor.
    • Separated egg whites in waffles = extra crispiness. Don’t skip this step.
    • Hot sauce in the maple syrup is a game-changer. Mix a few dashes in before drizzling.
    • Serve immediately. Chicken and waffles wait for no one.
  • Chicken Fried Steak: Southern Comfort on a Plate

    Chicken Fried Steak: Southern Comfort on a Plate

    Let’s clear something up: there’s no chicken in chicken fried steak. The name comes from the cooking method—it’s steak prepared like fried chicken. A tenderized cut of beef, dunked in seasoned flour, fried until golden and crispy, then served under a blanket of creamy, peppery gravy. It’s a beautiful deception.

    This is the kind of meal that shows up at diners and Sunday suppers across the South. It’s not fancy. It’s not pretending to be. It’s just good, honest food—crispy on the outside, tender on the inside, and absolutely drowning in gravy. Serve it with mashed potatoes and something green to pretend you’re being healthy.

    Ingredients

    Serves 4 hungry humans.

    For the Steak:

    • 4 cube steaks (about 1.5 lbs total, or use round steak and tenderize yourself)
    • 1½ cups all-purpose flour
    • 1 tsp baking powder (helps with crispiness)
    • 1 tsp smoked paprika
    • 1 tsp garlic powder
    • 1 tsp onion powder
    • Salt and black pepper, to taste
    • 2 large eggs
    • 1 cup buttermilk (or regular milk with 1 tbsp vinegar)
    • Neutral oil, for frying (vegetable or canola)

    For the Country Gravy:

    • ¼ cup reserved frying oil (or butter)
    • ¼ cup all-purpose flour
    • 2 cups whole milk, warmed
    • 1 tsp black pepper (plus more to taste)
    • ½ tsp salt
    • Pinch of cayenne (optional)

    For Serving:

    • Mashed potatoes (mandatory)
    • Your choice of vegetable—green beans, corn, or peas
    • Hot sauce, for those who like a kick

    Step-by-Step Instructions

    Step 1: Set Up Your Dredging Station

    1. In a shallow dish, whisk together flour, baking powder, paprika, garlic powder, onion powder, 1 tsp salt, and 1 tsp black pepper.
    2. In another shallow dish, whisk together eggs and buttermilk until combined.

    Step 2: Prep the Steak

    1. If your steaks aren’t already tenderized, place them between plastic wrap and pound with a meat mallet until about ¼-inch thick. Even thickness ensures even cooking.
    2. Pat steaks dry with paper towels. Season both sides with salt and pepper.

    Step 3: Dredge Like You Mean It

    1. Dredge each steak in the flour mixture, shaking off excess. Dip into the egg mixture, letting excess drip off. Dredge in flour again, pressing firmly so it adheres. This double-dredge is the secret to a thick, craggy crust.
    2. Place coated steaks on a wire rack and let rest for 10 minutes. This helps the coating stick during frying.

    Step 4: Fry to Golden Glory

    1. Heat about ¼ inch of oil in a large skillet (cast iron is perfect) over medium-high heat until shimmering. The oil should sizzle immediately when you drop in a bit of flour.
    2. Carefully place steaks in the pan, working in batches if needed. Don’t crowd them.
    3. Fry for 3-4 minutes per side until deep golden brown and crispy. Flip carefully to keep the crust intact.
    4. Transfer to a wire rack or paper towel-lined plate. Sprinkle with a little salt while hot. Reserve ¼ cup of the frying oil for gravy.

    Step 5: Make the Gravy (In the Same Pan)

    1. Pour off all but ¼ cup of the frying oil (or add oil/butter to make ¼ cup). Leave the browned bits—that’s flavor gold.
    2. Whisk in the ¼ cup flour and cook for 2-3 minutes, scraping up those bits, until the roux is golden brown.
    3. Slowly whisk in the warm milk, breaking up any lumps. Continue whisking until the gravy thickens, about 3-5 minutes.
    4. Season with salt, plenty of black pepper, and cayenne if using. Taste and adjust—this gravy should be boldly peppery.

    Step 6: Assemble and Serve

    1. Place a chicken fried steak on a plate next to a mountain of mashed potatoes.
    2. Ladle gravy generously over the steak and potatoes. Don’t be shy—this is what you’re here for.
    3. Sprinkle with a little fresh parsley or extra black pepper. Serve with your vegetable of choice.
    4. Take a bite of that crispy, creamy, peppery perfection. Sigh contentedly. You’re in the South now.

    Summary

    Prep Time: 20 minutes | Cook Time: 20 minutes | Total Time: 40 minutes

    Yield: 4 servings

    Difficulty: Comfort food classic

    Storage Notes

    Leftovers:

    Store steak and gravy separately in airtight containers in the fridge for up to 3 days. The steak will lose crispiness, but the flavor remains.

    Reheating:

    Oven method (best): Place steak on a wire rack over a baking sheet. Reheat at 375°F for 10-15 minutes until hot and crispy-ish. Reheat gravy separately on the stovetop, adding a splash of milk to thin.

    Air fryer: 375°F for 5-7 minutes works beautifully for the steak.

    Microwave: Works for gravy, but the steak will be sad and soggy. Avoid if possible.

    Make Ahead:

    You can bread the steaks up to 24 hours in advance and keep them refrigerated on a wire rack. Fry just before serving for maximum crunch.

    Pro Tips:

    • Hot oil is crucial. If the oil isn’t hot enough, the coating absorbs grease and turns soggy.
    • Don’t skip the rest. Letting breaded steaks sit for 10 minutes helps the coating adhere.
    • Gravy likes warm milk. Cold milk can cause lumps. Heat it in the microwave or a small pan first.
    • Pepper is not a suggestion. Country gravy should be boldly peppery. Taste and add more until it’s right.
  • Chicken Tostadas: Crunchy, Fresh, and Totally Customizable

    Chicken Tostadas: Crunchy, Fresh, and Totally Customizable

    Tostadas are the answer to the question “What’s for dinner?” when you want something fun, fast, and full of flavor. Think of them as the crispy, open-faced cousin of tacos—a golden corn tortilla piled high with toppings that you can customize to your heart’s content.

    This version starts with a layer of creamy refried beans, followed by juicy shredded chicken simmered in a savory tomato-chipotle sauce. Then comes the crunch: shredded lettuce, crumbled queso fresco, and a drizzle of crema. Add some pickled onions or a squeeze of lime, and you’ve got a meal that’s part dinner, part choose-your-own-adventure. Set out the toppings and let everyone build their own.

    Ingredients

    Serves 4 (makes 8 tostadas).

    For the Chicken:

    • 1 lb boneless, skinless chicken breasts or thighs
    • 1 tbsp olive oil
    • ½ onion, chopped
    • 2 cloves garlic, minced
    • 1 chipotle pepper in adobo, minced (plus 1 tbsp adobo sauce)
    • 1 tsp ground cumin
    • 1 tsp dried oregano
    • 1 cup chicken broth
    • Salt and pepper, to taste

    For the Tostada Shells:

    • 8 corn tortillas (white or yellow)
    • Neutral oil (vegetable or canola), for frying or brushing
    • Salt, for sprinkling

    For the Toppings Bar:

    • 1 can (16 oz) refried beans, warmed
    • 2 cups shredded lettuce or cabbage
    • 1 cup crumbled queso fresco or cotija cheese
    • ½ cup Mexican crema or sour cream
    • 1 avocado, sliced or cubed
    • Pickled red onions or fresh salsa
    • Hot sauce, for drizzling
    • Fresh cilantro, chopped
    • Lime wedges

    Step-by-Step Instructions

    Step 1: Cook the Chicken

    1. Season chicken with salt and pepper. Heat olive oil in a large skillet over medium-high heat. Brown chicken on both sides, about 3-4 minutes per side (it doesn’t need to be cooked through yet). Remove and set aside.
    2. In the same skillet, add onion and cook until softened, about 3 minutes. Add garlic, chipotle pepper, adobo sauce, cumin, and oregano. Cook 1 minute until fragrant.
    3. Pour in chicken broth and scrape up any browned bits. Return chicken to the skillet, bring to a simmer, then cover and reduce heat to low.
    4. Cook for 15-20 minutes until chicken is cooked through and tender.

    Step 2: Shred and Sauce

    1. Remove chicken to a cutting board and shred with two forks.
    2. Return shredded chicken to the skillet with the sauce. Simmer uncovered for 5-10 minutes until the sauce thickens and coats the chicken. Season with salt and pepper to taste.

    Step 3: Make the Tostada Shells (Two Ways)

    1. Frying method (classic): Heat about ½ inch of oil in a small skillet over medium heat. Fry tortillas one at a time for 1-2 minutes per side until golden and crisp. Drain on paper towels and sprinkle with salt.
    2. Baking method (easier): Preheat oven to 400°F. Brush tortillas lightly with oil on both sides, place on a baking sheet, and bake for 8-10 minutes, flipping halfway, until golden and crisp. Sprinkle with salt.

    Step 4: Warm the Beans

    1. While shells cook, warm the refried beans in a small saucepan over low heat. Add a splash of water or broth to thin if needed.

    Step 5: Assemble the Tostadas

    1. Spread a generous layer of warm refried beans onto each crispy tortilla.
    2. Top with a pile of shredded chipotle chicken.
    3. Add shredded lettuce, crumbled cheese, avocado slices, and pickled onions.
    4. Drizzle with crema and hot sauce. Sprinkle with fresh cilantro.

    Step 6: Serve and Crunch

    1. Arrange tostadas on a platter or let everyone build their own at the table.
    2. Serve with lime wedges for squeezing and extra hot sauce on the side.
    3. Eat immediately—tostadas wait for no one. Use a fork or go hands-on. Both are acceptable. Both are delicious.

    Summary

    Prep Time: 15 minutes | Cook Time: 30 minutes | Total Time: 45 minutes

    Yield: 8 tostadas (serves 4)

    Difficulty: Easy and fun

    Storage Notes

    Leftovers (Component Style):

    Store chicken, beans, and toppings separately in airtight containers in the fridge for up to 4 days. Tostada shells are best fresh—store any extras in an airtight container at room temperature for 2-3 days.

    Reheating:

    Reheat chicken in a skillet or microwave. Warm beans on the stovetop or microwave. Never assemble tostadas ahead—soggy shells are sad shells.

    Make Ahead:

    Cook the chicken up to 3 days in advance. It actually gets more flavorful overnight. Fry or bake shells the day of serving for maximum crunch.

    Pro Tip:

    Double the chicken recipe and use leftovers for tacos, burritos, salads, or quesadillas all week long. You’re not meal prepping; you’re future-you caring.

  • Garlic Lemon Butter Scallops: Fancy in 10 Minutes Flat

    Garlic Lemon Butter Scallops: Fancy in 10 Minutes Flat

    Scallops have a reputation. They’re what you order at a fancy restaurant when you want to feel like a grown-up. But here’s the thing they don’t tell you: scallops are one of the fastest, easiest things to cook at home. Like, embarrassingly easy.

    The secret is a screaming-hot pan, a little patience, and a lot of butter. You’ll get that beautiful golden crust while the inside stays sweet and tender. Then you’ll deglaze the pan with lemon juice, add more butter (obviously), and watch it come together into a sauce so good you’ll want to drink it. Ten minutes. One pan. You’re officially fancy now.

    Ingredients

    Serves 2 as a main, 4 as an appetizer.

    For the Scallops:

    • 1 lb large sea scallops (about 10-12 scallops)
    • Salt and freshly ground black pepper
    • 2 tbsp neutral oil (avocado or vegetable—high smoke point is key)
    • 3 tbsp unsalted butter, divided
    • 3 cloves garlic, minced
    • ¼ cup dry white wine (or chicken broth)
    • 2 tbsp fresh lemon juice
    • 1 tsp lemon zest
    • 2 tbsp fresh parsley, chopped

    For Serving:

    • Lemon wedges
    • Fresh parsley, for garnish
    • Crusty bread or pasta (to soak up that sauce)

    Step-by-Step Instructions

    Step 1: Prep the Scallops (This Matters)

    1. Remove the side muscle from each scallop if still attached—it’s a small, tough rectangular tab. Just peel it off.
    2. Pat scallops completely dry with paper towels. Moisture is the enemy of a good sear. Like, really dry. Let them sit on a paper towel-lined plate for a few minutes if needed.
    3. Season both sides generously with salt and pepper.

    Step 2: Get the Pan Screaming Hot

    1. Place a large skillet (cast iron is perfect) over medium-high heat. Add the oil and heat until it’s shimmering and almost smoking.
    2. Carefully place scallops in the pan, making sure they’re not touching. Give them space—crowding leads to steaming, not searing.

    Step 3: Don’t Touch Them (Seriously)

    1. Cook undisturbed for 2-3 minutes until the bottom is deep golden brown. The scallops should release easily from the pan—if they stick, they’re not ready.
    2. Flip and cook the other side for 2 minutes. Remove scallops to a plate and tent loosely with foil.

    Step 4: Make the Garlic Butter Sauce

    1. Reduce heat to medium. Add 1 tbsp of butter to the pan. Once melted, add garlic and sauté for 30 seconds until fragrant (don’t burn it).
    2. Pour in the white wine and lemon juice, scraping up all those browned bits from the bottom. This is where the flavor lives.
    3. Let it simmer and reduce by half, about 2 minutes.
    4. Remove from heat and whisk in the remaining 2 tbsp butter until melted and glossy. Stir in lemon zest and most of the parsley.

    Step 5: Return Scallops to Glory

    1. Return the scallops to the pan, spooning that gorgeous sauce over the top. Let them warm through for 1 minute.

    Step 6: Serve Immediately

    1. Transfer scallops to plates or a serving platter. Spoon extra sauce over the top.
    2. Sprinkle with remaining parsley and serve with lemon wedges.
    3. Serve with crusty bread to soak up every last drop of that garlic lemon butter. Lick the plate. We won’t tell.

    Summary

    Prep Time: 5 minutes | Cook Time: 8 minutes | Total Time: 13 minutes

    Yield: 2 main servings

    Difficulty: Shockingly easy

    Storage Notes

    Leftovers (Rare, But Possible):

    Scallops are truly best fresh—their texture changes when reheated. If you must, store in an airtight container in the fridge for up to 2 days.

    Reheating:

    Gently reheat in a skillet over low heat with a splash of butter or lemon juice just until warmed through. Do not microwave—it turns scallops into rubber bands.

    Pro Tip:

    Make extra sauce. Seriously. It keeps in the fridge for a week and makes everything better—fish, chicken, veggies, or just bread for dipping.

    The Golden Rules of Scallops:

    • Dry them like your life depends on it
    • Pan must be hot enough to make you nervous
    • Don’t crowd the pan
    • Don’t move them until they release naturally
    • Serve immediately
  • Honey Soy Baked Chicken

    Honey Soy Baked Chicken

    Some chicken recipes are fine. This one is unforgettable. Honey soy baked chicken is the kind of meal that makes everyone at the table go quiet—not because they’re polite, but because they’re too busy eating to talk.

    The magic is in the marinade. Honey brings the sweetness and helps everything caramelize into that sticky, lacquered finish. Soy sauce adds depth and salt. Garlic and ginger make it fragrant. And a little sesame oil? That’s the secret handshake. Bake it until the edges are slightly charred and the chicken is so tender it begs to be eaten straight off the bone. Serve with rice and something green, and watch it disappear.

    Ingredients

    Serves 4.

    For the Chicken:

    • 8 bone-in, skin-on chicken thighs (or drumsticks, or a mix)
    • 2 tbsp neutral oil (vegetable, canola, or avocado)
    • Sesame seeds and sliced green onions, for garnish

    For the Honey Soy Glaze:

    • ⅓ cup honey
    • ⅓ cup low-sodium soy sauce
    • 4 cloves garlic, minced
    • 1 tbsp fresh ginger, grated (or 1 tsp ground ginger)
    • 1 tbsp rice vinegar (or apple cider vinegar)
    • 1 tsp sesame oil
    • ½ tsp red pepper flakes (optional, for heat)
    • 1 tbsp cornstarch mixed with 2 tbsp water (slurry, for thickening)

    Optional Veggies (Sheet Pan Style):

    • 1 head broccoli, cut into florets
    • 1 red bell pepper, sliced
    • 1 cup snap peas or green beans
    • Drizzle of oil and pinch of salt

    Step-by-Step Instructions

    Step 1: Whisk the Magic

    1. In a medium bowl or measuring cup, whisk together honey, soy sauce, minced garlic, grated ginger, rice vinegar, sesame oil, and red pepper flakes. This is your flavor bomb.
    2. Pour half of the marinade into a small saucepan and set aside (this will become your thick glaze later). The other half stays in the bowl for marinating.

    Step 2: Marinate the Chicken

    1. Pat chicken thighs dry with paper towels. Place them in a large bowl or zip-top bag.
    2. Pour the marinade from the bowl over the chicken. Turn to coat every piece.
    3. Cover and refrigerate for at least 30 minutes (2 hours is better, overnight is ideal).

    Step 3: Preheat and Prep

    1. Preheat your oven to 400°F (200°C). Line a baking sheet with foil or parchment paper for easy cleanup. Place a wire rack on top if you have one—it helps the skin get crispy all over.
    2. Remove chicken from marinade and let excess drip off. Arrange on the prepared baking sheet, skin-side up. Reserve the used marinade (yes, we’re using it—keep reading).

    Step 4: Bake to Sticky Perfection

    1. Bake for 25 minutes. While it bakes, pour the reserved used marinade into the saucepan with the reserved fresh marinade. Bring to a boil over medium-high heat, then reduce to a simmer.
    2. Whisk in the cornstarch slurry and cook for 2-3 minutes until thickened and glossy. This is your final glaze—and boiling ensures it’s safe to eat.
    3. After 25 minutes, brush the chicken generously with some of the thickened glaze. Return to oven and bake another 10-15 minutes until the chicken is cooked through (165°F internal temp) and the glaze is sticky and caramelized.
    4. For extra sticky magic: brush with more glaze halfway through this second bake.

    Step 5: Sheet Pan Veggies (Optional)

    1. If adding veggies, toss them with a little oil and salt. Add them to the baking sheet during the last 15-20 minutes of cooking. They’ll roast in those chicken juices and be incredible.

    Step 6: Rest and Garnish

    1. Remove chicken from oven and let rest 5-10 minutes. This keeps it juicy.
    2. Sprinkle with sesame seeds and sliced green onions. Drizzle with any remaining glaze (warm it first).
    3. Serve with steamed rice to soak up all that sticky goodness. Use your fingers. Lick them. No shame.

    Summary

    Prep Time: 10 minutes + marinating | Cook Time: 40 minutes | Total Time: 50 minutes (plus patience)

    Yield: 4 servings

    Difficulty: Sticky, easy, perfect

    Storage Notes

    Leftovers:

    Store chicken in an airtight container in the fridge for up to 4 days. The glaze continues to work its magic overnight.

    Reheating:

    Oven is best: 350°F for 10-15 minutes until warmed through and sticky again. Air fryer works beautifully too (375°F for 5-7 minutes). Microwave works but the skin won’t be crispy—still delicious though.

    Freezer-Friendly:

    You can freeze baked chicken in an airtight container for up to 3 months. Thaw overnight in the fridge and reheat in the oven to revive that sticky glaze.

    Pro Tip:

    Double the glaze. Use the extra for stir-fry, veggies, or just drizzling over rice. You’ll thank yourself later.

  • Baked Spaghetti Casserole: The Cheesy, Crowd-Pleasing Dinner Everyone Loves

    Baked Spaghetti Casserole: The Cheesy, Crowd-Pleasing Dinner Everyone Loves

    Spaghetti night is sacred. But sometimes, you want the same comforting flavors with a little something extra. Enter baked spaghetti casserole: everything you love about the classic, baked into one golden, bubbly, cheese-crusted masterpiece.

    The pasta soaks up all that rich, meaty sauce while it bakes. The cheese on top gets crispy and bronzed. And underneath it all, there’s a creamy, cheesy layer hiding in the middle just waiting to surprise you. It feeds a crowd, reheats like a dream, and makes your kitchen smell like Sunday dinner. Basically, it’s spaghetti night, but make it casserole.

    Ingredients

    Serves 6-8 (or 4 with excellent leftovers).

    For the Sauce:

    • 1 lb spaghetti or other long pasta
    • 1 tbsp olive oil
    • 1 lb ground beef (or Italian sausage, or a mix)
    • 1 yellow onion, finely chopped
    • 4 cloves garlic, minced
    • 1 tsp dried oregano
    • 1 tsp dried basil
    • ½ tsp red pepper flakes (optional)
    • 24 oz (680g) marinara sauce (jarred or homemade)
    • Salt and pepper, to taste

    For the Cheese Situation:

    • 1 cup ricotta cheese (full-fat for creaminess)
    • 1 large egg
    • ½ cup grated Parmesan cheese, divided
    • 2 cups shredded mozzarella cheese, divided
    • ¼ cup fresh parsley or basil, chopped (for garnish)

    Step-by-Step Instructions

    Step 1: Boil the Pasta

    1. Bring a large pot of salted water to a boil. Cook spaghetti according to package directions until al dente (about 1 minute less than the box says—it’ll finish cooking in the oven).
    2. Drain and set aside. Drizzle with a tiny bit of olive oil to prevent sticking if needed.

    Step 2: Brown the Meat

    1. While pasta cooks, heat olive oil in a large skillet over medium-high heat. Add ground beef and cook, breaking it up with a spoon, until browned and no longer pink (about 5-7 minutes).
    2. Add chopped onion and cook until softened, about 3-4 minutes. Stir in garlic, oregano, basil, and red pepper flakes. Cook another minute until fragrant.
    3. Pour in marinara sauce, stir to combine, and let simmer for 5 minutes. Season with salt and pepper to taste.

    Step 3: Make the Cheesy Middle

    1. In a small bowl, mix together ricotta cheese, egg, and half of the Parmesan (about ¼ cup). Add a pinch of salt and pepper. This is the secret creamy layer.

    Step 4: Assemble the Casserole

    1. Preheat your oven to 375°F (190°C). Grease a 9×13-inch baking dish.
    2. Spread about 1 cup of the meat sauce evenly over the bottom of the dish.
    3. Layer half the cooked spaghetti over the sauce.
    4. Drop spoonfuls of the ricotta mixture over the pasta, then gently spread it (it doesn’t need to be perfect).
    5. Sprinkle with 1 cup of mozzarella.
    6. Add the remaining spaghetti in a second layer.
    7. Pour the rest of the meat sauce over the top, making sure it reaches the edges.
    8. Sprinkle with remaining 1 cup mozzarella and remaining ¼ cup Parmesan.

    Step 5: Bake Until Bubbly

    1. Cover with foil (to prevent cheese from burning) and bake for 20 minutes.
    2. Remove foil and bake another 10-15 minutes until the cheese is melted, bubbly, and golden in spots.
    3. Let it rest for at least 10 minutes before slicing. This is crucial—it sets up so you get clean squares instead of a saucy mess.

    Step 6: Garnish and Serve

    1. Sprinkle with fresh parsley or basil. Cut into squares and serve with a side salad and garlic bread (because duh).
    2. Watch people go back for seconds. Pretend you’re not also going back for seconds.

    Summary

    Prep Time: 20 minutes | Cook Time: 35 minutes | Total Time: 55 minutes

    Yield: 6-8 servings

    Difficulty: Easy enough for a crowd

    Storage Notes

    Leftovers:

    Store in an airtight container in the fridge for up to 4 days. The flavors meld and get even better overnight.

    Reheating:

    Microwave individual portions for 1-2 minutes. For larger portions, cover with foil and reheat in a 350°F oven for 15-20 minutes until warmed through.

    Freezer-Friendly (The Best Part):

    This casserole is a freezer superstar. Assemble completely but don’t bake. Cover tightly with plastic wrap and foil, freeze for up to 3 months. To bake from frozen: remove plastic wrap, cover with foil, and bake at 375°F for 60 minutes. Remove foil and bake another 15 minutes until bubbly.

    Pro Tip:

    Make two. Eat one now, freeze one for the chaotic Tuesday you know is coming. Future you will be so grateful.

  • Crispy Roast Pork Belly: The Loudest, Crunchiest and Most Glorious Bite

    Crispy Roast Pork Belly: The Loudest, Crunchiest and Most Glorious Bite

    Let’s talk about the sound. That first knife-through-the-crackling *crunch* that echoes through the kitchen. The way the golden, blistered skin shatters under your teeth while the meat below stays juicy, tender, and impossibly flavorful. That’s what we’re here for.

    Crispy roast pork belly looks like something only a professional chef could pull off. But here’s the truth: with a little patience, some salt, and a few clever tricks (hello, vinegar and baking soda), you can absolutely nail this at home. It’s a showstopper for holidays, Sunday dinners, or any day you decide you deserve something magnificent.

    Ingredients

    Serves 4-6 (or 2 with no leftovers).

    For the Pork:

    • 2-3 lbs pork belly, skin on (look for a piece that’s nice and flat, with even thickness)
    • 1 tbsp white vinegar or rice vinegar
    • 1 tbsp coarse salt (kosher or sea salt)
    • 1 tsp baking soda (the secret weapon for crackling)

    For the Rub:

    • 1 tbsp five-spice powder (optional but classic)
    • 1 tsp white pepper
    • 2 tsp salt
    • 1 tsp sugar
    • 4 cloves garlic, minced
    • 1 tbsp ginger, grated

    For Serving:

    • Flaky sea salt (Maldon is perfect)
    • Apple sauce or plum sauce
    • Steamed rice or crusty bread
    • Roasted vegetables or a simple salad

    Step-by-Step Instructions

    Step 1: Score the Skin (Crucial)

    1. Place pork belly skin-side up on a cutting board. Using a sharp knife or razor blade, score the skin in a crosshatch pattern, about ½ inch apart. Cut through the skin but STOP before you hit the meat. You want the fat layer intact.
    2. Pat the skin completely dry with paper towels. Dry skin = crispy skin.

    Step 2: Season the Meat, Not the Skin (Yet)

    1. Flip the pork over so the skin is down. Rub the meat side with five-spice powder, white pepper, salt, sugar, garlic, and ginger. Get it into every crevice.
    2. Flip back to skin-side up. Do NOT season the skin with anything except salt (and later, vinegar and baking soda). Spices on the skin will burn.

    Step 3: The Skin Prep Ritual

    1. Pour the white vinegar over the skin and rub it in. Vinegar helps dry out the skin and break down proteins for better crackling.
    2. Mix the coarse salt with baking soda. Sprinkle it evenly over the skin, making sure it gets into the scores. The baking soda helps with blistering and crunch.
    3. Place the pork in the fridge, uncovered, for at least 4 hours—overnight is even better. This dries out the skin completely. This step is non-negotiable.

    Step 4: Bring to Room Temp

    1. Remove pork from the fridge 1 hour before roasting. Preheat your oven to 400°F (200°C).
    2. Wipe off any excess salt mixture from the skin. Pat it dry again. You want it as dry as possible.

    Step 5: Roast Low and Slow (Kind of)

    1. Place pork on a wire rack set inside a baking tray. This lets air circulate underneath and prevents the bottom from steaming.
    2. Roast for 30 minutes at 400°F. Then reduce heat to 350°F (180°C) and roast for another 40-50 minutes, depending on thickness. The meat should be tender when pierced.

    Step 6: The Blistering Finale

    1. Crank the heat up to 450°F (230°C) or turn on the broiler. Watch it like a hawk for 5-10 minutes until the skin bubbles and crackles into a golden, puffed-up masterpiece.
    2. Don’t walk away. It can go from perfect to burnt in seconds.

    Step 7: Rest and CRUNCH

    1. Remove from oven and let rest for 15-20 minutes. This is agony but necessary—the juices need to redistribute.
    2. Sprinkle with flaky sea salt. Then do it: take a sharp knife and slice through that crackling. Listen to the sound. You earned it.
    3. Serve immediately with applesauce or plum sauce, rice or bread, and something green to pretend you’re being healthy.

    Summary

    Prep Time: 20 minutes + overnight drying | Cook Time: 1.5 hours | Total Time: Patience, young grasshopper

    Yield: 4-6 servings

    Difficulty: Weekend project (worth it)

    Storage Notes

    Leftovers (Mythical, But Possible):

    Store leftover pork belly in an airtight container in the fridge for up to 4 days. The crackling will soften, but don’t despair—there’s a fix.

    Reheating (Bring Back the Crunch):

    1. Air fryer method (best): 375°F for 3-5 minutes. The crackling comes back to life.
    2. Oven method: 400°F for 5-8 minutes on a wire rack. Watch closely.
    3. Pan method: Crisp skin-side down in a dry skillet over medium heat.
    4. Never microwave. You’ll turn your masterpiece into sad, chewy tragedy.

    Pro Tip:

    Leftover pork belly makes incredible fried rice, ramen toppings, or breakfast sandwiches. The fat is flavor gold.

  • The Perfect Lobster Roll: Summer in Every Bite

    The Perfect Lobster Roll: Summer in Every Bite

    The lobster roll is a thing of beauty. Not a complicated thing—just perfect, simple ingredients doing exactly what they’re supposed to do. Sweet, fresh lobster. A little bit of binder. A butter-griddled bun that shatters slightly when you bite into it. That’s it. That’s the dream.

    There’s a debate, of course. Maine style: chilled lobster salad with a light mayo dressing, crisp celery, and a squeeze of lemon. Connecticut style: warm lobster drenched in drawn butter, no apologies. This recipe gives you both. Because why choose? Summer is short. Eat both.

    Ingredients

    Serves 2 very happy people.

    For the Lobster:

    • 2 lobster tails (about 5-6 oz each) or 1 lb cooked lobster meat
    • 2 tbsp butter (for poaching, if cooking your own)

    For the Buns:

    • 2 New England-style split-top hot dog buns (or regular brioche buns)
    • 2 tbsp salted butter, softened (for griddling)

    For Maine Style (Cold):

    • 2 tbsp mayonnaise (preferably Hellmann’s or Duke’s)
    • 1 tsp fresh lemon juice
    • 1 tbsp celery, finely minced (optional, for crunch)
    • 1 tbsp fresh chives or parsley, chopped
    • Salt and pepper, to taste

    For Connecticut Style (Warm):

    • 3 tbsp unsalted butter, melted
    • Squeeze of fresh lemon juice
    • Pinch of salt

    For Serving:

    • Lemon wedges
    • Fresh chives or parsley, for garnish
    • Potato chips or fries, obviously

    Step-by-Step Instructions

    Step 1: Cook the Lobster (If Starting from Scratch)

    1. Bring a large pot of salted water to a boil. Drop in lobster tails and boil for 45-60 seconds per ounce (about 5 minutes for a 6 oz tail).
    2. Transfer to an ice bath to stop cooking. Once cool, remove meat from shells. Or for extra flavor: melt 2 tbsp butter in a skillet and gently poach the lobster meat for 3-4 minutes until just opaque.
    3. Chop or tear lobster into bite-sized chunks. Leave some bigger pieces for texture.

    Step 2: Choose Your Adventure

    1. For Maine (Cold) Style: In a bowl, gently combine lobster meat with mayo, lemon juice, celery (if using), and chives. Season with salt and pepper. Cover and refrigerate while you prep the buns.
    2. For Connecticut (Warm) Style: In a small pan, warm the melted butter with a squeeze of lemon and a pinch of salt. Add lobster meat and gently toss to coat. Keep warm over lowest heat while you prep the buns.

    Step 3: The Bun Is Not a Passenger

    1. Heat a skillet or griddle over medium heat. Butter the outside of each bun generously (all sides, including the bottom).
    2. Toast the buns, turning occasionally, until golden brown and crisp on all sides. The split-top style gives you maximum buttery surface area.

    Step 4: Assemble with Intention

    1. For Maine style: Pile the chilled lobster salad generously into the warm, toasted buns. Let it spill out the top—that’s the look.
    2. For Connecticut style: Use a slotted spoon to transfer warm buttered lobster into the buns. Spoon a little extra butter from the pan over the top.

    Step 5: Garnish and Serve

    1. Sprinkle with fresh chives or parsley. Add a lemon wedge on the side for squeezing.
    2. Serve immediately with a pile of crispy potato chips or fries. Maybe a pickle spear. Definitely a cold beer or a crisp white wine.
    3. Take a bite. Let the butter drip down your chin. Close your eyes. You’re at a shack on the coast of Maine. (Or Connecticut. No judgment.)

    Summary

    Prep Time: 15 minutes | Cook Time: 10 minutes | Total Time: 25 minutes

    Yield: 2 generous rolls

    Difficulty: Easy enough for a summer treat

    Storage Notes

    Leftovers (If You’re Lucky):

    Store lobster meat separately from buns. Maine-style lobster salad keeps in the fridge for up to 2 days. Connecticut-style warm buttered lobster is best eaten immediately, but you can refrigerate and gently reheat.

    Reheating:

    For warm lobster rolls, gently reheat lobster in a small pan with a splash of butter over low heat. Never microwave—it turns lobster into rubber. Toast fresh buns—don’t use leftover toasted buns.

    Pro Tip:

    Cook extra lobster. Cold lobster salad makes incredible lobster rolls the next day, or just eat it straight from the bowl with a fork like the royalty you are.

  • Garlic Parmesan Chicken Tenders: The Ones You’ll Fight Over

    Garlic Parmesan Chicken Tenders: The Ones You’ll Fight Over

    We’ve taken the classic and given it a serious upgrade. Think juicy, tender strips of chicken, encased in a crust that’s gloriously crispy and golden, thanks to a perfect blend of panko breadcrumbs, nutty parmesan, and a punch of savory garlic.

    The best part? They’re baked, not fried, so you get all the crunch with way less mess. Serve them up with a side of ranch, marinara, or honey mustard, and watch them disappear. This is the chicken tender recipe you’ll come back to again and again.

    Ingredients

    Serves 4.

    For the Chicken Tenders:

    • 1 ½ lbs (680g) chicken tenderloins (or chicken breasts sliced into strips)
    • ½ cup (65g) all-purpose flour
    • 2 large eggs
    • 1 ½ cups (135g) panko breadcrumbs (regular or gluten-free)
    • 1 cup (100g) freshly grated Parmesan cheese
    • 2 teaspoons garlic powder
    • 1 teaspoon onion powder
    • 1 teaspoon dried parsley
    • ½ teaspoon salt
    • ¼ teaspoon black pepper
    • ¼ cup (60g) unsalted butter, melted
    • Fresh parsley, chopped, for garnish

    For Serving (Optional):

    • Ranch dressing, marinara sauce, honey mustard, or your favorite dipping sauce

    Step-by-Step Instructions

    Step 1: Prep the Chicken

    1. Preheat your oven to 400°F (200°C). Place a wire rack on a baking sheet and spray it lightly with non-stick cooking spray. This allows air to circulate under the tenders, making them extra crispy.
    2. Pat the chicken tenders completely dry with paper towels. This helps the breading stick. Season them lightly on both sides with a pinch of salt and pepper.

    Step 2: Set Up Your Breading Station

    1. Grab three shallow bowls. This is your assembly line.
    2. Bowl 1: Place the all-purpose flour.
    3. Bowl 2: Crack the eggs and beat them with a fork until the yolks and whites are fully combined and slightly frothy.
    4. Bowl 3: In the third bowl, combine the panko breadcrumbs, freshly grated Parmesan cheese, garlic powder, onion powder, dried parsley, salt, and pepper. Mix everything together with a fork until it’s evenly distributed.

    Step 3: Bread the Chicken

    1. Working with one tender at a time, dredge it in the flour, shaking off any excess. This thin layer of flour helps the egg wash stick.
    2. Next, dip the floured tender into the beaten eggs, turning to coat all sides. Let any excess drip off.
    3. Finally, press the tender into the parmesan-panko mixture, turning and pressing firmly so the crumbs adhere in a thick, even layer. Place the breaded tender on the prepared wire rack.
    4. Repeat with all the chicken tenders, placing them in a single layer on the rack without touching.

    Step 4: The Secret to Extra Crispiness

    1. Once all the tenders are breaded and on the rack, use a spoon or a small brush to drizzle the melted butter evenly over the top of each one. This is the secret to getting that golden, fried-like finish from the oven.

    Step 5: Bake to Perfection

    1. Bake for 15-18 minutes, flipping the tenders halfway through, until they are golden brown, crispy, and cooked through. An instant-read thermometer inserted into the thickest part of a tender should read 165°F (74°C).
    2. For an even crispier exterior, you can switch the oven to broil for the last 1-2 minutes. Watch them carefully so they don’t burn!

    Step 6: Garnish and Serve

    1. Remove the tenders from the oven and let them rest for a couple of minutes.
    2. Transfer them to a serving platter. Sprinkle generously with freshly chopped parsley and an extra dusting of grated Parmesan cheese.
    3. Serve hot with your favorite dipping sauces on the side.

    Summary

    Prep Time: 20 minutes | Cook Time: 15-18 minutes | Total Time: 35-40 minutes

    Yield: 4 servings

    Difficulty: Easy

    Storage and Make-Ahead Tips

    How to Store:

    Store any leftover chicken tenders in an airtight container in the refrigerator for up to 4 days. They are delicious cold, but even better reheated.

    Reheating:

    To bring back that signature crunch, reheat in an air fryer at 350°F for 3-5 minutes, or in a 375°F oven on a wire rack for about 10 minutes. The microwave will work but will make the coating soft.

    Make-Ahead for Meal Prep:

    You can bread the chicken tenders up to 24 hours in advance. Place them on the wire rack on the baking sheet, cover loosely with plastic wrap, and store in the refrigerator. When ready to eat, simply drizzle with the melted butter and bake as directed, adding a couple of minutes to the cooking time.

    Freezing Instructions:

    Freeze the breaded, uncooked chicken tenders in a single layer on a parchment-lined baking sheet until solid. Transfer the frozen tenders to a freezer-safe bag or container. They can be frozen for up to 3 months. Bake from frozen at 400°F for 20-25 minutes, or until cooked through and crispy. No need to thaw!

  • Chocolate Éclairs That Would Make a French Baker Weep, With Joy

    Chocolate Éclairs That Would Make a French Baker Weep, With Joy

    Let’s be honest: biting into a perfect chocolate éclair is a near-religious experience. First, your teeth crack through that impossibly crisp, golden shell. Then you sink into a cloud of cool, velvety vanilla pastry cream.

    Finally, the whole thing is crowned by a thick, bittersweet chocolate glaze that shatters ever so slightly. It’s a symphony of textures, and it’s pure magic.

    Ingredients

    Makes about 12-14 éclairs.

    For the Pâte à Choux (Cream Puff Dough):

    • 1 cup (240ml) water
    • ½ cup (115g) unsalted butter, cut into cubes
    • 1 tablespoon granulated sugar
    • ¼ teaspoon salt
    • 1 cup (125g) all-purpose flour
    • 4 large eggs, at room temperature
    • 1 egg beaten with 1 teaspoon water (for egg wash)

    For the Vanilla Pastry Cream:

    • 2 cups (480ml) whole milk
    • 1 vanilla bean, split and scraped (or 2 teaspoons vanilla extract)
    • 5 large egg yolks
    • ½ cup (100g) granulated sugar
    • ¼ cup (30g) cornstarch
    • 2 tablespoons (30g) unsalted butter, cubed
    • Pinch of salt

    For the Chocolate Glaze:

    • 4 oz (115g) semi-sweet or bittersweet chocolate, finely chopped
    • ½ cup (120ml) heavy cream
    • 2 tablespoons unsalted butter, softened
    • 1 tablespoon light corn syrup (optional, for extra shine)

    Step-by-Step Instructions

    Part 1: Make the Pastry Cream (Can be done a day ahead)

    Step 1: Heat the Milk

    1. In a medium saucepan, combine the milk and the scraped vanilla bean seeds (and the pod, if using). Heat over medium heat until it just begins to simmer. Remove from heat, cover, and let it steep for 15-20 minutes to infuse the vanilla flavor. Remove the pod.

    Step 2: Whisk Egg Yolks and Sugar

    1. In a separate large bowl, whisk the egg yolks and sugar together until the mixture is pale and thick. This takes about 2 minutes of vigorous whisking.
    2. Whisk in the cornstarch and a pinch of salt until smooth and no lumps remain.

    Step 3: Temper the Egg Mixture

    1. Slowly pour about ¼ of the hot milk into the egg yolk mixture while whisking constantly. This tempers the eggs and prevents them from scrambling.
    2. Pour the tempered egg mixture back into the saucepan with the remaining milk, whisking continuously.

    Step 4: Thicken the Cream

    1. Return the saucepan to medium heat and cook, whisking constantly and vigorously, until the mixture thickens and comes to a boil. It will become very thick and start to bubble. Cook for one more minute to cook out the cornstarch taste.
    2. Remove from heat and whisk in the cubed butter until completely melted and smooth.

    Step 5: Chill the Pastry Cream

    1. Pour the pastry cream through a fine-mesh sieve into a shallow bowl to remove any potential lumps.
    2. Press a piece of plastic wrap directly onto the surface of the cream to prevent a skin from forming. Refrigerate for at least 2 hours, or until completely cold.

    Part 2: Make the Pâte à Choux (Éclair Shells)

    Step 6: Cook the Dough on the Stove

    1. Preheat your oven to 425°F (220°C). Line two baking sheets with parchment paper.
    2. In a medium saucepan, combine the water, butter, sugar, and salt. Bring to a boil over medium heat, stirring occasionally, until the butter is completely melted.
    3. Once boiling, remove the pan from the heat and add all the flour at once. Stir vigorously with a wooden spoon until the flour is fully incorporated.
    4. Return the pan to medium heat and cook, stirring constantly, for 2-3 minutes. You’ll see a thin film form on the bottom of the pan, and the dough will pull away from the sides and form a smooth ball.

    Step 7: Add the Eggs

    1. Transfer the dough to the bowl of a stand mixer fitted with the paddle attachment. Mix on low speed for a minute to let it cool down slightly.
    2. With the mixer on medium speed, add the eggs one at a time, beating well after each addition until the dough is smooth and glossy. After the last egg, beat for another minute. The dough should be thick, shiny, and fall from the paddle in a thick ribbon.

    Step 8: Pipe the Éclairs

    1. Transfer the dough to a large piping bag fitted with a large (½-inch) plain or star tip.
    2. Pipe 4-inch long strips of dough onto the prepared baking sheets, leaving about 2 inches between each to allow for puffing.
    3. Lightly beat the remaining egg with a teaspoon of water to make an egg wash. Gently brush the tops of the piped dough strips with the egg wash, smoothing down any peaks.
    4. Use the tines of a fork to gently score a light line down the length of each éclair. This helps them rise evenly.

    Step 9: Bake the Shells

    1. Bake at 425°F for 10 minutes, then reduce the oven temperature to 350°F (175°C) and bake for another 20-25 minutes, until the éclairs are puffed, deep golden brown, and feel light and hollow when lifted.
    2. Turn off the oven, prop the door open slightly with a wooden spoon, and let the shells cool completely in the oven. This helps them dry out and stay crisp.

    Part 3: Assemble the Éclairs

    Step 10: Fill the Éclairs

    1. Once the shells are completely cool, prepare the pastry cream for piping by whisking it briefly to loosen it up.
    2. Fit a piping bag with a long, thin filling tip (like a Bismarck tip). Fill the bag with pastry cream.
    3. Using the tip, poke three small holes in the bottom of each éclair (one near each end and one in the middle). Gently pipe the cream into each hole until the éclair feels heavy and full.

    Step 11: Make the Chocolate Glaze

    1. Place the finely chopped chocolate in a medium heat-proof bowl.
    2. In a small saucepan, heat the heavy cream over medium heat until it just begins to simmer (small bubbles around the edges).
    3. Pour the hot cream over the chocolate and let it sit for 2-3 minutes.
    4. Gently whisk until the chocolate is completely melted and the mixture is smooth and glossy. Whisk in the softened butter and corn syrup (if using) until combined and shiny.

    Step 12: Glaze and Serve

    1. Let the glaze cool for a few minutes until it thickens slightly but is still pourable.
    2. Hold each filled éclair by its ends and dip the top into the glaze, gently twisting as you lift it to let the excess drip off.
    3. Place the glazed éclairs on a wire rack set over a baking sheet to catch any drips.
    4. Allow the glaze to set for about 30 minutes before serving. These are best enjoyed the day they are made.

    Summary

    Prep Time: 1 hour (plus chilling) | Bake Time: 35 minutes | Assembly Time: 30 minutes | Total Time: About 3 hours (mostly hands-off chilling)

    Yield: 12-14 éclairs

    Difficulty: Advanced (but so worth it!)

    Storage and Make-Ahead Tips

    How to Store:

    Éclairs are truly at their peak the day they are made and assembled. The shells are crispiest and the texture is perfect. However, you can store filled and glazed éclairs in the refrigerator for up to 24 hours. Be aware that the shells will soften over time.

    Make-Ahead Components:

    Pastry Cream: Can be made up to 3 days in advance and stored in the refrigerator with plastic wrap pressed onto the surface.

    Éclair Shells: This is the best make-ahead option. Bake the shells completely, let them cool, and then store them in an airtight container at room temperature for up to 2 days. You can also freeze them in a freezer bag for up to a month. To re-crisp, place them in a 300°F oven for 5-7 minutes before cooling and filling.

    Can You Freeze Assembled Éclairs?

    It is not recommended. The cream filling will become icy and the shells will be very soft upon thawing. It’s much better to freeze the components separately.