Blog

  • Chicken Cordon Bleu: Crispy, Cheesy and Impressively Easy

    Chicken Cordon Bleu: Crispy, Cheesy and Impressively Easy

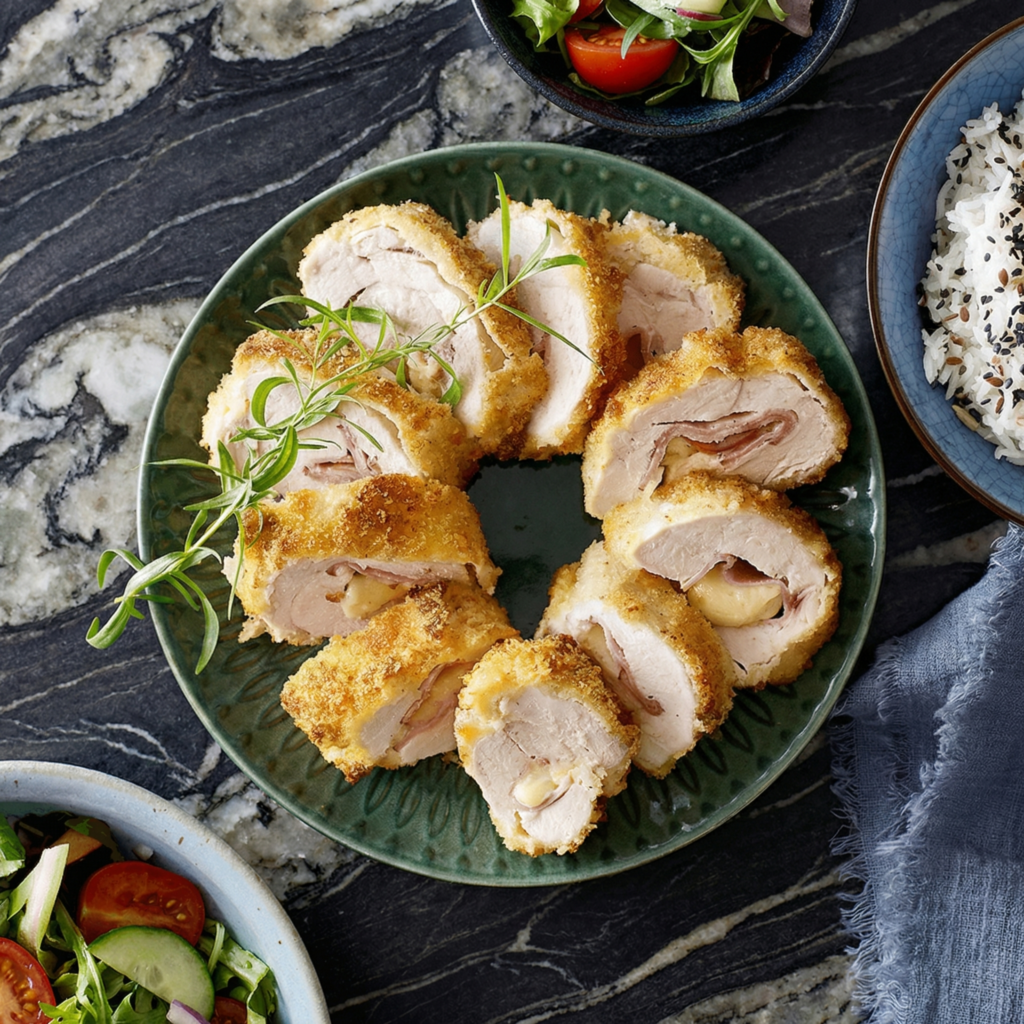
    Chicken Cordon Bleu sounds fancy. It sounds like something you’d order at a white-tablecloth restaurant, something that requires culinary school training. But here’s the secret: it’s just chicken, ham, and cheese, pounded thin, rolled tight, coated in crispy panko, and baked until golden. And it’s surprisingly simple.

    This version skips the frying. No messy oil, no splattering. Just a quick sear in a skillet to lock in flavor and get that crust started, then finished in the oven until the cheese melts into a glorious, stretchy river. Serve it with a simple pan sauce or a squeeze of lemon. It’s elegant enough for company, easy enough for a Sunday dinner.

    Ingredients

    Serves 4.

    For the Chicken:

    • 4 boneless, skinless chicken breasts (about 6 oz each)
    • 8 slices Swiss cheese (or Gruyère)
    • 8 slices deli ham (thinly sliced)
    • ½ cup all-purpose flour
    • 2 large eggs, beaten
    • 1½ cups panko breadcrumbs
    • ½ cup grated Parmesan cheese (optional, for extra flavor)
    • Salt and black pepper, to taste
    • 2 tbsp olive oil or butter (for searing)

    For the Pan Sauce (Optional):

    • ½ cup chicken broth
    • 2 tbsp butter
    • 1 tbsp Dijon mustard
    • 1 tbsp lemon juice
    • Fresh parsley, chopped

    For Garnish:

    • Fresh parsley or thyme
    • Lemon wedges

    Step-by-Step Instructions

    Step 1: Prep the Chicken

    1. Place a chicken breast between two sheets of plastic wrap or parchment paper.
    2. Using a meat mallet or rolling pin, pound to an even ¼-inch thickness. Be gentle—you want it thin, not shredded.
    3. Season both sides with salt and pepper. Repeat with remaining chicken breasts.

    Step 2: Layer and Roll

    1. Lay a pounded chicken breast flat on a clean surface.
    2. Place 2 slices of ham over the chicken, overlapping slightly.
    3. Place 2 slices of Swiss cheese over the ham.
    4. Starting from one short end, carefully roll the chicken tightly into a log. Tuck in any overhanging ham or cheese as you roll.
    5. Secure with toothpicks if needed. Repeat with remaining chicken.

    Step 3: Set Up Dredging Station

    1. Place flour in a shallow dish. Season with salt and pepper.
    2. Place beaten eggs in a second shallow dish.
    3. In a third dish, combine panko breadcrumbs and Parmesan cheese (if using).

    Step 4: Coat the Chicken

    1. Dredge each chicken roll in flour, shaking off excess.
    2. Dip into beaten eggs, letting excess drip off.
    3. Coat in panko mixture, pressing gently to adhere. The coating should be thick and even.
    4. Place coated rolls on a baking sheet or plate. Refrigerate for 15-30 minutes to set the coating (optional but helpful).

    Step 5: Sear the Rolls

    1. Preheat oven to 400°F (200°C).
    2. Heat olive oil or butter in a large oven-safe skillet over medium-high heat.
    3. Carefully place chicken rolls in the skillet, seam-side down. Sear for 2-3 minutes until golden brown on all sides, turning gently with tongs.

    Step 6: Bake to Perfection

    1. Transfer skillet to the preheated oven (or transfer rolls to a baking sheet if skillet isn’t oven-safe).
    2. Bake for 15-20 minutes until chicken is cooked through (internal temp 165°F) and the crust is deep golden brown.

    Step 7: Make the Pan Sauce (Optional)

    1. Remove chicken from skillet. Pour off excess fat, leaving any browned bits.
    2. Add chicken broth, butter, Dijon mustard, and lemon juice to the skillet over medium heat.
    3. Whisk, scraping up browned bits, until sauce thickens slightly, about 2-3 minutes.
    4. Stir in fresh parsley.

    Step 8: Serve Immediately

    1. Remove toothpicks from chicken rolls.
    2. Slice each roll into medallions (about 1-inch thick) for an elegant presentation, or serve whole.
    3. Drizzle with pan sauce and garnish with fresh parsley and lemon wedges.
    4. Take a bite. Crispy exterior, tender chicken, melty cheese, savory ham. Classic perfection.

    Summary

    Prep Time: 25 minutes | Cook Time: 25 minutes | Total Time: 50 minutes

    Yield: 4 servings

    Difficulty: Impressive, but approachable

    Storage Notes

    Leftovers:

    Store in an airtight container in the fridge for up to 3 days. The crust will soften but the flavor remains delicious.

    Reheating:

    Oven (best): 350°F for 10-12 minutes until heated through and crust re-crisps. Air fryer: 375°F for 5-7 minutes. Microwave: Not recommended—makes the coating soggy.

    Freezer-Friendly:

    Freeze uncooked, breaded chicken rolls on a baking sheet until solid, then transfer to a zip-top bag for up to 3 months. Bake from frozen, adding 10-15 minutes to cook time. No need to thaw.

    Make Ahead:

    Bread chicken rolls up to 24 hours in advance and refrigerate. Sear and bake just before serving for maximum crispiness.

    What to Serve With Chicken Cordon Bleu:

    • Roasted asparagus or green beans
    • Mashed potatoes or garlic herb potatoes
    • Rice pilaf
    • Roasted baby carrots
    • Simple green salad with lemon vinaigrette
    • Buttered egg noodles
    • Steamed broccoli with hollandaise
  • Truffle Mushroom Crostini: Earthy, Elegant and Irresistible

    Truffle Mushroom Crostini: Earthy, Elegant and Irresistible

    Truffle mushroom crostini are the appetizer that makes people stop mid-conversation. Crispy, golden baguette slices piled high with creamy, garlicky mushrooms, finished with a delicate drizzle of truffle oil that perfumes the entire room. They’re earthy. They’re elegant. They’re utterly addictive.

    This recipe takes humble mushrooms and transforms them into something extraordinary. A mix of cremini and shiitake, sautéed until golden, then finished with cream, fresh thyme, and a kiss of truffle oil. Spoon onto crisp crostini, garnish with Parmesan, and watch them disappear. Twenty minutes from start to serving.

    Ingredients

    Makes 12-16 crostini.

    For the Crostini:

    • 1 French baguette, sliced into ½-inch rounds
    • 2 tbsp olive oil (for brushing)
    • 1 clove garlic, peeled (for rubbing)

    For the Truffle Mushrooms:

    • 1 lb mixed mushrooms (cremini, shiitake, oyster, or wild mushrooms)
    • 2 tbsp butter
    • 1 tbsp olive oil
    • 2 cloves garlic, minced
    • 1 shallot, finely chopped
    • ¼ cup heavy cream
    • 2 tbsp fresh thyme leaves (plus extra for garnish)
    • 1-2 tsp truffle oil (to taste)
    • Salt and black pepper, to taste

    For Garnish:

    • Freshly grated Parmesan cheese
    • Fresh thyme sprigs
    • Flaky sea salt
    • Optional: microgreens or fresh parsley

    Step-by-Step Instructions

    Step 1: Toast the Baguette

    1. Preheat oven to 400°F (200°C). Arrange baguette slices on a baking sheet.
    2. Brush both sides lightly with olive oil. Bake for 5-7 minutes, flip, and bake another 3-5 minutes until golden and crisp.
    3. While still warm, rub each toast lightly with the peeled garlic clove for subtle garlic flavor. Set aside.

    Step 2: Prep the Mushrooms

    1. Wipe mushrooms clean with a damp paper towel. Do not rinse—mushrooms absorb water.
    2. Slice mushrooms thinly (about ¼-inch thick). If using shiitake, remove stems before slicing.

    Step 3: Sauté the Mushrooms

    1. In a large skillet over medium-high heat, melt butter with olive oil.
    2. Add shallot and cook for 2 minutes until softened. Add garlic and cook 30 seconds until fragrant.
    3. Add mushrooms in a single layer (work in batches if needed). Cook undisturbed for 3-4 minutes until golden brown on one side.
    4. Stir and continue cooking for 3-4 minutes until mushrooms are tender and deeply golden.

    Step 4: Finish the Mushrooms

    1. Reduce heat to low. Add heavy cream and fresh thyme. Stir to coat mushrooms.
    2. Cook for 1-2 minutes until cream thickens slightly and coats the mushrooms.
    3. Remove from heat. Drizzle with truffle oil and stir gently. Season with salt and pepper to taste.

    Step 5: Assemble the Crostini

    1. Spoon a generous amount of truffle mushrooms onto each toasted baguette slice.
    2. Top with freshly grated Parmesan cheese, a sprinkle of fresh thyme, and a pinch of flaky sea salt.
    3. Add an extra tiny drizzle of truffle oil if desired.

    Step 6: Serve Immediately

    1. Arrange on a platter and serve warm.
    2. Take a bite. Crispy bread, creamy mushrooms, earthy truffle. Pure elegance on a plate.

    Summary

    Prep Time: 10 minutes | Cook Time: 15 minutes | Total Time: 25 minutes

    Yield: 12-16 crostini

    Difficulty: Elegantly easy

    Storage Notes

    Leftovers:

    Store mushrooms separately from crostini in an airtight container in the fridge for up to 3 days. Toast fresh bread when ready to serve—assembled crostini will soften.

    Reheating:

    Mushrooms: Reheat gently in a skillet over medium-low heat with a splash of cream or water to loosen. Crostini: Best made fresh—reheating makes them stale.

    Make Ahead:

    Cook mushrooms up to 2 days in advance and refrigerate. Toast bread just before serving. Reheat mushrooms, assemble, and serve.

    What to Serve With Truffle Mushroom Crostini:

    • Champagne or sparkling wine (truffle and bubbles are a classic pairing)
    • Light-bodied red wine like Pinot Noir
    • Crisp white wine like Sauvignon Blanc
    • A simple arugula salad with lemon vinaigrette
    • As part of a grazing board with cheeses, olives, and cured meats

    Wine Pairing:

    Truffle mushrooms pair beautifully with earthy, medium-bodied reds like Pinot Noir or Nebbiolo. For white wine lovers, a rich Chardonnay or Champagne complements the creamy, earthy flavors. If you’re feeling adventurous, try a dry sherry or amontillado—the nutty notes are a perfect match.

  • Stuffed Mushrooms: Bite-Sized Party Perfection

    Stuffed Mushrooms: Bite-Sized Party Perfection

    Stuffed mushrooms are the appetizer MVP. They’re the first thing to vanish from the platter, the bite everyone reaches for twice, and the recipe that makes you look like a pro host. Creamy, cheesy, garlicky filling tucked into tender mushroom caps, baked until golden and irresistible.

    The best part? They come together in under 30 minutes with simple ingredients you probably already have. Make them for game day, holiday parties, or just because you want a little something special. One batch is never enough—trust me.

    Ingredients

    Makes about 20-24 mushrooms.

    For the Mushrooms:

    • 20-24 cremini or white button mushrooms (about 1½ lbs)
    • 2 tbsp olive oil, divided
    • Salt and black pepper, to taste

    For the Filling:

    • 4 oz cream cheese, softened
    • ¼ cup grated Parmesan cheese
    • ¼ cup panko breadcrumbs
    • 2 cloves garlic, minced
    • 2 tbsp fresh parsley, finely chopped (plus extra for garnish)
    • 1 tbsp fresh chives or green onions, finely chopped
    • ¼ tsp salt
    • ⅛ tsp black pepper
    • Optional: ¼ cup finely chopped mushroom stems (from the caps)

    Optional Additions:

    • ¼ cup cooked Italian sausage or bacon, crumbled
    • ¼ cup shredded mozzarella or cheddar
    • Red pepper flakes for heat
    • Fresh thyme or oregano

    Step-by-Step Instructions

    Step 1: Prep the Mushrooms

    1. Preheat oven to 375°F (190°C). Line a baking sheet with parchment paper or lightly grease.
    2. Gently wipe mushrooms clean with a damp paper towel. Do not rinse—mushrooms absorb water.
    3. Carefully twist and pull out the stems. Reserve stems for the filling if desired. Arrange caps on the baking sheet, stem-side up.
    4. Drizzle or brush caps with 1 tbsp olive oil. Season with a pinch of salt and pepper.

    Step 2: Make the Filling

    1. If using mushroom stems, finely chop them.
    2. In a medium bowl, combine softened cream cheese, Parmesan, panko, garlic, parsley, chives, salt, pepper, and chopped mushroom stems (if using).
    3. Mix until well combined. If the mixture is too thick, add a splash of milk or olive oil.
    4. Taste and adjust seasoning.

    Step 3: Fill the Mushrooms

    1. Spoon filling into each mushroom cap, mounding it slightly.
    2. Drizzle remaining 1 tbsp olive oil over the filled mushrooms (or spray lightly with cooking spray for browning).

    Step 4: Bake to Golden Perfection

    1. Bake for 18-22 minutes until mushrooms are tender and the filling is golden brown and bubbly.
    2. If desired, broil for the final 1-2 minutes for extra color on top—watch closely to prevent burning.

    Step 5: Serve Immediately

    1. Transfer stuffed mushrooms to a serving platter.
    2. Garnish with fresh parsley or chives.
    3. Serve warm. Take a bite—tender mushroom, creamy filling, savory garlic. Pure party perfection.

    Summary

    Prep Time: 15 minutes | Cook Time: 20 minutes | Total Time: 35 minutes

    Yield: 20-24 mushrooms (serves 6-8 as appetizer)

    Difficulty: Easy party favorite

    Storage Notes

    Leftovers:

    Store in an airtight container in the fridge for up to 3 days. Mushrooms will release liquid as they sit, so they’re best enjoyed fresh.

    Reheating:

    Oven or air fryer (best): 350°F for 5-7 minutes until warmed through and filling re-crisps. Microwave: 30-45 seconds—faster but softer texture.

    Make Ahead:

    Assemble mushrooms up to 24 hours in advance. Place filled caps on a baking sheet, cover with plastic wrap, and refrigerate. Add 3-5 minutes to bake time when cooking from cold.

    Freezer-Friendly:

    Freeze unbaked, filled mushrooms on a baking sheet until solid, then transfer to a zip-top bag for up to 3 months. Bake from frozen, adding 5-8 minutes to cook time.

    What to Serve With Stuffed Mushrooms:

    • As a standalone appetizer
    • Alongside a cheese board or charcuterie
    • As a side dish for steak or chicken
    • On a grazing table with olives, nuts, and dips
    • With a crisp white wine or cocktail

    Make It a Main Dish:

    Use large portobello caps instead of cremini mushrooms. Increase bake time by 5-10 minutes. Serve with a side salad or roasted vegetables for a satisfying vegetarian main course.

  • Smoked Salmon Crostini, Elegant Appetizer in 15 Minutes

    Smoked Salmon Crostini, Elegant Appetizer in 15 Minutes

    Smoked salmon crostini are the appetizer that looks like you spent hours in the kitchen but actually comes together in about 15 minutes. Crispy, golden baguette slices. Creamy, herb-flecked cream cheese. Silky ribbons of smoked salmon. A pop of briny caper and a sprig of fresh dill. It’s a bite-sized masterpiece.

    This is the recipe you pull out for holiday parties, dinner parties, or when you want to feel fancy on a Tuesday. Minimal ingredients, maximum impact. Arrange them on a platter, garnish with lemon zest, and watch them disappear before your guests even make it to the main course.

    Ingredients

    Makes 12-16 crostini.

    For the Crostini:

    • 1 French baguette, sliced into ½-inch rounds
    • 2 tbsp olive oil (for brushing)
    • 4 oz cream cheese, softened
    • 2 tbsp fresh dill, finely chopped (plus extra for garnish)
    • 1 tbsp fresh chives, finely chopped
    • 1 tsp lemon zest
    • 4 oz smoked salmon (or lox), thinly sliced
    • 2 tbsp capers, drained
    • Fresh dill sprigs, for garnish

    Optional Garnishes:

    • Thinly sliced red onion
    • Lemon wedges
    • Everything bagel seasoning
    • Cracked black pepper
    • Microgreens or arugula

    Step-by-Step Instructions

    Step 1: Toast the Baguette

    1. Preheat oven to 400°F (200°C) or preheat a grill pan.
    2. Arrange baguette slices on a baking sheet. Brush both sides lightly with olive oil.
    3. Bake for 5-7 minutes, flip, and bake another 3-5 minutes until golden and crisp. (Alternatively, toast in a skillet or on a grill pan.)
    4. Let cool slightly before topping.

    Step 2: Make the Herbed Cream Cheese

    1. In a small bowl, combine softened cream cheese, chopped dill, chives, and lemon zest. Mix until well combined.
    2. Taste and adjust seasoning with a pinch of salt and pepper if desired.

    Step 3: Assemble the Crostini

    1. Spread a generous layer of herbed cream cheese onto each toasted baguette slice.
    2. Drape a small piece of smoked salmon over the cream cheese, folding it into loose ribbons or rosettes for an elegant look.
    3. Top with a few capers and a small sprig of fresh dill.
    4. Add optional garnishes: thin red onion slices, cracked black pepper, or a sprinkle of everything bagel seasoning.

    Step 4: Serve Immediately

    1. Arrange crostini on a serving platter. Add lemon wedges for squeezing if desired.
    2. Serve immediately—crostini are best when the bread is still crisp.
    3. Take a bite. Crispy bread, creamy herb spread, silky salmon, briny capers. Pure elegance.

    Summary

    Prep Time: 10 minutes | Cook Time: 10 minutes | Total Time: 20 minutes

    Yield: 12-16 crostini

    Difficulty: Effortlessly elegant

    Storage Notes

    Leftovers:

    Crostini are best assembled fresh—toasted bread will soften if topped too far in advance. Store components separately in the fridge for up to 3 days and assemble just before serving.

    Make Ahead:

    • Toast the bread: Up to 1 day in advance. Store in an airtight container at room temperature.
    • Make the herbed cream cheese: Up to 3 days in advance. Keep refrigerated.
    • Assemble: Just before serving for maximum crunch.

    Wine Pairing:

    Smoked salmon crostini pair beautifully with Champagne, sparkling wine, or a crisp Sauvignon Blanc. The bubbles and acidity cut through the richness of the salmon and cream cheese, while complementing the briny capers. For a red option, try a light Pinot Noir.

  • Spicy Vodka Pasta: Creamy, Bold and Restaurant-Worthy

    Spicy Vodka Pasta: Creamy, Bold and Restaurant-Worthy

    Vodka pasta has a reputation. It’s the pasta that took over restaurant menus, then social media, then our collective consciousness. And for good reason. The sauce is pure alchemy—tomatoes, cream, a splash of vodka, and just enough heat to make it interesting. It’s silky, it’s bold, and it clings to ridged pasta like it was meant to be there.

    This version keeps things simple. A quick tomato base, a generous pour of cream, a hit of red pepper heat, and just enough vodka to wake everything up. Toss with rigatoni (because those ridges were made for holding sauce), finish with Parmesan, and try not to eat the whole pan.

    Ingredients

    Serves 4.

    For the Pasta:

    • 1 lb rigatoni (or penne, ziti, or any tube pasta)
    • 2 tbsp olive oil
    • 1 small shallot or onion, finely chopped
    • 3 cloves garlic, minced
    • ½ tsp red pepper flakes (more if you like heat)
    • ¼ cup tomato paste
    • ½ cup vodka
    • 1 cup heavy cream
    • 1 can (15 oz) crushed tomatoes or tomato passata
    • ½ cup freshly grated Parmesan cheese, plus more for serving
    • Salt and black pepper, to taste
    • Fresh basil or parsley, for garnish

    Optional Additions:

    • ¼ cup pancetta or bacon, diced (for richness)
    • Fresh mozzarella or burrata for topping

    Step-by-Step Instructions

    Step 1: Cook the Pasta

    1. Bring a large pot of salted water to a boil. Cook rigatoni according to package directions until al dente.
    2. Reserve 1 cup of pasta water before draining. Drain and set aside.

    Step 2: Start the Sauce

    1. In a large skillet or Dutch oven, heat olive oil over medium heat.
    2. If using pancetta or bacon, add now and cook until crispy, about 3-4 minutes. Remove with a slotted spoon and set aside.
    3. Add shallot and cook for 2-3 minutes until softened. Add garlic and red pepper flakes, cook for 1 minute until fragrant.

    Step 3: Build the Flavor

    1. Add tomato paste and cook for 2-3 minutes, stirring constantly, until it darkens to a brick red color. This deepens the flavor.
    2. Pour in the vodka and scrape up any browned bits from the bottom. Let it simmer for 2-3 minutes until reduced by half—the alcohol cooks off, leaving the flavor.
    3. Add crushed tomatoes and salt. Simmer for 5-7 minutes until slightly thickened.

    Step 4: Make It Creamy

    1. Reduce heat to low. Stir in heavy cream and simmer gently for 2-3 minutes until the sauce turns a beautiful orange-pink.
    2. Add the reserved pancetta if using.

    Step 5: Toss the Pasta

    1. Add the cooked rigatoni to the sauce. Toss to coat, adding reserved pasta water a little at a time until the sauce is silky and clings to every noodle.
    2. Stir in grated Parmesan until melted and incorporated.

    Step 6: Serve Immediately

    1. Divide pasta among warm bowls. Top with extra Parmesan and fresh basil or parsley.
    2. For extra indulgence, add a dollop of burrata or fresh mozzarella.
    3. Take a bite. Creamy, spicy, velvety, perfect. This is the pasta dreams are made of.

    Summary

    Prep Time: 10 minutes | Cook Time: 20 minutes | Total Time: 30 minutes

    Yield: 4 servings

    Difficulty: Easy enough for a weeknight, fancy enough for date night

    Storage Notes

    Leftovers:

    Store in an airtight container in the fridge for up to 4 days. The sauce thickens as it sits—add a splash of milk or pasta water when reheating.

    Reheating:

    Skillet (best): Reheat gently over medium-low heat with a splash of milk or water to loosen the sauce. Microwave: 60-90 seconds, stirring halfway through.

    Freezer-Friendly:

    The vodka sauce freezes beautifully on its own for up to 3 months. Cook fresh pasta when ready to serve. Thaw sauce overnight in the fridge and reheat gently.

    Make Ahead:

    Make the sauce up to 3 days in advance and refrigerate. Cook pasta fresh and toss before serving for best results.

  • Mussels Marinara Pasta: Restaurant-Style Seafood Feast

    Mussels Marinara Pasta: Restaurant-Style Seafood Feast

    Mussels are one of those ingredients that make you feel like a chef. A big pot of glossy, black shells, steaming open in a fragrant tomato broth, ready to be twirled with spaghetti and devoured with crusty bread. It looks impressive, tastes like the coast of Italy, and comes together faster than you think.

    This version keeps things classic: shallots and garlic sizzled in olive oil, crushed tomatoes simmered until rich, plump mussels cooked until they just pop open, and a generous handful of fresh parsley to brighten everything up. Toss with pasta, pour a glass of white wine, and pretend you’re dining on the Amalfi Coast.

    Ingredients

    Serves 4.

    For the Pasta and Mussels:

    • 1 lb spaghetti or linguine
    • 2 lbs fresh mussels, scrubbed and debearded
    • 3 tbsp olive oil, divided
    • 1 shallot, finely chopped
    • 4 cloves garlic, thinly sliced
    • ½ tsp red pepper flakes (optional, for heat)
    • 1 can (28 oz) crushed San Marzano tomatoes
    • ½ cup dry white wine
    • ¼ cup fresh parsley, roughly chopped
    • Salt and black pepper, to taste
    • Fresh basil, for garnish (optional)

    For Serving:

    • Crusty bread, for sopping up the sauce
    • Lemon wedges
    • Extra virgin olive oil, for drizzling

    Step-by-Step Instructions

    Step 1: Clean the Mussels

    1. Scrub mussels under cold running water with a stiff brush to remove any grit.
    2. Remove the beard (the fibrous tuft sticking out from the shell) by pulling it toward the hinge of the shell. If any mussels are open, tap them gently—if they don’t close, discard them.

    Step 2: Cook the Pasta

    1. Bring a large pot of salted water to a boil. Cook spaghetti according to package directions until al dente.
    2. Reserve ½ cup of pasta water before draining. Drain and set aside.

    Step 3: Build the Sauce

    1. In a large pot or Dutch oven, heat 2 tbsp olive oil over medium heat.
    2. Add shallot and cook for 2-3 minutes until softened. Add garlic and red pepper flakes, cook for 1 minute until fragrant—don’t let the garlic brown.
    3. Pour in the white wine and let it simmer for 2 minutes, scraping up any browned bits.
    4. Add crushed tomatoes, salt, and pepper. Simmer for 10-15 minutes until slightly thickened and flavorful.

    Step 4: Cook the Mussels

    1. Increase heat to medium-high. Add the cleaned mussels to the sauce. Cover and cook for 5-7 minutes, shaking the pot occasionally, until all the mussels have opened.
    2. Discard any mussels that remain closed after cooking.

    Step 5: Toss with Pasta

    1. Add the cooked spaghetti to the pot with the mussels and sauce. Toss gently to combine.
    2. Add a splash of reserved pasta water if needed to loosen the sauce.
    3. Stir in fresh parsley and remaining 1 tbsp olive oil.

    Step 6: Serve Immediately

    1. Divide pasta and mussels among warm bowls. Garnish with fresh basil.
    2. Serve with crusty bread for sopping up every drop of that marinara broth.
    3. Add a squeeze of lemon and a drizzle of extra virgin olive oil.
    4. Twirl. Slurp. Crack open a shell. Dip bread. Close your eyes. You’re in Italy.

    Summary

    Prep Time: 10 minutes | Cook Time: 25 minutes | Total Time: 35 minutes

    Yield: 4 servings

    Difficulty: Impressive, but easy

    Storage Notes

    Leftovers:

    Mussels are best enjoyed fresh. If you have leftovers, remove mussels from shells and store in an airtight container in the fridge for up to 1 day. The pasta will absorb sauce overnight.

    Reheating:

    Skillet (best): Reheat gently over medium-low heat with a splash of water or broth to loosen the sauce. Microwave: 60-90 seconds, but expect slightly chewier mussels.

    Make Ahead:

    You can make the marinara sauce up to 3 days in advance. Cook mussels and toss with pasta just before serving for best results. Mussels are at their peak within minutes of cooking—don’t delay.

  • Pierogis (Pillowy Dumplings Stuffed with Comfort)

    Pierogis (Pillowy Dumplings Stuffed with Comfort)

    Pierogis are little pockets of happiness. Soft, pillowy dough wrapped around a creamy potato and cheese filling, boiled until tender, then pan-fried until golden and crispy. Served with a mountain of caramelized onions and a dollop of sour cream. It’s the kind of meal that makes you want to pull up a chair and stay awhile.

    Making pierogis from scratch is a labor of love—the kind of kitchen project that brings people together. Roll, fill, pinch, boil, fry. It’s meditative. It’s satisfying. And the results? Absolutely worth every minute. Make a big batch. Freeze half. Thank yourself later.

    Ingredients

    Makes about 30-40 pierogis.

    For the Dough:

    • 3 cups all-purpose flour, plus more for rolling
    • 1 tsp salt
    • 1 large egg
    • ½ cup sour cream
    • ½ cup warm water
    • 2 tbsp melted butter

    For the Potato Cheese Filling:

    • 2 lbs russet potatoes (about 4 medium), peeled and cubed
    • 1 cup sharp cheddar cheese, shredded
    • ½ cup sour cream
    • ¼ cup milk (or more as needed)
    • 4 tbsp butter
    • Salt and black pepper, to taste
    • Optional: ¼ cup finely chopped chives or green onions

    For Serving:

    • 2 large onions, thinly sliced
    • 4 tbsp butter
    • Sour cream
    • Fresh chives or parsley, chopped
    • Bacon bits (optional, but amazing)

    Step-by-Step Instructions

    Step 1: Make the Filling

    1. Place potatoes in a large pot and cover with cold salted water. Bring to a boil and cook until fork-tender, about 15-20 minutes.
    2. Drain and return to pot. Mash potatoes until smooth.
    3. Add butter, sour cream, and milk. Stir until creamy.
    4. Mix in shredded cheddar, chives (if using), salt, and pepper. Set aside to cool completely. The filling needs to be cold for easier shaping.

    Step 2: Make the Dough

    1. In a large bowl, whisk together flour and salt.
    2. In a separate bowl, whisk together egg, sour cream, warm water, and melted butter.
    3. Pour wet ingredients into dry and mix until a shaggy dough forms.
    4. Turn onto a floured surface and knead for 5-8 minutes until smooth and elastic. The dough should be soft but not sticky.
    5. Wrap in plastic wrap and let rest for 30 minutes at room temperature.

    Step 3: Caramelize the Onions

    1. While dough rests, melt butter in a large skillet over medium-low heat.
    2. Add sliced onions and cook slowly, stirring occasionally, for 20-25 minutes until deeply golden and caramelized. Set aside.

    Step 4: Roll and Fill

    1. Divide dough into 2-3 portions. On a floured surface, roll one portion until about ⅛-inch thick.
    2. Use a 3-inch round cutter (or a glass) to cut circles. Reroll scraps as needed.
    3. Place 1-2 teaspoons of filling in the center of each circle.
    4. Fold dough over into a half-moon shape. Press edges firmly to seal. For a decorative edge, crimp with a fork.
    5. Place finished pierogis on a parchment-lined baking sheet. Keep covered with a towel to prevent drying.

    Step 5: Boil the Pierogis

    1. Bring a large pot of salted water to a boil.
    2. Working in batches, drop pierogis into the boiling water. They’re done when they float to the top, about 2-3 minutes.
    3. Remove with a slotted spoon. At this point, you can serve them with butter and onions, or pan-fry for extra crispiness.

    Step 6: Pan-Fry to Golden Perfection

    1. In a large skillet, melt 2-3 tablespoons of butter over medium-high heat.
    2. Add boiled pierogis in a single layer (work in batches). Fry for 2-3 minutes per side until golden brown and crispy.

    Step 7: Serve and Enjoy

    1. Arrange crispy pierogis on a platter. Top with caramelized onions.
    2. Add a generous dollop of sour cream and sprinkle with fresh chives.
    3. Add bacon bits if you’re feeling indulgent.
    4. Take a bite. Pillowy dough, creamy filling, crispy edges, sweet onions. This is Polish soul food.

    Summary

    Prep Time: 45 minutes | Cook Time: 30 minutes | Rest Time: 30 minutes | Total Time: 1 hour 45 minutes

    Yield: 30-40 pierogis

    Difficulty: Labor of love (worth it)

    Storage Notes

    Leftovers:

    Store cooked pierogis in an airtight container in the fridge for up to 4 days. They’re delicious reheated in a skillet with butter.

    Reheating:

    Skillet (best): Fry in butter over medium heat until crispy and warmed through. Air fryer: 375°F for 5-6 minutes. Microwave: Works but won’t be crispy.

    Freezer-Friendly (The Dream):

    Pierogis freeze beautifully! Arrange uncooked, unbaked pierogis on a baking sheet in a single layer (not touching). Freeze until solid, then transfer to a zip-top bag for up to 3 months. Cook from frozen—boil for 3-4 minutes, then pan-fry. No need to thaw.

    Make Ahead:

    Assemble pierogis up to 24 hours in advance and refrigerate on a parchment-lined baking sheet. Cover with plastic wrap. Boil and fry when ready to serve.

  • Sopapillas: Deep-Fried Bliss

    Sopapillas: Deep-Fried Bliss

    Sopapillas are magic in dough form. A simple mixture of flour, baking powder, and a little fat transforms into puffy, golden pillows when they hit hot oil. They puff up like little balloons, hollow inside, just waiting to be drizzled with honey, dusted with cinnamon sugar, or stuffed with savory fillings.

    In New Mexico, they’re the perfect end to any meal—served warm, dripping with honey, often with a sprinkle of cinnamon. They’re also a side dish, sometimes stuffed with beans and cheese. But mostly? They’re the reason you save room for dessert. Make them once, and they’ll become a regular request.

    Ingredients

    Serves 6 (makes about 12-16 sopapillas).

    For the Sopapillas:

    • 2 cups all-purpose flour
    • 1½ tsp baking powder
    • ½ tsp salt
    • 2 tbsp vegetable shortening or lard (or butter)
    • ¾ cup warm water (110°F)
    • Neutral oil, for frying (vegetable, canola, or peanut)

    For Serving:

    • Honey, for drizzling (lots of it)
    • Cinnamon sugar (¼ cup sugar + 1 tbsp cinnamon)
    • Powdered sugar (optional)

    For Savory Version (optional):

    • Shredded cheddar or cotija cheese
    • Refried beans
    • Shredded chicken or beef
    • Salsa and sour cream

    Step-by-Step Instructions

    Step 1: Make the Dough

    1. In a large bowl, whisk together flour, baking powder, and salt.
    2. Cut in the shortening using your fingers or a pastry cutter until the mixture resembles coarse crumbs.
    3. Slowly add warm water, stirring until a soft dough forms. Add more water if needed—dough should be soft but not sticky.

    Step 2: Knead and Rest

    1. Turn dough onto a lightly floured surface. Knead for 3-5 minutes until smooth and elastic.
    2. Cover with a clean kitchen towel and let rest for 20-30 minutes. This allows the gluten to relax, making the dough easier to roll and ensuring a light, airy texture.

    Step 3: Roll and Cut

    1. Roll dough out to about ⅛-inch thickness (slightly thinner than pie crust).
    2. Cut into triangles, squares, or rectangles—traditional sopapillas are diamond-shaped, but any shape works.
    3. Cover cut pieces with a towel to prevent drying while the oil heats.

    Step 4: Heat the Oil

    1. Pour oil into a heavy-bottomed pot or Dutch oven to a depth of about 2 inches.
    2. Heat oil to 375°F (190°C). Use a thermometer—temperature control is critical for that perfect puff.

    Step 5: Fry to Puffy Perfection

    1. Working in small batches, carefully drop a few pieces of dough into the hot oil. Don’t crowd the pot.
    2. Watch them puff up! Within seconds, the dough will start to swell and become golden. After 30-45 seconds, flip and fry the other side until golden brown.
    3. Remove with a slotted spoon and drain on paper towels.

    Step 6: Serve Immediately

    1. Arrange hot sopapillas on a platter. Drizzle generously with honey.
    2. Sprinkle with cinnamon sugar or powdered sugar if desired.
    3. For savory version, split open and stuff with beans, cheese, or shredded meat.
    4. Take a bite. Feel that crispy exterior give way to a soft, pillowy interior. The honey drips. This is pure comfort.

    Summary

    Prep Time: 15 minutes + resting | Cook Time: 10 minutes | Total Time: 45 minutes

    Yield: 12-16 sopapillas

    Difficulty: Easy, fun, impressive

    Storage Notes

    Leftovers:

    Sopapillas are best eaten fresh—they lose their crispiness within a few hours. Store leftovers in an airtight container at room temperature for up to 1 day.

    Reheating (Bring Back the Puff):

    Oven (best): 375°F for 3-5 minutes. Air fryer: 350°F for 2-3 minutes. Microwave: Not recommended—they’ll become chewy and sad.

    Make Ahead (Freezer-Friendly):

    Freeze uncooked, cut sopapillas in a single layer on a baking sheet, then transfer to a zip-top bag. Fry directly from frozen—add 15-30 seconds to cook time. This is the secret to having fresh sopapillas anytime.

  • Deep-Fried Oreos: State Fair Magic at Home

    Deep-Fried Oreos: State Fair Magic at Home

    Deep-fried Oreos are the quintessential state fair indulgence. The cookie that becomes something else entirely—warm, melty, with a crispy, golden exterior that gives way to a soft, chocolatey center. It’s the kind of treat that makes you wait in long lines and spend too many tickets.

    But here’s the secret: you can make them at home. No carnival required. A simple pancake-like batter, a pot of hot oil, and about 10 minutes. They come out just as crispy, just as melty, and infinitely more satisfying because you made them yourself.

    Ingredients

    Serves 4-6 (makes 12-16 Oreos).

    For the Fried Oreos:

    • 1 package Oreo cookies (regular, not Double Stuf—they can split)
    • 1 cup all-purpose flour
    • 1 tbsp sugar
    • 1 tsp baking powder
    • ¼ tsp salt
    • 1 cup milk
    • 1 large egg
    • 1 tsp vanilla extract
    • Neutral oil, for frying (vegetable, canola, or peanut)

    For Serving:

    • Powdered sugar, for dusting
    • Chocolate syrup (optional)
    • Whipped cream (optional)
    • Strawberries or raspberries (optional)

    Step-by-Step Instructions

    Step 1: Make the Batter

    1. In a medium bowl, whisk together flour, sugar, baking powder, and salt.
    2. In a separate bowl, whisk together milk, egg, and vanilla.
    3. Pour wet ingredients into dry and whisk until just combined. A few small lumps are okay—don’t overmix. The batter should be thick enough to coat a spoon.
    4. Let the batter rest for 5-10 minutes while the oil heats.

    Step 2: Heat the Oil

    1. Pour oil into a heavy-bottomed pot or Dutch oven to a depth of about 2 inches.
    2. Heat oil to 375°F (190°C). Use a thermometer—temperature control is key.

    Step 3: Dip and Coat

    1. Working one at a time, dip an Oreo into the batter, turning to coat completely. Let any excess drip off.
    2. Carefully lower the battered Oreo into the hot oil. Don’t crowd the pot—fry 3-4 at a time.

    Step 4: Fry to Golden Perfection

    1. Fry for 1-2 minutes per side, flipping once, until deep golden brown and puffed.
    2. Remove with a slotted spoon and drain briefly on a paper towel-lined plate.

    Step 5: Serve Immediately

    1. Arrange fried Oreos on a serving platter. Dust generously with powdered sugar.
    2. Drizzle with chocolate syrup and add a dollop of whipped cream if you’re going all out.
    3. Take a bite while they’re still warm. The outside is crispy. The inside is melty. The Oreo has transformed. This is fair food magic.

    Summary

    Prep Time: 10 minutes | Cook Time: 10 minutes | Total Time: 20 minutes

    Yield: 12-16 Oreos

    Difficulty: Carnival-easy

    Storage Notes

    Leftovers (If They Last):

    Deep-fried Oreos are best eaten immediately—they lose their crispiness within an hour. If you must store, keep in an airtight container at room temperature for up to 1 day. Reheat briefly in the oven or air fryer to restore some crunch.

    Reheating:

    Air fryer (best): 350°F for 2-3 minutes. Oven: 375°F for 3-4 minutes on a wire rack. Microwave: Not recommended—they’ll become soggy and sad.

    Make Ahead:

    The batter can be made up to 1 hour ahead and refrigerated. Stir before using. Fry just before serving for maximum crispiness.

    Pro Tips for Deep-Fried Oreo Greatness:

    • Regular Oreos work best. Double Stuf can split open during frying. The classic holds up better.
    • Don’t overmix the batter. A few lumps are fine. Overmixing develops gluten and makes the coating tough.
    • Let the batter rest. 5-10 minutes gives the baking powder time to activate and the gluten to relax.
    • Maintain oil temperature. 375°F is the sweet spot. Too cool = greasy Oreos. Too hot = burnt outside, raw inside.
    • Work in small batches. Overcrowding drops the oil temperature. Fry 3-4 at a time.
    • Drain briefly, then serve. A quick drain on paper towels removes excess oil. But serve immediately—they wait for no one.
    • Powdered sugar is essential. It adds sweetness and makes them look like they came from a fair booth.
  • Herb Crusted Rack of Lamb: Elegant and Impressive, Surprisingly Simple

    Herb Crusted Rack of Lamb: Elegant and Impressive, Surprisingly Simple

    A rack of lamb has a reputation. It’s what you order at fancy restaurants, the thing that says “special occasion.” But here’s the secret: it’s one of the easiest impressive meals you can make at home. A little garlic, a handful of fresh herbs, a hot oven, and about 30 minutes. That’s it.

    The herb crust is everything—fragrant rosemary, earthy thyme, punchy garlic, and nutty Parmesan, all coming together to form a golden, crispy coating on tender, perfectly pink lamb. Serve it with roasted potatoes and a green vegetable, and you’ve got a meal that looks like it came from a five-star kitchen.

    Ingredients

    Serves 2-4 (1 rack serves 2 generously).

    For the Lamb:

    • 1 rack of lamb (8-9 ribs), frenched (ask your butcher or do it yourself)
    • Salt and black pepper, to taste
    • 2 tbsp olive oil, divided
    • 1 tbsp Dijon mustard (helps the crust stick)

    For the Herb Crust:

    • ½ cup panko breadcrumbs
    • ¼ cup freshly grated Parmesan cheese
    • 2 tbsp fresh rosemary, finely chopped
    • 2 tbsp fresh thyme leaves, chopped
    • 3 cloves garlic, minced
    • 2 tbsp olive oil
    • Pinch of salt and pepper

    Step-by-Step Instructions

    Step 1: Prep the Lamb

    1. Remove lamb from the refrigerator 30-45 minutes before cooking to come to room temperature. This ensures even cooking.
    2. Pat the rack completely dry with paper towels. Season generously with salt and pepper on all sides.

    Step 2: Make the Herb Crust

    1. In a small bowl, combine panko, Parmesan, rosemary, thyme, garlic, olive oil, salt, and pepper. Mix until the crumbs are evenly moistened. Set aside.

    Step 3: Sear the Lamb

    1. Preheat oven to 400°F (200°C). Heat 1 tbsp olive oil in a large oven-safe skillet (cast iron is perfect) over medium-high heat.
    2. Place lamb rack fat-side down in the hot skillet. Sear for 2-3 minutes until deeply golden brown and crispy. Flip and sear the other side for 1-2 minutes. Sear the ends briefly as well.
    3. Remove from heat. Brush the top and sides of the rack with Dijon mustard—this helps the crust adhere.

    Step 4: Apply the Crust

    1. Press the herb panko mixture firmly onto the fat side and top of the rack. Use your hands to pack it on so it sticks.

    Step 5: Roast to Perfection

    1. Transfer the skillet to the preheated oven (or place rack on a baking sheet if your skillet isn’t oven-safe).
    2. Roast for 12-18 minutes, depending on desired doneness:
    3. Rare: 12 minutes (125°F internal)
    4. Medium-rare: 15 minutes (130-135°F internal)
    5. Medium: 18 minutes (140-145°F internal)
    6. Use a meat thermometer for accuracy—it’s the only way to guarantee perfect results.

    Step 6: Rest and Serve

    1. Remove from oven and let rest for 10 minutes. This is crucial—resting allows the juices to redistribute throughout the meat.
    2. Slice between the ribs into individual chops. Arrange on a platter.
    3. Sprinkle with fresh herbs and flaky salt if desired. Serve immediately with roasted potatoes and a green vegetable.
    4. Take a bite. Tender, juicy, herbaceous, and perfect. You just made a restaurant-quality meal.

    Summary

    Prep Time: 15 minutes | Cook Time: 20 minutes | Rest Time: 10 minutes | Total Time: 45 minutes

    Yield: 2-4 servings (1 rack serves 2 generously)

    Difficulty: Impressive, but easy

    Storage Notes

    Leftovers:

    Store leftover lamb chops in an airtight container in the fridge for up to 3 days. They’re delicious cold in salads or gently reheated.

    Reheating:

    Oven (best): 300°F for 5-8 minutes until warmed through. Skillet: Reheat over medium-low heat with a splash of broth. Microwave: Not recommended—it can overcook and toughen the meat.

    Make Ahead:

    Mix the herb crust up to 2 days in advance. Sear the lamb and apply the crust, then refrigerate (unbaked) for up to 24 hours. Bring to room temperature before roasting.

    Pro Tips for Rack of Lamb Greatness:

    • Let it come to room temperature. A cold rack will cook unevenly—30-45 minutes on the counter makes all the difference.
    • Pat it dry. Moisture is the enemy of a good sear. Dry lamb = crispy crust.
    • Sear the fat side first. Rendering that fat creates flavor and gives you that golden, crispy exterior.
    • Use a meat thermometer. Lamb goes from perfect to overdone in minutes. A thermometer takes the guesswork out.
    • Rest is non-negotiable. 10 minutes of rest keeps the juices in the meat instead of running all over your cutting board.
    • Ask your butcher to french the rack. Frenching means trimming the fat and meat from the rib bones, creating that elegant “lollipop” look. They’ll do it for you.
    • Don’t skip the Dijon. It’s the glue that holds the herb crust in place and adds a subtle tangy flavor.