Category: quick_meals

  • Truffle Mushroom Crostini: Earthy, Elegant and Irresistible

    Truffle Mushroom Crostini: Earthy, Elegant and Irresistible

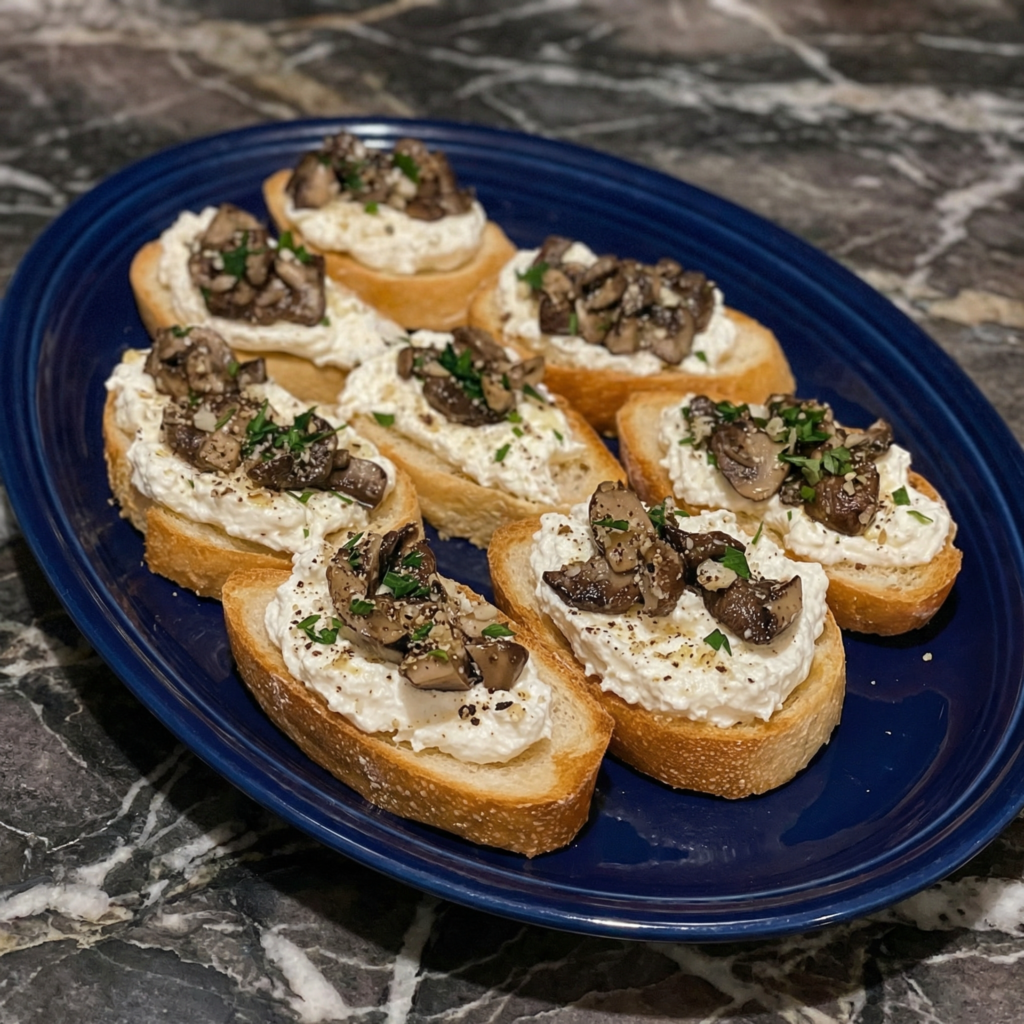
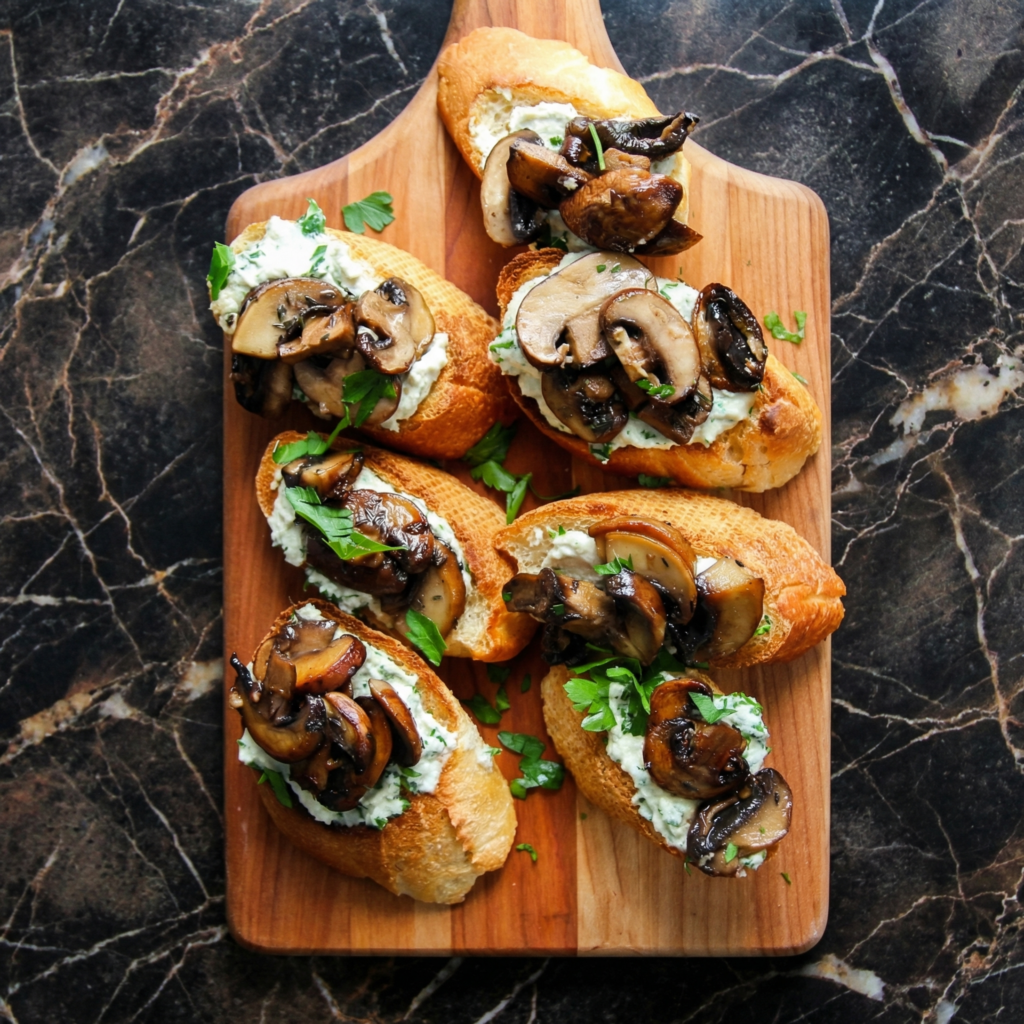
    Truffle mushroom crostini are the appetizer that makes people stop mid-conversation. Crispy, golden baguette slices piled high with creamy, garlicky mushrooms, finished with a delicate drizzle of truffle oil that perfumes the entire room. They’re earthy. They’re elegant. They’re utterly addictive.

    This recipe takes humble mushrooms and transforms them into something extraordinary. A mix of cremini and shiitake, sautéed until golden, then finished with cream, fresh thyme, and a kiss of truffle oil. Spoon onto crisp crostini, garnish with Parmesan, and watch them disappear. Twenty minutes from start to serving.

    Ingredients

    Makes 12-16 crostini.

    For the Crostini:

    • 1 French baguette, sliced into ½-inch rounds
    • 2 tbsp olive oil (for brushing)
    • 1 clove garlic, peeled (for rubbing)

    For the Truffle Mushrooms:

    • 1 lb mixed mushrooms (cremini, shiitake, oyster, or wild mushrooms)
    • 2 tbsp butter
    • 1 tbsp olive oil
    • 2 cloves garlic, minced
    • 1 shallot, finely chopped
    • ¼ cup heavy cream
    • 2 tbsp fresh thyme leaves (plus extra for garnish)
    • 1-2 tsp truffle oil (to taste)
    • Salt and black pepper, to taste

    For Garnish:

    • Freshly grated Parmesan cheese
    • Fresh thyme sprigs
    • Flaky sea salt
    • Optional: microgreens or fresh parsley

    Step-by-Step Instructions

    Step 1: Toast the Baguette

    1. Preheat oven to 400°F (200°C). Arrange baguette slices on a baking sheet.
    2. Brush both sides lightly with olive oil. Bake for 5-7 minutes, flip, and bake another 3-5 minutes until golden and crisp.
    3. While still warm, rub each toast lightly with the peeled garlic clove for subtle garlic flavor. Set aside.

    Step 2: Prep the Mushrooms

    1. Wipe mushrooms clean with a damp paper towel. Do not rinse—mushrooms absorb water.
    2. Slice mushrooms thinly (about ¼-inch thick). If using shiitake, remove stems before slicing.

    Step 3: Sauté the Mushrooms

    1. In a large skillet over medium-high heat, melt butter with olive oil.
    2. Add shallot and cook for 2 minutes until softened. Add garlic and cook 30 seconds until fragrant.
    3. Add mushrooms in a single layer (work in batches if needed). Cook undisturbed for 3-4 minutes until golden brown on one side.
    4. Stir and continue cooking for 3-4 minutes until mushrooms are tender and deeply golden.

    Step 4: Finish the Mushrooms

    1. Reduce heat to low. Add heavy cream and fresh thyme. Stir to coat mushrooms.
    2. Cook for 1-2 minutes until cream thickens slightly and coats the mushrooms.
    3. Remove from heat. Drizzle with truffle oil and stir gently. Season with salt and pepper to taste.

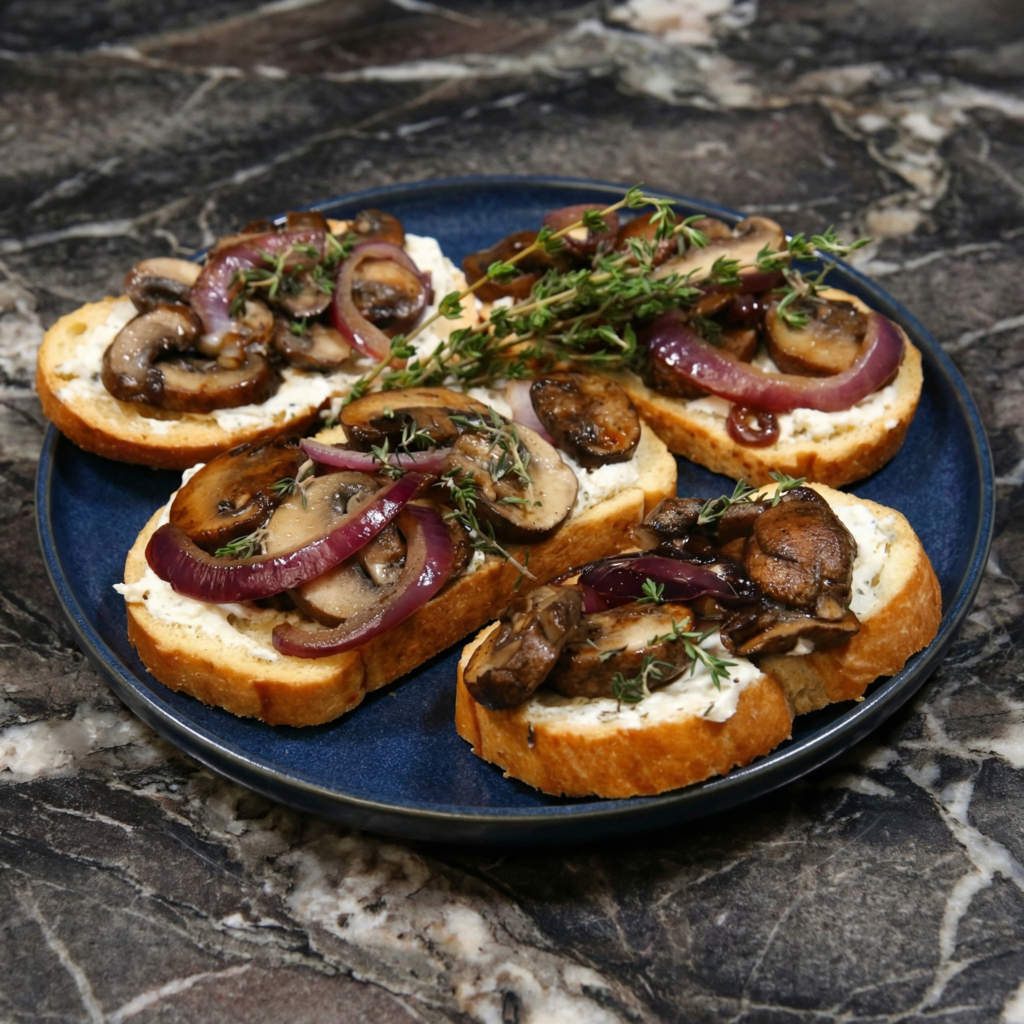
    Step 5: Assemble the Crostini

    1. Spoon a generous amount of truffle mushrooms onto each toasted baguette slice.
    2. Top with freshly grated Parmesan cheese, a sprinkle of fresh thyme, and a pinch of flaky sea salt.
    3. Add an extra tiny drizzle of truffle oil if desired.

    Step 6: Serve Immediately

    1. Arrange on a platter and serve warm.
    2. Take a bite. Crispy bread, creamy mushrooms, earthy truffle. Pure elegance on a plate.

    Summary

    Prep Time: 10 minutes | Cook Time: 15 minutes | Total Time: 25 minutes

    Yield: 12-16 crostini

    Difficulty: Elegantly easy

    Storage Notes

    Leftovers:

    Store mushrooms separately from crostini in an airtight container in the fridge for up to 3 days. Toast fresh bread when ready to serve—assembled crostini will soften.

    Reheating:

    Mushrooms: Reheat gently in a skillet over medium-low heat with a splash of cream or water to loosen. Crostini: Best made fresh—reheating makes them stale.

    Make Ahead:

    Cook mushrooms up to 2 days in advance and refrigerate. Toast bread just before serving. Reheat mushrooms, assemble, and serve.

    What to Serve With Truffle Mushroom Crostini:

    • Champagne or sparkling wine (truffle and bubbles are a classic pairing)
    • Light-bodied red wine like Pinot Noir
    • Crisp white wine like Sauvignon Blanc
    • A simple arugula salad with lemon vinaigrette
    • As part of a grazing board with cheeses, olives, and cured meats

    Wine Pairing:

    Truffle mushrooms pair beautifully with earthy, medium-bodied reds like Pinot Noir or Nebbiolo. For white wine lovers, a rich Chardonnay or Champagne complements the creamy, earthy flavors. If you’re feeling adventurous, try a dry sherry or amontillado—the nutty notes are a perfect match.

  • Stuffed Mushrooms: Bite-Sized Party Perfection

    Stuffed Mushrooms: Bite-Sized Party Perfection

    Stuffed mushrooms are the appetizer MVP. They’re the first thing to vanish from the platter, the bite everyone reaches for twice, and the recipe that makes you look like a pro host. Creamy, cheesy, garlicky filling tucked into tender mushroom caps, baked until golden and irresistible.

    The best part? They come together in under 30 minutes with simple ingredients you probably already have. Make them for game day, holiday parties, or just because you want a little something special. One batch is never enough—trust me.

    Ingredients

    Makes about 20-24 mushrooms.

    For the Mushrooms:

    • 20-24 cremini or white button mushrooms (about 1½ lbs)
    • 2 tbsp olive oil, divided
    • Salt and black pepper, to taste

    For the Filling:

    • 4 oz cream cheese, softened
    • ¼ cup grated Parmesan cheese
    • ¼ cup panko breadcrumbs
    • 2 cloves garlic, minced
    • 2 tbsp fresh parsley, finely chopped (plus extra for garnish)
    • 1 tbsp fresh chives or green onions, finely chopped
    • ¼ tsp salt
    • ⅛ tsp black pepper
    • Optional: ¼ cup finely chopped mushroom stems (from the caps)

    Optional Additions:

    • ¼ cup cooked Italian sausage or bacon, crumbled
    • ¼ cup shredded mozzarella or cheddar
    • Red pepper flakes for heat
    • Fresh thyme or oregano

    Step-by-Step Instructions

    Step 1: Prep the Mushrooms

    1. Preheat oven to 375°F (190°C). Line a baking sheet with parchment paper or lightly grease.
    2. Gently wipe mushrooms clean with a damp paper towel. Do not rinse—mushrooms absorb water.
    3. Carefully twist and pull out the stems. Reserve stems for the filling if desired. Arrange caps on the baking sheet, stem-side up.
    4. Drizzle or brush caps with 1 tbsp olive oil. Season with a pinch of salt and pepper.

    Step 2: Make the Filling

    1. If using mushroom stems, finely chop them.
    2. In a medium bowl, combine softened cream cheese, Parmesan, panko, garlic, parsley, chives, salt, pepper, and chopped mushroom stems (if using).
    3. Mix until well combined. If the mixture is too thick, add a splash of milk or olive oil.
    4. Taste and adjust seasoning.

    Step 3: Fill the Mushrooms

    1. Spoon filling into each mushroom cap, mounding it slightly.
    2. Drizzle remaining 1 tbsp olive oil over the filled mushrooms (or spray lightly with cooking spray for browning).

    Step 4: Bake to Golden Perfection

    1. Bake for 18-22 minutes until mushrooms are tender and the filling is golden brown and bubbly.
    2. If desired, broil for the final 1-2 minutes for extra color on top—watch closely to prevent burning.

    Step 5: Serve Immediately

    1. Transfer stuffed mushrooms to a serving platter.
    2. Garnish with fresh parsley or chives.
    3. Serve warm. Take a bite—tender mushroom, creamy filling, savory garlic. Pure party perfection.

    Summary

    Prep Time: 15 minutes | Cook Time: 20 minutes | Total Time: 35 minutes

    Yield: 20-24 mushrooms (serves 6-8 as appetizer)

    Difficulty: Easy party favorite

    Storage Notes

    Leftovers:

    Store in an airtight container in the fridge for up to 3 days. Mushrooms will release liquid as they sit, so they’re best enjoyed fresh.

    Reheating:

    Oven or air fryer (best): 350°F for 5-7 minutes until warmed through and filling re-crisps. Microwave: 30-45 seconds—faster but softer texture.

    Make Ahead:

    Assemble mushrooms up to 24 hours in advance. Place filled caps on a baking sheet, cover with plastic wrap, and refrigerate. Add 3-5 minutes to bake time when cooking from cold.

    Freezer-Friendly:

    Freeze unbaked, filled mushrooms on a baking sheet until solid, then transfer to a zip-top bag for up to 3 months. Bake from frozen, adding 5-8 minutes to cook time.

    What to Serve With Stuffed Mushrooms:

    • As a standalone appetizer
    • Alongside a cheese board or charcuterie
    • As a side dish for steak or chicken
    • On a grazing table with olives, nuts, and dips
    • With a crisp white wine or cocktail

    Make It a Main Dish:

    Use large portobello caps instead of cremini mushrooms. Increase bake time by 5-10 minutes. Serve with a side salad or roasted vegetables for a satisfying vegetarian main course.

  • Smoked Salmon Crostini, Elegant Appetizer in 15 Minutes

    Smoked Salmon Crostini, Elegant Appetizer in 15 Minutes

    Smoked salmon crostini are the appetizer that looks like you spent hours in the kitchen but actually comes together in about 15 minutes. Crispy, golden baguette slices. Creamy, herb-flecked cream cheese. Silky ribbons of smoked salmon. A pop of briny caper and a sprig of fresh dill. It’s a bite-sized masterpiece.

    This is the recipe you pull out for holiday parties, dinner parties, or when you want to feel fancy on a Tuesday. Minimal ingredients, maximum impact. Arrange them on a platter, garnish with lemon zest, and watch them disappear before your guests even make it to the main course.

    Ingredients

    Makes 12-16 crostini.

    For the Crostini:

    • 1 French baguette, sliced into ½-inch rounds
    • 2 tbsp olive oil (for brushing)
    • 4 oz cream cheese, softened
    • 2 tbsp fresh dill, finely chopped (plus extra for garnish)
    • 1 tbsp fresh chives, finely chopped
    • 1 tsp lemon zest
    • 4 oz smoked salmon (or lox), thinly sliced
    • 2 tbsp capers, drained
    • Fresh dill sprigs, for garnish

    Optional Garnishes:

    • Thinly sliced red onion
    • Lemon wedges
    • Everything bagel seasoning
    • Cracked black pepper
    • Microgreens or arugula

    Step-by-Step Instructions

    Step 1: Toast the Baguette

    1. Preheat oven to 400°F (200°C) or preheat a grill pan.
    2. Arrange baguette slices on a baking sheet. Brush both sides lightly with olive oil.
    3. Bake for 5-7 minutes, flip, and bake another 3-5 minutes until golden and crisp. (Alternatively, toast in a skillet or on a grill pan.)
    4. Let cool slightly before topping.

    Step 2: Make the Herbed Cream Cheese

    1. In a small bowl, combine softened cream cheese, chopped dill, chives, and lemon zest. Mix until well combined.
    2. Taste and adjust seasoning with a pinch of salt and pepper if desired.

    Step 3: Assemble the Crostini

    1. Spread a generous layer of herbed cream cheese onto each toasted baguette slice.
    2. Drape a small piece of smoked salmon over the cream cheese, folding it into loose ribbons or rosettes for an elegant look.
    3. Top with a few capers and a small sprig of fresh dill.
    4. Add optional garnishes: thin red onion slices, cracked black pepper, or a sprinkle of everything bagel seasoning.

    Step 4: Serve Immediately

    1. Arrange crostini on a serving platter. Add lemon wedges for squeezing if desired.
    2. Serve immediately—crostini are best when the bread is still crisp.
    3. Take a bite. Crispy bread, creamy herb spread, silky salmon, briny capers. Pure elegance.

    Summary

    Prep Time: 10 minutes | Cook Time: 10 minutes | Total Time: 20 minutes

    Yield: 12-16 crostini

    Difficulty: Effortlessly elegant

    Storage Notes

    Leftovers:

    Crostini are best assembled fresh—toasted bread will soften if topped too far in advance. Store components separately in the fridge for up to 3 days and assemble just before serving.

    Make Ahead:

    • Toast the bread: Up to 1 day in advance. Store in an airtight container at room temperature.
    • Make the herbed cream cheese: Up to 3 days in advance. Keep refrigerated.
    • Assemble: Just before serving for maximum crunch.

    Wine Pairing:

    Smoked salmon crostini pair beautifully with Champagne, sparkling wine, or a crisp Sauvignon Blanc. The bubbles and acidity cut through the richness of the salmon and cream cheese, while complementing the briny capers. For a red option, try a light Pinot Noir.

  • Spicy Vodka Pasta: Creamy, Bold and Restaurant-Worthy

    Spicy Vodka Pasta: Creamy, Bold and Restaurant-Worthy

    Vodka pasta has a reputation. It’s the pasta that took over restaurant menus, then social media, then our collective consciousness. And for good reason. The sauce is pure alchemy—tomatoes, cream, a splash of vodka, and just enough heat to make it interesting. It’s silky, it’s bold, and it clings to ridged pasta like it was meant to be there.

    This version keeps things simple. A quick tomato base, a generous pour of cream, a hit of red pepper heat, and just enough vodka to wake everything up. Toss with rigatoni (because those ridges were made for holding sauce), finish with Parmesan, and try not to eat the whole pan.

    Ingredients

    Serves 4.

    For the Pasta:

    • 1 lb rigatoni (or penne, ziti, or any tube pasta)
    • 2 tbsp olive oil
    • 1 small shallot or onion, finely chopped
    • 3 cloves garlic, minced
    • ½ tsp red pepper flakes (more if you like heat)
    • ¼ cup tomato paste
    • ½ cup vodka
    • 1 cup heavy cream
    • 1 can (15 oz) crushed tomatoes or tomato passata
    • ½ cup freshly grated Parmesan cheese, plus more for serving
    • Salt and black pepper, to taste
    • Fresh basil or parsley, for garnish

    Optional Additions:

    • ¼ cup pancetta or bacon, diced (for richness)
    • Fresh mozzarella or burrata for topping

    Step-by-Step Instructions

    Step 1: Cook the Pasta

    1. Bring a large pot of salted water to a boil. Cook rigatoni according to package directions until al dente.
    2. Reserve 1 cup of pasta water before draining. Drain and set aside.

    Step 2: Start the Sauce

    1. In a large skillet or Dutch oven, heat olive oil over medium heat.
    2. If using pancetta or bacon, add now and cook until crispy, about 3-4 minutes. Remove with a slotted spoon and set aside.
    3. Add shallot and cook for 2-3 minutes until softened. Add garlic and red pepper flakes, cook for 1 minute until fragrant.

    Step 3: Build the Flavor

    1. Add tomato paste and cook for 2-3 minutes, stirring constantly, until it darkens to a brick red color. This deepens the flavor.
    2. Pour in the vodka and scrape up any browned bits from the bottom. Let it simmer for 2-3 minutes until reduced by half—the alcohol cooks off, leaving the flavor.
    3. Add crushed tomatoes and salt. Simmer for 5-7 minutes until slightly thickened.

    Step 4: Make It Creamy

    1. Reduce heat to low. Stir in heavy cream and simmer gently for 2-3 minutes until the sauce turns a beautiful orange-pink.
    2. Add the reserved pancetta if using.

    Step 5: Toss the Pasta

    1. Add the cooked rigatoni to the sauce. Toss to coat, adding reserved pasta water a little at a time until the sauce is silky and clings to every noodle.
    2. Stir in grated Parmesan until melted and incorporated.

    Step 6: Serve Immediately

    1. Divide pasta among warm bowls. Top with extra Parmesan and fresh basil or parsley.
    2. For extra indulgence, add a dollop of burrata or fresh mozzarella.
    3. Take a bite. Creamy, spicy, velvety, perfect. This is the pasta dreams are made of.

    Summary

    Prep Time: 10 minutes | Cook Time: 20 minutes | Total Time: 30 minutes

    Yield: 4 servings

    Difficulty: Easy enough for a weeknight, fancy enough for date night

    Storage Notes

    Leftovers:

    Store in an airtight container in the fridge for up to 4 days. The sauce thickens as it sits—add a splash of milk or pasta water when reheating.

    Reheating:

    Skillet (best): Reheat gently over medium-low heat with a splash of milk or water to loosen the sauce. Microwave: 60-90 seconds, stirring halfway through.

    Freezer-Friendly:

    The vodka sauce freezes beautifully on its own for up to 3 months. Cook fresh pasta when ready to serve. Thaw sauce overnight in the fridge and reheat gently.

    Make Ahead:

    Make the sauce up to 3 days in advance and refrigerate. Cook pasta fresh and toss before serving for best results.

  • Mussels Marinara Pasta: Restaurant-Style Seafood Feast

    Mussels Marinara Pasta: Restaurant-Style Seafood Feast

    Mussels are one of those ingredients that make you feel like a chef. A big pot of glossy, black shells, steaming open in a fragrant tomato broth, ready to be twirled with spaghetti and devoured with crusty bread. It looks impressive, tastes like the coast of Italy, and comes together faster than you think.

    This version keeps things classic: shallots and garlic sizzled in olive oil, crushed tomatoes simmered until rich, plump mussels cooked until they just pop open, and a generous handful of fresh parsley to brighten everything up. Toss with pasta, pour a glass of white wine, and pretend you’re dining on the Amalfi Coast.

    Ingredients

    Serves 4.

    For the Pasta and Mussels:

    • 1 lb spaghetti or linguine
    • 2 lbs fresh mussels, scrubbed and debearded
    • 3 tbsp olive oil, divided
    • 1 shallot, finely chopped
    • 4 cloves garlic, thinly sliced
    • ½ tsp red pepper flakes (optional, for heat)
    • 1 can (28 oz) crushed San Marzano tomatoes
    • ½ cup dry white wine
    • ¼ cup fresh parsley, roughly chopped
    • Salt and black pepper, to taste
    • Fresh basil, for garnish (optional)

    For Serving:

    • Crusty bread, for sopping up the sauce
    • Lemon wedges
    • Extra virgin olive oil, for drizzling

    Step-by-Step Instructions

    Step 1: Clean the Mussels

    1. Scrub mussels under cold running water with a stiff brush to remove any grit.
    2. Remove the beard (the fibrous tuft sticking out from the shell) by pulling it toward the hinge of the shell. If any mussels are open, tap them gently—if they don’t close, discard them.

    Step 2: Cook the Pasta

    1. Bring a large pot of salted water to a boil. Cook spaghetti according to package directions until al dente.
    2. Reserve ½ cup of pasta water before draining. Drain and set aside.

    Step 3: Build the Sauce

    1. In a large pot or Dutch oven, heat 2 tbsp olive oil over medium heat.
    2. Add shallot and cook for 2-3 minutes until softened. Add garlic and red pepper flakes, cook for 1 minute until fragrant—don’t let the garlic brown.
    3. Pour in the white wine and let it simmer for 2 minutes, scraping up any browned bits.
    4. Add crushed tomatoes, salt, and pepper. Simmer for 10-15 minutes until slightly thickened and flavorful.

    Step 4: Cook the Mussels

    1. Increase heat to medium-high. Add the cleaned mussels to the sauce. Cover and cook for 5-7 minutes, shaking the pot occasionally, until all the mussels have opened.
    2. Discard any mussels that remain closed after cooking.

    Step 5: Toss with Pasta

    1. Add the cooked spaghetti to the pot with the mussels and sauce. Toss gently to combine.
    2. Add a splash of reserved pasta water if needed to loosen the sauce.
    3. Stir in fresh parsley and remaining 1 tbsp olive oil.

    Step 6: Serve Immediately

    1. Divide pasta and mussels among warm bowls. Garnish with fresh basil.
    2. Serve with crusty bread for sopping up every drop of that marinara broth.
    3. Add a squeeze of lemon and a drizzle of extra virgin olive oil.
    4. Twirl. Slurp. Crack open a shell. Dip bread. Close your eyes. You’re in Italy.

    Summary

    Prep Time: 10 minutes | Cook Time: 25 minutes | Total Time: 35 minutes

    Yield: 4 servings

    Difficulty: Impressive, but easy

    Storage Notes

    Leftovers:

    Mussels are best enjoyed fresh. If you have leftovers, remove mussels from shells and store in an airtight container in the fridge for up to 1 day. The pasta will absorb sauce overnight.

    Reheating:

    Skillet (best): Reheat gently over medium-low heat with a splash of water or broth to loosen the sauce. Microwave: 60-90 seconds, but expect slightly chewier mussels.

    Make Ahead:

    You can make the marinara sauce up to 3 days in advance. Cook mussels and toss with pasta just before serving for best results. Mussels are at their peak within minutes of cooking—don’t delay.

  • Pierogis (Pillowy Dumplings Stuffed with Comfort)

    Pierogis (Pillowy Dumplings Stuffed with Comfort)

    Pierogis are little pockets of happiness. Soft, pillowy dough wrapped around a creamy potato and cheese filling, boiled until tender, then pan-fried until golden and crispy. Served with a mountain of caramelized onions and a dollop of sour cream. It’s the kind of meal that makes you want to pull up a chair and stay awhile.

    Making pierogis from scratch is a labor of love—the kind of kitchen project that brings people together. Roll, fill, pinch, boil, fry. It’s meditative. It’s satisfying. And the results? Absolutely worth every minute. Make a big batch. Freeze half. Thank yourself later.

    Ingredients

    Makes about 30-40 pierogis.

    For the Dough:

    • 3 cups all-purpose flour, plus more for rolling
    • 1 tsp salt
    • 1 large egg
    • ½ cup sour cream
    • ½ cup warm water
    • 2 tbsp melted butter

    For the Potato Cheese Filling:

    • 2 lbs russet potatoes (about 4 medium), peeled and cubed
    • 1 cup sharp cheddar cheese, shredded
    • ½ cup sour cream
    • ¼ cup milk (or more as needed)
    • 4 tbsp butter
    • Salt and black pepper, to taste
    • Optional: ¼ cup finely chopped chives or green onions

    For Serving:

    • 2 large onions, thinly sliced
    • 4 tbsp butter
    • Sour cream
    • Fresh chives or parsley, chopped
    • Bacon bits (optional, but amazing)

    Step-by-Step Instructions

    Step 1: Make the Filling

    1. Place potatoes in a large pot and cover with cold salted water. Bring to a boil and cook until fork-tender, about 15-20 minutes.
    2. Drain and return to pot. Mash potatoes until smooth.
    3. Add butter, sour cream, and milk. Stir until creamy.
    4. Mix in shredded cheddar, chives (if using), salt, and pepper. Set aside to cool completely. The filling needs to be cold for easier shaping.

    Step 2: Make the Dough

    1. In a large bowl, whisk together flour and salt.
    2. In a separate bowl, whisk together egg, sour cream, warm water, and melted butter.
    3. Pour wet ingredients into dry and mix until a shaggy dough forms.
    4. Turn onto a floured surface and knead for 5-8 minutes until smooth and elastic. The dough should be soft but not sticky.
    5. Wrap in plastic wrap and let rest for 30 minutes at room temperature.

    Step 3: Caramelize the Onions

    1. While dough rests, melt butter in a large skillet over medium-low heat.
    2. Add sliced onions and cook slowly, stirring occasionally, for 20-25 minutes until deeply golden and caramelized. Set aside.

    Step 4: Roll and Fill

    1. Divide dough into 2-3 portions. On a floured surface, roll one portion until about ⅛-inch thick.
    2. Use a 3-inch round cutter (or a glass) to cut circles. Reroll scraps as needed.
    3. Place 1-2 teaspoons of filling in the center of each circle.
    4. Fold dough over into a half-moon shape. Press edges firmly to seal. For a decorative edge, crimp with a fork.
    5. Place finished pierogis on a parchment-lined baking sheet. Keep covered with a towel to prevent drying.

    Step 5: Boil the Pierogis

    1. Bring a large pot of salted water to a boil.
    2. Working in batches, drop pierogis into the boiling water. They’re done when they float to the top, about 2-3 minutes.
    3. Remove with a slotted spoon. At this point, you can serve them with butter and onions, or pan-fry for extra crispiness.

    Step 6: Pan-Fry to Golden Perfection

    1. In a large skillet, melt 2-3 tablespoons of butter over medium-high heat.
    2. Add boiled pierogis in a single layer (work in batches). Fry for 2-3 minutes per side until golden brown and crispy.

    Step 7: Serve and Enjoy

    1. Arrange crispy pierogis on a platter. Top with caramelized onions.
    2. Add a generous dollop of sour cream and sprinkle with fresh chives.
    3. Add bacon bits if you’re feeling indulgent.
    4. Take a bite. Pillowy dough, creamy filling, crispy edges, sweet onions. This is Polish soul food.

    Summary

    Prep Time: 45 minutes | Cook Time: 30 minutes | Rest Time: 30 minutes | Total Time: 1 hour 45 minutes

    Yield: 30-40 pierogis

    Difficulty: Labor of love (worth it)

    Storage Notes

    Leftovers:

    Store cooked pierogis in an airtight container in the fridge for up to 4 days. They’re delicious reheated in a skillet with butter.

    Reheating:

    Skillet (best): Fry in butter over medium heat until crispy and warmed through. Air fryer: 375°F for 5-6 minutes. Microwave: Works but won’t be crispy.

    Freezer-Friendly (The Dream):

    Pierogis freeze beautifully! Arrange uncooked, unbaked pierogis on a baking sheet in a single layer (not touching). Freeze until solid, then transfer to a zip-top bag for up to 3 months. Cook from frozen—boil for 3-4 minutes, then pan-fry. No need to thaw.

    Make Ahead:

    Assemble pierogis up to 24 hours in advance and refrigerate on a parchment-lined baking sheet. Cover with plastic wrap. Boil and fry when ready to serve.

  • Herb Crusted Rack of Lamb: Elegant and Impressive, Surprisingly Simple

    Herb Crusted Rack of Lamb: Elegant and Impressive, Surprisingly Simple

    A rack of lamb has a reputation. It’s what you order at fancy restaurants, the thing that says “special occasion.” But here’s the secret: it’s one of the easiest impressive meals you can make at home. A little garlic, a handful of fresh herbs, a hot oven, and about 30 minutes. That’s it.

    The herb crust is everything—fragrant rosemary, earthy thyme, punchy garlic, and nutty Parmesan, all coming together to form a golden, crispy coating on tender, perfectly pink lamb. Serve it with roasted potatoes and a green vegetable, and you’ve got a meal that looks like it came from a five-star kitchen.

    Ingredients

    Serves 2-4 (1 rack serves 2 generously).

    For the Lamb:

    • 1 rack of lamb (8-9 ribs), frenched (ask your butcher or do it yourself)
    • Salt and black pepper, to taste
    • 2 tbsp olive oil, divided
    • 1 tbsp Dijon mustard (helps the crust stick)

    For the Herb Crust:

    • ½ cup panko breadcrumbs
    • ¼ cup freshly grated Parmesan cheese
    • 2 tbsp fresh rosemary, finely chopped
    • 2 tbsp fresh thyme leaves, chopped
    • 3 cloves garlic, minced
    • 2 tbsp olive oil
    • Pinch of salt and pepper

    Step-by-Step Instructions

    Step 1: Prep the Lamb

    1. Remove lamb from the refrigerator 30-45 minutes before cooking to come to room temperature. This ensures even cooking.
    2. Pat the rack completely dry with paper towels. Season generously with salt and pepper on all sides.

    Step 2: Make the Herb Crust

    1. In a small bowl, combine panko, Parmesan, rosemary, thyme, garlic, olive oil, salt, and pepper. Mix until the crumbs are evenly moistened. Set aside.

    Step 3: Sear the Lamb

    1. Preheat oven to 400°F (200°C). Heat 1 tbsp olive oil in a large oven-safe skillet (cast iron is perfect) over medium-high heat.
    2. Place lamb rack fat-side down in the hot skillet. Sear for 2-3 minutes until deeply golden brown and crispy. Flip and sear the other side for 1-2 minutes. Sear the ends briefly as well.
    3. Remove from heat. Brush the top and sides of the rack with Dijon mustard—this helps the crust adhere.

    Step 4: Apply the Crust

    1. Press the herb panko mixture firmly onto the fat side and top of the rack. Use your hands to pack it on so it sticks.

    Step 5: Roast to Perfection

    1. Transfer the skillet to the preheated oven (or place rack on a baking sheet if your skillet isn’t oven-safe).
    2. Roast for 12-18 minutes, depending on desired doneness:
    3. Rare: 12 minutes (125°F internal)
    4. Medium-rare: 15 minutes (130-135°F internal)
    5. Medium: 18 minutes (140-145°F internal)
    6. Use a meat thermometer for accuracy—it’s the only way to guarantee perfect results.

    Step 6: Rest and Serve

    1. Remove from oven and let rest for 10 minutes. This is crucial—resting allows the juices to redistribute throughout the meat.
    2. Slice between the ribs into individual chops. Arrange on a platter.
    3. Sprinkle with fresh herbs and flaky salt if desired. Serve immediately with roasted potatoes and a green vegetable.
    4. Take a bite. Tender, juicy, herbaceous, and perfect. You just made a restaurant-quality meal.

    Summary

    Prep Time: 15 minutes | Cook Time: 20 minutes | Rest Time: 10 minutes | Total Time: 45 minutes

    Yield: 2-4 servings (1 rack serves 2 generously)

    Difficulty: Impressive, but easy

    Storage Notes

    Leftovers:

    Store leftover lamb chops in an airtight container in the fridge for up to 3 days. They’re delicious cold in salads or gently reheated.

    Reheating:

    Oven (best): 300°F for 5-8 minutes until warmed through. Skillet: Reheat over medium-low heat with a splash of broth. Microwave: Not recommended—it can overcook and toughen the meat.

    Make Ahead:

    Mix the herb crust up to 2 days in advance. Sear the lamb and apply the crust, then refrigerate (unbaked) for up to 24 hours. Bring to room temperature before roasting.

    Pro Tips for Rack of Lamb Greatness:

    • Let it come to room temperature. A cold rack will cook unevenly—30-45 minutes on the counter makes all the difference.
    • Pat it dry. Moisture is the enemy of a good sear. Dry lamb = crispy crust.
    • Sear the fat side first. Rendering that fat creates flavor and gives you that golden, crispy exterior.
    • Use a meat thermometer. Lamb goes from perfect to overdone in minutes. A thermometer takes the guesswork out.
    • Rest is non-negotiable. 10 minutes of rest keeps the juices in the meat instead of running all over your cutting board.
    • Ask your butcher to french the rack. Frenching means trimming the fat and meat from the rib bones, creating that elegant “lollipop” look. They’ll do it for you.
    • Don’t skip the Dijon. It’s the glue that holds the herb crust in place and adds a subtle tangy flavor.
  • Blackened Cajun Shrimp: Bold and Spicy

    Blackened Cajun Shrimp: Bold and Spicy

    Blackened shrimp is proof that big flavor doesn’t require big effort. A bold, smoky Cajun spice blend. A screaming-hot skillet. Two minutes per side. That’s it. The spice creates a dark, flavorful crust that’s not burnt—it’s blackened. There’s a difference, and it’s delicious.

    These shrimp are the ultimate weeknight hero. Serve them over rice, tucked into tacos, piled on a salad, or just eaten straight from the pan with your fingers (no judgment). From start to finish, you’re looking at 10 minutes. Cajun dinner? Done.

    Ingredients

    Serves 4.

    For the Blackened Shrimp:

    • 1½ lbs large shrimp, peeled and deveined (tails on or off)
    • 2 tbsp olive oil or avocado oil (high smoke point)
    • 2 tbsp unsalted butter (optional, for extra richness)
    • Lemon wedges, for serving
    • Fresh parsley, for garnish

    For the Cajun Spice Blend:

    • 1 tbsp smoked paprika
    • 1 tsp garlic powder
    • 1 tsp onion powder
    • 1 tsp dried oregano
    • 1 tsp dried thyme
    • ½ tsp cayenne pepper (adjust to your heat preference)
    • ½ tsp black pepper
    • ½ tsp salt
    • ¼ tsp white pepper (optional, adds depth)

    Step-by-Step Instructions

    Step 1: Make the Cajun Spice Blend

    1. In a small bowl, combine smoked paprika, garlic powder, onion powder, oregano, thyme, cayenne, black pepper, salt, and white pepper (if using).
    2. Mix well. Store any extra in an airtight jar—it’s great on chicken, fish, and vegetables too.

    Step 2: Prep the Shrimp

    1. Pat shrimp completely dry with paper towels. This is crucial for getting a good sear.
    2. Place shrimp in a bowl and drizzle with 1 tbsp oil. Toss to coat.
    3. Sprinkle the Cajun spice blend generously over the shrimp. Toss until every shrimp is well coated. You want a thick layer of spice—that’s what creates the blackened crust.

    Step 3: Heat the Skillet

    1. Heat a large cast-iron skillet or heavy-bottomed pan over medium-high heat until it’s ripping hot. It should be almost smoking.
    2. Add the remaining 1 tbsp oil (and butter if using) to the pan.

    Step 4: Sear the Shrimp

    1. Add shrimp to the skillet in a single layer. Don’t crowd the pan—work in batches if needed.
    2. Cook undisturbed for 1½-2 minutes until the underside is deeply darkened and crispy. The spice should look blackened, not burnt.
    3. Flip and cook another 1-2 minutes until shrimp are opaque, curled, and cooked through.
    4. Remove immediately to a plate—they continue cooking off the heat.

    Step 5: Serve and Devour

    1. Squeeze fresh lemon juice over the hot shrimp. Garnish with parsley.
    2. Serve over rice, in tacos, on a salad, or straight from the plate.
    3. Take a bite. Feel the heat. Smile. You just made Louisiana in your kitchen.

    Summary

    Prep Time: 5 minutes | Cook Time: 5 minutes | Total Time: 10 minutes

    Yield: 4 servings

    Difficulty: Fast, fiery, foolproof

    Storage Notes

    Leftovers:

    Store in an airtight container in the fridge for up to 2 days. Shrimp are best fresh but make excellent leftovers for salads or tacos.

    Reheating:

    Skillet (best): Reheat over medium heat for 1 minute per side. Air fryer: 350°F for 2-3 minutes. Microwave: 20-30 seconds at reduced power—watch carefully to avoid rubbery shrimp.

    Make Ahead:

    Mix the Cajun spice blend up to 3 months in advance. Prep shrimp up to 24 hours ahead and keep refrigerated. Season and cook just before serving.

  • Garlic Butter Herb Shrimp Pasta: Restaurant-Worthy in 20 Minutes

    Garlic Butter Herb Shrimp Pasta: Restaurant-Worthy in 20 Minutes

    Garlic butter shrimp pasta is the ultimate quick-fancy meal. The kind of dish that makes you feel like a chef, even when you’re in sweatpants on a Wednesday. Succulent shrimp, seared until golden, then tossed with al dente pasta in a sauce that’s pure magic—butter, garlic, white wine, lemon, and a shower of fresh herbs.

    It looks like something you’d order at a nice Italian restaurant. It tastes like something you’d pay too much for. But it comes together in about 20 minutes, uses one pan, and requires zero special skills. This is the recipe that makes you look like a pro.

    Ingredients

    Serves 4.

    For the Pasta:

    • 12 oz linguine or fettuccine (or any long pasta)
    • 1 lb large shrimp, peeled and deveined (tails on or off)
    • Salt and black pepper, to taste
    • 4 tbsp unsalted butter, divided
    • 2 tbsp olive oil
    • 6 cloves garlic, minced
    • ½ cup dry white wine (or chicken broth)
    • ½ cup pasta water, reserved
    • 2 tbsp fresh lemon juice
    • 1 tsp lemon zest
    • ¼ cup fresh parsley, finely chopped
    • 2 tbsp fresh basil, chopped (optional)
    • Red pepper flakes, to taste (optional)
    • Freshly grated Parmesan cheese, for serving

    Step-by-Step Instructions

    Step 1: Cook the Pasta

    1. Bring a large pot of salted water to a boil. Cook pasta according to package directions until al dente.
    2. Reserve ½ cup of pasta water before draining. Drain pasta and set aside.

    Step 2: Prep the Shrimp

    1. Pat shrimp completely dry with paper towels. Season generously with salt and pepper on both sides.

    Step 3: Sear the Shrimp

    1. In a large skillet over medium-high heat, melt 2 tbsp butter with olive oil until shimmering.
    2. Add shrimp in a single layer. Cook for 1-2 minutes per side until pink, curled, and just cooked through. Don’t overcrowd—work in batches if needed.
    3. Remove shrimp to a plate and set aside.

    Step 4: Make the Garlic Butter Sauce

    1. Reduce heat to medium. Add remaining 2 tbsp butter to the same skillet.
    2. Add garlic and cook for 30-60 seconds until fragrant—don’t let it burn.
    3. Pour in white wine and scrape up any browned bits from the bottom. Let it simmer for 2-3 minutes until slightly reduced.
    4. Add lemon juice, lemon zest, and red pepper flakes (if using). Stir to combine.

    Step 5: Toss the Pasta

    1. Add the cooked pasta to the skillet. Toss to coat in the sauce.
    2. Add reserved pasta water a little at a time until the sauce is silky and clings to the pasta.
    3. Return shrimp to the skillet and toss gently to warm through, about 1 minute.

    Step 6: Finish and Serve

    1. Remove from heat. Stir in fresh parsley and basil.
    2. Taste and adjust seasoning with salt, pepper, or more lemon.
    3. Serve immediately in warm bowls. Top with freshly grated Parmesan and an extra sprinkle of herbs.
    4. Take a bite. Let the garlic butter coat your soul. You just made a restaurant-worthy dish in 20 minutes.

    Summary

    Prep Time: 10 minutes | Cook Time: 15 minutes | Total Time: 25 minutes

    Yield: 4 servings

    Difficulty: Date night easy

    Storage Notes

    Leftovers:

    Store in an airtight container in the fridge for up to 2 days. Shrimp can become rubbery when reheated, so it’s best enjoyed fresh.

    Reheating:

    Skillet (best): Reheat gently over low heat with a splash of water or broth to loosen the sauce. Microwave: 30-60 seconds at reduced power—watch carefully to avoid overcooking the shrimp.

    Make Ahead:

    Prep shrimp (peel and devein) up to 24 hours in advance. Make the sauce base without pasta and refrigerate. Cook pasta and finish fresh for best results.

    Pro Tips for Shrimp Pasta Greatness:

    • Pat shrimp dry. Dry shrimp = good sear. Wet shrimp = steamed shrimp.
    • Don’t overcook the shrimp. They cook in 1-2 minutes per side. Overcooked shrimp are rubbery and sad.
    • Reserve pasta water. The starchy water is liquid gold—it helps the sauce cling to the pasta and adds silky texture.
    • Use fresh garlic. Lots of it. This is garlic butter pasta—don’t skimp.
    • Cook pasta al dente. It will continue cooking slightly in the sauce. Slightly undercook it by 1 minute.
    • Finish with fresh herbs. Parsley and basil add brightness and freshness that dried herbs can’t match.
    • Don’t skip the lemon. Acid balances the richness of the butter and wakes up all the flavors.
  • Parmesan Crusted Cod: the Perfect 20-Minute Dinner

    Parmesan Crusted Cod: the Perfect 20-Minute Dinner

    Parmesan crusted cod is the kind of dinner that feels fancy but is secretly one of the easiest things you’ll ever make. Flaky white fish, topped with a golden, crispy crust of Parmesan, panko, and herbs—it’s like a fish stick grew up and got sophisticated.

    The crust is everything: buttery, savory, with a satisfying crunch that gives way to tender, perfectly cooked cod. And it all comes together in a single pan in about 20 minutes. Serve it with roasted vegetables, a simple salad, or a pile of lemony potatoes. This one’s going into heavy rotation.

    Ingredients

    Serves 4.

    For the Cod:

    • 4 cod fillets (6 oz each, about 1½ inches thick)
    • Salt and black pepper, to taste
    • 2 tbsp olive oil or melted butter (for drizzling)
    • Lemon wedges, for serving
    • Fresh parsley, for garnish

    For the Parmesan Crust:

    • ½ cup panko breadcrumbs
    • ½ cup freshly grated Parmesan cheese
    • 2 tbsp fresh parsley, finely chopped
    • 2 cloves garlic, minced
    • 1 tsp lemon zest
    • ½ tsp paprika (optional, for color)
    • ¼ tsp salt
    • ¼ tsp black pepper
    • 3 tbsp melted butter

    Step-by-Step Instructions

    Step 1: Preheat and Prep

    1. Preheat your oven to 400°F (200°C). Line a baking sheet with parchment paper or lightly grease a baking dish.
    2. Pat cod fillets completely dry with paper towels. Season both sides with salt and pepper.

    Step 2: Make the Parmesan Crust

    1. In a small bowl, combine panko, Parmesan, parsley, garlic, lemon zest, paprika, salt, and pepper.
    2. Pour in melted butter and stir until everything is evenly moistened. The mixture should hold together slightly when pressed.

    Step 3: Top the Cod

    1. Place cod fillets on the prepared baking sheet. Brush each fillet with olive oil or drizzle with melted butter.
    2. Divide the Parmesan mixture evenly among the fillets, pressing it gently onto the top of each piece so it adheres.

    Step 4: Bake to Perfection

    1. Bake for 12-15 minutes, depending on thickness, until the fish is opaque and flakes easily with a fork and the crust is golden and crispy.
    2. If the crust needs more color, switch to broil for the final 1-2 minutes—watch closely to prevent burning.

    Step 5: Serve Immediately

    1. Transfer to plates. Garnish with fresh parsley and serve with lemon wedges for squeezing.
    2. Serve alongside roasted asparagus, green beans, or a simple arugula salad.
    3. Take a bite. Hear that crunch. Savor the flaky fish beneath. This is how dinner should be.

    Summary

    Prep Time: 8 minutes | Cook Time: 12-15 minutes | Total Time: 20 minutes

    Yield: 4 servings

    Difficulty: Weeknight easy

    Storage Notes

    Leftovers:

    Store in an airtight container in the fridge for up to 2 days. The crust will soften, but the flavor remains.

    Reheating (Bring Back the Crunch):

    Oven or air fryer (best): 375°F for 5-7 minutes until heated through and crust re-crisps. Skillet: Reheat in a dry pan over medium heat, flipping once. Microwave: Avoid—it makes the crust soggy.

    Make Ahead:

    Mix the Parmesan crust mixture up to 3 days in advance and refrigerate. Assemble and bake just before serving for maximum crispiness.

    Pro Tips for Parmesan Crusted Cod Greatness:

    • Pat the fish dry. Moisture prevents the crust from adhering and crisping properly.
    • Use fresh Parmesan. Pre-shredded cheese contains anti-caking agents that affect melting and browning. Grate your own.
    • Panko is non-negotiable. Japanese breadcrumbs are lighter and crispier than regular breadcrumbs.
    • Press the crust gently. Pressing helps it stick so it doesn’t fall off after baking.
    • Don’t overcook the cod. Cod is done when it’s opaque and flakes easily with a fork. Overcooked fish is dry and sad.
    • Broil for extra crunch. A minute under the broiler at the end gives you that deep golden, crispy top.