Category: quick_meals

  • Garlic Lemon Butter Scallops: Fancy in 10 Minutes Flat

    Garlic Lemon Butter Scallops: Fancy in 10 Minutes Flat

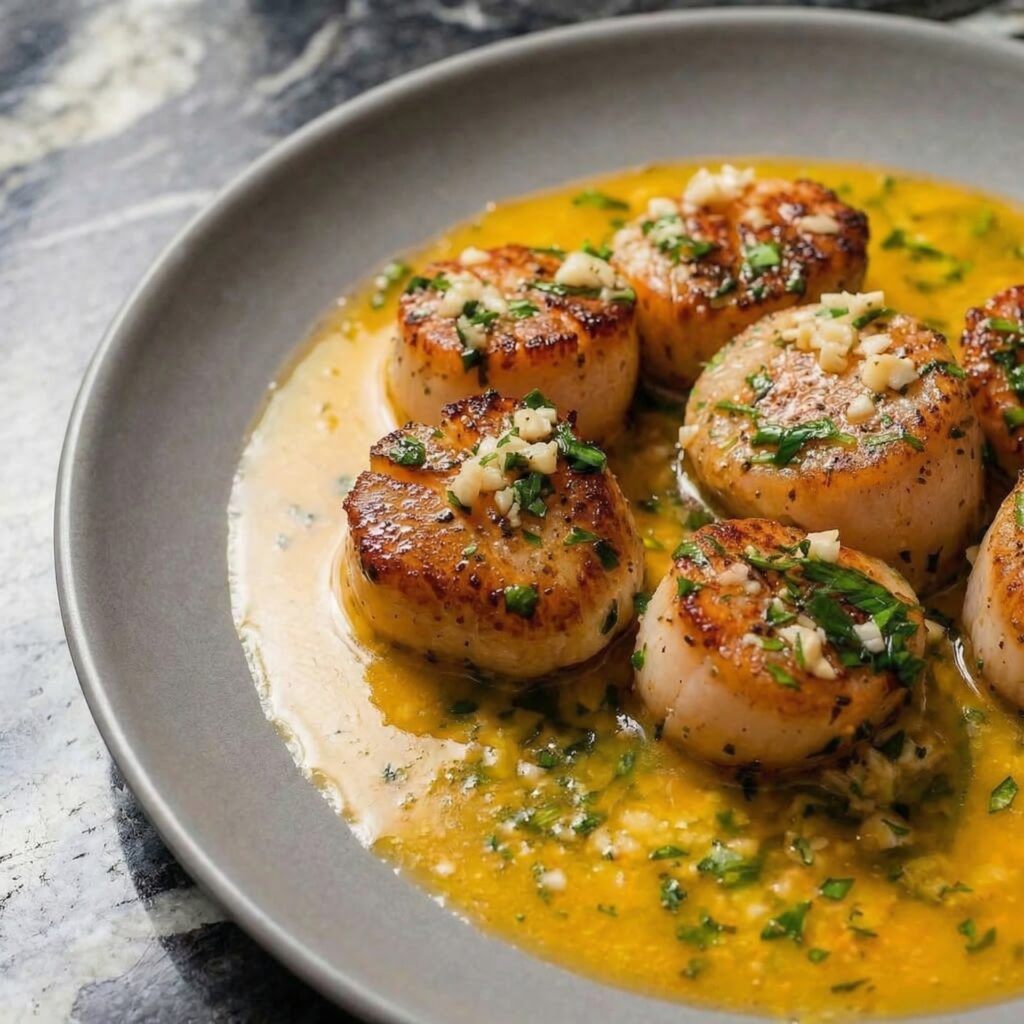
    Scallops have a reputation. They’re what you order at a fancy restaurant when you want to feel like a grown-up. But here’s the thing they don’t tell you: scallops are one of the fastest, easiest things to cook at home. Like, embarrassingly easy.

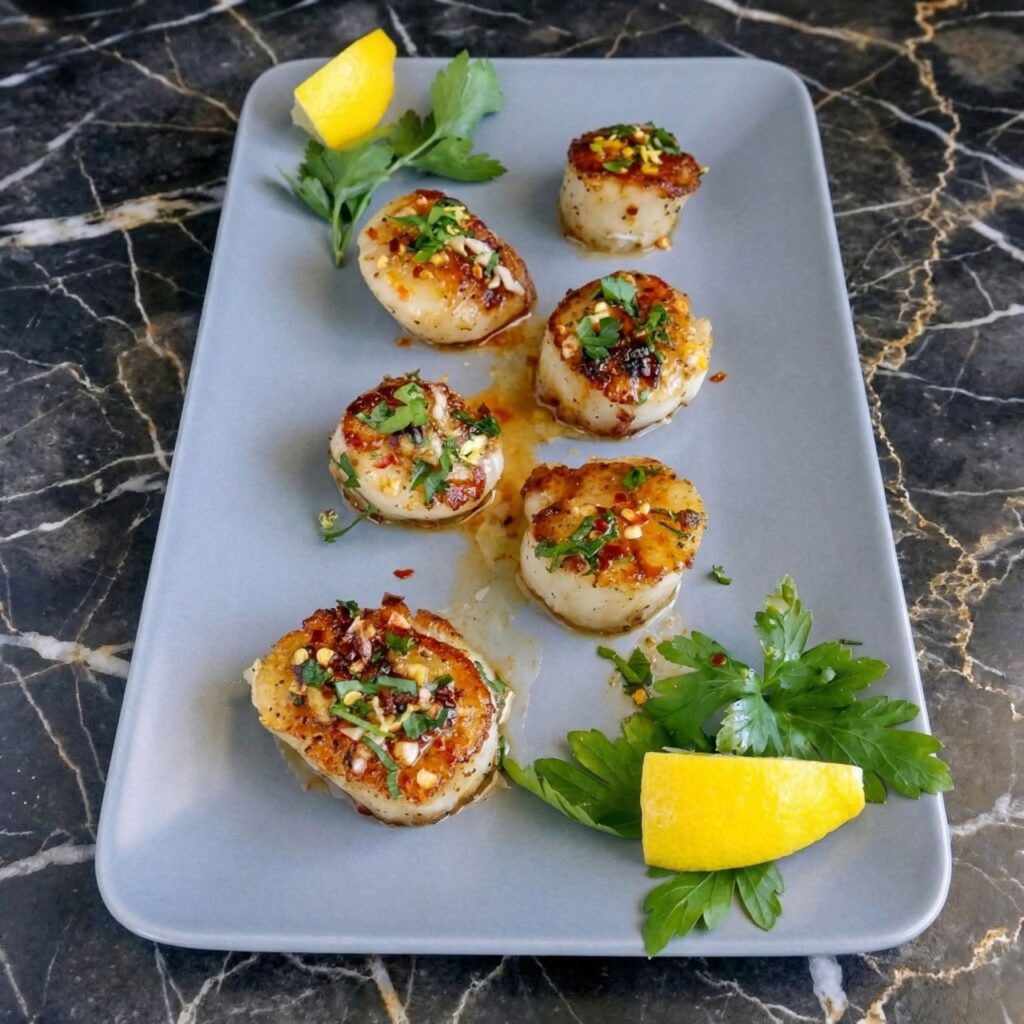
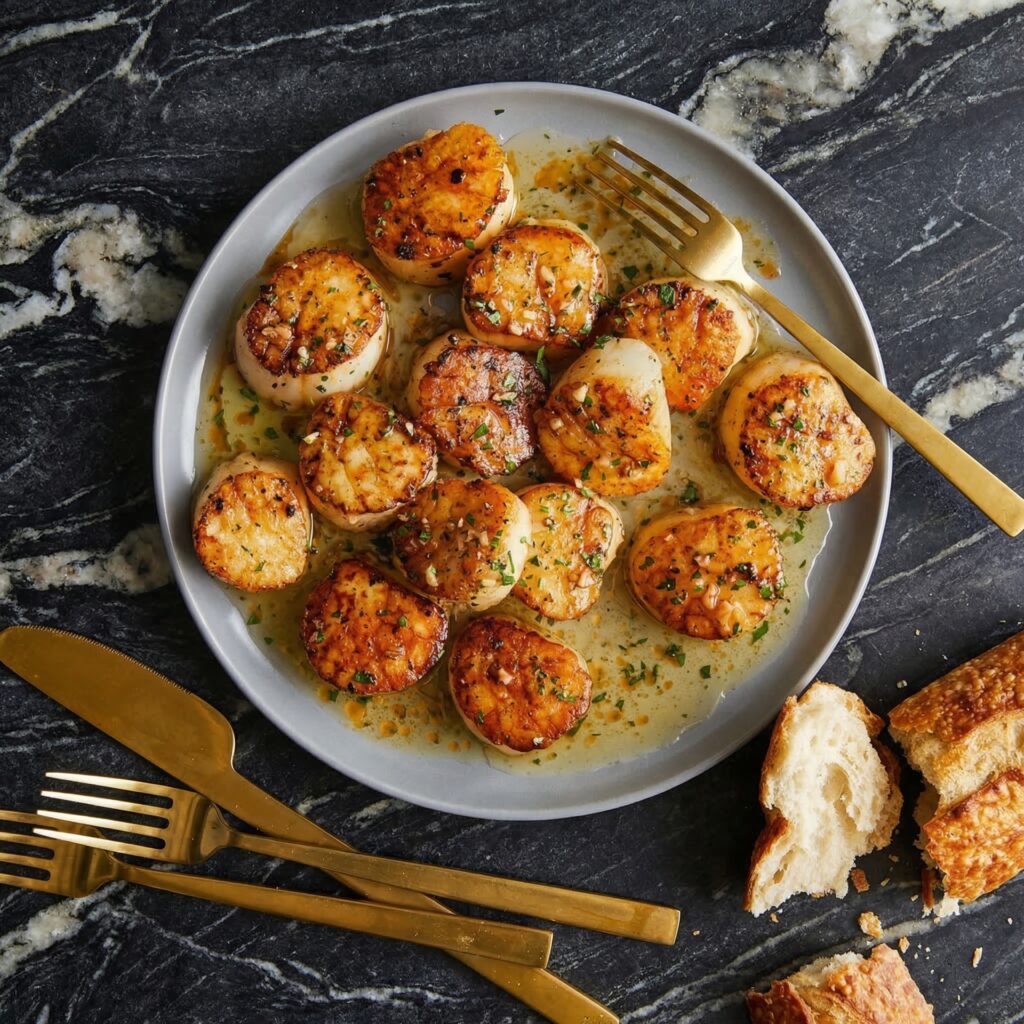
    The secret is a screaming-hot pan, a little patience, and a lot of butter. You’ll get that beautiful golden crust while the inside stays sweet and tender. Then you’ll deglaze the pan with lemon juice, add more butter (obviously), and watch it come together into a sauce so good you’ll want to drink it. Ten minutes. One pan. You’re officially fancy now.

    Ingredients

    Serves 2 as a main, 4 as an appetizer.

    For the Scallops:

    • 1 lb large sea scallops (about 10-12 scallops)
    • Salt and freshly ground black pepper
    • 2 tbsp neutral oil (avocado or vegetable—high smoke point is key)
    • 3 tbsp unsalted butter, divided
    • 3 cloves garlic, minced
    • ¼ cup dry white wine (or chicken broth)
    • 2 tbsp fresh lemon juice
    • 1 tsp lemon zest
    • 2 tbsp fresh parsley, chopped

    For Serving:

    • Lemon wedges
    • Fresh parsley, for garnish
    • Crusty bread or pasta (to soak up that sauce)

    Step-by-Step Instructions

    Step 1: Prep the Scallops (This Matters)

    1. Remove the side muscle from each scallop if still attached—it’s a small, tough rectangular tab. Just peel it off.
    2. Pat scallops completely dry with paper towels. Moisture is the enemy of a good sear. Like, really dry. Let them sit on a paper towel-lined plate for a few minutes if needed.
    3. Season both sides generously with salt and pepper.

    Step 2: Get the Pan Screaming Hot

    1. Place a large skillet (cast iron is perfect) over medium-high heat. Add the oil and heat until it’s shimmering and almost smoking.
    2. Carefully place scallops in the pan, making sure they’re not touching. Give them space—crowding leads to steaming, not searing.

    Step 3: Don’t Touch Them (Seriously)

    1. Cook undisturbed for 2-3 minutes until the bottom is deep golden brown. The scallops should release easily from the pan—if they stick, they’re not ready.
    2. Flip and cook the other side for 2 minutes. Remove scallops to a plate and tent loosely with foil.

    Step 4: Make the Garlic Butter Sauce

    1. Reduce heat to medium. Add 1 tbsp of butter to the pan. Once melted, add garlic and sauté for 30 seconds until fragrant (don’t burn it).
    2. Pour in the white wine and lemon juice, scraping up all those browned bits from the bottom. This is where the flavor lives.
    3. Let it simmer and reduce by half, about 2 minutes.
    4. Remove from heat and whisk in the remaining 2 tbsp butter until melted and glossy. Stir in lemon zest and most of the parsley.

    Step 5: Return Scallops to Glory

    1. Return the scallops to the pan, spooning that gorgeous sauce over the top. Let them warm through for 1 minute.

    Step 6: Serve Immediately

    1. Transfer scallops to plates or a serving platter. Spoon extra sauce over the top.
    2. Sprinkle with remaining parsley and serve with lemon wedges.
    3. Serve with crusty bread to soak up every last drop of that garlic lemon butter. Lick the plate. We won’t tell.

    Summary

    Prep Time: 5 minutes | Cook Time: 8 minutes | Total Time: 13 minutes

    Yield: 2 main servings

    Difficulty: Shockingly easy

    Storage Notes

    Leftovers (Rare, But Possible):

    Scallops are truly best fresh—their texture changes when reheated. If you must, store in an airtight container in the fridge for up to 2 days.

    Reheating:

    Gently reheat in a skillet over low heat with a splash of butter or lemon juice just until warmed through. Do not microwave—it turns scallops into rubber bands.

    Pro Tip:

    Make extra sauce. Seriously. It keeps in the fridge for a week and makes everything better—fish, chicken, veggies, or just bread for dipping.

    The Golden Rules of Scallops:

    • Dry them like your life depends on it
    • Pan must be hot enough to make you nervous
    • Don’t crowd the pan
    • Don’t move them until they release naturally
    • Serve immediately
  • Honey Soy Baked Chicken

    Honey Soy Baked Chicken

    Some chicken recipes are fine. This one is unforgettable. Honey soy baked chicken is the kind of meal that makes everyone at the table go quiet—not because they’re polite, but because they’re too busy eating to talk.

    The magic is in the marinade. Honey brings the sweetness and helps everything caramelize into that sticky, lacquered finish. Soy sauce adds depth and salt. Garlic and ginger make it fragrant. And a little sesame oil? That’s the secret handshake. Bake it until the edges are slightly charred and the chicken is so tender it begs to be eaten straight off the bone. Serve with rice and something green, and watch it disappear.

    Ingredients

    Serves 4.

    For the Chicken:

    • 8 bone-in, skin-on chicken thighs (or drumsticks, or a mix)
    • 2 tbsp neutral oil (vegetable, canola, or avocado)
    • Sesame seeds and sliced green onions, for garnish

    For the Honey Soy Glaze:

    • ⅓ cup honey
    • ⅓ cup low-sodium soy sauce
    • 4 cloves garlic, minced
    • 1 tbsp fresh ginger, grated (or 1 tsp ground ginger)
    • 1 tbsp rice vinegar (or apple cider vinegar)
    • 1 tsp sesame oil
    • ½ tsp red pepper flakes (optional, for heat)
    • 1 tbsp cornstarch mixed with 2 tbsp water (slurry, for thickening)

    Optional Veggies (Sheet Pan Style):

    • 1 head broccoli, cut into florets
    • 1 red bell pepper, sliced
    • 1 cup snap peas or green beans
    • Drizzle of oil and pinch of salt

    Step-by-Step Instructions

    Step 1: Whisk the Magic

    1. In a medium bowl or measuring cup, whisk together honey, soy sauce, minced garlic, grated ginger, rice vinegar, sesame oil, and red pepper flakes. This is your flavor bomb.
    2. Pour half of the marinade into a small saucepan and set aside (this will become your thick glaze later). The other half stays in the bowl for marinating.

    Step 2: Marinate the Chicken

    1. Pat chicken thighs dry with paper towels. Place them in a large bowl or zip-top bag.
    2. Pour the marinade from the bowl over the chicken. Turn to coat every piece.
    3. Cover and refrigerate for at least 30 minutes (2 hours is better, overnight is ideal).

    Step 3: Preheat and Prep

    1. Preheat your oven to 400°F (200°C). Line a baking sheet with foil or parchment paper for easy cleanup. Place a wire rack on top if you have one—it helps the skin get crispy all over.
    2. Remove chicken from marinade and let excess drip off. Arrange on the prepared baking sheet, skin-side up. Reserve the used marinade (yes, we’re using it—keep reading).

    Step 4: Bake to Sticky Perfection

    1. Bake for 25 minutes. While it bakes, pour the reserved used marinade into the saucepan with the reserved fresh marinade. Bring to a boil over medium-high heat, then reduce to a simmer.
    2. Whisk in the cornstarch slurry and cook for 2-3 minutes until thickened and glossy. This is your final glaze—and boiling ensures it’s safe to eat.
    3. After 25 minutes, brush the chicken generously with some of the thickened glaze. Return to oven and bake another 10-15 minutes until the chicken is cooked through (165°F internal temp) and the glaze is sticky and caramelized.
    4. For extra sticky magic: brush with more glaze halfway through this second bake.

    Step 5: Sheet Pan Veggies (Optional)

    1. If adding veggies, toss them with a little oil and salt. Add them to the baking sheet during the last 15-20 minutes of cooking. They’ll roast in those chicken juices and be incredible.

    Step 6: Rest and Garnish

    1. Remove chicken from oven and let rest 5-10 minutes. This keeps it juicy.
    2. Sprinkle with sesame seeds and sliced green onions. Drizzle with any remaining glaze (warm it first).
    3. Serve with steamed rice to soak up all that sticky goodness. Use your fingers. Lick them. No shame.

    Summary

    Prep Time: 10 minutes + marinating | Cook Time: 40 minutes | Total Time: 50 minutes (plus patience)

    Yield: 4 servings

    Difficulty: Sticky, easy, perfect

    Storage Notes

    Leftovers:

    Store chicken in an airtight container in the fridge for up to 4 days. The glaze continues to work its magic overnight.

    Reheating:

    Oven is best: 350°F for 10-15 minutes until warmed through and sticky again. Air fryer works beautifully too (375°F for 5-7 minutes). Microwave works but the skin won’t be crispy—still delicious though.

    Freezer-Friendly:

    You can freeze baked chicken in an airtight container for up to 3 months. Thaw overnight in the fridge and reheat in the oven to revive that sticky glaze.

    Pro Tip:

    Double the glaze. Use the extra for stir-fry, veggies, or just drizzling over rice. You’ll thank yourself later.

  • Baked Spaghetti Casserole: The Cheesy, Crowd-Pleasing Dinner Everyone Loves

    Baked Spaghetti Casserole: The Cheesy, Crowd-Pleasing Dinner Everyone Loves

    Spaghetti night is sacred. But sometimes, you want the same comforting flavors with a little something extra. Enter baked spaghetti casserole: everything you love about the classic, baked into one golden, bubbly, cheese-crusted masterpiece.

    The pasta soaks up all that rich, meaty sauce while it bakes. The cheese on top gets crispy and bronzed. And underneath it all, there’s a creamy, cheesy layer hiding in the middle just waiting to surprise you. It feeds a crowd, reheats like a dream, and makes your kitchen smell like Sunday dinner. Basically, it’s spaghetti night, but make it casserole.

    Ingredients

    Serves 6-8 (or 4 with excellent leftovers).

    For the Sauce:

    • 1 lb spaghetti or other long pasta
    • 1 tbsp olive oil
    • 1 lb ground beef (or Italian sausage, or a mix)
    • 1 yellow onion, finely chopped
    • 4 cloves garlic, minced
    • 1 tsp dried oregano
    • 1 tsp dried basil
    • ½ tsp red pepper flakes (optional)
    • 24 oz (680g) marinara sauce (jarred or homemade)
    • Salt and pepper, to taste

    For the Cheese Situation:

    • 1 cup ricotta cheese (full-fat for creaminess)
    • 1 large egg
    • ½ cup grated Parmesan cheese, divided
    • 2 cups shredded mozzarella cheese, divided
    • ¼ cup fresh parsley or basil, chopped (for garnish)

    Step-by-Step Instructions

    Step 1: Boil the Pasta

    1. Bring a large pot of salted water to a boil. Cook spaghetti according to package directions until al dente (about 1 minute less than the box says—it’ll finish cooking in the oven).
    2. Drain and set aside. Drizzle with a tiny bit of olive oil to prevent sticking if needed.

    Step 2: Brown the Meat

    1. While pasta cooks, heat olive oil in a large skillet over medium-high heat. Add ground beef and cook, breaking it up with a spoon, until browned and no longer pink (about 5-7 minutes).
    2. Add chopped onion and cook until softened, about 3-4 minutes. Stir in garlic, oregano, basil, and red pepper flakes. Cook another minute until fragrant.
    3. Pour in marinara sauce, stir to combine, and let simmer for 5 minutes. Season with salt and pepper to taste.

    Step 3: Make the Cheesy Middle

    1. In a small bowl, mix together ricotta cheese, egg, and half of the Parmesan (about ¼ cup). Add a pinch of salt and pepper. This is the secret creamy layer.

    Step 4: Assemble the Casserole

    1. Preheat your oven to 375°F (190°C). Grease a 9×13-inch baking dish.
    2. Spread about 1 cup of the meat sauce evenly over the bottom of the dish.
    3. Layer half the cooked spaghetti over the sauce.
    4. Drop spoonfuls of the ricotta mixture over the pasta, then gently spread it (it doesn’t need to be perfect).
    5. Sprinkle with 1 cup of mozzarella.
    6. Add the remaining spaghetti in a second layer.
    7. Pour the rest of the meat sauce over the top, making sure it reaches the edges.
    8. Sprinkle with remaining 1 cup mozzarella and remaining ¼ cup Parmesan.

    Step 5: Bake Until Bubbly

    1. Cover with foil (to prevent cheese from burning) and bake for 20 minutes.
    2. Remove foil and bake another 10-15 minutes until the cheese is melted, bubbly, and golden in spots.
    3. Let it rest for at least 10 minutes before slicing. This is crucial—it sets up so you get clean squares instead of a saucy mess.

    Step 6: Garnish and Serve

    1. Sprinkle with fresh parsley or basil. Cut into squares and serve with a side salad and garlic bread (because duh).
    2. Watch people go back for seconds. Pretend you’re not also going back for seconds.

    Summary

    Prep Time: 20 minutes | Cook Time: 35 minutes | Total Time: 55 minutes

    Yield: 6-8 servings

    Difficulty: Easy enough for a crowd

    Storage Notes

    Leftovers:

    Store in an airtight container in the fridge for up to 4 days. The flavors meld and get even better overnight.

    Reheating:

    Microwave individual portions for 1-2 minutes. For larger portions, cover with foil and reheat in a 350°F oven for 15-20 minutes until warmed through.

    Freezer-Friendly (The Best Part):

    This casserole is a freezer superstar. Assemble completely but don’t bake. Cover tightly with plastic wrap and foil, freeze for up to 3 months. To bake from frozen: remove plastic wrap, cover with foil, and bake at 375°F for 60 minutes. Remove foil and bake another 15 minutes until bubbly.

    Pro Tip:

    Make two. Eat one now, freeze one for the chaotic Tuesday you know is coming. Future you will be so grateful.

  • Crispy Roast Pork Belly: The Loudest, Crunchiest and Most Glorious Bite

    Crispy Roast Pork Belly: The Loudest, Crunchiest and Most Glorious Bite

    Let’s talk about the sound. That first knife-through-the-crackling *crunch* that echoes through the kitchen. The way the golden, blistered skin shatters under your teeth while the meat below stays juicy, tender, and impossibly flavorful. That’s what we’re here for.

    Crispy roast pork belly looks like something only a professional chef could pull off. But here’s the truth: with a little patience, some salt, and a few clever tricks (hello, vinegar and baking soda), you can absolutely nail this at home. It’s a showstopper for holidays, Sunday dinners, or any day you decide you deserve something magnificent.

    Ingredients

    Serves 4-6 (or 2 with no leftovers).

    For the Pork:

    • 2-3 lbs pork belly, skin on (look for a piece that’s nice and flat, with even thickness)
    • 1 tbsp white vinegar or rice vinegar
    • 1 tbsp coarse salt (kosher or sea salt)
    • 1 tsp baking soda (the secret weapon for crackling)

    For the Rub:

    • 1 tbsp five-spice powder (optional but classic)
    • 1 tsp white pepper
    • 2 tsp salt
    • 1 tsp sugar
    • 4 cloves garlic, minced
    • 1 tbsp ginger, grated

    For Serving:

    • Flaky sea salt (Maldon is perfect)
    • Apple sauce or plum sauce
    • Steamed rice or crusty bread
    • Roasted vegetables or a simple salad

    Step-by-Step Instructions

    Step 1: Score the Skin (Crucial)

    1. Place pork belly skin-side up on a cutting board. Using a sharp knife or razor blade, score the skin in a crosshatch pattern, about ½ inch apart. Cut through the skin but STOP before you hit the meat. You want the fat layer intact.
    2. Pat the skin completely dry with paper towels. Dry skin = crispy skin.

    Step 2: Season the Meat, Not the Skin (Yet)

    1. Flip the pork over so the skin is down. Rub the meat side with five-spice powder, white pepper, salt, sugar, garlic, and ginger. Get it into every crevice.
    2. Flip back to skin-side up. Do NOT season the skin with anything except salt (and later, vinegar and baking soda). Spices on the skin will burn.

    Step 3: The Skin Prep Ritual

    1. Pour the white vinegar over the skin and rub it in. Vinegar helps dry out the skin and break down proteins for better crackling.
    2. Mix the coarse salt with baking soda. Sprinkle it evenly over the skin, making sure it gets into the scores. The baking soda helps with blistering and crunch.
    3. Place the pork in the fridge, uncovered, for at least 4 hours—overnight is even better. This dries out the skin completely. This step is non-negotiable.

    Step 4: Bring to Room Temp

    1. Remove pork from the fridge 1 hour before roasting. Preheat your oven to 400°F (200°C).
    2. Wipe off any excess salt mixture from the skin. Pat it dry again. You want it as dry as possible.

    Step 5: Roast Low and Slow (Kind of)

    1. Place pork on a wire rack set inside a baking tray. This lets air circulate underneath and prevents the bottom from steaming.
    2. Roast for 30 minutes at 400°F. Then reduce heat to 350°F (180°C) and roast for another 40-50 minutes, depending on thickness. The meat should be tender when pierced.

    Step 6: The Blistering Finale

    1. Crank the heat up to 450°F (230°C) or turn on the broiler. Watch it like a hawk for 5-10 minutes until the skin bubbles and crackles into a golden, puffed-up masterpiece.
    2. Don’t walk away. It can go from perfect to burnt in seconds.

    Step 7: Rest and CRUNCH

    1. Remove from oven and let rest for 15-20 minutes. This is agony but necessary—the juices need to redistribute.
    2. Sprinkle with flaky sea salt. Then do it: take a sharp knife and slice through that crackling. Listen to the sound. You earned it.
    3. Serve immediately with applesauce or plum sauce, rice or bread, and something green to pretend you’re being healthy.

    Summary

    Prep Time: 20 minutes + overnight drying | Cook Time: 1.5 hours | Total Time: Patience, young grasshopper

    Yield: 4-6 servings

    Difficulty: Weekend project (worth it)

    Storage Notes

    Leftovers (Mythical, But Possible):

    Store leftover pork belly in an airtight container in the fridge for up to 4 days. The crackling will soften, but don’t despair—there’s a fix.

    Reheating (Bring Back the Crunch):

    1. Air fryer method (best): 375°F for 3-5 minutes. The crackling comes back to life.
    2. Oven method: 400°F for 5-8 minutes on a wire rack. Watch closely.
    3. Pan method: Crisp skin-side down in a dry skillet over medium heat.
    4. Never microwave. You’ll turn your masterpiece into sad, chewy tragedy.

    Pro Tip:

    Leftover pork belly makes incredible fried rice, ramen toppings, or breakfast sandwiches. The fat is flavor gold.

  • The Perfect Lobster Roll: Summer in Every Bite

    The Perfect Lobster Roll: Summer in Every Bite

    The lobster roll is a thing of beauty. Not a complicated thing—just perfect, simple ingredients doing exactly what they’re supposed to do. Sweet, fresh lobster. A little bit of binder. A butter-griddled bun that shatters slightly when you bite into it. That’s it. That’s the dream.

    There’s a debate, of course. Maine style: chilled lobster salad with a light mayo dressing, crisp celery, and a squeeze of lemon. Connecticut style: warm lobster drenched in drawn butter, no apologies. This recipe gives you both. Because why choose? Summer is short. Eat both.

    Ingredients

    Serves 2 very happy people.

    For the Lobster:

    • 2 lobster tails (about 5-6 oz each) or 1 lb cooked lobster meat
    • 2 tbsp butter (for poaching, if cooking your own)

    For the Buns:

    • 2 New England-style split-top hot dog buns (or regular brioche buns)
    • 2 tbsp salted butter, softened (for griddling)

    For Maine Style (Cold):

    • 2 tbsp mayonnaise (preferably Hellmann’s or Duke’s)
    • 1 tsp fresh lemon juice
    • 1 tbsp celery, finely minced (optional, for crunch)
    • 1 tbsp fresh chives or parsley, chopped
    • Salt and pepper, to taste

    For Connecticut Style (Warm):

    • 3 tbsp unsalted butter, melted
    • Squeeze of fresh lemon juice
    • Pinch of salt

    For Serving:

    • Lemon wedges
    • Fresh chives or parsley, for garnish
    • Potato chips or fries, obviously

    Step-by-Step Instructions

    Step 1: Cook the Lobster (If Starting from Scratch)

    1. Bring a large pot of salted water to a boil. Drop in lobster tails and boil for 45-60 seconds per ounce (about 5 minutes for a 6 oz tail).
    2. Transfer to an ice bath to stop cooking. Once cool, remove meat from shells. Or for extra flavor: melt 2 tbsp butter in a skillet and gently poach the lobster meat for 3-4 minutes until just opaque.
    3. Chop or tear lobster into bite-sized chunks. Leave some bigger pieces for texture.

    Step 2: Choose Your Adventure

    1. For Maine (Cold) Style: In a bowl, gently combine lobster meat with mayo, lemon juice, celery (if using), and chives. Season with salt and pepper. Cover and refrigerate while you prep the buns.
    2. For Connecticut (Warm) Style: In a small pan, warm the melted butter with a squeeze of lemon and a pinch of salt. Add lobster meat and gently toss to coat. Keep warm over lowest heat while you prep the buns.

    Step 3: The Bun Is Not a Passenger

    1. Heat a skillet or griddle over medium heat. Butter the outside of each bun generously (all sides, including the bottom).
    2. Toast the buns, turning occasionally, until golden brown and crisp on all sides. The split-top style gives you maximum buttery surface area.

    Step 4: Assemble with Intention

    1. For Maine style: Pile the chilled lobster salad generously into the warm, toasted buns. Let it spill out the top—that’s the look.
    2. For Connecticut style: Use a slotted spoon to transfer warm buttered lobster into the buns. Spoon a little extra butter from the pan over the top.

    Step 5: Garnish and Serve

    1. Sprinkle with fresh chives or parsley. Add a lemon wedge on the side for squeezing.
    2. Serve immediately with a pile of crispy potato chips or fries. Maybe a pickle spear. Definitely a cold beer or a crisp white wine.
    3. Take a bite. Let the butter drip down your chin. Close your eyes. You’re at a shack on the coast of Maine. (Or Connecticut. No judgment.)

    Summary

    Prep Time: 15 minutes | Cook Time: 10 minutes | Total Time: 25 minutes

    Yield: 2 generous rolls

    Difficulty: Easy enough for a summer treat

    Storage Notes

    Leftovers (If You’re Lucky):

    Store lobster meat separately from buns. Maine-style lobster salad keeps in the fridge for up to 2 days. Connecticut-style warm buttered lobster is best eaten immediately, but you can refrigerate and gently reheat.

    Reheating:

    For warm lobster rolls, gently reheat lobster in a small pan with a splash of butter over low heat. Never microwave—it turns lobster into rubber. Toast fresh buns—don’t use leftover toasted buns.

    Pro Tip:

    Cook extra lobster. Cold lobster salad makes incredible lobster rolls the next day, or just eat it straight from the bowl with a fork like the royalty you are.

  • Garlic Parmesan Chicken Tenders: The Ones You’ll Fight Over

    Garlic Parmesan Chicken Tenders: The Ones You’ll Fight Over

    We’ve taken the classic and given it a serious upgrade. Think juicy, tender strips of chicken, encased in a crust that’s gloriously crispy and golden, thanks to a perfect blend of panko breadcrumbs, nutty parmesan, and a punch of savory garlic.

    The best part? They’re baked, not fried, so you get all the crunch with way less mess. Serve them up with a side of ranch, marinara, or honey mustard, and watch them disappear. This is the chicken tender recipe you’ll come back to again and again.

    Ingredients

    Serves 4.

    For the Chicken Tenders:

    • 1 ½ lbs (680g) chicken tenderloins (or chicken breasts sliced into strips)
    • ½ cup (65g) all-purpose flour
    • 2 large eggs
    • 1 ½ cups (135g) panko breadcrumbs (regular or gluten-free)
    • 1 cup (100g) freshly grated Parmesan cheese
    • 2 teaspoons garlic powder
    • 1 teaspoon onion powder
    • 1 teaspoon dried parsley
    • ½ teaspoon salt
    • ¼ teaspoon black pepper
    • ¼ cup (60g) unsalted butter, melted
    • Fresh parsley, chopped, for garnish

    For Serving (Optional):

    • Ranch dressing, marinara sauce, honey mustard, or your favorite dipping sauce

    Step-by-Step Instructions

    Step 1: Prep the Chicken

    1. Preheat your oven to 400°F (200°C). Place a wire rack on a baking sheet and spray it lightly with non-stick cooking spray. This allows air to circulate under the tenders, making them extra crispy.
    2. Pat the chicken tenders completely dry with paper towels. This helps the breading stick. Season them lightly on both sides with a pinch of salt and pepper.

    Step 2: Set Up Your Breading Station

    1. Grab three shallow bowls. This is your assembly line.
    2. Bowl 1: Place the all-purpose flour.
    3. Bowl 2: Crack the eggs and beat them with a fork until the yolks and whites are fully combined and slightly frothy.
    4. Bowl 3: In the third bowl, combine the panko breadcrumbs, freshly grated Parmesan cheese, garlic powder, onion powder, dried parsley, salt, and pepper. Mix everything together with a fork until it’s evenly distributed.

    Step 3: Bread the Chicken

    1. Working with one tender at a time, dredge it in the flour, shaking off any excess. This thin layer of flour helps the egg wash stick.
    2. Next, dip the floured tender into the beaten eggs, turning to coat all sides. Let any excess drip off.
    3. Finally, press the tender into the parmesan-panko mixture, turning and pressing firmly so the crumbs adhere in a thick, even layer. Place the breaded tender on the prepared wire rack.
    4. Repeat with all the chicken tenders, placing them in a single layer on the rack without touching.

    Step 4: The Secret to Extra Crispiness

    1. Once all the tenders are breaded and on the rack, use a spoon or a small brush to drizzle the melted butter evenly over the top of each one. This is the secret to getting that golden, fried-like finish from the oven.

    Step 5: Bake to Perfection

    1. Bake for 15-18 minutes, flipping the tenders halfway through, until they are golden brown, crispy, and cooked through. An instant-read thermometer inserted into the thickest part of a tender should read 165°F (74°C).
    2. For an even crispier exterior, you can switch the oven to broil for the last 1-2 minutes. Watch them carefully so they don’t burn!

    Step 6: Garnish and Serve

    1. Remove the tenders from the oven and let them rest for a couple of minutes.
    2. Transfer them to a serving platter. Sprinkle generously with freshly chopped parsley and an extra dusting of grated Parmesan cheese.
    3. Serve hot with your favorite dipping sauces on the side.

    Summary

    Prep Time: 20 minutes | Cook Time: 15-18 minutes | Total Time: 35-40 minutes

    Yield: 4 servings

    Difficulty: Easy

    Storage and Make-Ahead Tips

    How to Store:

    Store any leftover chicken tenders in an airtight container in the refrigerator for up to 4 days. They are delicious cold, but even better reheated.

    Reheating:

    To bring back that signature crunch, reheat in an air fryer at 350°F for 3-5 minutes, or in a 375°F oven on a wire rack for about 10 minutes. The microwave will work but will make the coating soft.

    Make-Ahead for Meal Prep:

    You can bread the chicken tenders up to 24 hours in advance. Place them on the wire rack on the baking sheet, cover loosely with plastic wrap, and store in the refrigerator. When ready to eat, simply drizzle with the melted butter and bake as directed, adding a couple of minutes to the cooking time.

    Freezing Instructions:

    Freeze the breaded, uncooked chicken tenders in a single layer on a parchment-lined baking sheet until solid. Transfer the frozen tenders to a freezer-safe bag or container. They can be frozen for up to 3 months. Bake from frozen at 400°F for 20-25 minutes, or until cooked through and crispy. No need to thaw!

  • Buffalo Chicken Sliders

    Buffalo Chicken Sliders

    These aren’t your average sliders. We’re talking about tender, juicy shredded chicken, drenched in a perfectly balanced homemade buffalo sauce that’s equal parts buttery and spicy.

    It’s piled high onto soft, sweet Hawaiian rolls, blanketed with gooey provolone cheese, and baked until the tops are buttery and the edges are gloriously crisp. The combination of spicy, creamy, sweet, and savory is absolutely irresistible. Get ready to make a lot of these, because one batch is never enough.

    Ingredients

    Serves 6-8 (makes 12 sliders).

    For the Buffalo Chicken:

    • 2 lbs (about 3 large) boneless, skinless chicken breasts
    • 1 teaspoon garlic powder
    • 1 teaspoon onion powder
    • ½ teaspoon salt
    • ¼ teaspoon black pepper
    • 1 tablespoon olive oil
    • ½ cup (120ml) Frank’s RedHot Original hot sauce (or your favorite buffalo-style sauce)
    • ¼ cup (60g) unsalted butter, cubed
    • 1 tablespoon honey (optional, to balance the heat)

    For the Sliders:

    • 1 package (12-count) Hawaiian sweet rolls (like King’s Hawaiian)
    • 12 slices provolone cheese (or 2 cups shredded mozzarella/cheddar blend)
    • ¼ cup (60g) unsalted butter, melted
    • 1 tablespoon honey
    • 1 teaspoon garlic powder
    • 1 teaspoon dried parsley flakes
    • Optional: Crumbled blue cheese or ranch dressing for serving/drizzling

    Step-by-Step Instructions

    Step 1: Cook and Shred the Chicken

    1. Preheat your oven to 375°F (190°C).
    2. Place the chicken breasts in a baking dish. Drizzle with olive oil and season generously with garlic powder, onion powder, salt, and pepper. Toss to coat.
    3. Bake for 20-25 minutes, or until the chicken is cooked through and reaches an internal temperature of 165°F (74°C). The exact time will depend on the thickness of your breasts.
    4. Let the chicken rest for 5-10 minutes, then use two forks to shred it into bite-sized pieces. (Alternatively, you can use a stand mixer with a paddle attachment on low speed to shred it in seconds!)

    Step 2: Make the Buffalo Sauce

    1. While the chicken bakes, make the sauce. In a small saucepan over low heat, combine the hot sauce and cubed butter. Stir frequently until the butter is melted and the sauce is smooth.
    2. Whisk in the honey (if using). Remove from heat.

    Step 3: Combine Chicken and Sauce

    1. Place the shredded chicken in a large bowl. Pour about ¾ of the buffalo sauce over the chicken and toss well to coat. You want it generously sauced, but not swimming in it. Reserve the remaining sauce for brushing on top.

    Step 4: Assemble the Sliders

    1. Without separating the individual rolls, slice the entire slab of Hawaiian rolls in half horizontally. Place the bottom half of the rolls in a 9×13 inch baking dish (or on a parchment-lined baking sheet).
    2. Place the cheese slices evenly over the bottom layer of rolls, overlapping slightly to cover completely. This creates a cheesy barrier that helps keep the rolls from getting soggy.
    3. Pile the buffalo chicken mixture evenly over the cheese.
    4. Place the top half of the rolls over the chicken to create a complete “slab” of sandwiches.

    Step 5: The Famous Buttery Topping

    1. In a small bowl, whisk together the melted butter, honey, garlic powder, and dried parsley.
    2. Generously brush this mixture all over the tops of the rolls. Don’t be shy—let it soak into the crevices.
    3. If you have any reserved buffalo sauce, you can also drizzle a little over the top for extra kick.

    Step 6: Bake to Golden Perfection

    1. Cover the dish loosely with aluminum foil (to prevent the tops from burning before the insides are hot).
    2. Bake at 350°F (175°C) for 15 minutes.
    3. Remove the foil and bake for another 5-10 minutes, until the tops are golden brown and the edges are just starting to get crispy.

    Step 7: Serve Immediately

    1. Let the sliders rest for 5 minutes before using a sharp knife to cut between the rolls and separate them into individual sliders.
    2. Serve hot with extra buffalo sauce, ranch dressing, or blue cheese crumbles on the side for dipping. Prepare for them to disappear instantly.

    Summary

    Prep Time: 20 minutes | Cook Time: 30 minutes (for chicken) + 25 minutes (for assembly) | Total Time: About 1 hour 15 minutes

    Yield: 12 sliders (serves 4-6 as a meal, 8-10 as an appetizer)

    Difficulty: Easy

    Storage and Make-Ahead Tips

    How to Store Leftovers:

    Store any leftover sliders in an airtight container in the refrigerator for up to 3 days. The flavors will meld, but the buns may lose some of their crispness.

    Reheating:

    For best results, reheat in a 350°F oven for 5-10 minutes, or in an air fryer for 2-3 minutes to help re-crisp the tops. The microwave works in a pinch but will make the buns softer.

    Make-Ahead for Parties:

    You can prepare the buffalo chicken up to 2 days in advance and store it in the refrigerator. When you’re ready to serve, simply assemble the sliders (bring the chicken to room temperature or warm it slightly for easier spreading), add the buttery topping, and bake as directed.

    Freezing Instructions:

    Assemble the sliders completely (but do not bake) in a freezer-safe aluminum foil pan. Wrap tightly with plastic wrap and foil. Freeze for up to 3 months. To bake from frozen, remove the plastic wrap, cover with foil, and bake at 350°F for 30 minutes. Remove the foil and bake for another 5-10 minutes until hot and golden.

  • Spinach and Ricotta Stuffed Shells: The Ultimate Comfort Hug

    Spinach and Ricotta Stuffed Shells: The Ultimate Comfort Hug

    There are certain dishes that feel like a hug in a baking dish. This is one of them. These Spinach and Ricotta Stuffed Shells are pure, unadulterated comfort—tender pasta pillows cradling a dreamy, creamy filling of ricotta, spinach, and three kinds of cheese, all swimming in a rustic tomato sauce.

    This is the meal you make for a new mom, a grieving friend, or just for yourself on a chilly Sunday evening. It’s hearty enough to satisfy the biggest appetites, yet it’s completely vegetarian.

    Ingredients

    Serves 4-6.

    For the Shells & Filling:

    • 1 box (12 oz / 340g) jumbo pasta shells
    • 2 tablespoons olive oil
    • 15 oz (425g) whole milk ricotta cheese
    • 10 oz (280g) frozen chopped spinach, thawed and squeezed completely dry
    • 2 cups (200g) shredded mozzarella cheese, divided
    • ½ cup (50g) grated Parmesan cheese, plus more for topping
    • 1 large egg, lightly beaten
    • 2 cloves garlic, minced
    • ½ teaspoon salt
    • ¼ teaspoon black pepper
    • ¼ teaspoon ground nutmeg (freshly grated is amazing)

    For the Sauce & Assembly:

    • 3 cups (720ml) your favorite marinara or tomato sauce (jarred is fine, homemade is divine)
    • Fresh basil leaves, for garnish

    Step-by-Step Instructions

    Step 1: Cook the Pasta Shells

    1. Bring a large pot of generously salted water to a rolling boil. (The water should taste like the sea!)
    2. Add the jumbo shells and cook according to package directions until they are al dente. It’s crucial not to overcook them, as they’ll continue to cook in the oven. Aim for the firmer side of al dente.
    3. Drain the shells and rinse with cool water to stop the cooking process. Toss them gently with a drizzle of olive oil to prevent them from sticking together. Set aside.

    Step 2: Prepare the Spinach & Ricotta Filling

    1. The most important step for the filling: squeeze every last drop of water out of your thawed spinach. Place it in a clean kitchen towel, gather the ends, and wring it out over the sink. You’ll be amazed at how much liquid comes out. This prevents soggy shells.
    2. In a large bowl, combine the well-drained ricotta, squeezed spinach, 1 cup of the shredded mozzarella, the Parmesan cheese, beaten egg, minced garlic, salt, pepper, and nutmeg.
    3. Mix until everything is thoroughly combined. Give it a taste and adjust seasoning if needed.

    Step 3: Assemble the Stuffed Shells

    1. Preheat your oven to 375°F (190°C).
    2. Spread 1 ½ cups of your marinara sauce evenly over the bottom of a 9×13 inch baking dish. This prevents the shells from sticking and adds a saucier base.
    3. Now for the fun part: take a cooked shell in one hand and use a small spoon or a piping bag (a zip-top bag with the corner snipped off works great!) to carefully fill each shell with the ricotta mixture. Don’t overstuff, or they’ll burst.
    4. Place each filled shell, opening-side up, in the baking dish, nestled snugly together in a single layer.
    5. Once all the shells are in the dish, pour the remaining 1 ½ cups of marinara sauce over and around them. Try to cover most of the shells, but a few peeking out is fine.

    Step 4: Bake to Bubbly Perfection

    1. Sprinkle the remaining 1 cup of mozzarella cheese generously over the top of the shells. Finish with an extra dusting of Parmesan cheese.
    2. Cover the baking dish tightly with aluminum foil. This traps steam and ensures the shells cook through without drying out.
    3. Bake for 30 minutes, covered.
    4. Remove the foil and bake for another 10-15 minutes, until the cheese is melted, bubbly, and just starting to turn golden brown in spots.

    Step 5: Rest and Serve

    1. Let the dish rest for at least 10 minutes before serving. This allows the filling to set up slightly so the shells hold their shape better when you serve them.
    2. Garnish with fresh basil leaves and an extra sprinkle of Parmesan. Serve hot and watch them disappear.

    Summary

    Prep Time: 30 minutes | Cook Time: 45 minutes | Rest Time: 10 minutes | Total Time: 1 hour 25 minutes

    Yield: 4-6 servings

    Difficulty: Easy

    Storage and Make-Ahead Tips

    How to Store Leftovers:

    Store any leftover stuffed shells in an airtight container in the refrigerator for up to 4 days. They reheat beautifully.

    Reheating:

    For best results, reheat individual portions in the microwave, or place the shells in an oven-safe dish with a splash of water or extra sauce, cover with foil, and warm in a 350°F oven for 15-20 minutes.

    Freezing Instructions (The Ultimate Make-Ahead):

    Stuffed shells are a freezer hero. Assemble the entire dish in a freezer-safe baking dish (aluminum foil pans are perfect for this), but do not bake it. Cover tightly with a layer of plastic wrap and then a layer of aluminum foil. Freeze for up to 3 months.

    To bake from frozen, remove the plastic wrap, re-cover with foil, and bake at 375°F for 55-65 minutes, removing the foil for the last 10-15 minutes to brown the cheese. You can also thaw in the refrigerator overnight and then bake as directed.

    Make-Ahead for a Stress-Free Dinner:

    You can assemble the stuffed shells up to 24 hours in advance. Simply prepare the recipe through Step 3, cover the unbaked dish tightly with plastic wrap, and store it in the refrigerator.

    When you’re ready to eat, let it sit on the counter while the oven preheats (to take the chill off), then bake as directed, adding 5-10 minutes to the covered baking time.

  • The “Sunday Sauce” Pappardelle with Beef Ragu

    The “Sunday Sauce” Pappardelle with Beef Ragu

    Close your eyes and imagine this: It’s a quiet Sunday afternoon. A big pot is simmering on the stove, filling your entire home with the warm, intoxicating scent of red wine, garlic, and herbs.

    The beef has been bubbling away for hours, transforming from a tough cut into spoonably tender strands of flavor. This is the magic of a true beef ragu.

    Ingredients

    Serves 4-6 generously.

    For the Beef Ragu:

    • 2 lbs (900g) beef chuck roast, cut into 2-inch chunks
    • 2 tablespoons olive oil
    • 1 large yellow onion, finely chopped
    • 2 celery stalks, finely chopped
    • 2 large carrots, finely chopped
    • 4-5 garlic cloves, minced
    • 2 tablespoons tomato paste
    • 1 ½ cups dry red wine (like Chianti, Merlot, or Cabernet Sauvignon)
    • 1 can (28 oz) crushed San Marzano tomatoes
    • 1 cup beef broth
    • 2 sprigs fresh rosemary
    • 2 sprigs fresh thyme (or 1 tsp dried thyme)
    • 2 bay leaves
    • Salt and freshly ground black pepper, to taste

    For Serving:

    • 1 lb (450g) dried pappardelle pasta (or fresh, if you’re feeling ambitious)
    • 1 cup freshly grated Parmesan cheese, plus more for serving
    • 2 tablespoons unsalted butter (optional, for extra richness)
    • Fresh parsley or basil, chopped, for garnish

    Step-by-Step Instructions

    Step 1: Sear the Beef (The Flavor Foundation)

    1. Pat the beef chunks completely dry with paper towels. This is crucial for getting a good sear. Season generously all over with salt and pepper.
    2. In a large Dutch oven or heavy-bottomed pot, heat the olive oil over medium-high heat until it shimmers.
    3. Working in batches to avoid crowding the pan (crowding will steam the meat instead of browning it), add the beef chunks in a single layer. Sear for 3-4 minutes per side, until a deep golden-brown crust forms. Transfer the browned beef to a plate and set aside.

    Step 2: Build the Soffritto

    1. Reduce the heat to medium. In the same pot, add the chopped onion, carrot, and celery. Sauté for 5-7 minutes, scraping up any browned bits (fond) from the bottom of the pot with a wooden spoon, until the vegetables have softened.
    2. Add the minced garlic and cook for another minute until fragrant.
    3. Stir in the tomato paste and cook for 2-3 minutes, letting it caramelize slightly to deepen its flavor.

    Step 3: Deglaze and Braise

    1. Pour in the red wine, scraping the bottom of the pot to release any remaining fond. Let the wine bubble and reduce by about half, which should take 3-5 minutes.
    2. Add the crushed tomatoes, beef broth, rosemary sprigs, thyme sprigs, and bay leaves. Stir to combine.
    3. Return the browned beef and any accumulated juices on the plate to the pot. Bring the sauce to a gentle simmer.
    4. Cover the pot with a tight-fitting lid and transfer it to a preheated 325°F (160°C) oven. Alternatively, you can leave it on the stovetop over the lowest possible heat.
    5. Braise for 2.5 to 3 hours, or until the beef is fall-apart tender and can be easily shredded with a fork.

    Step 4: Shred and Finish the Ragu

    1. Carefully remove the pot from the oven. Using tongs or a slotted spoon, transfer the beef chunks to a cutting board. Discard the herb sprigs and bay leaves.
    2. Use two forks to shred the beef into bite-sized pieces, discarding any large pieces of fat.
    3. Return the shredded beef to the pot with the sauce. If the sauce seems thin, simmer it on the stovetop uncovered for 10-15 minutes to reduce it to your desired consistency. Taste and adjust seasoning with salt and pepper.

    Step 5: Cook the Pasta and Serve

    1. About 20 minutes before serving, bring a large pot of generously salted water to a rolling boil. (The water should taste like the sea!)
    2. Cook the pappardelle according to package directions until al dente. Before draining, reserve about 1 cup of the starchy pasta water.
    3. Drain the pasta and return it to the pot. Add several large spoonfuls of the beef ragu and a splash of the reserved pasta water. Toss vigorously over low heat to coat the pasta; the starch in the water will help the sauce cling to the noodles.
    4. If using, toss in the butter and ½ cup of the grated Parmesan until melted and glossy.
    5. Serve immediately in warm bowls, topped with an extra ladle of ragu, a generous sprinkle of Parmesan, and a garnish of fresh parsley or basil.

    Summary

    Prep Time: 30 minutes | Cook Time: 3 hours | Total Time: 3 hours 30 minutes

    Yield: 4-6 servings

    Difficulty: Intermediate

    Storage and Make-Ahead Tips

    How to Store:

    Store leftover ragu (sauce and meat only, not the pasta) in an airtight container in the refrigerator for up to 4 days. The flavor will actually deepen and improve over this time.

    Can You Freeze It?

    Absolutely! This ragu is a freezer superstar. Let the sauce cool completely, then transfer it to freezer-safe bags or containers. It will keep beautifully for up to 3 months. Thaw overnight in the refrigerator before reheating gently on the stovetop with a splash of water or broth.

    Pro Tip for Leftovers:

    Always cook fresh pasta to serve with your leftover ragu. Storing the pasta mixed with the sauce will result in mushy noodles. Keep them separate for the best next-day experience.

  • Crunch Meets Heat: The Ultimate Spicy Tuna Crispy Rice at Home

    Crunch Meets Heat: The Ultimate Spicy Tuna Crispy Rice at Home

    If you’ve ever ordered Spicy Tuna Crispy Rice at a sushi bar, you know the magic: golden, crunchy rice squares topped with cool, creamy, spicy tuna and finished with a pop of jalapeño. It’s the perfect contrast of textures—crispy and tender, spicy and refreshing, rich yet balanced.

    The good news?

    You don’t need a restaurant kitchen to make it. With a few key techniques and fresh ingredients, you can recreate this crowd-pleasing appetizer right at home.

    Let’s break it down step by step so you can achieve that irresistible crunch and bold flavor.


    Ingredients

    For the sushi rice:

    • 2 cups short-grain sushi rice
    • 2 ¼ cups water
    • 3 tablespoons rice vinegar
    • 1 tablespoon sugar
    • 1 teaspoon salt

    For frying:

    • Neutral oil (vegetable, canola, or avocado oil)

    For the spicy tuna:

    • 8 ounces sushi-grade ahi tuna, finely diced
    • 2–3 tablespoons mayonnaise (Japanese-style preferred)
    • 1–2 teaspoons sriracha (adjust to taste)
    • ½ teaspoon sesame oil
    • 1 teaspoon soy sauce
    • 1 green onion, finely sliced

    For garnish:

    • Thinly sliced jalapeño
    • Sesame seeds
    • Extra green onion
    • Drizzle of spicy mayo (optional)

    Step 1: Rinse the Rice

    Place the sushi rice in a bowl and rinse under cold water, gently swirling with your hand. Drain and repeat until the water runs mostly clear. This removes excess starch and ensures the rice isn’t gummy.

    Proper rinsing is essential for achieving distinct grains that hold together without becoming mushy.


    Step 2: Cook the Rice

    Combine the rinsed rice and water in a pot or rice cooker. If using the stovetop, bring to a boil, then reduce heat to low, cover, and simmer for 15 minutes. Remove from heat and let sit covered for another 10 minutes to steam.

    Avoid lifting the lid during cooking, as steam is crucial for perfect texture.


    Step 3: Season the Rice

    While the rice rests, combine rice vinegar, sugar, and salt in a small bowl. Stir until dissolved.

    Transfer the cooked rice to a large bowl. Gently fold in the vinegar mixture using a spatula, slicing and lifting the rice rather than stirring aggressively. This keeps the grains intact.

    Allow the rice to cool to room temperature.


    Step 4: Shape and Chill

    Line a baking dish (about 8×8 inches) with plastic wrap. Press the seasoned rice evenly into the dish, about ¾ to 1 inch thick. Use damp hands or the back of a spatula to press it firmly and evenly.

    Cover and refrigerate for at least 2 hours, or until fully chilled and firm. This step is key—cold rice holds its shape when frying.


    Step 5: Prepare the Spicy Tuna

    In a mixing bowl, combine the finely diced sushi-grade tuna, mayonnaise, sriracha, sesame oil, soy sauce, and green onion.

    Stir gently to combine. Taste and adjust spice level as desired. Refrigerate the mixture until ready to use.

    Keeping the tuna chilled maintains freshness and food safety.


    Step 6: Cut the Rice

    Once the rice is firm, remove it from the pan using the plastic wrap. Place it on a cutting board.

    Using a sharp knife (wipe it clean between cuts), slice the rice into small rectangles or squares—about 2 by 1 inch each. Aim for uniform pieces to ensure even frying.


    Step 7: Fry the Rice

    Pour about ½ inch of neutral oil into a heavy skillet and heat over medium-high. The oil is ready when a small piece of rice sizzles immediately upon contact.

    Working in batches, carefully place the rice pieces into the hot oil. Fry for about 2–3 minutes per side until deeply golden and crispy.

    Use tongs or a spatula to flip gently. Once done, transfer to a paper towel-lined plate to drain excess oil.

    The exterior should be crisp and golden, while the inside remains tender.


    Step 8: Assemble the Crispy Rice

    Allow the rice to cool slightly so it stays crisp but isn’t too hot.

    Top each crispy rice square with a generous spoonful of spicy tuna. Gently press the tuna onto the rice so it adheres.

    Add a thin slice of jalapeño on top, sprinkle with sesame seeds, and garnish with extra green onion if desired.

    For extra indulgence, drizzle with additional spicy mayo.


    Step 9: Serve Immediately

    Spicy Tuna Crispy Rice is best served fresh, while the rice is still crisp and warm. Arrange on a platter and serve as an appetizer or party bite.

    The contrast between warm, crunchy rice and cool, spicy tuna is what makes this dish unforgettable.


    Pro Tips for Success

    • Use sushi-grade tuna from a trusted source. Freshness is critical.
    • Chill the rice thoroughly before cutting to prevent crumbling.
    • Don’t overcrowd the pan when frying; this keeps the rice crisp.
    • Maintain oil temperature—too low and the rice absorbs oil; too high and it burns.

    Flavor Variations

    • Add finely diced avocado to the tuna mixture for extra creaminess.
    • Mix in a touch of chili oil for deeper heat.
    • Substitute spicy salmon for a twist.
    • Top with a small dollop of wasabi or a drizzle of eel sauce for added complexity.

    Why This Recipe Works

    Short-grain sushi rice provides the ideal sticky texture for shaping and frying. Pressing and chilling it creates a firm structure that crisps beautifully in hot oil. The spicy tuna mixture balances creamy, salty, and spicy notes, while jalapeño adds freshness and bite.

    Each element complements the others—crunch meets creaminess, heat meets coolness, and richness meets brightness.


    Spicy Tuna Crispy Rice is proof that texture can elevate a simple dish into something extraordinary.

    With a little preparation and attention to detail, you can recreate this sushi-bar favorite in your own kitchen.

    Whether for entertaining or indulging in a restaurant-style treat at home, this dish delivers bold flavor and irresistible crunch in every bite.