Category: quick_meals

  • Fresh, Flavorful, and Fast: Easy Salmon “Sushi” Bowls You Can Make at Home

    Fresh, Flavorful, and Fast: Easy Salmon “Sushi” Bowls You Can Make at Home

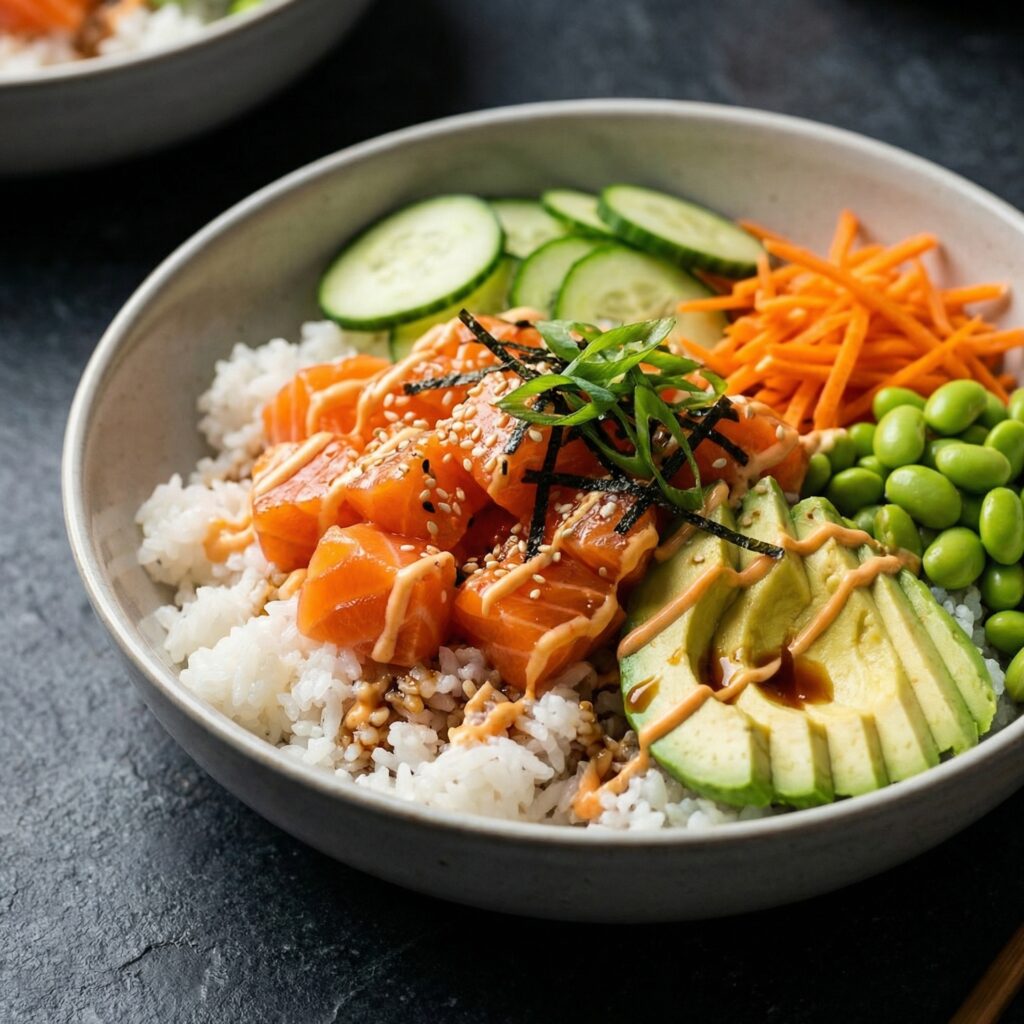
    Sushi doesn’t have to be intimidating—or require a trip to your favorite Japanese restaurant. With Easy Salmon “Sushi” Bowls, you get all the bright, fresh flavors of sushi in a simple, deconstructed format.

    These bowls are perfect for weeknight dinners, meal prep, or even a casual gathering with friends. Juicy salmon, tender rice, crisp veggies, and a punchy sauce come together to create a satisfying, customizable dish that’s as fun to make as it is to eat.

    Let’s dive into this step-by-step guide so you can assemble vibrant, restaurant-quality bowls at home.
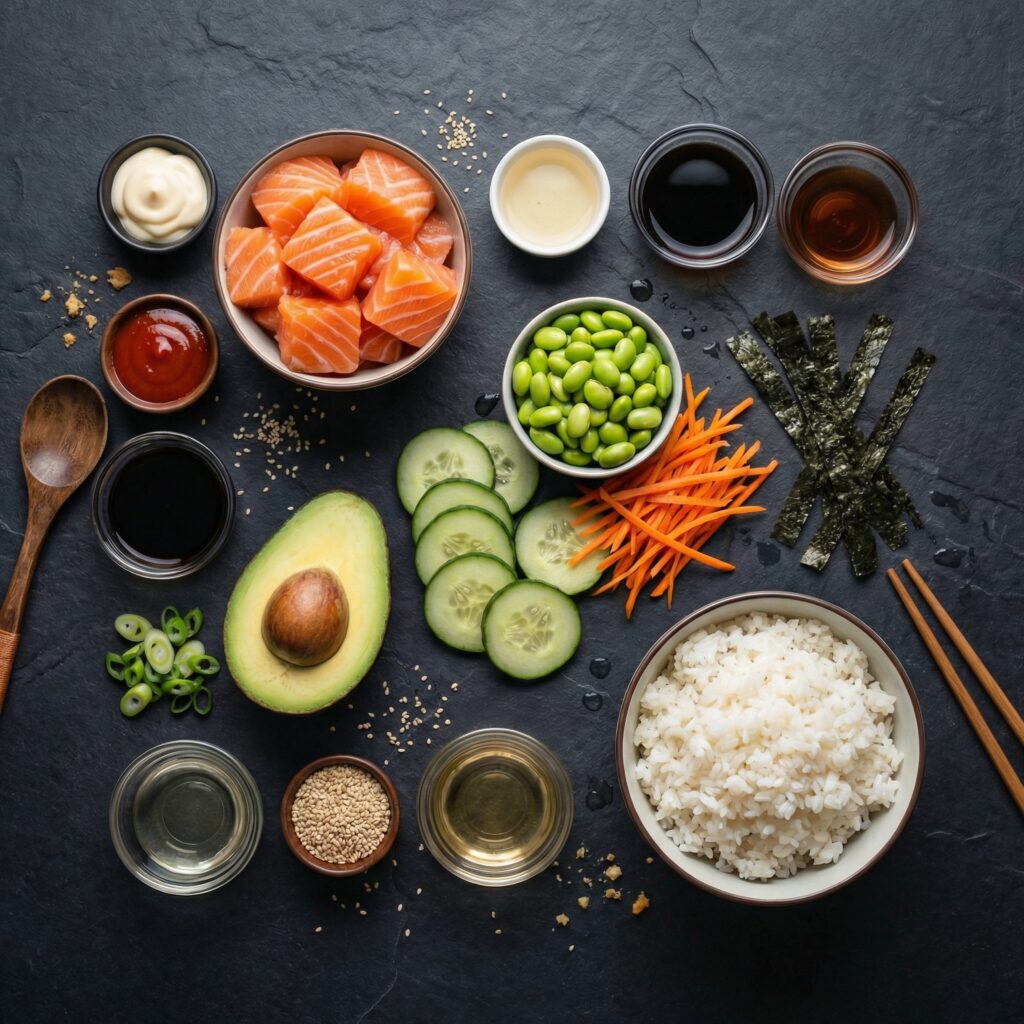

    Ingredients

    For the base:

    • 2 cups sushi rice
    • 2 ¼ cups water
    • 3 tablespoons rice vinegar
    • 1 tablespoon sugar
    • 1 teaspoon salt

    For the salmon:

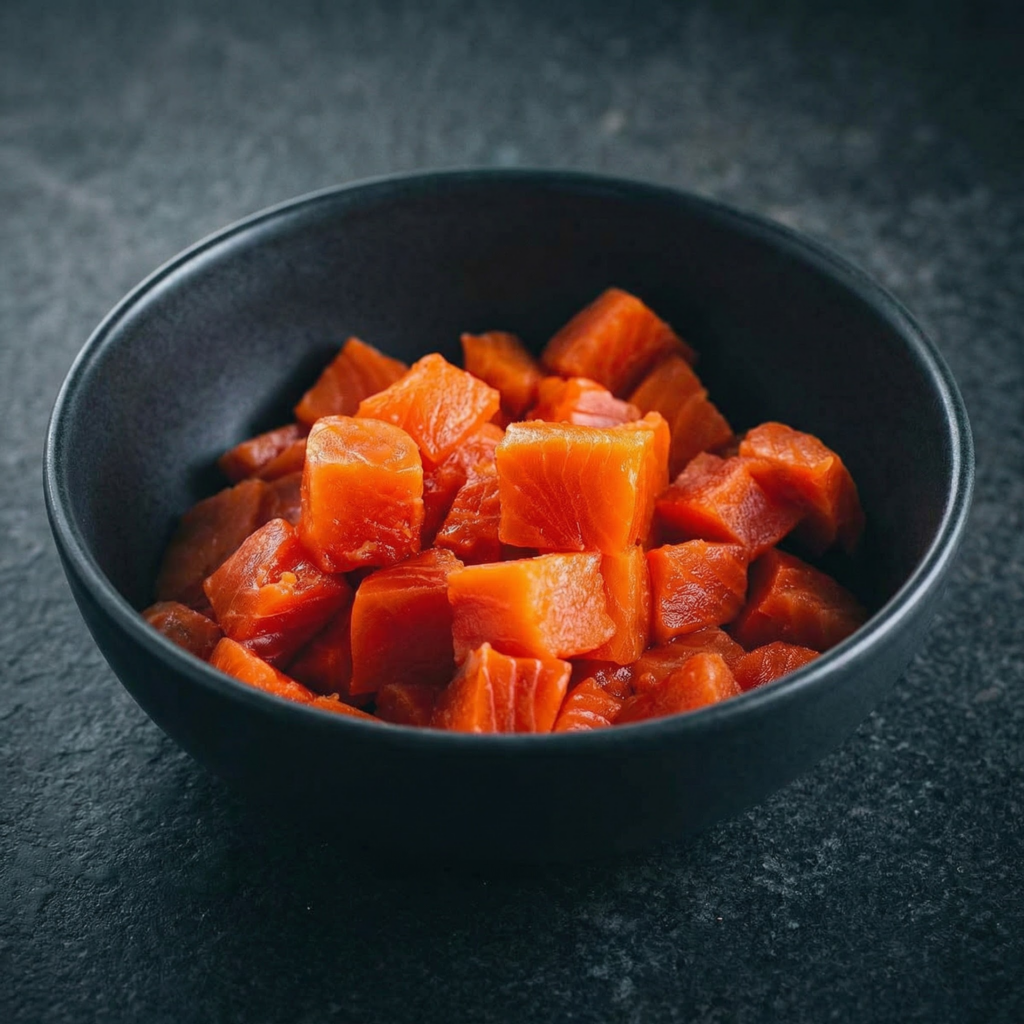
    • 8–10 ounces sushi-grade salmon, cut into cubes
    • 1 teaspoon sesame oil
    • 1–2 teaspoons soy sauce
    • ½ teaspoon sriracha or chili paste (optional)

    For the vegetables and toppings:

    • 1 small cucumber, thinly sliced or julienned
    • 1 ripe avocado, sliced
    • 1 medium carrot, shredded or julienned
    • 2–3 radishes, thinly sliced
    • 1 sheet nori, cut into thin strips (optional)
    • 1 tablespoon sesame seeds
    • Green onions, sliced, for garnish
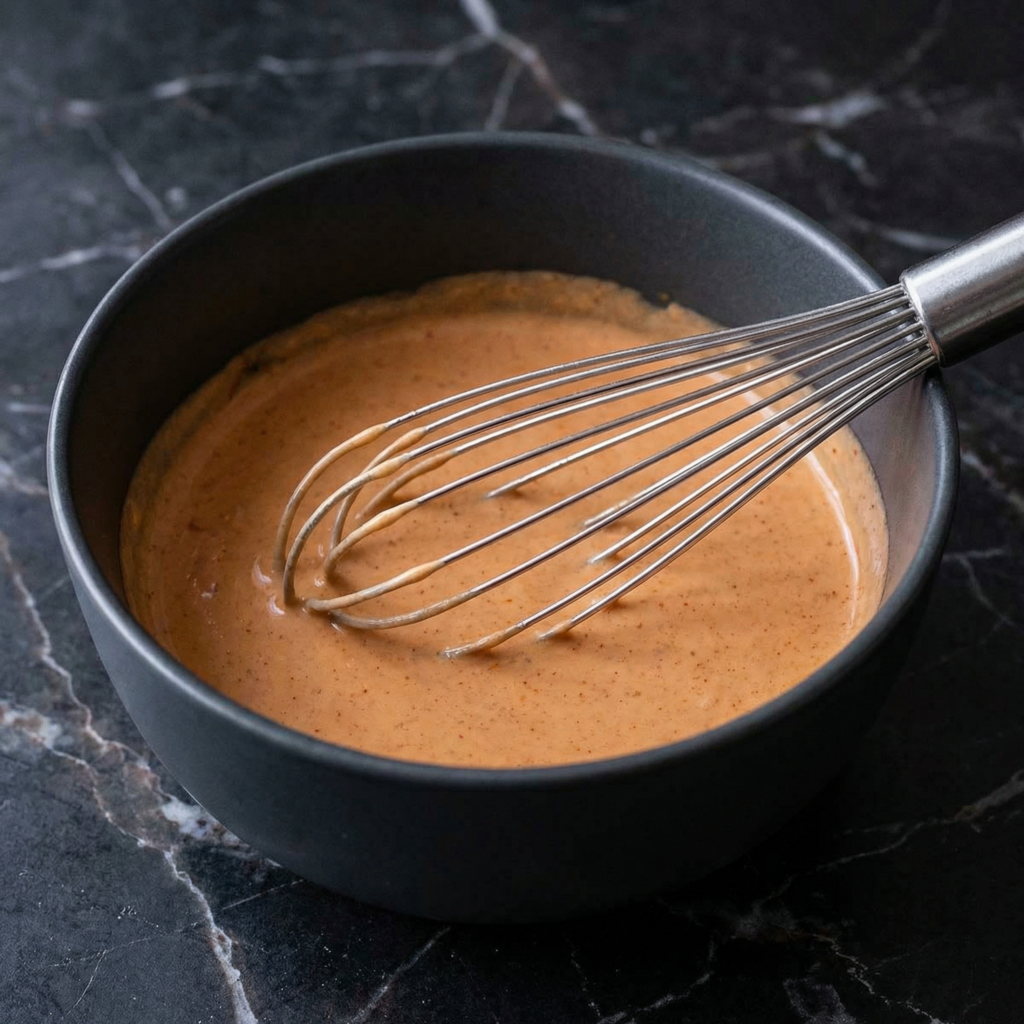
    For the sauce:

    • 3 tablespoons mayonnaise (Japanese mayo preferred)
    • 1 teaspoon sriracha (or more to taste)
    • 1 teaspoon soy sauce
    • 1 teaspoon lime or lemon juice

    Step 1: Cook the Sushi Rice

    Rinse the rice under cold water until the water runs mostly clear. This removes excess starch, giving you rice that’s tender but not sticky.

    Combine the rinsed rice and water in a rice cooker or saucepan. If using a pot, bring to a boil, then reduce to low, cover, and simmer for 15 minutes. Remove from heat and let it sit, covered, for another 10 minutes to steam.


    Step 2: Season the Rice

    In a small bowl, mix rice vinegar, sugar, and salt until dissolved. Transfer the cooked rice to a large bowl and fold in the vinegar mixture gently.

    Avoid stirring aggressively to keep the grains intact.

    Allow the rice to cool to slightly warm or room temperature.


    Step 3: Prepare the Salmon

    Cut the sushi-grade salmon into bite-sized cubes. In a small bowl, combine sesame oil, soy sauce, and sriracha (if using).

    Toss the salmon cubes gently in the marinade and set aside for 5–10 minutes. This adds flavor without cooking the fish, maintaining its silky texture.


    Step 4: Prepare the Sauce

    In another small bowl, mix mayonnaise, sriracha, soy sauce, and lime juice.

    Adjust the spice level to your liking. The sauce will provide a creamy, tangy kick that complements the salmon perfectly.


    Step 5: Prep the Veggies

    While the rice is cooling and the salmon is marinating, prep the vegetables. Slice cucumber, radishes, and carrot.

    Cut the avocado just before serving to prevent browning. Arrange them neatly for easy assembly.


    Step 6: Assemble the Bowls

    Start by dividing the sushi rice evenly among serving bowls. Arrange the salmon cubes over the rice, then add cucumber, carrot, avocado, radishes, and nori strips on top.

    Drizzle with the prepared spicy mayo sauce.

    Finish by sprinkling sesame seeds and sliced green onions over the top for flavor and color.


    Step 7: Optional Additions

    • Pickled ginger or kimchi for a tangy bite
    • Masago (smelt roe) or tobiko for a crunchy, salty pop
    • Edamame beans for extra protein and texture
    • A drizzle of unagi or soy glaze for sweetness

    Step 8: Serve Immediately

    These bowls are best enjoyed fresh to preserve the salmon’s silky texture and the crispness of the vegetables.

    The rice should be slightly warm or at room temperature—never hot, as that can partially cook the raw salmon.


    Tips for Perfect Sushi Bowls

    • Use sushi-grade salmon: Freshness is key. Never use frozen or raw salmon not labeled safe for raw consumption.
    • Rinse rice properly: This prevents a mushy base.
    • Balance flavors: Adjust the spicy mayo and soy sauce to your taste.
    • Prep ingredients ahead: You can cook the rice in advance and prep the vegetables for faster assembly.
    • Customize toppings: Don’t be afraid to experiment with vegetables, pickles, or garnishes.

    Why This Dish Works

    The combination of lightly marinated salmon, perfectly seasoned rice, and fresh, crisp vegetables creates a dish with varied textures and flavors.

    The spicy mayo adds richness, while the citrus and soy elements bring brightness and umami. Each bite balances creamy, crunchy, savory, and tangy notes—just like sushi, but in an approachable, customizable bowl form.


    Meal Prep and Storage

    These bowls are excellent for meal prep, but assemble them fresh for best results. Store cooked rice separately in an airtight container in the fridge for up to 3 days.

    Keep the salmon chilled and prepare veggies in advance.

    Assemble bowls right before eating to maintain freshness and texture.


    Variations

    • Shrimp Sushi Bowl: Swap salmon for cooked or raw shrimp.
    • Vegetarian Option: Replace salmon with marinated tofu or avocado for a plant-based bowl.
    • Spicy Crunch: Add tempura flakes or crispy onions on top for extra texture.
    • Citrus Twist: Add mandarin orange slices or a squeeze of lemon for brightness.

    The Takeaway

    Easy Salmon “Sushi” Bowls bring all the vibrant flavors of sushi into a simple, home-cooked meal.

    They’re perfect for anyone who loves sushi but wants a fast, flexible option without rolling and cutting nigiri. With tender salmon, crisp vegetables, perfectly seasoned rice, and a spicy, tangy sauce, this bowl is balanced, flavorful, and visually stunning.

    Whether for a weeknight dinner, a lunch meal prep, or a weekend treat, these bowls are satisfying, wholesome, and guaranteed to impress. Once you try them, you’ll realize how simple it is to recreate restaurant-quality sushi right in your own kitchen—without the hassle.

  • Creamy, Cozy, and Classic: The Ultimate Homemade Beef Stroganoff

    Creamy, Cozy, and Classic: The Ultimate Homemade Beef Stroganoff

    When it comes to hearty comfort food, few dishes rival the rich, creamy satisfaction of Beef Stroganoff.

    Tender strips of beef, savory mushrooms, and onions simmered in a velvety sour cream sauce—served over buttery egg noodles—make this dish a timeless favorite. It’s elegant enough for guests but simple enough for a cozy weeknight dinner.

    This step-by-step guide will show you exactly how to achieve perfectly tender beef and a silky, flavorful sauce every time.


    Why You’ll Love This Beef Stroganoff

    • Rich, creamy, and deeply savory
    • Tender beef with perfectly cooked mushrooms
    • Ready in about 40 minutes
    • Perfect over noodles, rice, or mashed potatoes
    • Ideal for family dinners or special occasions

    The key to an incredible stroganoff is properly searing the beef and building layers of flavor in the sauce.


    Ingredients You’ll Need

    For the Stroganoff:

    • 1 ½ pounds beef sirloin or tenderloin, thinly sliced
    • Salt and black pepper, to taste
    • 2 tablespoons olive oil or butter
    • 1 medium onion, thinly sliced
    • 8 ounces mushrooms, sliced
    • 2 cloves garlic, minced
    • 2 tablespoons all-purpose flour
    • 1 cup beef broth
    • 1 tablespoon Worcestershire sauce
    • 1 teaspoon Dijon mustard
    • 1 cup sour cream
    • Fresh parsley, chopped (for garnish)

    For Serving:

    • 12 ounces egg noodles (or rice/mashed potatoes)

    Step 1: Prepare the Beef

    Slice the beef into thin strips, about ¼-inch thick. Cutting against the grain ensures tenderness.

    Pat the beef dry with paper towels and season lightly with salt and black pepper. Removing excess moisture helps achieve a proper sear.


    Step 2: Cook the Noodles

    Bring a large pot of salted water to a boil and cook the egg noodles according to package instructions. Drain and toss lightly with butter to prevent sticking. Set aside.

    Cooking the noodles early allows you to focus fully on the sauce later.


    Step 3: Sear the Beef

    Heat 1 tablespoon of oil or butter in a large skillet over medium-high heat.

    Working in batches (to avoid overcrowding), add the beef in a single layer. Sear for about 1–2 minutes per side until browned but not fully cooked through. Remove and set aside.

    Avoid overcooking at this stage—the beef will finish cooking in the sauce later.


    Step 4: Sauté the Vegetables

    In the same skillet, add the remaining tablespoon of oil if needed.

    Add the sliced onions and cook for 3–4 minutes until softened and slightly caramelized. Stir in the mushrooms and cook for another 5–7 minutes until they release their moisture and become golden.

    Add the minced garlic and cook for 30 seconds until fragrant.

    These layers create the deep, savory base of the stroganoff.


    Step 5: Build the Sauce

    Sprinkle the flour over the mushroom mixture and stir to coat evenly. Cook for 1–2 minutes to eliminate the raw flour taste.

    Slowly pour in the beef broth while stirring constantly to prevent lumps. Scrape the bottom of the pan to lift any browned bits—this adds incredible flavor.

    Stir in Worcestershire sauce and Dijon mustard. Bring the mixture to a gentle simmer and let it thicken for 3–5 minutes.


    Step 6: Add the Beef Back

    Return the seared beef (and any accumulated juices) to the skillet. Stir gently to combine.

    Simmer for 3–4 minutes, just until the beef is tender and cooked through. Avoid prolonged simmering, as it can make the beef tough.


    Step 7: Stir in the Sour Cream

    Reduce the heat to low and stir in the sour cream. Mix gently until fully incorporated and creamy.

    Do not boil after adding sour cream, as high heat can cause it to curdle. The sauce should be smooth, rich, and velvety.

    Taste and adjust seasoning with additional salt and pepper if needed.


    Step 8: Serve and Garnish

    Spoon the beef stroganoff generously over the prepared egg noodles.

    Sprinkle freshly chopped parsley on top for brightness and color.

    Serve immediately while warm and creamy.


    Flavor and Texture Highlights

    • Tender, juicy beef strips
    • Earthy, golden mushrooms
    • Silky, creamy sauce with subtle tang
    • Savory depth from Worcestershire and mustard
    • Comforting base of buttery noodles

    Every bite is rich yet balanced, hearty yet elegant.


    Tips for Perfect Beef Stroganoff

    Choose the right cut. Sirloin or tenderloin works best for quick cooking and tenderness.

    Don’t overcrowd the pan. Searing in batches ensures browning instead of steaming.

    Deglaze the pan. Scraping up browned bits enhances the sauce’s flavor.

    Control the heat. Keep it low after adding sour cream to maintain a smooth texture.

    Slice against the grain. This is essential for tender beef.


    Optional Variations

    • Add White Wine: Deglaze the pan with ¼ cup white wine before adding broth.
    • Creamier Sauce: Substitute half of the sour cream with heavy cream.
    • Extra Herbs: Add thyme or a bay leaf while simmering.
    • Mushroom Lover’s Version: Double the mushrooms for deeper earthy flavor.
    • Low-Carb Option: Serve over cauliflower mash or zucchini noodles.

    Storage and Reheating

    Store leftovers in an airtight container in the refrigerator for up to 3 days.

    Reheat gently over low heat on the stovetop, adding a splash of broth or cream to loosen the sauce. Avoid microwaving at high heat to prevent sauce separation.

    Beef stroganoff is best enjoyed fresh, but careful reheating keeps it delicious.


    Why This Recipe Works

    This Beef Stroganoff succeeds because of careful layering. Searing the beef locks in flavor, sautéing the mushrooms builds depth, and thickening the broth creates structure for the creamy finish. The sour cream adds signature tang and richness without overpowering the savory base.

    Cooking the beef briefly and finishing it in the sauce ensures tenderness, while gentle heat maintains a silky texture.


    With its creamy sauce, tender beef, and comforting noodles, this Beef Stroganoff recipe delivers timeless comfort in every bite. It’s hearty, satisfying, and elegant enough to impress while remaining simple enough for everyday cooking.

    Whether served for a family meal or a cozy dinner for two, this dish is sure to become a repeat favorite—rich, creamy, and utterly comforting from the first forkful to the last.