Category: quick_meals

  • Spinach Ricotta Stuffed Lasagna Rolls: Individual Bites of Heaven

    Spinach Ricotta Stuffed Lasagna Rolls: Individual Bites of Heaven

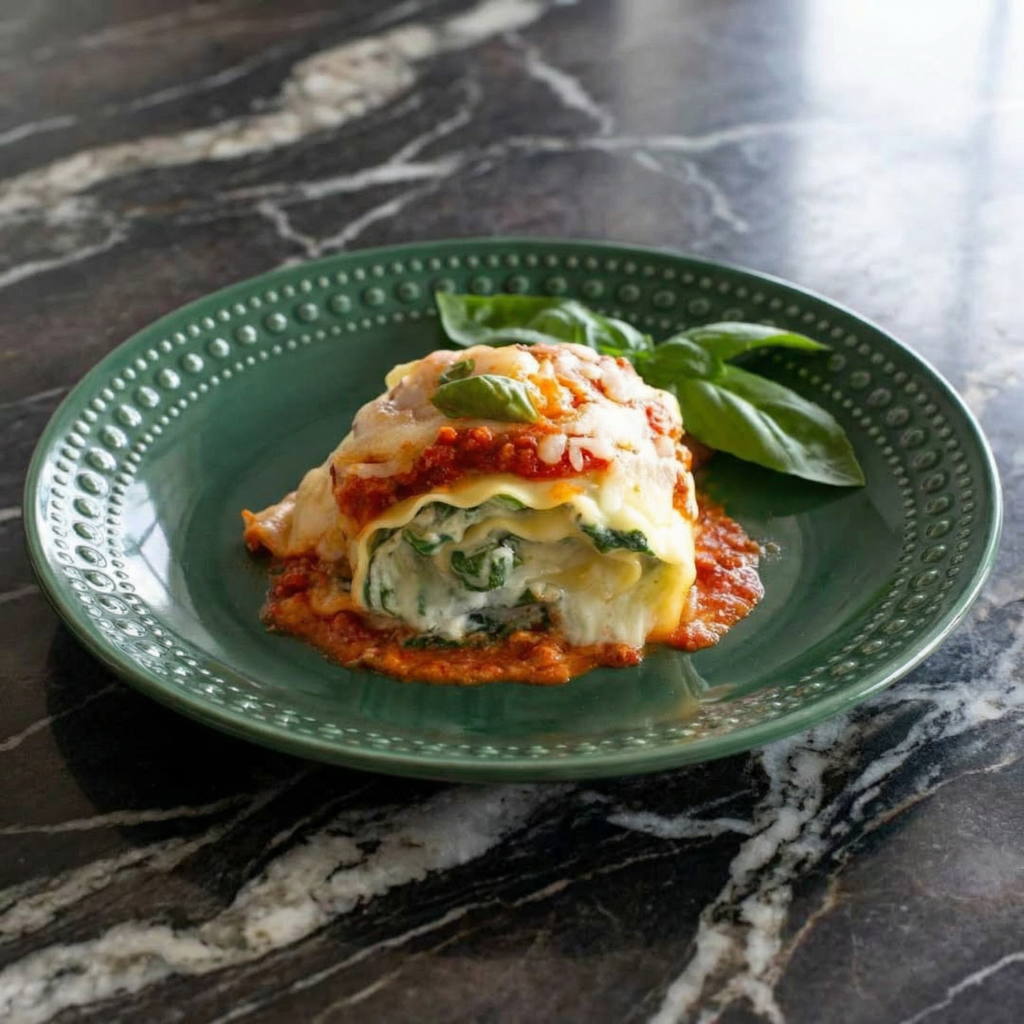
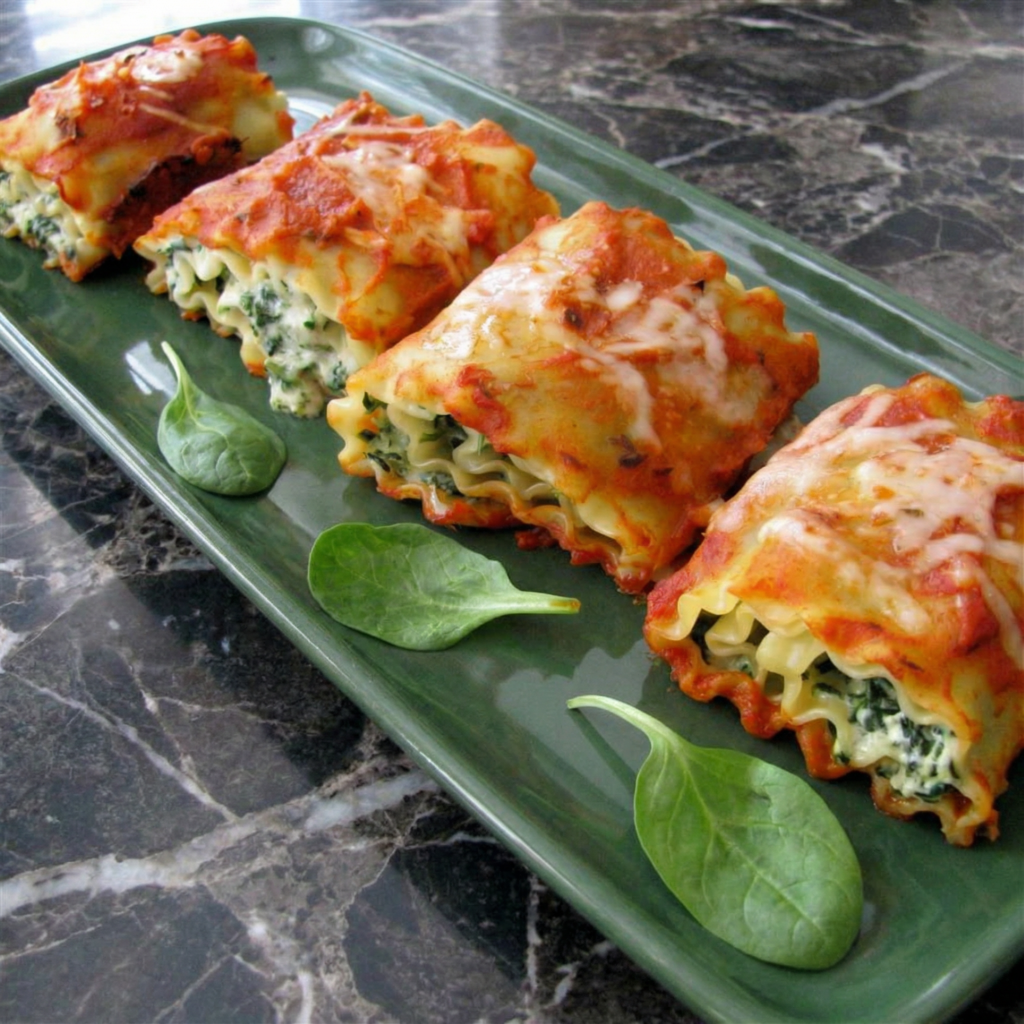
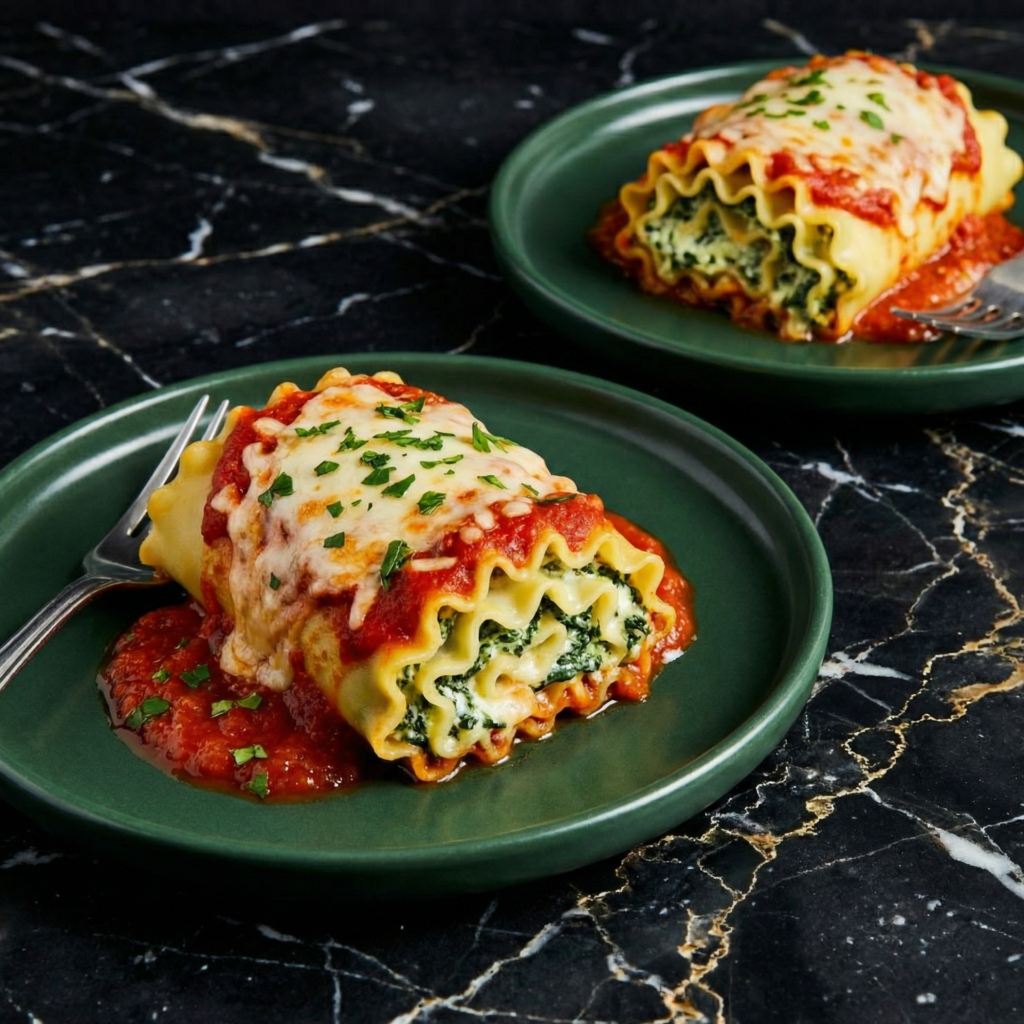
    Lasagna is glorious, but lasagna rolls? They’re something else. Each one is a perfectly portioned spiral of tender pasta, creamy spinach-ricotta filling, and melty cheese—like a little gift wrapped just for you. No messy slicing, no fighting over the corner piece (though that’s still a valid debate).

    These rolls have all the comfort of traditional lasagna but come together faster and look stunning on the plate. Make them for a weeknight dinner, a dinner party, or meal prep for the week. They freeze beautifully, reheat like a dream, and will make you wonder why you ever made lasagna any other way.

    Ingredients

    Serves 4-6 (makes 10-12 rolls).

    For the Lasagna Rolls:

    • 12 lasagna noodles (about 1 box)
    • 15 oz (425g) whole milk ricotta cheese
    • 10 oz (300g) frozen spinach, thawed and squeezed completely dry
    • 1 cup grated Parmesan cheese, divided
    • 1 large egg, lightly beaten
    • 2 cloves garlic, minced
    • ¼ tsp freshly grated nutmeg
    • ½ tsp salt
    • ¼ tsp black pepper
    • 2 cups shredded mozzarella cheese, divided

    For the Sauce:

    • 24 oz (680g) marinara sauce (jarred or homemade)
    • 1 tbsp olive oil
    • 2 cloves garlic, minced (optional)
    • Fresh basil, for garnish

    Step-by-Step Instructions

    Step 1: Cook the Noodles

    1. Bring a large pot of salted water to a boil. Cook lasagna noodles according to package directions until al dente (about 1 minute less than the box says—they’ll finish cooking in the oven).
    2. Drain and lay noodles flat on a parchment-lined baking sheet to prevent sticking. Drizzle with a tiny bit of oil if needed.

    Step 2: Make the Filling

    1. Thaw frozen spinach completely. Place in a clean kitchen towel and wring out every drop of water. Squeeze like your life depends on it—wet spinach = soggy rolls.
    2. In a large bowl, combine ricotta, squeezed spinach, ½ cup Parmesan, egg, garlic, nutmeg, salt, and pepper. Mix until well combined. Taste and adjust seasoning.

    Step 3: Prep the Sauce

    1. In a small saucepan, warm marinara sauce with olive oil and minced garlic (if using). Simmer for 5 minutes to meld flavors.
    2. Spread 1 cup of the sauce evenly over the bottom of a 9×13-inch baking dish.

    Step 4: Assemble the Rolls

    1. Lay a lasagna noodle flat on a clean surface. Spread about 2-3 tablespoons of the ricotta mixture evenly over the noodle, leaving a small border at the edges.
    2. Sprinkle with a little shredded mozzarella.
    3. Carefully roll the noodle up from one short end to form a tight spiral. Place seam-side down in the prepared baking dish.
    4. Repeat with remaining noodles and filling.

    Step 5: Top and Bake

    1. Pour the remaining marinara sauce over the rolls, spreading to cover them completely.
    2. Sprinkle with remaining mozzarella cheese and remaining ½ cup Parmesan.
    3. Cover with foil and bake at 375°F (190°C) for 25 minutes.
    4. Remove foil and bake another 10-15 minutes until cheese is melted, bubbly, and golden in spots.

    Step 6: Rest and Serve

    1. Let the rolls rest for 10 minutes before serving. This allows them to set up so you get clean, beautiful rolls.
    2. Garnish with fresh basil. Serve with a simple green salad and crusty bread.
    3. Take a bite. Let the cheese stretch. You’ve just made the coziest Italian comfort food imaginable.

    Summary

    Prep Time: 25 minutes | Cook Time: 35 minutes | Total Time: 1 hour

    Yield: 10-12 rolls (serves 4-6)

    Difficulty: Easier than traditional lasagna

    Storage Notes

    Leftovers:

    Store in an airtight container in the fridge for up to 4 days. The flavors meld beautifully overnight.

    Reheating:

    Oven (best): Cover with foil and bake at 350°F for 15-20 minutes. Microwave: Individual rolls in 60-90 seconds—cover with a damp paper towel to prevent drying out.

    Freezer-Friendly (Meal Prep Dream):

    Assemble rolls in the baking dish but don’t bake. Cover tightly with plastic wrap and foil, freeze for up to 3 months. To bake from frozen: remove plastic wrap, cover with foil, and bake at 375°F for 45-50 minutes. Remove foil and bake another 10-15 minutes until bubbly.

    Make Ahead:

    Assemble the rolls up to 24 hours in advance and refrigerate. Add 10-15 minutes to the bake time when cooking from cold.

    Pro Tips for Lasagna Roll Greatness:

    • Squeeze that spinach. Excess moisture is the enemy of creamy filling. Get it as dry as possible.
    • Don’t overcook the noodles. Cook until al dente—they’ll soften more during baking. Overcooked noodles tear when rolling.
    • Lay noodles flat. After draining, lay them in a single layer on a baking sheet. If they stick, a light drizzle of oil helps.
    • Spread filling evenly. Too much filling = bursting rolls. Too little = sad rolls. Aim for a thin, even layer.
    • Roll tight but not too tight. Firm enough to hold shape, but leave room for the filling to expand.
    • Seam-side down. Placing rolls seam-side down keeps them from unrolling during baking.
    • Rest before serving. 10 minutes lets the rolls set up for clean, beautiful portions.
  • Thai Basil Chicken: 15-Minute Flavor Explosion

    Thai Basil Chicken: 15-Minute Flavor Explosion

    If you’ve ever been to Thailand, you know pad kra pao. It’s the sizzling, fragrant, spicy stir-fry that vendors cook up on street corners, the smell of garlic and chilies hitting you before you even see the cart. Chicken wok-tossed with mountains of Thai basil, served over rice with a fried egg that has crispy, lacy edges and a runny yolk.

    This is the real deal. It’s fast, it’s fiery, and it’s deeply satisfying. The secret is the sauce—a balance of fish sauce, oyster sauce, and a touch of sugar—and the basil. Holy basil is traditional, but Thai basil works beautifully. Make it once, and you’ll understand why it’s Thailand’s national comfort food.

    Ingredients

    Serves 2-3.

    For the Stir Fry:

    • 1 lb chicken (or pork, beef, or tofu)
    • 6-8 Thai bird chilies, thinly sliced (adjust to your heat tolerance)
    • 5 cloves garlic, minced
    • 1 shallot, thinly sliced
    • 2 cups fresh holy basil or Thai basil leaves (packed—don’t skimp)
    • 2 tbsp neutral oil (vegetable or avocado)
    • Jasmine rice, for serving
    • 2-3 fried eggs, for topping (crispy edges, runny yolks)

    For the Sauce:

    • 2 tbsp fish sauce
    • 1 tbsp oyster sauce
    • 1 tbsp soy sauce (or dark soy for color)
    • 1 tsp sugar (palm sugar is traditional, but brown or white works)
    • 2 tbsp water

    For Serving:

    • Fresh cilantro, for garnish (optional)
    • Lime wedges
    • Extra fish sauce and chili flakes, on the side

    Step-by-Step Instructions

    Step 1: Make the Sauce

    1. In a small bowl, whisk together fish sauce, oyster sauce, soy sauce, sugar, and water. Set aside.

    Step 2: Prep the Aromatics

    1. Using a mortar and pestle (or just a knife), roughly pound or chop the chilies, garlic, and shallot together until they form a coarse paste. This releases more flavor than chopping separately.

    Step 3: Cook the Aromatics

    1. Heat oil in a wok or large skillet over high heat until smoking.
    2. Add the chili-garlic-shallot paste and stir-fry for 30 seconds until incredibly fragrant. Open a window—this is powerful stuff.

    Step 4: Brown the Chicken

    1. Add chicken to the wok. Break it up with a spatula and cook, without stirring too much, until it starts to brown and caramelize, about 3-4 minutes.
    2. Let it get crispy edges—this adds texture and flavor.

    Step 5: Add the Sauce

    1. Pour the sauce over the chicken. Stir-fry for 1-2 minutes until the sauce reduces and coats the meat.

    Step 6: Add the Basil

    1. Turn off the heat. Add all the basil leaves and stir until they wilt from the residual heat. The basil should be fragrant and slightly wilted, not completely cooked down.

    Step 7: Fry the Eggs

    1. In a separate pan, fry eggs in hot oil until the edges are crispy and lacy and the yolks are still runny. Season with a pinch of salt.

    Step 8: Assemble and Serve

    1. Scoop jasmine rice into bowls. Top with the Thai basil chicken.
    2. Place a fried egg on top of each bowl, letting that golden yolk get ready to spill.
    3. Garnish with fresh cilantro if desired and serve with lime wedges.
    4. Break the yolk. Let it run into the chicken and rice. Take a bite. Close your eyes. You’re on a Bangkok street corner now.

    Summary

    Prep Time: 5 minutes | Cook Time: 10 minutes | Total Time: 15 minutes

    Yield: 2-3 servings

    Difficulty: Street food easy

    Storage Notes

    Leftovers:

    Store in an airtight container in the fridge for up to 3 days. The flavors meld beautifully overnight. Store egg separately if possible—it’s best made fresh.

    Reheating:

    Skillet or wok (best): Reheat over medium-high heat with a splash of water to revive the sauce. Microwave: Works in a pinch—cover with a damp paper towel to prevent drying out. Make a fresh egg to top.

    Make Ahead:

    Mix the sauce up to a week ahead. Prep the chili-garlic paste up to 2 days ahead. The stir-fry itself is best made fresh—it takes 10 minutes!

    Pro Tips for Pad Kra Pao Greatness:

    • Holy basil is the real deal. If you can find it at an Asian market, use it. It has a peppery, slightly spicy flavor that’s irreplaceable. Thai basil (with purple stems) is a great substitute. Sweet Italian basil will work in a pinch but won’t have the same kick.
    • Don’t skimp on the basil. The recipe calls for 2 cups packed—that’s not a garnish, it’s a main ingredient.
    • High heat is essential. A screaming-hot wok gives you that smoky, caramelized flavor. Don’t be afraid of a little smoke.
    • Crispy egg is non-negotiable. The runny yolk becomes the sauce. Fry it in plenty of oil until the edges are lacy and crisp.
    • Adjust the heat. Thai bird chilies are no joke. Start with fewer if you’re sensitive, and serve with extra chili flakes on the side.
    • Pound the aromatics. Using a mortar and pestle (or a rough chop) releases more oils than a fine mince. It’s worth the extra minute.

    Variations:

    • Pad kra pao pork: Use ground pork instead of chicken—it’s the traditional version.
    • Pad kra pao beef: Use ground beef for a richer flavor.
    • Pad kra pao tofu: Use crumbled firm tofu for a vegetarian version. Add a splash more soy sauce to compensate for the missing fish sauce.
    • Seafood version: Use chopped shrimp or squid—cook quickly and don’t overcook.
    • Crispy pork version: Top with crispy fried pork belly (moo grob) for next-level indulgence.
    • Extra vegetables: Add green beans, bell peppers, or bamboo shoots for more texture.

    What to Serve With It:

    • Jasmine rice (essential)
    • Fried egg (essential)
    • Cucumber slices (for freshness)
    • Nam pla prik (fish sauce with fresh chilies) on the side
    • Ice-cold Thai iced tea or Singha beer

    Holy Basil vs. Thai Basil vs. Sweet Basil:

    Holy basil (kra pao): Peppery, slightly spicy, with purple-tinged leaves. The authentic choice. Thai basil: Anise-like flavor, purple stems. Great substitute. Sweet basil: Mild, slightly sweet. Works in a pinch but won’t have that signature kick.

  • Udon Stir Fry: Chewy Noodles and Bold Sauce

    Udon Stir Fry: Chewy Noodles and Bold Sauce

    Udon noodles are comfort in carbohydrate form—thick, bouncy, and impossibly satisfying. When you toss them in a hot wok with crisp vegetables, a punchy stir-fry sauce, and whatever protein you have on hand, magic happens. Fast, flavorful, and deeply slurpable.

    This stir fry comes together in the time it takes to order delivery. The sauce is a perfect balance of savory, sweet, and umami. The noodles soak up every drop. And it’s endlessly adaptable—chicken, shrimp, tofu, or just vegetables. Make it once, and it’ll be in your weeknight rotation forever.

    Ingredients

    Serves 2-3.

    For the Noodles and Stir Fry:

    • 2 packs (about 14 oz) fresh or frozen udon noodles (or dried)
    • 2 tbsp neutral oil (vegetable, avocado, or canola)
    • 1 lb chicken breast or thighs, thinly sliced (or shrimp, beef, or tofu)
    • 1 bell pepper, thinly sliced
    • 1 carrot, julienned or thinly sliced
    • 1 cup snap peas or broccoli florets
    • 2 green onions, sliced (white and green parts separated)
    • 2 cloves garlic, minced
    • 1 tbsp ginger, grated
    • Sesame seeds, for garnish

    For the Stir Fry Sauce:

    • ¼ cup soy sauce (low sodium preferred)
    • 2 tbsp oyster sauce
    • 1 tbsp mirin (or honey)
    • 1 tbsp sesame oil
    • 1 tsp brown sugar
    • ½ tsp red pepper flakes (optional, for heat)
    • ¼ cup water or chicken broth
    • 1 tbsp cornstarch (for thickening)

    Step-by-Step Instructions

    Step 1: Prep the Noodles

    1. If using fresh or frozen udon, cook according to package directions (usually 1-2 minutes in boiling water). Drain, rinse with cold water to stop cooking, and toss with a tiny bit of oil to prevent sticking. Set aside.
    2. If using dried udon, cook until al dente, then drain and rinse.

    Step 2: Make the Sauce

    1. In a small bowl, whisk together soy sauce, oyster sauce, mirin, sesame oil, brown sugar, red pepper flakes, water, and cornstarch until smooth. Set aside.

    Step 3: Cook the Protein

    1. Heat 1 tbsp oil in a wok or large skillet over high heat. Add chicken (or your protein) in a single layer. Cook undisturbed for 2-3 minutes until browned, then flip and cook another 2-3 minutes until cooked through.
    2. Remove chicken to a plate and set aside.

    Step 4: Stir Fry the Vegetables

    1. Add remaining oil to the wok. Toss in garlic, ginger, and white parts of green onions. Stir-fry for 30 seconds until fragrant.
    2. Add bell pepper, carrot, and snap peas. Stir-fry for 2-3 minutes until vegetables are crisp-tender.

    Step 5: Combine Everything

    1. Return chicken to the wok. Add the cooked udon noodles.
    2. Pour the sauce over everything and toss vigorously to combine. Cook for 1-2 minutes until the sauce thickens and coats every strand of noodle.

    Step 6: Garnish and Serve

    1. Stir in the green parts of the green onions.
    2. Transfer to bowls. Sprinkle with sesame seeds and an extra drizzle of sesame oil if desired.
    3. Serve immediately. Slurp loudly. It’s a compliment to the chef.

    Summary

    Prep Time: 10 minutes | Cook Time: 10 minutes | Total Time: 20 minutes

    Yield: 2-3 servings

    Difficulty: Faster than takeout

    Storage Notes

    Leftovers:

    Store in an airtight container in the fridge for up to 3 days. The noodles will absorb sauce overnight, making leftovers even more flavorful.

    Reheating:

    Skillet or wok (best): Reheat over medium-high heat with a splash of water or soy sauce to loosen the sauce. Microwave: Works in a pinch—cover with a damp paper towel to prevent drying out.

    Make Ahead:

    Prep all vegetables and sauce up to 2 days ahead. Cook noodles just before stir-frying for best texture. The whole dish comes together in minutes when everything is ready to go.

    Pro Tips for Udon Greatness:

    • High heat is non-negotiable. A screaming-hot wok gives you that smoky “wok hei” flavor. Don’t crowd the pan—work in batches if needed.
    • Prep everything first. Stir-frying moves fast. Have all ingredients measured and ready before you turn on the heat.
    • Don’t overcook the noodles. They’ll continue cooking in the wok. Slightly undercook them if boiling separately.
    • Cornstarch is the secret. It thickens the sauce so it clings to the noodles instead of pooling at the bottom.
    • Fresh udon is best. If you can find fresh or frozen udon in the refrigerated section, grab it. Dried works, but the texture won’t be as bouncy.

    Variations:

    • Vegetarian: Skip the chicken, use tofu or mushrooms, and substitute oyster sauce with vegetarian mushroom sauce or extra soy sauce.
    • Spicy udon: Add extra red pepper flakes, sriracha, or gochujang to the sauce.
    • Shrimp udon: Substitute chicken with shrimp—add during the last minute of vegetable stir-fry.
    • Beef udon: Use thinly sliced beef (like shabu-shabu or ribeye). Sear quickly and remove before vegetables.
    • Mushroom udon: Add shiitake or king oyster mushrooms for extra umami.
    • Curry udon: Add a teaspoon of curry powder to the sauce for Japanese curry flavor.

    Quick Sauce Swaps:

    • Teriyaki style: Use teriyaki sauce instead of the stir-fry sauce.
    • Peanut style: Add 2 tbsp peanut butter and a splash of rice vinegar to the sauce.
    • Garlic sesame: Double the garlic and add an extra drizzle of sesame oil at the end.
  • Pineapple Fried Rice: Sweet, Savory and Served in a Pineapple

    Pineapple Fried Rice: Sweet, Savory and Served in a Pineapple

    Pineapple fried rice is what happens when savory meets sweet and they decide to throw a party. Fragrant jasmine rice, wok-tossed with juicy chunks of pineapple, plump shrimp, crunchy cashews, and a whisper of curry powder—all served in a hollowed-out pineapple that doubles as the coolest bowl you’ll ever eat from.

    This Thai street food classic hits every note: sweet from the pineapple, savory from the fish sauce and soy, nutty from the cashews, and a little heat from the curry. It’s the kind of meal that feels like a celebration, even if it’s just Tuesday night. And yes, you can absolutely serve it in a pineapple. You only live once.

    Ingredients

    Serves 2-3 hungry people.

    For the Fried Rice:

    • 1 large ripe pineapple (or 2 cups fresh pineapple chunks)
    • 3 cups cooked jasmine rice, preferably day-old and cold
    • 2 tbsp neutral oil (vegetable or avocado)
    • ½ lb large shrimp, peeled and deveined (or chicken, or tofu)
    • 2 cloves garlic, minced
    • 1 shallot, thinly sliced
    • 1 red bell pepper, diced
    • ½ cup frozen peas and carrots (or fresh)
    • 2 green onions, sliced (white and green parts separated)
    • ½ cup roasted cashews
    • 2 eggs, lightly beaten (optional, but classic)

    For the Sauce:

    • 2 tbsp fish sauce
    • 1 tbsp soy sauce (or tamari)
    • 1 tbsp oyster sauce
    • 1 tsp curry powder
    • 1 tsp sugar

    For Serving:

    • Fresh cilantro, chopped
    • Lime wedges
    • Red pepper flakes or Sriracha (optional)

    Step-by-Step Instructions

    Step 1: Prep the Pineapple

    1. If using a whole pineapple for serving: slice it in half lengthwise through the leaves (so both halves have a leafy top). Using a knife, cut around the edges and scoop out the flesh with a spoon. Reserve the pineapple boats for serving.
    2. Chop the pineapple flesh into bite-sized chunks. You’ll need about 2 cups. Set aside.

    Step 2: Make the Sauce

    1. In a small bowl, whisk together fish sauce, soy sauce, oyster sauce, curry powder, and sugar. Set aside.

    Step 3: Scramble the Eggs (Optional)

    1. Heat a wok or large skillet over medium-high heat. Add a splash of oil. Pour in beaten eggs and scramble until just set. Remove to a plate.

    Step 4: Cook the Shrimp

    1. Add 1 tbsp oil to the wok. Add shrimp in a single layer and cook for 1-2 minutes per side until pink and curled. Remove and set aside.

    Step 5: Stir-Fry the Aromatics

    1. Add remaining oil to the wok. Toss in garlic, shallot, and white parts of green onions. Stir-fry for 30 seconds until fragrant.
    2. Add bell pepper and peas/carrots. Stir-fry for 1-2 minutes until slightly tender.

    Step 6: Add the Rice

    1. Add the cold rice to the wok, breaking up any clumps with your spatula. Toss to combine with the vegetables.
    2. Pour the sauce over the rice and stir-fry for 2-3 minutes until everything is well coated and the rice is heated through.

    Step 7: Add the Good Stuff

    1. Add the pineapple chunks, cooked shrimp, scrambled eggs, and cashews. Toss gently to combine and heat through, about 1-2 minutes.
    2. Stir in the green parts of the green onions. Taste and adjust seasoning—more fish sauce for salt, more lime for brightness.

    Step 8: Serve in Style

    1. Spoon the fried rice into your hollowed-out pineapple halves (or regular bowls, no judgment).
    2. Top with fresh cilantro and serve with lime wedges for squeezing.
    3. Add red pepper flakes or Sriraja if you like heat.
    4. Take a bite. Let the sweet pineapple and savory rice dance on your tongue. Pretend you’re on a beach in Thailand. You deserve this.

    Summary

    Prep Time: 15 minutes | Cook Time: 15 minutes | Total Time: 30 minutes

    Yield: 2-3 servings

    Difficulty: Wok it out

    Storage Notes

    Leftovers:

    Store in an airtight container in the fridge for up to 3 days. The flavors actually meld and get even better overnight.

    Reheating:

    Wok or skillet (best): Reheat over medium-high heat, adding a splash of water or soy sauce to revive the moisture. Microwave: Works in a pinch—cover with a damp paper towel to prevent drying out.

    Make Ahead:

    Cook rice a day ahead and refrigerate. Cold, day-old rice is essential for good fried rice—fresh rice turns to mush. Prep all ingredients ahead of time for a quick weeknight stir-fry.

    Pro Tips for Fried Rice Greatness:

    • Day-old rice is non-negotiable. Fresh rice is too moist and will clump. Spread it on a baking sheet in the fridge overnight for best results.
    • High heat is your friend. A screaming-hot wok gives you that smoky “wok hei” flavor. Don’t crowd the pan—work in batches if needed.
    • Prep everything before you start. Stir-frying moves fast. Have all ingredients measured and ready to go.
    • Don’t skip the curry powder. It’s subtle but gives that signature Thai yellow hue and warm flavor.
    • Cashews add crunch. Add them at the end so they stay crispy.

    Variations:

    • Chicken pineapple fried rice: Substitute shrimp with diced chicken breast.
    • Tofu version (vegetarian): Use firm tofu instead of shrimp, and substitute fish sauce with soy sauce.
    • Spicy version: Add fresh Thai bird chilies or extra red pepper flakes.
    • Bacon pineapple fried rice: Add crispy bacon for smoky saltiness.
    • Curry powder boost: Add an extra teaspoon for more intense curry flavor.

    Pineapple Boat Pro Tip:

    If using a pineapple boat, you can briefly heat the hollowed-out shells in the oven at 300°F for 5 minutes before filling. This warms the pineapple and adds a touch of sweetness to the rice that goes in. Just be careful—they get hot!

  • Eggs Florentine: The Brunch Classic You Need to Master

    Eggs Florentine: The Brunch Classic You Need to Master

    There’s something about eggs florentine. Maybe it’s the way the creamy, lemony hollandaise pools over a perfectly poached egg. Maybe it’s the moment that golden yolk spills out, mingling with the tender spinach and crisp English muffin. Or maybe it’s just that it feels like a celebration, even if you’re eating it in your pajamas on a Tuesday.

    Eggs Benedict gets all the glory, but florentine—with its bed of garlicky sautéed spinach—is the vegetarian version that might actually be better. And yes, you can make hollandaise without a meltdown. I’ll show you how.

    Ingredients

    Serves 2 (or 1 very hungry bruncher).

    For the Poached Eggs:

    • 4 large eggs, as fresh as possible
    • 1 tbsp white vinegar (helps the whites set)
    • Salt, for the water

    For the Spinach:

    • 8 oz fresh spinach (about 8 cups, packed)
    • 1 tbsp butter
    • 1 clove garlic, minced
    • Salt and pepper, to taste
    • Pinch of nutmeg (optional, but classic)

    For the Hollandaise Sauce:

    • ½ cup unsalted butter (1 stick)
    • 3 large egg yolks
    • 1 tbsp fresh lemon juice
    • ½ tsp salt
    • Pinch of cayenne or white pepper
    • 1 tsp water (for blending)

    For the Base:

    • 2 English muffins, split and toasted
    • Fresh chives or parsley, for garnish
    • Paprika, for dusting (optional)

    Step-by-Step Instructions

    Step 1: Make the Hollandaise (First—Trust Me)

    1. Melt butter in a small saucepan until hot and bubbly (but not browned). Keep warm.
    2. In a blender, combine egg yolks, lemon juice, salt, cayenne, and water. Blend for 5 seconds to combine.
    3. With the blender running on low, slowly drizzle in the hot butter in a thin stream. The sauce will thicken and emulsify into a creamy, silky hollandaise.
    4. Taste and adjust seasoning. Keep warm (but not hot—it can break) by setting the blender cup in a bowl of warm water.

    Step 2: Sauté the Spinach

    1. In a large skillet over medium heat, melt butter. Add garlic and cook for 30 seconds until fragrant.
    2. Add spinach in handfuls, stirring until wilted. Season with salt, pepper, and a pinch of nutmeg.
    3. Remove from heat and set aside. Squeeze out any excess liquid if needed.

    Step 3: Toast the Muffins

    1. Split English muffins and toast until golden and crisp. Set aside.

    Step 4: Poach the Eggs

    1. Fill a medium saucepan with about 3 inches of water. Add a pinch of salt and the vinegar. Bring to a gentle simmer (not a rolling boil—tiny bubbles only).
    2. Crack each egg into a small ramekin or cup. Swirl the water with a spoon to create a gentle vortex, then carefully slide the egg into the center. The swirling helps the white wrap around the yolk.
    3. Poach for 3-4 minutes for a runny yolk. Remove with a slotted spoon and drain on a paper towel.

    Step 5: Assemble

    1. Place toasted English muffin halves on plates. Top each with a generous pile of sautéed spinach.
    2. Carefully place a poached egg on top of each mound of spinach.
    3. Ladle warm hollandaise sauce over each egg. Let it cascade down the sides.

    Step 6: Garnish and Serve

    1. Sprinkle with fresh chives or parsley. Dust with a little paprika if desired.
    2. Serve immediately with a knife and fork (and extra napkins).
    3. Cut into that egg. Watch the yolk run. Take a bite that includes muffin, spinach, egg, and sauce all at once. This is brunch royalty.

    Summary

    Prep Time: 10 minutes | Cook Time: 20 minutes | Total Time: 30 minutes

    Yield: 2 servings

    Difficulty: Brunch flex

    Storage Notes

    Leftovers (Rare, But Possible):

    Eggs Florentine is best eaten immediately—poached eggs and hollandaise don’t reheat well. If you have leftover components, store separately in the fridge for up to 1 day.

    Reheating:

    Hollandaise: Gently warm in a bowl set over warm water, whisking constantly. Never microwave—it will break and scramble. Spinach: Reheat in a small skillet. Eggs: Best to poach fresh.

    Make Ahead Tips:

    • Hollandaise: Can be made up to 1 hour ahead and kept warm in a thermos or bowl over warm water.
    • Spinach: Can be sautéed a day ahead and reheated.
    • Poached eggs: Can be poached up to 1 day ahead, stored in cold water in the fridge, and reheated in simmering water for 30 seconds before serving.

    Pro Tips for Hollandaise Success:

    • Use the blender method. It’s foolproof and eliminates the risk of scrambled eggs.
    • Butter should be hot but not browned. Hot butter cooks the yolks just enough to thicken.
    • Keep it warm, not hot. Too much heat will break the emulsion.
    • If it breaks, fix it. Start with a fresh yolk and a teaspoon of warm water, then slowly whisk in the broken sauce. Rescue mission complete.

    Pro Tips for Poached Eggs:

    • Fresh eggs are essential. The whites hold together better.
    • Vinegar helps. It helps the egg whites coagulate faster.
    • Don’t boil. A gentle simmer is all you need—violent bubbles will shred your eggs.
    • Strain if you’re fancy. Crack each egg into a fine-mesh sieve to remove the watery whites. You’ll get perfect, compact poached eggs every time.

    Variations:

    • Eggs Benedict: Replace spinach with Canadian bacon or ham.
    • Eggs Royale: Add smoked salmon under the spinach.
    • Eggs Blackstone: Add a slice of tomato and crispy bacon.
    • Mushroom Florentine: Sauté mushrooms with the spinach.
  • The Ultimate Loaded Baked Potato

    The Ultimate Loaded Baked Potato

    The baked potato is humble. The loaded baked potato? That’s a star. A perfectly baked potato with a crispy, salty skin and a fluffy, steam-in-the-oven interior, split open and stuffed with all the good stuff—melty cheddar, crispy bacon, cool sour cream, and fresh chives.

    This is the kind of meal that asks very little of you but delivers everything. It’s a blank canvas for whatever you have in the fridge, but the classics are classic for a reason. Butter, cheese, bacon, and a dollop of sour cream. Maybe some broccoli if you’re feeling virtuous. Dinner is served.

    Ingredients

    Serves 4.

    For the Potatoes:

    • 4 large russet potatoes (the best for baking—high starch = fluffy interior)
    • 1 tbsp olive oil (for rubbing)
    • 1 tsp coarse salt (for the skin)

    For the Toppings Bar:

    • 1½ cups shredded sharp cheddar cheese
    • 8 slices bacon, cooked crispy and crumbled
    • 1 cup sour cream
    • 4 tbsp unsalted butter (1 tbsp per potato, minimum)
    • ¼ cup fresh chives or green onions, chopped
    • Salt and black pepper, to taste

    Optional Toppings (Because Why Not?):

    • Steamed broccoli florets
    • Chili (for a fully loaded meal)
    • Pickled jalapeños
    • Hot sauce
    • Extra cheese (always extra cheese)

    Step-by-Step Instructions

    Step 1: Preheat and Prep

    1. Preheat your oven to 400°F (200°C). Scrub potatoes clean and dry thoroughly.
    2. Poke each potato several times with a fork. This lets steam escape so they don’t explode in your oven.
    3. Rub each potato with olive oil and sprinkle generously with coarse salt. The oil helps the skin crisp up; the salt makes it delicious.

    Step 2: Bake the Potatoes

    1. Place potatoes directly on the oven rack (with a baking sheet on the rack below to catch any drips). This allows air to circulate and gives you crispy skin all around.
    2. Bake for 50-60 minutes until the skin is crisp and a knife slides in easily with no resistance.
    3. For extra fluffy potatoes, let them rest for 10 minutes before handling.

    Step 3: Prep the Toppings

    1. While potatoes bake, cook your bacon until crispy, then crumble or chop.
    2. Shred the cheese (freshly shredded melts better than pre-shredded).
    3. Chop your chives and set up a toppings bar if serving family-style.

    Step 4: Open and Fluff

    1. Transfer hot potatoes to a plate. Using a sharp knife, slice each potato lengthwise down the middle, but not all the way through—you want to open it like a book.
    2. Gently squeeze the ends to push the potato open and expose the fluffy interior.
    3. Use a fork to fluff the inside, breaking it up a bit. This creates more surface area for butter and toppings.

    Step 5: Build Your Masterpiece

    1. Drop a pat of butter into each potato and let it melt into the fluffy interior. Sprinkle with a pinch of salt and pepper.
    2. Pile on the shredded cheddar—it will melt from the residual heat.
    3. Sprinkle with crispy bacon and fresh chives.
    4. Top with a generous dollop of sour cream.

    Step 6: Serve Immediately

    1. Serve hot with extra toppings on the side for those who want more.
    2. Take a bite that includes crispy skin, fluffy potato, melted cheese, and bacon all at once. Close your eyes. This is peak comfort.

    Summary

    Prep Time: 10 minutes | Cook Time: 60 minutes | Total Time: 1 hour 10 minutes

    Yield: 4 servings

    Difficulty: Embarrassingly easy

    Storage Notes

    Leftovers:

    Store leftover baked potatoes (without toppings) in the fridge for up to 4 days. Store toppings separately.

    Reheating:

    Oven method (best): 350°F for 15-20 minutes until heated through and skin re-crisps. Air fryer: 375°F for 5-7 minutes. Microwave: Works in a pinch, but skin will be soft. Split, add butter, and reheat in 60-second bursts.

    Make Ahead:

    You can bake potatoes up to 2 days in advance. Store in the fridge, then reheat in a 400°F oven for 10-15 minutes before serving. Or use leftovers for twice-baked potatoes—just scoop out the insides, mix with toppings, stuff back in, and bake until golden.

    Pro Tips for Potato Perfection:

    • Russets are non-negotiable. Waxy potatoes (red, Yukon) won’t give you that fluffy interior.
    • Salt the skin. It’s not just for show—it seasons the potato and helps the skin crisp.
    • Don’t wrap in foil. Foil steams the potato instead of baking it. You want dry heat for crispy skin.
    • Use a wire rack or oven rack. Air circulation is key to even cooking.
    • Freshly shredded cheese melts better. Anti-caking agents in pre-shredded cheese mess with meltability.

    Potato Bar Party Idea:

    Set up a loaded potato bar for your next gathering. Bake a bunch of potatoes, keep them warm in a low oven, and set out bowls of toppings: cheeses, bacon, sour cream, chives, broccoli, chili, pulled pork, pickled jalapeños, hot sauces. Let everyone build their own masterpiece. It’s interactive, delicious, and way easier than catering to individual preferences.

  • Buffalo Wings: Crispy and Saucy

    Buffalo Wings: Crispy and Saucy

    Buffalo wings are a beautiful thing. Not complicated, not fancy—just chicken, heat, butter, and time. The goal is simple: wings so crispy they crunch when you bite into them, coated in a sauce that’s equal parts tangy, buttery, and spicy, with enough residual heat to make you reach for a cold beer.

    The secret is in the technique. A steam-and-bake method (or a double fry, if you’re feeling ambitious) ensures the skin renders and crisps without burning. Then comes the sauce—a simple emulsion of Frank’s RedHot and butter that’s greater than the sum of its parts. Toss, serve with celery and blue cheese, and watch them disappear.

    Ingredients

    Serves 4 as an appetizer (or 2 as a meal).

    For the Wings:

    • 2 lbs chicken wings, split into drums and flats (tip removed or saved for stock)
    • 1 tbsp baking powder (NOT baking soda—this is crucial for crispiness)
    • 1 tsp salt
    • 1 tsp garlic powder
    • ½ tsp black pepper
    • Neutral oil, for frying (if frying—skip for baking method)

    For the Buffalo Sauce:

    • ½ cup Frank’s RedHot Original hot sauce (the classic, don’t substitute)
    • ⅓ cup unsalted butter, cut into cubes
    • 1 tbsp white vinegar (optional, for extra tang)
    • ½ tsp Worcestershire sauce
    • ¼ tsp cayenne (optional, for extra heat)

    For Serving:

    • Blue cheese dressing (homemade or quality store-bought)
    • Celery sticks
    • Carrot sticks (optional)
    • Extra hot sauce, for those who like pain

    Step-by-Step Instructions

    Step 1: Prep the Wings

    1. Pat wings completely dry with paper towels. Moisture is the enemy of crispiness.
    2. In a large bowl, combine baking powder, salt, garlic powder, and black pepper. Toss wings in the mixture until evenly coated. This baking powder trick is the secret to oven-crispy wings.

    Step 2: Choose Your Method

    1. Oven Method (Easier): Place wings on a wire rack set over a baking sheet. Refrigerate uncovered for at least 1 hour (up to 24) to dry out the skin. Bake at 400°F for 40-50 minutes, flipping halfway, until golden and crispy.
    2. Frying Method (Classic): Heat 2 inches of oil in a deep pot to 375°F. Fry wings in batches for 10-12 minutes until golden and cooked through. Drain on a wire rack.
    3. Air Fryer Method (Best of Both): Place wings in air fryer basket in single layer. Cook at 380°F for 12 minutes, flip, then 12 minutes more at 400°F until extra crispy.

    Step 3: Make the Buffalo Sauce

    1. While wings cook, combine hot sauce and butter in a small saucepan over low heat. Whisk until butter is melted and sauce is smooth.
    2. Stir in vinegar and Worcestershire sauce. Keep warm.

    Step 4: Sauce the Wings

    1. Place cooked wings in a large bowl. Pour about half the sauce over them and toss to coat. Add more sauce as needed—you want them well-coated but not drowning.
    2. Reserve extra sauce for dipping (or double-dipping, we don’t judge).

    Step 5: Serve Immediately

    1. Arrange wings on a platter with celery sticks and a bowl of blue cheese dressing.
    2. Sprinkle with a little extra salt or cayenne if desired.
    3. Serve with plenty of napkins and cold beer. This is not finger food—it’s whole-hand food.
    4. Take a bite. Feel that crunch. Let the sauce run down your chin. This is Buffalo.

    Summary

    Prep Time: 15 minutes + drying time | Cook Time: 40-50 minutes | Total Time: 1 hour (mostly hands-off)

    Yield: 2 lbs wings (serves 4 as appetizer)

    Difficulty: Game-day essential

    Storage Notes

    Leftovers:

    Store leftover wings (without sauce) in an airtight container in the fridge for up to 3 days. Store sauce separately.

    Reheating (Bring Back the Crunch):

    Oven: 375°F for 10-15 minutes on a wire rack. Air fryer: 375°F for 5-7 minutes. Toss with warmed sauce after reheating.

    Never microwave wings—they become sad, soggy, rubbery versions of their former glory.

    Make Ahead:

    You can dry the wings (tossed in baking powder mixture) in the fridge for up to 24 hours before cooking. This makes them even crispier. Sauce can be made ahead and gently reheated.

    Freezer-Friendly:

    Freeze cooked, unsauced wings for up to 3 months. Reheat from frozen in a 400°F oven until hot and crispy, then toss with fresh sauce.

    Pro Tips for Wing Greatness:

    • Baking powder, not soda. Baking soda will make them taste metallic. Trust the recipe.
    • Dry those wings. Pat them dry before anything else. More drying = more crispy.
    • Frank’s is the law. Other hot sauces won’t give you that classic Buffalo flavor. Don’t argue with tradition.
    • Butter matters. Real butter, not margarine. It emulsifies with the hot sauce into silky perfection.
    • Toss twice, eat once. Coat well, but don’t drown. You want crispy wings with sauce, not saucy wings with crunch.
    • Blue cheese, not ranch. In Buffalo, this is a religious debate with a clear answer. Blue cheese.
  • Chicken and Waffles: The Sweet, Savory, Fried Chicken Dream

    Chicken and Waffles: The Sweet, Savory, Fried Chicken Dream

    Chicken and waffles is the kind of dish that makes you question why we ever decided to separate breakfast and dinner. On one side: crispy, juicy fried chicken with a seasoned crust that shatters when you bite into it. On the other: a light, fluffy waffle with crisp edges, ready to catch every drop of maple syrup.

    Together, they’re magic. The sweetness of the syrup mingling with the savory, peppery chicken. The crunch of the crust against the tender waffle. A little hot sauce to cut through it all. This is the meal you make when you want to impress someone—or when you just want to impress yourself on a lazy Sunday morning.

    Ingredients

    Serves 4 (or 2 very hungry people).

    For the Fried Chicken:

    • 8 chicken thighs or drumsticks (bone-in, skin-on for maximum flavor)
    • 2 cups buttermilk
    • 2 tbsp hot sauce (Frank’s or Tabasco)
    • 2 cups all-purpose flour
    • 1 tbsp cornstarch (for extra crunch)
    • 1 tsp smoked paprika
    • 1 tsp garlic powder
    • 1 tsp onion powder
    • 1 tsp cayenne pepper (adjust to your heat tolerance)
    • 1 tsp black pepper
    • 1 tsp salt
    • Neutral oil, for frying (vegetable or peanut)

    For the Waffles:

    • 2 cups all-purpose flour
    • 2 tbsp sugar
    • 1 tbsp baking powder
    • ½ tsp salt
    • 2 large eggs, separated
    • 1½ cups buttermilk
    • ½ cup melted butter, plus more for brushing
    • 1 tsp vanilla extract

    For Serving:

    • Warm maple syrup (grade A or B, both are delicious)
    • Hot sauce (for that sweet-heat combo)
    • Flaky salt (optional, but trust me)
    • Fresh herbs like thyme or parsley for garnish

    Step-by-Step Instructions

    Step 1: Brine the Chicken

    1. In a large bowl, whisk together buttermilk and hot sauce. Add chicken pieces, turning to coat. Cover and refrigerate for at least 4 hours (overnight is ideal). This tenderizes and flavors the meat.

    Step 2: Make the Waffle Batter

    1. In a large bowl, whisk together flour, sugar, baking powder, and salt.
    2. In a separate bowl, whisk egg yolks, buttermilk, melted butter, and vanilla.
    3. Pour wet ingredients into dry and stir until just combined. Lumps are okay—don’t overmix.
    4. In a clean bowl, beat egg whites until stiff peaks form. Gently fold into the batter. This makes waffles light and crispy.

    Step 3: Prepare the Chicken Dredge

    1. In a shallow dish, combine flour, cornstarch, paprika, garlic powder, onion powder, cayenne, black pepper, and salt. Mix well.
    2. Remove chicken from buttermilk, letting excess drip off. Dredge each piece in the flour mixture, pressing firmly to adhere. Place on a wire rack and let rest 15 minutes (this helps coating stick).

    Step 4: Fry the Chicken

    1. Heat about 2 inches of oil in a deep Dutch oven or heavy pot to 350°F (175°C).
    2. Working in batches, carefully lower chicken into the oil. Don’t crowd the pot.
    3. Fry for 10-12 minutes, turning occasionally, until golden brown and cooked through (internal temp 165°F).
    4. Transfer to a wire rack set over a baking sheet. Sprinkle with a little salt while hot.

    Step 5: Make the Waffles

    1. While chicken rests, preheat your waffle iron according to manufacturer’s instructions. Brush with melted butter.
    2. Pour batter onto the hot iron and cook until golden and crisp. Keep waffles warm in a 200°F oven while you cook the rest.

    Step 6: Assemble the Masterpiece

    1. Place a waffle on a plate. Top with a piece (or two) of fried chicken.
    2. Drizzle generously with warm maple syrup. Add a few dashes of hot sauce for that perfect sweet-heat balance.
    3. Sprinkle with flaky salt and fresh herbs if using.

    Step 7: Serve and Swoon

    1. Serve immediately, preferably with extra syrup and hot sauce on the table.
    2. Take a bite that includes chicken, waffle, and syrup all at once. Close your eyes. You’ve achieved culinary nirvana.

    Summary

    Prep Time: 30 minutes + marinating | Cook Time: 30 minutes | Total Time: 1 hour + patience

    Yield: 4 servings

    Difficulty: Weekend brunch hero

    Storage Notes

    Leftovers (If You’re Lucky):

    Store chicken and waffles separately in airtight containers in the fridge for up to 3 days. Waffles can be stored in a zip-top bag at room temperature for 2 days or frozen.

    Reheating:

    For chicken: Oven at 375°F for 10-15 minutes brings back the crispiness. Air fryer at 375°F for 5-7 minutes is even better.

    For waffles: Pop them in the toaster or toaster oven for a quick refresh. Oven works too.

    Never microwave either—soggy chicken and rubbery waffles are crimes against humanity.

    Make Ahead:

    Marinate chicken up to 24 hours in advance. Make waffle batter the night before and keep refrigerated (whites folded in just before cooking). Fry chicken just before serving for maximum crunch.

    Freezer-Friendly:

    Freeze cooked chicken and waffles separately for up to 3 months. Reheat directly from frozen in a 375°F oven until hot and crispy (about 20 minutes).

    Pro Tips:

    • Buttermilk is non-negotiable. It tenderizes the chicken and adds flavor.
    • Separated egg whites in waffles = extra crispiness. Don’t skip this step.
    • Hot sauce in the maple syrup is a game-changer. Mix a few dashes in before drizzling.
    • Serve immediately. Chicken and waffles wait for no one.
  • Chicken Fried Steak: Southern Comfort on a Plate

    Chicken Fried Steak: Southern Comfort on a Plate

    Let’s clear something up: there’s no chicken in chicken fried steak. The name comes from the cooking method—it’s steak prepared like fried chicken. A tenderized cut of beef, dunked in seasoned flour, fried until golden and crispy, then served under a blanket of creamy, peppery gravy. It’s a beautiful deception.

    This is the kind of meal that shows up at diners and Sunday suppers across the South. It’s not fancy. It’s not pretending to be. It’s just good, honest food—crispy on the outside, tender on the inside, and absolutely drowning in gravy. Serve it with mashed potatoes and something green to pretend you’re being healthy.

    Ingredients

    Serves 4 hungry humans.

    For the Steak:

    • 4 cube steaks (about 1.5 lbs total, or use round steak and tenderize yourself)
    • 1½ cups all-purpose flour
    • 1 tsp baking powder (helps with crispiness)
    • 1 tsp smoked paprika
    • 1 tsp garlic powder
    • 1 tsp onion powder
    • Salt and black pepper, to taste
    • 2 large eggs
    • 1 cup buttermilk (or regular milk with 1 tbsp vinegar)
    • Neutral oil, for frying (vegetable or canola)

    For the Country Gravy:

    • ¼ cup reserved frying oil (or butter)
    • ¼ cup all-purpose flour
    • 2 cups whole milk, warmed
    • 1 tsp black pepper (plus more to taste)
    • ½ tsp salt
    • Pinch of cayenne (optional)

    For Serving:

    • Mashed potatoes (mandatory)
    • Your choice of vegetable—green beans, corn, or peas
    • Hot sauce, for those who like a kick

    Step-by-Step Instructions

    Step 1: Set Up Your Dredging Station

    1. In a shallow dish, whisk together flour, baking powder, paprika, garlic powder, onion powder, 1 tsp salt, and 1 tsp black pepper.
    2. In another shallow dish, whisk together eggs and buttermilk until combined.

    Step 2: Prep the Steak

    1. If your steaks aren’t already tenderized, place them between plastic wrap and pound with a meat mallet until about ¼-inch thick. Even thickness ensures even cooking.
    2. Pat steaks dry with paper towels. Season both sides with salt and pepper.

    Step 3: Dredge Like You Mean It

    1. Dredge each steak in the flour mixture, shaking off excess. Dip into the egg mixture, letting excess drip off. Dredge in flour again, pressing firmly so it adheres. This double-dredge is the secret to a thick, craggy crust.
    2. Place coated steaks on a wire rack and let rest for 10 minutes. This helps the coating stick during frying.

    Step 4: Fry to Golden Glory

    1. Heat about ¼ inch of oil in a large skillet (cast iron is perfect) over medium-high heat until shimmering. The oil should sizzle immediately when you drop in a bit of flour.
    2. Carefully place steaks in the pan, working in batches if needed. Don’t crowd them.
    3. Fry for 3-4 minutes per side until deep golden brown and crispy. Flip carefully to keep the crust intact.
    4. Transfer to a wire rack or paper towel-lined plate. Sprinkle with a little salt while hot. Reserve ¼ cup of the frying oil for gravy.

    Step 5: Make the Gravy (In the Same Pan)

    1. Pour off all but ¼ cup of the frying oil (or add oil/butter to make ¼ cup). Leave the browned bits—that’s flavor gold.
    2. Whisk in the ¼ cup flour and cook for 2-3 minutes, scraping up those bits, until the roux is golden brown.
    3. Slowly whisk in the warm milk, breaking up any lumps. Continue whisking until the gravy thickens, about 3-5 minutes.
    4. Season with salt, plenty of black pepper, and cayenne if using. Taste and adjust—this gravy should be boldly peppery.

    Step 6: Assemble and Serve

    1. Place a chicken fried steak on a plate next to a mountain of mashed potatoes.
    2. Ladle gravy generously over the steak and potatoes. Don’t be shy—this is what you’re here for.
    3. Sprinkle with a little fresh parsley or extra black pepper. Serve with your vegetable of choice.
    4. Take a bite of that crispy, creamy, peppery perfection. Sigh contentedly. You’re in the South now.

    Summary

    Prep Time: 20 minutes | Cook Time: 20 minutes | Total Time: 40 minutes

    Yield: 4 servings

    Difficulty: Comfort food classic

    Storage Notes

    Leftovers:

    Store steak and gravy separately in airtight containers in the fridge for up to 3 days. The steak will lose crispiness, but the flavor remains.

    Reheating:

    Oven method (best): Place steak on a wire rack over a baking sheet. Reheat at 375°F for 10-15 minutes until hot and crispy-ish. Reheat gravy separately on the stovetop, adding a splash of milk to thin.

    Air fryer: 375°F for 5-7 minutes works beautifully for the steak.

    Microwave: Works for gravy, but the steak will be sad and soggy. Avoid if possible.

    Make Ahead:

    You can bread the steaks up to 24 hours in advance and keep them refrigerated on a wire rack. Fry just before serving for maximum crunch.

    Pro Tips:

    • Hot oil is crucial. If the oil isn’t hot enough, the coating absorbs grease and turns soggy.
    • Don’t skip the rest. Letting breaded steaks sit for 10 minutes helps the coating adhere.
    • Gravy likes warm milk. Cold milk can cause lumps. Heat it in the microwave or a small pan first.
    • Pepper is not a suggestion. Country gravy should be boldly peppery. Taste and add more until it’s right.
  • Chicken Tostadas: Crunchy, Fresh, and Totally Customizable

    Chicken Tostadas: Crunchy, Fresh, and Totally Customizable

    Tostadas are the answer to the question “What’s for dinner?” when you want something fun, fast, and full of flavor. Think of them as the crispy, open-faced cousin of tacos—a golden corn tortilla piled high with toppings that you can customize to your heart’s content.

    This version starts with a layer of creamy refried beans, followed by juicy shredded chicken simmered in a savory tomato-chipotle sauce. Then comes the crunch: shredded lettuce, crumbled queso fresco, and a drizzle of crema. Add some pickled onions or a squeeze of lime, and you’ve got a meal that’s part dinner, part choose-your-own-adventure. Set out the toppings and let everyone build their own.

    Ingredients

    Serves 4 (makes 8 tostadas).

    For the Chicken:

    • 1 lb boneless, skinless chicken breasts or thighs
    • 1 tbsp olive oil
    • ½ onion, chopped
    • 2 cloves garlic, minced
    • 1 chipotle pepper in adobo, minced (plus 1 tbsp adobo sauce)
    • 1 tsp ground cumin
    • 1 tsp dried oregano
    • 1 cup chicken broth
    • Salt and pepper, to taste

    For the Tostada Shells:

    • 8 corn tortillas (white or yellow)
    • Neutral oil (vegetable or canola), for frying or brushing
    • Salt, for sprinkling

    For the Toppings Bar:

    • 1 can (16 oz) refried beans, warmed
    • 2 cups shredded lettuce or cabbage
    • 1 cup crumbled queso fresco or cotija cheese
    • ½ cup Mexican crema or sour cream
    • 1 avocado, sliced or cubed
    • Pickled red onions or fresh salsa
    • Hot sauce, for drizzling
    • Fresh cilantro, chopped
    • Lime wedges

    Step-by-Step Instructions

    Step 1: Cook the Chicken

    1. Season chicken with salt and pepper. Heat olive oil in a large skillet over medium-high heat. Brown chicken on both sides, about 3-4 minutes per side (it doesn’t need to be cooked through yet). Remove and set aside.
    2. In the same skillet, add onion and cook until softened, about 3 minutes. Add garlic, chipotle pepper, adobo sauce, cumin, and oregano. Cook 1 minute until fragrant.
    3. Pour in chicken broth and scrape up any browned bits. Return chicken to the skillet, bring to a simmer, then cover and reduce heat to low.
    4. Cook for 15-20 minutes until chicken is cooked through and tender.

    Step 2: Shred and Sauce

    1. Remove chicken to a cutting board and shred with two forks.
    2. Return shredded chicken to the skillet with the sauce. Simmer uncovered for 5-10 minutes until the sauce thickens and coats the chicken. Season with salt and pepper to taste.

    Step 3: Make the Tostada Shells (Two Ways)

    1. Frying method (classic): Heat about ½ inch of oil in a small skillet over medium heat. Fry tortillas one at a time for 1-2 minutes per side until golden and crisp. Drain on paper towels and sprinkle with salt.
    2. Baking method (easier): Preheat oven to 400°F. Brush tortillas lightly with oil on both sides, place on a baking sheet, and bake for 8-10 minutes, flipping halfway, until golden and crisp. Sprinkle with salt.

    Step 4: Warm the Beans

    1. While shells cook, warm the refried beans in a small saucepan over low heat. Add a splash of water or broth to thin if needed.

    Step 5: Assemble the Tostadas

    1. Spread a generous layer of warm refried beans onto each crispy tortilla.
    2. Top with a pile of shredded chipotle chicken.
    3. Add shredded lettuce, crumbled cheese, avocado slices, and pickled onions.
    4. Drizzle with crema and hot sauce. Sprinkle with fresh cilantro.

    Step 6: Serve and Crunch

    1. Arrange tostadas on a platter or let everyone build their own at the table.
    2. Serve with lime wedges for squeezing and extra hot sauce on the side.
    3. Eat immediately—tostadas wait for no one. Use a fork or go hands-on. Both are acceptable. Both are delicious.

    Summary

    Prep Time: 15 minutes | Cook Time: 30 minutes | Total Time: 45 minutes

    Yield: 8 tostadas (serves 4)

    Difficulty: Easy and fun

    Storage Notes

    Leftovers (Component Style):

    Store chicken, beans, and toppings separately in airtight containers in the fridge for up to 4 days. Tostada shells are best fresh—store any extras in an airtight container at room temperature for 2-3 days.

    Reheating:

    Reheat chicken in a skillet or microwave. Warm beans on the stovetop or microwave. Never assemble tostadas ahead—soggy shells are sad shells.

    Make Ahead:

    Cook the chicken up to 3 days in advance. It actually gets more flavorful overnight. Fry or bake shells the day of serving for maximum crunch.

    Pro Tip:

    Double the chicken recipe and use leftovers for tacos, burritos, salads, or quesadillas all week long. You’re not meal prepping; you’re future-you caring.