Category: quick_meals

  • Ahi Tuna Tostada (Sushi Meets Crunchy, No Passport Needed)

    Ahi Tuna Tostada (Sushi Meets Crunchy, No Passport Needed)

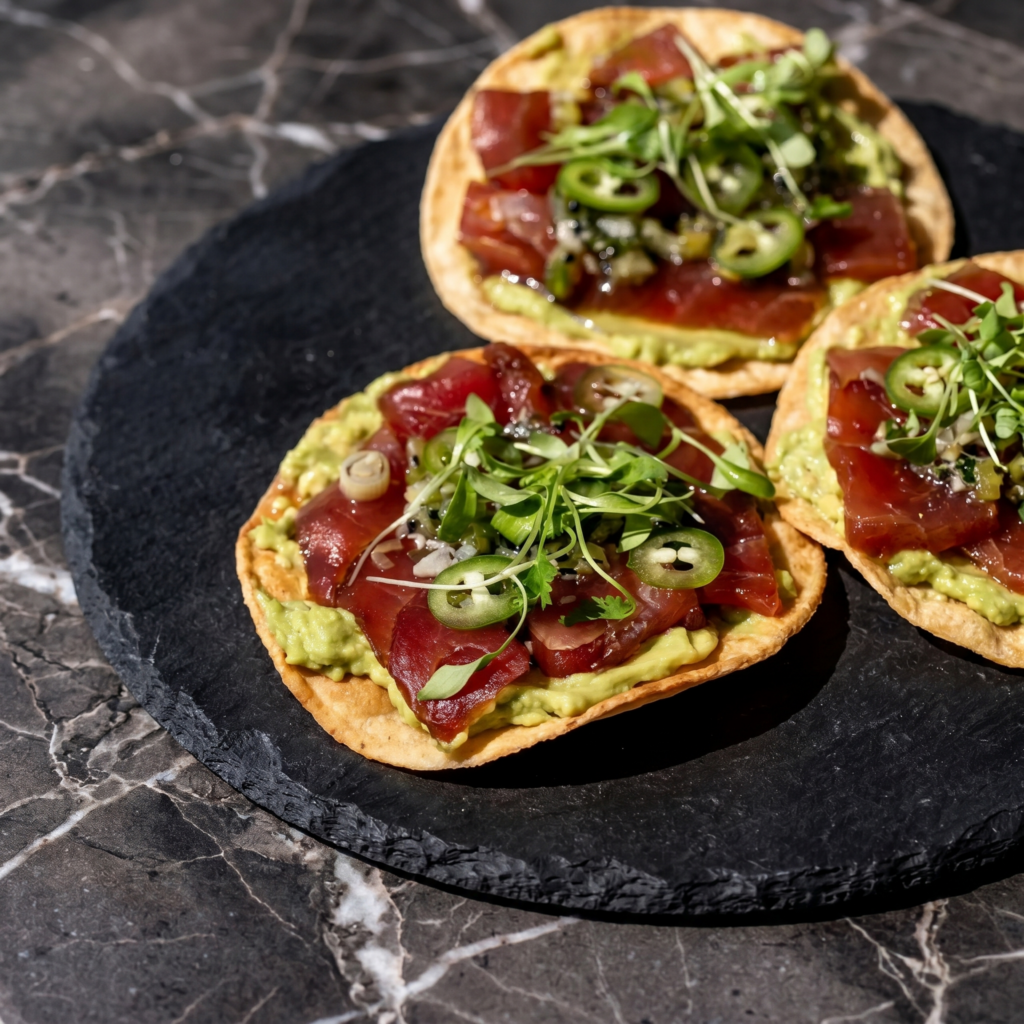
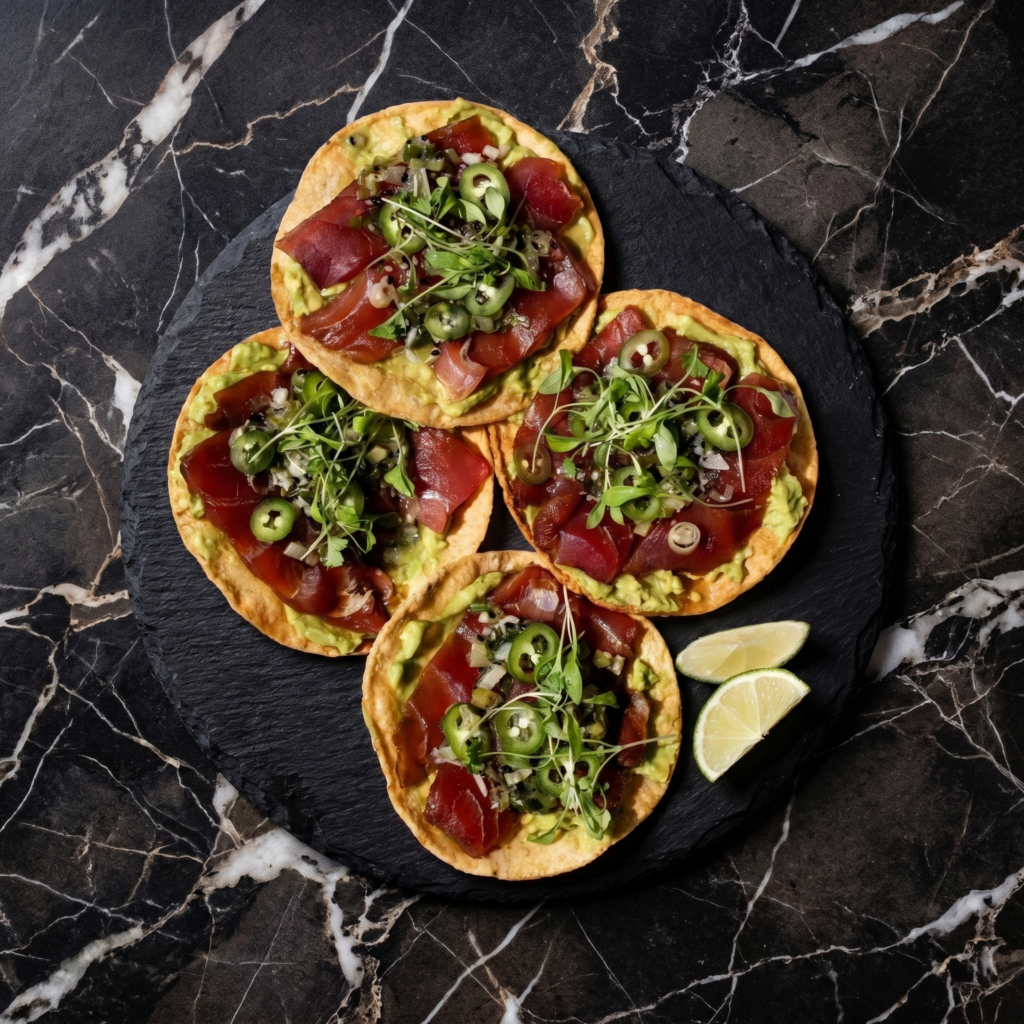
    Imagine sushi and a crispy taco had a beautiful, flavor-packed baby. That’s this ahi tuna tostada.

    Cool, buttery raw tuna. Crunchy fried tostada shell. Creamy avocado. Spicy mayo. It’s bright, fast, and dangerously addictive. No stove, no oven, and absolutely no cooking skills required—just sharp knife skills and good fish.

    Ingredients

    Serves 4 as appetizer or 2 as light meal.

    • 8 oz (225g) sushi-grade ahi tuna
    • 4 tostada shells (crispy flat tortillas)
    • 1 ripe avocado
    • ¼ cup sriracha mayo
    • 2 tablespoons soy sauce
    • 1 teaspoon sesame oil
    • 1 tablespoon lime juice (plus wedges for serving)
    • 2 tablespoons sliced green onions
    • 1 teaspoon sesame seeds (black or white)
    • Optional: thin jalapeño slices, fresh cilantro

    Step-by-Step Instructions

    Step 1: Prep the Tuna

    1. Pat tuna dry with paper towels. Cut into small ¼-inch cubes.

    Step 2: Make the Sauce

    1. In a small bowl, whisk together sriracha mayo, soy sauce, sesame oil, and lime juice.

    Step 3: Toss It Together

    1. Place cubed tuna in a medium bowl. Pour half the sauce over it. Gently toss to coat.
    2. Save the remaining sauce for drizzling.

    Step 4: Mash or Slice Avocado

    1. Mash avocado lightly with a fork (or slice thinly). Season with a pinch of salt.

    Step 5: Assemble

    1. Spread mashed avocado on each tostada shell.
    2. Top with the sauced tuna.
    3. Drizzle remaining sauce on top.

    Step 6: Garnish and Serve

    1. Sprinkle with green onions, sesame seeds, and jalapeño if using.
    2. Serve immediately with lime wedges. Eat within 5 minutes—soggy tostadas are sad tostadas.

    Summary

    Prep Time: 15 minutes | Cook Time: 0 minutes | Total Time: 15 minutes

    Yield: 4 appetizer servings

    Difficulty: Easy

    Storage Notes

    Do Not Store Assembled

    Tostadas get soggy almost immediately. This is a eat-right-now recipe.

    Prep Ahead Instead:

    • Tuna: Cube and mix with sauce up to 2 hours ahead. Keep refrigerated.
    • Avocado: Mash just before serving (it browns fast).
    • Tostada shells: Store in a sealed bag at room temperature for weeks.

    Leftover Tuna Warning:

    Raw tuna does not keep once mixed with sauce. Make only what you’ll eat immediately.

  • Chipotle Honey Chicken: Sweet, Smoky, Sticky Magic

    Chipotle Honey Chicken: Sweet, Smoky, Sticky Magic

    This is the chicken that disappears first at every dinner. A sticky, smoky, sweet glaze that clings to every bite. The heat from chipotle hits first, then honey smooths it out.

    One skillet. Under 30 minutes. Serve with rice, tacos, or just eat it straight off the pan. No judgment.

    Ingredients

    Serves 4.

    • 1.5 lbs boneless, skinless chicken thighs (or breasts)
    • 3 tablespoons honey
    • 2 tablespoons chipotle peppers in adobo sauce (minced, from a can)
    • 2 cloves garlic, minced
    • 2 tablespoons lime juice (about 1 lime)
    • 1 tablespoon olive oil
    • 1 teaspoon salt
    • Optional garnish: fresh cilantro, lime wedges

    Step-by-Step Instructions

    Step 1: Make the Glaze

    1. In a small bowl, whisk together honey, minced chipotle (plus 1 teaspoon adobo sauce), garlic, lime juice, and a pinch of salt.

    Step 2: Sear the Chicken

    1. Heat olive oil in a large skillet over medium-high heat.
    2. Season chicken with salt. Add to skillet and cook 5-6 minutes per side until deeply browned.

    Step 3: Glaze and Sticky-ify

    1. Pour the chipotle honey mixture over the chicken.
    2. Reduce heat to medium-low. Let it simmer for 2-3 minutes, flipping chicken to coat.
    3. The sauce will thicken into a sticky glaze. Keep flipping until chicken is glossy and coated.

    Step 4: Finish and Serve

    1. Remove from heat. Garnish with cilantro and a squeeze of lime.
    2. Serve over rice, in tacos, or on a bowl with avocado and black beans.

    Summary

    Prep Time: 5 minutes | Cook Time: 18 minutes | Total Time: 23 minutes

    Yield: 4 servings

    Difficulty: Easy

    Storage Notes

    Fridge:

    Store in an airtight container for up to 4 days. The glaze soaks into the chicken and gets even better.

    Freezing:

    Freeze cooked chicken with glaze for up to 3 months. Thaw overnight in the fridge.

    Reheating:

    Reheat in a skillet over medium-low heat with a splash of water to loosen the glaze. Microwave works too (30-45 seconds).

    Heat Control:

    Start with 1 tablespoon of chipotle for less heat, add more for extra fire. The honey balances nicely either way.

  • Buffalo Wings: Crispy, Saucy, Game Day Royalty

    Buffalo Wings: Crispy, Saucy, Game Day Royalty

    Buffalo wings are a vibe. Spicy, buttery, tangy, and just messy enough to be fun. The secret to crispy baked wings? Baking powder and a hot oven.

    These wings come out shatteringly crisp without a drop of frying oil. Toss them in homemade Buffalo sauce and prepare for a napkin avalanche.

    Ingredients

    Serves 4 (2-3 people if they’re hungry).

    • 2 lbs chicken wings (drumettes and flats)
    • 1 tablespoon baking powder (NOT baking soda)
    • 1 teaspoon salt
    • ½ teaspoon garlic powder

    Buffalo Sauce:

    • ½ cup hot sauce (Frank’s RedHot is the classic)
    • 4 tablespoons unsalted butter, melted
    • 1 tablespoon honey (optional, for balance)
    • Serve with: ranch or blue cheese dressing, celery sticks

    Step-by-Step Instructions

    Step 1: Dry the Wings (Crucial)

    1. Pat wings completely dry with paper towels. Like, really dry. Moisture is the enemy of crispiness.

    Step 2: Coat with Baking Powder

    1. In a bowl, mix baking powder, salt, and garlic powder.
    2. Toss wings in the mixture until evenly coated.

    Step 3: Bake Until Crispy

    1. Preheat oven to 425°F (220°C). Line a baking sheet with foil and place a wire rack on top.
    2. Arrange wings on the rack (not touching).
    3. Bake for 45-50 minutes, flipping halfway, until golden brown and super crispy.

    Step 4: Make the Sauce

    1. While wings bake, whisk together hot sauce, melted butter, and honey (if using).

    Step 5: Toss and Serve

    1. Transfer hot wings to a large bowl. Pour sauce over and toss to coat.
    2. Serve immediately with ranch or blue cheese and plenty of napkins.

    Summary

    Prep Time: 10 minutes | Cook Time: 50 minutes | Total Time: 1 hour

    Yield: 4 servings

    Difficulty: Easy

    Storage Notes

    Leftover Wings:

    Store in the fridge for up to 3 days. The sauce soaks in and they’ll be less crispy but still tasty.

    Reheating (Critical):

    Air fryer at 375°F for 5-7 minutes. Oven at 400°F for 8-10 minutes on a wire rack. Never microwave (rubbery wings are a crime).

    Make-Ahead Baking:

    Bake wings without sauce, cool completely, and refrigerate. Reheat in a hot oven, then toss in warm sauce. Almost as good as fresh.

  • Chicken Nuggets: Better Than The Drive-Thru

    Chicken Nuggets: Better Than The Drive-Thru

    Let’s be honest: fast food nuggets are weird. This version uses actual chicken breast, a simple breading, and hot oil (or an air fryer).

    They’re crunchy, juicy, and 100% identifiable as chicken. Make a double batch. Trust me.

    Ingredients

    Serves 4 (makes about 20 nuggets).

    • 1 lb (450g) boneless, skinless chicken breasts
    • 1 cup all-purpose flour
    • 2 large eggs, beaten
    • 1½ cups breadcrumbs (panko = extra crunchy)
    • 1 teaspoon salt
    • ½ teaspoon black pepper
    • ½ teaspoon garlic powder
    • ½ teaspoon paprika
    • Oil for frying (or cooking spray for air fryer)

    Step-by-Step Instructions

    Step 1: Cut the Chicken

    1. Cut chicken breasts into bite-sized, nugget-shaped pieces (1-1.5 inches).
    2. Pat dry with paper towels.

    Step 2: Set Up Breading Station

    1. Bowl 1: Flour, salt, pepper, garlic powder, paprika.
    2. Bowl 2: Beaten eggs.
    3. Bowl 3: Breadcrumbs.

    Step 3: Bread the Nuggets

    1. Dip each nugget in flour (shake off excess), then egg, then breadcrumbs.
    2. Press breadcrumbs on firmly so they stick.

    Step 4: Cook Your Way

    1. Frying: Heat ½ inch oil to 350°F. Fry 3-4 minutes until golden and cooked through.
    2. Air Fryer: 375°F for 8-10 minutes, flipping halfway. Spray with oil first.
    3. Oven: 400°F for 15-18 minutes on a wire rack.

    Step 5: Serve Hot

    1. Sprinkle with extra salt. Serve with ketchup, honey mustard, or ranch. Watch them disappear.

    Summary

    Prep Time: 15 minutes | Cook Time: 10 minutes | Total Time: 25 minutes

    Yield: 20 nuggets

    Difficulty: Easy

    Storage Notes

    Fridge:

    Store cooked nuggets in an airtight container for up to 4 days.

    Freezer (Best Move):

    Freeze cooked and cooled nuggets on a tray, then transfer to a bag. Freeze for up to 3 months. Reheat in air fryer at 375°F for 5-6 minutes or oven at 400°F for 10 minutes.

    Never Microwave:

    Soggy nuggets are sad nuggets. Air fryer or oven only.

  • Baked Lemon Chicken: Bright, Juicy, One Pan

    Baked Lemon Chicken: Bright, Juicy, One Pan

    Lemon chicken has one job: brighten up your dinner table. This baked version delivers big citrus flavor without babysitting a skillet.

    Toss everything on a sheet pan. The oven does the work. The chicken stays juicy, the edges get crispy, and the lemon-garlic pan juices are practically a sauce. Serve with rice or crusty bread to soak it all up.

    Ingredients

    Serves 4.

    • 1.5 lbs boneless, skinless chicken thighs (or breasts)
    • 2 lemons (1 juiced, 1 sliced into rounds)
    • 4 cloves garlic, minced
    • 3 tablespoons olive oil
    • 1 teaspoon dried oregano
    • 1 teaspoon salt
    • ½ teaspoon black pepper
    • ¼ cup chicken broth (or white wine)
    • Fresh parsley for garnish

    Step-by-Step Instructions

    Step 1: Preheat and Prep

    1. Preheat oven to 400°F (200°C).
    2. In a small bowl, whisk olive oil, lemon juice, garlic, oregano, salt, and pepper.

    Step 2: Arrange in the Pan

    1. Place chicken thighs in a 9×13 baking dish or on a sheet pan.
    2. Pour the lemon-garlic mixture over the chicken.
    3. Pour broth around the chicken (not over—keeps sauce from burning).
    4. Tuck lemon slices between the chicken pieces.

    Step 3: Bake Until Golden

    1. Bake for 25-30 minutes until chicken is cooked through (165°F internal).
    2. For crispy edges, broil for 2-3 minutes at the end.

    Step 4: Serve with Pan Juices

    1. Spoon those glorious lemony pan juices over the chicken.
    2. Garnish with fresh parsley. Serve with rice, roasted potatoes, or a chunk of bread.

    Summary

    Prep Time: 10 minutes | Cook Time: 30 minutes | Total Time: 40 minutes

    Yield: 4 servings

    Difficulty: Easy

    Storage Notes

    Fridge:

    Store in an airtight container for up to 4 days. The lemon flavor intensifies (in a good way).

    Freezing:

    Freeze cooked chicken with pan juices for up to 2 months. Thaw overnight in the fridge.

    Reheating:

    Reheat in a covered skillet over medium-low heat with a splash of broth. Microwave works too (45-60 seconds).

    Pro Tip:

    Add a handful of halved cherry tomatoes or sliced red onion to the pan for extra flavor. Zero extra effort.

  • Chicken Cordon Bleu: Fancy Enough for Guests, Easy Enough for You

    Chicken Cordon Bleu: Fancy Enough for Guests, Easy Enough for You

    Chicken Cordon Bleu sounds intimidating. But it’s just chicken stuffed with ham and cheese, rolled up, breaded, and baked. The cheese gets melty. The chicken stays juicy. And that creamy sauce? Pure velvet.

    This version skips the frying and uses the oven. Less mess, less stress, same impressive result.

    Ingredients

    Serves 4.

    • 4 boneless, skinless chicken breasts
    • 4 slices deli ham (or prosciutto)
    • 4 slices Swiss cheese (or Gruyère)
    • ½ cup all-purpose flour
    • 2 large eggs, beaten
    • 1 cup panko breadcrumbs
    • ½ teaspoon salt
    • ¼ teaspoon black pepper
    • ½ teaspoon paprika
    • 2 tablespoons olive oil (or cooking spray)

    Creamy Dijon Sauce:

    • 2 tablespoons butter
    • 2 tablespoons flour
    • 1 cup milk
    • ¼ cup chicken broth
    • 2 tablespoons Dijon mustard
    • ¼ cup grated Parmesan (optional)

    Step-by-Step Instructions

    Step 1: Prep the Chicken

    1. Place chicken breasts between plastic wrap. Pound to ¼-inch thickness.
    2. Season with salt, pepper, and paprika.

    Step 2: Stuff and Roll

    1. Layer 1 slice ham and 1 slice Swiss on each chicken breast.
    2. Roll tightly from the short end. Secure with toothpicks if needed.

    Step 3: Bread the Chicken

    1. Set up bowls: flour, beaten eggs, panko mixed with a pinch of salt.
    2. Dredge each chicken roll in flour, then egg, then panko. Press firmly.

    Step 4: Bake Until Golden

    1. Preheat oven to 400°F (200°C). Line a baking sheet with parchment.
    2. Place chicken rolls on the sheet. Drizzle or spray with olive oil.
    3. Bake for 25-30 minutes until golden and internal temp reaches 165°F.

    Step 5: Make the Sauce

    1. In a saucepan, melt butter over medium heat. Whisk in flour, cook 1 minute.
    2. Slowly whisk in milk and broth. Simmer until thickened (2-3 minutes).
    3. Whisk in Dijon and Parmesan. Season with salt and pepper.

    Step 6: Serve

    1. Remove toothpicks. Slice chicken into medallions or serve whole.
    2. Drizzle with Dijon sauce. Watch everyone pretend they’re at a French bistro.

    Summary

    Prep Time: 20 minutes | Cook Time: 30 minutes | Total Time: 50 minutes

    Yield: 4 servings

    Difficulty: Medium

    Storage Notes

    Fridge:

    Store cooked chicken cordon bleu in an airtight container for up to 4 days. Store sauce separately.

    Reheating:

    Air fryer at 375°F for 6-8 minutes. Oven at 375°F for 10 minutes. Microwave works but crust gets soft.

    Freezing:

    Freeze cooked chicken cordon bleu (without sauce) for up to 2 months. Reheat from frozen in a 375°F oven for 20 minutes.

    Make-Ahead:

    Assemble and bread the chicken rolls up to 1 day ahead. Refrigerate covered. Bake when ready.

    Pro Tip:

    Skip the toothpicks if you roll tightly and place seam-side down on the baking sheet. The weight seals it.

  • Chicken Tenders: Bigger, Juicier, Better

    Chicken Tenders: Bigger, Juicier, Better

    Chicken tenders aren’t just for kids. When done right, they’re a crunchy, juicy masterpiece. The secret? A buttermilk soak and double breading.

    These come out shatteringly crisp on the outside, impossibly tender inside. Way better than any fast food version. And yes, you need a good dip.

    Ingredients

    Serves 4 (makes 10-12 tenders).

    • 1 lb chicken tenderloins (or slice chicken breasts into strips)
    • 1 cup buttermilk (or milk + 1 tablespoon vinegar)
    • 1 cup all-purpose flour
    • 1½ cups panko breadcrumbs (extra crispy)
    • 2 large eggs, beaten
    • 1 teaspoon salt
    • 1 teaspoon paprika
    • ½ teaspoon garlic powder
    • ½ teaspoon black pepper
    • Oil for frying (or cooking spray for air fryer)

    Step-by-Step Instructions

    Step 1: Soak in Buttermilk

    1. Place chicken tenders in a bowl and cover with buttermilk.
    2. Let sit for 15 minutes (or up to 4 hours in the fridge). This guarantees juicy chicken.

    Step 2: Set Up Breading Station

    1. Bowl 1: Flour, salt, paprika, garlic powder, pepper.
    2. Bowl 2: Beaten eggs.
    3. Bowl 3: Panko breadcrumbs.

    Step 3: Double Bread (Key Step)

    1. Remove tender from buttermilk, letting excess drip off.
    2. Dip in flour, then egg, then panko. Press firmly.
    3. For extra crunch: dip in egg and panko again.

    Step 4: Cook ‘Em Up

    1. Frying: Heat ½ inch oil to 350°F. Fry 3-4 minutes per side until golden.
    2. Air Fryer: 375°F for 8-10 minutes, flipping halfway. Spray with oil.
    3. Oven: 400°F for 15-18 minutes on a wire rack.

    Step 5: Dip and Devour

    1. Serve immediately with ranch, honey mustard, BBQ sauce, or comeback sauce.

    Summary

    Prep Time: 20 minutes (includes soak) | Cook Time: 10 minutes | Total Time: 30 minutes

    Yield: 10-12 tenders

    Difficulty: Easy

    Storage Notes

    Fridge:

    Store cooked tenders in an airtight container for up to 4 days.

    Freezer:

    Freeze cooked and cooled tenders on a tray, then transfer to a bag. Freeze for up to 3 months.

    Reheating:

    Air fryer at 375°F for 5-6 minutes. Oven at 400°F for 8-10 minutes on a wire rack. Never microwave (soggy crime).

    Make-Ahead Breading:

    Bread the tenders and freeze raw. Cook from frozen (add 3-4 minutes to cook time).

  • Caviar Blinis (Tiny Pancakes, Big Luxury)

    Caviar Blinis (Tiny Pancakes, Big Luxury)

    Caviar is luxury. Blinis are humble. Together? Pure magic.

    Mini fluffy buckwheat pancakes. Silky crème fraîche. Salty, briny caviar. A sprinkle of chives. One bite. That’s it. That’s the whole recipe. New Year’s Eve. Anniversary. Tuesday. You deserve it.

    Ingredients

    Makes about 20 blinis (serves 4 as an appetizer).

    For the Blinis:

    • ½ cup buckwheat flour
    • ½ cup all-purpose flour
    • 1 teaspoon baking powder
    • ¼ teaspoon salt
    • ¾ cup milk (or buttermilk)
    • 1 large egg, separated
    • 2 tablespoons unsalted butter, melted
    • Butter or oil for frying

    For the Toppings:

    • ¼ cup crème fraîche or sour cream
    • 1 oz (30g) caviar (osetra, beluga, or salmon roe for budget option)
    • Fresh chives, finely chopped
    • Optional: lemon wedges, finely chopped red onion, hard-boiled egg yolk

    Step-by-Step Instructions

    Step 1: Make the Blini Batter

    1. In a bowl, whisk buckwheat flour, all-purpose flour, baking powder, and salt.
    2. In another bowl, whisk milk, egg yolk, and melted butter.
    3. Combine wet and dry ingredients. Mix until just combined.
    4. In a separate bowl, whip egg white until soft peaks form. Fold gently into batter.

    Step 2: Cook the Blinis

    1. Heat a nonstick pan over medium heat. Lightly butter.
    2. Drop 1 tablespoon of batter per blini. Cook for 1–2 minutes until bubbles form.
    3. Flip. Cook for another minute until golden. Repeat with remaining batter.

    Step 3: Assemble

    1. Top each warm blini with a small dollop of crème fraîche.
    2. Add a small spoonful of caviar.
    3. Sprinkle with fresh chives.

    Step 4: Serve

    1. Arrange on a platter. Serve immediately with champagne or chilled vodka.
    2. Pop. Eat. Feel fancy.

    Summary

    Prep Time: 10 minutes | Cook Time: 15 minutes | Total Time: 25 minutes

    Yield: About 20 blinis

    Difficulty: Easy

    Storage Notes

    Blinis freeze beautifully. Caviar does not. Assemble fresh.

    • Freezer (blinis only): Freeze cooked blinis in a single layer, then bag. Freeze for up to 2 months. Reheat in a dry pan or toaster.
    • Fridge (blinis): Store for up to 3 days. Reheat before serving.
    • Caviar: Keep refrigerated. Open just before serving. Never freeze.
    • Pro tip: Use a non-metal spoon for caviar (metal can affect the taste). Mother-of-pearl, plastic, or wood are best.
  • Fig and Prosciutto Flatbread (Salty-Sweet Perfection in 15 Minutes)

    Fig and Prosciutto Flatbread (Salty-Sweet Perfection in 15 Minutes)

    Some recipes exist to make you look like a hero with zero effort. This is one of them. You don’t even turn on the oven—just toast, spread, layer, and devour.

    Fig jam brings sweetness. Prosciutto brings salty silkiness. Burrata brings creamy chaos. And arugula? That’s your peppery little conscience telling you this counts as a salad.

    Ingredients

    Serves 4 as an appetizer.

    • 2 large flatbreads or naan breads
    • ¼ cup fig jam
    • 4 oz burrata cheese (or fresh mozzarella)
    • 3 oz prosciutto, torn into ribbons
    • 1 cup arugula
    • 1 tablespoon balsamic glaze
    • Flaky salt and cracked black pepper
    • Optional: fresh figs, thinly sliced (if in season)

    Step-by-Step Instructions

    Step 1: Toast the Base

    1. Toast flatbreads in a toaster, dry skillet, or under the broiler until crisp and lightly charred in spots. About 2 minutes per side.

    Step 2: Spread and Layer

    1. Spread fig jam evenly over each warm flatbread.
    2. Tear burrata into chunks and scatter across.
    3. Drape prosciutto ribbons over the cheese.

    Step 3: Add Fresh Toppings

    1. Toss arugula with a tiny drizzle of olive oil (optional). Pile on top.
    2. If using fresh figs, tuck slices around the flatbread.

    Step 4: Finish and Serve

    1. Drizzle with balsamic glaze. Sprinkle with flaky salt and cracked pepper.
    2. Slice and serve immediately—before someone eats the whole thing standing at the counter.

    Summary

    Prep Time: 10 minutes | Cook Time: 5 minutes | Total Time: 15 minutes

    Yield: 4 appetizer servings

    Difficulty: Embarrassingly Easy

    Storage Notes

    Don’t store assembled: Flatbread gets soggy fast. Keep components separate and assemble right before serving.

    Prep ahead: Toast flatbreads and tear prosciutto hours in advance. Store flatbreads in a ziplock bag. Assemble cold or re-crisp flatbreads for 1 minute before topping.

    Leftover jam: Fig jam keeps for months in the fridge. Use on toast, cheese boards, or roasted meats.

  • Tandoori Chicken Without a Clay Oven (Juicy, Smoky, No Regrets)

    Tandoori Chicken Without a Clay Oven (Juicy, Smoky, No Regrets)

    Real tandoori chicken doesn’t require a tandoor. You need a hot oven (or grill), a killer yogurt marinade, and one trick for that signature smoky flavor. This version is juicy, not dry, with charred edges and tender meat that falls off the bone. No red dye #40 required—just paprika doing its job.

    Ingredients

    Serves 4.

    • 2 lbs chicken drumsticks or thighs, skin removed, scored
    • 1 cup plain full-fat yogurt
    • 2 tablespoons lemon juice
    • 4 cloves garlic, minced
    • 1 tablespoon ginger, grated
    • 1 tablespoon garam masala
    • 1 tablespoon paprika (for color and mild heat)
    • 1 teaspoon cumin
    • 1 teaspoon coriander
    • ½ teaspoon cayenne (optional, for heat)
    • 1 teaspoon salt
    • 1 tablespoon oil

    Step-by-Step Instructions

    Step 1: Marinate (Do This Early)

    1. Score chicken thighs or drumsticks with shallow cuts.
    2. Whisk yogurt, lemon juice, garlic, ginger, all spices, salt, and oil.
    3. Coat chicken completely. Cover and refrigerate for 2-24 hours. Longer = better.

    Step 2: Preheat Like Crazy

    1. Preheat oven to 475°F (245°C) with a baking sheet inside.
    2. Line a second baking sheet with foil and place a wire rack on top.

    Step 3: Bake or Grill

    1. Place chicken on the wire rack. Shake off excess marinade.
    2. Bake for 20 minutes. Flip and bake 10-15 more minutes until charred and cooked through.
    3. For grill: cook over medium-high direct heat for 15-20 minutes, turning often.

    Step 4: Add Smoky Finish (The Trick)

    1. Optional but amazing: heat a small piece of charcoal until red hot.
    2. Place it in a small foil cup on the baking sheet. Drizzle with oil.
    3. Cover chicken and pan tightly with foil. Let smoke infuse for 2 minutes.

    Step 5: Serve Hot

    1. Squeeze fresh lemon over the chicken.
    2. Serve with mint chutney, raw onions, and naan.

    Summary

    Prep Time: 10 minutes + marinating | Cook Time: 30 minutes | Total Time: 40 minutes (plus marinating)

    Yield: 4 servings

    Difficulty: Easy

    Storage Notes

    Refrigerate leftovers for up to 3 days. Reheat in a 375°F oven or air fryer for 8-10 minutes—microwave makes it rubbery. Tandoori chicken freezes well for up to 2 months; thaw overnight before reheating.