Category: quick_meals

  • Beef Satay Skewers (Juicy, Flavor-Packed, Peanut Butter Lover’s Dream)

    Beef Satay Skewers (Juicy, Flavor-Packed, Peanut Butter Lover’s Dream)

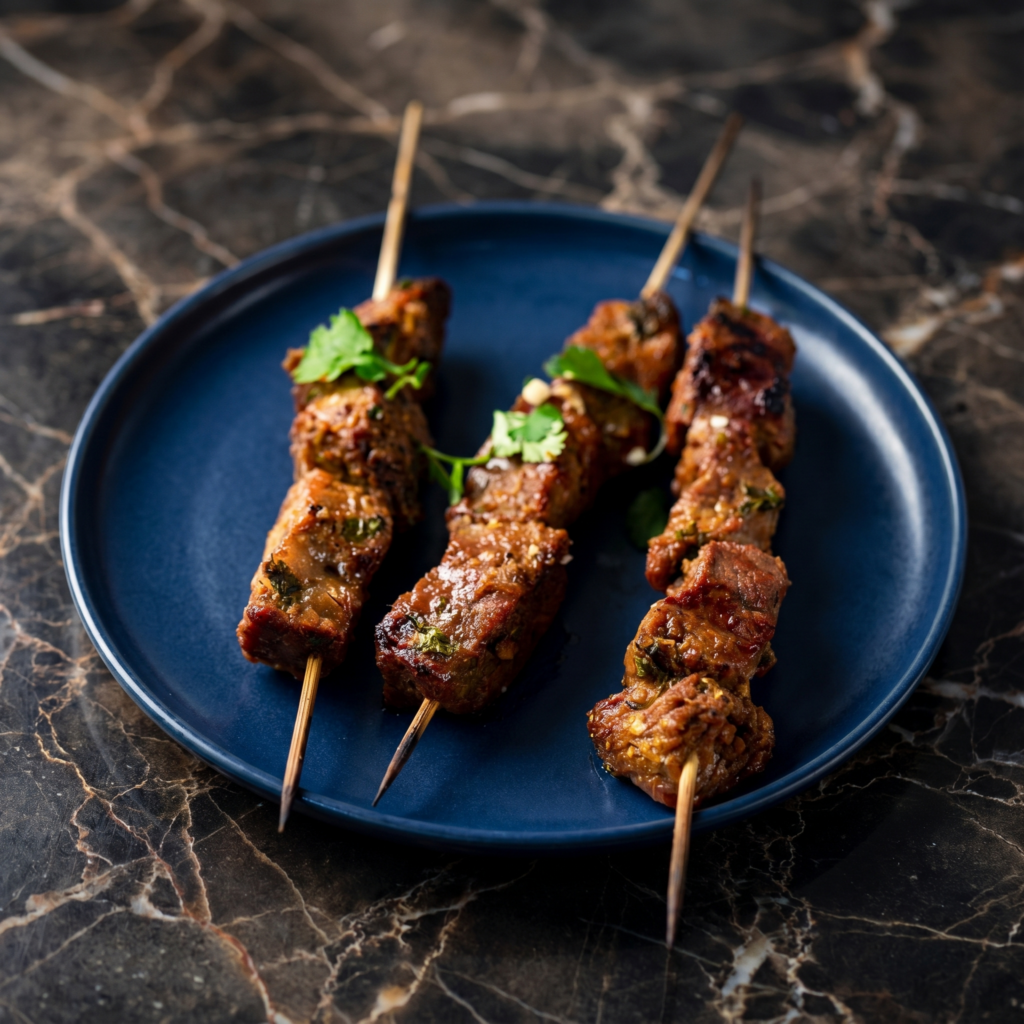
    Beef satay is proof that meat on a stick can be life-changing. Coconut milk-marinated beef, grilled until slightly charred. The real star? That rich, spicy peanut sauce for dipping. Fire up the grill. Let’s skewer.

    Ingredients

    Serves 4 (makes 10-12 skewers).

    For the Beef Satay:

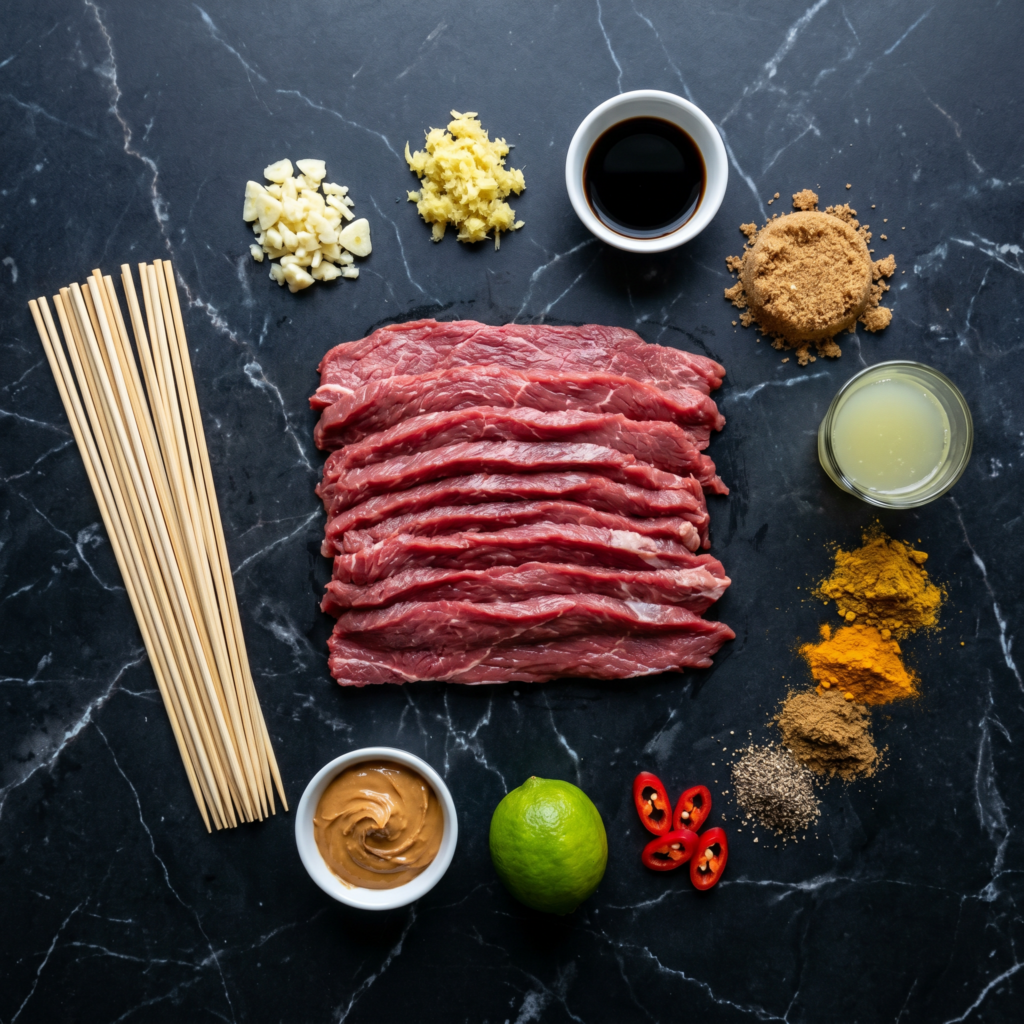
    • 1½ lbs (675g) beef sirloin or flank steak, thinly sliced against the grain
    • 1 can (14 oz / 400ml) coconut milk
    • 2 tbsp fish sauce
    • 2 tbsp soy sauce
    • 2 tbsp brown sugar
    • 1 tbsp turmeric powder
    • 1 tbsp coriander powder
    • 2 cloves garlic, minced
    • 1 tsp ginger, grated
    • Wooden skewers (soaked in water 30 minutes)

    For the Peanut Sauce:

    • ½ cup creamy peanut butter
    • ½ cup coconut milk
    • 2 tbsp soy sauce
    • 1 tbsp lime juice
    • 1 tbsp brown sugar
    • 1 tsp red curry paste (or sriracha)
    • ¼ cup water (to thin)

    Step-by-Step Instructions

    Step 1: Marinate Beef

    1. Whisk coconut milk, fish sauce, soy sauce, brown sugar, turmeric, coriander, garlic, and ginger.
    2. Add beef strips. Toss to coat. Cover and marinate 2-8 hours (longer = better).

    Step 2: Make Peanut Sauce

    1. Whisk peanut butter, coconut milk, soy sauce, lime juice, brown sugar, and curry paste in a saucepan.
    2. Warm over medium-low heat. Add water gradually until desired consistency (smooth and dippable). Set aside.

    Step 3: Skewer

    1. Thread beef strips onto soaked skewers, weaving back and forth.

    Step 4: Grill

    1. Heat grill or grill pan to medium-high heat.
    2. Grill skewers 2-3 minutes per side until charred and cooked through.

    Step 5: Serve

    1. Serve hot with peanut sauce. Add cucumber relish or pickled onions if you’re feeling fancy.

    Summary

    Prep Time: 15 min + marinate | Cook Time: 10 min | Total: 25 min + marinate

    Yield: 10-12 skewers | Difficulty: Easy

    Storage Notes

    Fridge (marinated uncooked): 1 day. Cooked satay: 3 days. Reheat in oven or air fryer at 375°F for 5 minutes. Peanut sauce keeps 5 days in fridge — reheat with a splash of water.

  • Crab Rangoon (The Crispy, Creamy, Disappears-First Appetizer)

    Crab Rangoon (The Crispy, Creamy, Disappears-First Appetizer)

    Let’s be real: you order Chinese takeout for the crab rangoon. Those crispy, creamy, salty-sweet little triangles that vanish in 60 seconds. This homemade version is faster than delivery, way crispier, and you can stuff them as full as you want. No skimping here.

    Ingredients

    Makes 24 rangoon.

    • 8 oz (225g) cream cheese, softened
    • 6 oz (170g) lump crab meat (fresh or canned, drained well)
    • 2 green onions, finely chopped
    • 1 tsp Worcestershire sauce
    • ½ tsp garlic powder
    • 24 wonton wrappers
    • Oil for frying (vegetable or canola)
    • Sweet chili sauce or duck sauce, for dipping

    Step-by-Step Instructions

    Step 1: Make Filling

    1. In a bowl, mix cream cheese, crab, green onions, Worcestershire, and garlic powder until combined. Don’t overmix (keep crab chunks intact).

    Step 2: Fill Wontons

    1. Place a wonton wrapper like a diamond. Add 1 teaspoon of filling to the center.
    2. Wet edges with water. Fold into a triangle, pressing out air. Seal well.
    3. For the classic shape, wet the two long corners and fold them together.

    Step 3: Fry

    1. Heat 1½ inches of oil to 350°F (175°C).
    2. Fry 4-5 rangoon at a time for 1-2 minutes, flipping once, until golden brown.
    3. Drain on paper towels.

    Step 4: Serve

    1. Serve hot with sweet chili sauce. They wait for no one.

    Summary

    Prep Time: 20 min | Cook Time: 10 min | Total: 30 min

    Yield: 24 rangoon | Difficulty: Easy

    Storage Notes

    Make ahead: Assemble uncooked rangoon and freeze on a tray. Once frozen, transfer to a bag. Fry from frozen (add 1 minute). Leftovers? Reheat in air fryer at 375°F for 3 minutes. Never microwave (soggy sadness).

  • Cream Cheese Wontons (Crispy, Creamy, Addictive)

    Cream Cheese Wontons (Crispy, Creamy, Addictive)

    Cream cheese wontons are the unsung heroes of takeout menus. Crispy, golden, stuffed with sweet and tangy cream cheese. No crab needed. Just pure, fried, creamy perfection. Make a double batch. You’ll thank me.

    Ingredients

    Makes 24 wontons.

    • 24 wonton wrappers
    • 8 oz (225g) cream cheese, softened
    • 2 green onions, finely chopped (optional)
    • 1 tsp sugar
    • ½ tsp garlic powder
    • ¼ tsp salt
    • 1 egg white (for sealing)
    • Vegetable oil for frying
    • Sweet chili sauce or duck sauce for dipping

    Step-by-Step Instructions

    Step 1: Make Filling

    1. In a bowl, mix cream cheese, green onions, sugar, garlic powder, and salt until smooth.

    Step 2: Fill Wontons

    1. Place a wonton wrapper in a diamond shape. Place 1 teaspoon of filling in the center.
    2. Wet edges with egg white. Fold into a triangle, pressing out air. Seal well.
    3. For the classic shape, wet the two long corners and fold them together.
    4. Repeat with remaining wrappers.

    Step 3: Fry

    1. Heat 1½ inches of oil to 350°F (175°C).
    2. Fry wontons in batches (5-6 at a time) for 1-2 minutes until golden brown and crispy.
    3. Drain on paper towels or a wire rack.

    Step 4: Serve

    1. Serve hot with sweet chili sauce or duck sauce. Fight over the last one.

    Summary

    Prep Time: 20 min | Cook Time: 10 min | Total: 30 min

    Yield: 24 wontons | Difficulty: Easy

    Storage Notes

    Make ahead: Assemble uncooked wontons and freeze on a tray. Once frozen, transfer to a bag. Fry from frozen (add 1 minute). Leftovers: Reheat in oven or air fryer at 375°F for 5-7 minutes. Never microwave — sogginess is tragedy.

  • Breakfast Egg Rolls (Eggs, Bacon, and Cheese — Deep Fried)

    Breakfast Egg Rolls (Eggs, Bacon, and Cheese — Deep Fried)

    Breakfast egg rolls are the best idea you’ve never had. Fluffy scrambled eggs. Crispy bacon. Melty cheese. Wrapped in a golden, crunchy egg roll wrapper. Serve with maple syrup or hot sauce. Breakfast just got dangerous.

    Ingredients

    Makes 8-10 egg rolls.

    • 8-10 egg roll wrappers
    • 6 large eggs
    • 2 tbsp milk or cream
    • 6 strips bacon, cooked and crumbled
    • ½ cup shredded cheddar cheese
    • 2 green onions, sliced (optional)
    • Salt and pepper to taste
    • Vegetable oil for frying
    • Optional dippers: maple syrup, hot sauce, ranch

    Step-by-Step Instructions

    Step 1: Make Scrambled Eggs

    1. Whisk eggs, milk, salt, and pepper. Scramble in a buttered skillet over medium heat until soft and just set. Let cool slightly.

    Step 2: Mix Filling

    1. In a bowl, combine scrambled eggs, crumbled bacon, cheddar, and green onions.

    Step 3: Assemble Egg Rolls

    1. Place an egg roll wrapper in a diamond shape. Add 2-3 tablespoons of filling in the center.
    2. Fold bottom corner over filling. Fold in sides. Roll tightly. Wet top corner with water to seal.

    Step 4: Fry

    1. Heat 1½ inches of oil to 350°F (175°C). Fry egg rolls 2-3 at a time, 2-3 minutes per side, until golden brown and crispy.
    2. Drain on a wire rack (not paper towels — keeps them crispy).

    Step 5: Serve

    1. Serve hot with maple syrup for sweet-savory or hot sauce for kick. Either way, you’re winning.

    Summary

    Prep Time: 15 min | Cook Time: 15 min | Total: 30 min

    Yield: 8-10 egg rolls | Difficulty: Medium

    Storage Notes

    Make ahead: Assemble uncooked egg rolls, freeze on a tray, then bag. Fry from frozen (add 2 minutes). Leftovers: Reheat in oven or air fryer at 375°F for 8-10 minutes. Never microwave — sogginess is the enemy of the egg roll.

  • Tiropita (Flaky, Cheesy, Greek Phyllo Pie)

    Tiropita (Flaky, Cheesy, Greek Phyllo Pie)

    Tiropita is Greece’s answer to “what’s for snack?” Buttery, crispy phyllo wrapped around a creamy, tangy feta filling. Baked until golden. Perfect for breakfast, lunch, or anytime you need cheese. Make extra. They vanish fast.

    Ingredients

    Makes 12 triangles.

    • 1 package (16 oz / 450g) phyllo dough, thawed
    • ½ cup (115g) unsalted butter, melted (or olive oil)

    For the Filling:

    • 8 oz (225g) feta cheese, crumbled
    • 8 oz (225g) ricotta cheese (or cottage cheese)
    • 1 large egg
    • 1 tbsp fresh dill or parsley, chopped (optional)
    • ¼ tsp black pepper

    Step-by-Step Instructions

    Step 1: Preheat & Prep

    1. Preheat oven to 375°F (190°C). Line a baking sheet with parchment.
    2. Thaw phyllo according to package directions. Keep covered with a damp towel while working (prevents drying).

    Step 2: Make Filling

    1. In a bowl, mix feta, ricotta, egg, dill, and pepper until combined.

    Step 3: Assemble Triangles

    1. Place one phyllo sheet on a work surface. Brush lightly with melted butter. Top with a second sheet. Brush again.
    2. Cut into 3 long strips (about 4 inches wide). Place 1 tablespoon of filling at the bottom corner of each strip.
    3. Fold corner over filling to form a triangle. Continue folding (like a flag) until the entire strip is folded. Brush top with butter.
    4. Repeat with remaining phyllo and filling.

    Step 4: Bake

    1. Place triangles on baking sheet. Bake 20-25 minutes until golden brown and crispy.

    Step 5: Serve

    1. Cool 5 minutes. Serve warm or at room temperature. Watch them disappear.

    Summary

    Prep Time: 20 min | Bake Time: 25 min | Total: 45 min

    Yield: 12 triangles | Difficulty: Medium

    Storage Notes

    Fridge: 4 days. Reheat in oven or air fryer at 350°F for 5-7 minutes (crispy returns). Freeze unbaked triangles: 3 months. Bake from frozen (add 5-7 minutes). Never microwave — phyllo gets sad and floppy.

  • Homemade Calzones (Pizza’s Portable, Pockets Full of Goodness)

    Homemade Calzones (Pizza’s Portable, Pockets Full of Goodness)

    Calzones are pizza’s cooler cousin. Same great toppings. Same cheesy goodness. Folded into a portable pocket. No slice necessary. Dip in marinara. Eat with your hands. Pizza night just leveled up.

    Ingredients

    Makes 4 calzones.

    • 1 lb (450g) pizza dough (store-bought or homemade), room temperature
    • 1 cup ricotta cheese
    • 1½ cups shredded mozzarella cheese, divided
    • ½ cup grated Parmesan cheese
    • ½ cup ricotta salata or provolone (optional)
    • ½ cup pepperoni slices (or cooked sausage, mushrooms, bell peppers)
    • ½ cup marinara sauce (plus more for dipping)
    • 1 egg, beaten (for egg wash)
    • 1 tsp Italian seasoning
    • Cornmeal or flour for dusting

    Step-by-Step Instructions

    Step 1: Preheat & Prep

    1. Preheat oven to 400°F (200°C). Line a baking sheet with parchment or dust with cornmeal.

    Step 2: Divide & Roll

    1. Divide dough into 4 equal pieces. Roll each into a 6-8 inch circle (about ¼ inch thick).

    Step 3: Assemble

    1. On one half of each dough circle, layer: ricotta, mozzarella, Parmesan, pepperoni, and a spoonful of marinara. Leave a ½-inch border.
    2. Sprinkle with Italian seasoning.

    Step 4: Fold & Seal

    1. Fold empty half over the filling. Press edges firmly to seal. Crimp with a fork or fold edge over itself. Cut a small slit on top for steam.

    Step 5: Egg Wash & Bake

    1. Brush calzones with beaten egg. Bake 15-20 minutes until golden brown and puffed.

    Step 6: Serve

    1. Cool 5 minutes. Serve warm with extra marinara for dipping. Pizza night, pocket-sized.

    Summary

    Prep Time: 15 min | Bake Time: 20 min | Total: 35 min

    Yield: 4 calzones | Difficulty: Easy

    Storage Notes

    Fridge: 4 days. Freezer: 3 months (baked or unbaked). Reheat in oven or air fryer at 375°F for 8-10 minutes. Never microwave — dough gets chewy. Great for meal prep — assemble and refrigerate unbaked.

  • Crispy Smashed Potatoes (Crunchy Outside, Fluffy Inside)

    Crispy Smashed Potatoes (Crunchy Outside, Fluffy Inside)

    Smashed potatoes are the best potatoes. Boil. Smash. Roast until crispy. That’s it. Crunchy, craggy outside. Fluffy inside. Seasoned with garlic and herbs. The side dish that steals the show.

    Ingredients

    Serves 4.

    • 1½ lbs (675g) baby potatoes (Yukon gold or red)
    • 3 tbsp olive oil
    • 3 cloves garlic, minced
    • 1 tsp salt
    • ½ tsp black pepper
    • 1 tsp fresh rosemary or thyme (or ½ tsp dried)
    • ½ tsp paprika (optional)
    • Fresh parsley for garnish

    Step-by-Step Instructions

    Step 1: Boil Potatoes

    1. Place potatoes in a large pot. Cover with cold salted water. Bring to a boil. Cook 15-20 minutes until fork-tender.
    2. Drain and let cool slightly (5 minutes).

    Step 2: Preheat & Smash

    1. Preheat oven to 425°F (220°C). Line a baking sheet with parchment.
    2. Place potatoes on the baking sheet. Use a glass or potato masher to gently smash each potato to about ½-inch thickness (don’t obliterate — keep them intact).

    Step 3: Season

    1. Drizzle potatoes with olive oil. Sprinkle with garlic, salt, pepper, herbs, and paprika.

    Step 4: Roast

    1. Roast 20-25 minutes until edges are deep golden brown and crispy.

    Step 5: Serve

    1. Garnish with fresh parsley. Serve immediately. Fight over the crispiest ones.

    Summary

    Prep Time: 10 min | Cook Time: 40 min | Total: 50 min

    Yield: 4 servings | Difficulty: Easy

    Storage Notes

    Best fresh. Fridge 3 days. Reheat in oven or air fryer at 400°F for 8-10 minutes (crispy returns). Never microwave — potatoes get floppy. Leftovers also great chopped up in breakfast hash.

  • Lasagna Roll Ups (All the Flavor, None of the Layering Drama)

    Lasagna Roll Ups (All the Flavor, None of the Layering Drama)

    Love lasagna but hate the layering? Try roll ups. Same cheesy, saucy goodness. No fussy assembly. Faster baking. Each person gets their own perfect portion. Weeknight lasagna is possible.

    Ingredients

    Serves 4-6 (makes 8-10 roll ups).

    • 12 lasagna noodles (about 8 oz / 225g)
    • 2 cups ricotta cheese
    • 2 cups shredded mozzarella cheese, divided
    • ½ cup grated Parmesan cheese
    • 1 large egg
    • 2 cloves garlic, minced
    • 1 tsp dried oregano
    • ½ tsp salt
    • ¼ tsp black pepper
    • 2 cups marinara sauce
    • Fresh basil for garnish (optional)

    Step-by-Step Instructions

    Step 1: Cook Noodles

    1. Cook lasagna noodles according to package directions. Drain and lay flat on parchment paper to prevent sticking.

    Step 2: Make Filling

    1. In a bowl, mix ricotta, 1 cup mozzarella, Parmesan, egg, garlic, oregano, salt, and pepper.

    Step 3: Preheat & Prep

    1. Preheat oven to 375°F (190°C). Spread ½ cup marinara sauce on the bottom of a 9×13 baking dish.

    Step 4: Assemble Roll Ups

    1. Spread 2-3 tablespoons of ricotta filling evenly over each noodle. Roll up tightly.
    2. Place roll ups seam-side down in the baking dish.

    Step 5: Top & Bake

    1. Pour remaining marinara sauce over the roll ups. Sprinkle with remaining 1 cup mozzarella.
    2. Cover with foil. Bake 20 minutes. Uncover and bake 10-15 more minutes until bubbly and golden.

    Step 6: Serve

    1. Garnish with fresh basil. Serve hot. Watch them disappear.

    Summary

    Prep Time: 15 min | Bake Time: 35 min | Total: 50 min

    Yield: 8-10 roll ups | Difficulty: Easy

    Storage Notes

    Fridge: 5 days. Freezer: 3 months (assemble unbaked). Bake from frozen (add 15-20 minutes). Reheat leftovers in oven or microwave. Great for meal prep — make a double batch.

  • Smash Burgers (Craggy, Crispy, Better Than Any Fast Food)

    Smash Burgers (Craggy, Crispy, Better Than Any Fast Food)

    Smash burgers are the ultimate burger. Thin patties smashed into a screaming-hot skillet. Lacy, crispy edges. Beefy, juicy center. Double them up. Add American cheese. You’ll never cook a thick patty again.

    Ingredients

    Serves 4 (makes 8 patties / 4 double burgers).

    • 2 lbs (900g) ground beef (80/20 — don’t go leaner)
    • 1 tsp salt
    • 1 tsp black pepper
    • 8 slices American cheese (or cheddar/provolone)
    • 4 burger buns (potato buns recommended)
    • 2 tbsp butter (for toasting buns)
    • Optional toppings: pickles, onion, lettuce, tomato, special sauce

    Step-by-Step Instructions

    Step 1: Prep

    1. Divide beef into 8 balls (about ¼ cup / 4 oz each). Do not overwork — loosely form.
    2. Season generously with salt and pepper.

    Step 2: Heat Skillet

    1. Heat a cast iron skillet or griddle over high heat until smoking hot (5-7 minutes). No oil needed — the fat will render.

    Step 3: Smash & Cook

    1. Place a beef ball in the skillet. Smash firmly with a heavy spatula or bacon press until very thin (about ¼ inch).
    2. Cook 60-90 seconds until edges are brown and crispy. Scrape under the patty with a metal spatula to flip.
    3. Flip. Add cheese immediately. Cook 30 seconds more.
    4. Repeat with remaining patties (work in batches, don’t crowd).

    Step 4: Toast Buns

    1. Butter cut sides of buns. Toast in the skillet until golden.

    Step 5: Assemble

    1. Stack two cheesy patties per bottom bun. Add pickles, onion, lettuce, and sauce. Top with bun.

    Step 6: Serve

    1. Serve immediately. That crust is the whole point.

    Summary

    Prep Time: 10 min | Cook Time: 15 min | Total: 25 min

    Yield: 4 double burgers | Difficulty: Easy

    Storage Notes

    Best fresh. Smash burgers don’t reheat well — the crispy crust is a one-time magic trick. Cooked patties can be refrigerated for 2 days but texture suffers. Leftovers? Chop up and toss in scrambled eggs or mac and cheese.

  • Crispy Ground Beef Tacos (Shell vs. Meat? Shell Wins)

    Crispy Ground Beef Tacos (Shell vs. Meat? Shell Wins)

    Hard shell tacos get a bad rap. Not these. Golden, crunchy shells. Seasoned ground beef. Melty cheese. Fresh lettuce and salsa. One bite. That crunch. Taco Tuesday forever.

    Ingredients

    Serves 4 (makes 8-10 tacos).

    • 1 lb (450g) ground beef (80/20)
    • 1 small onion, finely chopped
    • 2 cloves garlic, minced
    • 1 packet taco seasoning (or 2 tbsp homemade)
    • ½ cup water
    • 8-10 crispy taco shells (hard shell)
    • 1½ cups shredded cheddar or Mexican blend cheese
    • 2 cups shredded lettuce
    • 1 cup diced tomatoes (or pico de gallo)
    • Sour cream and salsa for serving
    • Hot sauce (optional)

    Step-by-Step Instructions

    Step 1: Cook Beef

    1. Heat a large skillet over medium-high heat. Add ground beef and onion. Cook 5-7 minutes, breaking it up, until beef is browned and cooked through.
    2. Drain excess fat. Add garlic and cook 1 minute.

    Step 2: Season

    1. Add taco seasoning and water. Stir and simmer 3-4 minutes until most liquid is absorbed. Remove from heat.

    Step 3: Warm Shells

    1. Preheat oven to 350°F (175°C). Arrange taco shells on a baking sheet. Warm 3-4 minutes until crispy.

    Step 4: Assemble

    1. Fill each shell with seasoned beef. Top with shredded cheese (the heat will melt it slightly).
    2. Add lettuce, tomatoes, sour cream, salsa, and hot sauce.

    Step 5: Serve

    1. Serve immediately. Eat with your hands. Accept the crunch.

    Summary

    Prep Time: 10 min | Cook Time: 15 min | Total: 25 min

    Yield: 8-10 tacos | Difficulty: Easy

    Storage Notes

    Don’t assemble ahead. Soggy shells = sadness. Store seasoned beef in fridge for 4 days. Reheat beef in skillet or microwave. Assemble tacos fresh right before eating for maximum crunch. Shells can be stored in pantry.