Author: user

  • Kimchijeon: Crispy, Spicy, Funky, Flippable

    Kimchijeon: Crispy, Spicy, Funky, Flippable

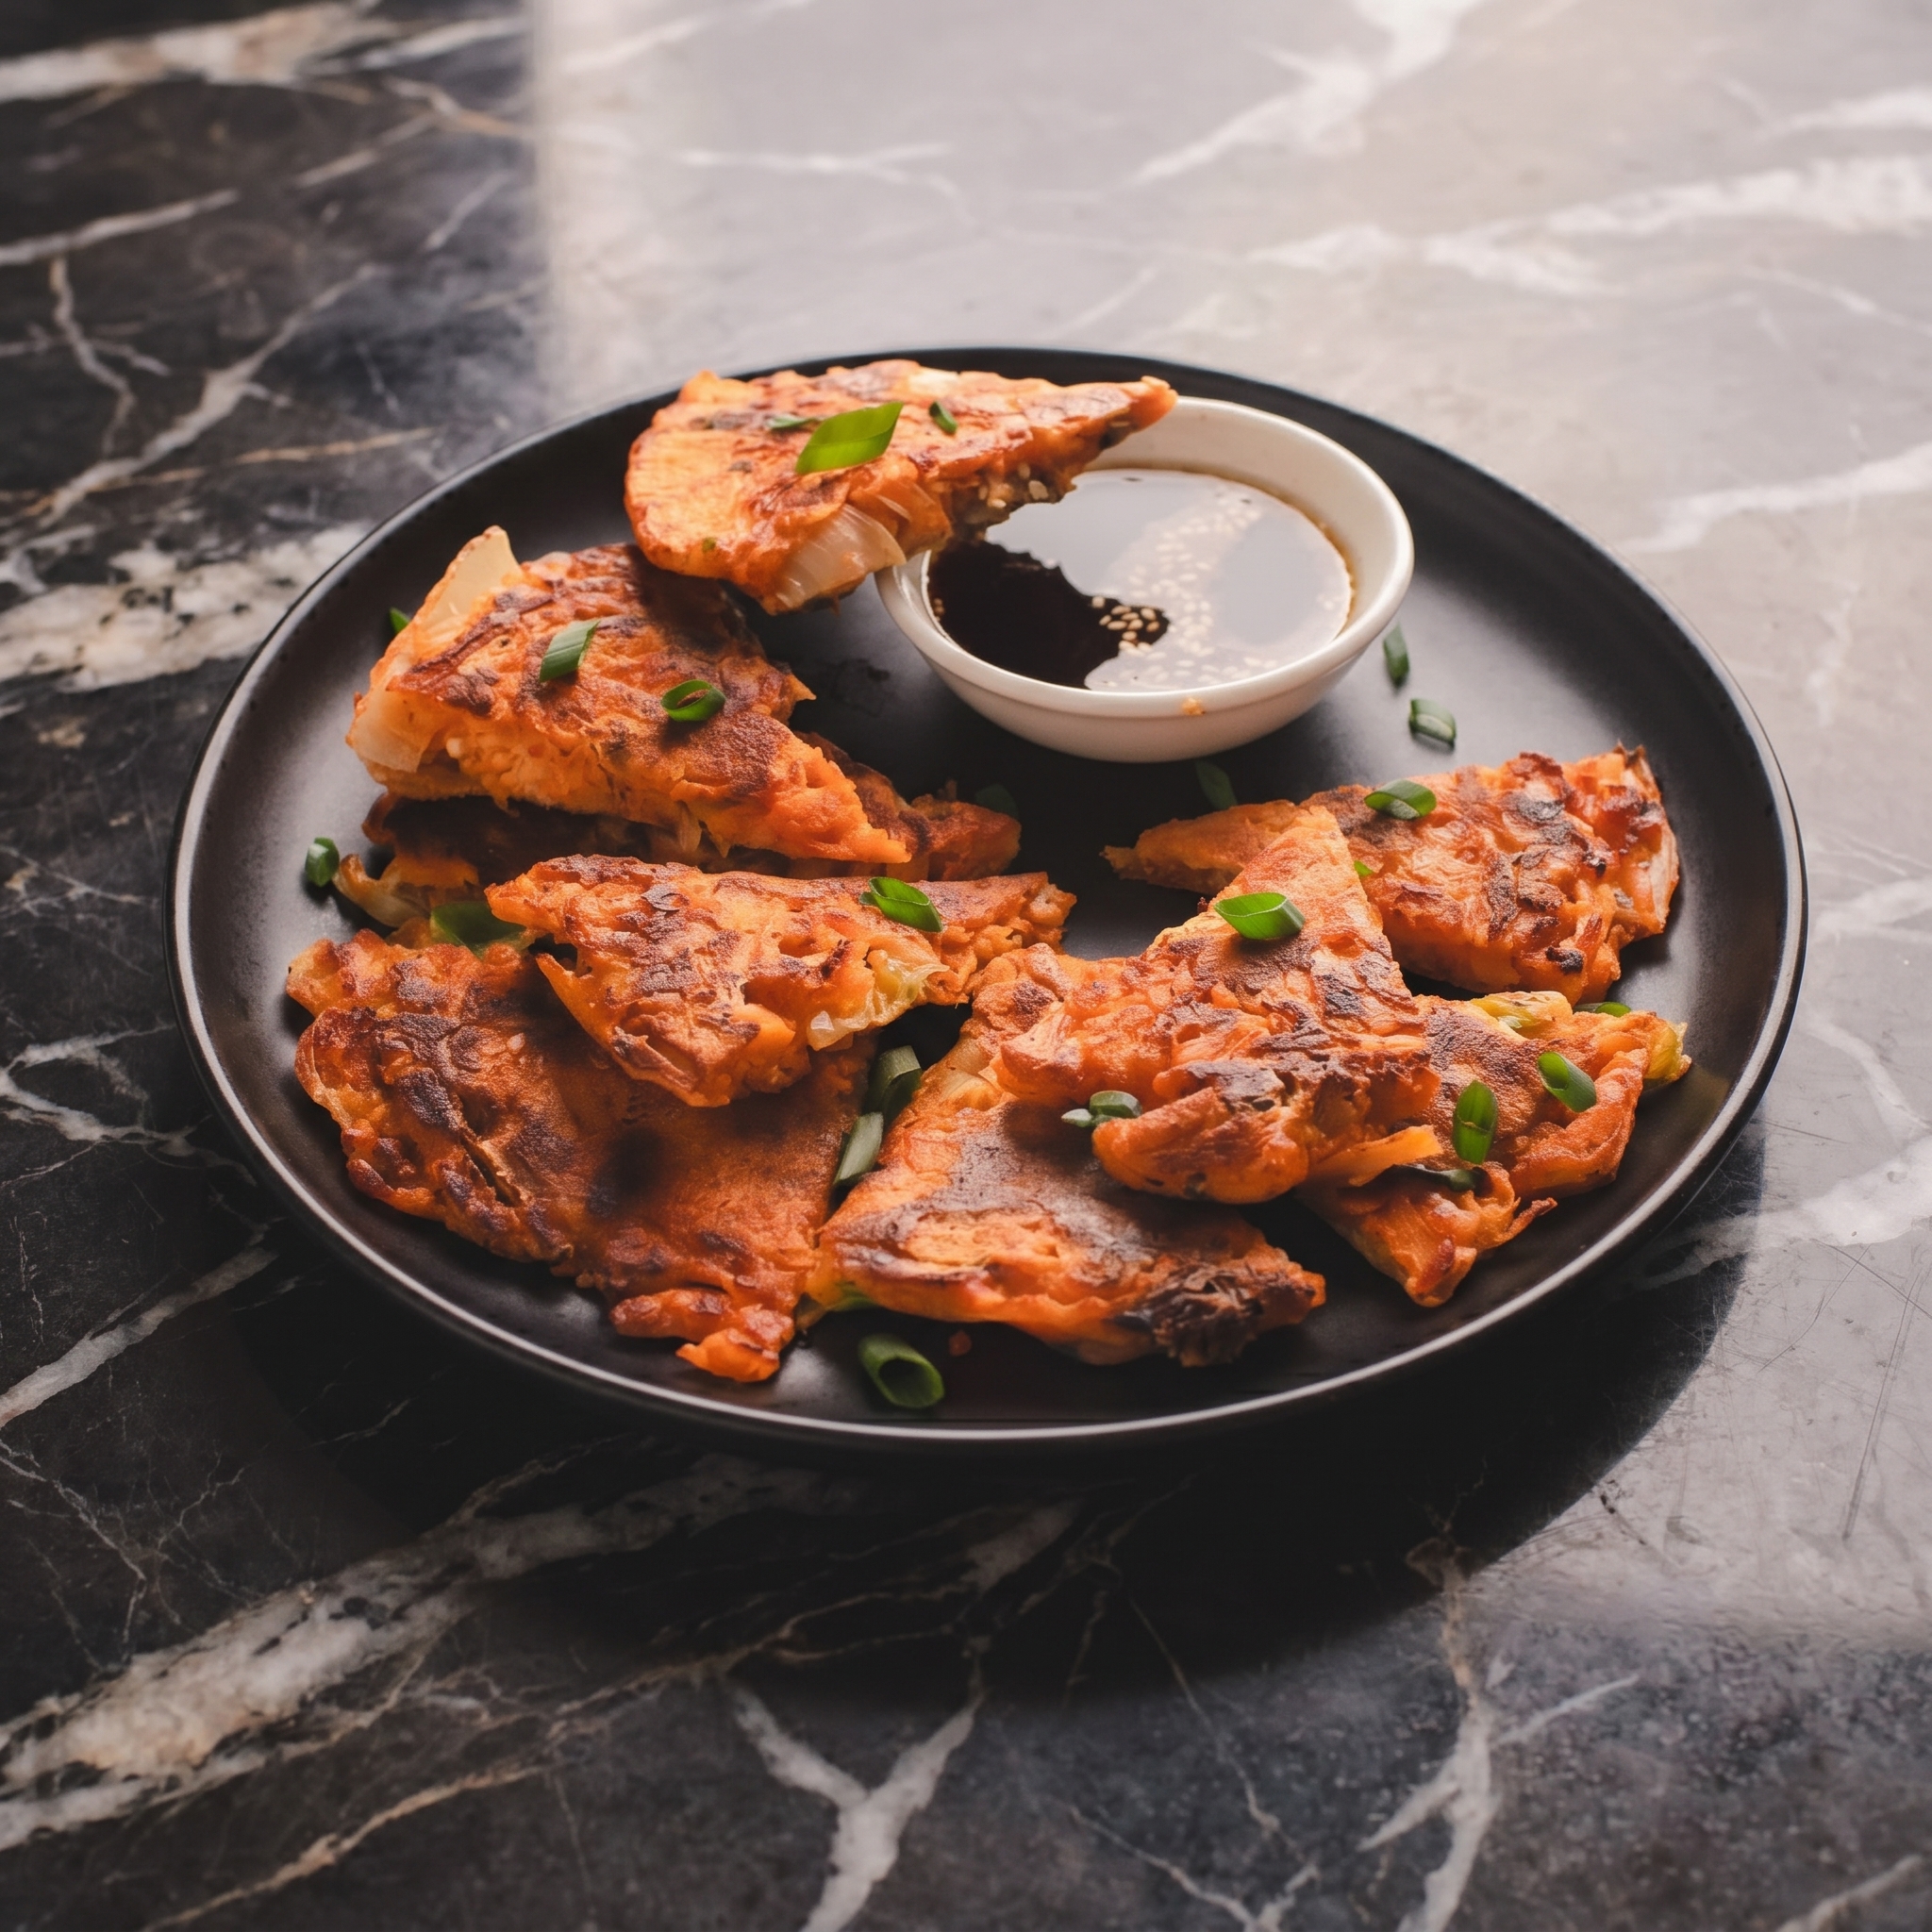
    Kimchijeon is Korea’s answer to the crispy, spicy, savory pancake. It’s addictive.

    Tangy, fermented kimchi. Crispy lacy edges. Chewy, tender center. 15 minutes. One bowl. One skillet. Dip in soy-vinegar sauce. You’ll make it weekly.

    Ingredients

    Serves 2-4 (makes one large pancake).

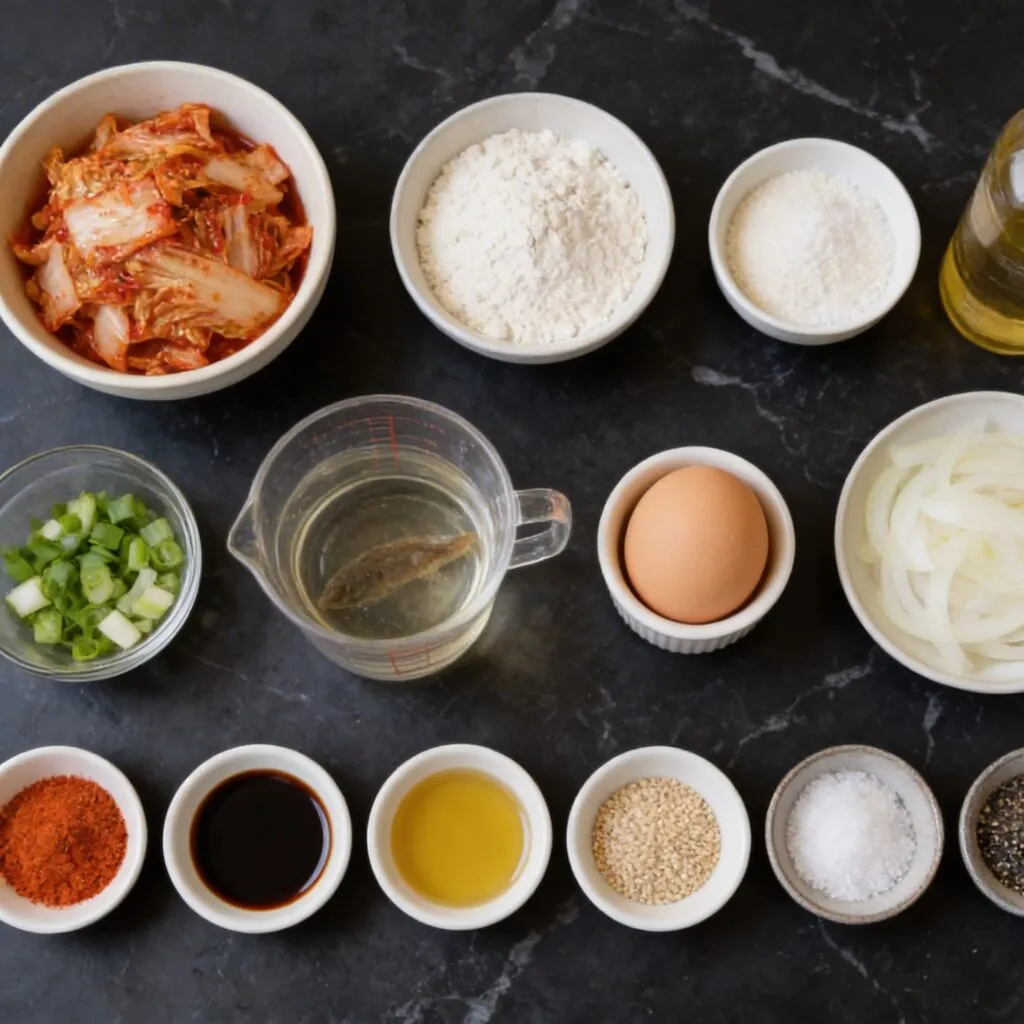
    • 1 cup kimchi, well chopped (plus 2 tbsp kimchi juice)
    • ½ cup all-purpose flour (or glutinous rice flour for extra chew)
    • ¼ cup water
    • 1 large egg (optional, for fluffiness)
    • 2 green onions, sliced (white + green parts separated)
    • 1 tsp gochugaru (Korean chili flakes, optional for heat)
    • 1 tbsp oil for frying (vegetable or sesame oil)

    For the Dipping Sauce:

    • 2 tbsp soy sauce
    • 1 tbsp rice vinegar
    • 1 tsp sugar
    • 1 tsp sesame oil
    • 1 tsp toasted sesame seeds
    • 1 green onion, sliced

    Step-by-Step Instructions

    Step 1: Make the Dipping Sauce

    1. Whisk all dipping sauce ingredients in a small bowl. Set aside.

    Step 2: Make the Batter

    1. In a bowl, combine flour, water, egg, kimchi juice, and gochugaru. Stir until smooth.
    2. Fold in chopped kimchi and white parts of green onions (reserve green tops).

    Step 3: Pan-Fry the Pancake

    1. Heat oil in a large non-stick skillet over medium-high heat.
    2. Pour batter into skillet. Spread into a thin, even layer.
    3. Sprinkle green onion tops on top. Press gently.
    4. Cook 3-4 minutes until bottom is golden and crispy. Flip. Cook 2-3 minutes more.

    Step 4: Serve

    1. Slide onto a cutting board. Slice into wedges.
    2. Serve immediately with dipping sauce.

    Summary

    Prep Time: 5 minutes | Cook Time: 5-7 minutes | Total Time: 15 minutes

    Yield: 2-4 servings

    Difficulty: Easy

    Storage Notes

    Best Fresh:

    Kimchijeon is best hot and crispy. Leftovers get soft but are still tasty.

    Reheat:

    Skillet over medium heat for 2-3 minutes per side. Air fryer at 375°F for 5 minutes.

    Pro Tip:

    Use old, sour kimchi (fermented longer). More flavor = better pancake.

  • Indian Spiced Sweet Potato Patties: Turmeric. Cumin. Crispy. Delicious.

    Indian Spiced Sweet Potato Patties: Turmeric. Cumin. Crispy. Delicious.

    Sweet potatoes meet Indian spices. Magic happens.

    Mashed sweet potato. Cumin. Coriander. Turmeric. Ginger. Pan-fried until crispy outside, soft inside. 30 minutes. Dip in yogurt or mango chutney. You’re welcome.

    Ingredients

    Makes 8 patties.

    • 2 large sweet potatoes (about 2 lbs), peeled and cubed
    • 2 tbsp olive oil or ghee (plus more for frying)
    • 1 small onion, finely diced
    • 2 garlic cloves, minced
    • 1 tsp ginger, grated
    • 1 tsp ground cumin
    • 1 tsp ground coriander
    • ½ tsp turmeric
    • ½ tsp red chili powder or cayenne (optional)
    • ½ tsp salt
    • ¼ cup chopped fresh cilantro
    • ¼ cup breadcrumbs or chickpea flour (for binding)

    For serving: Plain yogurt, mango chutney, or cilantro chutney

    Step-by-Step Instructions

    Step 1: Cook the Sweet Potatoes

    1. Boil or steam sweet potato cubes until fork-tender (10-15 minutes). Drain and mash.

    Step 2: Sauté Aromatics

    1. Heat oil in a skillet. Add onion and cook 3 minutes until soft.
    2. Add garlic, ginger, cumin, coriander, turmeric, chili powder, and salt. Cook 1 minute.

    Step 3: Mix Patties

    1. Combine mashed sweet potatoes, sautéed mixture, cilantro, and breadcrumbs. Mix well.
    2. Form into 8 patties (about ½-inch thick).

    Step 4: Pan-Fry

    1. Heat oil in a skillet over medium heat.
    2. Cook patties 3-4 minutes per side until golden brown and crispy.

    Step 5: Serve

    1. Serve warm with yogurt or chutney for dipping.

    Summary

    Prep Time: 15 minutes | Cook Time: 15 minutes | Total Time: 30 minutes

    Yield: 8 patties

    Difficulty: Easy

    Storage Notes

    Fridge:

    Store cooked patties in an airtight container for 4 days.

    Reheat:

    Skillet over medium heat for 2-3 minutes per side. Air fryer at 375°F for 5 minutes.

    Freezer Friendly:

    Freeze uncooked patties for 2 months. Pan-fry from frozen (add 2 minutes per side).

    Pro Tip:

    Don’t overmash. Small chunks = better texture.

  • Blondies: Brownies’ Buttery, Brown Sugar Cousin

    Blondies: Brownies’ Buttery, Brown Sugar Cousin

    Brownies get all the attention. Blondies are the unsung hero.

    Chewy. Buttery. Loaded with white chocolate chips and pecans. 30 minutes. One bowl. No cocoa. All flavor.

    Ingredients

    Makes 16 bars.

    • ½ cup unsalted butter, melted
    • 1 cup brown sugar
    • 1 large egg
    • 1 tbsp vanilla extract
    • 1 cup all-purpose flour
    • ½ tsp baking powder
    • ¼ tsp salt
    • ½ cup white chocolate chips
    • ½ cup chopped pecans or walnuts (optional)

    Step-by-Step Instructions

    Step 1: Preheat and Prep

    1. Preheat oven to 350°F (175°C). Line an 8×8 baking pan with parchment paper.

    Step 2: Mix Wet Ingredients

    1. Whisk melted butter and brown sugar until smooth. Add egg and vanilla. Whisk until combined.

    Step 3: Add Dry Ingredients

    1. Add flour, baking powder, and salt. Stir until just combined. (Don’t overmix.)
    2. Fold in white chocolate chips and pecans.

    Step 4: Bake

    1. Spread batter evenly into prepared pan.
    2. Bake 20-25 minutes until edges are golden and center is set (toothpick may have moist crumbs).

    Step 5: Cool and Cut

    1. Cool completely in pan. Lift out using parchment. Cut into 16 squares.

    Summary

    Prep Time: 5 minutes | Cook Time: 20-25 minutes | Total Time: 25-30 minutes

    Yield: 16 bars

    Difficulty: Easy

    Storage Notes

    Room Temp:

    Store in an airtight container for up to 1 week.

    Freezer Friendly:

    Freeze for 3 months. Thaw at room temperature.

    Pro Tip:

    Underbake slightly for chewier blondies. Overbake = dry and crumbly.

  • Nutella Cruffins: Croissant + Muffin + Nutella = Obsession

    Nutella Cruffins: Croissant + Muffin + Nutella = Obsession

    Croissant. Muffin. Nutella. Together at last.

    Flaky, buttery puff pastry. Swirled with creamy Nutella. Baked in a muffin tin. Dusted with sugar. 35 minutes. You’ve been warned.

    Ingredients

    Makes 6 cruffins.

    • 2 sheets frozen puff pastry (thawed)
    • ½ cup Nutella (plus extra for drizzling)
    • 2 tbsp unsalted butter, melted
    • 2 tbsp brown sugar
    • 1 egg, beaten (for egg wash, optional)

    For Topping:

    • ¼ cup granulated sugar
    • 1 tbsp coarse sugar (turbinado, optional)
    • Powdered sugar for dusting

    Step-by-Step Instructions

    Step 1: Preheat and Prep

    1. Preheat oven to 375°F (190°C). Grease a 6-cup muffin tin.
    2. Roll each puff pastry sheet slightly into a 10×12-inch rectangle.

    Step 2: Add Nutella

    1. Brush pastry with melted butter. Sprinkle with brown sugar.
    2. Warm Nutella slightly (10 seconds in microwave) until spreadable. Spread evenly over both sheets.

    Step 3: Roll and Cut

    1. Roll each sheet tightly into a log. Slice each log into 3 equal pieces.
    2. Place each piece cut-side up into a muffin cup.

    Step 4: Top and Bake

    1. Optional: Brush tops with beaten egg. Sprinkle with turbinado sugar.
    2. Bake 18-22 minutes until golden brown and puffed.
    3. Cool in pan 5 minutes, then transfer to wire rack.

    Step 5: Coat and Serve

    1. Roll warm cruffins in granulated sugar. Dust with powdered sugar.
    2. Drizzle with extra melted Nutella. Serve warm.

    Summary

    Prep Time: 15 minutes | Cook Time: 18-22 minutes | Total Time: 35-40 minutes

    Yield: 6 cruffins

    Difficulty: Easy

    Storage Notes

    Best Fresh:

    Cruffins are best the day they’re made. Reheat in oven for crispiness.

    Reheat:

    Oven at 350°F for 5-7 minutes. Microwave for 15 seconds but less crispy.

    Pro Tip:

    Warm Nutella before spreading. Cold Nutella tears the pastry.

  • Peanut Butter Fudge Bars: Peanut Butter + Chocolate. No Baking.

    Peanut Butter Fudge Bars: Peanut Butter + Chocolate. No Baking.

    Peanut butter and chocolate are a match made in heaven. These bars are proof.

    Creamy peanut butter fudge layer. Rich chocolate topping. 15 minutes. No oven. 6 ingredients. Dangerously easy. Dangerously good.

    Ingredients

    Makes 16 bars.

    For the Peanut Butter Layer:

    • 1 cup creamy peanut butter
    • ¼ cup unsalted butter, melted
    • 1 cup powdered sugar
    • ½ tsp vanilla extract
    • ¼ tsp salt

    For the Chocolate Topping:

    • 1 cup semisweet or dark chocolate chips
    • ¼ cup heavy cream (or 2 tbsp coconut oil)

    Optional topping: Flaky sea salt, crushed peanuts

    Step-by-Step Instructions

    Step 1: Prepare the Pan

    1. Line an 8×8 baking pan with parchment paper, leaving overhang on two sides.

    Step 2: Make the Peanut Butter Layer

    1. In a bowl, mix peanut butter and melted butter until smooth.
    2. Add powdered sugar, vanilla, and salt. Stir until thick and well combined.
    3. Press mixture evenly into the prepared pan.

    Step 3: Make the Chocolate Topping

    1. In a microwave-safe bowl, combine chocolate chips and heavy cream.
    2. Microwave in 20-second bursts, stirring each time, until smooth.

    Step 4: Assemble and Chill

    1. Pour chocolate mixture over peanut butter layer. Spread evenly.
    2. Sprinkle with sea salt or crushed peanuts if desired.
    3. Refrigerate 1-2 hours until firm.

    Step 5: Cut and Serve

    1. Lift bars out using parchment overhang. Cut into 16 squares.
    2. Store in refrigerator. Serve cold.

    Summary

    Prep Time: 10 minutes | Chill Time: 1-2 hours | Total Time: ~1.5 hours

    Yield: 16 bars

    Difficulty: So Easy

    Storage Notes

    Fridge:

    Store in an airtight container in the refrigerator for up to 2 weeks.

    Freezer Friendly:

    Freeze for 3 months. Thaw in refrigerator before serving.

    Pro Tip:

    Use natural peanut butter? Stir well first. The oil can separate.

  • White Forest Cake: Black Forest’s Elegant Blonde Sister

    White Forest Cake: Black Forest’s Elegant Blonde Sister

    Love Black Forest cake? Meet its elegant blonde sister.

    Vanilla bean cake layers. Creamy white chocolate. Tart cherries. Fluffy whipped cream. No cocoa. All class. Almost too pretty to eat. Almost.

    Ingredients

    Serves 10-12.

    For the Vanilla Cake:

    • 2¼ cups all-purpose flour
    • 1½ cups granulated sugar
    • 1 tbsp baking powder
    • ½ tsp salt
    • ½ cup unsalted butter, softened
    • 3 large eggs
    • 1 cup milk
    • 2 tsp vanilla bean paste or vanilla extract

    For the Cherry Filling:

    • 2 cups fresh or frozen cherries (pitted)
    • ¼ cup granulated sugar
    • 1 tbsp lemon juice
    • 2 tbsp cornstarch mixed with 2 tbsp water
    • ¼ cup cherry liqueur or white rum (optional)

    For the Topping & Frosting:

    • 2 cups heavy cream
    • ¼ cup powdered sugar
    • 1 tsp vanilla extract
    • 4 oz white chocolate, shaved or curled
    • Fresh cherries for garnish

    Step-by-Step Instructions

    Step 1: Make the Cake

    1. Preheat oven to 350°F (175°C). Grease two 9-inch round cake pans.
    2. Whisk flour, sugar, baking powder, and salt. Add butter until crumbly.
    3. Add eggs, milk, and vanilla. Beat 2 minutes until smooth. Pour into pans.
    4. Bake 25-30 minutes. Cool completely.

    Step 2: Make Cherry Filling

    1. In a saucepan, cook cherries, sugar, and lemon juice over medium heat until juicy (5 minutes).
    2. Add cornstarch slurry. Cook until thickened. Stir in liqueur if using. Cool.

    Step 3: Make Whipped Cream

    1. Whip heavy cream, powdered sugar, and vanilla until stiff peaks form.

    Step 4: Assemble Cake

    1. Slice each cake layer in half horizontally (4 layers total).
    2. Place first layer on plate. Spread cherry filling. Add whipped cream.
    3. Repeat. Frost outside with whipped cream.

    Step 5: Decorate and Serve

    1. Press white chocolate shavings onto sides. Top with fresh cherries.
    2. Chill 1 hour before serving.

    Summary

    Prep Time: 30 minutes | Cook Time: 30 minutes | Total Time: ~2 hours

    Yield: 10-12 servings

    Difficulty: Medium

    Storage Notes

    Fridge:

    Store in refrigerator for up to 4 days (cream is perishable).

    Freezer Friendly:

    Freeze unfrosted cake layers for 3 months. Thaw and assemble fresh.

    Pro Tip:

    Use a vegetable peeler on a white chocolate bar to make chocolate curls.

  • Cream Puffs: Pâte à Choux. Pastry Cream. Pure Magic.

    Cream Puffs: Pâte à Choux. Pastry Cream. Pure Magic.

    Cream puffs look like they came from a French bakery. They came from your kitchen.

    Light, airy choux pastry. Silky vanilla pastry cream. Dusted with powdered sugar. 1 hour. Easier than they look. Fancier than they should be.

    Ingredients

    Makes 12-15 cream puffs.

    For the Choux Pastry:

    • ½ cup water
    • ½ cup milk
    • ½ cup unsalted butter
    • 1 tbsp granulated sugar
    • ¼ tsp salt
    • 1 cup all-purpose flour
    • 4 large eggs

    For the Pastry Cream:

    • 2 cups whole milk
    • ½ cup granulated sugar
    • 4 large egg yolks
    • ¼ cup cornstarch
    • 2 tbsp unsalted butter
    • 1 tsp vanilla extract

    For Topping:

    • Powdered sugar for dusting

    Step-by-Step Instructions

    Step 1: Make the Pastry Cream

    1. Heat milk in saucepan until steaming. In a bowl, whisk sugar, egg yolks, and cornstarch.
    2. Slowly whisk hot milk into egg mixture. Return to pot. Cook until thick.
    3. Remove from heat. Stir in butter and vanilla. Cover with plastic wrap (touch surface). Chill.

    Step 2: Make the Choux Pastry

    1. Preheat oven to 400°F (200°C). Line baking sheet with parchment.
    2. In a saucepan, combine water, milk, butter, sugar, and salt. Bring to a boil.
    3. Add flour all at once. Stir vigorously until dough forms a ball (about 2 minutes).
    4. Remove from heat. Cool 5 minutes. Add eggs one at a time, beating well after each.

    Step 3: Pipe and Bake

    1. Transfer dough to a piping bag. Pipe 1.5-inch mounds onto baking sheet.
    2. Bake 20-25 minutes until puffed and golden. Do not open oven! Cool completely.

    Step 4: Fill the Cream Puffs

    1. Cut each puff in half. Pipe or spoon pastry cream into bottom half.
    2. Replace tops. Dust with powdered sugar.

    Step 5: Serve

    1. Serve immediately or refrigerate up to 4 hours before serving.

    Summary

    Prep Time: 30 minutes | Cook Time: 20-25 minutes | Total Time: ~1 hour

    Yield: 12-15 cream puffs

    Difficulty: Medium (worth it)

    Storage Notes

    Best Fresh:

    Fill just before serving. Unfilled puffs keep 2 days in airtight container.

    Freezer Friendly:

    Freeze unfilled puffs for 2 months. Reheat at 350°F for 5 minutes before filling.

    Pro Tip:

    Do NOT open the oven while baking. Cold air = deflated puffs.

  • Pecan Pie Bars: All the Pie. None of the Slice Drama.

    Pecan Pie Bars: All the Pie. None of the Slice Drama.

    Pecan pie is amazing. Pecan pie bars are amazing AND easy.

    Buttery shortbread crust. Gooey, nutty pecan topping. No pie crust to roll. No edges to crimp. 45 minutes. All the flavor. None of the fuss.

    Ingredients

    Makes 16 bars.

    For the Crust:

    • 1½ cups all-purpose flour
    • ½ cup powdered sugar
    • ¾ cup cold unsalted butter, cubed
    • ¼ tsp salt

    For the Pecan Topping:

    • ¾ cup brown sugar
    • ½ cup light corn syrup
    • 2 large eggs
    • 2 tbsp unsalted butter, melted
    • 1 tsp vanilla extract
    • ¼ tsp salt
    • 2 cups pecan halves or chopped pecans

    Step-by-Step Instructions

    Step 1: Preheat and Prep Crust

    1. Preheat oven to 350°F (175°C). Line an 8×8 or 9×9 baking pan with parchment.
    2. Mix flour, powdered sugar, and salt. Cut in cold butter until mixture looks like coarse meal.
    3. Press firmly into the bottom of the pan. Bake 18-20 minutes until lightly golden.

    Step 2: Make the Topping

    1. Whisk brown sugar, corn syrup, eggs, melted butter, vanilla, and salt until smooth.
    2. Stir in pecans.

    Step 3: Assemble and Bake

    1. Pour pecan mixture over warm crust. Spread evenly.
    2. Bake 20-25 minutes until topping is set and bubbly.

    Step 4: Cool and Cut

    1. Cool completely in pan (about 1 hour).
    2. Lift out using parchment. Cut into 16 bars.

    Step 5: Serve

    1. Serve at room temperature. Great with coffee or vanilla ice cream.

    Summary

    Prep Time: 15 minutes | Cook Time: 40-45 minutes | Total Time: 1 hour (+ cooling)

    Yield: 16 bars

    Difficulty: Easy

    Storage Notes

    Room Temp:

    Store in an airtight container for up to 1 week.

    Freezer Friendly:

    Freeze for 3 months. Thaw at room temperature.

    Pro Tip:

    Parchment overhang = easy removal. Don’t skip it.

  • Pumpkin Cheesecake: Fall on a Fork. Creamy. Spiced. Perfect.

    Pumpkin Cheesecake: Fall on a Fork. Creamy. Spiced. Perfect.

    Pumpkin pie is fine. Pumpkin cheesecake is unforgettable.

    Silky, creamy, spiced pumpkin filling. Buttery graham cracker crust. No cracks. No water bath drama. 1 hour bake. Overnight chill. Worth the wait.

    Ingredients

    Serves 10-12.

    For the Crust:

    • 1½ cups graham cracker crumbs
    • ¼ cup granulated sugar
    • 6 tbsp unsalted butter, melted

    For the Cheesecake Filling:

    • 3 packages (8 oz each) cream cheese, softened
    • 1 cup granulated sugar
    • 1 cup pumpkin puree (not pie filling)
    • 3 large eggs
    • ¼ cup sour cream
    • 1 tsp vanilla extract
    • 1½ tsp pumpkin pie spice (or 1 tsp cinnamon + ¼ tsp each nutmeg, ginger, cloves)

    For Topping:

    • 1 cup heavy cream
    • 2 tbsp powdered sugar
    • ¼ tsp vanilla extract

    Step-by-Step Instructions

    Step 1: Make the Crust

    1. Preheat oven to 350°F (175°C).
    2. Mix graham crumbs, sugar, and butter. Press into a 9-inch springform pan.
    3. Bake 10 minutes. Cool.

    Step 2: Make the Filling

    1. Beat cream cheese and sugar until smooth.
    2. Add pumpkin, eggs one at a time, sour cream, vanilla, and pumpkin spice. Mix until just combined.

    Step 3: Bake the Cheesecake

    1. Pour filling over crust. Smooth top.
    2. Bake 50-60 minutes until edges are set but center jiggles slightly.
    3. Turn off oven. Crack door open. Cool in oven 1 hour.

    Step 4: Chill

    1. Cool completely on counter. Refrigerate overnight (at least 6 hours).

    Step 5: Top and Serve

    1. Whip heavy cream, powdered sugar, and vanilla until stiff peaks form.
    2. Spread or pipe onto chilled cheesecake.
    3. Slice. Serve. Accept applause.

    Summary

    Prep Time: 20 minutes | Cook Time: 1 hour | Chill Time: 6+ hours | Total Time: 7+ hours

    Yield: 10-12 servings

    Difficulty: Easy (needs patience)

    Storage Notes

    Fridge:

    Store in refrigerator for up to 5 days.

    Freezer Friendly:

    Freeze whole or sliced for 2 months. Thaw in fridge overnight.

    Pro Tip:

    Room temp ingredients = smooth cheesecake. Cold cream cheese = lumpy.

  • Avocado Nut Bread: Green. Tender. Secretly Delicious.

    Avocado Nut Bread: Green. Tender. Secretly Delicious.

    Avocado in bread? Yes. And it’s incredible.

    Avocado replaces butter or oil. The bread stays moist, tender, and surprisingly not green-tasting. Walnuts add crunch. Banana bread’s cooler, creamier cousin.

    Ingredients

    Makes 1 loaf (8-10 slices).

    • 1½ cups all-purpose flour
    • 1 tsp baking soda
    • ½ tsp salt
    • 1 tsp cinnamon (optional)
    • 2 ripe avocados, mashed (about 1 cup)
    • ¾ cup brown sugar
    • 2 large eggs
    • ¼ cup milk (or buttermilk)
    • 1 tsp vanilla extract
    • ½ cup chopped walnuts

    Step-by-Step Instructions

    Step 1: Preheat and Prep

    1. Preheat oven to 350°F (175°C). Grease a 9×5 loaf pan or line with parchment.

    Step 2: Mash Avocados

    1. Mash avocados in a large bowl until smooth. Measure 1 cup.

    Step 3: Mix Wet Ingredients

    1. Add brown sugar, eggs, milk, and vanilla to mashed avocado. Whisk until combined.

    Step 4: Add Dry Ingredients

    1. Add flour, baking soda, salt, and cinnamon. Stir until just combined.
    2. Fold in walnuts.

    Step 5: Bake

    1. Pour batter into loaf pan. Bake 45-50 minutes until toothpick comes out clean.
    2. Cool 15 minutes in pan, then transfer to wire rack.

    Step 6: Serve

    1. Slice and serve warm or at room temperature. Great with butter or cream cheese.

    Summary

    Prep Time: 10 minutes | Cook Time: 45-50 minutes | Total Time: 1 hour

    Yield: 1 loaf (8-10 slices)

    Difficulty: Easy

    Storage Notes

    Room Temp:

    Store wrapped tightly for 3 days.

    Freezer Friendly:

    Freeze for 3 months. Thaw at room temperature.

    Pro Tip:

    Use ripe, almost-overripe avocados. They mash easier and give the best texture.