Author: user

  • Cinnamon Babka (Swirled, Buttery, and Absolutely Irresistible)

    Cinnamon Babka (Swirled, Buttery, and Absolutely Irresistible)

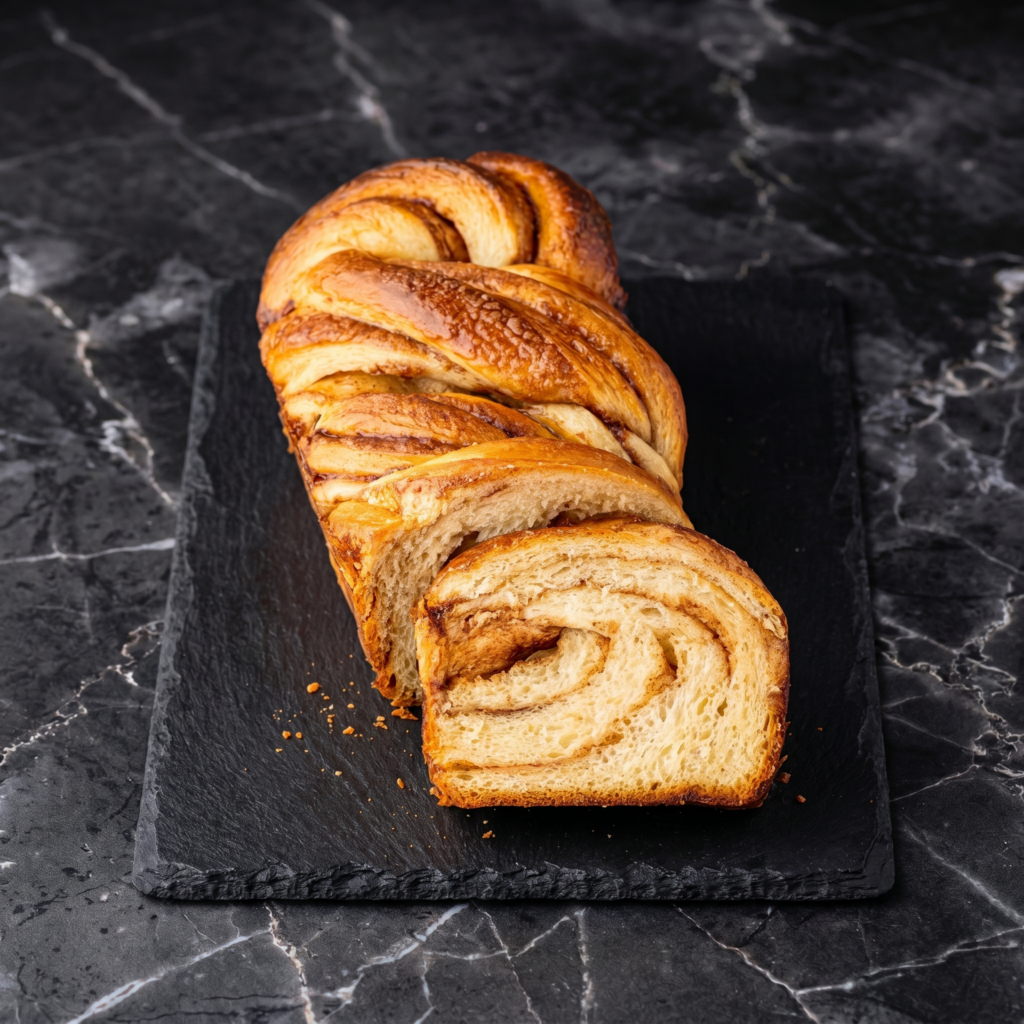
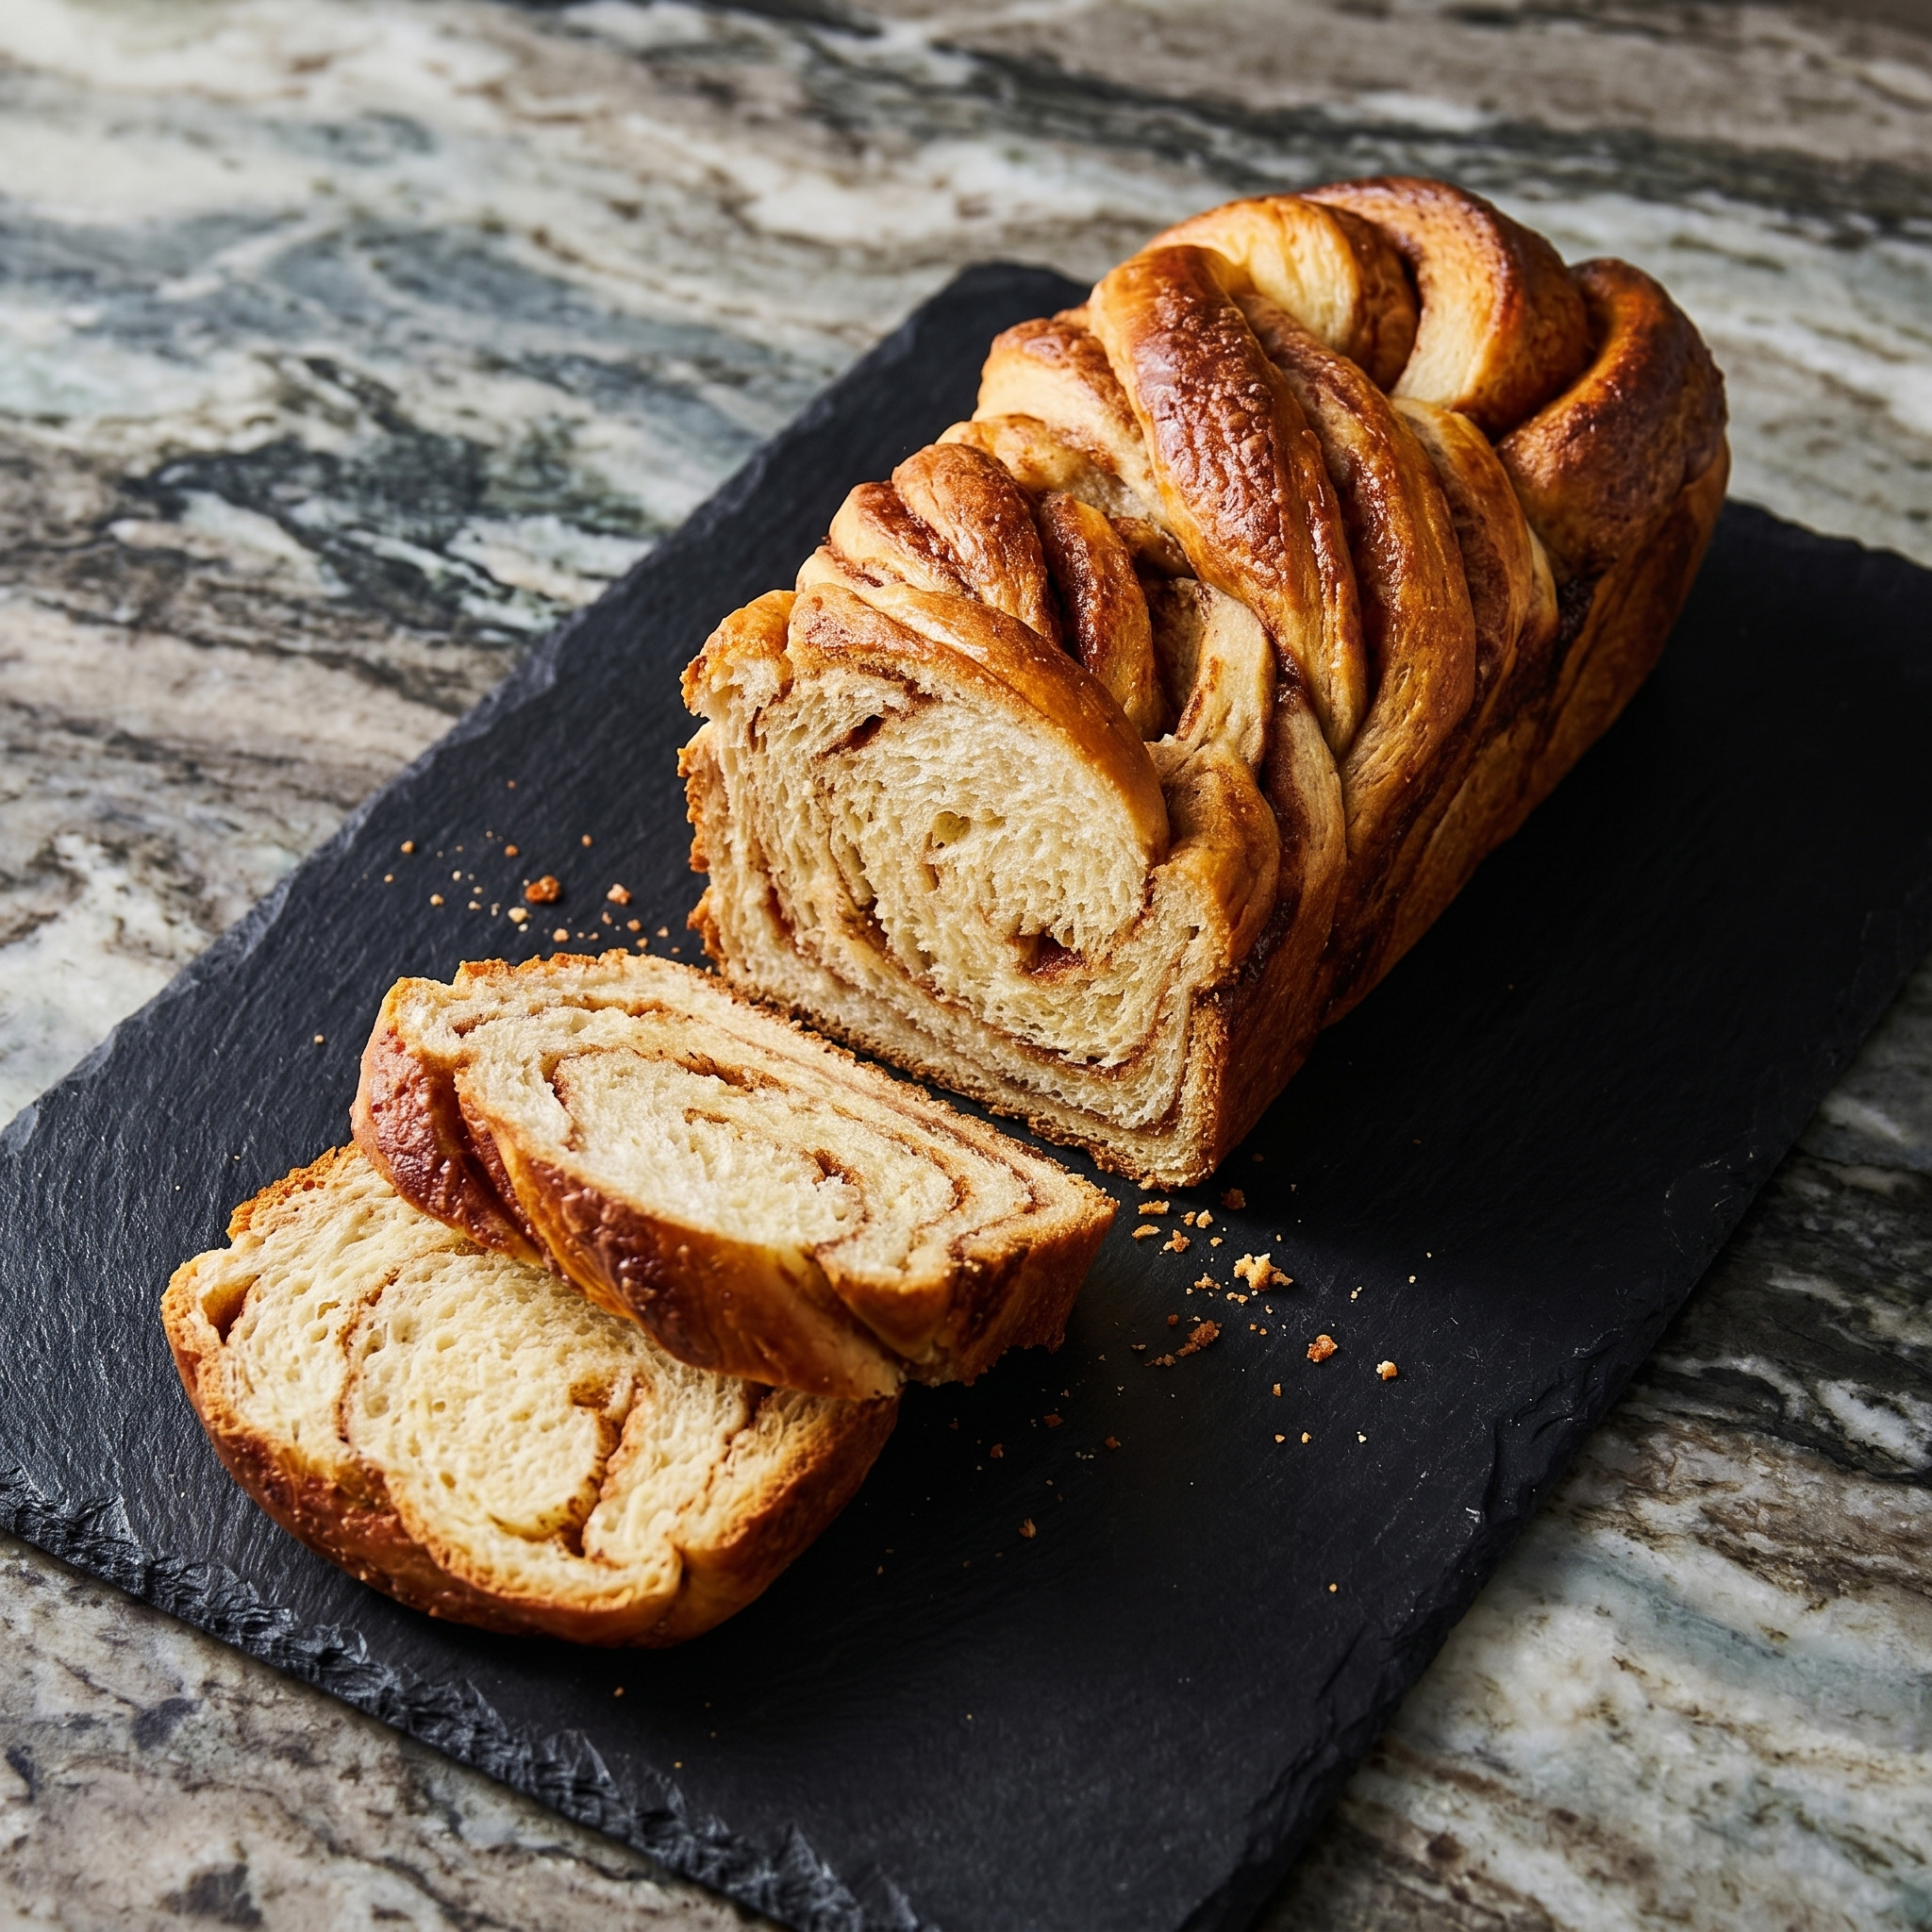
    Babka is the queen of sweet breads. Buttery, tender, brioche-like dough swirled with ribbons of cinnamon sugar. It takes time. It takes patience. It’s worth every single minute. Make two. You’ll thank me.

    Ingredients

    Makes 1 loaf.

    For the Dough:

    • 3½ cups (440g) all-purpose flour
    • ¼ cup (50g) sugar
    • 1 packet (2¼ tsp) instant yeast
    • ½ tsp salt
    • 3 large eggs
    • ¼ cup (60ml) warm milk
    • ½ cup (115g) unsalted butter, softened

    For the Cinnamon Filling:

    • ½ cup (115g) unsalted butter, softened
    • ¾ cup (150g) brown sugar
    • 2 tbsp ground cinnamon

    For the Syrup:

    • ¼ cup (50g) sugar
    • ¼ cup (60ml) water

    Step-by-Step Instructions

    Step 1: Make Dough

    1. Whisk flour, sugar, yeast, and salt. Add eggs, warm milk, and softened butter. Knead 8-10 minutes until smooth and elastic.
    2. Cover and rise 1-2 hours until doubled.

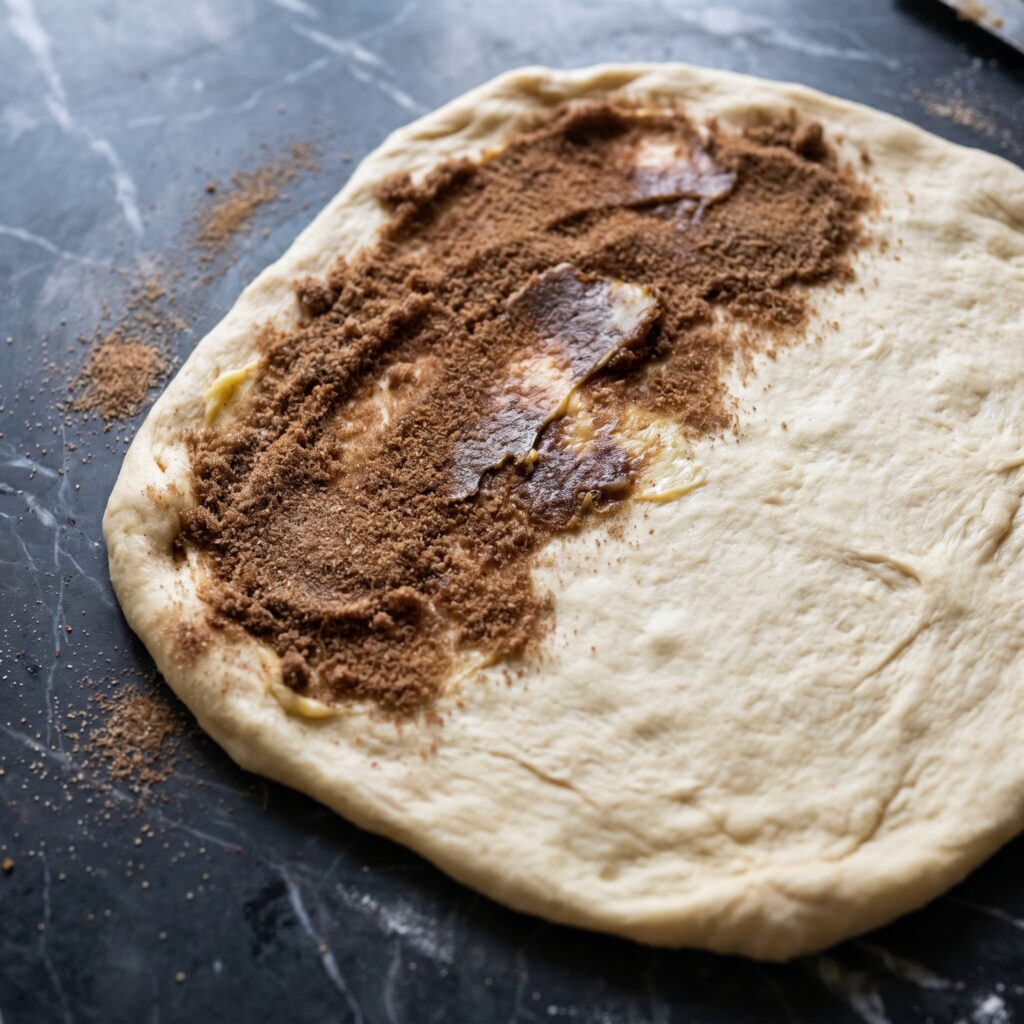
    Step 2: Make Filling

    1. Mix softened butter, brown sugar, and cinnamon until smooth.

    Step 3: Roll & Fill

    1. Roll dough into a 10×15 inch rectangle. Spread filling evenly over the surface.
    2. Roll tightly from the long side into a log.

    Step 4: Twist & Pan

    1. Cut the log in half lengthwise. Twist the two halves together (cut sides facing out).
    2. Place into a greased 9×5 inch loaf pan. Cover and rise 45-60 minutes.

    Step 5: Bake

    1. Preheat oven to 350°F (175°C). Bake 35-40 minutes until golden brown.

    Step 6: Syrup & Serve

    1. While babka bakes, simmer sugar and water until dissolved.
    2. Brush warm babka with syrup. Cool in pan 10 minutes, then transfer to a rack.

    Summary

    Prep Time: 30 min + rises | Bake Time: 40 min | Total: 1 hour 10 min + rises

    Yield: 1 loaf | Difficulty: Medium

    Storage Notes

    Counter (wrapped): 4 days. Freezer: 3 months. Cinnamon babka actually gets better on day two — flavors deepen. Toast slices for maximum enjoyment. Never refrigerate (dries out).

  • Smash Burgers (Craggy, Crispy, Better Than Any Fast Food)

    Smash Burgers (Craggy, Crispy, Better Than Any Fast Food)

    Smash burgers are the ultimate burger. Thin patties smashed into a screaming-hot skillet. Lacy, crispy edges. Beefy, juicy center. Double them up. Add American cheese. You’ll never cook a thick patty again.

    Ingredients

    Serves 4 (makes 8 patties / 4 double burgers).

    • 2 lbs (900g) ground beef (80/20 — don’t go leaner)
    • 1 tsp salt
    • 1 tsp black pepper
    • 8 slices American cheese (or cheddar/provolone)
    • 4 burger buns (potato buns recommended)
    • 2 tbsp butter (for toasting buns)
    • Optional toppings: pickles, onion, lettuce, tomato, special sauce

    Step-by-Step Instructions

    Step 1: Prep

    1. Divide beef into 8 balls (about ¼ cup / 4 oz each). Do not overwork — loosely form.
    2. Season generously with salt and pepper.

    Step 2: Heat Skillet

    1. Heat a cast iron skillet or griddle over high heat until smoking hot (5-7 minutes). No oil needed — the fat will render.

    Step 3: Smash & Cook

    1. Place a beef ball in the skillet. Smash firmly with a heavy spatula or bacon press until very thin (about ¼ inch).
    2. Cook 60-90 seconds until edges are brown and crispy. Scrape under the patty with a metal spatula to flip.
    3. Flip. Add cheese immediately. Cook 30 seconds more.
    4. Repeat with remaining patties (work in batches, don’t crowd).

    Step 4: Toast Buns

    1. Butter cut sides of buns. Toast in the skillet until golden.

    Step 5: Assemble

    1. Stack two cheesy patties per bottom bun. Add pickles, onion, lettuce, and sauce. Top with bun.

    Step 6: Serve

    1. Serve immediately. That crust is the whole point.

    Summary

    Prep Time: 10 min | Cook Time: 15 min | Total: 25 min

    Yield: 4 double burgers | Difficulty: Easy

    Storage Notes

    Best fresh. Smash burgers don’t reheat well — the crispy crust is a one-time magic trick. Cooked patties can be refrigerated for 2 days but texture suffers. Leftovers? Chop up and toss in scrambled eggs or mac and cheese.

  • Crispy Ground Beef Tacos (Shell vs. Meat? Shell Wins)

    Crispy Ground Beef Tacos (Shell vs. Meat? Shell Wins)

    Hard shell tacos get a bad rap. Not these. Golden, crunchy shells. Seasoned ground beef. Melty cheese. Fresh lettuce and salsa. One bite. That crunch. Taco Tuesday forever.

    Ingredients

    Serves 4 (makes 8-10 tacos).

    • 1 lb (450g) ground beef (80/20)
    • 1 small onion, finely chopped
    • 2 cloves garlic, minced
    • 1 packet taco seasoning (or 2 tbsp homemade)
    • ½ cup water
    • 8-10 crispy taco shells (hard shell)
    • 1½ cups shredded cheddar or Mexican blend cheese
    • 2 cups shredded lettuce
    • 1 cup diced tomatoes (or pico de gallo)
    • Sour cream and salsa for serving
    • Hot sauce (optional)

    Step-by-Step Instructions

    Step 1: Cook Beef

    1. Heat a large skillet over medium-high heat. Add ground beef and onion. Cook 5-7 minutes, breaking it up, until beef is browned and cooked through.
    2. Drain excess fat. Add garlic and cook 1 minute.

    Step 2: Season

    1. Add taco seasoning and water. Stir and simmer 3-4 minutes until most liquid is absorbed. Remove from heat.

    Step 3: Warm Shells

    1. Preheat oven to 350°F (175°C). Arrange taco shells on a baking sheet. Warm 3-4 minutes until crispy.

    Step 4: Assemble

    1. Fill each shell with seasoned beef. Top with shredded cheese (the heat will melt it slightly).
    2. Add lettuce, tomatoes, sour cream, salsa, and hot sauce.

    Step 5: Serve

    1. Serve immediately. Eat with your hands. Accept the crunch.

    Summary

    Prep Time: 10 min | Cook Time: 15 min | Total: 25 min

    Yield: 8-10 tacos | Difficulty: Easy

    Storage Notes

    Don’t assemble ahead. Soggy shells = sadness. Store seasoned beef in fridge for 4 days. Reheat beef in skillet or microwave. Assemble tacos fresh right before eating for maximum crunch. Shells can be stored in pantry.

  • BBQ Beef Brisket (Low, Slow, and Completely Unforgettable)

    BBQ Beef Brisket (Low, Slow, and Completely Unforgettable)

    Brisket is the king of BBQ. Low and slow is the only way. This oven method delivers smoky, tender, fall-apart beef with a sticky glaze. No smoker? No problem. Your kitchen can do this.

    Ingredients

    Serves 6-8.

    • 3-4 lb (1.4-1.8kg) beef brisket
    • 2 tbsp olive oil
    • 1 cup beef broth

    For the Dry Rub:

    • 2 tbsp brown sugar
    • 1 tbsp smoked paprika
    • 1 tbsp garlic powder
    • 1 tbsp onion powder
    • 1 tbsp black pepper
    • 1 tbsp salt
    • 1 tsp cayenne pepper (optional)

    For the BBQ Glaze:

    • 1½ cups BBQ sauce
    • ¼ cup apple cider vinegar
    • 2 tbsp Worcestershire sauce

    Step-by-Step Instructions

    Step 1: Preheat & Season

    1. Preheat oven to 300°F (150°C). Mix dry rub ingredients. Rub all over brisket.

    Step 2: Sear

    1. Heat oil in a Dutch oven or large oven-safe pot over high heat. Sear brisket 3-4 minutes per side until browned.

    Step 3: Slow Cook

    1. Pour beef broth around the brisket (not over the top — keeps rub intact). Cover with lid.
    2. Bake 3½ to 4 hours until fork-tender.

    Step 4: Make Glaze

    1. Mix BBQ sauce, vinegar, and Worcestershire sauce.

    Step 5: Glaze & Finish

    1. Remove brisket. Brush generously with glaze. Return to oven uncovered for 15-20 minutes until sticky.

    Step 6: Rest & Slice

    1. Rest 15 minutes. Slice against the grain (crucial for tenderness). Serve with extra BBQ sauce.

    Summary

    Prep Time: 15 min | Cook Time: 4 hours | Total: 4 hours 15 min

    Yield: 6-8 servings | Difficulty: Easy (requires patience)

    Storage Notes

    Fridge: 5 days. Freezer (sliced): 3 months. Reheat in oven at 300°F for 15-20 minutes covered with foil (keeps moist). Avoid microwave — brisket gets tough. Leftovers are incredible in sandwiches, tacos, or on loaded nachos.

  • Beef Wellington (The Showstopper You Can Actually Make)

    Beef Wellington (The Showstopper You Can Actually Make)

    Beef Wellington has a reputation. Fancy. Hard. Only for chefs. Not true. Yes, it takes time. But step by step, you can do this. Tender beef. Mushroom duxelles. Prosciutto. Golden pastry. Holiday hero.

    Ingredients

    Serves 4-6.

    • 1½ lb (675g) beef tenderloin center-cut
    • 2 tbsp olive oil
    • 1 lb (450g) mushrooms (cremini or button), finely chopped
    • 2 shallots, finely chopped
    • 2 cloves garlic, minced
    • 2 tbsp fresh thyme leaves
    • 6 slices prosciutto
    • 1 sheet puff pastry (about 9×12 inches), thawed
    • 2 tbsp Dijon mustard
    • 1 egg, beaten (for egg wash)
    • Salt and black pepper
    • Flour for dusting

    Step-by-Step Instructions

    Step 1: Sear Beef

    1. Season beef generously with salt and pepper. Heat oil in a skillet over high heat. Sear all sides until browned (2-3 minutes total). Brush with Dijon mustard. Cool completely.

    Step 2: Make Duxelles

    1. In the same skillet, cook mushrooms, shallots, garlic, and thyme over medium-high heat until moisture evaporates (8-10 minutes). Spread on a plate to cool.

    Step 3: Wrap in Prosciutto

    1. Lay prosciutto slices on plastic wrap, overlapping slightly. Spread mushroom mixture over prosciutto. Place beef in center. Roll tightly using plastic wrap. Refrigerate 30 minutes.

    Step 4: Wrap in Pastry

    1. Roll puff pastry on a floured surface. Unwrap beef and place in center. Fold pastry over, sealing edges. Trim excess. Brush with egg wash. Refrigerate 30 minutes.

    Step 5: Bake

    1. Preheat oven to 400°F (200°C). Line baking sheet with parchment.
    2. Place Wellington seam-side down. Brush with more egg wash. Score decorative lines on top.
    3. Bake 35-40 minutes until pastry is golden and beef reaches 125°F (52°C) for medium-rare.

    Step 6: Rest & Serve

    1. Rest 10 minutes. Slice into thick rounds. Serve with red wine sauce or gravy.

    Summary

    Prep Time: 40 min + chilling | Bake Time: 40 min | Total: 1 hour 20 min + chilling

    Yield: 4-6 servings | Difficulty: Hard (but worth it)

    Storage Notes

    Best fresh. Leftovers fridge 3 days. Reheat in oven at 325°F for 10-15 minutes (pastry won’t be as crisp). Freeze uncooked Wellington for 3 months. Bake from frozen (add 15-20 minutes).

  • Chicken Pesto Flatbread (Better Than Any Restaurant)

    Chicken Pesto Flatbread (Better Than Any Restaurant)

    Flatbread is pizza’s faster, crispier cousin. Top it with pesto, chicken, mozzarella, and tomatoes. 15 minutes. One pan. Zero regrets. Better than any restaurant version.

    Ingredients

    Serves 4 (makes 2 flatbreads).

    • 2 flatbreads or naan breads
    • ½ cup basil pesto (store-bought or homemade)
    • 2 cups cooked chicken, shredded or diced (rotisserie works great)
    • 1½ cups shredded mozzarella cheese
    • ½ cup cherry tomatoes, halved
    • ¼ cup red onion, thinly sliced (optional)
    • 2 tbsp Parmesan cheese, grated
    • Fresh basil for garnish (optional)
    • Red pepper flakes (optional)

    Step-by-Step Instructions

    Step 1: Preheat

    1. Preheat oven to 400°F (200°C). Line a baking sheet with parchment.

    Step 2: Assemble Flatbreads

    1. Place flatbreads on baking sheet. Spread pesto evenly over each.
    2. Top with shredded chicken, mozzarella, cherry tomatoes, and red onion (if using).
    3. Sprinkle with Parmesan.

    Step 3: Bake

    1. Bake 8-10 minutes until cheese is melted and edges are crispy.

    Step 4: Finish & Serve

    1. Garnish with fresh basil and red pepper flakes. Slice and serve immediately.

    Summary

    Prep Time: 5 min | Bake Time: 10 min | Total: 15 min

    Yield: 4 servings | Difficulty: Easy

    Storage Notes

    Best fresh. Fridge 2 days. Reheat in oven or air fryer at 375°F for 5-7 minutes (crispy returns). Microwave makes flatbread chewy — avoid. Great for meal prep — assemble and bake fresh.

  • Pretzel Hot Dogs (Soft Pretzel + Juicy Hot Dog = Pure Magic)

    Pretzel Hot Dogs (Soft Pretzel + Juicy Hot Dog = Pure Magic)

    Pretzel dogs are the best of both worlds. Soft, chewy, golden pretzel dough wrapped around a juicy hot dog. Brush with butter. Sprinkle with salt. Dip in mustard or cheese sauce. Pure magic.

    Ingredients

    Makes 8 pretzel hot dogs.

    For the Dough:

    • 1½ cups (360ml) warm water (110°F / 45°C)
    • 1 packet (2¼ tsp) instant yeast
    • 1 tbsp brown sugar
    • 3½ cups (440g) all-purpose flour
    • 1 tsp salt
    • 2 tbsp melted butter

    For the Baking Soda Bath:

    • 8 cups water
    • ½ cup baking soda

    For Assembly:

    • 8 hot dogs
    • 1 egg yolk + 1 tbsp water (egg wash)
    • Flaky sea salt
    • ¼ cup melted butter (for brushing after baking)

    For Serving:

    • Mustard or cheese sauce

    Step-by-Step Instructions

    Step 1: Make Dough

    1. Mix warm water, yeast, and brown sugar. Let sit 5 minutes until foamy.
    2. Add flour, salt, and melted butter. Knead 5-7 minutes until smooth. Cover and rise 1 hour until doubled.

    Step 2: Preheat & Prep Bath

    1. Preheat oven to 425°F (220°C). Line baking sheet with parchment.
    2. Bring 8 cups water and baking soda to a gentle boil.

    Step 3: Shape Dogs

    1. Punch down dough. Divide into 8 equal pieces. Roll each into a 12-inch rope.
    2. Wrap each rope around a hot dog, spiraling from top to bottom. Pinch ends to seal.

    Step 4: Baking Soda Bath

    1. Gently drop each pretzel dog into boiling water for 30 seconds. Remove with slotted spoon.

    Step 5: Top & Bake

    1. Place on baking sheet. Brush with egg wash. Sprinkle with flaky salt.
    2. Bake 12-15 minutes until deep golden brown.

    Step 6: Butter & Serve

    1. Brush warm pretzel dogs with melted butter. Serve with mustard or cheese sauce.

    Summary

    Prep Time: 20 min + rise | Cook Time: 15 min | Total: 35 min + rise

    Yield: 8 pretzel hot dogs | Difficulty: Medium

    Storage Notes

    Best fresh. Fridge 3 days. Reheat in oven or air fryer at 375°F for 8-10 minutes. Never microwave — pretzel gets chewy. Freeze baked pretzel dogs for 3 months. Reheat from frozen.

  • Mini Pizzas (Bite-Sized Pizza Night Perfection)

    Mini Pizzas (Bite-Sized Pizza Night Perfection)

    Mini pizzas are the ultimate fast dinner. Crispy crust. Sauce. Cheese. Pepperoni. 10 minutes. No dough-rolling required. Make your own. Eat six. No judgment.

    Ingredients

    Makes 8 mini pizzas.

    • 4 English muffins (or 8 mini naan, pita rounds, or slider buns), split in half
    • ½ cup pizza sauce or marinara
    • 1½ cups shredded mozzarella cheese
    • ¼ cup grated Parmesan cheese
    • 24 slices pepperoni (or any toppings: cooked sausage, olives, bell peppers, mushrooms)
    • 1 tsp dried oregano (optional)
    • Red pepper flakes (optional)

    Step-by-Step Instructions

    Step 1: Preheat & Prep

    1. Preheat oven to 400°F (200°C). Line a baking sheet with parchment paper.
    2. Arrange English muffin halves (or chosen base) on the baking sheet, cut-side up.

    Step 2: Assemble

    1. Spread about 1 tablespoon of sauce on each muffin half.
    2. Sprinkle with mozzarella and Parmesan.
    3. Top with pepperoni (or your favorite toppings). Sprinkle with oregano.

    Step 3: Bake

    1. Bake 8-10 minutes until cheese is melted and bubbly and edges are golden brown.

    Step 4: Serve

    1. Cool 2 minutes. Sprinkle with red pepper flakes if desired. Eat immediately.

    Summary

    Prep Time: 5 min | Bake Time: 10 min | Total: 15 min

    Yield: 8 mini pizzas | Difficulty: Easy

    Storage Notes

    Fridge: 3 days. Reheat in oven or air fryer at 375°F for 5-7 minutes (crispy returns). Microwave makes them chewy — avoid if possible. Great for meal prep. Freeze baked mini pizzas for 3 months.

  • Jamaican Beef Patties: Spicy, Flaky, Island Vibes

    Jamaican Beef Patties: Spicy, Flaky, Island Vibes

    Jamaican beef patties are the Caribbean’s answer to the empanada. Spicy. Flaky. Golden. Grab one and go.

    Turmeric-tinted, buttery crust. Savory, spicy ground beef inside. Baked until golden. 1 hour. Jamaica in every bite.

    Ingredients

    Makes 8 patties.

    For the Crust:

    • 2 cups all-purpose flour
    • 1 tsp turmeric
    • ½ tsp salt
    • ½ cup cold unsalted butter, cubed
    • ¼ cup cold water
    • 1 tbsp vinegar

    For the Beef Filling:

    • 1 tbsp oil
    • 1 small onion, finely diced
    • 2 garlic cloves, minced
    • 1 tsp fresh ginger, grated
    • 1 lb ground beef
    • 2 tbsp Jamaican curry powder
    • 1 tsp thyme
    • ½ tsp allspice
    • ½ tsp black pepper
    • ½ tsp salt
    • ¼ tsp cayenne (optional)
    • ½ cup beef broth
    • 1 tbsp ketchup
    • 1 tbsp breadcrumbs (optional, for binding)

    For egg wash: 1 egg beaten with 1 tbsp water

    Step-by-Step Instructions

    Step 1: Make the Crust

    1. Whisk flour, turmeric, and salt. Cut in cold butter until crumbly.
    2. Add water and vinegar. Mix until dough forms. Wrap and chill 30 minutes.

    Step 2: Make the Filling

    1. Heat oil. Cook onion, garlic, ginger until soft (3 minutes).
    2. Add ground beef. Cook until browned. Drain fat.
    3. Add curry powder, thyme, allspice, pepper, salt, and cayenne. Cook 1 minute.
    4. Add broth and ketchup. Simmer 5 minutes until thickened. Stir in breadcrumbs if needed. Cool.

    Step 3: Preheat and Roll

    1. Preheat oven to 375°F (190°C). Line baking sheet with parchment.
    2. Roll dough to ⅛-inch thickness. Cut into 8 circles (about 6 inches wide).

    Step 4: Fill and Seal

    1. Place ¼ cup filling on one half of each circle. Fold over. Press edges with a fork.
    2. Brush with egg wash. Cut small slits for steam.

    Step 5: Bake

    1. Bake 25-30 minutes until golden brown. Serve hot.

    Summary

    Prep Time: 20 minutes | Chill: 30 minutes | Cook Time: 30 minutes | Total Time: ~1.5 hours

    Yield: 8 patties

    Difficulty: Medium

    Storage Notes

    Fridge:

    Store baked patties for 5 days. Reheat in oven or air fryer.

    Freezer Friendly:

    Freeze unbaked patties for 3 months. Bake from frozen at 375°F for 30-35 minutes.

    Pro Tip:

    Jamaican curry powder is key. Different from Indian curry. Find it online or in Caribbean stores.

  • Mini Key Lime Pies: Tart, Sweet, Poppable Sunshine

    Mini Key Lime Pies: Tart, Sweet, Poppable Sunshine

    Key lime pie is summer in a crust. Mini versions? Even better.

    Buttery graham crust. Tangy, sweet lime filling. Fluffy whipped cream. 20 minutes. No oven. No slicing. Just grab and gobble.

    Ingredients

    Makes 12 mini pies (muffin tin size).

    For the Crust:

    • 1½ cups graham cracker crumbs
    • 6 tbsp unsalted butter, melted
    • 2 tbsp granulated sugar

    For the Key Lime Filling:

    • 1 can (14 oz) sweetened condensed milk
    • ½ cup key lime juice (fresh or bottled)
    • 1 tbsp key lime zest
    • 3 large egg yolks

    For Topping:

    • ½ cup heavy cream
    • 1 tbsp powdered sugar
    • ¼ tsp vanilla extract
    • Lime zest or slices for garnish

    Step-by-Step Instructions

    Step 1: Prep the Pan

    1. Line a 12-cup muffin tin with paper liners.

    Step 2: Make the Crust

    1. Mix graham crumbs, melted butter, and sugar. Press 2 tbsp mixture into each liner.
    2. Use a small glass or measuring cup to press firmly.

    Step 3: Make the Filling

    1. Whisk condensed milk, key lime juice, lime zest, and egg yolks until smooth and thickened (about 2 minutes).

    Step 4: Fill and Chill

    1. Spoon filling evenly into crusts (about 2 tbsp each).
    2. Refrigerate at least 4 hours (overnight is better).

    Step 5: Make Topping and Serve

    1. Whip heavy cream, powdered sugar, and vanilla until stiff peaks form.
    2. Pipe or dollop onto chilled pies. Garnish with lime zest or slices.

    Summary

    Prep Time: 20 minutes | Chill Time: 4+ hours | Total Time: ~4.5 hours

    Yield: 12 mini pies

    Difficulty: Easy

    Storage Notes

    Fridge:

    Store in refrigerator for up to 5 days (cream topping is perishable).

    Freezer Friendly:

    Freeze unfilled crusts for 2 months. Freeze filled pies (without cream) for 2 months.

    Pro Tip:

    Bottled key lime juice works great. No need to juice tiny limes.