Author: user

  • Corn Fritters (Sweet, Crispy, Bursting with Summer Corn)

    Corn Fritters (Sweet, Crispy, Bursting with Summer Corn)

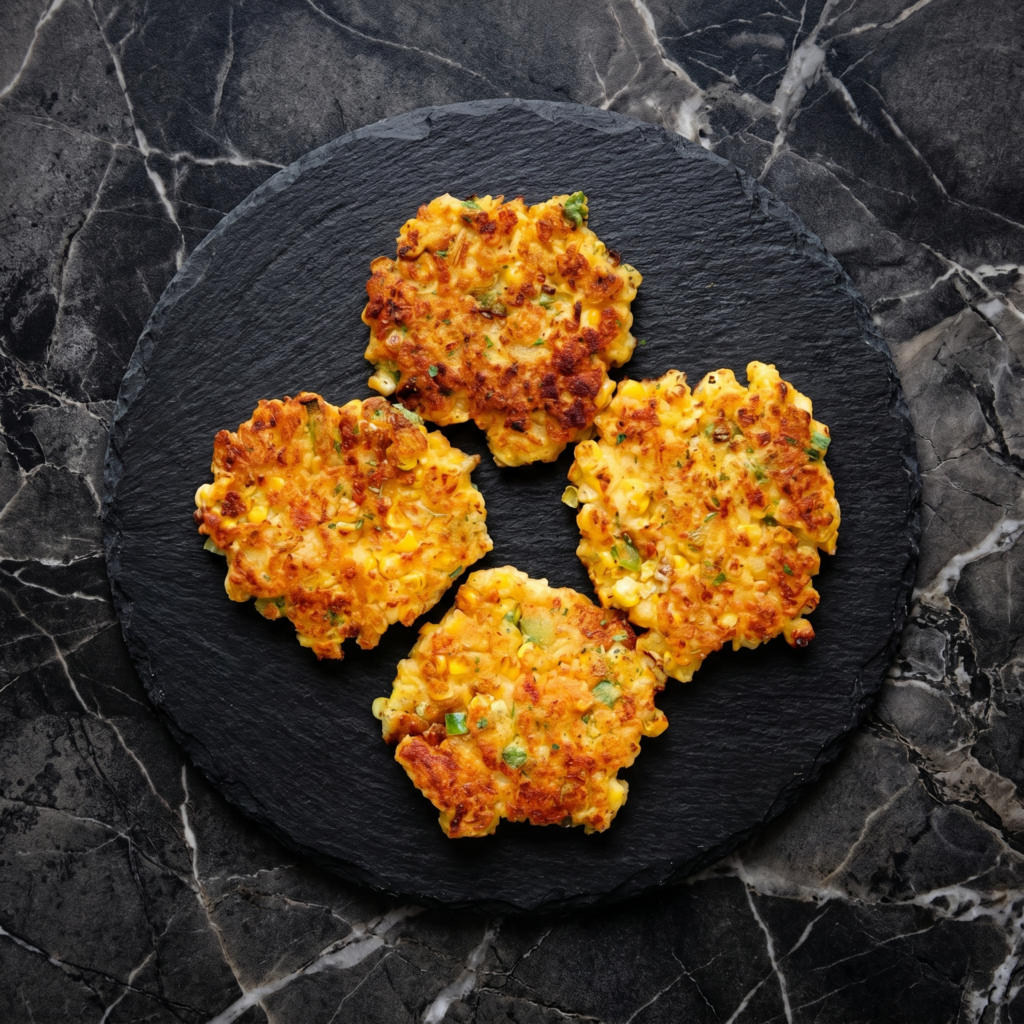
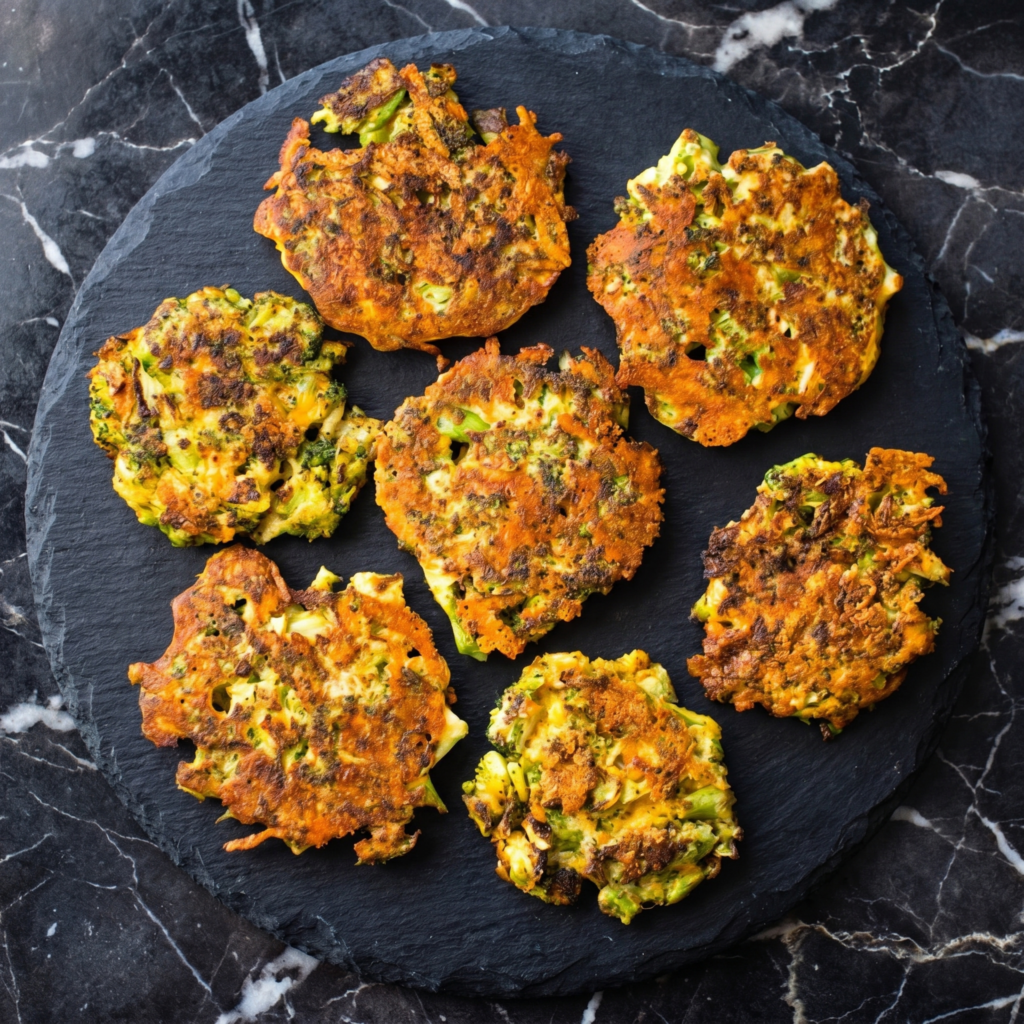
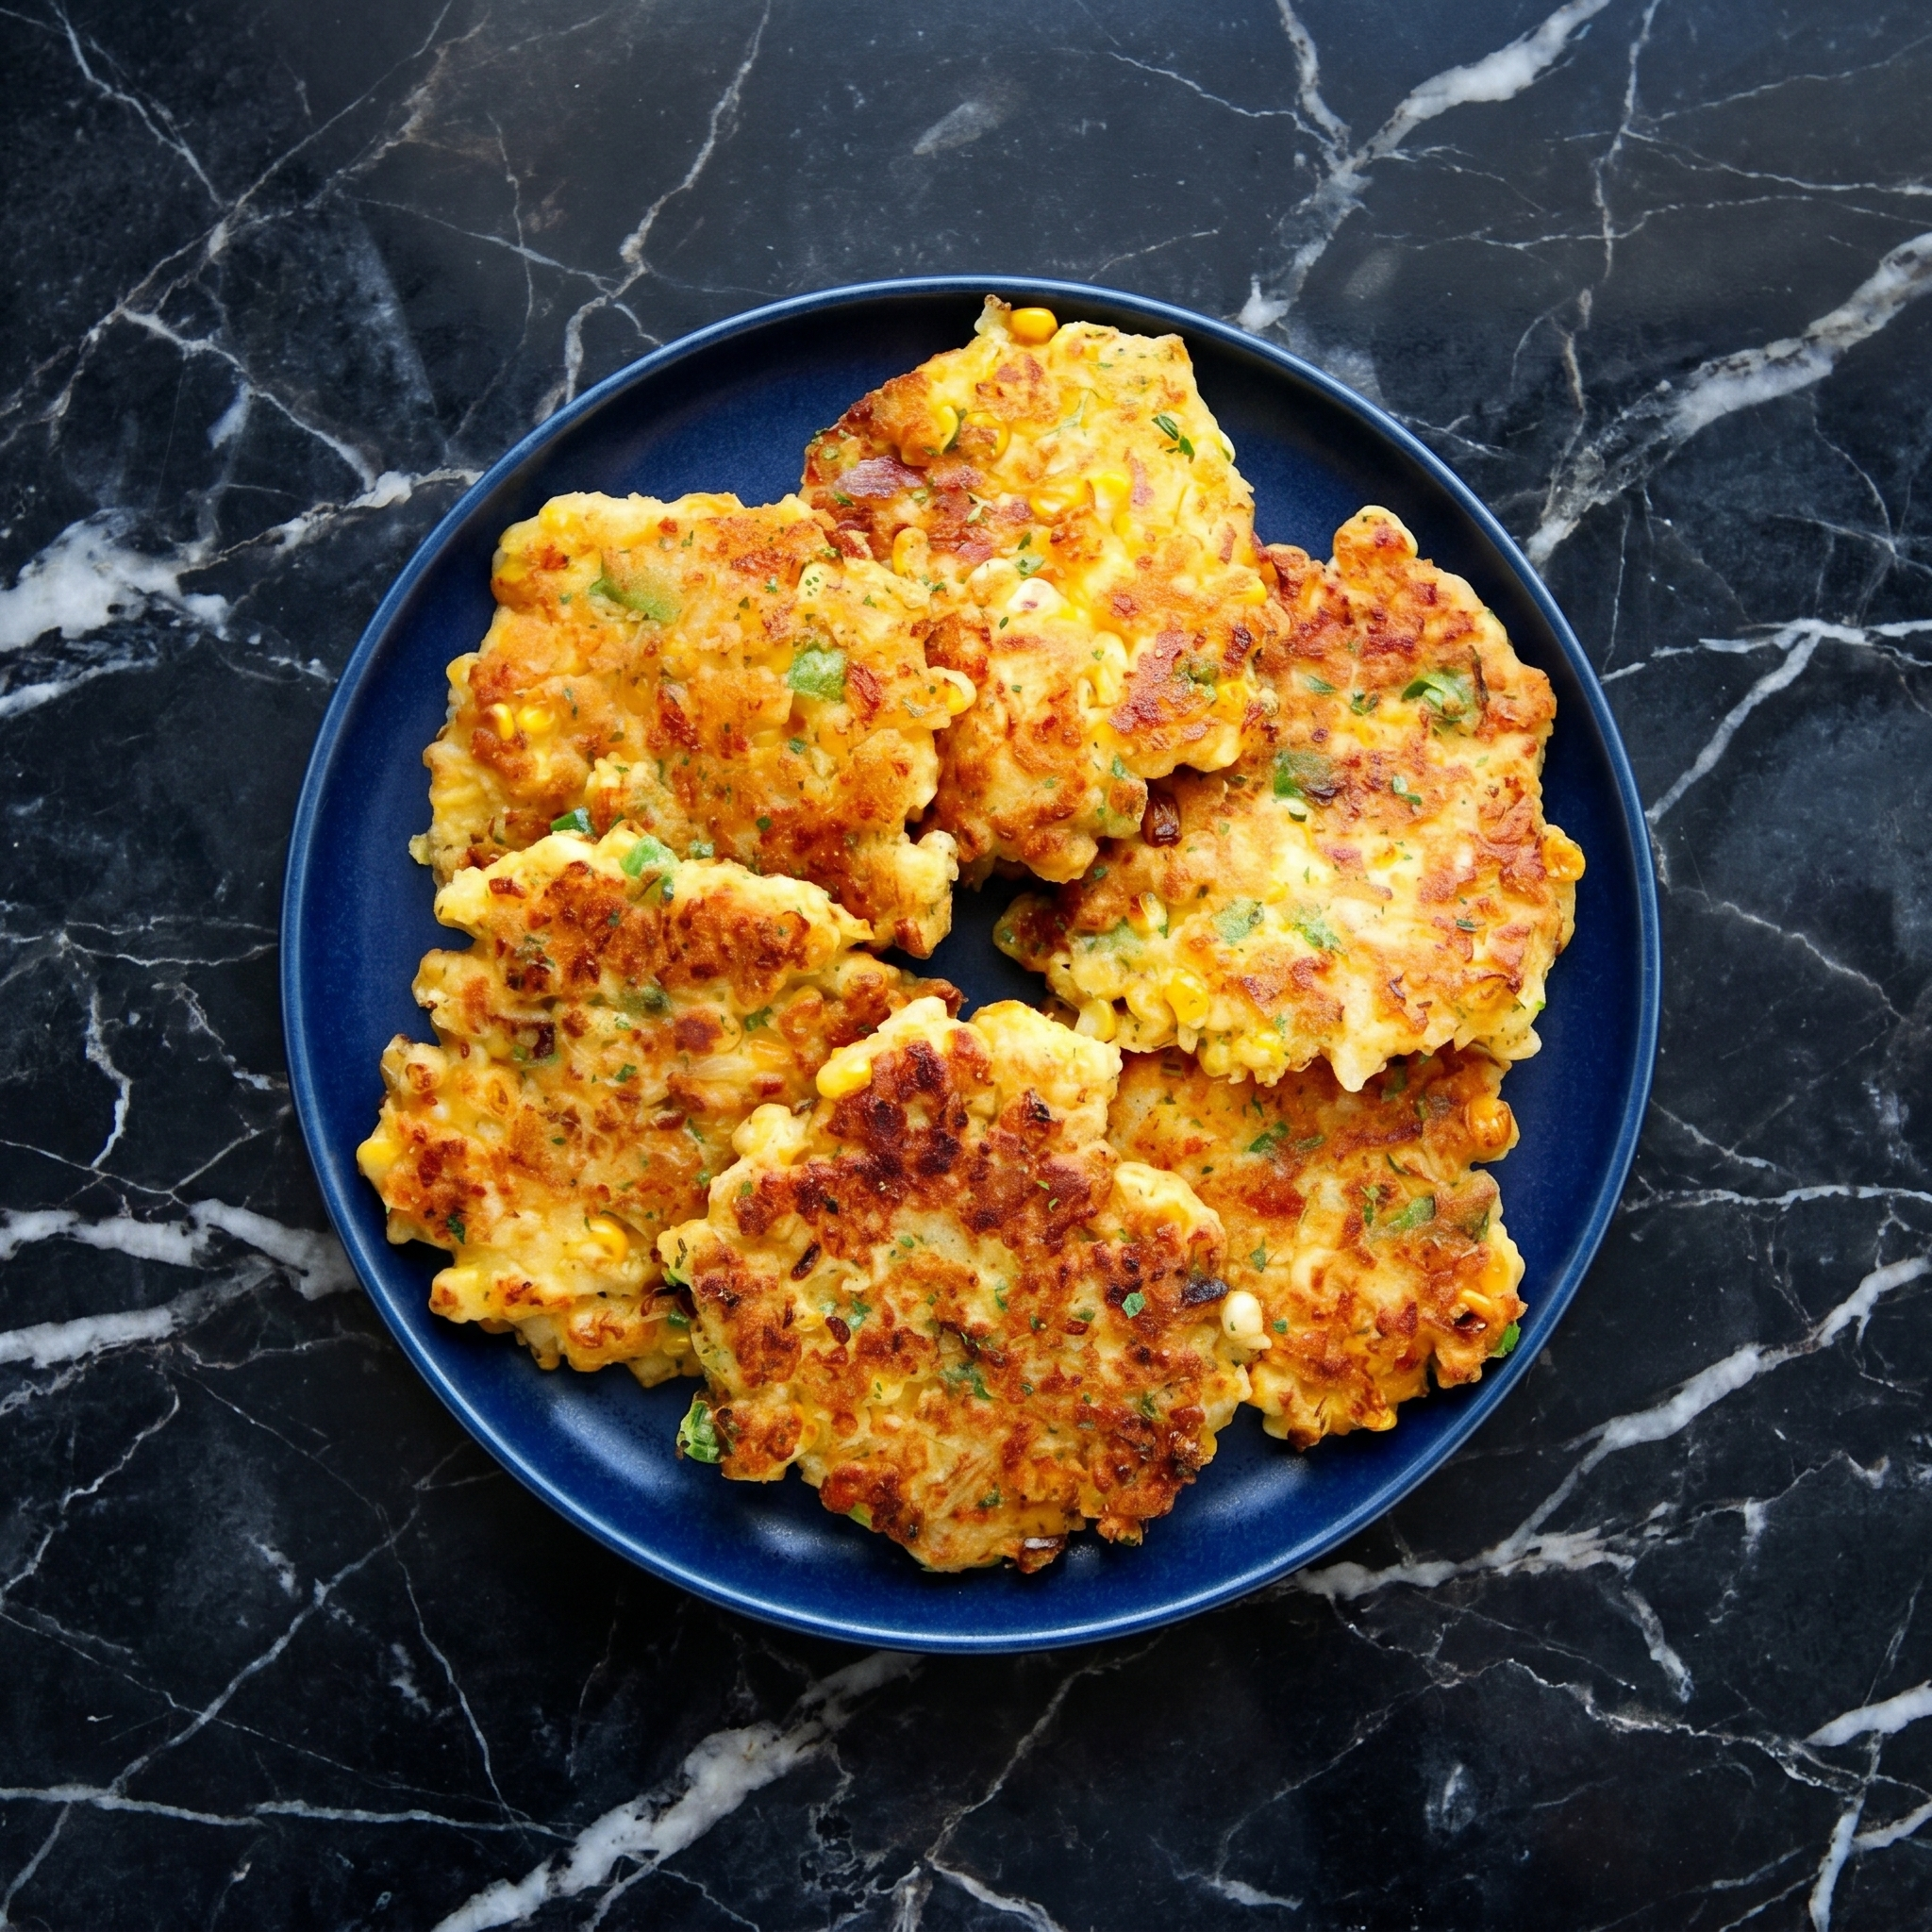
    Corn fritters are summer on a plate. Sweet corn kernels tucked into a golden, crispy fritter. A little savory. A little sweet. Dip in honey butter or sriracha mayo. You’ll make these all season long.

    Ingredients

    Serves 4 (makes 8-10 fritters).

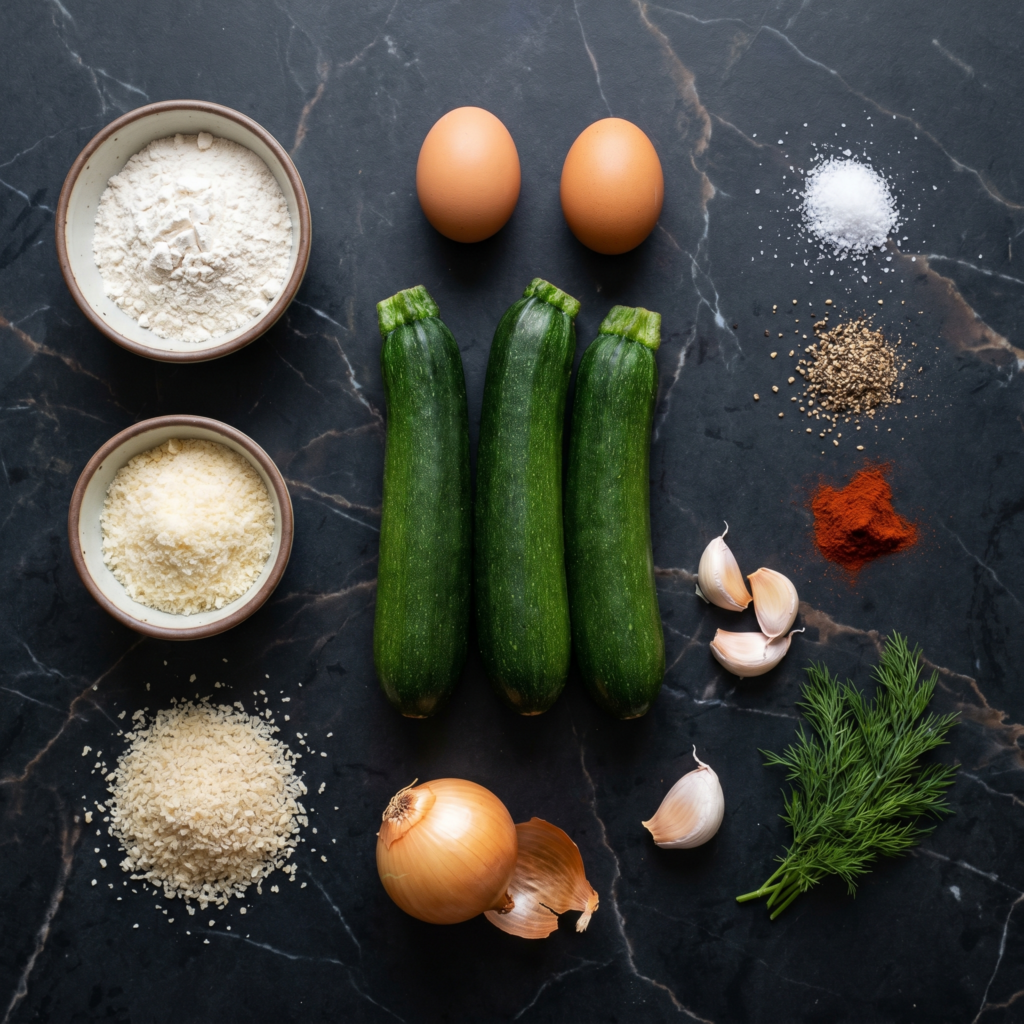
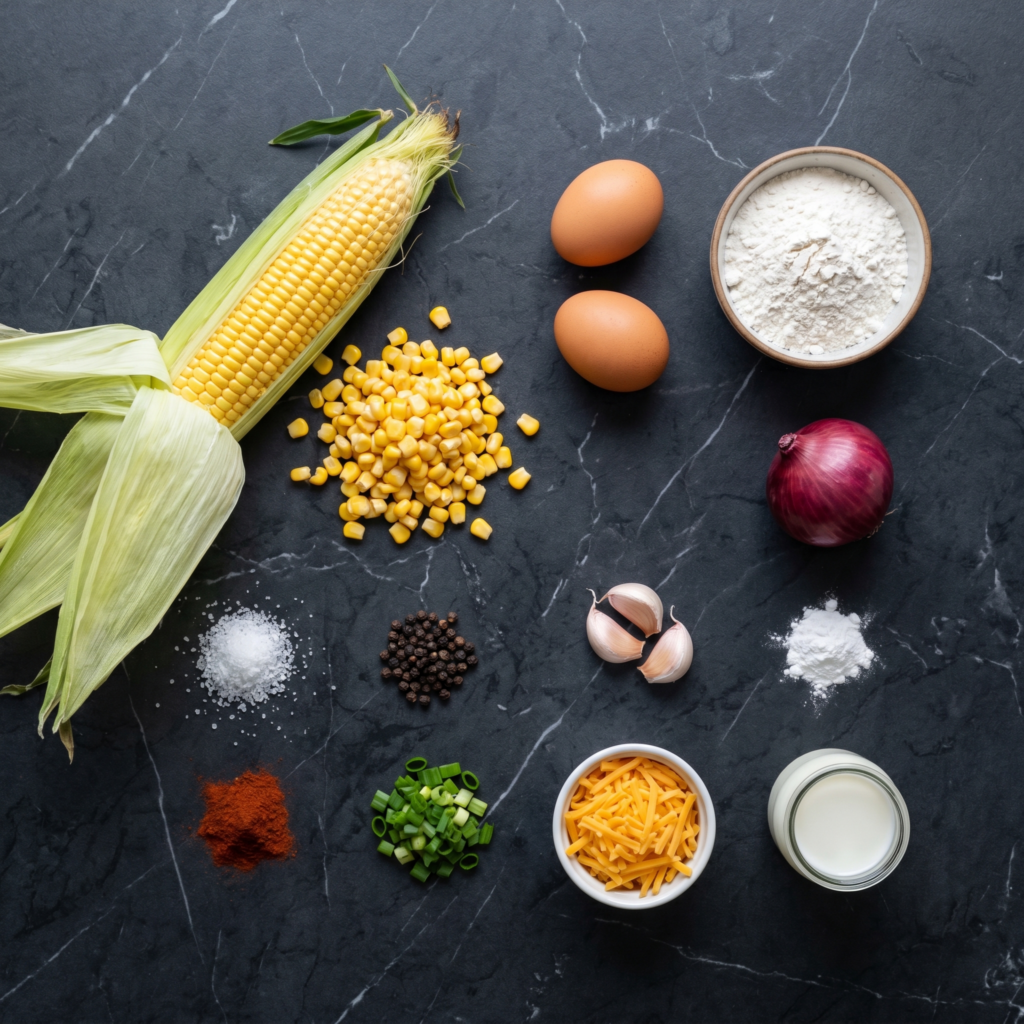
    • 2 cups fresh or frozen corn kernels (thawed if frozen)
    • 2 large eggs
    • ½ cup all-purpose flour
    • ¼ cup cornmeal (optional, for extra crunch)
    • ¼ cup grated Parmesan or cotija cheese
    • 2 green onions, finely sliced
    • 2 tbsp fresh cilantro or parsley, chopped
    • ½ tsp salt
    • ¼ tsp black pepper
    • ¼ tsp paprika or cayenne (optional)
    • 2 tbsp olive oil or vegetable oil (for frying)

    For Dipping:

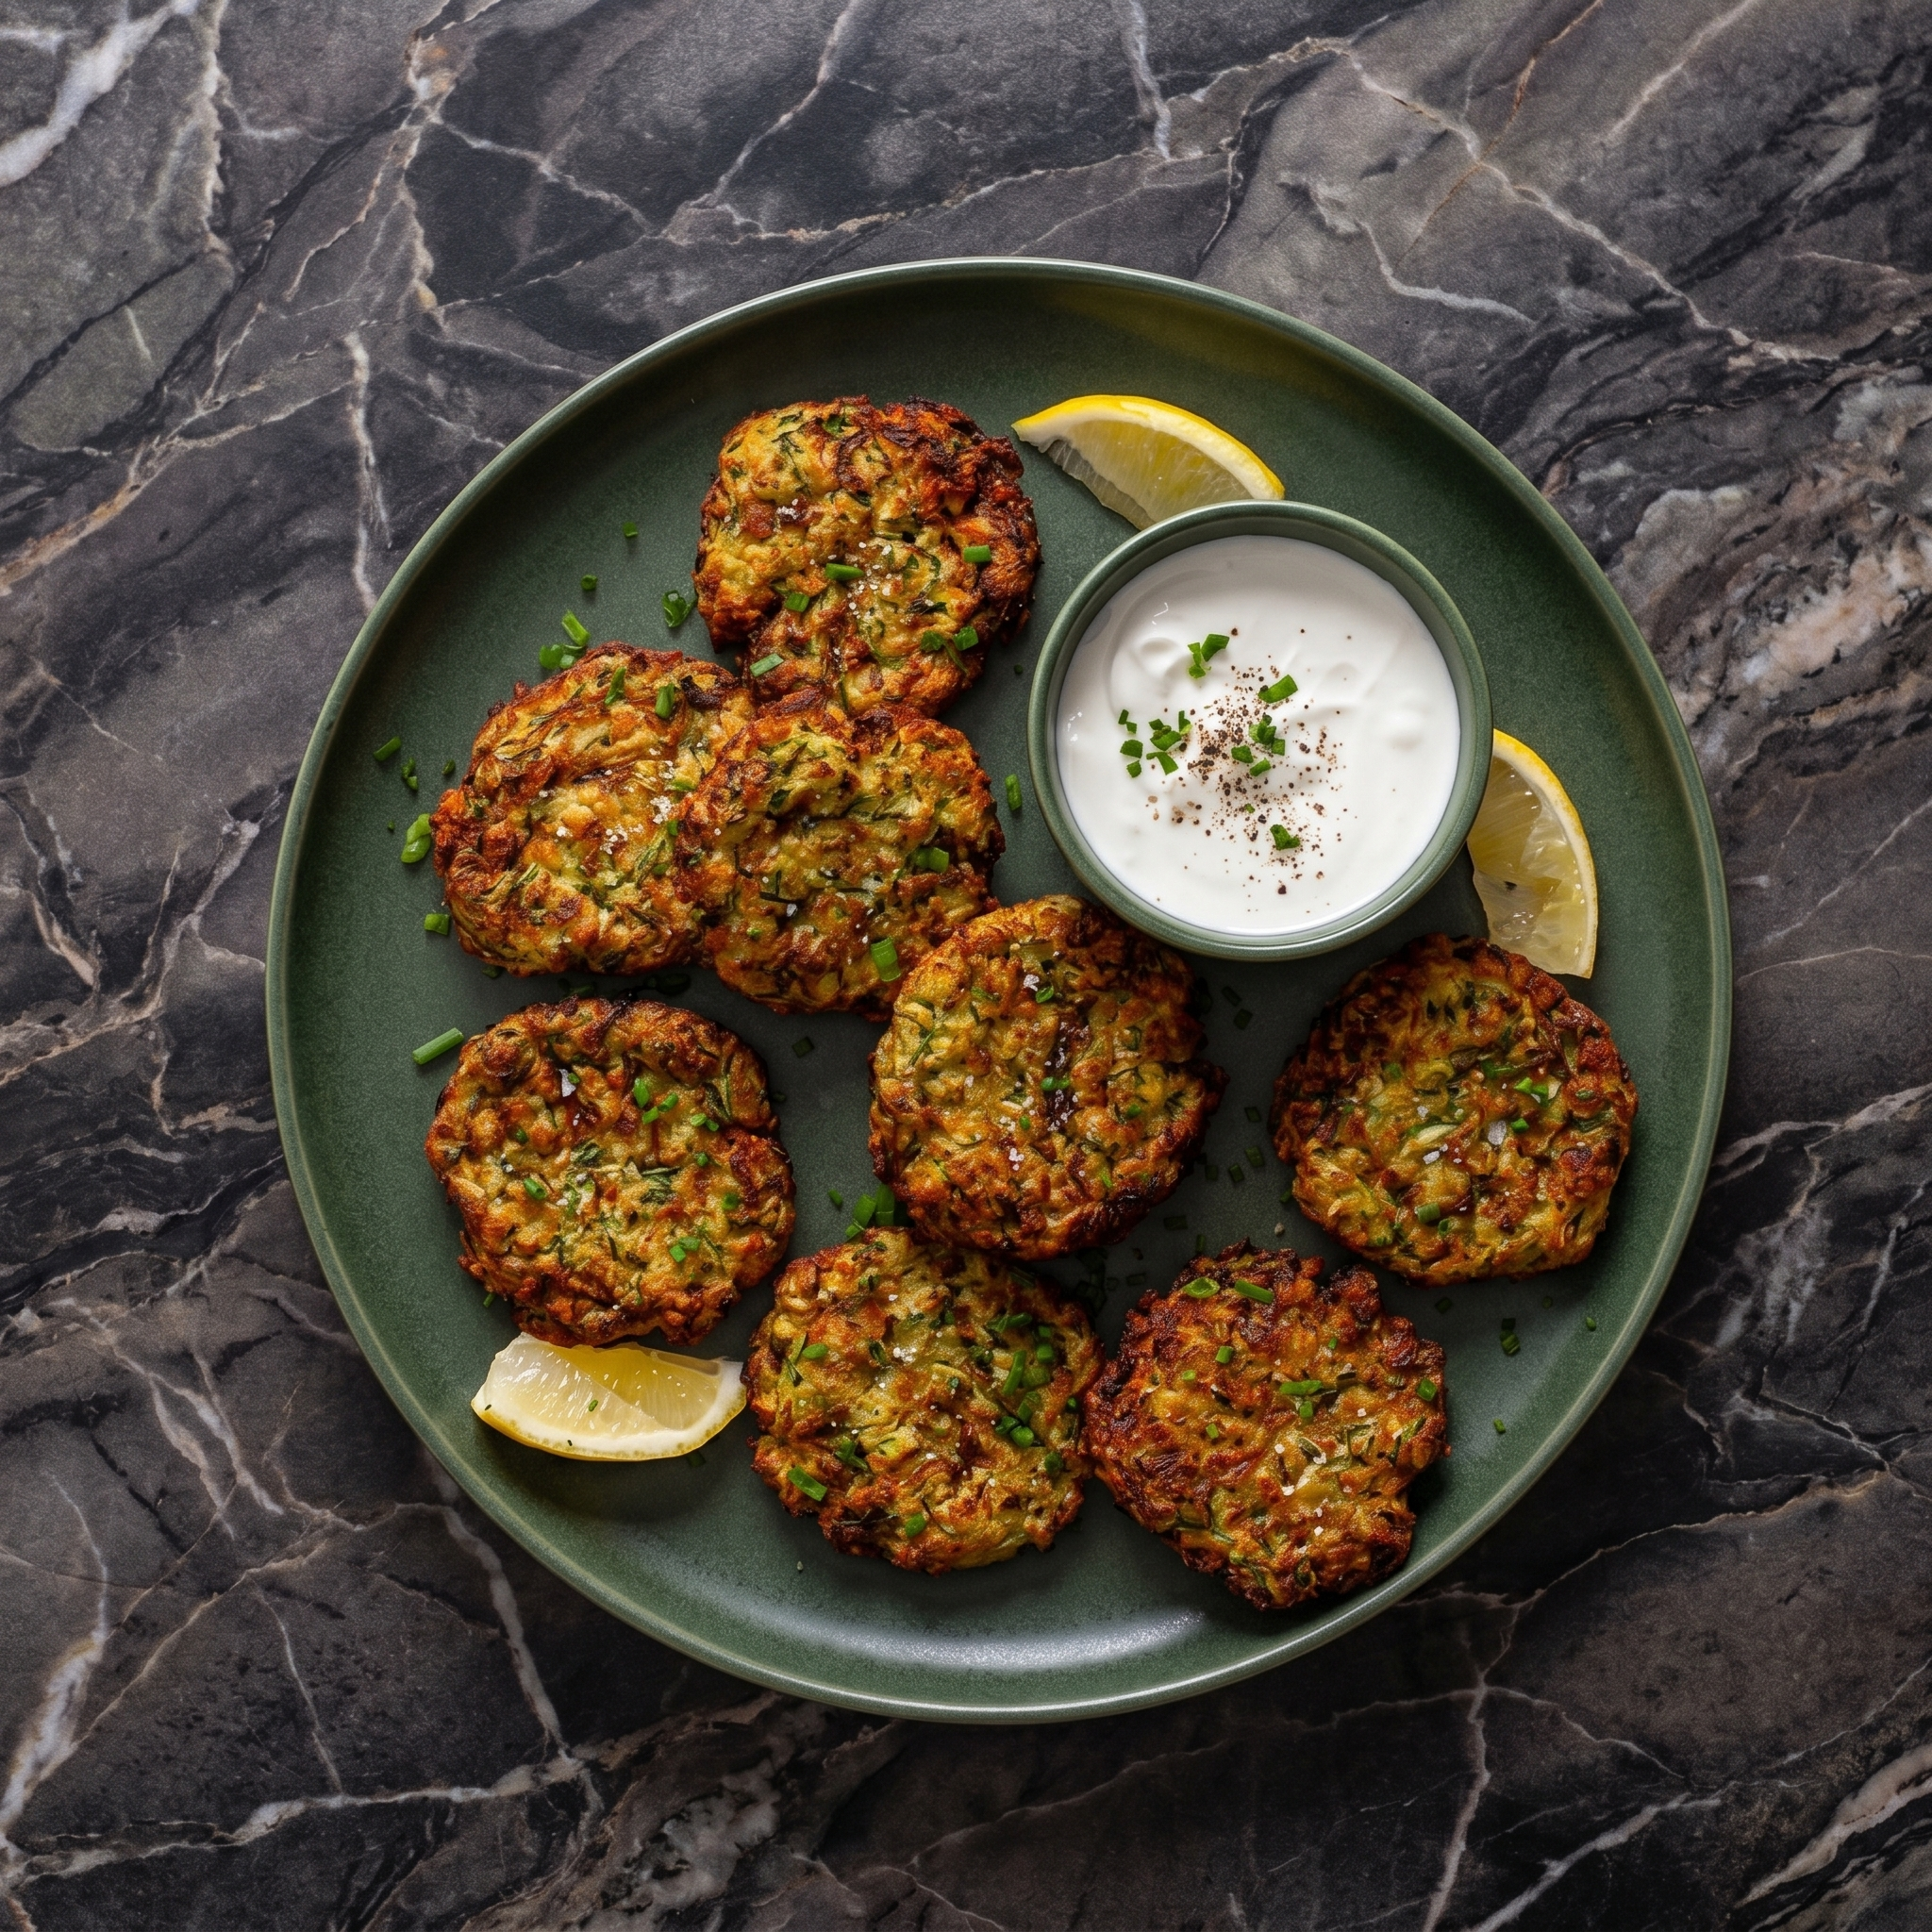
    • Honey butter, sriracha mayo, sour cream, or ranch

    Step-by-Step Instructions

    Step 1: Mix Batter

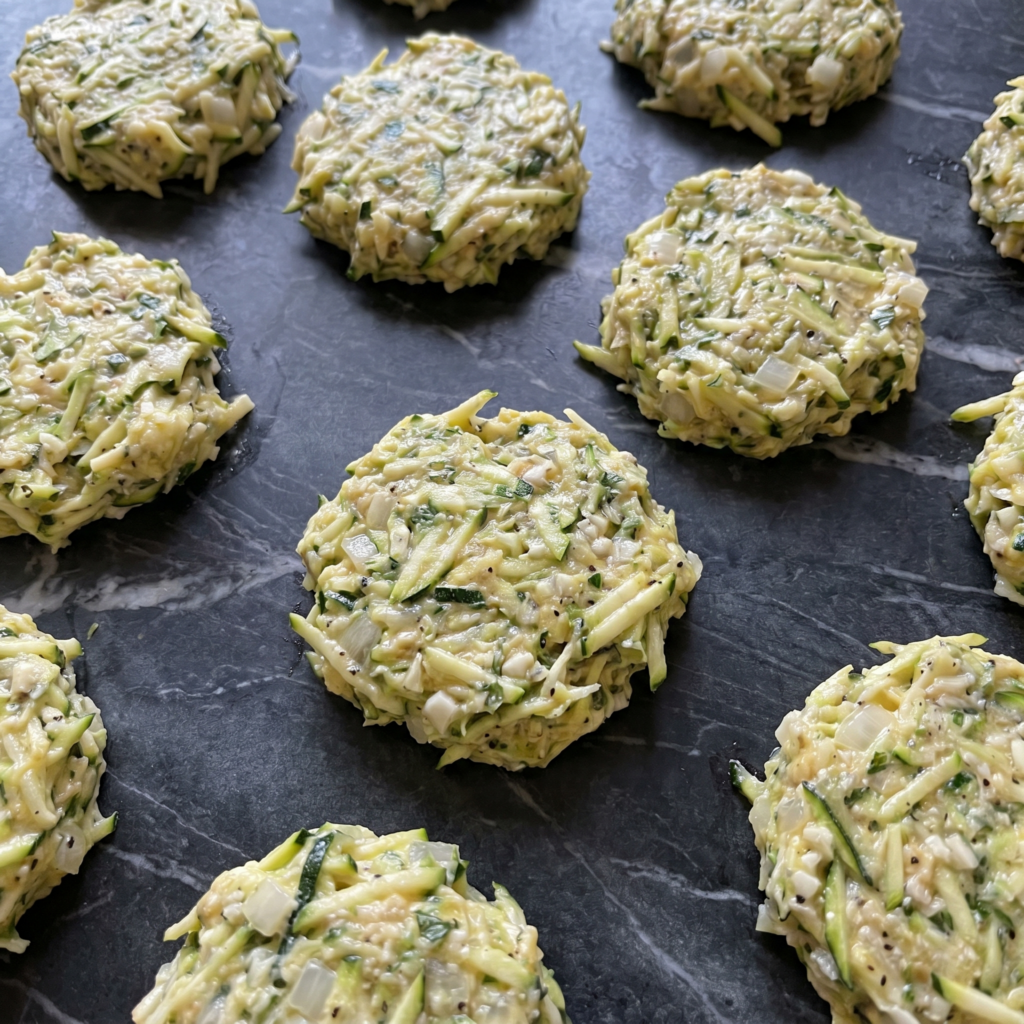
    1. In a bowl, whisk eggs. Add flour, cornmeal (if using), cheese, green onions, cilantro, salt, pepper, and paprika. Stir until combined. Fold in corn kernels. The batter will be thick and chunky.

    Step 2: Form & Fry

    1. Heat oil in a large skillet over medium heat.
    2. Scoop ¼ cup of batter per fritter into the skillet. Flatten slightly with the back of a spoon.
    3. Cook 2-3 minutes per side until golden brown and crispy.
    4. Drain on paper towels.

    Step 3: Serve

    1. Serve hot with honey butter, sriracha mayo, or your favorite dipping sauce. Watch them vanish.

    Summary

    Prep Time: 10 min | Cook Time: 10 min | Total: 20 min

    Yield: 8-10 fritters | Difficulty: Easy

    Storage Notes

    Best fresh. Fridge 3 days. Reheat in oven or air fryer at 375°F for 5-7 minutes (crispy returns). Never microwave — sogginess is the enemy of the fritter. Uncooked batter can be refrigerated for 1 day.

  • Zucchini Fritters (Golden, Crispy, Gone in Minutes)

    Zucchini Fritters (Golden, Crispy, Gone in Minutes)

    Zucchini fritters are the best thing to do with summer squash. Golden, crispy edges. Tender, cheesy centers. Made in one bowl. Ready in 15 minutes. Dip in tzatziki or garlic aioli. You’ll make these all season.

    Ingredients

    Serves 4 (makes 8-10 fritters).

    • 2 medium zucchinis (about 1 lb / 450g)
    • 2 large eggs
    • ½ cup breadcrumbs or panko
    • ½ cup grated Parmesan cheese
    • 2 cloves garlic, minced
    • 2 tbsp fresh dill or parsley, chopped (or 1 tsp dried)
    • ½ tsp salt
    • ¼ tsp black pepper
    • 2 tbsp olive oil (for frying)

    For Serving:

    • Tzatziki, sour cream, or garlic aioli

    Step-by-Step Instructions

    Step 1: Grate & Drain Zucchini

    1. Grate zucchinis using a box grater. Place grated zucchini in a clean kitchen towel. Squeeze out as much liquid as possible (crucial for crispy fritters). You should have about 1½ cups squeezed zucchini.

    Step 2: Mix Batter

    1. In a bowl, combine squeezed zucchini, eggs, breadcrumbs, Parmesan, garlic, dill, salt, and pepper. Mix until well combined.

    Step 3: Form & Fry

    1. Heat oil in a large skillet over medium heat.
    2. Scoop ¼ cup of mixture per fritter. Press into a patty shape. Place in skillet.
    3. Cook 2-3 minutes per side until golden brown and crispy.
    4. Drain on paper towels.

    Step 4: Serve

    1. Serve hot with tzatziki or garlic aioli. Watch them disappear.

    Summary

    Prep Time: 10 min | Cook Time: 10 min | Total: 20 min

    Yield: 8-10 fritters | Difficulty: Easy

    Storage Notes

    Best fresh. Fridge 3 days. Reheat in oven or air fryer at 375°F for 5-7 minutes (crispy returns). Never microwave — sogginess is the enemy. Uncooked fritter mixture can be refrigerated for 1 day.

  • Crispy Broccoli Fritters (The Easiest Way to Eat Your Veggies)

    Crispy Broccoli Fritters (The Easiest Way to Eat Your Veggies)

    Broccoli fritters are the trick you need. Golden, crispy, cheesy, and packed with finely chopped broccoli. Ready in 15 minutes. Dip in ranch or garlic aioli. Even broccoli haters will ask for seconds.

    Ingredients

    Serves 4 (makes 8-10 fritters).

    • 2 cups broccoli florets, finely chopped (about 1 small head)
    • 2 large eggs
    • ½ cup breadcrumbs or panko
    • ½ cup grated Parmesan cheese
    • ¼ cup shredded mozzarella or cheddar (optional)
    • 2 cloves garlic, minced
    • ½ tsp salt
    • ¼ tsp black pepper
    • ¼ tsp red pepper flakes (optional)
    • 2 tbsp olive oil (for frying)

    For Dipping:

    • Ranch dressing, garlic aioli, or sour cream

    Step-by-Step Instructions

    Step 1: Chop Broccoli

    1. Finely chop broccoli florets into small, rice-sized pieces (a food processor works great — pulse, don’t purée).

    Step 2: Mix Batter

    1. In a bowl, combine chopped broccoli, eggs, breadcrumbs, Parmesan, mozzarella (if using), garlic, salt, pepper, and red pepper flakes. Mix until well combined. The mixture should hold together when pressed.

    Step 3: Form & Fry

    1. Heat oil in a large skillet over medium heat.
    2. Scoop ¼ cup of mixture per fritter. Press into a patty shape. Place in skillet.
    3. Cook 2-3 minutes per side until golden brown and crispy.
    4. Drain on paper towels.

    Step 4: Serve

    1. Serve hot with ranch or garlic aioli. Watch the broccoli disappear.

    Summary

    Prep Time: 10 min | Cook Time: 10 min | Total: 20 min

    Yield: 8-10 fritters | Difficulty: Easy

    Storage Notes

    Fridge: 4 days. Reheat in oven or air fryer at 375°F for 5-7 minutes (crispy returns). Freeze uncooked fritters: 3 months (freeze on a tray, then cook from frozen). Never microwave — sogginess is the enemy of the fritter.

  • Stuffed Cabbage Rolls (Old-School Comfort, One Pot)

    Stuffed Cabbage Rolls (Old-School Comfort, One Pot)

    Stuffed cabbage rolls are the ultimate old-school comfort food. Tender leaves wrapped around savory beef and rice, slow-simmered in a sweet and tangy tomato sauce. Low and slow wins the race. Make extra. They freeze beautifully.

    Ingredients

    Serves 6-8 (makes 12-14 rolls).

    • 1 large head green cabbage
    • 1½ lbs (675g) ground beef (or half beef, half pork)
    • 1 cup cooked white rice
    • 1 small onion, finely chopped
    • 2 cloves garlic, minced
    • 1 egg
    • 1 tsp salt
    • ½ tsp black pepper
    • 1 tsp paprika

    For the Sauce:

    • 1 can (28 oz / 800g) crushed tomatoes
    • ¼ cup brown sugar
    • ¼ cup lemon juice or apple cider vinegar
    • 1 cup beef broth
    • 2 bay leaves

    Step-by-Step Instructions

    Step 1: Prep Cabbage

    1. Bring a large pot of salted water to a boil. Cut out the cabbage core. Place cabbage in boiling water. Peel off leaves as they soften (about 2-3 minutes per leaf). You’ll need 12-14 leaves. Trim thick center stems.

    Step 2: Make Filling

    1. In a bowl, mix ground beef, rice, onion, garlic, egg, salt, pepper, and paprika.

    Step 3: Roll

    1. Place a cabbage leaf flat. Add ¼ cup filling near the stem end. Fold sides over, then roll up tightly. Repeat with all leaves.

    Step 4: Make Sauce

    1. In a large pot or Dutch oven, whisk crushed tomatoes, brown sugar, lemon juice, and beef broth.

    Step 5: Layer & Simmer

    1. Place cabbage rolls seam-side down in the pot, packed tightly. Add bay leaves. Spoon some sauce over the top.
    2. Cover and simmer over low heat for 1½ to 2 hours until cabbage is tender and flavors meld.

    Step 6: Serve

    1. Remove bay leaves. Serve hot with sour cream and fresh dill if desired. This is pure nostalgia.

    Summary

    Prep Time: 30 min | Cook Time: 2 hours | Total: 2 hours 30 min

    Yield: 6-8 servings | Difficulty: Medium

    Storage Notes

    Fridge: 5 days (tastes even better the next day). Freezer: 3 months. Reheat in oven or microwave. This is a perfect make-ahead meal for busy weeks.

  • Beef Satay Skewers (Juicy, Flavor-Packed, Peanut Butter Lover’s Dream)

    Beef Satay Skewers (Juicy, Flavor-Packed, Peanut Butter Lover’s Dream)

    Beef satay is proof that meat on a stick can be life-changing. Coconut milk-marinated beef, grilled until slightly charred. The real star? That rich, spicy peanut sauce for dipping. Fire up the grill. Let’s skewer.

    Ingredients

    Serves 4 (makes 10-12 skewers).

    For the Beef Satay:

    • 1½ lbs (675g) beef sirloin or flank steak, thinly sliced against the grain
    • 1 can (14 oz / 400ml) coconut milk
    • 2 tbsp fish sauce
    • 2 tbsp soy sauce
    • 2 tbsp brown sugar
    • 1 tbsp turmeric powder
    • 1 tbsp coriander powder
    • 2 cloves garlic, minced
    • 1 tsp ginger, grated
    • Wooden skewers (soaked in water 30 minutes)

    For the Peanut Sauce:

    • ½ cup creamy peanut butter
    • ½ cup coconut milk
    • 2 tbsp soy sauce
    • 1 tbsp lime juice
    • 1 tbsp brown sugar
    • 1 tsp red curry paste (or sriracha)
    • ¼ cup water (to thin)

    Step-by-Step Instructions

    Step 1: Marinate Beef

    1. Whisk coconut milk, fish sauce, soy sauce, brown sugar, turmeric, coriander, garlic, and ginger.
    2. Add beef strips. Toss to coat. Cover and marinate 2-8 hours (longer = better).

    Step 2: Make Peanut Sauce

    1. Whisk peanut butter, coconut milk, soy sauce, lime juice, brown sugar, and curry paste in a saucepan.
    2. Warm over medium-low heat. Add water gradually until desired consistency (smooth and dippable). Set aside.

    Step 3: Skewer

    1. Thread beef strips onto soaked skewers, weaving back and forth.

    Step 4: Grill

    1. Heat grill or grill pan to medium-high heat.
    2. Grill skewers 2-3 minutes per side until charred and cooked through.

    Step 5: Serve

    1. Serve hot with peanut sauce. Add cucumber relish or pickled onions if you’re feeling fancy.

    Summary

    Prep Time: 15 min + marinate | Cook Time: 10 min | Total: 25 min + marinate

    Yield: 10-12 skewers | Difficulty: Easy

    Storage Notes

    Fridge (marinated uncooked): 1 day. Cooked satay: 3 days. Reheat in oven or air fryer at 375°F for 5 minutes. Peanut sauce keeps 5 days in fridge — reheat with a splash of water.

  • Crab Rangoon (The Crispy, Creamy, Disappears-First Appetizer)

    Crab Rangoon (The Crispy, Creamy, Disappears-First Appetizer)

    Let’s be real: you order Chinese takeout for the crab rangoon. Those crispy, creamy, salty-sweet little triangles that vanish in 60 seconds. This homemade version is faster than delivery, way crispier, and you can stuff them as full as you want. No skimping here.

    Ingredients

    Makes 24 rangoon.

    • 8 oz (225g) cream cheese, softened
    • 6 oz (170g) lump crab meat (fresh or canned, drained well)
    • 2 green onions, finely chopped
    • 1 tsp Worcestershire sauce
    • ½ tsp garlic powder
    • 24 wonton wrappers
    • Oil for frying (vegetable or canola)
    • Sweet chili sauce or duck sauce, for dipping

    Step-by-Step Instructions

    Step 1: Make Filling

    1. In a bowl, mix cream cheese, crab, green onions, Worcestershire, and garlic powder until combined. Don’t overmix (keep crab chunks intact).

    Step 2: Fill Wontons

    1. Place a wonton wrapper like a diamond. Add 1 teaspoon of filling to the center.
    2. Wet edges with water. Fold into a triangle, pressing out air. Seal well.
    3. For the classic shape, wet the two long corners and fold them together.

    Step 3: Fry

    1. Heat 1½ inches of oil to 350°F (175°C).
    2. Fry 4-5 rangoon at a time for 1-2 minutes, flipping once, until golden brown.
    3. Drain on paper towels.

    Step 4: Serve

    1. Serve hot with sweet chili sauce. They wait for no one.

    Summary

    Prep Time: 20 min | Cook Time: 10 min | Total: 30 min

    Yield: 24 rangoon | Difficulty: Easy

    Storage Notes

    Make ahead: Assemble uncooked rangoon and freeze on a tray. Once frozen, transfer to a bag. Fry from frozen (add 1 minute). Leftovers? Reheat in air fryer at 375°F for 3 minutes. Never microwave (soggy sadness).

  • Cream Cheese Wontons (Crispy, Creamy, Addictive)

    Cream Cheese Wontons (Crispy, Creamy, Addictive)

    Cream cheese wontons are the unsung heroes of takeout menus. Crispy, golden, stuffed with sweet and tangy cream cheese. No crab needed. Just pure, fried, creamy perfection. Make a double batch. You’ll thank me.

    Ingredients

    Makes 24 wontons.

    • 24 wonton wrappers
    • 8 oz (225g) cream cheese, softened
    • 2 green onions, finely chopped (optional)
    • 1 tsp sugar
    • ½ tsp garlic powder
    • ¼ tsp salt
    • 1 egg white (for sealing)
    • Vegetable oil for frying
    • Sweet chili sauce or duck sauce for dipping

    Step-by-Step Instructions

    Step 1: Make Filling

    1. In a bowl, mix cream cheese, green onions, sugar, garlic powder, and salt until smooth.

    Step 2: Fill Wontons

    1. Place a wonton wrapper in a diamond shape. Place 1 teaspoon of filling in the center.
    2. Wet edges with egg white. Fold into a triangle, pressing out air. Seal well.
    3. For the classic shape, wet the two long corners and fold them together.
    4. Repeat with remaining wrappers.

    Step 3: Fry

    1. Heat 1½ inches of oil to 350°F (175°C).
    2. Fry wontons in batches (5-6 at a time) for 1-2 minutes until golden brown and crispy.
    3. Drain on paper towels or a wire rack.

    Step 4: Serve

    1. Serve hot with sweet chili sauce or duck sauce. Fight over the last one.

    Summary

    Prep Time: 20 min | Cook Time: 10 min | Total: 30 min

    Yield: 24 wontons | Difficulty: Easy

    Storage Notes

    Make ahead: Assemble uncooked wontons and freeze on a tray. Once frozen, transfer to a bag. Fry from frozen (add 1 minute). Leftovers: Reheat in oven or air fryer at 375°F for 5-7 minutes. Never microwave — sogginess is tragedy.

  • Breakfast Egg Rolls (Eggs, Bacon, and Cheese — Deep Fried)

    Breakfast Egg Rolls (Eggs, Bacon, and Cheese — Deep Fried)

    Breakfast egg rolls are the best idea you’ve never had. Fluffy scrambled eggs. Crispy bacon. Melty cheese. Wrapped in a golden, crunchy egg roll wrapper. Serve with maple syrup or hot sauce. Breakfast just got dangerous.

    Ingredients

    Makes 8-10 egg rolls.

    • 8-10 egg roll wrappers
    • 6 large eggs
    • 2 tbsp milk or cream
    • 6 strips bacon, cooked and crumbled
    • ½ cup shredded cheddar cheese
    • 2 green onions, sliced (optional)
    • Salt and pepper to taste
    • Vegetable oil for frying
    • Optional dippers: maple syrup, hot sauce, ranch

    Step-by-Step Instructions

    Step 1: Make Scrambled Eggs

    1. Whisk eggs, milk, salt, and pepper. Scramble in a buttered skillet over medium heat until soft and just set. Let cool slightly.

    Step 2: Mix Filling

    1. In a bowl, combine scrambled eggs, crumbled bacon, cheddar, and green onions.

    Step 3: Assemble Egg Rolls

    1. Place an egg roll wrapper in a diamond shape. Add 2-3 tablespoons of filling in the center.
    2. Fold bottom corner over filling. Fold in sides. Roll tightly. Wet top corner with water to seal.

    Step 4: Fry

    1. Heat 1½ inches of oil to 350°F (175°C). Fry egg rolls 2-3 at a time, 2-3 minutes per side, until golden brown and crispy.
    2. Drain on a wire rack (not paper towels — keeps them crispy).

    Step 5: Serve

    1. Serve hot with maple syrup for sweet-savory or hot sauce for kick. Either way, you’re winning.

    Summary

    Prep Time: 15 min | Cook Time: 15 min | Total: 30 min

    Yield: 8-10 egg rolls | Difficulty: Medium

    Storage Notes

    Make ahead: Assemble uncooked egg rolls, freeze on a tray, then bag. Fry from frozen (add 2 minutes). Leftovers: Reheat in oven or air fryer at 375°F for 8-10 minutes. Never microwave — sogginess is the enemy of the egg roll.

  • Tiropita (Flaky, Cheesy, Greek Phyllo Pie)

    Tiropita (Flaky, Cheesy, Greek Phyllo Pie)

    Tiropita is Greece’s answer to “what’s for snack?” Buttery, crispy phyllo wrapped around a creamy, tangy feta filling. Baked until golden. Perfect for breakfast, lunch, or anytime you need cheese. Make extra. They vanish fast.

    Ingredients

    Makes 12 triangles.

    • 1 package (16 oz / 450g) phyllo dough, thawed
    • ½ cup (115g) unsalted butter, melted (or olive oil)

    For the Filling:

    • 8 oz (225g) feta cheese, crumbled
    • 8 oz (225g) ricotta cheese (or cottage cheese)
    • 1 large egg
    • 1 tbsp fresh dill or parsley, chopped (optional)
    • ¼ tsp black pepper

    Step-by-Step Instructions

    Step 1: Preheat & Prep

    1. Preheat oven to 375°F (190°C). Line a baking sheet with parchment.
    2. Thaw phyllo according to package directions. Keep covered with a damp towel while working (prevents drying).

    Step 2: Make Filling

    1. In a bowl, mix feta, ricotta, egg, dill, and pepper until combined.

    Step 3: Assemble Triangles

    1. Place one phyllo sheet on a work surface. Brush lightly with melted butter. Top with a second sheet. Brush again.
    2. Cut into 3 long strips (about 4 inches wide). Place 1 tablespoon of filling at the bottom corner of each strip.
    3. Fold corner over filling to form a triangle. Continue folding (like a flag) until the entire strip is folded. Brush top with butter.
    4. Repeat with remaining phyllo and filling.

    Step 4: Bake

    1. Place triangles on baking sheet. Bake 20-25 minutes until golden brown and crispy.

    Step 5: Serve

    1. Cool 5 minutes. Serve warm or at room temperature. Watch them disappear.

    Summary

    Prep Time: 20 min | Bake Time: 25 min | Total: 45 min

    Yield: 12 triangles | Difficulty: Medium

    Storage Notes

    Fridge: 4 days. Reheat in oven or air fryer at 350°F for 5-7 minutes (crispy returns). Freeze unbaked triangles: 3 months. Bake from frozen (add 5-7 minutes). Never microwave — phyllo gets sad and floppy.

  • Homemade Calzones (Pizza’s Portable, Pockets Full of Goodness)

    Homemade Calzones (Pizza’s Portable, Pockets Full of Goodness)

    Calzones are pizza’s cooler cousin. Same great toppings. Same cheesy goodness. Folded into a portable pocket. No slice necessary. Dip in marinara. Eat with your hands. Pizza night just leveled up.

    Ingredients

    Makes 4 calzones.

    • 1 lb (450g) pizza dough (store-bought or homemade), room temperature
    • 1 cup ricotta cheese
    • 1½ cups shredded mozzarella cheese, divided
    • ½ cup grated Parmesan cheese
    • ½ cup ricotta salata or provolone (optional)
    • ½ cup pepperoni slices (or cooked sausage, mushrooms, bell peppers)
    • ½ cup marinara sauce (plus more for dipping)
    • 1 egg, beaten (for egg wash)
    • 1 tsp Italian seasoning
    • Cornmeal or flour for dusting

    Step-by-Step Instructions

    Step 1: Preheat & Prep

    1. Preheat oven to 400°F (200°C). Line a baking sheet with parchment or dust with cornmeal.

    Step 2: Divide & Roll

    1. Divide dough into 4 equal pieces. Roll each into a 6-8 inch circle (about ¼ inch thick).

    Step 3: Assemble

    1. On one half of each dough circle, layer: ricotta, mozzarella, Parmesan, pepperoni, and a spoonful of marinara. Leave a ½-inch border.
    2. Sprinkle with Italian seasoning.

    Step 4: Fold & Seal

    1. Fold empty half over the filling. Press edges firmly to seal. Crimp with a fork or fold edge over itself. Cut a small slit on top for steam.

    Step 5: Egg Wash & Bake

    1. Brush calzones with beaten egg. Bake 15-20 minutes until golden brown and puffed.

    Step 6: Serve

    1. Cool 5 minutes. Serve warm with extra marinara for dipping. Pizza night, pocket-sized.

    Summary

    Prep Time: 15 min | Bake Time: 20 min | Total: 35 min

    Yield: 4 calzones | Difficulty: Easy

    Storage Notes

    Fridge: 4 days. Freezer: 3 months (baked or unbaked). Reheat in oven or air fryer at 375°F for 8-10 minutes. Never microwave — dough gets chewy. Great for meal prep — assemble and refrigerate unbaked.