Author: user

  • Pumpkin Pie: Silky, Spiced, and Nobody Will Know It’s This Easy

    Pumpkin Pie: Silky, Spiced, and Nobody Will Know It’s This Easy

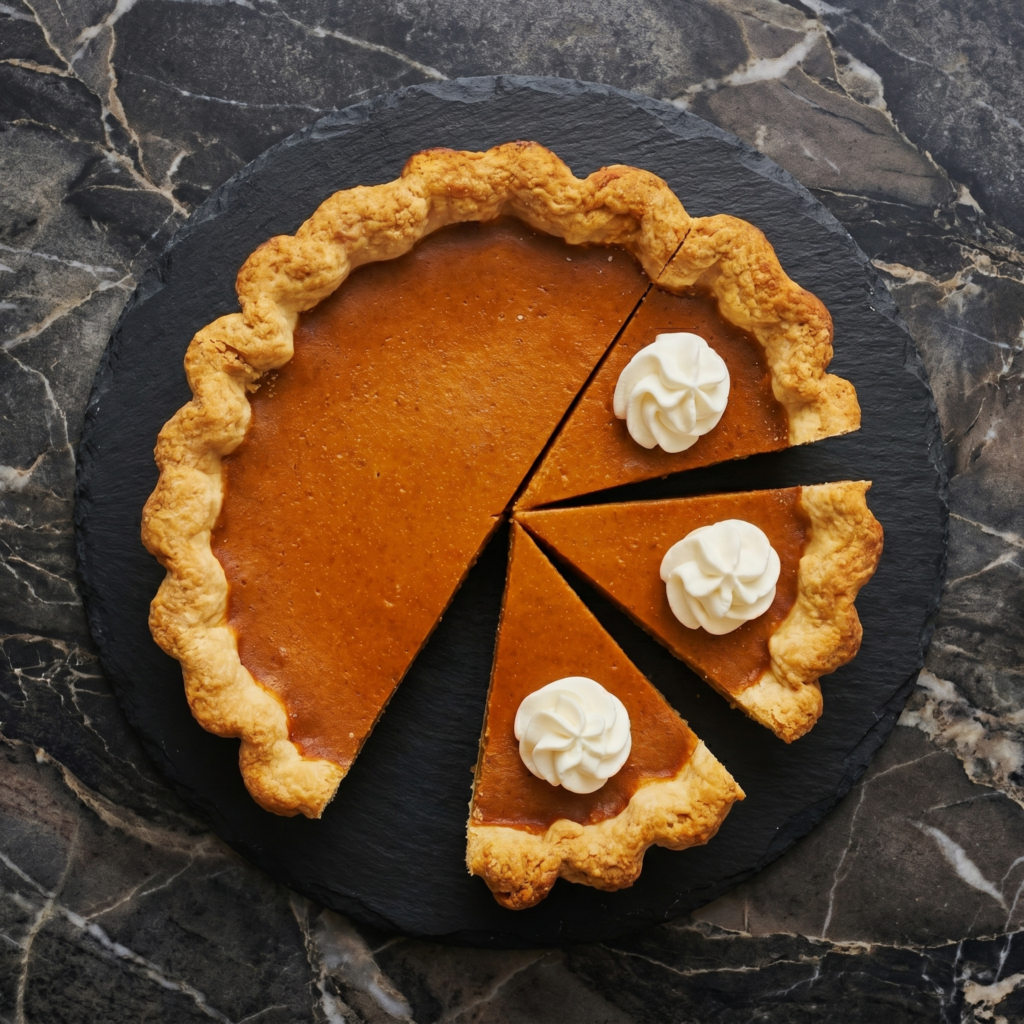
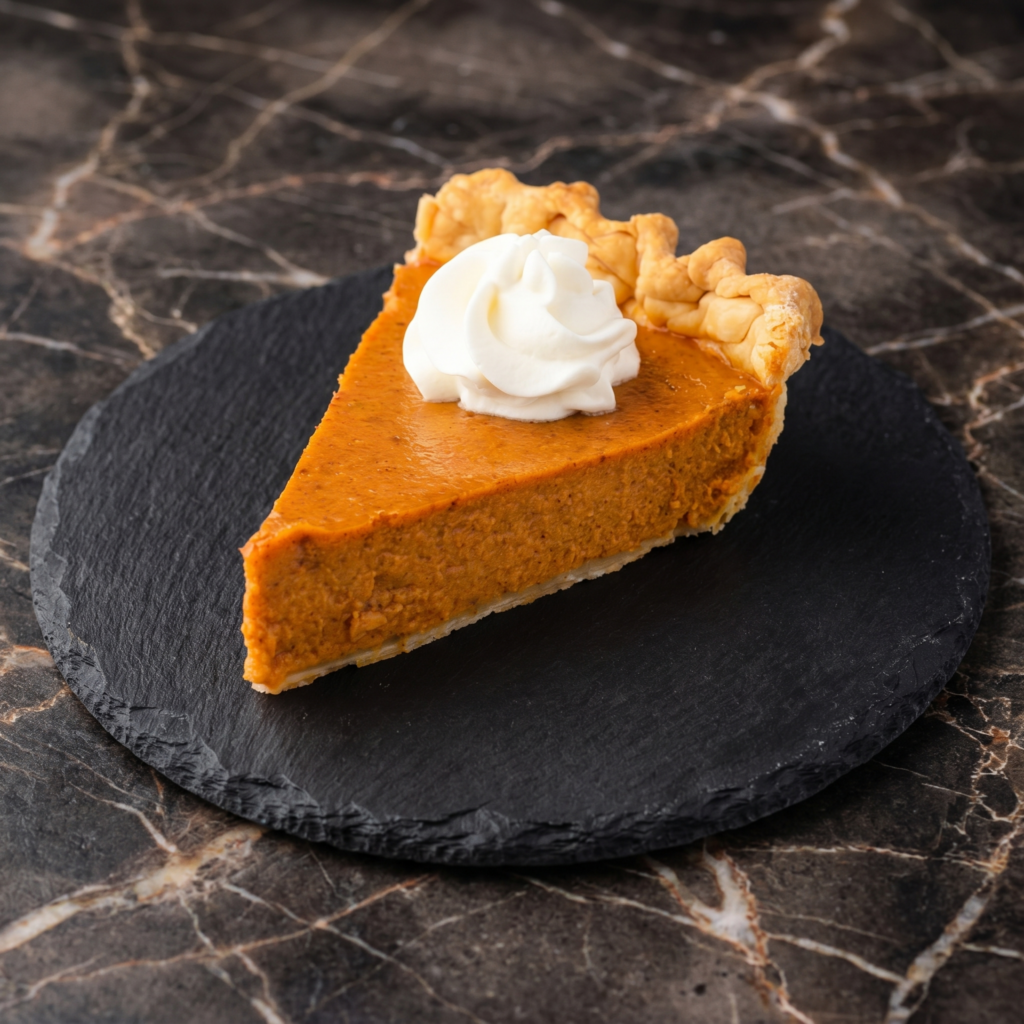
    Pumpkin pie gets a bad rap for being basic. But a good one? Silky, spiced, and perfect against a flaky crust—it’s a masterpiece. This recipe uses real pumpkin (canned is fine, we don’t judge) and a custard that sets like velvet. No water bath. No fancy techniques. Just a pie that disappears before the whipped cream runs out.

    Ingredients

    Makes one 9-inch pie (8 slices).

    For the Crust:

    • 1¼ cups all-purpose flour
    • ½ teaspoon salt
    • ½ cup (1 stick) cold unsalted butter, cubed
    • 3-4 tablespoons ice water

    For the Filling:

    • 1 can (15 oz) pumpkin purée (not pie filling)
    • 1 can (12 oz) evaporated milk
    • ¾ cup granulated sugar
    • 2 large eggs
    • 1 teaspoon cinnamon
    • ½ teaspoon ground ginger
    • ¼ teaspoon ground nutmeg
    • ¼ teaspoon ground cloves
    • ½ teaspoon salt

    Step-by-Step Instructions

    Step 1: Make the Crust

    1. Mix flour and salt. Cut in cold butter until pea-sized crumbs form.
    2. Add ice water, 1 tablespoon at a time, until dough comes together.
    3. Form into a disc, wrap, and chill for 30 minutes.
    4. Roll out and press into a 9-inch pie pan. Crimp edges.

    Step 2: Preheat and Par-Bake (Optional but Recommended)

    1. Preheat oven to 375°F (190°C).
    2. Line crust with parchment and fill with pie weights or dried beans.
    3. Bake for 10 minutes. Remove weights. Bake 5 more minutes.

    Step 3: Make the Filling

    1. In a bowl, whisk pumpkin, evaporated milk, sugar, eggs, spices, and salt until smooth.

    Step 4: Bake the Pie

    1. Pour filling into warm crust.
    2. Bake at 375°F for 50-60 minutes.
    3. Pie is done when edges are set but center still jiggles slightly like Jell-O.

    Step 5: Cool and Serve

    1. Cool completely on a wire rack (at least 2 hours).
    2. Serve with whipped cream. Cold or room temperature.

    Summary

    Prep Time: 20 minutes + 30 minutes chill | Cook Time: 1 hour 15 minutes | Cooling: 2 hours | Total Time: ~4 hours

    Yield: 8 slices

    Difficulty: Easy (patience for cooling)

    Storage Notes

    How to Store:

    Keep pumpkin pie in the fridge for up to 4 days. Cover loosely with foil or plastic wrap.

    Serving Temperature:

    Pumpkin pie is delicious cold, at room temperature, or gently warmed. For warm pie: microwave a slice for 15 seconds.

    Freezing:

    Freeze baked and cooled whole pie or slices for up to 2 months. Wrap tightly. Thaw overnight in the fridge.

    Pro Tips:

    Don’t use pumpkin pie filling—it’s pre-spiced and sweetened and will throw off the ratios. Par-baking the crust prevents a soggy bottom. And the center should still jiggle when you pull it from the oven; carryover heat finishes the job. Overbaked pumpkin pie = cracked, rubbery sadness.

  • Éclairs: Fancy French Pastry That’s Actually Easier Than You Think

    Éclairs: Fancy French Pastry That’s Actually Easier Than You Think

    Éclairs sound fancy. They look fancy. But here’s the secret: choux pastry is just flour, butter, eggs, and water—no yeast, no complicated folds. Pipe it, bake it until puffed and golden, then fill with silky vanilla pastry cream. Top with a crackly chocolate ganache. That’s it. Your friends will think you trained in Paris. Let them.

    Ingredients

    Makes 10-12 éclairs.

    For the Choux Pastry (Pâte à Choux):

    • ½ cup water
    • ½ cup whole milk
    • ½ cup (1 stick) unsalted butter, cubed
    • 1 tablespoon sugar
    • ¼ teaspoon salt
    • 1 cup all-purpose flour
    • 4 large eggs, at room temperature

    For the Pastry Cream (Crème Pâtissière):

    • 2 cups whole milk
    • ½ cup sugar
    • 4 egg yolks
    • ¼ cup cornstarch
    • 2 teaspoons vanilla extract
    • 2 tablespoons unsalted butter

    For the Chocolate Ganache:

    • ½ cup semi-sweet chocolate chips
    • ¼ cup heavy cream

    Step-by-Step Instructions

    Step 1: Make the Choux Pastry

    1. Preheat oven to 400°F (200°C). Line a baking sheet with parchment.
    2. In a saucepan, heat water, milk, butter, sugar, and salt until boiling.
    3. Reduce heat. Add flour all at once. Stir vigorously until dough forms a ball and pulls away from the sides.
    4. Transfer to a bowl. Let cool 5 minutes.
    5. Add eggs one at a time, mixing completely after each. Dough should be shiny and pipeable.

    Step 2: Pipe and Bake

    1. Pipe 4-inch logs onto the baking sheet.
    2. Bake for 20 minutes at 400°F, then reduce to 350°F (175°C) and bake 10-15 more minutes until deep golden.
    3. Poke a small hole in each to let steam escape. Cool completely.

    Step 3: Make the Pastry Cream

    1. Heat milk until steaming. Whisk sugar, yolks, and cornstarch in a bowl.
    2. Slowly pour hot milk into yolk mixture while whisking. Return to pan.
    3. Cook until thickened. Remove from heat. Stir in vanilla and butter. Chill completely.

    Step 4: Make the Ganache

    1. Heat cream until steaming. Pour over chocolate chips. Let sit 2 minutes. Stir until smooth.

    Step 5: Assemble

    1. Pipe pastry cream into éclairs through the poke holes or slice open.
    2. Dip tops in ganache. Let set for 15 minutes. Serve.

    Summary

    Prep Time: 45 minutes | Cook Time: 35 minutes | Cooling: 1 hour | Total Time: ~2.5 hours

    Yield: 10-12 éclairs

    Difficulty: Medium (choux technique matters)

    Storage Notes

    Best Eaten Fresh:

    Éclairs are happiest within 4-6 hours of filling. The pastry stays crisp; the cream stays silky.

    How to Store Components:

    Baked unfilled shells last 2 days in an airtight container at room temperature. Pastry cream keeps 3 days in the fridge. Fill just before serving.

    Freezing Shells:

    Freeze baked unfilled éclairs for up to 2 months. Re-crisp in a 350°F oven for 5 minutes before filling.

    Pro Tips:

    Don’t open the oven during baking—choux needs steady heat to puff. Poke steam holes immediately after baking to prevent sogginess. And use whole milk for pastry cream; skim won’t cut it.

  • Double Chocolate Muffins: Bakery Style, Deeply Chocolatey, Dangerously Easy

    Double Chocolate Muffins: Bakery Style, Deeply Chocolatey, Dangerously Easy

    Some muffins pretend to be healthy. These do not. Double chocolate muffins are dark, moist, and loaded with melting chocolate chunks. Bakery-style tall domes. Crackly tops. Deep cocoa flavor. No mixer needed, no fancy tricks—just a bowl, a whisk, and a serious chocolate craving. Breakfast? Dessert? Both. Eat warm with milk or coffee and feel zero guilt.

    Ingredients

    Makes 12 muffins.

    • 1¾ cups all-purpose flour
    • ¾ cup unsweetened cocoa powder
    • 1½ teaspoons baking powder
    • ½ teaspoon baking soda
    • ½ teaspoon salt
    • 2 large eggs
    • 1 cup granulated sugar
    • ½ cup brown sugar, packed
    • ½ cup vegetable oil
    • 1 cup buttermilk (or milk + 1 tablespoon vinegar)
    • 2 teaspoons vanilla extract
    • 1½ cups chocolate chips or chunks (semi-sweet or dark)

    Step-by-Step Instructions

    Step 1: Preheat and Prep

    1. Preheat oven to 425°F (220°C). Line a 12-cup muffin tin with liners.

    Step 2: Mix Dry Ingredients

    1. In a large bowl, whisk flour, cocoa powder, baking powder, baking soda, and salt.

    Step 3: Mix Wet Ingredients

    1. In another bowl, whisk eggs, both sugars, oil, buttermilk, and vanilla until smooth.

    Step 4: Combine and Fold

    1. Pour wet into dry. Mix until just combined—lumps are fine, don’t overmix.
    2. Fold in chocolate chips.

    Step 5: Bake Hot and Drop Temp

    1. Fill muffin liners all the way to the top (for tall domes).
    2. Bake at 425°F for 5 minutes, then reduce to 350°F (175°C) and bake 12-15 more minutes.
    3. Muffins are done when a toothpick comes out with a few moist crumbs.
    4. Cool in pan for 5 minutes, then transfer to a wire rack.

    Summary

    Prep Time: 15 minutes | Cook Time: 20 minutes | Total Time: 35 minutes

    Yield: 12 muffins

    Difficulty: Easy (don’t overmix)

    Storage Notes

    How to Store:

    Keep in an airtight container at room temperature for up to 4 days. Microwave for 10 seconds to bring back that fresh-baked warmth.

    Freezing:

    Freeze cooled muffins in a ziplock bag for up to 3 months. Thaw at room temperature or microwave for 20-30 seconds.

    Pro Tips:

    The high-then-low oven trick gives you those iconic bakery domes—don’t skip it. Use buttermilk for tenderness; if you don’t have any, add 1 tablespoon of white vinegar to regular milk and let sit for 5 minutes. And please, fill those liners to the top. Scant fillings make flat, sad muffins.

  • Homemade Chocolate Pop Tarts: Store-Bought Could Never

    Homemade Chocolate Pop Tarts: Store-Bought Could Never

    Remember pop tarts? The dry, crumbly, vaguely chocolate rectangles from a foil pouch? Yeah, these are nothing like that. Homemade chocolate pop tarts have a buttery, tender crust, a fudgy dark chocolate center, and a thick layer of chocolate icing on top. One bite and you’ll never go back to the boxed version. Plus, you get bragging rights. Let’s make pastry.

    Ingredients

    Makes 8 pop tarts.

    For the Crust:

    • 2 cups all-purpose flour
    • 1 tablespoon sugar
    • ½ teaspoon salt
    • 1 cup (2 sticks) cold unsalted butter, cubed
    • ¼ cup ice water (plus more as needed)

    For the Chocolate Filling:

    • ½ cup semi-sweet chocolate chips
    • 2 tablespoons heavy cream
    • 1 tablespoon unsalted butter

    For the Chocolate Icing:

    • 1 cup powdered sugar
    • 2 tablespoons cocoa powder
    • 2 tablespoons milk
    • Sprinkles (mandatory for authenticity)

    Step-by-Step Instructions

    Step 1: Make the Crust

    1. In a bowl, mix flour, sugar, and salt. Cut in cold butter until pea-sized crumbs form.
    2. Add ice water 1 tablespoon at a time until dough just comes together.
    3. Divide into two discs. Wrap and chill for 1 hour.

    Step 2: Make the Filling

    1. Microwave chocolate chips, cream, and butter in 15-second bursts until smooth. Let cool slightly.

    Step 3: Assemble the Pop Tarts

    1. Preheat oven to 375°F (190°C). Line a baking sheet with parchment.
    2. Roll out each dough disc into a 9×12 rectangle. Cut into eight 3×4 rectangles.
    3. Place 4 rectangles on the baking sheet. Spoon 1 tablespoon filling onto each, leaving a border.
    4. Top with remaining rectangles. Press edges with a fork to seal. Poke vent holes.

    Step 4: Bake

    1. Bake for 20-25 minutes until golden brown. Cool completely on a wire rack.

    Step 5: Ice and Sprinkle

    1. Whisk powdered sugar, cocoa powder, and milk until smooth.
    2. Spread icing over cooled pop tarts. Add sprinkles immediately.
    3. Let icing set for 15 minutes. Toast or eat at room temp.

    Summary

    Prep Time: 30 minutes + 1 hour chill | Cook Time: 25 minutes | Total Time: ~2 hours

    Yield: 8 pop tarts

    Difficulty: Medium (dough handling)

    Storage Notes

    How to Store:

    Keep in an airtight container at room temperature for up to 5 days. They actually stay pretty fresh.

    Freezing (Best Hack):

    Freeze unbaked assembled pop tarts on a tray, then transfer to a bag. Bake from frozen—add 5 minutes to bake time. Bake only what you want. This is the move.

    Toasting:

    Pop a baked pop tart in the toaster or toaster oven for 1-2 minutes to warm the filling. Yes, like the old days. But better.

    Pro Tip:

    Don’t overfill. Too much chocolate = blowouts in the oven. One tablespoon is plenty. Also, chill the assembled tarts for 15 minutes before baking—it prevents shrinkage and keeps the shape perfect.

  • Fried Oreos: State Fair Magic in Your Own Kitchen (No Tickets Required)

    Fried Oreos: State Fair Magic in Your Own Kitchen (No Tickets Required)

    Fried Oreos shouldn’t work. But they do. A humble Oreo gets wrapped in a sweet pancake-like batter, dropped into hot oil, and transformed into a warm, gooey, crunchy-on-the-outside, melty-on-the-inside ball of carnival magic. Dust with powdered sugar, drizzle with chocolate sauce, or just eat them straight off the rack. This is fair food at its finest—no tickets, no lines, no regrets.

    Ingredients

    Serves 4 (about 12-15 fried Oreos).

    • 1 package Oreos (regular, not Double Stuf—they puff too much)
    • 1 cup pancake mix (or all-purpose flour)
    • 1 cup milk
    • 1 egg
    • 1 tablespoon vegetable oil (plus more for frying)
    • 1 teaspoon vanilla extract
    • Powdered sugar for dusting
    • Optional: chocolate sauce, caramel, or strawberry syrup

    Step-by-Step Instructions

    Step 1: Make the Batter

    1. In a bowl, whisk pancake mix, milk, egg, 1 tablespoon oil, and vanilla.
    2. Batter should be thick enough to coat a spoon—not too runny.
    3. Chill batter for 10 minutes if you have time (helps it stick).

    Step 2: Heat the Oil

    1. Heat 2 inches of neutral oil in a pot to 365°F (185°C).
    2. Test with a drop of batter—it should sizzle and float immediately.

    Step 3: Dip and Fry

    1. Dip each Oreo into batter, coating completely. Let excess drip off.
    2. Carefully drop into hot oil. Fry 3-4 at a time—don’t crowd.
    3. Fry for 45-60 seconds per side until golden brown and puffed.

    Step 4: Drain and Dust

    1. Remove with a slotted spoon. Drain on a wire rack (not paper towels—they trap steam).
    2. Let cool for 60 seconds (the inside is lava).
    3. Dust generously with powdered sugar.

    Step 5: Serve Immediately

    1. Serve warm with chocolate sauce for dipping. Accept compliments.

    Summary

    Prep Time: 10 minutes | Cook Time: 10 minutes | Total Time: 20 minutes

    Yield: 12-15 fried Oreos (4 servings)

    Difficulty: Easy (watch the heat)

    Storage Notes

    Don’t Even Think About It:

    Fried Oreos are a fresh-only food. Within an hour, they become sad, soggy, and chewy. Eat them all immediately. That’s the rule.

    Make-Ahead (Not Really):

    You can’t fry ahead. But you can set up a fried Oreo bar at a party and fry in small batches while people watch. It’s entertainment AND dessert.

    Pro Tips:

    Use regular Oreos, not Double Stuf—the extra cream makes them explode in the fryer. Freeze Oreos for 15 minutes before dipping; they hold together better. And seriously: let them cool slightly. The molten cream center will burn your mouth. You’ve been warned.

  • Blueberry Cheesecake Muffins That Steal the Show

    Blueberry Cheesecake Muffins That Steal the Show

    Muffins are great. Muffins with a secret cheesecake core? Unforgettable.

    These Blueberry Cheesecake Muffins are soft, buttery, and packed with juicy blueberries. But the real magic is the creamy, tangy cheesecake filling hiding inside. Topped with crunchy streusel and a drizzle of glaze. One bowl. No mixer required. Let’s bake.

    Ingredients

    Makes 12 muffins.

    For the Streusel Topping:

    • ½ cup all-purpose flour
    • ¼ cup brown sugar
    • ¼ cup cold butter, cubed

    For the Cheesecake Filling:

    • 4 oz cream cheese, softened
    • 2 tablespoons sugar
    • 1 teaspoon vanilla extract

    For the Muffin Batter:

    • 1 ½ cups all-purpose flour
    • ½ cup sugar
    • 2 teaspoons baking powder
    • ½ teaspoon salt
    • 1 large egg
    • ½ cup milk
    • ⅓ cup vegetable oil
    • 1 teaspoon vanilla
    • 1 cup fresh or frozen blueberries

    Step-by-Step Instructions

    Step 1: Prep & Preheat

    1. Preheat oven to 375°F (190°C). Line a 12-cup muffin tin with paper liners.

    Step 2: Make the Streusel

    1. Mix flour and brown sugar. Cut in cold butter with a fork until crumbly. Set aside.

    Step 3: Make Cheesecake Filling

    1. Beat cream cheese, sugar, and vanilla until smooth. Set aside.

    Step 4: Make Muffin Batter

    1. Whisk flour, sugar, baking powder, and salt in a large bowl.
    2. In another bowl, whisk egg, milk, oil, and vanilla.
    3. Combine wet and dry ingredients until just mixed. Fold in blueberries gently.

    Step 5: Assemble the Muffins

    1. Fill each liner halfway with batter.
    2. Add a small scoop of cheesecake filling (about 1 teaspoon) in the center.
    3. Top with remaining batter until liners are ¾ full.
    4. Sprinkle streusel generously over each muffin.

    Step 6: Bake & Cool

    1. Bake for 18–20 minutes, until a toothpick comes out clean (except for the gooey center).
    2. Cool in the pan for 5 minutes, then transfer to a wire rack.

    Summary

    Prep Time: 15 minutes | Bake Time: 20 minutes | Total Time: 35 minutes

    Yield: 12 muffins | Difficulty: Easy

    Storage Notes

    Store in an airtight container at room temperature for up to 3 days. Refrigerate for up to 6 days (bring to room temp before eating). Freeze without glaze for up to 3 months.

  • Pecan Pie: Sticky, Nutty, Dangerous (In a Good Way)

    Pecan Pie: Sticky, Nutty, Dangerous (In a Good Way)

    Pecan pie doesn’t try to be fancy. It just shows up, steals the show, and leaves everyone asking for the recipe.

    This version is sticky, nutty, deeply caramel-flavored, and zero drama. No corn syrup. No candy thermometer. Just pantry staples, one bowl, and a pie crust that’s ready in 10 minutes. Bake it for Thanksgiving, Christmas, or a random Tuesday. We won’t tell.

    Ingredients

    Makes one 9-inch pie.

    For the Crust:

    • 1 ¼ cups all-purpose flour
    • ½ teaspoon salt
    • ½ cup cold butter, cubed
    • 3-4 tablespoons ice water

    For the Filling:

    • 3 large eggs
    • 1 cup brown sugar, packed
    • ¾ cup maple syrup (or light corn syrup)
    • ¼ cup melted butter
    • 1 tablespoon vanilla extract
    • ¼ teaspoon salt
    • 2 cups pecan halves

    Step-by-Step Instructions

    Step 1: Make the Crust

    1. Mix flour and salt. Cut in cold butter until pea-sized crumbs form.
    2. Add ice water 1 tablespoon at a time until dough comes together.
    3. Press into a disk, wrap, and chill 30 minutes.
    4. Roll out and fit into a 9-inch pie pan.

    Step 2: Make the Filling

    1. Preheat oven to 350°F (175°C).
    2. Whisk eggs in a large bowl. Add brown sugar, maple syrup, melted butter, vanilla, and salt. Whisk until smooth.
    3. Stir in 1 ½ cups pecans. Pour into crust.
    4. Arrange remaining ½ cup pecans on top in a pretty pattern.

    Step 3: Bake & Cool

    1. Bake for 45-50 minutes. The center should jiggle slightly but not look wet.
    2. Cool completely on a wire rack (at least 2 hours). The filling sets as it cools.

    Summary

    Prep Time: 15 minutes | Bake Time: 50 minutes | Cool Time: 2 hours

    Yield: 8 slices | Difficulty: Easy

    Storage Notes

    Store at room temperature, covered, for up to 3 days. Refrigerate for up to a week. Serve cold, at room temp, or warm it up for 10 seconds in the microwave. Add whipped cream or vanilla ice cream. You’re welcome.

  • Jalapeño Poppers (Spicy, Creamy, Bacon-Wrapped Bliss)

    Jalapeño Poppers (Spicy, Creamy, Bacon-Wrapped Bliss)

    Jalapeño poppers are the appetizer that fights back. A little spicy, a little sweet, a lot addicting.

    Fresh jalapeños stuffed with creamy, cheesy filling, then wrapped in bacon and baked until crispy. No deep frying. No mess. Just pure, poppable perfection.

    Ingredients

    Makes 16 poppers.

    • 8 fresh jalapeños
    • 4 oz (115g) cream cheese, softened
    • ½ cup shredded cheddar cheese
    • 2 green onions, finely chopped
    • ¼ tsp garlic powder
    • 8 slices bacon, cut in half

    Step-by-Step Instructions

    Step 1: Preheat and Prep

    1. Preheat oven to 400°F (200°C). Line a baking sheet with foil or parchment.

    Step 2: Prepare Jalapeños

    1. Cut jalapeños in half lengthwise. Remove seeds and membranes (wear gloves!).

    Step 3: Make Filling

    1. Mix cream cheese, cheddar, green onions, and garlic powder until smooth.

    Step 4: Stuff

    1. Fill each jalapeño half with cheese mixture.

    Step 5: Wrap with Bacon

    1. Wrap a half-slice of bacon around each stuffed jalapeño.
    2. Place seam-side down on baking sheet.

    Step 6: Bake

    1. Bake 15-20 minutes until bacon is crispy and filling is bubbly.
    2. Optional: Broil 1-2 minutes for extra crisp.

    Step 7: Serve

    1. Cool 5 minutes. Serve warm with ranch or blue cheese dressing.

    Summary

    Prep Time: 15 minutes | Cook Time: 20 minutes | Total Time: 35 minutes

    Yield: 16 poppers

    Difficulty: Easy

    Storage Notes

    Refrigerate Leftovers:

    Store in an airtight container for up to 3 days. Reheat in oven at 375°F for 5-7 minutes (not microwave—soggy bacon).

    Prep Ahead:

    Assemble poppers up to 1 day ahead. Cover and refrigerate. Bake when ready.

    Freeze Unbaked:

    Freeze on a tray, then transfer to a bag. Bake from frozen at 400°F for 20-25 minutes.

    Heat Warning:

    Wear gloves when handling jalapeños. Don’t touch your eyes. Seriously.

    Milder Version:

    Remove all seeds and membranes, or use mini sweet peppers instead.

  • Char Siu Bao (Fluffy Clouds Filled with Sweet BBQ Pork)

    Char Siu Bao (Fluffy Clouds Filled with Sweet BBQ Pork)

    Char siu bao are the reason dim sum exists. Fluffy, cloud-like dough wrapped around sweet, savory, sticky BBQ pork.

    Yes, they take a little time. No, it’s not hard. The filling comes together fast, the dough is forgiving, and the first bite—warm, soft, porky—makes every minute worth it.

    Ingredients

    Makes 12 buns.

    For the Filling:

    • 1½ cups cooked char siu (Chinese BBQ pork), finely diced
    • 1 tablespoon oyster sauce
    • 1 tablespoon soy sauce
    • 1 tablespoon hoisin sauce
    • 1 teaspoon sugar
    • ½ cup water + 1 teaspoon cornstarch (slurry)

    For the Dough:

    • 2 cups (260g) all-purpose flour
    • 1 tablespoon sugar
    • 1 teaspoon instant yeast
    • ½ teaspoon baking powder
    • ¼ teaspoon salt
    • ¾ cup (180ml) warm water
    • 1 tablespoon vegetable oil

    Step-by-Step Instructions

    Step 1: Make the Filling

    1. In a small pan, mix diced char siu, oyster sauce, soy sauce, hoisin, and sugar.
    2. Cook over medium heat for 2 minutes. Add cornstarch slurry. Stir until thick and sticky. Cool completely.

    Step 2: Make the Dough

    1. In a bowl, mix flour, sugar, yeast, baking powder, and salt. Add warm water and oil.
    2. Knead for 8-10 minutes until smooth and elastic. Let rise 1 hour until doubled.

    Step 3: Shape the Buns

    1. Punch down dough. Divide into 12 balls. Flatten each into a 4-inch circle.
    2. Place 1 tablespoon of filling in the center. Gather edges and pinch to seal.

    Step 4: Second Rise

    1. Place buns seam-side down on parchment squares. Let rise 30 minutes.

    Step 5: Steam

    1. Steam buns in a steamer basket over simmering water for 12 minutes.
    2. Turn off heat. Let rest 5 minutes before opening lid (prevents collapse).

    Step 6: Serve

    1. Serve warm. Buns can be steamed again later.

    Summary

    Prep Time: 30 minutes + 1½ hours rising | Cook Time: 12 minutes

    Total Time: ~2 hours (mostly hands-off)

    Yield: 12 buns

    Difficulty: Medium (patience required)

    Storage Notes

    Fridge: Steamed buns keep 4 days. Re-steam for 5-6 minutes until warm.

    Freezer: Freeze uncooked or cooked buns up to 3 months. Steam from frozen (add 5 minutes).

    Make ahead tip: Make filling 3 days ahead. Make dough, assemble, and steam fresh.

  • Baked Banana Oat Cups (Breakfast That Tastes Like Dessert)

    Baked Banana Oat Cups (Breakfast That Tastes Like Dessert)

    Muffins are great. But these banana oat cups are easier, healthier, and somehow just as delicious.

    No flour. No refined sugar. Just bananas, oats, and a few pantry staples. Blend, pour, bake. You’ve got breakfast for the whole week. And yes, chocolate chips are mandatory.

    Ingredients

    Makes 12 oat cups.

    • 3 ripe bananas (spotty is best)
    • 2 cups (180g) rolled oats (use gluten-free if needed)
    • ¼ cup maple syrup or honey
    • ¼ cup milk (any kind)
    • 2 eggs
    • 1 teaspoon vanilla extract
    • 1 teaspoon cinnamon
    • 1 teaspoon baking powder
    • ¼ teaspoon salt
    • ½ cup chocolate chips or blueberries

    Step-by-Step Instructions

    Step 1: Preheat Oven

    1. Preheat to 375°F (190°C). Line a 12-cup muffin tin with liners or spray with nonstick spray.

    Step 2: Blend Everything

    1. Add all ingredients (except chocolate chips) to a blender.
    2. Blend until smooth, about 30-60 seconds. Scrape down sides if needed.

    Step 3: Add Chocolate Chips

    1. Stir in chocolate chips by hand (don’t blend them—they’ll disappear).

    Step 4: Fill and Bake

    1. Divide batter evenly among muffin cups (fill almost to the top).
    2. Bake for 18-20 minutes until golden and a toothpick comes out clean.

    Step 5: Cool and Store

    1. Let cool in pan for 5 minutes, then transfer to a wire rack.

    Summary

    Prep Time: 5 minutes | Cook Time: 20 minutes | Total Time: 25 minutes

    Yield: 12 oat cups

    Difficulty: Easy

    Storage Notes

    Fridge: Keeps 1 week. Eat cold or microwave for 15-20 seconds.

    Freezer: Freezes up to 3 months. Thaw overnight or microwave from frozen for 30-40 seconds.

    Meal prep gold: Make a double batch on Sunday. Grab and go all week.