Author: user

  • Sopapillas (Puffy, Honey-Drenched, and Impossible to Eat Just One)

    Sopapillas (Puffy, Honey-Drenched, and Impossible to Eat Just One)

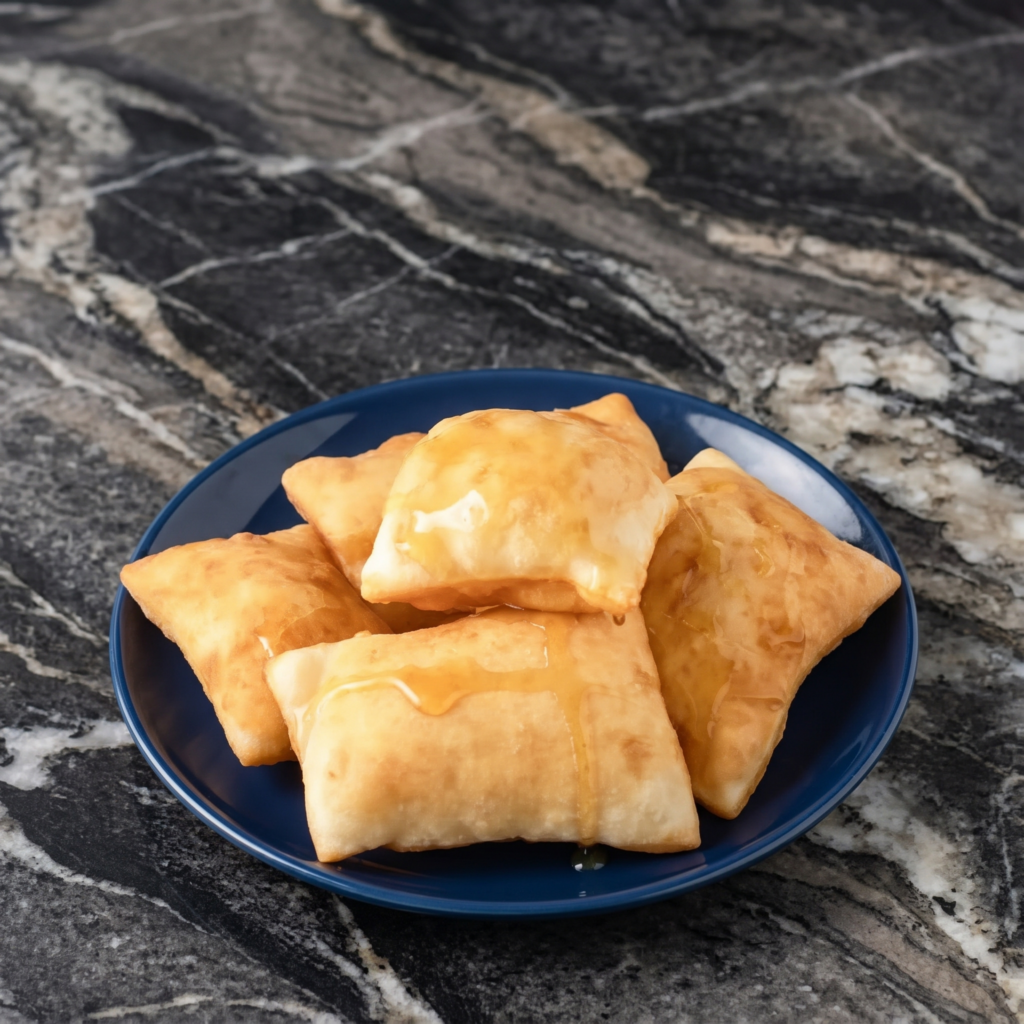
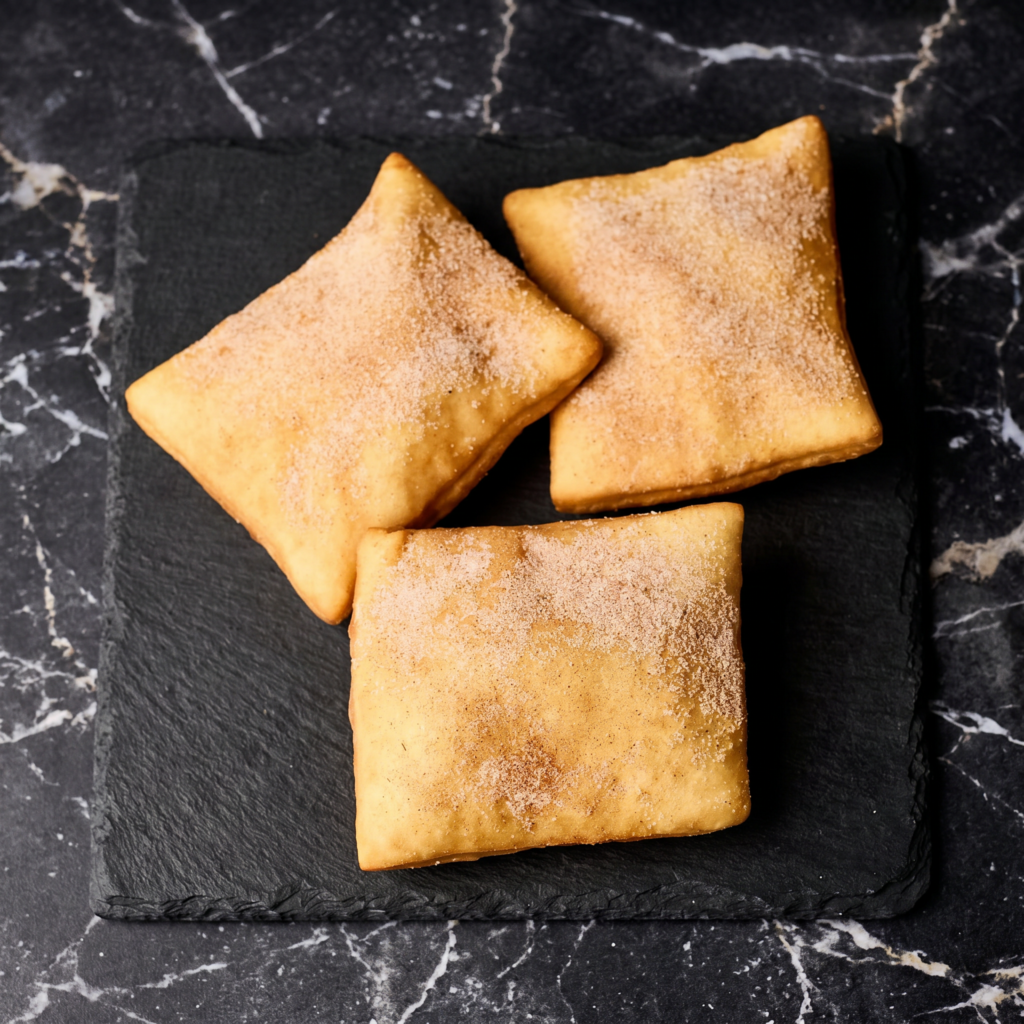
    Sopapillas are pure magic. Little dough squares hit hot oil and puff into crispy, hollow pillows of joy.

    No yeast. No waiting. Just mix, roll, fry, and drench in honey. They’re the 15-minute dessert you didn’t know you needed. Serve them at dinner parties or eat them in your pajamas. No judgment.

    Ingredients

    Makes about 20 sopapillas.

    • 2 cups (260g) all-purpose flour
    • 1 tablespoon baking powder
    • ½ teaspoon salt
    • 2 tablespoons sugar
    • 2 tablespoons butter, melted
    • ¾ cup (180ml) warm water
    • Vegetable oil (for frying, about 2 inches deep)

    For Topping:

    • Honey (lots of it)
    • ½ cup sugar + 1 tablespoon cinnamon (for cinnamon sugar, optional)
    • Powdered sugar (optional)

    Step-by-Step Instructions

    Step 1: Make the Dough

    1. In a bowl, whisk flour, baking powder, salt, and sugar.
    2. Add melted butter and warm water. Stir until a soft dough forms.
    3. Knead on a floured surface for 2 minutes until smooth (don’t overwork).

    Step 2: Roll and Cut

    1. Roll dough out to ¼-inch thickness. Cut into 2-inch squares or triangles.

    Step 3: Heat the Oil

    1. Heat 2 inches of oil in a pot to 375°F (190°C).

    Step 4: Fry

    1. Drop 3-4 dough squares into hot oil. They’ll puff up in 10-15 seconds.
    2. Fry for 30-45 seconds per side until golden brown.
    3. Drain on paper towels or a wire rack.

    Step 5: Coat and Serve

    1. Roll in cinnamon sugar while still warm, or skip and just drizzle with honey.
    2. Serve immediately. Drizzle with honey right before eating (so they stay crisp).

    Summary

    Prep Time: 10 minutes | Cook Time: 5 minutes | Total Time: 15 minutes

    Yield: 20 sopapillas

    Difficulty: Easy (watch the oil temp)

    Storage Notes

    Don’t store leftovers. Sopapillas are a fresh-only situation. They get sad and soggy within hours.

    Make ahead: Cut the dough squares and stack them between parchment paper. Keep in the fridge for up to 2 days. Fry fresh when ready.

    Reheat (if you must): Air fryer at 350°F for 2-3 minutes. Never microwave.

  • Pepperoni Pizza Rolls (Better Than the Frozen Ones, Promise)

    Pepperoni Pizza Rolls (Better Than the Frozen Ones, Promise)

    Let’s be honest: frozen pizza rolls are fine. These are unforgettable.

    Real dough. Real cheese. Real pepperoni. Rolled up, sliced into pinwheels, and baked until golden. They’re crispy, gooey, and dangerously snackable. Make a double batch. Trust me.

    Ingredients

    Makes 20-24 pizza rolls.

    • 1 lb (450g) pizza dough (store-bought or homemade)
    • ½ cup marinara or pizza sauce (plus more for dipping)
    • 1½ cups shredded mozzarella cheese
    • ½ cup grated Parmesan cheese
    • 4 oz (120g) pepperoni, finely chopped
    • 1 teaspoon Italian seasoning
    • 1 egg, beaten (for egg wash)
    • Garlic butter for brushing (optional)

    Step-by-Step Instructions

    Step 1: Preheat and Prep

    1. Preheat oven to 400°F (200°C). Line a baking sheet with parchment paper.

    Step 2: Roll the Dough

    1. On a floured surface, roll dough into a 12×10-inch rectangle (about ¼-inch thick).

    Step 3: Add Fillings

    1. Spread marinara sauce evenly over dough, leaving a 1-inch border.
    2. Sprinkle with mozzarella, Parmesan, chopped pepperoni, and Italian seasoning.

    Step 4: Roll and Slice

    1. Starting from the long edge, roll dough tightly into a log. Pinch the seam to seal.
    2. Using a serrated knife, slice into 1-inch rolls (about 20-24 pieces).

    Step 5: Bake

    1. Place rolls cut-side up on the baking sheet. Brush with beaten egg.
    2. Bake for 15-18 minutes until golden brown and bubbly.

    Step 6: Serve

    1. Brush with garlic butter if desired. Serve warm with marinara for dipping.

    Summary

    Prep Time: 15 minutes | Cook Time: 18 minutes | Total Time: 33 minutes

    Yield: 20-24 pizza rolls

    Difficulty: Easy

    Storage Notes

    Fridge: Keeps 4 days. Reheat in oven at 375°F for 5-7 minutes or air fryer at 350°F for 3-4 minutes.

    Freezer (baked): Freeze up to 3 months. Reheat from frozen at 375°F for 10-12 minutes.

    Freezer (unbaked): Freeze sliced rolls on a tray, then bag. Bake from frozen at 400°F for 20-22 minutes.

  • Japanese Curry Pan (The Deep-Fried Bakery Dream You’ve Been Missing)

    Japanese Curry Pan (The Deep-Fried Bakery Dream You’ve Been Missing)

    Imagine a curry-filled doughnut. But savory. And somehow even better.

    Curry pan is a Japanese convenience store classic: soft bread, thick Japanese curry, a panko crust, and hot oil. The outside shatters. The inside oozes. One bite and you’ll understand the obsession.

    Ingredients

    Makes 6 curry pans.

    For the Dough:

    • 2½ cups (315g) bread flour
    • 2 tablespoons sugar
    • 1 teaspoon salt
    • 1 packet (2¼ tsp) instant yeast
    • ½ cup (120ml) warm milk
    • ¼ cup (60ml) warm water
    • 1 egg
    • 2 tablespoons softened butter

    For the Filling:

    • 1 cup leftover or fresh Japanese curry (thick, not watery)
    • ½ cup ground beef or pork (optional)

    For Breading + Frying:

    • ½ cup flour (for dusting)
    • 2 eggs, beaten (for egg wash)
    • 1½ cups panko breadcrumbs
    • Vegetable oil (for deep frying)

    Step-by-Step Instructions

    Step 1: Make the Dough

    1. In a bowl, mix flour, sugar, salt, and yeast. Add warm milk, warm water, and egg. Mix until shaggy.
    2. Add softened butter. Knead 8-10 minutes until smooth. Let rise 1 hour until doubled.

    Step 2: Prep the Curry

    1. Curry should be very thick (like mashed potatoes). If too loose, simmer until reduced. Chill for easier handling.
    2. Form chilled curry into 6 small balls or patties.

    Step 3: Assemble

    1. Punch down dough. Divide into 6 balls. Flatten each into a 4-inch circle.
    2. Place a curry ball in the center. Fold dough over and pinch to seal tightly.

    Step 4: Bread the Buns

    1. Roll each bun in flour, then beaten egg, then panko. Press panko to adhere.
    2. Let rest 10 minutes while oil heats.

    Step 5: Deep Fry

    1. Heat oil to 340°F (170°C). Fry 2-3 buns at a time for 3-4 minutes, flipping once, until deep golden brown.
    2. Drain on a wire rack.

    Step 6: Serve Immediately

    1. Eat warm. The curry is lava. You’ve been warned.

    Summary

    Prep Time: 30 minutes | Rise Time: 1 hour | Cook Time: 10 minutes

    Total Time: ~1 hour 40 minutes (mostly rising)

    Yield: 6 curry pans

    Difficulty: Medium (deep frying + dough handling)

    Storage Notes

    Not for fridge: Bread gets weird. Eat fresh or freeze.

    Freezer (cooked): Freeze up to 2 months. Reheat in oven at 375°F for 10-12 minutes (or air fryer at 350°F for 5-6 minutes).

    Freezer (uncooked, breaded): Freeze on a tray, then bag. Fry from frozen – add 1-2 minutes to cook time.

  • Homemade Cheeze-Its: Sharp, Crunchy, Addictive (Send Help)

    Homemade Cheeze-Its: Sharp, Crunchy, Addictive (Send Help)

    The red box has nothing on this.

    These homemade cheese crackers are exactly what you want: crunchy, salty, intensely cheesy, and impossible to stop eating. Four ingredients. One bowl. No food processor required. Bake a batch and watch them disappear before the next commercial break.

    Ingredients

    Makes about 80 crackers.

    • 8 oz sharp cheddar cheese, finely shredded (2 cups)
    • 1 cup all-purpose flour
    • 4 tablespoons cold butter, cubed
    • ½ teaspoon salt
    • ¼ teaspoon smoked paprika (optional, but do it)
    • 2-3 tablespoons ice water

    Step-by-Step Instructions

    Step 1: Make the Dough

    1. In a bowl, mix flour, salt, and paprika.
    2. Add shredded cheese and cold butter. Use your fingers to pinch it all together until it looks like coarse crumbs.
    3. Add ice water 1 tablespoon at a time until dough forms a ball.
    4. Flatten into a disk, wrap, and chill for 30 minutes.

    Step 2: Roll & Cut

    1. Preheat oven to 375°F (190°C). Line two baking sheets with parchment.
    2. Roll dough very thin (⅛ inch) between two sheets of parchment paper.
    3. Cut into 1-inch squares. Use a toothpick or skewer to poke a hole in the center of each.

    Step 3: Bake

    1. Arrange crackers on baking sheets, spaced slightly apart.
    2. Sprinkle with a little extra salt.
    3. Bake for 12-15 minutes until edges are golden brown and crispy.
    4. Cool completely on the pan (they crisp up as they cool).

    Summary

    Prep Time: 15 minutes | Chill Time: 30 minutes | Bake Time: 15 minutes

    Yield: 80 crackers | Difficulty: Easy

    Storage Notes

    Store in an airtight container at room temperature for up to 2 weeks. They stay crunchy! No refrigeration needed. To keep them crisp, throw in a piece of bread or a silica packet (like a pro).

  • Homemade Pop Tarts: Store-Bought Could Never

    Homemade Pop Tarts: Store-Bought Could Never

    Pop Tarts lied to us. They said a dry, crumbly rectangle was fine. It was never fine.

    These homemade Pop Tarts are the truth. Buttery, flaky crust. A thick layer of real jam. And a vanilla glaze that cracks when you bite into it. Make a batch. Watch them vanish.

    Ingredients

    Makes 8 Pop Tarts.

    For the Crust:

    • 2 ½ cups all-purpose flour
    • 1 tablespoon sugar
    • 1 teaspoon salt
    • 1 cup cold butter, cubed
    • 6-8 tablespoons ice water

    For the Filling:

    • ½ cup strawberry jam (or any flavor)
    • 1 tablespoon cornstarch (to thicken)

    For the Glaze:

    • 1 cup powdered sugar
    • 2 tablespoons milk
    • ½ teaspoon vanilla extract
    • Sprinkles (non-negotiable)

    Step-by-Step Instructions

    Step 1: Make the Crust

    1. Whisk flour, sugar, and salt. Cut in cold butter until pea-sized crumbs form.
    2. Add ice water 1 tablespoon at a time until dough comes together.
    3. Divide dough in half, flatten into disks, wrap, and chill for 1 hour.

    Step 2: Roll & Fill

    1. Preheat oven to 375°F (190°C). Line a baking sheet with parchment.
    2. Roll each disk into a 9×12-inch rectangle. Cut into 8 rectangles (about 3×4 inches each).
    3. Mix jam with cornstarch. Spoon 1 tablespoon onto the center of 8 rectangles.
    4. Top with remaining rectangles. Seal edges with a fork.

    Step 3: Bake

    1. Poke a few holes in the top of each Pop Tart with a fork.
    2. Bake for 20-25 minutes until golden brown.
    3. Cool completely on a wire rack.

    Step 4: Glaze & Sprinkles

    1. Whisk powdered sugar, milk, and vanilla until smooth.
    2. Drizzle glaze over cooled Pop Tarts.
    3. Add sprinkles before the glaze sets. Wait 15 minutes. Devour.

    Summary

    Prep Time: 30 minutes | Chill Time: 1 hour | Bake Time: 25 minutes

    Yield: 8 Pop Tarts | Difficulty: Medium

    Storage Notes

    Store in an airtight container at room temperature for up to 5 days. Freeze for up to 3 months. To reheat, pop in a toaster oven or air fryer at 350°F for 5 minutes. Microwave works but kills the flaky vibe.

  • Pretzel Buns: Chewy, Salty, Better Than the Mall

    Pretzel Buns: Chewy, Salty, Better Than the Mall

    Pretzel buns are the main character. The burger is just there for the ride.

    These are chewy, salty, shiny, and impossibly golden. And no, you don’t need food-grade lye. A baking soda bath does the trick. Mix, boil, bake, and suddenly you’re a bakery. Let’s go.

    Ingredients

    Makes 8 buns.

    For the Dough:

    • 4 cups all-purpose flour
    • 1 packet (2 ¼ tsp) instant yeast
    • 1 ½ teaspoons salt
    • 1 tablespoon brown sugar
    • 1 ¼ cups warm water (about 110°F)
    • 2 tablespoons melted butter

    For the Baking Soda Bath:

    • 10 cups water
    • ⅔ cup baking soda

    For Topping:

    • 1 egg yolk beaten with 1 tablespoon water (egg wash)
    • Coarse sea salt or pretzel salt

    Step-by-Step Instructions

    Step 1: Make the Dough

    1. In a large bowl, whisk flour, yeast, salt, and brown sugar.
    2. Add warm water and melted butter. Mix until a shaggy dough forms.
    3. Knead for 8-10 minutes until smooth and elastic.
    4. Let rise in a greased bowl for 1 hour, until doubled.

    Step 2: Shape the Buns

    1. Punch down dough. Divide into 8 equal pieces (about 100g each).
    2. Roll each into a tight ball. Place on a parchment-lined baking sheet.
    3. Cover and rest for 20 minutes.

    Step 3: The Baking Soda Bath

    1. Preheat oven to 425°F (220°C).
    2. Bring 10 cups water to a boil. Slowly add baking soda (it will bubble up).
    3. Drop 2-3 dough balls into the water. Boil for 30 seconds per side.
    4. Remove with a slotted spoon. Return to baking sheet.

    Step 4: Bake

    1. Brush buns with egg wash. Sprinkle with coarse salt.
    2. Score an “X” on top with a sharp knife (optional).
    3. Bake for 15-18 minutes until deep golden brown.
    4. Cool on a wire rack for 10 minutes. Then destroy.

    Summary

    Prep Time: 20 minutes | Rise Time: 1 hour 20 minutes | Bake Time: 18 minutes

    Yield: 8 buns | Difficulty: Medium

    Storage Notes

    Store in an airtight container for up to 3 days. Freeze for up to 3 months. To reheat, wrap in foil and warm at 350°F for 8-10 minutes. Brush with melted butter for that “fresh out of the oven” magic.

  • Vegan Tacos So Good, You Won’t Mention the “V” Word

    Vegan Tacos So Good, You Won’t Mention the “V” Word

    Taco Tuesday doesn’t need meat. Fight us.

    These vegan tacos pack smoky, spicy, satisfying “meat” made from walnuts and lentils. Top it with a tangy cashew-lime crema, crunchy cabbage, and whatever else you love. Ready in 20 minutes. Zero sacrifice. Maximum flavor.

    Ingredients

    Makes 8-10 tacos.

    For the Walnut-Lentil Meat:

    • 1 cup cooked brown or green lentils
    • 1 cup raw walnuts
    • 2 tablespoons soy sauce or tamari
    • 1 tablespoon chili powder
    • 1 teaspoon cumin
    • 1 teaspoon smoked paprika
    • ½ teaspoon garlic powder
    • 2 tablespoons water

    For the Lime Crema:

    • ½ cup raw cashews (soaked in hot water for 10 minutes)
    • ¼ cup water
    • 2 tablespoons lime juice
    • 1 clove garlic
    • Salt to taste

    For Assembly:

    • 8-10 small corn or flour tortillas
    • Shredded purple cabbage
    • Fresh cilantro
    • Red onion, diced
    • Lime wedges

    Step-by-Step Instructions

    Step 1: Make the Crema

    1. Drain soaked cashews. Blend with water, lime juice, garlic, and salt until smooth and creamy. Set aside.

    Step 2: Make the Taco “Meat”

    1. Pulse walnuts in a food processor until finely crumbled (not powder).
    2. Add lentils, soy sauce, chili powder, cumin, paprika, garlic powder, and water.
    3. Pulse a few more times until combined and crumbly.

    Step 3: Warm & Assemble

    1. Warm tortillas in a dry skillet or directly over a gas flame.
    2. Spoon walnut-lentil mixture into each tortilla.
    3. Top with shredded cabbage, red onion, and cilantro.
    4. Drizzle generously with lime crema and squeeze fresh lime over everything.

    Summary

    Prep Time: 15 minutes | Cook Time: 5 minutes | Total Time: 20 minutes

    Yield: 8-10 tacos | Difficulty: Easy

    Storage Notes

    Store walnut-lentil meat in the fridge for up to 5 days. Eat cold or reheat in a skillet. Crema keeps for 4 days. Never assemble tacos ahead—soggy shells are sadness. Keep everything separate and build fresh.

  • Garlic Knots: The Bread That Ends Friendships (Over the Last One)

    Garlic Knots: The Bread That Ends Friendships (Over the Last One)

    Garlic knots are proof that simple things done right are unstoppable.

    Take pizza dough. Tie it in a knot. Bake until golden. Then drown it in garlic butter, Parmesan, and parsley. That’s it. That’s the recipe. These disappear in about four minutes flat, so make extra.

    Ingredients

    Makes 16 knots.

    For the Knots:

    • 1 lb store-bought pizza dough (or homemade)
    • 2 tablespoons olive oil

    For the Garlic Butter:

    • 6 tablespoons salted butter
    • 6 cloves garlic, minced
    • ¼ cup fresh parsley, finely chopped
    • ¼ cup grated Parmesan cheese
    • ½ teaspoon salt

    Step-by-Step Instructions

    Step 1: Prep & Preheat

    1. Preheat oven to 400°F (200°C). Line a baking sheet with parchment.
    2. Lightly flour a surface. Roll pizza dough into a 12×8-inch rectangle.

    Step 2: Make the Knots

    1. Cut dough into 16 strips (each about 1 inch wide and 6 inches long).
    2. Tie each strip into a loose knot. Tuck the ends underneath.
    3. Place knots on the baking sheet. Brush with olive oil.
    4. Bake for 12-15 minutes until golden brown.

    Step 3: Make the Garlic Butter

    1. While knots bake, melt butter in a small pan over low heat.
    2. Add minced garlic and cook for 1 minute until fragrant (don’t burn it).
    3. Remove from heat. Stir in parsley and salt.

    Step 4: Toss & Serve

    1. Transfer hot knots to a large bowl. Pour garlic butter over them. Toss to coat.
    2. Sprinkle with Parmesan cheese. Toss again.
    3. Serve warm with marinara sauce for dipping.

    Summary

    Prep Time: 10 minutes | Bake Time: 15 minutes | Total Time: 25 minutes

    Yield: 16 knots | Difficulty: Easy

    Storage Notes

    Best fresh and hot. Store leftovers (ha!) in an airtight container in the fridge for up to 3 days. Reheat in an air fryer at 350°F for 3-4 minutes or in an oven. Never microwave—they turn into rubber.

  • Samosas: The Triangle Everyone Fights Over

    Samosas: The Triangle Everyone Fights Over

    Is it even a party without samosas? No. The answer is no.

    These little triangles are pure magic: a shatteringly crisp shell wrapped around warm, spiced potatoes and sweet peas. They’re easier to make than you think. No fancy equipment. No hard-to-find spices. Just a simple dough, a killer filling, and your favorite cooking method—fry, bake, or air fry.

    Ingredients

    Makes 12 samosas.

    For the Dough:

    • 2 cups all-purpose flour
    • ½ teaspoon salt
    • ¼ cup oil or ghee
    • ½ cup water (approx)

    For the Filling:

    • 3 medium potatoes, boiled and mashed
    • ½ cup frozen peas
    • 1 teaspoon cumin seeds
    • 1 teaspoon garam masala
    • ½ teaspoon turmeric
    • 1 green chili, minced (optional)
    • Salt to taste

    Step-by-Step Instructions

    Step 1: Make the Dough

    1. Mix flour and salt. Rub in oil until crumbly.
    2. Add water slowly and knead into a stiff dough. Rest for 30 minutes.

    Step 2: Make the Filling

    1. Heat 1 tablespoon oil. Add cumin seeds until they pop.
    2. Add mashed potatoes, peas, spices, chili, and salt. Cook 2-3 minutes. Cool.

    Step 3: Shape the Samosas

    1. Divide dough into 6 balls. Roll each into a 6-inch circle. Cut in half.
    2. Take one half, form a cone, and seal the edge with water.
    3. Stuff with filling. Seal the top edge with water. Repeat.

    Step 4: Cook Your Way

    1. Fry: Heat oil to 350°F. Fry 3-4 minutes until golden.
    2. Bake: Brush with oil. Bake at 375°F for 20 minutes, flipping halfway.
    3. Air Fry: 375°F for 10-12 minutes, shaking once.

    Summary

    Prep Time: 20 minutes | Cook Time: 10 minutes | Rest Time: 30 minutes

    Yield: 12 samosas | Difficulty: Medium

    Storage Notes

    Freeze uncooked samosas on a tray, then transfer to a bag for up to 3 months. Cook from frozen (add 2-3 minutes). Cooked samosas last 3 days in the fridge—reheat in an air fryer or oven, not microwave.

    Dip with: mint chutney, tamarind sauce, or ketchup. No judgment.

  • Banana Egg Rolls: 10-Minute Dessert Danger

    Banana Egg Rolls: 10-Minute Dessert Danger

    Egg rolls aren’t just for takeout anymore.

    Meet your new late-night obsession: Banana Egg Rolls. Warm, jammy bananas tucked inside a shatteringly crisp shell, dusted with cinnamon sugar. No deep fryer needed. Just a pan with oil, a few ingredients, and five minutes of courage. Let’s get rolling.

    Ingredients

    Makes 8 egg rolls.

    • 8 egg roll wrappers
    • 3 ripe bananas, cut into small chunks
    • ¼ cup brown sugar
    • 1 teaspoon cinnamon
    • Oil for frying (vegetable or canola)
    • Optional: powdered sugar, chocolate syrup, caramel sauce

    Step-by-Step Instructions

    Step 1: Mix the Filling

    1. In a small bowl, toss banana chunks with brown sugar and cinnamon.

    Step 2: Roll the Egg Rolls

    1. Place an egg roll wrapper like a diamond. Add 2-3 banana chunks to the center.
    2. Fold bottom corner over filling. Fold in sides. Roll tightly and seal the top corner with a dab of water.
    3. Repeat for all 8.

    Step 3: Fry ‘Em Up

    1. Heat 1 inch of oil in a skillet to 350°F (175°C).
    2. Fry egg rolls 1-2 minutes per side until golden brown and crispy.
    3. Drain on paper towels.

    Step 4: Finish & Devour

    1. Dust with powdered sugar or cinnamon sugar. Drizzle with chocolate or caramel.
    2. Serve warm. Trust us—these vanish fast.

    Summary

    Prep Time: 5 minutes | Cook Time: 5 minutes | Total Time: 10 minutes

    Yield: 8 egg rolls | Difficulty: Super Easy

    Storage Notes

    Best eaten fresh and hot. To reheat, air fry at 350°F for 3-4 minutes (not microwave—they’ll get soggy). You can freeze uncooked egg rolls for up to 2 months; fry straight from frozen, adding 1-2 extra minutes.