Category: baking

  • Kourabiedes (Greek Butter Cookies That Melt Like Snow)

    Kourabiedes (Greek Butter Cookies That Melt Like Snow)

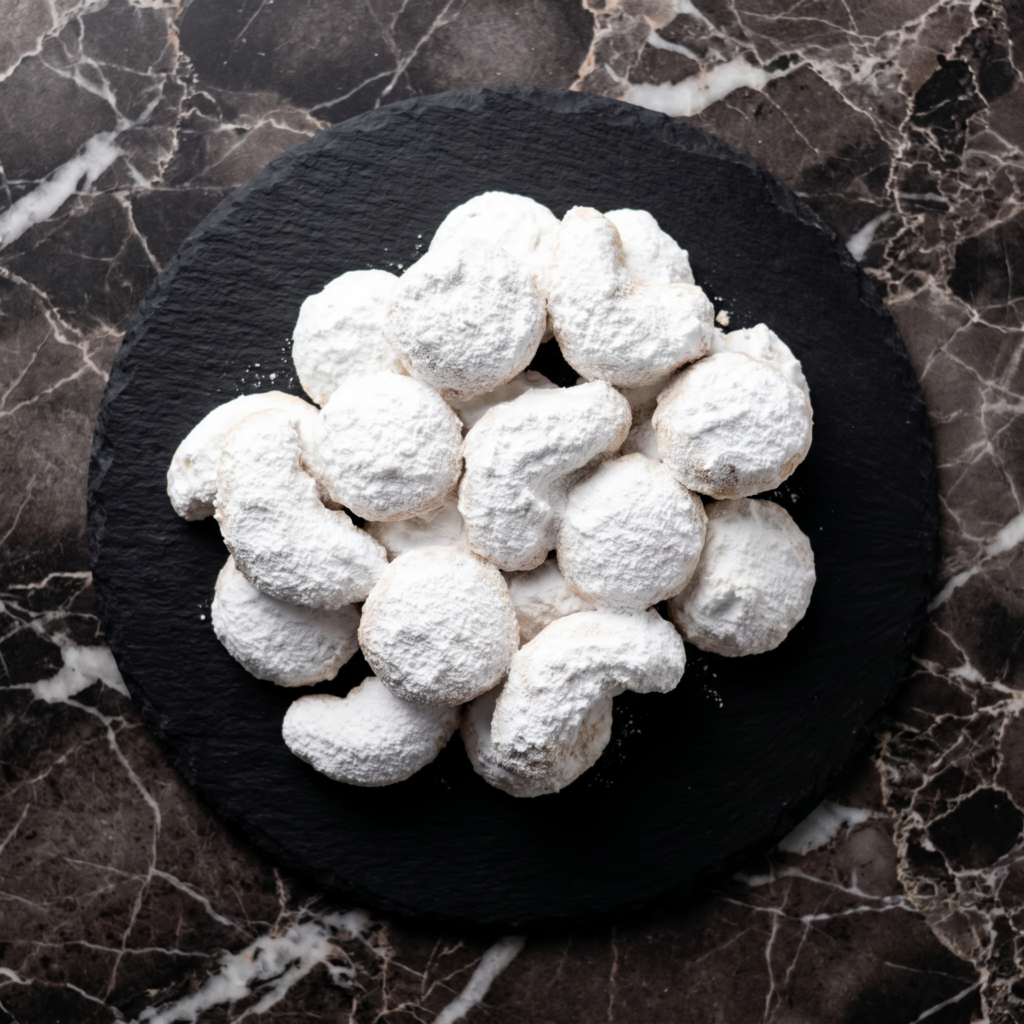
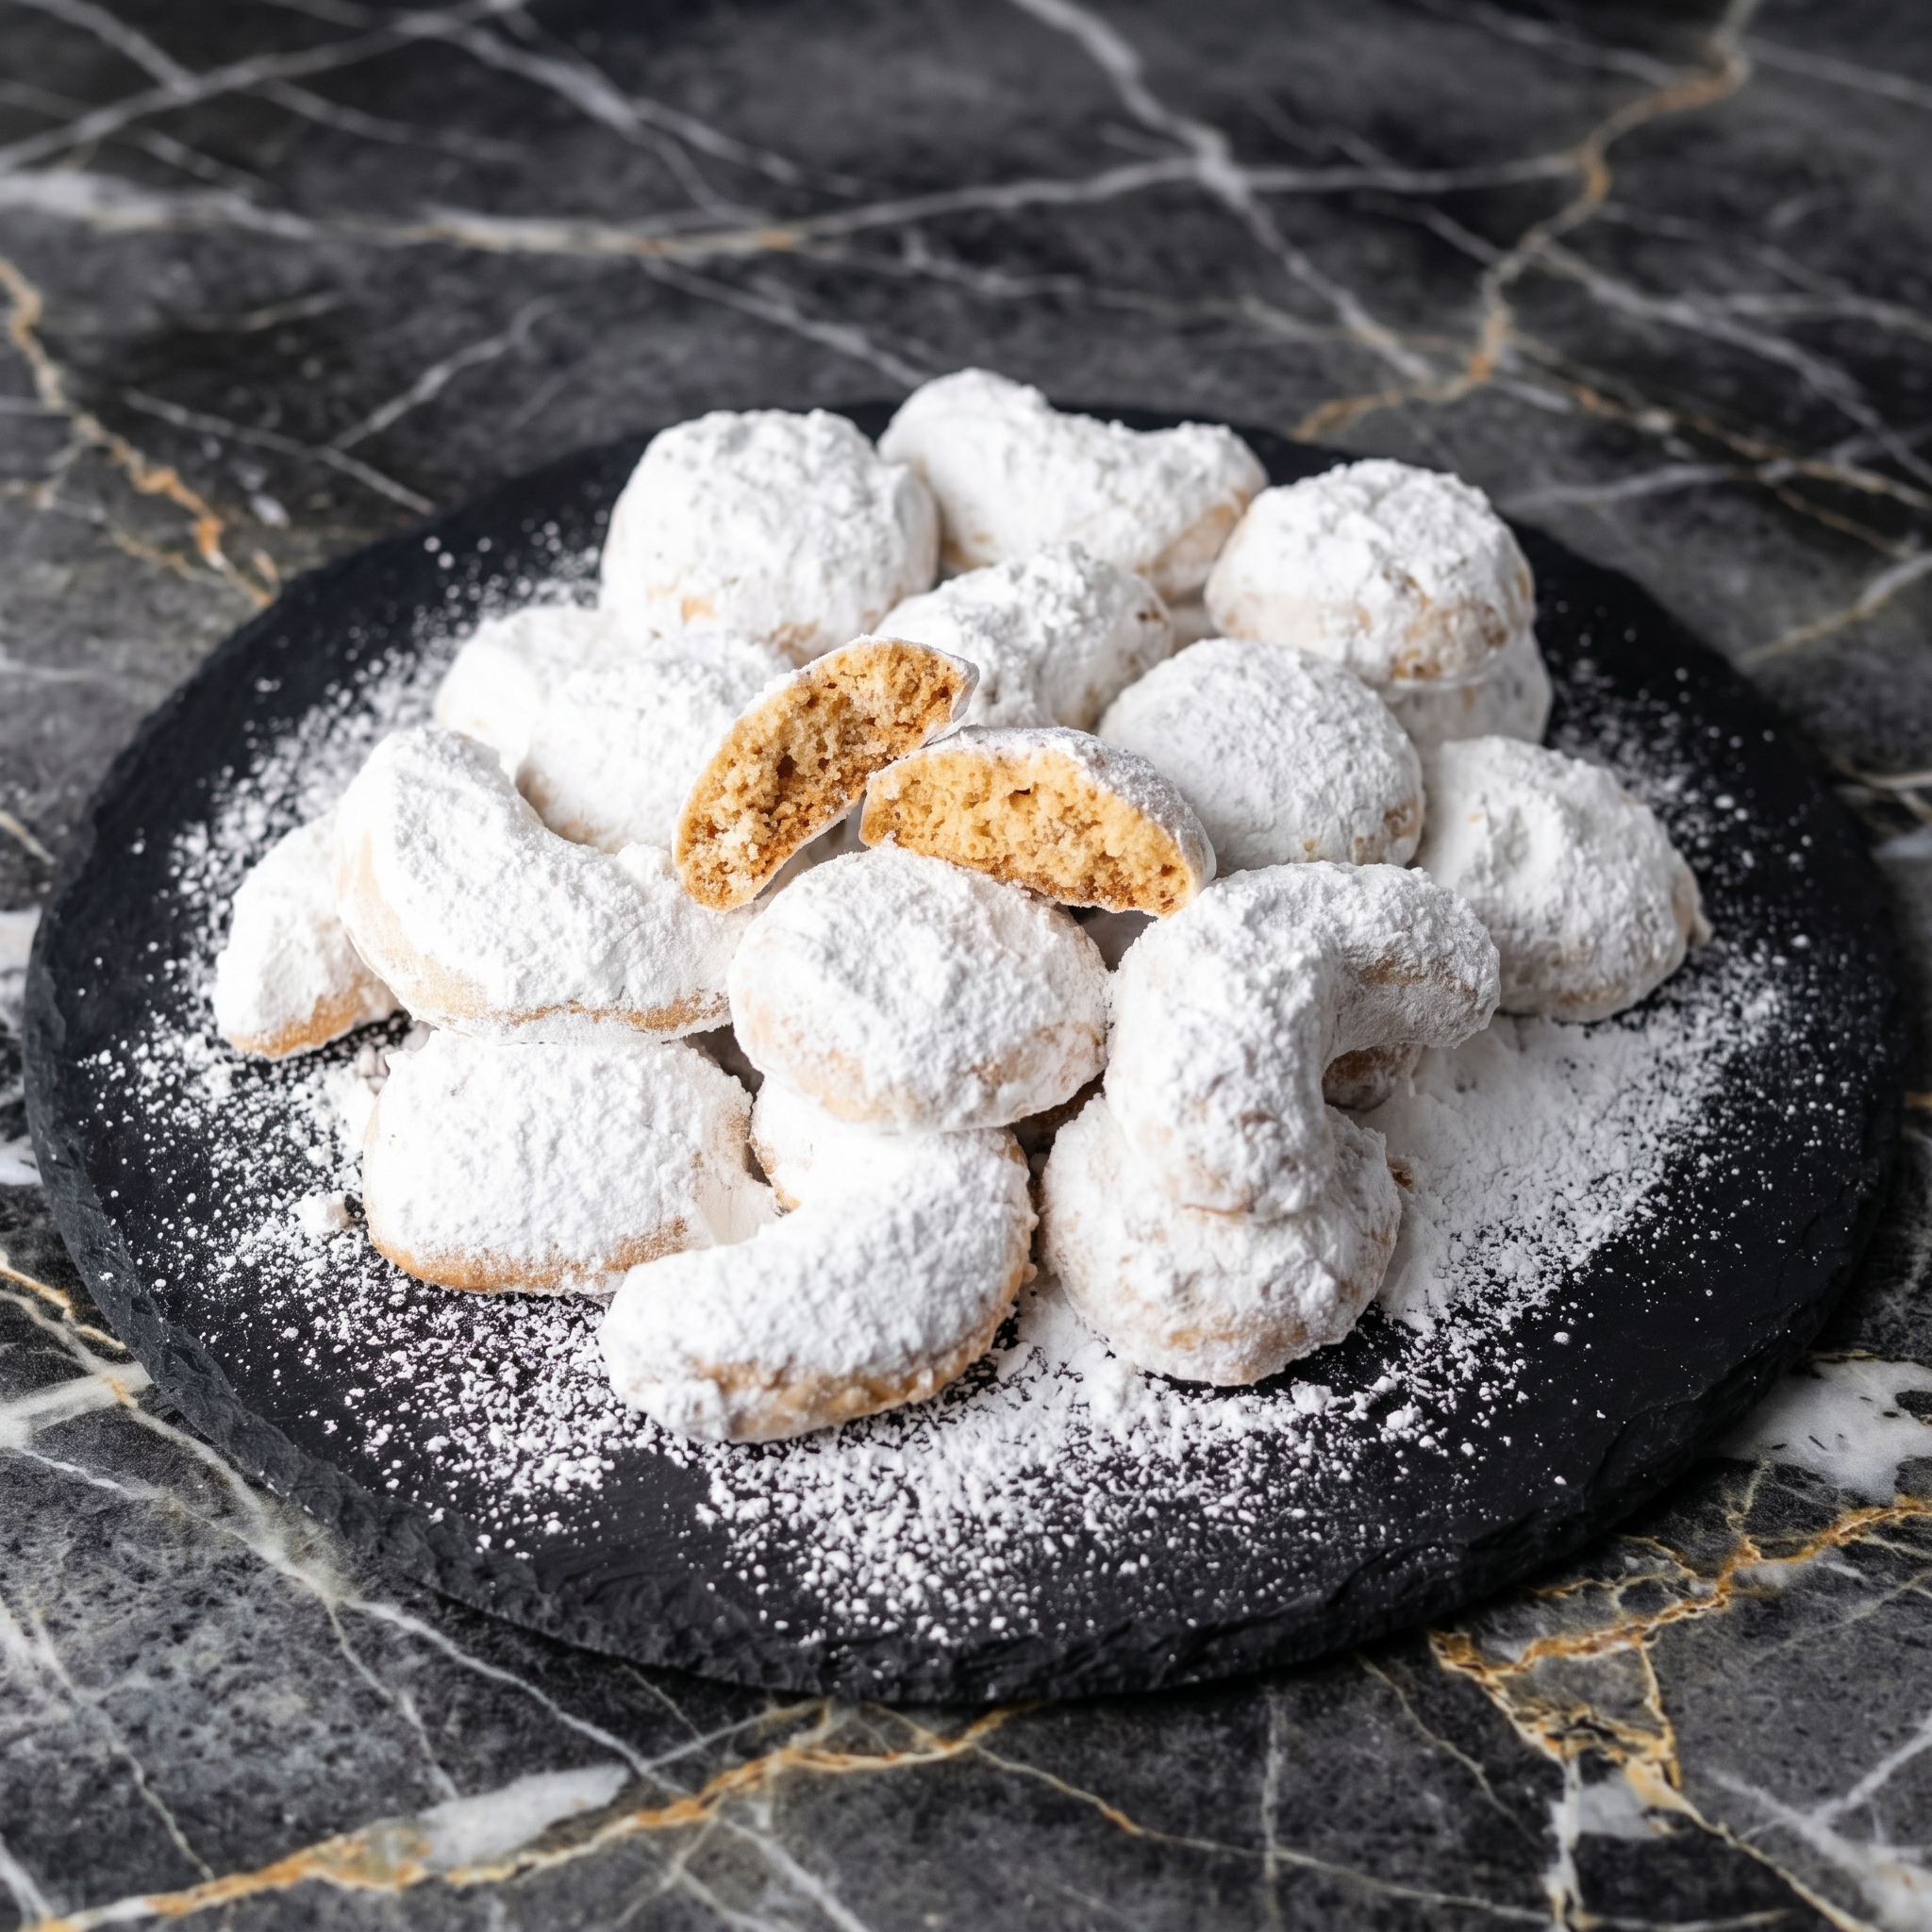
    Kourabiedes are little snowdrifts of butter and joy. Rich, crumbly, packed with toasted almonds, and drowned in powdered sugar. One cookie. One thousand crumbs. Zero regrets. Let’s bake.
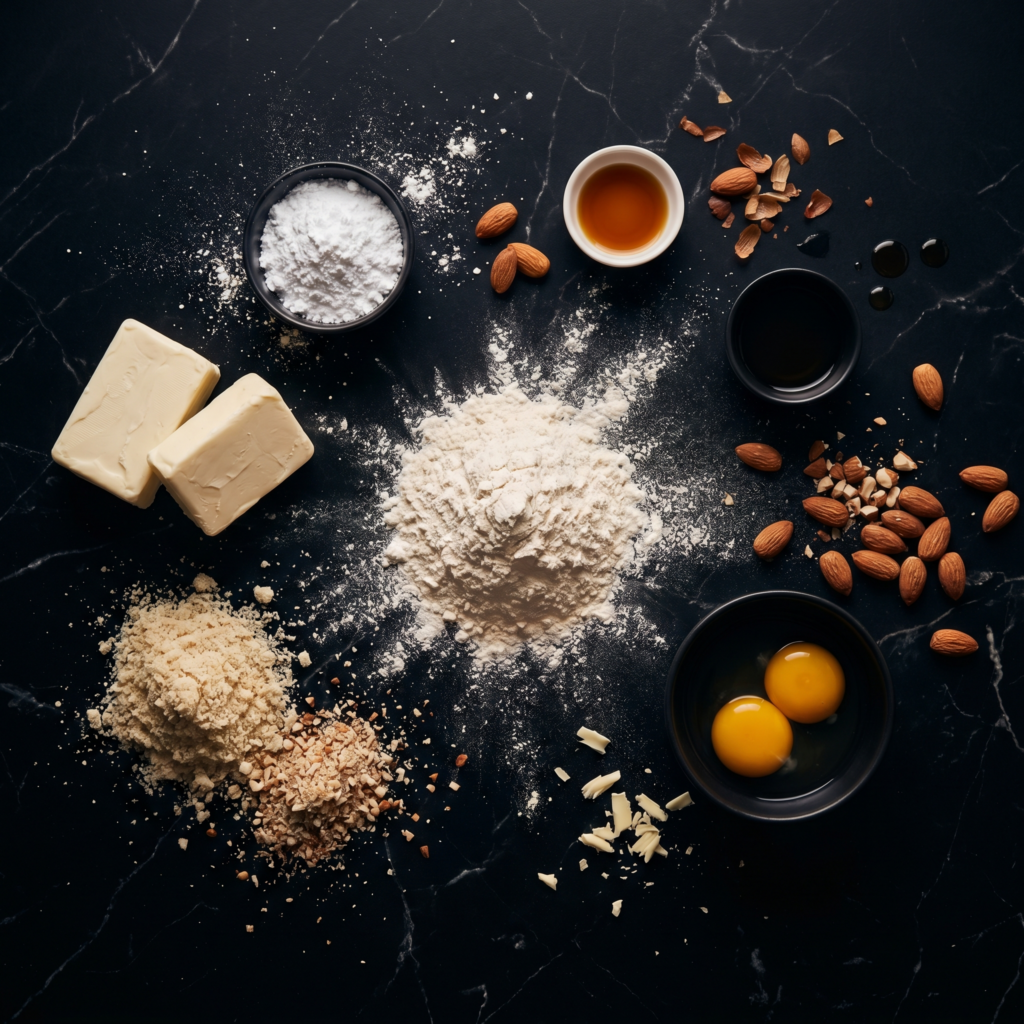
    Ingredients

    Makes about 30 cookies.

    • 1 cup (230g) unsalted butter, room temperature
    • ½ cup (60g) powdered sugar (plus 1–2 cups for coating)
    • 1 egg yolk
    • 2 tbsp brandy or ouzo (or milk + ½ tsp vanilla)
    • 1 tsp vanilla extract
    • 2½ cups (310g) all-purpose flour
    • ½ cup (60g) almonds, toasted and chopped
    • ½ tsp baking powder
    • ¼ tsp salt
    • Whole cloves for decoration (optional)

    Step-by-Step Instructions

    Step 1: Toast Almonds

    1. Toast almonds in a dry pan over medium heat until golden (3–4 minutes). Cool. Chop coarsely.

    Step 2: Cream Butter

    1. Beat butter and powdered sugar until pale and fluffy (5 minutes).
    2. Beat in egg yolk, brandy, and vanilla.

    Step 3: Make Dough

    1. Whisk flour, baking powder, and salt. Gradually add to butter mixture. Fold in almonds.
    2. Dough will be soft. Cover and chill 30 minutes.

    Step 4: Shape & Bake

    1. Preheat oven to 350°F (175°C).
    2. Roll dough into 1-inch balls or crescent shapes. Press a clove into each (optional).
    3. Place on parchment-lined baking sheet. Bake 15–18 minutes until bottoms are lightly golden (tops stay pale).

    Step 5: Coat in Snow

    1. Cool cookies for 5 minutes (still warm).
    2. Dredge generously in powdered sugar while warm. Cool completely. Dredge again (thick coat = authentic).

    Step 6: Serve

    1. Pile on a plate. Serve with strong Greek coffee. Watch the snow fly.

    Summary

    Prep Time: 20 min + chill | Bake Time: 18 min | Total: 40 min + chill

    Yield: 30 cookies | Difficulty: Easy

    Storage Notes

    Airtight container: 2 weeks (they get better after a few days). Freezer: 3 months. Handle gently — these are fragile little clouds of butter.

  • Baklava (Sticky, Nutty, Flaky Greek Perfection)

    Baklava (Sticky, Nutty, Flaky Greek Perfection)

    Baklava is a sticky, flaky masterpiece. Dozens of butter-brushed phyllo layers sandwiching spiced nuts, then flooded with honey syrup. It sounds fancy. It’s actually simple. Just patience and butter. So much butter.

    Ingredients

    Makes one 9×13 pan (about 24 pieces).

    For the Baklava:

    • 1 box (16 oz / 450g) phyllo dough, thawed
    • 2 cups (240g) walnuts, finely chopped
    • 1 cup (120g) pistachios, finely chopped
    • 1 tsp ground cinnamon
    • ¼ tsp ground cloves
    • 1 cup (230g) unsalted butter, melted

    For the Syrup:

    • 1 cup (240ml) honey
    • 1 cup (200g) sugar
    • 1 cup (240ml) water
    • 1 cinnamon stick
    • 1 strip lemon peel
    • 1 tsp vanilla extract

    Step-by-Step Instructions

    Step 1: Prep Nuts & Syrup

    1. Mix walnuts, pistachios, cinnamon, and cloves in a bowl.
    2. For syrup: Combine honey, sugar, water, cinnamon stick, and lemon peel. Simmer 10 minutes. Remove cinnamon and lemon. Stir in vanilla. Cool completely.

    Step 2: Layer Phyllo

    1. Preheat oven to 325°F (160°C). Brush a 9×13 pan with butter.
    2. Lay one phyllo sheet in pan. Brush with butter. Repeat 8 times (8 sheets).
    3. Sprinkle ⅓ of the nut mixture over phyllo.
    4. Add 4 more buttered phyllo sheets. Sprinkle another ⅓ nuts.
    5. Add 4 more buttered phyllo sheets. Sprinkle remaining nuts.
    6. Top with 8–10 more buttered phyllo sheets. Brush top generously with butter.

    Step 3: Cut & Bake

    1. Using a sharp knife, cut baklava into diamonds or squares (cut all the way through).
    2. Bake 45–50 minutes until deep golden brown.

    Step 4: Syrup & Cool

    1. Remove baklava from oven. Immediately pour cold syrup evenly over hot baklava.
    2. Let it absorb for at least 4 hours (overnight is better).

    Step 5: Serve

    1. Serve at room temperature. Sticky, flaky, dangerous.

    Summary

    Prep Time: 30 min | Bake Time: 50 min | Rest: 4+ hours | Total: 5½ hours

    Yield: 24 pieces | Difficulty: Medium (phyllo handling)

    Storage Notes

    Counter (airtight): 2 weeks. Fridge: 1 month. Freezer: 3 months. Baklava actually improves after a day or two — flavors meld. Serve at room temperature.

  • BBQ Beef Biscuit Cups: Biscuit Meets BBQ in a Muffin Tin

    BBQ Beef Biscuit Cups: Biscuit Meets BBQ in a Muffin Tin

    Biscuits are great. BBQ beef is great. Together in a cup? Genius.

    Flaky biscuit dough pressed into a muffin tin. Filled with tangy BBQ beef and cheddar. Baked until golden. 30 minutes. Handheld happiness.

    Ingredients

    Makes 10 biscuit cups.

    • 1 can (16 oz) refrigerated biscuit dough (10 biscuits)
    • 1 lb ground beef
    • ½ cup BBQ sauce (plus extra for drizzling)
    • ½ small onion, diced
    • 1 tbsp brown sugar (optional)
    • 1 cup shredded cheddar cheese
    • Fresh parsley or green onions for garnish (optional)

    Step-by-Step Instructions

    Step 1: Preheat and Cook Beef

    1. Preheat oven to 375°F (190°C). Grease a 10-cup muffin tin.
    2. In a skillet, cook ground beef and onion over medium heat until browned (5-7 minutes). Drain fat.
    3. Stir in BBQ sauce and brown sugar. Simmer 2 minutes.

    Step 2: Press the Biscuits

    1. Press each biscuit into the bottom and up the sides of a muffin cup, forming a cup shape.

    Step 3: Fill the Cups

    1. Spoon BBQ beef mixture into each biscuit cup.
    2. Top with shredded cheddar cheese.

    Step 4: Bake

    1. Bake 12-15 minutes until biscuits are golden brown and cheese is melted.

    Step 5: Serve

    1. Let cool 5 minutes. Run a knife around edges to loosen.
    2. Drizzle with extra BBQ sauce. Garnish with parsley or green onions. Serve warm.

    Summary

    Prep Time: 10 minutes | Cook Time: 15-20 minutes | Total Time: 25-30 minutes

    Yield: 10 biscuit cups

    Difficulty: Easy

    Storage Notes

    Fridge:

    Store leftovers in an airtight container for 3 days.

    Reheat:

    Oven at 350°F for 5-7 minutes. Microwave for 20-30 seconds.

    Freezer Friendly:

    Freeze baked cups for 2 months. Reheat in oven from frozen at 350°F for 10-12 minutes.

    Pro Tip:

    Use Grands-style biscuits for deeper cups. Flaky layers work best.

  • Bacon Wrapped Sausages: Two Meats, One Stick, Zero Remorse

    Bacon Wrapped Sausages: Two Meats, One Stick, Zero Remorse

    Bacon makes everything better. Sausages are already great. Together? Meat perfection.

    Wrap sausage in bacon. Brush with BBQ glaze. Bake until crispy. Secure with a toothpick. 25 minutes. These disappear faster than you can make them. Make two batches.

    Ingredients

    Makes 16-20 pieces.

    • 1 package (16 oz) little smoked sausages or cocktail wieners (about 16-20)
    • 1 package (16 oz) thin-cut bacon, cut into thirds
    • ½ cup BBQ sauce
    • 2 tbsp brown sugar
    • 1 tsp garlic powder
    • ½ tsp black pepper
    • Toothpicks (soaked in water 10 minutes to prevent burning)

    Optional glaze add-ins: Honey, sriracha, maple syrup

    Step-by-Step Instructions

    Step 1: Preheat and Prep

    1. Preheat oven to 375°F (190°C). Line a baking sheet with foil and place a wire rack on top.
    2. Cut bacon strips into thirds.

    Step 2: Wrap the Sausages

    1. Wrap one piece of bacon around each sausage. Secure with a toothpick.
    2. Place on wire rack seam-side down.

    Step 3: Make the Glaze

    1. Mix BBQ sauce, brown sugar, garlic powder, and black pepper in a small bowl.

    Step 4: Glaze and Bake

    1. Brush glaze over each bacon-wrapped sausage.
    2. Bake 15-20 minutes until bacon is crispy and caramelized.

    Step 5: Serve

    1. Let cool 5 minutes. Transfer to a platter. Serve warm with extra BBQ sauce for dipping.

    Summary

    Prep Time: 10 minutes | Cook Time: 15-20 minutes | Total Time: 25-30 minutes

    Yield: 16-20 pieces

    Difficulty: Easy

    Storage Notes

    Fridge:

    Store leftovers for 3 days. Reheat in oven or air fryer to restore crispiness.

    Reheat:

    Air fryer at 350°F for 5 minutes. Oven at 375°F for 8-10 minutes.

    Freezer Friendly:

    Freeze baked or unbaked for 2 months. Bake from frozen at 375°F for 20-25 minutes.

    Pro Tip:

    Use thin-cut bacon. Thick-cut won’t crisp up properly in the oven.

  • Garlic Herb Chicken Drumsticks: Juicy. Crispy. Addictive.

    Garlic Herb Chicken Drumsticks: Juicy. Crispy. Addictive.

    Drumsticks are cheap. Drumsticks are forgiving. Drumsticks are delicious.

    Toss them in garlic and fresh herbs. Bake until skin is crispy and meat is juicy. 10 minutes of prep. The oven does the rest. Weeknight win.

    Ingredients

    Serves 4.

    • 8-10 chicken drumsticks (about 2 lbs)
    • 4 tbsp unsalted butter, melted
    • 6 garlic cloves, minced
    • 2 tbsp fresh rosemary, finely chopped
    • 2 tbsp fresh thyme, finely chopped
    • 1 tbsp fresh parsley, chopped (plus extra for garnish)
    • 1 tsp salt
    • ½ tsp black pepper
    • 1 tsp paprika (optional, for color)
    • Lemon wedges for serving

    Step-by-Step Instructions

    Step 1: Preheat and Prep

    1. Preheat oven to 425°F (220°C). Line a baking sheet with foil and place a wire rack on top.
    2. Pat drumsticks completely dry with paper towels.

    Step 2: Make Garlic Herb Butter

    1. Mix melted butter, garlic, rosemary, thyme, parsley, salt, pepper, and paprika.

    Step 3: Coat the Drumsticks

    1. Place drumsticks in a large bowl. Pour garlic herb butter over. Toss to coat.
    2. Arrange on wire rack in a single layer.

    Step 4: Bake

    1. Bake 35-40 minutes, flipping halfway, until skin is crispy and internal temp reaches 175°F (80°C).

    Step 5: Serve

    1. Garnish with fresh parsley and squeeze lemon over the top. Serve hot.

    Summary

    Prep Time: 10 minutes | Cook Time: 35-40 minutes | Total Time: 45-50 minutes

    Yield: 4 servings

    Difficulty: Easy

    Storage Notes

    Fridge:

    Store in an airtight container for 4 days.

    Reheat:

    Oven at 375°F for 10-12 minutes. Air fryer at 350°F for 5-6 minutes.

    Freezer Friendly:

    Freeze cooked drumsticks for 2 months. Thaw overnight. Reheat in oven.

    Pro Tip:

    Dry skin = crispy skin. Don’t skip patting them dry before adding butter.

  • Stromboli: Pizza’s Rolled-Up, Snackable Cousin

    Stromboli: Pizza’s Rolled-Up, Snackable Cousin

    Stromboli is what happens when pizza and a burrito fall in love.

    Pepperoni. Salami. Ham. Provolone. Roasted peppers. Rolled up in pizza dough. Baked until golden. Slice it. Dip it. Lose your mind. Easier than homemade pizza. Feeds a crowd.

    Ingredients

    Serves 4-6.

    • 1 lb pizza dough (store-bought or homemade)
    • ½ cup marinara sauce (plus extra for dipping)
    • 20 slices pepperoni
    • 10 slices salami
    • 10 slices ham or capicola
    • 12 slices provolone cheese (or 1½ cups shredded Italian blend)
    • ½ cup roasted red peppers, drained and sliced
    • 1 egg, beaten (for egg wash)
    • 1 tbsp sesame seeds or everything bagel seasoning (optional)

    Step-by-Step Instructions

    Step 1: Preheat and Roll

    1. Preheat oven to 400°F (200°C). Line a baking sheet with parchment.
    2. Roll pizza dough into a 10×14-inch rectangle on floured surface.

    Step 2: Layer the Fillings

    1. Spread marinara sauce on dough, leaving a 1-inch border.
    2. Layer provolone, pepperoni, salami, ham, and roasted peppers.
    3. Add another layer of provolone on top.

    Step 3: Roll It Up

    1. Roll tightly from the long side, like a jelly roll. Pinch seams to seal.
    2. Place seam-side down on baking sheet.

    Step 4: Brush and Slash

    1. Brush with beaten egg. Sprinkle with sesame seeds if using.
    2. Cut 3-4 small slits on top for steam.

    Step 5: Bake

    1. Bake 20-25 minutes until golden brown and crispy.
    2. Let cool 5 minutes. Slice into rounds. Serve warm with extra marinara.

    Summary

    Prep Time: 10 minutes | Cook Time: 20-25 minutes | Total Time: 30-35 minutes

    Yield: 4-6 servings

    Difficulty: Easy

    Storage Notes

    Fridge:

    Store leftovers in an airtight container for 4 days. Cold stromboli is great lunch.

    Reheat:

    Oven at 375°F for 8-10 minutes. Air fryer at 350°F for 5 minutes. Microwave works but crust gets soft.

    Freezer Friendly:

    Freeze unbaked stromboli for 3 months. Bake from frozen at 400°F for 30-35 minutes.

    Pro Tip:

    Don’t overstuff. Less filling = tighter roll = no blowouts in the oven.

  • BBQ Chicken Sliders: Little Buns, Big Flavor

    BBQ Chicken Sliders: Little Buns, Big Flavor

    Sliders are the perfect food. Change my mind.

    BBQ chicken. Buttery Hawaiian rolls. Crunchy coleslaw. They’re sweet, smoky, creamy, and crunchy. Baked in one dish. Pull apart. Disappear. Make two batches.

    Ingredients

    Makes 12 sliders.

    • 1 package (12 count) Hawaiian rolls
    • 3 cups cooked chicken, shredded (rotisserie = hero)
    • ¾ cup BBQ sauce (plus extra for drizzling)
    • 1 cup shredded cheddar or Monterey Jack cheese
    • 1 cup creamy coleslaw (store-bought or homemade)
    • 3 tbsp butter, melted
    • 1 tsp garlic powder
    • ½ tsp smoked paprika (optional)

    Step-by-Step Instructions

    Step 1: Preheat and Sauce

    1. Preheat oven to 375°F (190°C).
    2. Toss shredded chicken with BBQ sauce until coated.

    Step 2: Prep the Rolls

    1. Without separating individual rolls, slice the entire slab of Hawaiian rolls horizontally (top and bottom).
    2. Place bottom half in a greased 9×13 baking dish.

    Step 3: Assemble

    1. Layer BBQ chicken evenly on bottom rolls.
    2. Sprinkle with cheese.
    3. Spread coleslaw over the cheese.
    4. Place top slab of rolls back on.

    Step 4: Butter and Bake

    1. Mix melted butter, garlic powder, and smoked paprika. Brush over tops.
    2. Bake 10-12 minutes until golden and cheese is melted.

    Step 5: Pull Apart and Serve

    1. Drizzle extra BBQ sauce on top. Separate sliders. Serve hot.

    Summary

    Prep Time: 10 minutes | Cook Time: 10-12 minutes | Total Time: 20-22 minutes

    Yield: 12 sliders

    Difficulty: Easy

    Storage Notes

    Fridge:

    Store leftovers for 3 days. The coleslaw softens the buns, but still tasty.

    Reheat:

    Oven at 350°F for 8-10 minutes. Microwave for 30 seconds but buns get soft.

    Pro Tip:

    Assemble ahead without coleslaw. Refrigerate. Add coleslaw after baking for crunch.

  • Buffalo Cauliflower Bites: Wings for Plants (and Everyone Else)

    Buffalo Cauliflower Bites: Wings for Plants (and Everyone Else)

    Cauliflower has no business being this good.

    Battered. Baked until crispy. Tossed in buttery buffalo sauce. These bites are crunchy, spicy, addictive. Serve with ranch or blue cheese. Omnivores won’t believe it’s cauliflower.

    Ingredients

    Serves 4 as appetizer.

    • 1 medium head cauliflower, cut into bite-sized florets
    • ¾ cup flour (all-purpose or GF blend)
    • ¾ cup water (or unsweetened plant milk)
    • 1 tsp garlic powder
    • 1 tsp paprika
    • ½ tsp salt
    • ¼ tsp black pepper

    For the Buffalo Sauce:

    • ½ cup hot sauce (Frank’s RedHot is classic)
    • 3 tbsp melted butter (or vegan butter)
    • 1 tbsp honey or maple syrup (optional, for balance)

    For serving: Ranch or blue cheese dressing, celery sticks

    Step-by-Step Instructions

    Step 1: Preheat and Prep

    1. Preheat oven to 450°F (230°C). Line a baking sheet with parchment.
    2. Cut cauliflower into bite-sized florets.

    Step 2: Make the Batter

    1. Whisk flour, water, garlic powder, paprika, salt, and pepper until smooth.

    Step 3: Coat and Bake

    1. Dip each floret into batter, letting excess drip off.
    2. Place on baking sheet. Bake 20 minutes, flipping halfway.

    Step 4: Sauce Them Up

    1. Whisk hot sauce and melted butter together.
    2. Transfer baked cauliflower to a bowl. Pour sauce over. Toss to coat.

    Step 5: Bake Again (For Stickiness)

    1. Return coated cauliflower to baking sheet.
    2. Bake 10-15 more minutes until sauce is sticky and edges are crispy.

    Step 6: Serve

    1. Serve immediately with ranch and celery. Watch them disappear.

    Summary

    Prep Time: 10 minutes | Cook Time: 30-35 minutes | Total Time: 40-45 minutes

    Yield: 4 appetizer servings

    Difficulty: Easy

    Storage Notes

    Best Fresh:

    These are crispiest straight from the oven. Leftovers get soft.

    Reheat:

    Air fryer at 375°F for 5-6 minutes. Oven at 400°F for 8-10 minutes. Don’t microwave (soggy).

    Pro Tip:

    For extra crunch, use panko breadcrumbs after the batter. Double bake for maximum crisp.

  • Lemon Pepper Chicken Wings: Bright, Buttery, Undisputed

    Lemon Pepper Chicken Wings: Bright, Buttery, Undisputed

    Lemon pepper wings don’t need hot sauce to be great. They just need butter and lemon. Lots of both.

    Bake these until the skin shatters. Toss in a buttery, zesty, peppery glaze. Bright. Rich. Addictive. Make extra. You’ll eat them all.

    Ingredients

    Serves 4 as appetizer.

    • 2 lbs chicken wings (drumettes and flats)
    • 1 tbsp baking powder (NOT baking soda)
    • 1 tsp salt
    • ½ tsp black pepper

    For the Lemon Pepper Butter:

    • 4 tbsp unsalted butter
    • 2 tbsp lemon pepper seasoning (like Lawry’s or homemade)
    • 1 tbsp fresh lemon juice
    • 1 tsp lemon zest (optional)
    • Fresh parsley for garnish

    Step-by-Step Instructions

    Step 1: Preheat and Prep

    1. Preheat oven to 425°F (220°C). Line a baking sheet with foil. Place a wire rack on top.
    2. Pat wings completely dry with paper towels (critical for crispiness).

    Step 2: Season the Wings

    1. In a bowl, mix baking powder, salt, and pepper. Toss wings to coat evenly.
    2. Arrange wings in a single layer on the rack.

    Step 3: Bake Until Crispy

    1. Bake 40-45 minutes, flipping halfway, until golden brown and crispy.

    Step 4: Make the Lemon Pepper Butter

    1. While wings bake, melt butter in a small saucepan or microwave.
    2. Whisk in lemon pepper seasoning, lemon juice, and lemon zest.

    Step 5: Toss and Serve

    1. Transfer hot wings to a large bowl. Pour lemon pepper butter over. Toss to coat.
    2. Garnish with parsley. Serve immediately with extra lemon wedges.

    Summary

    Prep Time: 10 minutes | Cook Time: 40-45 minutes | Total Time: 50-55 minutes

    Yield: 4 appetizer servings

    Difficulty: Easy

    Storage Notes

    Fridge:

    Store for 3 days. Reheat to bring back crispiness.

    Reheat:

    Air fryer at 375°F for 5 minutes. Oven at 400°F for 8-10 minutes. Microwave = sad wings. Don’t.

    Pro Tip:

    Use fresh lemon zest if you have it. Makes the lemon flavor pop.

  • Philly Cheesesteak Sliders: All the Flavor, None of the Drama

    Philly Cheesesteak Sliders: All the Flavor, None of the Drama

    Cheesesteaks are messy. Sliders are neat. These are the best of both worlds.

    Thinly sliced steak, caramelized onions and peppers, gooey provolone, all tucked into sweet Hawaiian rolls. Brush with garlic butter. Bake. Pull apart. Disappear.

    Ingredients

    Makes 12 sliders.

    • 1 package (12 count) Hawaiian rolls
    • 1 lb thinly sliced ribeye or steak-umms
    • 1 green bell pepper, thinly sliced
    • 1 onion, thinly sliced
    • 2 tbsp olive oil
    • ½ tsp salt
    • ¼ tsp black pepper
    • 6 slices provolone cheese (torn in half)
    • 3 tbsp butter, melted
    • 1 tsp garlic powder

    Step-by-Step Instructions

    Step 1: Preheat and Cook Fillings

    1. Preheat oven to 375°F (190°C).
    2. Heat oil in a skillet over medium-high heat. Add onion and pepper. Cook 5 minutes until soft. Remove.
    3. Add steak to same skillet. Cook 3-4 minutes until browned. Season with salt and pepper.
    4. Mix steak with peppers and onions.

    Step 2: Prep the Rolls

    1. Slice entire slab of Hawaiian rolls horizontally (keep rolls connected).
    2. Place bottom half in a greased 9×13 baking dish.

    Step 3: Assemble

    1. Layer steak mixture evenly on bottom rolls.
    2. Top with provolone slices.
    3. Place top slab of rolls back on.

    Step 4: Butter and Bake

    1. Mix melted butter and garlic powder. Brush over tops.
    2. Bake 10-12 minutes until golden and cheese is melted.

    Step 5: Pull Apart and Serve

    1. Separate sliders. Serve hot. Watch them vanish.

    Summary

    Prep Time: 10 minutes | Cook Time: 15 minutes | Total Time: 25 minutes

    Yield: 12 sliders

    Difficulty: Easy

    Storage Notes

    Fridge:

    Store leftovers for 3 days.

    Reheat:

    Oven at 350°F for 8-10 minutes. Microwave for 30 seconds but rolls get soft.

    Pro Tip:

    Assemble ahead. Refrigerate unbaked up to 24 hours. Bake when guests arrive. Hero status unlocked.