Category: baking

  • Stunning, Savory, and Full of Flavor: Layered Ratatouille Made Easy

    Stunning, Savory, and Full of Flavor: Layered Ratatouille Made Easy

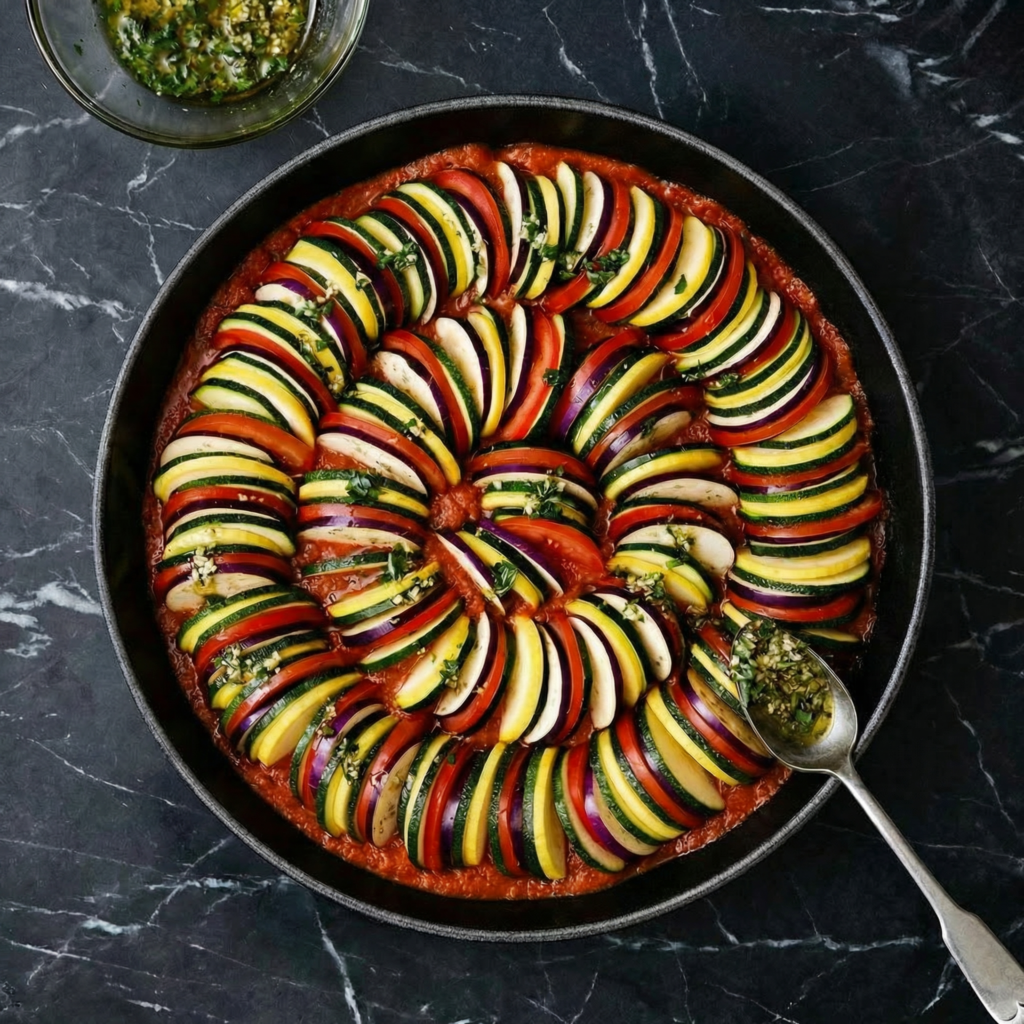
    Ratatouille isn’t just a dish—it’s a visual masterpiece.

    The layered version, often called Confit Byaldi, transforms simple vegetables into a colorful, elegant dish where each bite bursts with flavor.

    With zucchini, eggplant, bell peppers, and tomatoes arranged in beautiful overlapping layers and roasted to perfection, this recipe is perfect for dinner parties, special occasions, or even a weeknight treat that feels extra special.

    The good news? Despite its fancy appearance, layered ratatouille is surprisingly approachable. With a little prep, careful layering, and a gentle roast, you’ll have a dish that looks like a work of art and tastes like heaven.
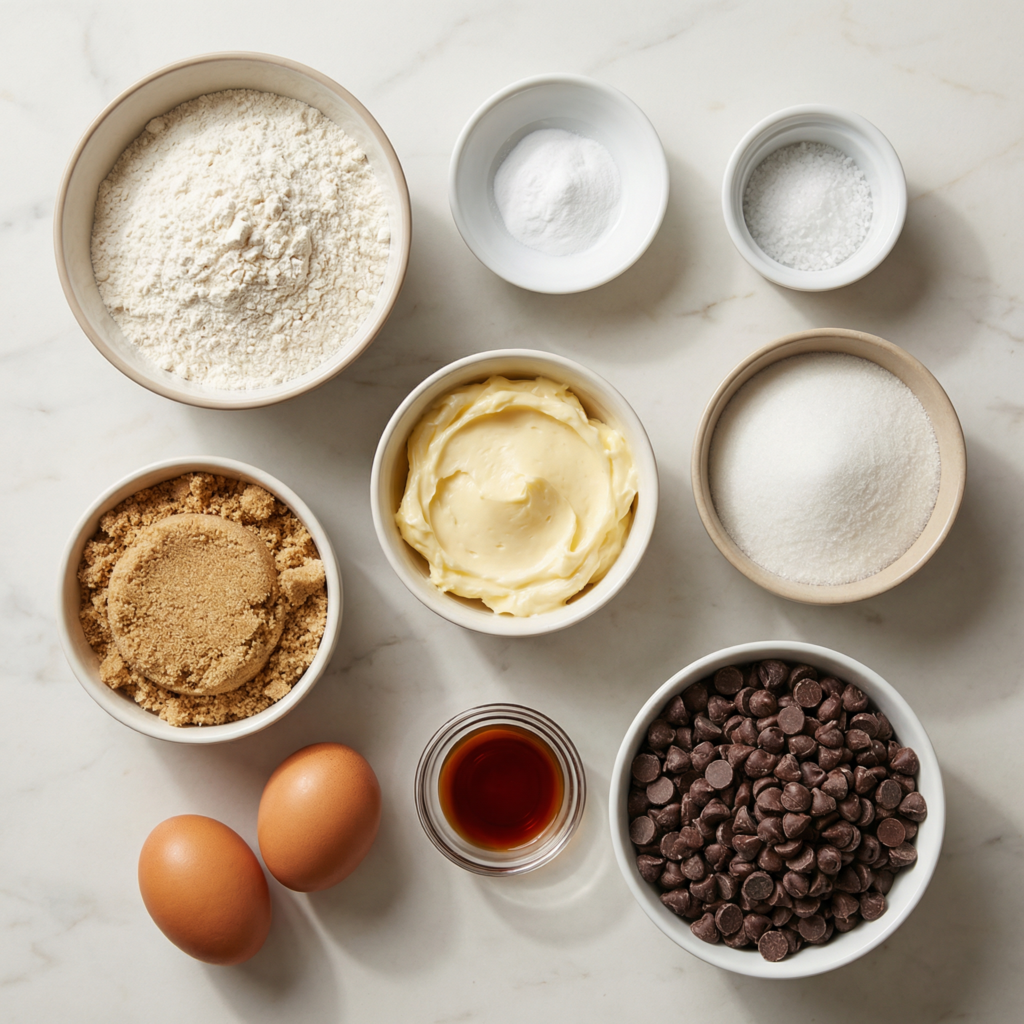

    Ingredients

    For the base sauce:

    • 2 tablespoons olive oil
    • 1 medium onion, finely chopped
    • 2 cloves garlic, minced
    • 1 (14-ounce) can crushed tomatoes
    • 1 teaspoon dried thyme
    • 1 teaspoon dried oregano
    • Salt and freshly ground black pepper, to taste

    For the vegetables:

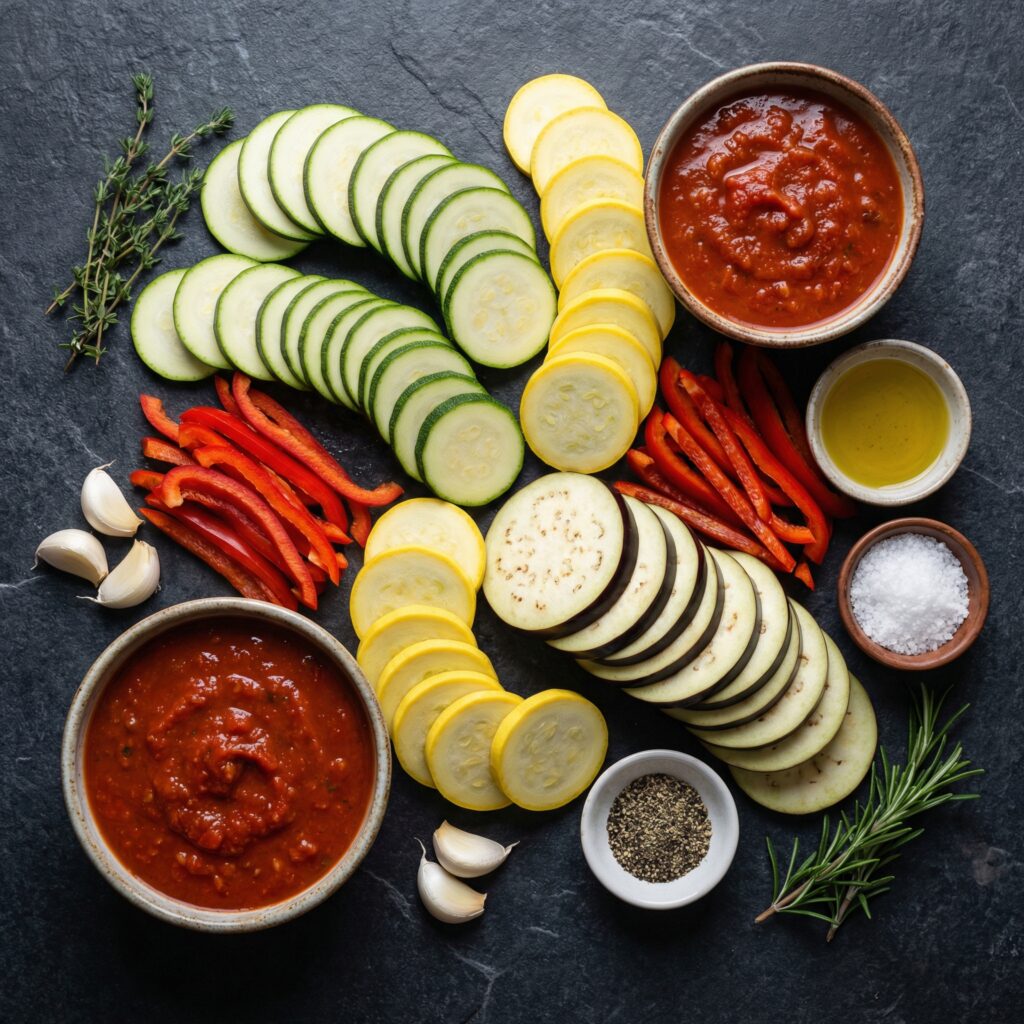
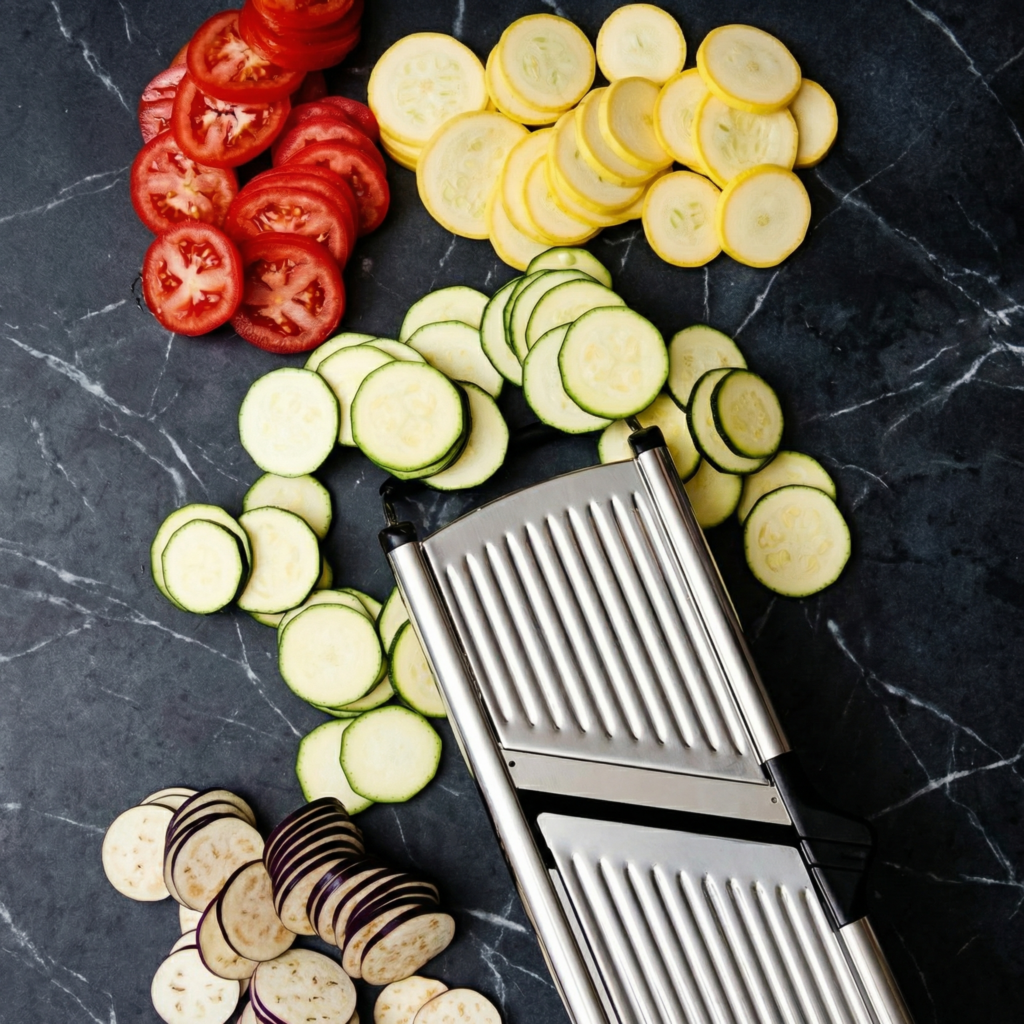
    • 1 small eggplant, thinly sliced into rounds (¼ inch thick)
    • 1 medium zucchini, thinly sliced
    • 1 yellow squash, thinly sliced
    • 1 red bell pepper, thinly sliced
    • 1 yellow bell pepper, thinly sliced
    • 1 medium tomato, thinly sliced

    For finishing:

    • 2 tablespoons olive oil
    • 1 teaspoon dried herbs (thyme, oregano, or Herbes de Provence)
    • Fresh basil or parsley, chopped, for garnish

    Step 1: Prepare the Base Sauce

    Start by preheating your oven to 375°F (190°C).

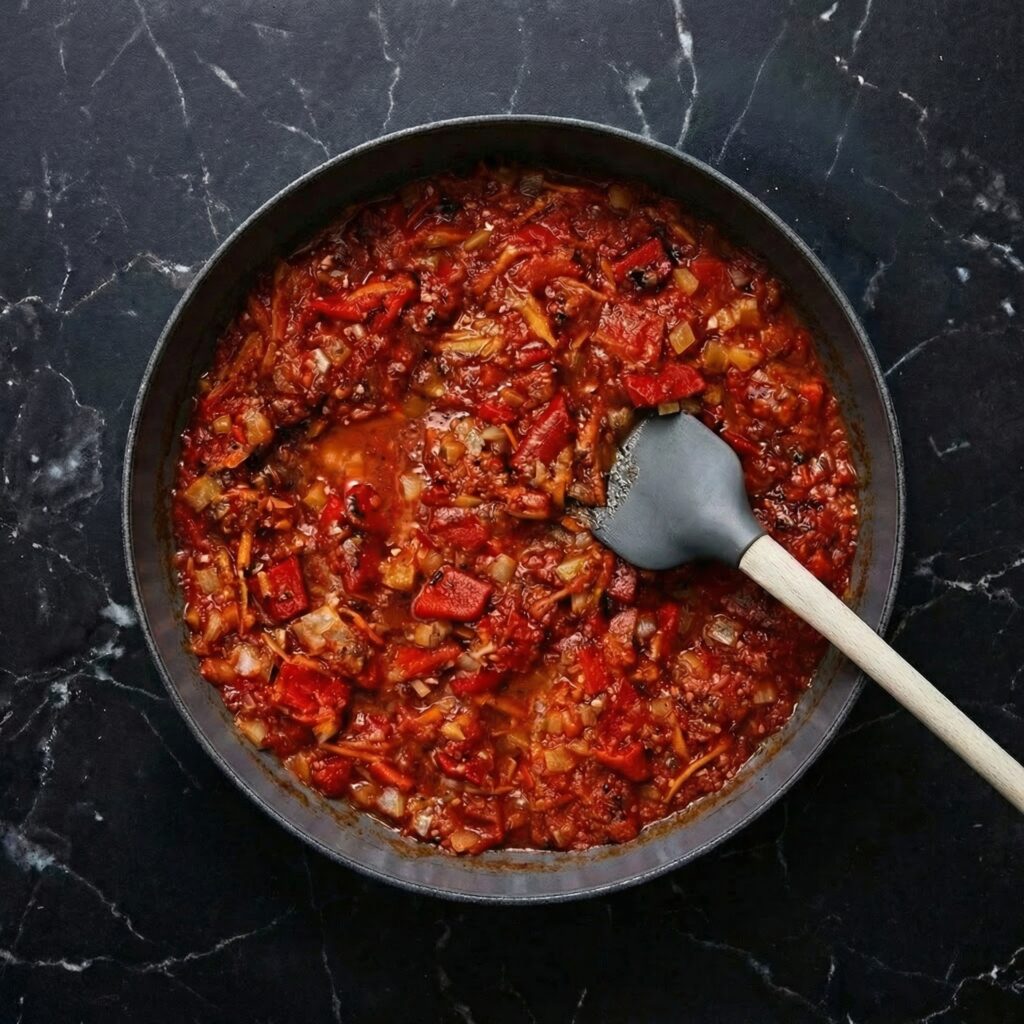
    In a medium skillet, heat 2 tablespoons of olive oil over medium heat. Add the chopped onion and sauté for 3–4 minutes until softened. Add minced garlic and cook for an additional 30 seconds until fragrant.

    Pour in the crushed tomatoes, then stir in the dried thyme, oregano, salt, and pepper. Simmer over low heat for 10–12 minutes until the sauce thickens slightly.

    This tomato base provides a savory, flavorful foundation for the vegetables, ensuring that every bite is moist and rich.


    Step 2: Prepare the Vegetables

    Wash all vegetables thoroughly. Slice the eggplant, zucchini, yellow squash, bell peppers, and tomato into thin, uniform rounds or strips. Consistent size is key for even cooking and a visually stunning presentation.

    Tip: If your eggplant is particularly bitter or watery, sprinkle the slices with salt and let them sit for 10 minutes. Pat dry with a paper towel before layering.


    Step 3: Assemble the Base

    Spread the tomato sauce evenly on the bottom of a shallow baking dish or oven-safe skillet. This layer will infuse the vegetables with flavor and prevent them from sticking to the pan.


    Step 4: Layer the Vegetables

    Starting at one side of the dish, arrange the vegetables in an overlapping, alternating pattern: eggplant, zucchini, yellow squash, red bell pepper, yellow bell pepper, and tomato. Repeat until the dish is filled.

    The key is uniform layers and a tight, neat arrangement. This creates the signature spiral or linear pattern seen in classic layered ratatouille.


    Step 5: Season and Oil

    Drizzle 2 tablespoons of olive oil evenly over the arranged vegetables. Sprinkle additional dried herbs, salt, and freshly ground black pepper on top.

    The olive oil not only enhances flavor but also helps the vegetables roast beautifully, developing a caramelized exterior while staying tender inside.


    Step 6: Cover and Bake

    Cover the dish with aluminum foil and bake in the preheated oven for 30 minutes. Covering the dish allows the vegetables to steam slightly and cook evenly without drying out.


    Step 7: Uncover and Roast

    After 30 minutes, remove the foil and continue baking for another 15–20 minutes. The vegetables should be tender, with lightly caramelized edges and a fragrant aroma filling your kitchen.


    Step 8: Garnish and Serve

    Once baked, remove the dish from the oven. Let it rest for a few minutes to allow flavors to settle. Garnish with freshly chopped basil or parsley for color and freshness.

    Layered ratatouille can be served hot as a main dish, alongside grilled proteins, or even as a stunning side dish for a dinner party.


    Pro Tips for Perfect Layered Ratatouille

    • Uniform slices: Thin, even slices ensure that all vegetables cook at the same rate.
    • Don’t overcrowd: Overlapping is beautiful, but too many layers can prevent even cooking.
    • Salt the eggplant: This removes excess moisture and bitterness.
    • Use a shallow baking dish: This ensures even heat distribution and prevents soggy vegetables.
    • Let it rest: Allowing the dish to sit for a few minutes before serving enhances the flavor meld.

    Why This Recipe Works

    Layered ratatouille works because it balances flavor, texture, and visual appeal. The tomato base provides a savory, aromatic foundation. Each vegetable contributes its unique texture and flavor: tender zucchini, sweet bell peppers, and hearty eggplant. Olive oil and herbs tie everything together, creating a cohesive, flavorful dish.

    The baking process allows the natural sweetness of the vegetables to intensify while maintaining structure, resulting in a dish that is both elegant and comforting.


    Variations and Serving Ideas

    • Cheesy twist: Sprinkle grated Parmesan or crumbled feta over the vegetables before baking.
    • Protein boost: Serve alongside grilled chicken, fish, or tofu.
    • Herbal variation: Add rosemary or sage for a different aroma.
    • Roasted garlic: Include whole garlic cloves in the tomato sauce for a deeper flavor profile.
    • Meal prep: Prepare in advance and reheat gently for a weeknight dinner.

    Storage and Reheating

    Layered ratatouille keeps well in the refrigerator for 3–4 days. Store in an airtight container and reheat gently in the oven or on the stovetop. It also freezes beautifully for up to 2 months—simply thaw overnight in the fridge before reheating.


    The Takeaway

    Layered Ratatouille proves that vegetable dishes can be both visually stunning and deeply flavorful. By carefully layering thinly sliced vegetables over a savory tomato base and roasting them to perfection, you create a dish that looks like it belongs on a restaurant menu but is achievable at home.

    Whether for a cozy dinner, a dinner party, or a special occasion, this recipe highlights the natural beauty and flavor of summer vegetables. The combination of tender, caramelized vegetables with fragrant herbs and rich tomato sauce is irresistible, making this layered ratatouille a true showstopper.

    Once you try this recipe, you’ll see why layered ratatouille continues to be a timeless classic: elegant, satisfying, and unforgettable in both flavor and presentation.

  • Thick, Buttery & Irresistibly Soft: The Ultimate Chewy Chocolate Chip Bars

    Thick, Buttery & Irresistibly Soft: The Ultimate Chewy Chocolate Chip Bars

    If you love classic chocolate chip cookies but don’t feel like scooping dough and baking in batches, Chewy Chocolate Chip Bars are your new best friend.

    These bars deliver everything you adore about cookies—gooey chocolate, buttery flavor, soft centers, and slightly crisp edges—but in an easy, slice-and-serve form.

    Perfect for parties, potlucks, lunchboxes, or late-night cravings, this recipe comes together quickly and bakes in one pan. Let’s walk step by step through making thick, bakery-style chocolate chip bars with the ultimate chewy texture.


    Why You’ll Love These Chocolate Chip Bars

    • Soft and chewy center
    • Buttery, rich flavor
    • Loaded with chocolate chips
    • Easier than individual cookies
    • Perfect for sharing

    These bars strike the perfect balance between gooey and structured, making them easy to slice while still staying ultra-soft.


    Ingredients You’ll Need

    Wet Ingredients:

    • ¾ cup unsalted butter, melted
    • 1 cup brown sugar (packed)
    • ½ cup granulated sugar
    • 2 large eggs
    • 1 tablespoon vanilla extract

    Dry Ingredients:

    • 2 ¼ cups all-purpose flour
    • 1 teaspoon baking soda
    • ½ teaspoon salt

    Add-Ins:

    • 2 cups semi-sweet chocolate chips
    • ½ cup chocolate chunks (optional for extra gooeyness)

    Step 1: Preheat and Prepare the Pan

    Preheat your oven to 350°F (175°C).

    Line a 9×13-inch baking pan with parchment paper, leaving some overhang for easy removal. Lightly grease the paper to prevent sticking.

    Using parchment ensures clean edges and effortless lifting after baking.


    Step 2: Melt the Butter

    Melt the butter in a microwave-safe bowl or saucepan.

    Allow it to cool slightly before mixing with the sugars. Warm (not hot) butter helps create that chewy texture without scrambling the eggs.

    Melted butter contributes to density and chewiness rather than a cakey texture.


    Step 3: Mix the Sugars

    Add brown sugar and granulated sugar to the melted butter.

    Whisk thoroughly until smooth and glossy.

    Brown sugar is key here—it adds moisture and chewiness thanks to its molasses content.


    Step 4: Add Eggs and Vanilla

    Add the eggs one at a time, whisking well after each addition.

    Stir in vanilla extract.

    The mixture should become thick and slightly lighter in color. Proper mixing at this stage builds structure and ensures even texture.


    Step 5: Combine Dry Ingredients

    In a separate bowl, whisk together:

    • Flour
    • Baking soda
    • Salt

    Whisking ensures the leavening agent distributes evenly throughout the dough.


    Step 6: Combine Wet and Dry

    Gradually fold the dry ingredients into the wet mixture using a spatula.

    Mix just until combined. Avoid overmixing, as that can develop gluten and make the bars tough.

    The dough will be thick and slightly sticky.


    Step 7: Fold in the Chocolate

    Gently fold in chocolate chips and chocolate chunks.

    Reserve a handful of chips to sprinkle on top for a bakery-style finish.

    Even distribution ensures every bite has melty chocolate goodness.


    Step 8: Press into the Pan

    Transfer the dough into the prepared baking pan.

    Use a spatula or lightly greased hands to press the dough evenly into the corners.

    Sprinkle reserved chocolate chips over the top.

    For thicker bars, use a slightly smaller pan and increase baking time slightly.


    Step 9: Bake to Chewy Perfection

    Bake for 22–28 minutes.

    The edges should be golden brown, and the center should look slightly underbaked but set.

    A toothpick inserted in the center should come out with moist crumbs—not raw batter.

    Do not overbake. Slight underbaking is the secret to chewy bars.


    Step 10: Cool Before Slicing

    Allow the bars to cool in the pan for at least 30 minutes.

    For cleaner slices, let them cool completely or chill briefly before cutting.

    Lift out using parchment overhang and transfer to a cutting board.

    Slice into squares or rectangles using a sharp knife.


    Texture and Flavor Highlights

    • Soft, chewy center
    • Buttery, rich base
    • Slightly crisp golden edges
    • Gooey, melted chocolate in every bite
    • Balanced sweetness

    These bars offer cookie flavor with a denser, more satisfying bite.


    Pro Tips for Perfect Chewy Bars

    Use more brown sugar than white. This guarantees chewiness.

    Don’t overbake. The bars continue cooking as they cool.

    Measure flour correctly. Spoon and level—don’t scoop directly from the bag.

    Cool before slicing. Prevents crumbling.

    Use quality chocolate. It makes a noticeable difference.


    Optional Variations

    Sea Salt Finish: Sprinkle flaky sea salt on top before baking.

    Nutty Addition: Add ½ cup chopped walnuts or pecans.

    Peanut Butter Swirl: Drop spoonfuls of peanut butter and swirl before baking.

    Double Chocolate: Replace ¼ cup flour with cocoa powder.

    Caramel Twist: Add caramel bits for gooey pockets of sweetness.


    Storage Instructions

    Store in an airtight container at room temperature for up to 4 days.

    Refrigerate for up to 1 week if preferred.

    Freeze individually wrapped bars for up to 3 months.

    To refresh, microwave for 10–15 seconds for that just-baked warmth.


    Why This Recipe Works

    Chewy Chocolate Chip Bars rely on melted butter and brown sugar to create their soft texture. The ratio of fat to flour keeps them dense and moist, while proper mixing ensures structure without toughness.

    Underbaking slightly locks in moisture, and cooling allows the crumb to set while maintaining chewiness. Using both chocolate chips and chunks creates pockets of melted chocolate throughout.


    Chewy Chocolate Chip Bars are the perfect solution when you want all the comfort of cookies with half the effort. Thick, buttery, and loaded with chocolate, they’re guaranteed to satisfy every sweet craving.

    Once you try these soft and gooey bars, they’ll quickly become a staple in your baking rotation—easy, crowd-pleasing, and absolutely irresistible.

  • Messy, Cheesy, and Utterly Delicious: How to Make Pasta Alla Zozzona at Home

    Messy, Cheesy, and Utterly Delicious: How to Make Pasta Alla Zozzona at Home

    There’s comfort, and then there’s Pasta Alla Zozzona—a gloriously messy, cheesy, and indulgent Italian pasta dish that’s all about layers of flavor. Think creamy béchamel, melty mozzarella, savory pancetta, and a hint of spice, all baked to bubbling perfection.

    Despite its decadent reputation, Pasta Alla Zozzona is surprisingly simple to make at home, and it’s guaranteed to impress anyone at the dinner table.

    This step-by-step guide will walk you through creating the perfect saucy, cheesy, baked pasta masterpiece.


    Why You’ll Love Pasta Alla Zozzona

    • Creamy, cheesy, and rich
    • Hearty and satisfying
    • Layers of flavor in every bite
    • Perfect for dinner parties or indulgent weeknight meals
    • Easy to adapt with your favorite proteins or vegetables

    Once you taste this baked pasta, you’ll understand why it’s called “zozzona”—Italian for “messy but irresistible.” It’s all about comfort food that doesn’t take itself too seriously.


    Ingredients You’ll Need

    For the Pasta and Filling:

    • 12 ounces penne or rigatoni
    • 6 ounces pancetta or bacon, diced
    • 1 medium onion, finely chopped
    • 3 cloves garlic, minced
    • 1 cup heavy cream
    • 1 cup tomato sauce (preferably homemade or a simple marinara)
    • 1 teaspoon red pepper flakes (optional)
    • Salt and black pepper, to taste
    • 1 teaspoon Italian seasoning

    For the Cheese Layer:

    • 1 ½ cups shredded mozzarella
    • ½ cup grated Parmesan
    • ½ cup ricotta (optional, for extra creaminess)

    For Garnish:

    • Fresh basil or parsley
    • Extra grated Parmesan

    Step 1: Preheat the Oven

    Set your oven to 375°F (190°C) and lightly grease a 9×13-inch baking dish. A well-greased dish prevents sticking and allows for easy serving.


    Step 2: Cook the Pasta

    Bring a large pot of salted water to a boil. Cook the pasta 1–2 minutes less than the package instructions, as it will continue cooking in the oven.

    Drain and set aside, tossing lightly with a drizzle of olive oil to prevent sticking. Slightly undercooked pasta ensures it absorbs the sauce without turning mushy.


    Step 3: Cook the Pancetta and Aromatics

    In a large skillet over medium heat, cook the diced pancetta until crispy. Remove excess fat if necessary, leaving just enough to sauté the onion and garlic.

    Add the chopped onion and cook for 3–4 minutes until soft and translucent. Stir in minced garlic and red pepper flakes, cooking for 30 seconds until fragrant.

    The pancetta adds a savory, smoky base while the aromatics create depth in the sauce.


    Step 4: Prepare the Creamy Tomato Sauce

    Add heavy cream and tomato sauce to the skillet with the pancetta and aromatics. Stir in Italian seasoning, salt, and pepper.

    Simmer gently for 5 minutes, allowing the flavors to meld. The sauce should be creamy and slightly thickened—rich enough to coat the pasta beautifully.

    If using ricotta, stir it in at this stage for extra creaminess.


    Step 5: Combine Pasta and Sauce

    Add the cooked pasta to the sauce and toss to coat thoroughly. Every noodle should be enveloped in the creamy, savory mixture.

    Taste and adjust seasoning as needed. The balance of salty pancetta, creamy sauce, and subtle spice is key to achieving the perfect flavor.


    Step 6: Layer the Cheese

    Transfer half of the sauced pasta into the prepared baking dish. Sprinkle half of the shredded mozzarella and grated Parmesan over the pasta.

    Add the remaining pasta on top, then layer the remaining mozzarella and Parmesan evenly. For extra indulgence, dot the top with small spoonfuls of ricotta.

    The layering ensures gooey, cheesy pockets throughout the baked pasta.


    Step 7: Bake to Bubbling Perfection

    Place the baking dish in the preheated oven. Bake uncovered for 20–25 minutes, or until the cheese is melted, bubbly, and lightly golden.

    For a crispier top, broil for 1–2 minutes at the end—watch carefully to avoid burning.


    Step 8: Rest and Garnish

    Remove the dish from the oven and let it rest for 5 minutes. This allows the pasta to set slightly for easier serving.

    Sprinkle with freshly chopped basil or parsley and extra Parmesan for color and flavor.


    Flavor and Texture Highlights

    • Creamy, rich tomato-cream sauce
    • Savory, smoky pancetta
    • Gooey, melted cheese in every bite
    • Slightly crisp top from baking
    • Aromatic, flavorful herbs

    The combination of textures—soft pasta, crispy edges, and molten cheese—is what makes Pasta Alla Zozzona truly irresistible.


    Tips for the Perfect Pasta Alla Zozzona

    • Slightly undercook pasta. Prevents mushy baked pasta.
    • Use quality cheese. Fresh mozzarella and real Parmesan enhance flavor.
    • Don’t skimp on pancetta. It’s the flavor backbone of the dish.
    • Simmer sauce gently. Avoid boiling to maintain creaminess.
    • Rest before serving. Helps the pasta hold together while serving.

    Optional Variations

    • Vegetarian: Replace pancetta with sautéed mushrooms or roasted vegetables.
    • Spicy: Increase red pepper flakes or add sliced chili for a kick.
    • Extra Cheese: Mix provolone or fontina for a different flavor profile.
    • Protein Boost: Add cooked chicken or Italian sausage slices.
    • Gluten-Free: Use gluten-free pasta and ensure sauces are thickened with cornstarch if needed.

    Storage and Reheating

    Store leftovers in an airtight container in the refrigerator for up to 3 days.

    Reheat individual portions in the microwave, or warm the whole dish in a 350°F (175°C) oven for 10–15 minutes until heated through. Cover with foil to prevent the cheese from burning.

    Pasta Alla Zozzona also freezes well. Wrap tightly and freeze for up to 2 months. Thaw in the fridge overnight before reheating.


    Why This Recipe Works

    Pasta Alla Zozzona succeeds because of its balance of creamy, cheesy, and savory elements.

    Slightly undercooked pasta absorbs the sauce while baking, pancetta adds smokiness, and layered cheese melts throughout, creating pockets of gooey indulgence.

    Baking the dish unites the flavors and textures, giving it that messy, comforting charm that the dish’s name promises.


    Baked, cheesy, and perfectly messy, Pasta Alla Zozzona is the ultimate comfort food for pasta lovers.

    With rich sauce, crispy edges, and layers of gooey cheese, this recipe is perfect for dinner parties, weeknight indulgence, or whenever you need a little culinary happiness.

    Once you try it, you’ll understand why it’s a family favorite—rich, decadent, and totally unforgettable.