Category: baking

  • Chocolate Éclairs That Would Make a French Baker Weep, With Joy

    Chocolate Éclairs That Would Make a French Baker Weep, With Joy

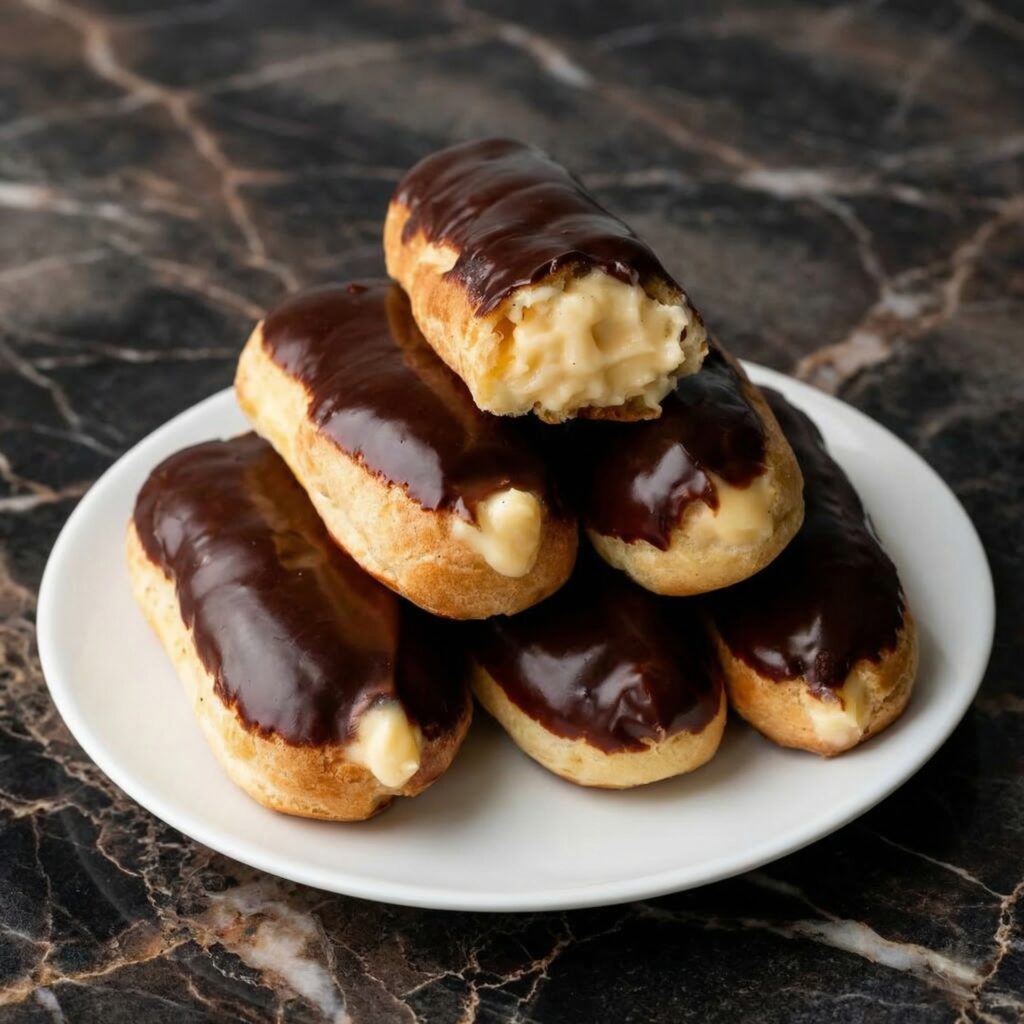
    Let’s be honest: biting into a perfect chocolate éclair is a near-religious experience. First, your teeth crack through that impossibly crisp, golden shell. Then you sink into a cloud of cool, velvety vanilla pastry cream.

    Finally, the whole thing is crowned by a thick, bittersweet chocolate glaze that shatters ever so slightly. It’s a symphony of textures, and it’s pure magic.

    Ingredients

    Makes about 12-14 éclairs.

    For the Pâte à Choux (Cream Puff Dough):

    • 1 cup (240ml) water
    • ½ cup (115g) unsalted butter, cut into cubes
    • 1 tablespoon granulated sugar
    • ¼ teaspoon salt
    • 1 cup (125g) all-purpose flour
    • 4 large eggs, at room temperature
    • 1 egg beaten with 1 teaspoon water (for egg wash)

    For the Vanilla Pastry Cream:

    • 2 cups (480ml) whole milk
    • 1 vanilla bean, split and scraped (or 2 teaspoons vanilla extract)
    • 5 large egg yolks
    • ½ cup (100g) granulated sugar
    • ¼ cup (30g) cornstarch
    • 2 tablespoons (30g) unsalted butter, cubed
    • Pinch of salt

    For the Chocolate Glaze:

    • 4 oz (115g) semi-sweet or bittersweet chocolate, finely chopped
    • ½ cup (120ml) heavy cream
    • 2 tablespoons unsalted butter, softened
    • 1 tablespoon light corn syrup (optional, for extra shine)

    Step-by-Step Instructions

    Part 1: Make the Pastry Cream (Can be done a day ahead)

    Step 1: Heat the Milk

    1. In a medium saucepan, combine the milk and the scraped vanilla bean seeds (and the pod, if using). Heat over medium heat until it just begins to simmer. Remove from heat, cover, and let it steep for 15-20 minutes to infuse the vanilla flavor. Remove the pod.

    Step 2: Whisk Egg Yolks and Sugar

    1. In a separate large bowl, whisk the egg yolks and sugar together until the mixture is pale and thick. This takes about 2 minutes of vigorous whisking.
    2. Whisk in the cornstarch and a pinch of salt until smooth and no lumps remain.

    Step 3: Temper the Egg Mixture

    1. Slowly pour about ¼ of the hot milk into the egg yolk mixture while whisking constantly. This tempers the eggs and prevents them from scrambling.
    2. Pour the tempered egg mixture back into the saucepan with the remaining milk, whisking continuously.

    Step 4: Thicken the Cream

    1. Return the saucepan to medium heat and cook, whisking constantly and vigorously, until the mixture thickens and comes to a boil. It will become very thick and start to bubble. Cook for one more minute to cook out the cornstarch taste.
    2. Remove from heat and whisk in the cubed butter until completely melted and smooth.

    Step 5: Chill the Pastry Cream

    1. Pour the pastry cream through a fine-mesh sieve into a shallow bowl to remove any potential lumps.
    2. Press a piece of plastic wrap directly onto the surface of the cream to prevent a skin from forming. Refrigerate for at least 2 hours, or until completely cold.

    Part 2: Make the Pâte à Choux (Éclair Shells)

    Step 6: Cook the Dough on the Stove

    1. Preheat your oven to 425°F (220°C). Line two baking sheets with parchment paper.
    2. In a medium saucepan, combine the water, butter, sugar, and salt. Bring to a boil over medium heat, stirring occasionally, until the butter is completely melted.
    3. Once boiling, remove the pan from the heat and add all the flour at once. Stir vigorously with a wooden spoon until the flour is fully incorporated.
    4. Return the pan to medium heat and cook, stirring constantly, for 2-3 minutes. You’ll see a thin film form on the bottom of the pan, and the dough will pull away from the sides and form a smooth ball.

    Step 7: Add the Eggs

    1. Transfer the dough to the bowl of a stand mixer fitted with the paddle attachment. Mix on low speed for a minute to let it cool down slightly.
    2. With the mixer on medium speed, add the eggs one at a time, beating well after each addition until the dough is smooth and glossy. After the last egg, beat for another minute. The dough should be thick, shiny, and fall from the paddle in a thick ribbon.

    Step 8: Pipe the Éclairs

    1. Transfer the dough to a large piping bag fitted with a large (½-inch) plain or star tip.
    2. Pipe 4-inch long strips of dough onto the prepared baking sheets, leaving about 2 inches between each to allow for puffing.
    3. Lightly beat the remaining egg with a teaspoon of water to make an egg wash. Gently brush the tops of the piped dough strips with the egg wash, smoothing down any peaks.
    4. Use the tines of a fork to gently score a light line down the length of each éclair. This helps them rise evenly.

    Step 9: Bake the Shells

    1. Bake at 425°F for 10 minutes, then reduce the oven temperature to 350°F (175°C) and bake for another 20-25 minutes, until the éclairs are puffed, deep golden brown, and feel light and hollow when lifted.
    2. Turn off the oven, prop the door open slightly with a wooden spoon, and let the shells cool completely in the oven. This helps them dry out and stay crisp.

    Part 3: Assemble the Éclairs

    Step 10: Fill the Éclairs

    1. Once the shells are completely cool, prepare the pastry cream for piping by whisking it briefly to loosen it up.
    2. Fit a piping bag with a long, thin filling tip (like a Bismarck tip). Fill the bag with pastry cream.
    3. Using the tip, poke three small holes in the bottom of each éclair (one near each end and one in the middle). Gently pipe the cream into each hole until the éclair feels heavy and full.

    Step 11: Make the Chocolate Glaze

    1. Place the finely chopped chocolate in a medium heat-proof bowl.
    2. In a small saucepan, heat the heavy cream over medium heat until it just begins to simmer (small bubbles around the edges).
    3. Pour the hot cream over the chocolate and let it sit for 2-3 minutes.
    4. Gently whisk until the chocolate is completely melted and the mixture is smooth and glossy. Whisk in the softened butter and corn syrup (if using) until combined and shiny.

    Step 12: Glaze and Serve

    1. Let the glaze cool for a few minutes until it thickens slightly but is still pourable.
    2. Hold each filled éclair by its ends and dip the top into the glaze, gently twisting as you lift it to let the excess drip off.
    3. Place the glazed éclairs on a wire rack set over a baking sheet to catch any drips.
    4. Allow the glaze to set for about 30 minutes before serving. These are best enjoyed the day they are made.

    Summary

    Prep Time: 1 hour (plus chilling) | Bake Time: 35 minutes | Assembly Time: 30 minutes | Total Time: About 3 hours (mostly hands-off chilling)

    Yield: 12-14 éclairs

    Difficulty: Advanced (but so worth it!)

    Storage and Make-Ahead Tips

    How to Store:

    Éclairs are truly at their peak the day they are made and assembled. The shells are crispiest and the texture is perfect. However, you can store filled and glazed éclairs in the refrigerator for up to 24 hours. Be aware that the shells will soften over time.

    Make-Ahead Components:

    Pastry Cream: Can be made up to 3 days in advance and stored in the refrigerator with plastic wrap pressed onto the surface.

    Éclair Shells: This is the best make-ahead option. Bake the shells completely, let them cool, and then store them in an airtight container at room temperature for up to 2 days. You can also freeze them in a freezer bag for up to a month. To re-crisp, place them in a 300°F oven for 5-7 minutes before cooling and filling.

    Can You Freeze Assembled Éclairs?

    It is not recommended. The cream filling will become icy and the shells will be very soft upon thawing. It’s much better to freeze the components separately.

  • Fudgy Brownies

    Fudgy Brownies

    Let’s talk about brownies. Not cakey brownies, not borderline-brownie muffins, but the real deal: dense, fudgy, intensely chocolate brownies with that iconic crackly, paper-thin top that shatters ever so slightly when you bite into them.

    This is that recipe. The one you’ll come back to again and again, the one that disappears from bake sales in minutes, the one that friends will beg you to share. Made with cocoa powder for that deep chocolate flavor and a technique that guarantees that beautiful crackly crust, these brownies are pure perfection.

    They’re rich without being overwhelming, fudgy without being underbaked, and absolutely deadly with a glass of cold milk. Let’s bake the best brownies of your life.

    Ingredients

    Yields 16 brownies (8×8 inch pan).

    For the Brownies:

    • ¾ cup (170g) unsalted butter
    • 1 ¼ cups (250g) granulated sugar
    • ¾ cup (75g) unsweetened cocoa powder (Dutch-process recommended)
    • ½ teaspoon salt
    • 2 large eggs, cold
    • 1 teaspoon vanilla extract
    • ¾ cup (95g) all-purpose flour
    • ¼ teaspoon baking powder (optional, for slightly cakier brownies)

    Optional Add-Ins:

    • 1 cup (175g) semi-sweet chocolate chips or chunks
    • ½ cup chopped walnuts or pecans
    • Flaky sea salt for sprinkling

    Step-by-Step Instructions

    1. Preheat and Prepare:

    1. Preheat your oven to 350°F (175°C). Line an 8×8 inch baking pan with parchment paper, leaving overhang on two opposite sides for easy removal. Lightly grease the parchment.

    2. Melt the Butter:

    1. In a medium saucepan over low heat, melt the butter completely. Remove from heat as soon as it’s melted.
    2. Add the sugar, cocoa powder, and salt to the warm melted butter. Whisk vigorously until everything is combined and the mixture looks like a thick, grainy paste. It will be quite thick—this is normal.
    3. Let the mixture cool for 2-3 minutes. It should be warm but not hot to the touch. This is important so you don’t scramble the eggs.

    3. Add the Eggs and Vanilla:

    1. Add the cold eggs one at a time, whisking vigorously after each addition. The mixture will go from thick and pasty to smooth, glossy, and beautifully fudgy. This is where that crackly top magic starts to happen!
    2. Whisk in the vanilla extract.

    4. Add the Flour:

    1. Sprinkle the flour (and baking powder if using) over the chocolate mixture.
    2. Fold gently with a spatula until just combined. Be careful not to overmix. If you’re adding chocolate chips or nuts, fold them in now.
    3. The batter will be thick, fudgy, and glossy—exactly what you want.

    5. Bake:

    1. Pour the batter into the prepared pan and spread it into an even layer.
    2. If desired, sprinkle a few extra chocolate chips or a pinch of flaky sea salt on top.
    3. Bake for 25-30 minutes, until a toothpick inserted into the center comes out with a few moist crumbs (not wet batter). The edges should look set and the top should be crackly and shiny.
    4. Let the brownies cool completely in the pan on a wire rack. This is important for clean slices and the perfect fudgy texture.

    6. Slice and Serve:

    1. Once completely cool, use the parchment overhang to lift the entire block of brownies onto a cutting board.
    2. Slice into 16 squares with a sharp knife, wiping the blade clean between cuts for neat edges.
    3. Serve at room temperature. Store leftovers in an airtight container.

    Summary

    Prep Time: 10 minutes | Bake Time: 25-30 minutes | Cooling Time: 1 hour | Total Time: 1 hour 40 minutes

    Yield: 16 brownies

    Difficulty: Easy

    Storage and Make-Ahead Tips

    How to Store:

    Store brownies in an airtight container at room temperature for up to 5 days. Place a piece of parchment paper between layers to prevent sticking. They actually get even fudgier the next day!

    Can You Freeze Brownies?

    Absolutely! Brownies freeze beautifully. Wrap individual brownies or the whole slab tightly in plastic wrap, then in foil, and place in a freezer bag. Freeze for up to 3 months. Thaw at room temperature.

    Freezing Brownie Batter:

    You can freeze the brownie batter in the pan. Prepare the batter, pour into the parchment-lined pan, cover tightly with plastic wrap and foil, and freeze for up to 3 months. Bake from frozen, adding 5-10 minutes to the baking time.

    Make-Ahead for Parties:

    Brownies are actually better the next day. Make them a day ahead, store at room temperature, and slice just before serving.

    Reviving Stale Brownies:

    If your brownies have been around for a few days and are starting to dry out, microwave them for 10-15 seconds. They’ll taste almost freshly baked!

  • Perfect Blondies

    Perfect Blondies

    Brownies get all the attention, but let’s take a moment to appreciate their equally delicious cousin: the blondie. Where brownies are deep, dark, and intense, blondies are buttery, caramel-y, and just pure comfort in bar form.

    These perfect blondies are everything you want them to be—chewy around the edges, soft and tender in the middle, with that unmistakable brown sugar and butter flavor that reminds you of the best chocolate chip cookie you’ve ever had.

    Load them up with chocolate chips, nuts, or anything else your heart desires. They come together in one bowl with no mixer required, and they disappear just as fast as you can bake them. Let’s give blondies the spotlight they deserve.

    Ingredients

    Yields 16 blondies (8×8 inch pan).

    For the Blondies:

    • ½ cup (115g) unsalted butter, melted and slightly cooled
    • 1 cup (200g) light brown sugar, packed
    • 1 large egg, at room temperature
    • 1 teaspoon vanilla extract
    • 1 cup (125g) all-purpose flour
    • ½ teaspoon baking powder
    • ¼ teaspoon baking soda
    • ½ teaspoon salt

    Optional Add-Ins (Choose Your Adventure):

    • 1 cup (175g) semi-sweet or milk chocolate chips
    • ½ cup chopped walnuts or pecans
    • ½ cup white chocolate chips
    • ½ cup butterscotch chips
    • ½ cup dried cranberries or cherries
    • Flaky sea salt for sprinkling

    Step-by-Step Instructions

    1. Preheat and Prepare:

    1. Preheat your oven to 350°F (175°C). Line an 8×8 inch baking pan with parchment paper, leaving overhang on two opposite sides for easy removal. Lightly grease the parchment.

    2. Combine Wet Ingredients:

    1. In a large bowl, combine the melted butter and brown sugar. Whisk until smooth and well combined, with no lumps of brown sugar remaining.
    2. Add the egg and vanilla extract. Whisk vigorously until the mixture is smooth, glossy, and slightly lighter in color, about 30-60 seconds.

    3. Add Dry Ingredients:

    1. Add the flour, baking powder, baking soda, and salt to the bowl.
    2. Fold gently with a spatula until just combined and no streaks of flour remain. Do not overmix.
    3. Fold in your desired add-ins (chocolate chips, nuts, etc.), reserving a handful to press into the top if desired.

    4. Bake:

    1. Spread the batter evenly into the prepared pan. It will be thick—use a spatula to press it into the corners.
    2. If reserved, press a few extra chocolate chips into the top of the batter for a bakery-style look.
    3. Bake for 20-25 minutes, until the edges are golden brown and a toothpick inserted into the center comes out clean or with a few moist crumbs. The center should still look slightly soft.
    4. Let the blondies cool completely in the pan on a wire rack. This is important for clean slices.

    5. Slice and Serve:

    1. Once completely cool, use the parchment overhang to lift the entire block of blondies onto a cutting board.
    2. Slice into 16 squares with a sharp knife, wiping the blade clean between cuts for neat edges.
    3. Serve at room temperature. Store leftovers in an airtight container.

    Summary

    Prep Time: 10 minutes | Bake Time: 20-25 minutes | Cooling Time: 1 hour | Total Time: 1 hour 35 minutes

    Yield: 16 blondies

    Difficulty: Super Easy

    Storage and Make-Ahead Tips

    How to Store:

    Store blondies in an airtight container at room temperature for up to 5 days. Place parchment paper between layers to prevent sticking. They actually get even better after a day or two!

    Can You Freeze Blondies?

    Absolutely! Blondies freeze beautifully. Wrap individual blondies or the whole slab tightly in plastic wrap, then in foil, and place in a freezer bag. Freeze for up to 3 months. Thaw at room temperature.

    Freezing Blondie Batter:

    You can freeze the batter in the pan. Prepare the batter, spread it into the parchment-lined pan, cover tightly with plastic wrap and foil, and freeze for up to 3 months. Bake from frozen, adding 5-10 minutes to the baking time.

    Make-Ahead for Parties:

    Blondies are perfect for making ahead. Bake them a day or two before your event, store at room temperature, and slice just before serving. The flavor actually improves over time.

    Reviving Stale Blondies:

    If your blondies have been around for a few days and are starting to dry out, microwave them for 10-15 seconds. They’ll taste almost freshly baked!

  • Classic Coffee Cake

    Classic Coffee Cake

    Let’s clear something up right away: coffee cake doesn’t actually have coffee in it. It’s called coffee cake because it’s meant to be enjoyed alongside a hot cup of coffee—and honestly, is there a better pairing in the world?

    This classic coffee cake is everything you want it to be. A tender, buttery sour cream cake forms the base, with a ribbon of cinnamon sugar running through the middle and an absolutely generous layer of buttery streusel crumb on top.

    It’s not too sweet, perfectly moist, and that crumb topping? It’s the kind you’ll find yourself picking off piece by piece. Whether it’s for breakfast, brunch, or a midday treat, this cake will make your coffee taste better.

    Ingredients

    Makes one 9-inch square or round cake (9-12 servings).

    For the Streusel Topping & Filling:

    • 1 cup (125g) all-purpose flour
    • ¾ cup (150g) light brown sugar, packed
    • 2 teaspoons ground cinnamon
    • ¼ teaspoon salt
    • ½ cup (115g) unsalted butter, melted
    • 1 teaspoon vanilla extract
    • ¾ cup chopped walnuts or pecans (optional)

    For the Coffee Cake:

    • 1 ½ cups (190g) all-purpose flour
    • 1 teaspoon baking powder
    • ½ teaspoon baking soda
    • ½ teaspoon salt
    • ½ cup (115g) unsalted butter, softened
    • ¾ cup (150g) granulated sugar
    • 2 large eggs, at room temperature
    • 1 ½ teaspoons vanilla extract
    • 1 cup (240g) sour cream, at room temperature

    Step-by-Step Instructions

    1. Preheat and Prepare:

    1. Preheat your oven to 350°F (175°C). Grease a 9-inch square baking pan or 9-inch round springform pan. If using a square pan, line with parchment paper leaving overhang for easy removal.

    2. Make the Streusel:

    1. In a medium bowl, whisk together the flour, brown sugar, cinnamon, and salt.
    2. Pour in the melted butter and vanilla extract. Stir with a fork until the mixture forms clumps and resembles wet sand. If using nuts, stir them in now.
    3. Set aside. This will serve as both your filling and your topping.

    3. Make the Cake Batter:

    1. In a medium bowl, whisk together the flour, baking powder, baking soda, and salt. Set aside.
    2. In a large bowl, beat the softened butter and granulated sugar together with an electric mixer until light and fluffy, about 2-3 minutes. Scrape down the sides as needed.
    3. Add the eggs one at a time, beating well after each addition. Scrape down the bowl again.
    4. Beat in the vanilla extract.
    5. With the mixer on low speed, add half of the flour mixture, mixing until just combined. Add all of the sour cream, then the remaining flour mixture. Mix until just combined and no streaks of flour remain. Do not overmix.

    4. Assemble the Cake:

    1. Spread half of the cake batter evenly into the prepared pan. It will be a thick layer—use an offset spatula to spread it to the edges.
    2. Sprinkle about half of the streusel mixture evenly over the batter. This will be the cinnamon swirl layer.
    3. Carefully spread the remaining batter over the streusel layer. This takes a little patience—drop spoonfuls of batter over the streusel and gently spread to cover as best you can. It doesn’t have to be perfect.
    4. Sprinkle the remaining streusel evenly over the top, pressing it gently so it adheres.

    5. Bake:

    1. Bake for 35-45 minutes, until a toothpick inserted into the center comes out clean or with a few moist crumbs.
    2. If the top is browning too quickly, tent loosely with foil for the last 10-15 minutes.
    3. Let the cake cool in the pan on a wire rack for at least 30 minutes before serving. It can be served warm or at room temperature.

    6. Serve:

    1. Slice and serve with a hot cup of coffee. The cake is delicious on its own, but a dusting of powdered sugar or a drizzle of simple glaze is always welcome.

    Summary

    Prep Time: 20 minutes | Bake Time: 35-45 minutes | Cooling Time: 30 minutes | Total Time: 1 hour 30 minutes

    Yield: 9-inch cake (9-12 servings)

    Difficulty: Easy

    Storage and Make-Ahead Tips

    How to Store:

    Store coffee cake tightly covered at room temperature for up to 4 days. The streusel will soften slightly over time, which is part of its charm. You can also store in the refrigerator, but bring to room temperature before serving.

    Can You Freeze Coffee Cake?

    Absolutely! Coffee cake freezes beautifully. Wrap the cooled cake (whole or in slices) tightly in plastic wrap, then in foil, and place in a freezer bag. Freeze for up to 3 months. Thaw at room temperature.

    Make-Ahead for Brunch:

    Coffee cake is perfect for making ahead. Bake it a day before, store at room temperature, and it’ll be ready to serve. The flavors actually meld and deepen overnight.

    Freezing Unbaked:

    You can assemble the entire cake in the pan, cover tightly, and freeze for up to 3 months. Bake from frozen, adding 10-15 minutes to the baking time.

    Reviving Day-Old Coffee Cake:

    If your coffee cake is a day or two old, warm individual slices in the microwave for 10-15 seconds. It’ll taste almost freshly baked!

  • Perfect Chocolate Chip Cookies (Soft, Chewy & Loaded with Chips)

    Perfect Chocolate Chip Cookies (Soft, Chewy & Loaded with Chips)

    Let’s be honest—the world does not need another chocolate chip cookie recipe. But it does need *this* one. After countless batches, dozens of tweaks, and more taste tests than I care to admit, I’ve finally landed on what I truly believe is the perfect chocolate chip cookie.

    What makes these so special? They have that ideal contrast—edges that are golden and slightly crisp, centers that are soft, chewy, and almost doughy (in the best way possible).

    They’re loaded with chocolate in every bite, have a hint of salt to balance the sweetness, and they stay soft for days. Whether you’re a classic purist or someone who loves a good bakery-style jumbo cookie, this recipe is about to become your new favorite.

    Ingredients

    Yields 14-16 large cookies.

    For the Cookies:

    • 2 ¼ cups (280g) all-purpose flour
    • 1 teaspoon baking soda
    • 1 ½ teaspoons cornstarch
    • ½ teaspoon salt
    • ¾ cup (170g) unsalted butter, melted and slightly cooled
    • ¾ cup (150g) light brown sugar, packed
    • ½ cup (100g) granulated sugar
    • 1 large egg + 1 egg yolk, at room temperature
    • 2 teaspoons vanilla extract
    • 2 cups (340g) semi-sweet chocolate chips (or chopped chocolate bar)

    Optional Toppings:

    • Flaky sea salt, for sprinkling
    • Extra chocolate chips for pressing into tops

    Step-by-Step Instructions

    1. Whisk Dry Ingredients:

    1. In a medium bowl, whisk together the flour, baking soda, cornstarch, and salt. Set aside.

    2. Combine Wet Ingredients:

    1. In a large bowl, whisk together the melted butter, brown sugar, and granulated sugar until well combined and no lumps remain.
    2. Add the egg, egg yolk, and vanilla extract. Whisk vigorously for about 30-60 seconds until the mixture becomes smooth, glossy, and slightly lighter in color. This step is important—it helps create that chewy texture!

    3. Bring It Together:

    1. Pour the dry ingredients into the wet ingredients. Fold with a rubber spatula until just combined and no streaks of flour remain. Be careful not to overmix.
    2. Gently fold in the chocolate chips, reserving a handful to press into the tops of the cookies later.
    3. The dough will be soft and slightly sticky. That’s exactly what you want.

    4. Chill the Dough (Crucial Step!):

    1. Cover the bowl tightly with plastic wrap and refrigerate for at least 2 hours, or up to 3 days. Chilling is non-negotiable—it prevents spreading, deepens the flavor, and creates that perfect texture.
    2. If you’re in a hurry, you can chill for 1 hour, but 2+ hours is better. Overnight is best.

    5. Preheat and Prep:

    1. When ready to bake, preheat your oven to 350°F (175°C). Line two baking sheets with parchment paper or silicone baking mats.

    6. Scoop and Bake:

    1. Scoop the chilled dough into large balls (about 3 tablespoons each). I recommend using a cookie scoop for even sizing.
    2. Place them on the prepared baking sheets, spacing about 3 inches apart.
    3. Press a few extra chocolate chips into the tops of each dough ball—this makes them look bakery-style and beautiful.
    4. Bake for 10-12 minutes, until the edges are golden brown and the centers still look slightly soft and underdone.
    5. Let the cookies cool on the baking sheet for 10 minutes. They will continue to bake and set up during this time.
    6. Transfer to a wire rack to cool completely, or enjoy warm with a glass of cold milk.

    Summary

    Prep Time: 15 minutes | Chill Time: 2 hours (minimum) | Bake Time: 12 minutes | Total Time: 2 hours 30 minutes

    Yield: 14-16 large cookies

    Difficulty: Easy

    Storage and Make-Ahead Tips

    How to Store:

    Store baked cookies in an airtight container at room temperature for up to 5 days. Place a slice of white bread in the container to keep them extra soft—the cookies will absorb moisture from the bread.

    Can You Freeze the Dough?

    Absolutely! This is my favorite make-ahead trick. Scoop the dough into balls and place them on a parchment-lined baking sheet. Freeze until solid, then transfer the frozen dough balls to a freezer bag. Bake from frozen, adding 1-2 minutes to the baking time. Fresh cookies anytime!

    Freezing Baked Cookies:

    Baked cookies freeze beautifully. Place them in a single layer in a freezer-safe container with parchment between layers. Freeze for up to 3 months. Thaw at room temperature or warm gently in the microwave for a few seconds.

    Make-Ahead Dough:

    The dough can be refrigerated for up to 3 days before baking. In fact, longer chilling (24-72 hours) develops even more flavor. Just let it sit at room temperature for 10-15 minutes to soften slightly before scooping.

  • Ultimate Moist Banana Bread (The Only Recipe You’ll Ever Need)

    Ultimate Moist Banana Bread (The Only Recipe You’ll Ever Need)

    We all have that moment—you know, when the bananas on your counter have turned completely brown and spotty, and you’re wondering what to do with them. That, my friend, is the universe telling you it’s time to make banana bread.

    This recipe has been in my family for years, and it’s the one I come back to again and again. It produces a loaf that’s incredibly moist, deeply flavored with sweet bananas, and topped with a slightly crunchy, caramelized crust that is simply perfection.

    It’s not fancy or complicated—just simple, honest, soul-warming banana bread that never disappoints. Whether you’re a seasoned baker or making banana bread for the first time, this recipe is about to become your go-to.

    Ingredients

    Makes 1 loaf (9×5 inch loaf pan).

    For the Banana Bread:

    • 1 ¾ cups (220g) all-purpose flour
    • 1 teaspoon baking soda
    • ½ teaspoon salt
    • ½ teaspoon ground cinnamon (optional, but highly recommended)
    • ½ cup (115g) unsalted butter, softened
    • ¾ cup (150g) granulated sugar
    • ¼ cup (50g) light brown sugar, packed
    • 2 large eggs, at room temperature
    • 2 teaspoons vanilla extract
    • 4 medium very ripe bananas, mashed (about 1 ½ cups)
    • ¼ cup (60g) sour cream or plain Greek yogurt, at room temperature

    Optional Add-Ins:

    • ½ cup chopped walnuts or pecans
    • ½ cup chocolate chips
    • 1 tablespoon turbinado sugar (for sprinkling on top)

    Step-by-Step Instructions

    1. Preheat and Prepare:

    1. Preheat your oven to 350°F (175°C). Grease a 9×5 inch loaf pan and line with parchment paper, leaving overhang on the long sides for easy removal.

    2. Combine Dry Ingredients:

    1. In a medium bowl, whisk together the flour, baking soda, salt, and cinnamon (if using). Set aside.

    3. Cream Butter and Sugars:

    1. In a large bowl, beat the softened butter, granulated sugar, and brown sugar together with an electric mixer until light and fluffy, about 2-3 minutes.

    4. Add Wet Ingredients:

    1. Add the eggs one at a time, beating well after each addition. Scrape down the sides of the bowl.
    2. Beat in the vanilla extract.
    3. Add the mashed bananas and sour cream, and mix until combined. The mixture may look slightly curdled—that’s perfectly normal.

    5. Combine Wet and Dry:

    1. Gradually add the dry ingredients to the wet ingredients, mixing on low speed or folding with a spatula until just combined. Do not overmix—a few streaks of flour are fine.
    2. If adding nuts or chocolate chips, fold them in gently now.

    6. Bake:

    1. Pour the batter into the prepared loaf pan and spread it evenly.
    2. If desired, sprinkle turbinado sugar over the top for a crunchy crust.
    3. Bake for 55-65 minutes, until a toothpick inserted into the center comes out clean or with just a few moist crumbs.
    4. If the top is browning too quickly, tent loosely with foil for the last 15-20 minutes.

    7. Cool and Serve:

    1. Let the banana bread cool in the pan for 15-20 minutes.
    2. Use the parchment overhang to lift the loaf onto a wire rack to cool completely before slicing. I know it’s hard to wait, but this prevents the bread from becoming gummy!

    Summary

    Prep Time: 15 minutes | Bake Time: 55-65 minutes | Cooling Time: 20 minutes | Total Time: 1 hour 30 minutes

    Yield: 1 loaf (10-12 slices)

    Difficulty: Easy

    Storage and Make-Ahead Tips

    How to Store:

    Wrap banana bread tightly in plastic wrap or store in an airtight container at room temperature for up to 4 days. The moisture actually improves over the first day or two!

    Can You Freeze It?

    Absolutely! Banana bread freezes beautifully. Wrap the cooled loaf (or individual slices) tightly in plastic wrap, then in foil, and place in a freezer bag. Freeze for up to 3 months. Thaw at room temperature or warm slices in the microwave for 15-20 seconds.

    Make-Ahead for Gifts or Events:

    Banana bread is actually better the next day, making it perfect for making ahead. Bake a day or two before you need it and store at room temperature.

    Using Overripe Bananas:

    If you have bananas that are too ripe to use now, peel them and freeze in a zip-top bag. Thaw and use directly in banana bread—they’ll be even softer and more flavorful!

  • Crispy, Cheesy, and Elegant: How to Make Perfect Chicken Cordon Bleu at Home

    Crispy, Cheesy, and Elegant: How to Make Perfect Chicken Cordon Bleu at Home

    If you’re looking for a dish that feels restaurant-worthy but is completely doable in your own kitchen, Chicken Cordon Bleu is the answer.

    This classic recipe features tender chicken breasts stuffed with savory ham and melted cheese, then breaded and baked (or fried) until golden and crisp. Slice into it, and you’re rewarded with a gooey, cheesy center wrapped in juicy chicken and a crunchy crust.

    Despite its elegant appearance, Chicken Cordon Bleu is surprisingly straightforward when broken down step by step. Let’s walk through exactly how to make it perfectly every time.


    Why You’ll Love This Chicken Cordon Bleu

    • Crispy golden exterior
    • Gooey, melty cheese center
    • Juicy, tender chicken
    • Impressive presentation
    • Perfect for special dinners or family meals

    This dish combines textures and flavors beautifully—salty ham, creamy cheese, and seasoned chicken all in one satisfying bite.


    Ingredients You’ll Need

    For the Chicken:

    • 4 boneless, skinless chicken breasts
    • Salt and black pepper, to taste
    • 4 slices deli ham
    • 4 slices Swiss cheese (or Gruyère)

    For the Breading:

    • 1 cup all-purpose flour
    • 2 large eggs
    • 1 cup breadcrumbs (panko or regular)
    • ½ teaspoon garlic powder
    • ½ teaspoon paprika

    For Cooking:

    • 2 tablespoons olive oil or melted butter

    Optional Cream Sauce:

    • 2 tablespoons butter
    • 2 tablespoons flour
    • 1 cup milk
    • ½ cup chicken broth
    • ½ teaspoon Dijon mustard
    • Salt and pepper to taste

    Step 1: Prepare the Chicken

    Place each chicken breast between two sheets of plastic wrap. Using a meat mallet or rolling pin, gently pound the chicken to about ¼-inch thickness.

    Pounding ensures even cooking and makes rolling easier. Be careful not to tear the meat.

    Season both sides lightly with salt and pepper.


    Step 2: Add the Filling

    Lay one slice of ham and one slice of Swiss cheese on each flattened chicken breast.

    Keep the filling centered and avoid placing it too close to the edges to prevent leakage during cooking.


    Step 3: Roll and Secure

    Starting from the narrower end, tightly roll each chicken breast into a log shape.

    Secure with toothpicks if necessary to keep everything tightly wrapped.

    Place the rolled chicken seam-side down while preparing the breading station.


    Step 4: Set Up the Breading Station

    Prepare three shallow bowls:

    1. Bowl 1: Flour
    2. Bowl 2: Beaten eggs
    3. Bowl 3: Breadcrumbs mixed with garlic powder and paprika

    This three-step breading process ensures a crisp, even coating.


    Step 5: Bread the Chicken

    Roll each chicken piece first in flour, shaking off excess.

    Next, dip into the beaten eggs, coating completely.

    Finally, roll in the seasoned breadcrumbs, pressing gently so the crumbs adhere well.

    Place breaded chicken on a plate or baking sheet.


    Step 6: Preheat the Oven

    Preheat your oven to 375°F (190°C).

    Lightly grease a baking dish or line a baking sheet with parchment paper.


    Step 7: Sear for Extra Crispiness (Optional but Recommended)

    For a crispier crust, heat olive oil or melted butter in a skillet over medium heat.

    Sear the chicken rolls for 2–3 minutes per side until lightly golden. This step enhances texture and flavor.

    Transfer the seared chicken to the prepared baking dish.


    Step 8: Bake Until Perfect

    Bake for 25–30 minutes, or until the internal temperature reaches 165°F (74°C).

    If the crust begins browning too quickly, loosely cover with foil.

    Remove toothpicks carefully after baking.


    Step 9: Prepare the Optional Cream Sauce

    While the chicken bakes, melt butter in a small saucepan over medium heat.

    Whisk in flour and cook for 1–2 minutes to remove raw taste.

    Slowly whisk in milk and chicken broth, stirring constantly until thickened.

    Add Dijon mustard, salt, and pepper. Simmer gently until smooth and creamy.


    Step 10: Rest and Serve

    Allow the chicken to rest for 5 minutes before slicing. Resting helps the juices redistribute and keeps the chicken moist.

    Slice into rounds to reveal the beautiful spiral of ham and melted cheese.

    Drizzle with cream sauce if desired and serve immediately.


    Flavor and Texture Highlights

    • Crisp, golden breadcrumb crust
    • Tender, juicy chicken
    • Salty ham with creamy, melted cheese
    • Smooth, slightly tangy mustard cream sauce

    Each bite offers crunch on the outside and rich, savory comfort on the inside.


    Tips for Perfect Chicken Cordon Bleu

    Pound evenly. Uneven thickness leads to uneven cooking.

    Roll tightly. This prevents cheese from leaking out.

    Secure well. Toothpicks help maintain shape during cooking.

    Use good-quality cheese. Swiss or Gruyère melts beautifully and adds depth.

    Don’t overbake. Overcooking dries out the chicken.


    Optional Variations

    • Air Fryer Version: Cook at 375°F for 18–20 minutes, flipping halfway.
    • Spicy Twist: Add a thin layer of Dijon mustard inside before rolling.
    • Herb Crust: Mix dried thyme or parsley into breadcrumbs.
    • Prosciutto Upgrade: Substitute ham with prosciutto for a more refined flavor.
    • Low-Carb Option: Replace breadcrumbs with crushed pork rinds or almond flour.

    Storage and Reheating

    Store leftovers in an airtight container in the refrigerator for up to 3 days.

    Reheat in a 350°F (175°C) oven for 10–15 minutes to maintain crispness. Avoid microwaving if possible, as it softens the crust.


    Why This Recipe Works

    Chicken Cordon Bleu succeeds because it balances texture and flavor. The chicken remains juicy thanks to pounding and proper baking time. The ham adds savory depth, while the melted cheese provides creamy richness. The breadcrumb coating creates a satisfying crunch that contrasts beautifully with the soft interior.

    Searing before baking enhances crispness, while resting preserves moisture. The optional cream sauce adds an extra layer of indulgence without overpowering the main flavors.


    With its crispy crust, tender chicken, and gooey, cheesy center, Chicken Cordon Bleu is a dish that feels luxurious yet is completely achievable at home. Whether served with roasted vegetables, mashed potatoes, or a simple green salad, it’s guaranteed to impress.

    Elegant, comforting, and packed with flavor, this classic recipe will quickly become a favorite in your kitchen.

  • Saucy, Cheesy, and Irresistible: The Ultimate Homemade Beef Enchiladas

    Saucy, Cheesy, and Irresistible: The Ultimate Homemade Beef Enchiladas

    There’s nothing quite like a bubbling dish of Beef Enchiladas fresh from the oven.

    Tender tortillas wrapped around savory, seasoned beef, smothered in rich enchilada sauce, and topped with melty cheese—this is comfort food at its finest.

    Whether you’re cooking for a family dinner, meal prepping for the week, or hosting friends, beef enchiladas are always a crowd-pleaser.

    This step-by-step guide will walk you through creating flavorful, authentic-style beef enchiladas right in your own kitchen.


    Why You’ll Love This Recipe

    • Hearty and satisfying
    • Packed with bold, savory flavor
    • Perfect for feeding a crowd
    • Easy to customize
    • Great for leftovers and meal prep

    With simple ingredients and clear steps, you’ll have a delicious tray of enchiladas ready in under an hour.


    Ingredients You’ll Need

    For the Beef Filling:

    • 1 pound ground beef
    • 1 small onion, finely diced
    • 2 cloves garlic, minced
    • 1 tablespoon chili powder
    • 1 teaspoon ground cumin
    • ½ teaspoon smoked paprika
    • ½ teaspoon salt
    • ¼ teaspoon black pepper
    • ½ cup tomato sauce

    For Assembly:

    • 8 small flour or corn tortillas
    • 2 cups red enchilada sauce (store-bought or homemade)
    • 2 cups shredded Mexican blend or cheddar cheese
    • Optional: chopped cilantro, sliced jalapeños, sour cream

    Step 1: Preheat the Oven

    Preheat your oven to 375°F (190°C). Lightly grease a 9×13-inch baking dish with cooking spray or a thin layer of oil to prevent sticking.


    Step 2: Prepare the Beef Filling

    In a large skillet over medium heat, add the ground beef. Break it apart with a wooden spoon and cook until browned, about 5–7 minutes.

    Add the diced onion and cook for another 3–4 minutes until softened. Stir in the minced garlic and cook for 30 seconds until fragrant.

    Drain any excess grease from the pan to prevent the enchiladas from becoming oily.


    Step 3: Season the Meat

    Add chili powder, cumin, smoked paprika, salt, and black pepper to the skillet. Stir well to evenly coat the beef.

    Pour in ½ cup tomato sauce and stir to combine. Let the mixture simmer for 3–5 minutes until slightly thickened and flavorful. Remove from heat.

    The filling should be moist but not watery.


    Step 4: Warm the Tortillas

    Warming tortillas prevents cracking when rolling.

    You can:

    • Wrap them in a damp paper towel and microwave for 30 seconds, or
    • Lightly heat each tortilla in a dry skillet for 10–15 seconds per side

    Keep them covered to stay warm and pliable.


    Step 5: Prepare the Baking Dish

    Spread about ½ cup of enchilada sauce evenly across the bottom of the prepared baking dish. This prevents sticking and adds flavor to the base layer.


    Step 6: Fill and Roll the Enchiladas

    Lay one tortilla flat on a clean surface. Spoon about 2–3 tablespoons of the beef filling down the center. Sprinkle a small handful of cheese over the filling.

    Roll the tortilla tightly and place it seam-side down in the baking dish.

    Repeat with the remaining tortillas, arranging them snugly side by side.


    Step 7: Add Sauce and Cheese

    Pour the remaining enchilada sauce evenly over the rolled tortillas, making sure they’re fully covered. This keeps them moist while baking.

    Sprinkle the remaining shredded cheese generously over the top.


    Step 8: Bake to Perfection

    Cover the baking dish loosely with foil and bake for 20 minutes.

    Remove the foil and bake for another 10–15 minutes, or until the cheese is melted, bubbly, and slightly golden.

    For extra browning, broil for 1–2 minutes at the end—but watch carefully to avoid burning.


    Step 9: Let Them Rest

    Allow the enchiladas to rest for 5–10 minutes after removing them from the oven. This helps the filling set and makes serving easier.


    Step 10: Garnish and Serve

    Top with chopped cilantro, sliced jalapeños, or a dollop of sour cream for added freshness and contrast.

    Serve with:

    • Mexican rice
    • Refried beans
    • Guacamole
    • A crisp side salad

    Flavor and Texture Highlights

    • Tender tortillas soaked in savory sauce
    • Juicy, seasoned beef filling
    • Melted, gooey cheese topping
    • Rich, slightly spicy enchilada sauce

    Every bite is a balance of warmth, spice, and cheesy comfort.


    Tips for the Best Beef Enchiladas

    Don’t skip warming the tortillas. Cold tortillas crack easily when rolled.

    Use enough sauce. Dry enchiladas can ruin the dish—be generous but not excessive.

    Drain excess grease. This prevents a greasy final result.

    Customize the spice level. Add diced green chilies or extra chili powder for more heat.

    Make ahead. Assemble the enchiladas, cover tightly, and refrigerate up to 24 hours before baking. Add 5–10 extra minutes to bake time if starting cold.


    Optional Variations

    • Add Beans: Mix black beans into the beef filling.
    • Vegetable Boost: Add sautéed bell peppers or corn.
    • Creamy Version: Stir 2 tablespoons of cream cheese into the beef mixture.
    • Green Enchiladas: Swap red sauce for green enchilada sauce.
    • Low-Carb Option: Use low-carb tortillas or wrap filling in thin grilled zucchini slices.

    Storage and Reheating

    Store leftovers in an airtight container in the refrigerator for up to 4 days.

    Reheat:

    • In the oven at 350°F (175°C) for 15 minutes
    • Or microwave individual portions for 1–2 minutes

    Enchiladas also freeze beautifully. Wrap tightly and freeze for up to 2 months. Thaw overnight before reheating.


    Why This Recipe Works

    This beef enchilada recipe balances moisture, flavor, and texture perfectly. The seasoned beef creates a savory base, the sauce keeps everything tender, and the cheese adds richness and comfort. Baking allows the tortillas to absorb flavor while staying soft and cohesive.

    It’s hearty without being heavy, flavorful without being overpowering, and simple enough for a weeknight meal while impressive enough for guests.


    With its rich sauce, savory beef, and gooey melted cheese, this Beef Enchiladas recipe is guaranteed to become a family favorite. Once you master the basic technique, you can experiment with fillings, sauces, and toppings to make it your own.

    Warm, comforting, and packed with flavor—this is homemade enchilada perfection.