Author: user

  • The Perfect Tuna Melt: Crispy, Melty and Nostalgic Goodness

    The Perfect Tuna Melt: Crispy, Melty and Nostalgic Goodness

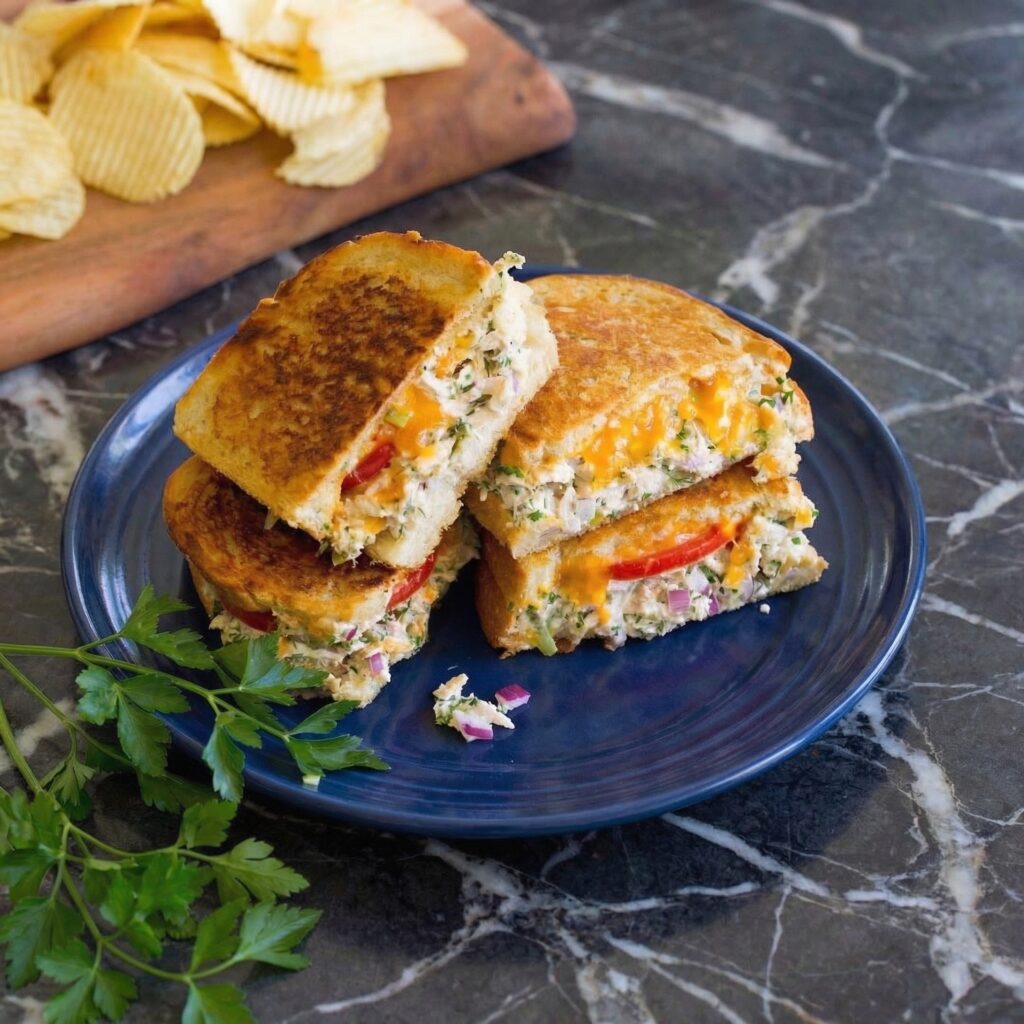
    The tuna melt is a quiet legend. It’s what happens when tuna salad meets grilled cheese, and they decide to become something greater. A crispy, buttery, golden-brown exterior giving way to creamy, tangy tuna and a blanket of melted cheddar that stretches from sandwich to mouth like a delicious promise.

    This is diner food at its best. No frills, no fuss—just good ingredients, proper technique, and the satisfaction of biting into something that tastes like comfort. Make it for lunch, make it for dinner, make it when you need a hug in sandwich form.

    Ingredients

    Serves 2.

    For the Tuna Salad:

    • 2 cans (5 oz each) solid white albacore tuna in water, drained
    • ¼ cup mayonnaise (Hellmann’s or Duke’s are the classics)
    • 1 tbsp Dijon mustard (or yellow mustard for tang)
    • 1 tbsp fresh lemon juice
    • 2 tbsp finely chopped celery (for crunch)
    • 1 tbsp finely chopped red onion or shallot
    • 1 tbsp chopped fresh parsley or dill (optional)
    • Salt and black pepper, to taste

    For the Sandwich:

    • 4 slices sourdough bread (or rye, or hearty white)
    • 4 tbsp unsalted butter, softened
    • 4 slices sharp cheddar cheese (or Swiss, provolone, or American)
    • Optional: Tomato slices, avocado, pickles, or arugula

    Step-by-Step Instructions

    Step 1: Make the Tuna Salad

    1. Drain tuna well—press out excess water with the can lid or a paper towel.
    2. In a medium bowl, flake tuna with a fork. Add mayonnaise, mustard, lemon juice, celery, red onion, and fresh herbs if using.
    3. Stir until combined. Season with salt and pepper to taste. Don’t overmix—you want texture, not paste.

    Step 2: Prep the Bread

    1. Butter one side of each bread slice generously. Use softened butter for easy spreading.

    Step 3: Assemble the Sandwiches

    1. Place two bread slices, buttered-side down, on a clean surface.
    2. Divide the tuna salad between them, spreading it evenly.
    3. Top each with 2 slices of cheese (overlap slightly if needed).
    4. Add any optional toppings like tomato slices or avocado at this point.
    5. Close with the remaining bread slices, buttered-side up.

    Step 4: Griddle to Golden Perfection

    1. Heat a large skillet or griddle over medium heat.
    2. Carefully place sandwiches in the pan. Cook for 3-4 minutes per side until the bread is deep golden brown and crispy, and the cheese is fully melted.
    3. Press down gently with a spatula halfway through each side for even browning.
    4. If the bread is browning too fast before the cheese melts, lower the heat and cover the pan for a minute.

    Step 5: Serve Immediately

    1. Transfer to a cutting board and let rest for 1 minute.
    2. Slice diagonally (the only proper way).
    3. Serve with pickles, potato chips, or a simple side salad.
    4. Take a bite. Let the cheese stretch. Sigh contentedly. This is comfort.

    Summary

    Prep Time: 10 minutes | Cook Time: 8 minutes | Total Time: 18 minutes

    Yield: 2 sandwiches

    Difficulty: Easy comfort

    Storage Notes

    Leftovers:

    Tuna melts are best eaten immediately—the bread loses its crispiness when stored. However, you can store assembled, uncooked sandwiches in the fridge for up to 1 day. Tuna salad keeps separately for up to 3 days.

    Reheating:

    Skillet (best): Reheat over medium-low heat, flipping once, until warmed through and crispy again. Air fryer: 350°F for 3-4 minutes. Microwave: Not recommended—you’ll get a sad, soggy sandwich.

    Make Ahead:

    Make the tuna salad up to 3 days in advance and store in an airtight container in the fridge. Assemble and cook when ready to eat.

    Pro Tips for Tuna Melt Greatness:

    • Drain the tuna well. Excess water makes for watery tuna salad and soggy bread.
    • Use good tuna. Solid white albacore in water has better texture than chunk light.
    • Butter the bread, not the pan. Buttering the bread directly gives you that perfect golden crust.
    • Low and slow wins. Medium heat gives the cheese time to melt before the bread burns.
    • Don’t overmix the tuna. You want flaky chunks, not paste.
    • Cheese matters. Sharp cheddar gives the best flavor, but Swiss or provolone are classic alternatives.
    • Add crunch. Celery in the tuna salad and a few pickles on the side are essential.

    Variations:

    • Open-faced tuna melt: Toast bread, top with tuna salad and cheese, broil until bubbly.
    • Classic diner style: Use rye bread and Swiss cheese. Serve with a pickle spear.
    • Mediterranean tuna melt: Add chopped olives, sun-dried tomatoes, and feta cheese. Use provolone on top.
    • Spicy tuna melt: Add sriracha or chopped pickled jalapeños to the tuna salad. Use pepper jack cheese.
    • Avocado tuna melt: Add sliced avocado under the cheese. Don’t smash—just layer.
    • Bacon tuna melt: Add crispy bacon. Everything is better with bacon.
    • Caprese tuna melt: Add fresh mozzarella, tomato slices, and fresh basil.

    Bread Options:

    • Sourdough: Tangy, sturdy, gets extra crispy. The best choice.
    • Rye: Classic diner style. Adds earthy flavor.
    • Hearty white or Texas toast: Soft, pillowy, nostalgic.
    • Whole wheat or multigrain: A healthier option with nutty flavor.
    • English muffin or bagel: Great for an open-faced version.

    Cheese Options:

    • Sharp cheddar: Bold, tangy, melts beautifully.
    • Swiss: Mild, nutty, classic diner pairing.
    • Provolone: Smooth, melts like a dream.
    • American: Creamy, nostalgic, unbeatable meltability.
    • Pepper jack: Adds a spicy kick.
    • Gruyère: Fancy, nutty, incredible melt.

    Quick Upgrade: Quick-Pickled Red Onions

    Slice a red onion thinly, cover with equal parts water and vinegar, add a pinch of salt and sugar. Let sit 15 minutes. Adds tangy crunch that cuts through the richness perfectly.

  • Kimchi Fried Rice: The 15-Minute Korean Comfort Classic

    Kimchi Fried Rice: The 15-Minute Korean Comfort Classic

    Kimchi fried rice is what happens when leftover rice and that jar of fermented cabbage in your fridge decide to throw a party. And everyone’s invited. It’s tangy, it’s spicy, it’s savory, and it comes together in the time it takes to decide you’re too tired to cook anything complicated.

    This is Korean comfort food at its finest. The kimchi gets all jammy and caramelized in the pan. The rice soaks up that fiery red gochujang sauce. And then—the pièce de résistance—a runny egg with a crispy-edged white, its golden yolk ready to break and coat every single grain. Fifteen minutes, one pan, and dinner is served.

    Ingredients

    Serves 2 very happy people.

    The Rice Situation:

    • 2 cups cooked white rice (day-old, refrigerated rice is the secret weapon)
    • 1 cup kimchi, chopped (the older and funkier, the better)
    • 2 tbsp kimchi juice (squeeze it from the jar—liquid gold)
    • 2 tbsp gochujang (Korean red pepper paste)
    • 1 tbsp soy sauce
    • 1 tbsp sesame oil
    • 2 tbsp neutral oil (vegetable or avocado)
    • 2 green onions, chopped (white and green parts separated)
    • 2 cloves garlic, minced
    • ½ cup protein of choice: spam, bacon, tofu, or leftover chicken (optional, but highly recommended)

    The Toppings Bar:

    • 2 eggs (fried sunny-side up, with runny yolks)
    • Toasted sesame seeds
    • Roasted seaweed (gim), crumbled or cut into strips
    • Extra sesame oil drizzle

    Step-by-Step Instructions

    Step 1: Prep Your Squad

    1. Take your rice out of the fridge. Cold, day-old rice is non-negotiable—fresh rice turns into mushy sadness.
    2. Chop your kimchi into bite-sized pieces. Reserve that juice!
    3. Mix gochujang, soy sauce, and kimchi juice in a small bowl. This is your flavor bomb.

    Step 2: Sizzle the Aromatics

    1. Heat neutral oil in a large skillet or wok over medium-high heat until shimmering.
    2. Toss in the white parts of the green onions and the garlic. Stir for 30 seconds until fragrant.
    3. If using protein (spam, bacon, tofu), add it now and cook until browned and crispy.

    Step 3: Kimchi Gets Caramelized

    1. Add the chopped kimchi to the pan. Let it sizzle and fry for 2-3 minutes, stirring occasionally. You want it to darken and get a little jammy—this deepens the flavor big time.

    Step 4: Rice Joins the Party

    1. Add the cold rice to the pan, breaking up any clumps with your spatula. Toss everything together so the rice gets coated in all that kimchi goodness.
    2. Pour the gochujang sauce mixture over the rice. Stir-fry for 3-4 minutes, letting the rice get slightly crispy in spots. Patience—crispy rice is the goal.

    Step 5: Finish with Fire

    1. Drizzle the sesame oil over the rice and toss one last time. Turn off the heat.
    2. Stir in the green parts of the onions—they’ll wilt slightly from the residual heat.

    Step 6: Egg on Top

    1. In a separate pan, fry your eggs sunny-side up until the whites are set but the yolks are gloriously runny.
    2. Divide the rice between two bowls. Top each with a fried egg, a shower of sesame seeds, and crumbled seaweed.
    3. Break that yolk. Watch it cascade down. Take a bite. Grin uncontrollably.

    Summary

    Prep Time: 5 minutes | Cook Time: 10 minutes | Total Time: 15 minutes

    Yield: 2 servings

    Difficulty: Easy enough for a Tuesday

    Storage Notes

    Leftovers:

    Store in an airtight container in the fridge for up to 3 days. The flavors actually get deeper and more delicious overnight.

    Reheating:

    Skillet or wok over medium heat is the move—add a splash of water or sesame oil to bring it back to life. Microwave works, but you’ll lose the crispy edges (still tastes great though).

    Pro Tip:

    Make extra rice on purpose. Cold, leftover rice is the only way to nail fried rice. Fresh rice turns to paste. You’ve been warned.

  • One-Pan Cherry Tomato Gnocchi: The Easiest Dinner You’ll Make All Week

    One-Pan Cherry Tomato Gnocchi: The Easiest Dinner You’ll Make All Week

    Let’s talk about the kind of dinner that feels fancy but is secretly lazy. This cherry tomato gnocchi is exactly that. You toss a pint of cherry tomatoes into a pan with some garlic and olive oil, let them get all blistered and jammy, then toss in pillowy potato gnocchi to soak up that incredible sauce.

    No boiling water. No draining. No massive cleanup. Just one pan, 20 minutes, and dinner that tastes like it came from a little Italian trattoria. The tomatoes break down into this silky, slightly sweet sauce that coats every single gnocchi. Add a handful of fresh basil and a snowstorm of parmesan, and you’re in business.

    Ingredients

    Serves 2-3 hungry humans.

    For the Gnocchi:

    • 1 lb (450g) store-bought potato gnocchi (fresh or shelf-stable both work)
    • 2 tbsp olive oil
    • 2 cups cherry tomatoes (mix colors if you’re feeling fancy)
    • 3 cloves garlic, thinly sliced
    • ¼ tsp red pepper flakes (optional, for heat)
    • Salt and black pepper, to taste
    • Handful of fresh basil leaves, torn
    • Freshly grated parmesan cheese, for finishing

    Optional Add-Ins:

    • Handful of fresh spinach (stir in at the end to wilt)
    • Burrata or fresh mozzarella pearls for extra creaminess
    • Lemon zest to brighten it up
    • Toasted pine nuts for crunch

    Step-by-Step Instructions

    Step 1: Get That Pan Hot

    1. Heat olive oil in a large skillet over medium heat. A non-stick or well-seasoned cast iron works best.
    2. Add the cherry tomatoes and let them hang out undisturbed for 2-3 minutes. You want them to start blistering and getting color.

    Step 2: Make It Saucy

    1. Toss in the sliced garlic and red pepper flakes. Cook for another minute until fragrant—your kitchen should smell incredible right about now.
    2. Using a wooden spoon, gently smash some of the tomatoes to release their juices. Leave some whole for texture. Season with salt and pepper.

    Step 3: Gnocchi Goes In

    1. Add the gnocchi directly to the pan (no boiling needed!). Stir everything together so the gnocchi gets coated in that tomato goodness.
    2. Cover and cook for 5 minutes. The gnocchi will cook right in the tomato juices and release a little starch, which helps thicken the sauce.

    Step 4: Stir and Finish

    1. Uncover and give everything a good stir. The gnocchi should be tender and the sauce should be clinging to every pillow.
    2. If using spinach, stir it in now and let it wilt for a minute.
    3. Remove from heat and toss in most of the torn basil.

    Step 5: The Grand Finale

    1. Transfer to serving bowls. Top with a generous shower of grated parmesan—don’t hold back.
    2. Scatter the remaining basil on top and add a crack of fresh black pepper.
    3. Serve immediately with crusty bread to soak up any extra sauce. Lick the pan when nobody’s watching.

    Summary

    Prep Time: 5 minutes | Cook Time: 15 minutes | Total Time: 20 minutes

    Yield: 2-3 servings

    Difficulty: Embarrassingly easy

    Storage Notes

    Leftovers:

    Store in an airtight container in the fridge for up to 3 days. The gnocchi will absorb some sauce overnight and get even more flavorful.

    Reheating:

    The skillet is your friend. Reheat over medium-low heat with a splash of water or extra olive oil to loosen the sauce back up. Microwave works in a pinch, but the texture won’t be as dreamy.

    Freezer-Friendly?

    You can freeze the tomato sauce separately, but cooked gnocchi get weird when frozen and thawed. Best to make fresh—it’s only 20 minutes!

  • The Smoked Salmon Bagel: 5 Minutes to Brunch Heaven

    The Smoked Salmon Bagel: 5 Minutes to Brunch Heaven

    Some meals are more than just food. The smoked salmon bagel? It’s a vibe. That first bite—the chewy crust giving way to cool, tangy cream cheese and buttery ribbons of salmon—hits different. It’s brunch at your favorite café, but you’re in sweatpants and the coffee is exactly how you like it.

    The magic is in the contrast. Salty capers pop against the rich fish. Sharp red onion cuts through the cream cheese. Fresh dill makes it all taste garden-fresh. And the best part? This entire masterpiece comes together in about five minutes flat.

    Ingredients

    Serves 2 lucky people.

    The Lineup:

    • 2 everything bagels (or your favorite—sesame, poppy, plain)
    • 4 oz cream cheese, softened (splurge on the good stuff)
    • 4 oz smoked salmon or lox
    • ¼ small red onion, shaved paper-thin
    • 2 tbsp capers, drained and roughly chopped (or leave whole)
    • Fresh dill, for that fresh-from-the-garden finish

    Extras (Because Why Not?):

    • Sliced tomato, lemon wedges, cracked pepper
    • Cucumber ribbons for extra crunch

    Step-by-Step Instructions

    Step 1: Bagel Time

    1. Slice your bagels in half. Give them a good toast until golden and crisp around the edges. This isn’t optional—toasting builds the foundation.

    Step 2: Schmear Campaign

    1. Let your cream cheese soften while the bagels toast. Spread it on thick and generous, all the way to the edges. This is your flavor base, so don’t be shy.

    Step 3: Salmon Goes On

    1. Drape the smoked salmon over the cream cheese. For bonus points, fold it into loose ribbons or little rosettes. It looks fancy and creates tiny pockets for the toppings to nestle into.

    Step 4: Topping Frenzy

    1. Sprinkle on the red onion, then scatter the capers evenly so every bite gets that briny pop.
    2. Tuck a few sprigs of fresh dill on top. It’s pretty and tastes like spring.

    Step 5: The Finish Line

    1. Squeeze a little lemon over everything if you’re using it. Crack some black pepper on top for a warm kick.
    2. Top with the other bagel half, or serve open-faced so everyone can admire your work.
    3. Serve immediately with a pile of potato chips or a pickle spear. Close your eyes. Take a bite. You’re officially brunch royalty.

    Summary

    Prep Time: 5 minutes | Cook Time: 3 minutes (toasting) | Total Time: 8 minutes

    Yield: 2 servings

    Difficulty: So easy it’s almost not a recipe

    Storage Notes

    Keep It Fresh:

    This is a now-food. Assembled bagels turn into sad, soggy sandwiches fast. Store components separately instead.

    Component Prep:

    • Salmon: Keep wrapped tight in the fridge. Use within 3 days of opening.
    • Onion: Slice fresh each time—pre-sliced onions get funky fast.
    • Cream Cheese: Store plain, or mix in herbs up to 2 days ahead for extra flavor.

    Brunch Hack:

    Set up a bagel bar! Lay out all the ingredients and let everyone build their own. Less work for you, more fun for everyone.

  • The Ultimate Stromboli: A Pizzeria Classic, Baked at Home

    The Ultimate Stromboli: A Pizzeria Classic, Baked at Home

    Meet the Stromboli: the rolled-up, stuffed-to-the-brim cousin of pizza that deserves a permanent spot on your dinner rotation. Imagine a crisp, golden-brown crust giving way to layer after layer of spicy Italian meats and a catastrophic amount of melted cheese. It’s pizza night, but make it an adventure.

    The best part? It’s deceptively simple. With store-bought or homemade dough, you can roll this beauty up in minutes and have a crowd-pleasing meal on the table fast. No pizza stone, no special skills—just pure, carb-loaded satisfaction.

    Ingredients

    Serves 4.

    For the Stromboli:

    • 1 lb pizza dough (store-bought or homemade), at room temperature
    • 1/2 cup pizza sauce, plus more for dipping
    • 6 oz sliced mozzarella cheese (low-moisture works best)
    • 4 oz sliced salami
    • 4 oz sliced ham or prosciutto
    • 1/4 cup grated Parmesan cheese
    • 1 egg, beaten (for egg wash)
    • Optional: Pepperoni, cooked sausage, sautéed mushrooms, banana peppers

    For the Topping:

    • Sesame seeds or everything bagel seasoning (optional, for crunch)
    • Flaky sea salt
    • Dried oregano or Italian seasoning

    Step-by-Step Instructions

    Step 1: Preheat and Prep

    1. Preheat your oven to 400°F (200°C). Line a baking sheet with parchment paper.
    2. On a lightly floured surface, roll out the pizza dough into a rough 10×12-inch rectangle, about ¼-inch thick.

    Step 2: Layer the Fillings

    1. Spread the pizza sauce in a thin layer over the dough, leaving a 1-inch border around the edges. Going too heavy on sauce will make it soggy.
    2. Lay the mozzarella slices evenly over the sauce.
    3. Layer the salami and ham over the cheese. Don’t overstuff, or it will burst!
    4. Sprinkle with grated Parmesan.

    Step 3: Roll It Up

    1. Starting from one of the long sides, tightly roll the dough into a log, tucking in the fillings as you go. Pinch the seam firmly to seal.
    2. Fold the ends under the log and pinch to seal, so the cheese doesn’t escape during baking.

    Step 4: Score and Egg Wash

    1. Place the Stromboli seam-side down on the prepared baking sheet.
    2. Brush the entire surface with the beaten egg wash—this is the secret to that gorgeous golden crust.
    3. Cut 3-4 small slits across the top with a sharp knife to let steam escape.
    4. Sprinkle with sesame seeds, flaky salt, and dried oregano for a pizzeria-style finish.

    Step 5: Bake to Golden Perfection

    1. Bake for 20-25 minutes, until the crust is deep golden brown and the filling is bubbling up through the slits.
    2. Let it rest on the baking sheet for at least 5-10 minutes before slicing. This is crucial—cutting too early turns it into a cheese explosion.

    Step 6: Slice and Serve

    1. Use a serrated knife to slice the Stromboli into 2-inch thick pieces. The gentle sawing motion prevents squishing.
    2. Serve warm with extra pizza sauce and maybe some ranch dressing on the side for dipping. Watch it disappear.

    Summary

    Prep Time: 15 minutes | Cook Time: 25 minutes | Total Time: 40 minutes

    Yield: 4 servings

    Difficulty: Easy

    Storage Notes

    Leftovers:

    Store leftover slices in an airtight container in the fridge for up to 3 days. Reheat in a 350°F oven or air fryer for 5-7 minutes to bring back the crunch. The microwave works, but the crust will be sad and chewy.

    Freezer-Friendly:

    You can freeze an unbaked Stromboli! Assemble it, wrap tightly in plastic wrap, and freeze for up to 3 months. Bake from frozen, adding 10-15 minutes to the cook time. Alternatively, bake first, then freeze leftovers for a quick future lunch.

  • Eggs Benedict: The Brunch Dish That’s Worth the Hype

    Eggs Benedict: The Brunch Dish That’s Worth the Hype

    There are a few dishes that define the art of brunch, and Eggs Benedict sits proudly at the top of that list. It’s the dish you order when you want to feel fancy, the one that arrives at your table looking so perfect you almost don’t want to cut into it. Almost.

    But here’s the secret: you don’t need to wait for a special brunch out to enjoy this classic. With a little patience and the right technique, you can create restaurant-worthy Eggs Benedict right in your own kitchen.

    We’ll walk through every component—the poached eggs with their runny golden yolks, the perfectly toasted English muffin, the salty Canadian bacon, and the crowning glory: a silky, lemony Hollandaise sauce that’s surprisingly doable at home. Let’s make brunch magic happen.

    Ingredients

    Serves 4.

    For the Poached Eggs:

    • 8 large eggs (the fresher, the better—fresh eggs hold their shape)
    • 1 tablespoon white vinegar (helps the egg whites coagulate)
    • Salt, for the water

    For the Hollandaise Sauce:

    • 3 large egg yolks
    • 1 tablespoon fresh lemon juice
    • 1 tablespoon cold water
    • 1 stick (½ cup / 115g) unsalted butter, melted and kept hot
    • Pinch of cayenne pepper
    • Salt and white pepper, to taste

    For Assembly:

    • 4 English muffins, split in half
    • 8 slices Canadian bacon (or thin ham slices)
    • Butter, for the muffins
    • Fresh parsley or chives, chopped, for garnish
    • Paprika, for sprinkling (optional)

    Step-by-Step Instructions

    Part 1: Make the Hollandaise Sauce (The Star of the Show)

    Note: Hollandaise is best made fresh and served immediately. Have all your ingredients ready before you start.

    Step 1: Whisk the Egg Yolks

    1. Place the egg yolks, lemon juice, and cold water in a blender. Blend for about 1 minute until the mixture is light and frothy.
    2. Alternatively, use a double boiler: whisk the yolks, lemon juice, and water in a heatproof bowl over gently simmering water until the mixture thickens and leaves a ribbon trail when the whisk is lifted.

    Step 2: Emulsify with Butter

    1. With the blender running, slowly drizzle the hot melted butter through the opening in the lid in a thin, steady stream. The sauce will immediately begin to thicken and become glossy.
    2. If using the double boiler method, add the melted butter drop by drop at first, then in a thin stream, whisking constantly until the sauce is thick and smooth.

    Step 3: Season and Keep Warm

    1. Stir in a pinch of cayenne pepper, salt, and white pepper to taste.
    2. Cover the sauce and keep it warm by placing the blender container or bowl over a pot of warm (not hot) water. Do not let it get too hot, or the sauce may separate.

    Part 2: Poach the Eggs

    Step 4: Prepare the Poaching Water

    1. Fill a large, deep skillet or saucepan with about 2-3 inches of water. Add the vinegar and a pinch of salt. Bring to a boil, then reduce the heat to a gentle simmer (small bubbles rising, but not a rolling boil).

    Step 5: Create a Vortex (Optional but Helpful)

    1. Crack one egg into a small cup or ramekin. Using a spoon, stir the simmering water in a circular motion to create a gentle vortex.
    2. Carefully slide the egg into the center of the vortex. The swirling water will help wrap the egg white around the yolk.
    3. Repeat with remaining eggs, cooking 2-3 at a time to avoid overcrowding.

    Step 6: Cook and Remove

    1. Let the eggs poach for 3-4 minutes for runny yolks, or 5 minutes for firmer yolks. The whites should be set and opaque.
    2. Remove the eggs with a slotted spoon and transfer them to a plate lined with paper towels to drain excess water. Trim any ragged edges if desired.

    Part 3: Assemble the Eggs Benedict

    Step 7: Prepare the Base

    1. While the eggs poach, toast the English muffin halves until golden brown. Butter them lightly.
    2. In a separate skillet, warm the Canadian bacon slices over medium heat until heated through, about 1 minute per side.

    Step 8: Bring It All Together

    1. Place two toasted English muffin halves on each plate, buttered side up.
    2. Top each half with a slice of Canadian bacon.
    3. Gently place a poached egg on top of each bacon slice.
    4. Spoon the warm Hollandaise sauce generously over the eggs, letting it cascade down the sides.

    Step 9: Garnish and Serve Immediately

    1. Sprinkle with chopped fresh parsley or chives and a dusting of paprika, if desired.
    2. Serve at once—this dish waits for no one!

    Summary

    Prep Time: 10 minutes | Cook Time: 25 minutes | Total Time: 35 minutes

    Yield: 4 servings

    Difficulty: Intermediate

    Storage Notes

    Can You Make Eggs Benedict Ahead?

    Eggs Benedict is truly best enjoyed fresh, right after preparation. However, you can prep components in advance:

    • Hollandaise Sauce: Can be made 1-2 hours ahead and kept warm in a thermos or in a bowl set over warm water. Stir occasionally. Do not refrigerate and reheat—it will likely separate.
    • Poached Eggs: You can poach eggs up to a day ahead. Immediately after cooking, transfer them to a bowl of ice water to stop the cooking process. Store in the refrigerator. To reheat, slip them into simmering water for 30-60 seconds just before serving.
    • Canadian Bacon and Muffins: These can be prepped just before serving; they’re quick to warm and toast.
  • Creamy, Peppery Perfection: How to Make Authentic Cacio e Pepe at Home

    Creamy, Peppery Perfection: How to Make Authentic Cacio e Pepe at Home

    Few pasta dishes prove that simple ingredients can create extraordinary flavor quite like Cacio e Pepe.

    This iconic Roman dish translates literally to “cheese and pepper,” yet the result is far more complex than the name suggests. With just pasta, Pecorino Romano cheese, black pepper, and pasta water, you can create a silky, creamy sauce that coats every strand of pasta beautifully.

    The magic of Cacio e Pepe lies in technique rather than complicated ingredients.

    When done correctly, the starch from the pasta water emulsifies with the cheese to create a smooth sauce without any cream or butter. The freshly cracked black pepper adds warmth and aroma, balancing the salty richness of the cheese.

    In this guide, you’ll learn how to make authentic Cacio e Pepe step by step, along with helpful tips to ensure the sauce turns out perfectly creamy every time.


    What Makes Cacio e Pepe Special

    Cacio e Pepe is a traditional dish from Rome that has been enjoyed for centuries. Originally created by shepherds who traveled with simple ingredients, the dish relies on pantry staples that were easy to carry and store.

    Despite its simplicity, Cacio e Pepe requires attention to detail. The key is properly combining the cheese and pasta water to create a smooth, glossy sauce that clings to the pasta rather than clumping.

    When executed well, the result is a luxurious pasta dish that tastes rich, bold, and comforting.


    Ingredients

    To serve 3–4 people, you will need:

    • 400 grams spaghetti or tonnarelli pasta
    • 1 ½ cups finely grated Pecorino Romano cheese
    • 2 teaspoons freshly cracked black pepper
    • Salt for the pasta water
    • 1–2 cups reserved pasta cooking water

    Using freshly grated Pecorino Romano is crucial. Pre-grated cheese often contains anti-caking agents that can prevent the sauce from emulsifying properly.


    Step 1: Bring the Pasta Water to a Boil

    Fill a large pot with water and bring it to a rolling boil.

    Add a generous amount of salt to the water. The pasta water should taste slightly salty, as this helps season the pasta from the inside.

    Once the water is boiling, add the pasta and cook according to the package instructions until al dente.


    Step 2: Reserve the Pasta Water

    Before draining the pasta, scoop out about 1–2 cups of pasta cooking water and set it aside.

    This starchy water is the secret ingredient that helps create the creamy sauce. The starch binds the cheese and pepper together, forming the signature silky texture.


    Step 3: Toast the Black Pepper

    While the pasta cooks, place a large skillet over medium heat.

    Add the freshly cracked black pepper to the dry skillet and toast it for about 1 minute.

    Toasting the pepper intensifies its aroma and releases its natural oils, giving the dish its characteristic peppery flavor.


    Step 4: Add Pasta Water to the Pepper

    Pour about ½ cup of the reserved pasta water into the skillet with the toasted pepper.

    Allow the mixture to simmer gently for a minute. This step helps infuse the water with the pepper’s flavor and prepares the base for the sauce.


    Step 5: Add the Cooked Pasta

    Using tongs, transfer the cooked pasta directly into the skillet with the pepper and pasta water.

    Toss the pasta so it becomes fully coated in the pepper-infused liquid.

    Let it cook for about 1 minute while stirring constantly.


    Step 6: Remove the Pan from Heat

    Before adding the cheese, remove the skillet from the heat.

    This step is crucial because excessive heat can cause the cheese to clump instead of melting smoothly.

    Allow the pasta to cool slightly for about 30 seconds.


    Step 7: Add the Pecorino Romano

    Gradually sprinkle the grated Pecorino Romano cheese over the pasta while tossing continuously.

    Add the cheese in small batches rather than all at once. This helps the cheese melt evenly and combine with the pasta water to form a creamy sauce.

    If the mixture seems too thick, add a splash of reserved pasta water and keep tossing.


    Step 8: Emulsify the Sauce

    Continue tossing the pasta until the cheese and pasta water form a smooth, glossy sauce that coats every strand.

    The starch from the pasta water binds with the cheese to create the creamy texture without needing cream or butter.

    If necessary, add small amounts of pasta water until the sauce reaches the desired consistency.


    Step 9: Taste and Adjust

    Taste the pasta and adjust the seasoning if needed.

    Since Pecorino Romano is quite salty, additional salt is usually unnecessary. However, you may want to add a bit more black pepper for extra spice.


    Step 10: Serve Immediately

    Cacio e Pepe is best enjoyed immediately while the sauce is hot and silky.

    Divide the pasta among serving bowls and sprinkle a little extra Pecorino Romano and freshly cracked pepper on top.

    Serve right away for the best texture and flavor.


    Tips for Perfect Cacio e Pepe

    Use finely grated cheese. Finely grated Pecorino melts more smoothly into the sauce.

    Keep the heat low. High heat can cause the cheese to clump rather than emulsify.

    Save enough pasta water. The starch in the water is essential for the creamy sauce.

    Work quickly. The sauce forms best while the pasta is still warm.


    Optional Variations

    While traditional Cacio e Pepe uses only a few ingredients, some cooks like to experiment with small variations.

    You might try:

    • Mixing Pecorino Romano with Parmesan for a milder flavor
    • Adding a small knob of butter for extra richness
    • Using rigatoni or bucatini instead of spaghetti

    These variations can add subtle differences while still preserving the spirit of the classic dish.


    Final Thoughts

    Cacio e Pepe is a beautiful example of how a few humble ingredients can create something truly remarkable. With its creamy cheese sauce, bold black pepper, and perfectly cooked pasta, this Roman classic delivers comfort and elegance in every bite.

    Once you master the simple technique of emulsifying cheese with pasta water, you’ll be able to recreate this restaurant-quality dish anytime at home. It’s quick, satisfying, and proof that great cooking doesn’t always require complicated recipes.

    Serve it hot, enjoy the silky sauce clinging to each strand of pasta, and savor one of Italy’s most beloved comfort foods.

  • Blueberry Muffins

    Blueberry Muffins

    You know those muffins from the bakery—the ones with the tall, domed tops, the crunchy streusel, and the berries so perfectly distributed that every bite has at least three? The ones you can’t resist buying even though you know they cost five times what they should?

    This is that muffin. And now you can make them at home, any time the craving strikes. These jumbo blueberry muffins are everything you want: tender and moist, bursting with fresh blueberries, and topped with a generous, buttery streusel that adds the perfect crunch.

    The secret to those sky-high domes? A hot oven and a simple technique that works every time. Let’s bake the best blueberry muffins of your life.

    Ingredients

    Yields 6 jumbo muffins or 12 standard muffins.

    For the Streusel Topping:

    • ½ cup (65g) all-purpose flour
    • ¼ cup (50g) granulated sugar
    • ¼ cup (50g) light brown sugar, packed
    • ½ teaspoon ground cinnamon
    • Pinch of salt
    • ¼ cup (60g) unsalted butter, melted

    For the Blueberry Muffins:

    • 2 ½ cups (310g) all-purpose flour
    • 1 tablespoon baking powder
    • ½ teaspoon baking soda
    • ½ teaspoon salt
    • ½ cup (115g) unsalted butter, softened
    • 1 cup (200g) granulated sugar
    • 2 large eggs, at room temperature
    • 1 ½ teaspoons vanilla extract
    • 1 teaspoon lemon zest (optional, but recommended)
    • 1 cup (240ml) buttermilk, at room temperature
    • 2 cups (300g) fresh or frozen blueberries (do not thaw if frozen)
    • 1 tablespoon all-purpose flour (for tossing blueberries)

    Step-by-Step Instructions

    1. Preheat and Prepare:

    1. Preheat your oven to 425°F (220°C). Line a jumbo 6-cup muffin pan or a standard 12-cup muffin pan with paper liners. For jumbo muffins, you may need to spray the tops of the pan with non-stick spray to prevent the muffin tops from sticking.

    2. Make the Streusel:

    1. In a medium bowl, whisk together the flour, granulated sugar, brown sugar, cinnamon, and salt.
    2. Pour in the melted butter and stir with a fork until the mixture forms clumps. Set aside in the refrigerator while you prepare the muffin batter.

    3. Prepare the Blueberries:

    1. In a small bowl, toss the blueberries with 1 tablespoon of flour. This helps prevent them from sinking to the bottom of the muffins. If using frozen blueberries, keep them frozen and toss with flour just before adding to the batter.

    4. Combine Dry Ingredients:

    1. In a medium bowl, whisk together the flour, baking powder, baking soda, and salt. Set aside.

    5. Cream Butter and Sugar:

    1. In a large bowl, beat the softened butter and granulated sugar together with an electric mixer until light and fluffy, about 2-3 minutes. Scrape down the sides as needed.

    6. Add Wet Ingredients:

    1. Add the eggs one at a time, beating well after each addition. Scrape down the bowl again.
    2. Beat in the vanilla extract and lemon zest (if using).

    7. Alternate Dry and Wet:

    1. With the mixer on low speed, add half of the flour mixture, mixing until just combined. Add all of the buttermilk, then the remaining flour mixture. Mix until just combined and no streaks of flour remain. Do not overmix.
    2. Gently fold in the floured blueberries with a spatula, being careful not to crush them. A few strokes should do it.

    8. Fill the Muffin Cups:

    1. Scoop the batter into the prepared muffin cups, filling them all the way to the top. For jumbo muffins, this will be about ½ cup of batter per muffin. For standard muffins, about ¼ cup. This high fill is the secret to those domed tops!
    2. Sprinkle the streusel generously over each muffin, pressing it gently so it adheres.

    9. Bake:

    1. Bake at 425°F for 5 minutes, then reduce the oven temperature to 375°F (190°C) without opening the door. Continue baking for 15-18 minutes for standard muffins, or 20-25 minutes for jumbo muffins, until a toothpick inserted into the center comes out clean or with a few moist crumbs.
    2. Let the muffins cool in the pan for 5-10 minutes, then transfer to a wire rack to cool completely. Serve warm or at room temperature.

    Summary

    Prep Time: 20 minutes | Bake Time: 20-25 minutes (jumbo) or 15-18 minutes (standard) | Total Time: 40-45 minutes

    Yield: 6 jumbo muffins or 12 standard muffins

    Difficulty: Easy

    Storage and Make-Ahead Tips

    How to Store:

    Store blueberry muffins in an airtight container at room temperature for up to 3 days. The streusel will soften slightly over time, which is normal. For longer storage, refrigerate for up to 5 days.

    Can You Freeze Muffins?

    Absolutely! Muffins freeze beautifully. Cool completely, then place in a freezer bag or airtight container with parchment between layers. Freeze for up to 3 months. Thaw at room temperature or microwave for 20-30 seconds.

    Reviving Day-Old Muffins:

    To refresh muffins, microwave for 10-15 seconds or warm in a 300°F oven for 5-7 minutes. They’ll taste almost freshly baked!

    Make-Ahead for Breakfast:

    You can prepare the streusel up to 3 days ahead and store in the refrigerator. The muffin batter is best baked immediately, but you can mix the dry ingredients ahead of time.

    Freezing Unbaked Muffins:

    Fill muffin cups with batter, top with streusel, and freeze until solid. Transfer frozen muffins to a freezer bag. Bake from frozen, adding 5-10 minutes to the baking time.

  • Perfect Cornbread

    Perfect Cornbread

    Is there anything more comforting than a warm slice of cornbread fresh from the oven? That golden crust, the tender crumb, the subtle sweetness balanced with corn’s natural earthiness—it’s the perfect companion to so many of our favorite meals.

    This cornbread recipe strikes that ideal balance. It’s moist without being dense, tender without being crumbly, and just sweet enough to complement savory dishes without tasting like cake.

    Made with buttermilk for tang and tenderness, and baked until the edges are perfectly golden, this is the cornbread you’ll come back to again and again. Whether you’re serving it alongside chili, crumbling it into a bowl of beans, or simply slathering it with honey butter, this recipe delivers pure comfort every time.

    Ingredients

    Makes one 9-inch skillet, 8×8 pan, or 9-inch round cake (9-12 servings).

    For the Cornbread:

    • 1 cup (125g) all-purpose flour
    • 1 cup (160g) cornmeal (yellow or white)
    • ½ cup (100g) granulated sugar (adjust to taste)
    • 1 tablespoon baking powder
    • ½ teaspoon salt
    • 1 cup (240ml) buttermilk, at room temperature
    • 2 large eggs, at room temperature
    • ½ cup (115g) unsalted butter, melted and slightly cooled
    • 2 tablespoons honey (optional, for extra sweetness and moisture)

    For Honey Butter (Optional, but Highly Recommended):

    • ½ cup (115g) unsalted butter, softened
    • 2-3 tablespoons honey
    • Pinch of salt

    Step-by-Step Instructions

    1. Preheat and Prepare:

    1. Preheat your oven to 375°F (190°C). Place a 9-inch cast iron skillet, 8×8 baking pan, or 9-inch round cake pan in the oven while it preheats. This creates a hot pan that gives cornbread a beautiful golden crust.
    2. If not using a cast iron skillet, you can grease your pan instead of preheating it.

    2. Combine Dry Ingredients:

    1. In a large bowl, whisk together the flour, cornmeal, sugar, baking powder, and salt until well combined. Make sure there are no lumps.

    3. Combine Wet Ingredients:

    1. In a medium bowl or large measuring cup, whisk together the buttermilk, eggs, melted butter, and honey (if using) until smooth and well combined.

    4. Combine Wet and Dry:

    1. Pour the wet ingredients into the dry ingredients. Stir with a spatula or wooden spoon until just combined and no streaks of flour remain. Do not overmix—a few small lumps are fine. Overmixing can make cornbread tough.
    2. The batter will be thick but pourable.

    5. Bake:

    1. Carefully remove the hot skillet or pan from the oven. If using a skillet, add a tablespoon of butter and swirl to melt, coating the bottom and sides. This creates an extra-crispy crust.
    2. Pour the batter into the hot pan and spread evenly.
    3. Bake for 20-25 minutes, until the top is golden brown and a toothpick inserted into the center comes out clean or with a few moist crumbs.
    4. The edges should be golden and slightly pulling away from the sides.

    6. Cool and Serve:

    1. Let the cornbread cool in the pan for 10-15 minutes before slicing and serving.
    2. Serve warm with honey butter, if desired.

    For Honey Butter:

    1. In a small bowl, beat the softened butter with honey and a pinch of salt until smooth and creamy.
    2. Serve alongside warm cornbread.

    Summary

    Prep Time: 10 minutes | Bake Time: 20-25 minutes | Total Time: 30-35 minutes

    Yield: 9-inch skillet or pan (9-12 servings) or 12 muffins

    Difficulty: Super Easy

    Storage and Make-Ahead Tips

    How to Store:

    Store cornbread tightly wrapped in plastic wrap or in an airtight container at room temperature for up to 3 days. For longer storage, refrigerate for up to 5 days.

    Can You Freeze Cornbread?

    Absolutely! Cornbread freezes beautifully. Wrap the cooled cornbread (whole or in slices) tightly in plastic wrap, then in foil, and place in a freezer bag. Freeze for up to 3 months. Thaw at room temperature or warm in the oven.

    Reviving Day-Old Cornbread:

    To refresh cornbread, wrap in foil and warm in a 300°F oven for 10-15 minutes. You can also microwave individual slices for 10-15 seconds.

    Make-Ahead for Parties:

    Cornbread is best served fresh, but you can make it a day ahead and reheat before serving. The honey butter can be made up to a week ahead and refrigerated.

    Using Leftover Cornbread:

    Leftover cornbread makes amazing cornbread dressing/stuffing, cornbread croutons for salads, or can be crumbled over chili or into a bowl of beans.

  • Homemade Pita Bread (Soft, Puffy & Always Pockets!)

    Homemade Pita Bread (Soft, Puffy & Always Pockets!)

    There is something truly magical about watching pita bread puff up in the oven. One moment it’s a flat disc of dough, and the next—poof!—it balloons into a gorgeous, golden pocket, just waiting to be filled with your favorite ingredients.

    Making pita bread at home is easier than you might think. With just a handful of simple ingredients and a hot oven, you can create soft, pillowy pitas that put any store-bought version to shame.

    They’re perfect for stuffing with gyros and falafel, tearing and dipping into hummus, or simply slathering with butter and eating warm from the oven. Once you try homemade, there’s no going back. Let’s make some pita!

    Ingredients

    Yields 8 pitas.

    For the Pita Dough:

    • 3 ½ cups (440g) all-purpose flour or bread flour, plus more for dusting
    • 2 teaspoons instant yeast (or active dry yeast)
    • 2 teaspoons salt
    • 1 teaspoon sugar
    • 1 ¼ cups (300ml) warm water (about 105-115°F)
    • 2 tablespoons olive oil

    For Baking:

    • Cornmeal or semolina flour (for dusting baking sheets, optional)

    Step-by-Step Instructions

    1. Mix the Dough:

    1. In a large bowl or the bowl of a stand mixer, whisk together the flour, instant yeast, salt, and sugar.
    2. Add the warm water and olive oil. If using active dry yeast instead of instant, dissolve it in the warm water with a pinch of sugar first and let it sit for 5-10 minutes until foamy, then proceed.
    3. Mix with a wooden spoon or dough hook until a shaggy dough forms.

    2. Knead:

    1. If using a stand mixer, knead with the dough hook on medium-low speed for 5-7 minutes, until the dough is smooth and elastic.
    2. If kneading by hand, turn the dough onto a lightly floured surface and knead for 8-10 minutes, until smooth and springy.
    3. The dough should be soft, smooth, and slightly tacky but not sticky. Add flour one tablespoon at a time only if absolutely necessary.

    3. First Rise:

    1. Place the dough in a lightly oiled bowl, cover with plastic wrap or a clean kitchen towel, and let rise in a warm place for 1-1.5 hours, until doubled in size.

    4. Divide and Shape:

    1. Punch down the risen dough and turn it onto a lightly floured surface.
    2. Divide the dough into 8 equal pieces (about 110-120g each).
    3. Shape each piece into a smooth ball by pulling the edges underneath and pinching to seal. Place on a lightly floured surface, cover with a towel, and let rest for 15-20 minutes. This rest is crucial for easy rolling.

    5. Roll Out:

    1. On a lightly floured surface, roll each ball into a circle about ¼-inch thick and 6-7 inches in diameter. Roll gently and evenly—if the edges are too thin, they won’t puff properly.
    2. Place the rolled circles on a lightly floured baking sheet, separated by parchment paper or floured towels. Cover and let rest for 30-45 minutes while you preheat the oven.

    6. Preheat the Oven and Baking Surface:

    1. Place a baking stone, steel, or an inverted heavy baking sheet on the middle rack of your oven. Preheat to 500°F (260°C) for at least 30 minutes. The intense heat is essential for the pita to puff.
    2. If you have one, place a cast iron skillet on the bottom rack to create steam, or have a spray bottle ready for water.

    7. Bake:

    1. Carefully remove the hot baking surface from the oven and dust lightly with cornmeal or semolina if using (this prevents sticking and adds a nice texture).
    2. Place 2-3 pitas on the hot surface (don’t overcrowd).
    3. Bake for 2-3 minutes, until they puff up dramatically and get lightly golden spots. You can also toss a few ice cubes or spray water into the bottom of the oven just before closing the door to create steam, which helps with puffing.
    4. Flip and bake for another 1-2 minutes if desired, though this isn’t always necessary.
    5. Remove from the oven and wrap immediately in a clean kitchen towel to keep them soft. The steam trapped in the towel keeps them pliable.
    6. Repeat with remaining pitas.

    8. Serve:

    1. Serve warm, stuffed with your favorite fillings, or alongside dips like hummus, tzatziki, and baba ganoush.

    Summary

    Prep Time: 20 minutes | Rise Time: 1.5-2 hours | Bake Time: 3-4 minutes per batch | Total Time: About 2 hours

    Yield: 8 pitas

    Difficulty: Easy to Intermediate

    Storage and Make-Ahead Tips

    How to Store:

    Store cooled pitas in an airtight container or zip-top bag at room temperature for up to 3 days. To keep them soft, you can add a slightly damp paper towel to the bag and refresh in the microwave for 10-15 seconds.

    Can You Freeze Them?

    Absolutely! Pita bread freezes beautifully. Stack cooled pitas with parchment paper between each one to prevent sticking, then place in a freezer bag. Freeze for up to 3 months. Thaw at room temperature and warm in a dry skillet, oven, or microwave before serving.

    Make-Ahead Dough:

    You can prepare the dough through step 3 (first rise), then punch it down, cover tightly, and refrigerate for up to 24 hours. When ready to bake, let it come to room temperature, then proceed with dividing, shaping, and resting.

    Freezing Shaped Pitas:

    Roll out the pitas, place them on parchment-lined baking sheets with parchment between layers, and freeze until solid. Transfer to a freezer bag. Bake from frozen directly on a hot baking stone—they may need an extra minute.

    Reviving Day-Old Pitas:

    Sprinkle slightly stale pitas with a few drops of water, wrap in foil, and warm in a 300°F oven for 5-10 minutes. They’ll taste almost freshly baked.