Author: user

  • Baked Garlic Mussels: Buttery, Briny, Irresistible

    Baked Garlic Mussels: Buttery, Briny, Irresistible

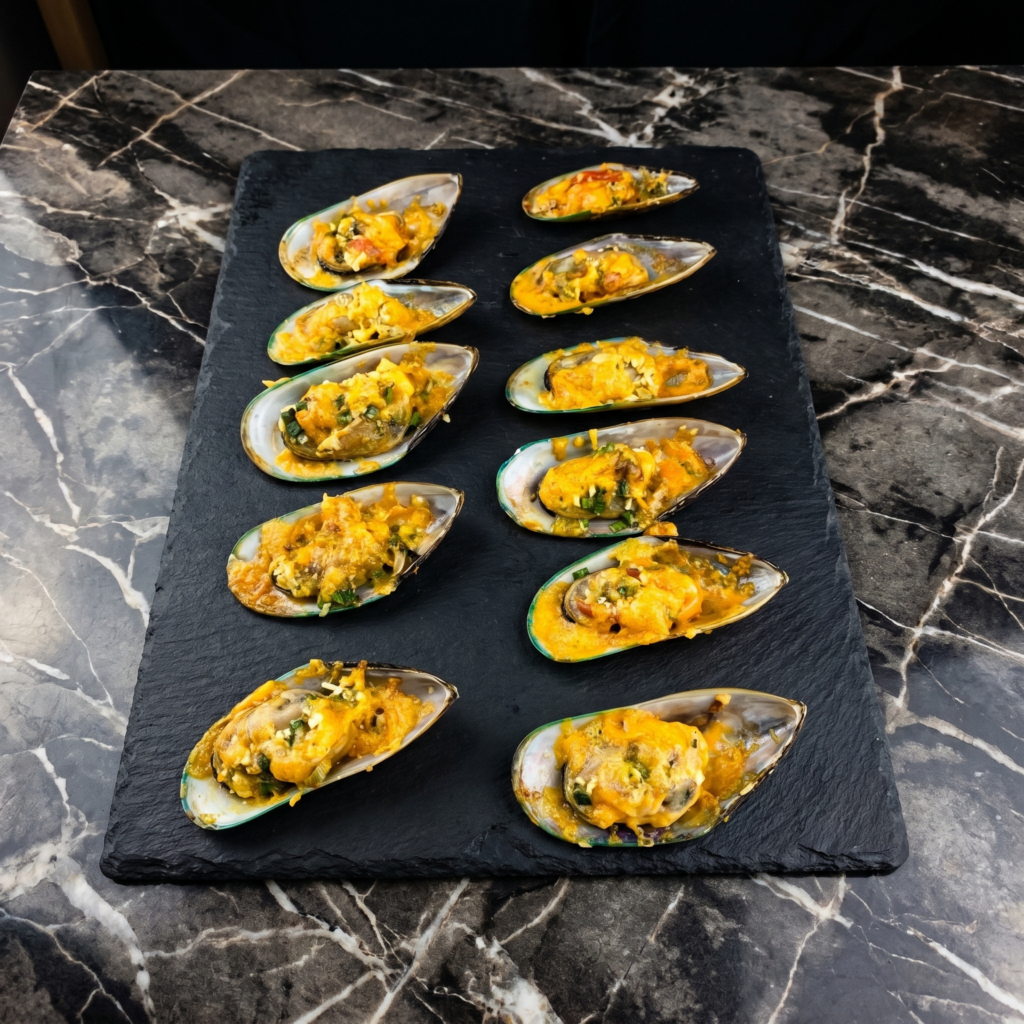
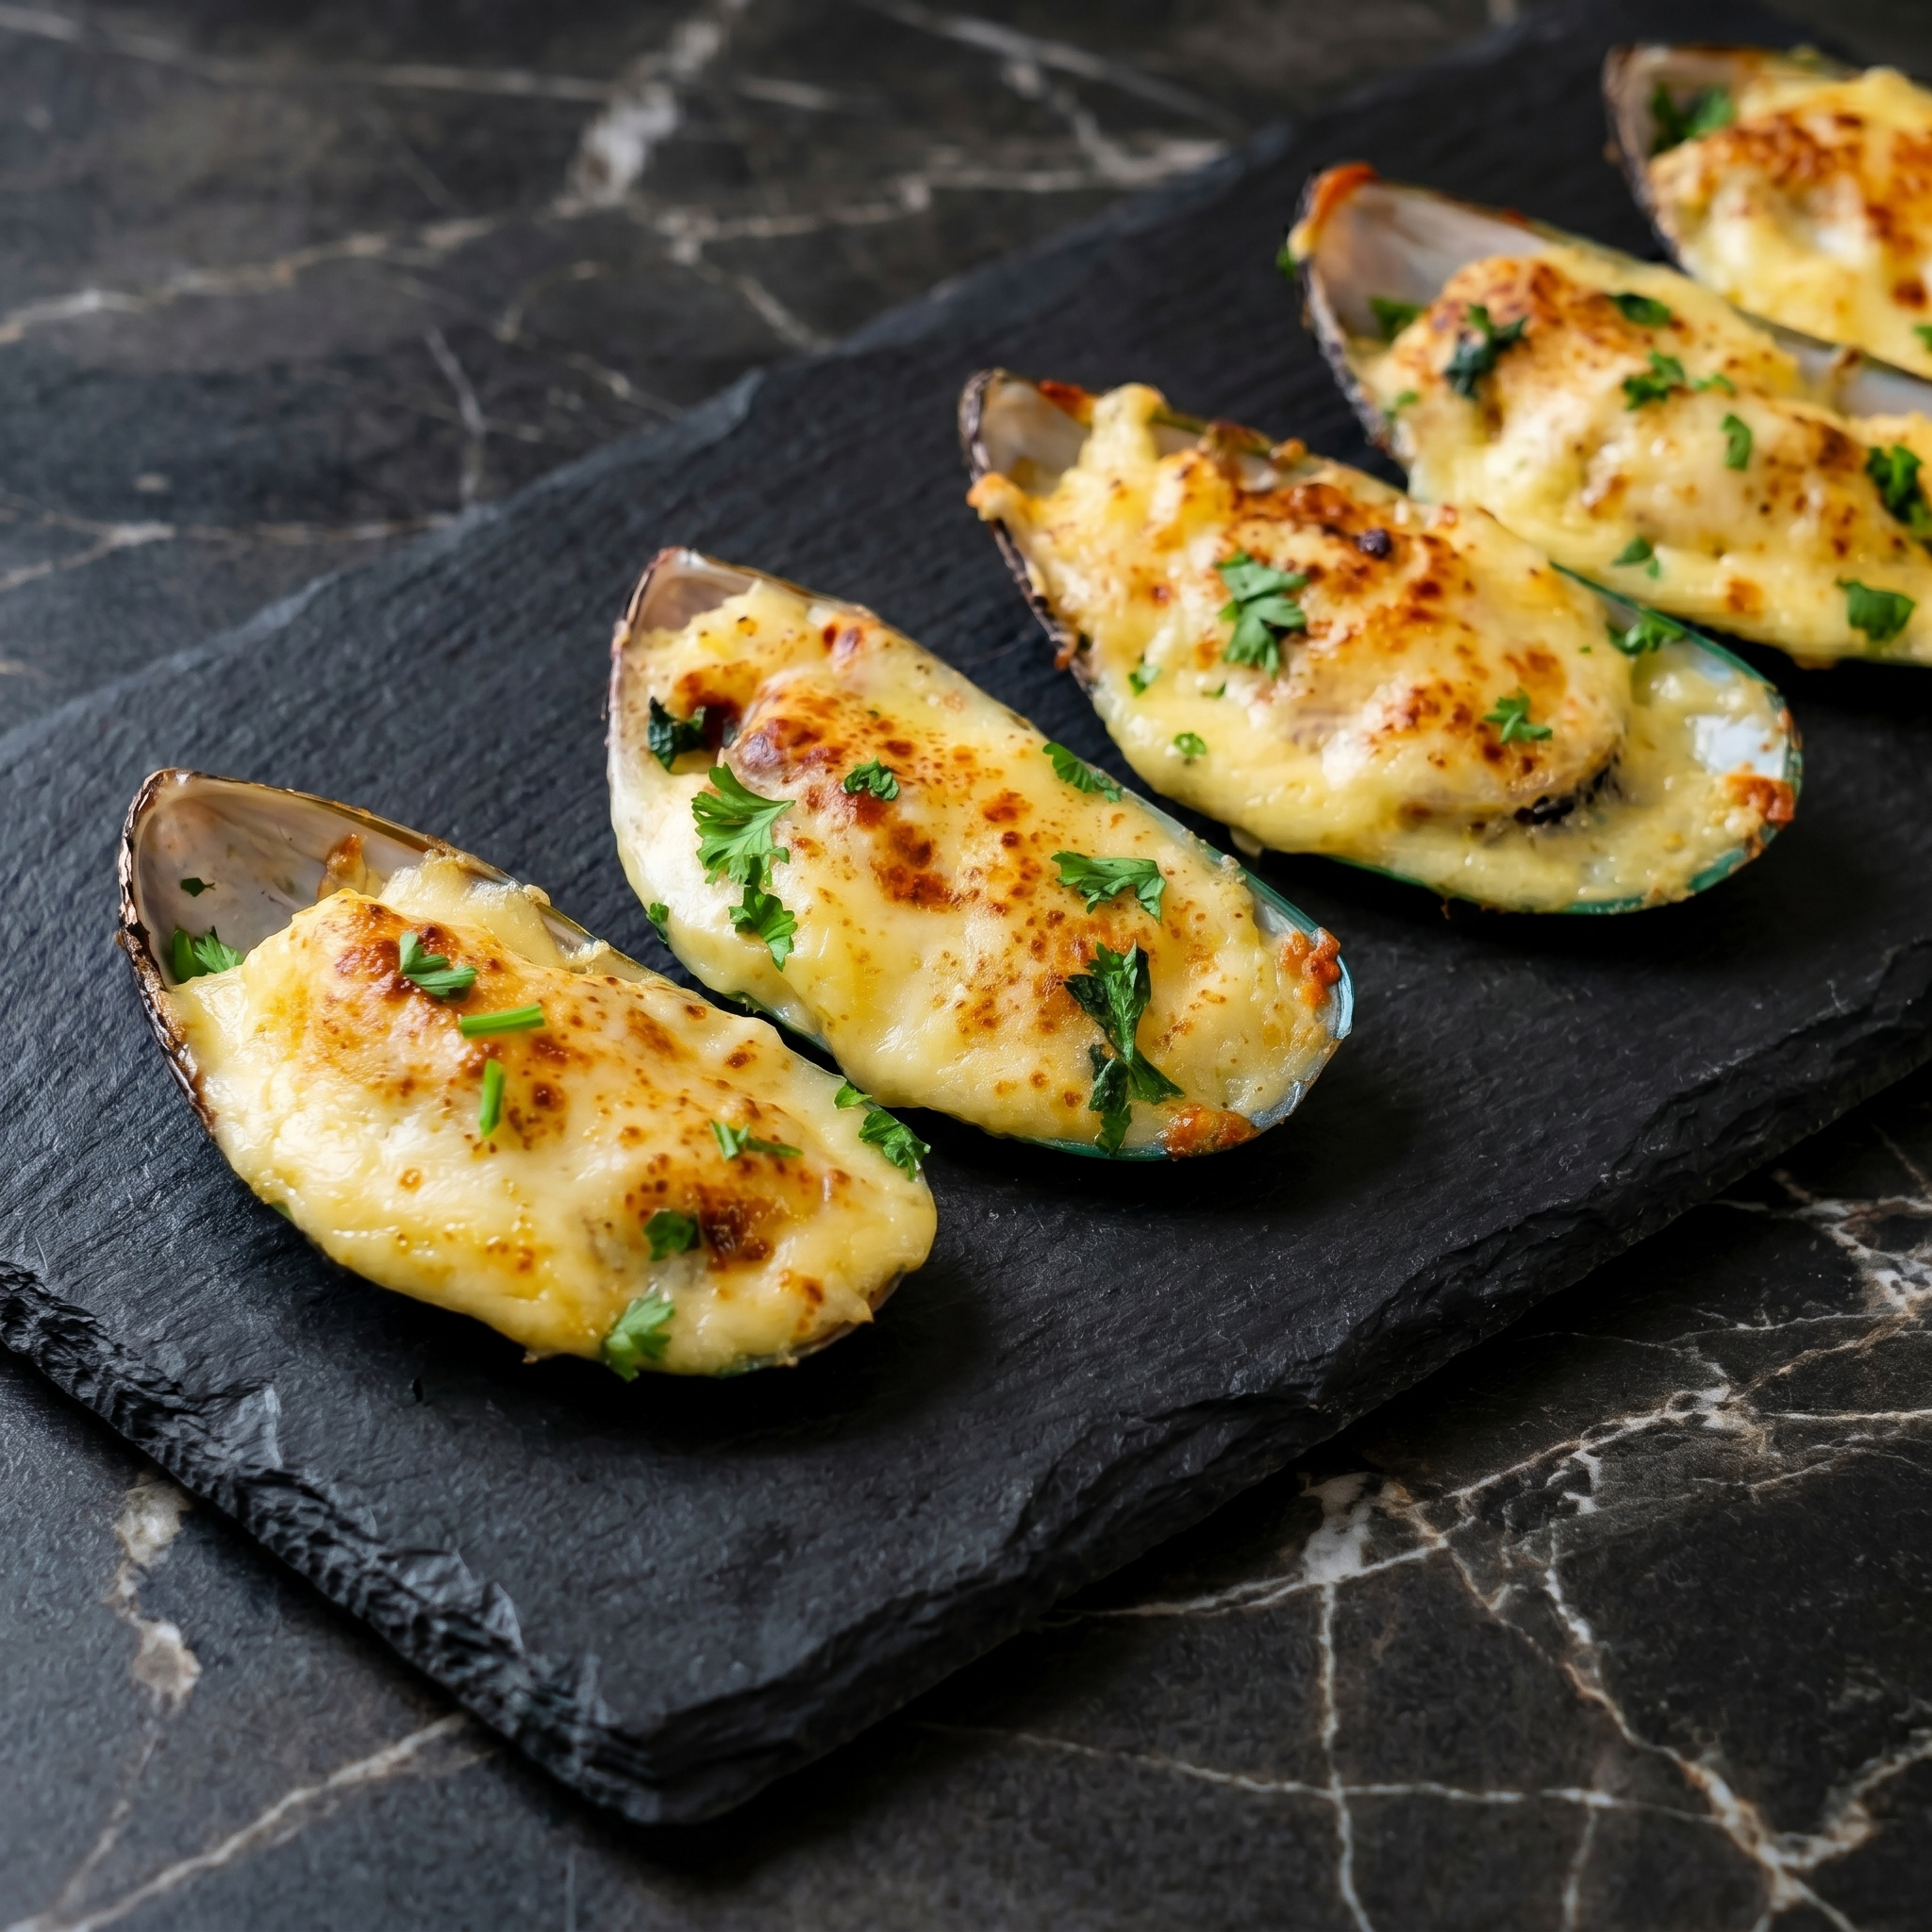
    Mussels are secretly easy. They cook fast, taste like the ocean, and look impressive as hell. This baked version tops them with garlic butter, Parmesan, and breadcrumbs. Then you broil until bubbly and golden.

    Frozen or fresh mussels work. Ten minutes of prep. Serve with a baguette and a glass of white wine. Date night solved.

    Ingredients

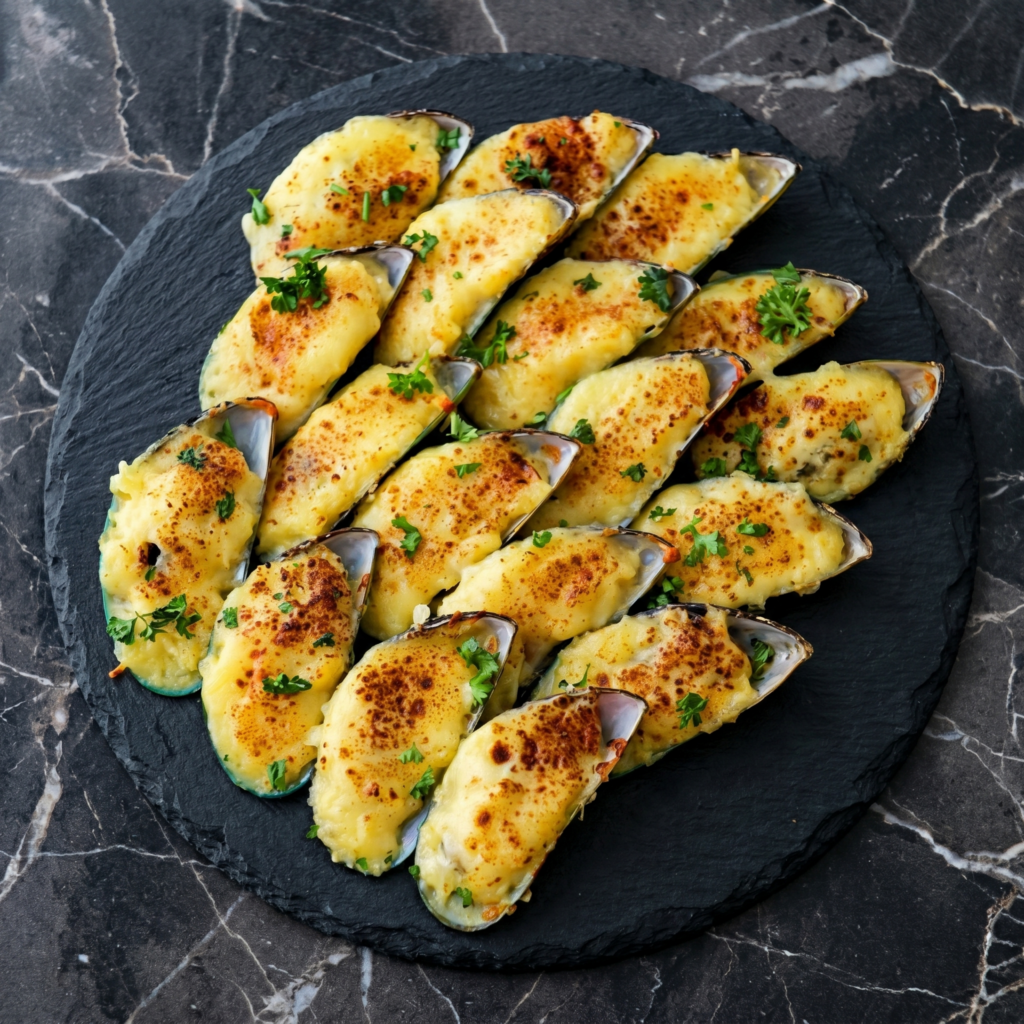
    Serves 2-3 as an appetizer (about 20-24 mussels).

    • 1 lb mussels (about 20-24), cleaned and debearded
    • ½ cup unsalted butter, softened
    • 4 cloves garlic, minced
    • ¼ cup grated Parmesan cheese
    • ¼ cup panko breadcrumbs
    • 2 tablespoons fresh parsley, finely chopped
    • 1 tablespoon lemon juice
    • ¼ teaspoon salt
    • ¼ teaspoon black pepper
    • Lemon wedges for serving

    Step-by-Step Instructions

    Step 1: Preheat and Prep

    1. Preheat oven to 450°F (230°C) with broiler on high.
    2. Clean mussels: scrub shells, remove beards (the fuzzy string), and discard any that are already open and won’t close when tapped.

    Step 2: Make the Garlic Butter Topping

    1. In a bowl, mix softened butter, minced garlic, Parmesan, panko, parsley, lemon juice, salt, and pepper until combined.

    Step 3: Top the Mussels

    1. Place mussels in a single layer on a baking sheet (cup-side up so the topping doesn’t run out).
    2. Top each mussel with a generous dollop of the garlic butter mixture.

    Step 4: Bake and Broil

    1. Bake for 5 minutes. Then switch to broil for 2-3 minutes until the topping is golden brown and bubbly.
    2. Watch closely—broiler moves fast.

    Step 5: Serve Immediately

    1. Transfer to a platter. Sprinkle with extra parsley. Serve with lemon wedges and crusty bread for dipping in the garlic butter puddles.

    Summary

    Prep Time: 10 minutes | Cook Time: 8 minutes | Total Time: 18 minutes

    Yield: 2-3 servings as appetizer

    Difficulty: Easy

    Storage Notes

    Leftovers?

    Mussels are best fresh. Reheated mussels get rubbery. If you must, store in the fridge for 1 day and reheat in a covered skillet with a splash of water or white wine.

    Make-Ahead Topping:

    Mix the garlic butter topping up to 3 days ahead. Keep refrigerated. Bring to room temperature before topping mussels.
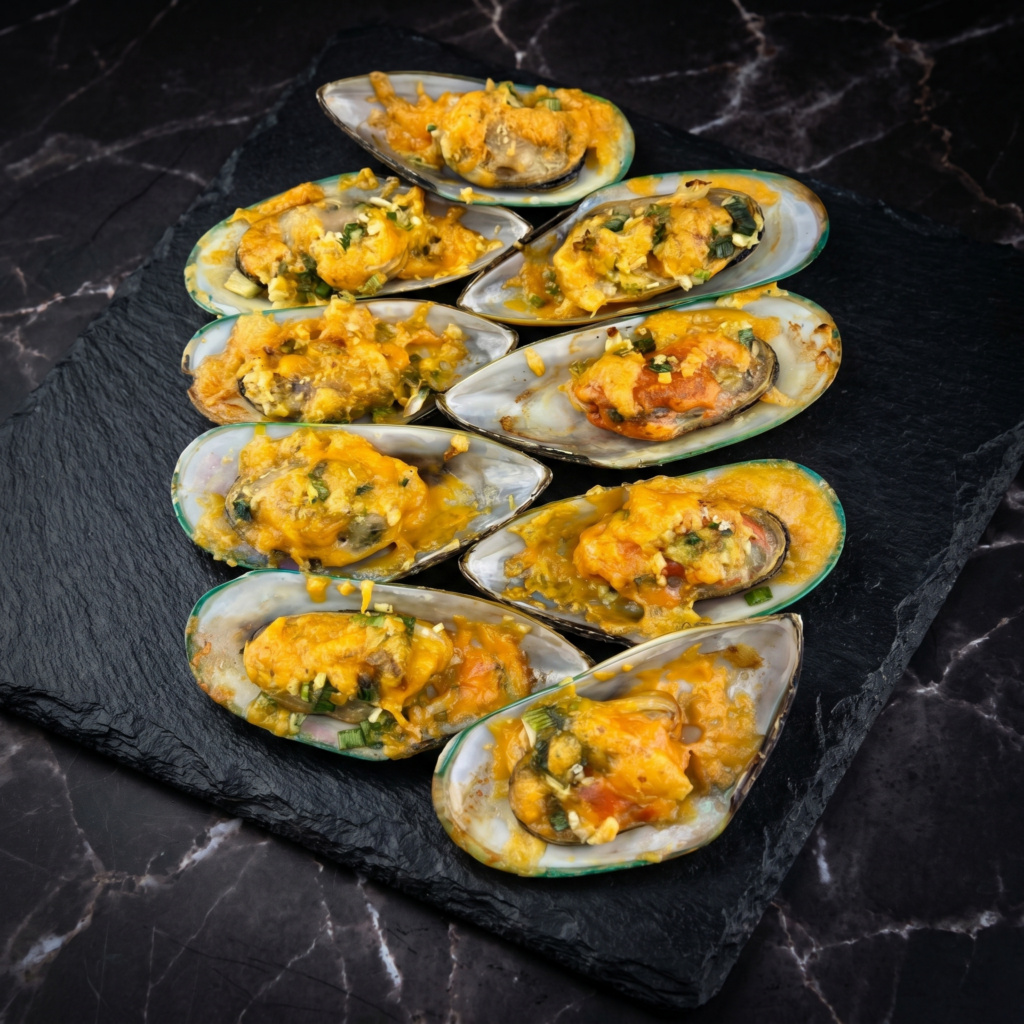
    Frozen Mussels:

    Frozen pre-cooked mussels work great. Thaw, drain, and bake as directed (reduce baking time by 2 minutes since they’re already cooked).

    Pro Tip:

    Serve these right out of the oven. They cool fast and lose that magical butter puddle action.

  • Chicken Kiev: Buttery, Garlicky, Golden Explosion

    Chicken Kiev: Buttery, Garlicky, Golden Explosion

    Chicken Kiev sounds fancy. But it’s just a chicken breast stuffed with garlic butter, breaded, and fried until golden. The payoff? That dramatic butter lava flow when you cut in.

    This recipe has a trick: freeze the butter first. No leaks. No spills. Just pure, garlicky joy.

    Ingredients

    Serves 4.

    • 4 boneless, skinless chicken breasts
    • ½ cup unsalted butter, softened
    • 4 cloves garlic, minced
    • 2 tablespoons fresh parsley, finely chopped
    • 1 tablespoon fresh dill or chives (optional)
    • ½ teaspoon salt
    • ¼ teaspoon black pepper

    Breading Station:

    • ½ cup all-purpose flour
    • 3 large eggs, beaten
    • 1½ cups panko breadcrumbs
    • Salt and pepper for seasoning
    • Oil for frying (about ½ inch deep)

    Step-by-Step Instructions

    Step 1: Make the Garlic Butter

    1. In a bowl, mix softened butter, garlic, parsley, dill, salt, and pepper.
    2. Spoon onto plastic wrap. Roll into a log about 1 inch thick.
    3. Freeze for at least 30 minutes (this is the secret to no leaks).

    Step 2: Prep the Chicken

    1. Place chicken breast between two sheets of plastic wrap. Pound to ¼-inch thickness.
    2. Season both sides with salt and pepper.

    Step 3: Stuff the Chicken

    1. Cut frozen butter log into 4 pieces.
    2. Place one butter piece in the center of each pounded chicken breast.
    3. Fold sides over, then roll tightly like a burrito. Seal edges well.

    Step 4: Bread the Chicken

    1. Set up bowls: flour, beaten eggs, panko.
    2. Dredge each chicken roll in flour, then egg, then panko. Press firmly.
    3. For extra crunch, repeat egg and panko.
    4. Refrigerate for 15 minutes (helps breading stick during frying).

    Step 5: Fry Until Golden

    1. Heat ½ inch oil in a large skillet to 350°F (175°C).
    2. Fry chicken for 4-5 minutes per side until deep golden brown and cooked through (internal temp 165°F).
    3. Drain on a wire rack (not paper towels—keeps crust crisp).

    Step 6: Serve Immediately

    1. Place on plates. Cut open dramatically. Watch the butter pour out. Serve with mashed potatoes or rice to soak it all up.

    Summary

    Prep Time: 20 minutes + freezing | Cook Time: 10 minutes | Total Time: 1 hour + freezing

    Yield: 4 servings

    Difficulty: Medium

    Storage Notes

    Fridge:

    Store cooked chicken Kiev in an airtight container for up to 3 days. The butter solidifies again but reheats fine.

    Reheating:

    Air fryer at 375°F for 6-8 minutes (best). Oven at 375°F for 10-12 minutes. Microwave is fine but crust gets soft.

    Freezing Uncooked:

    Bread the stuffed chicken and freeze on a tray. Once solid, transfer to a bag. Freeze for up to 2 months. Fry from frozen (add 5-7 minutes).

    Pro Tip:

    Don’t skip freezing the butter. Room temperature butter will melt and leak out during frying. Frozen butter stays put until you cut into it.

  • Crab Cakes: Golden, Crabby, Completely Addictive

    Crab Cakes: Golden, Crabby, Completely Addictive

    Bad crab cakes are mostly breadcrumbs. Good crab cakes are mostly crab. This recipe keeps the filler minimal—just enough to hold these beautiful lumps of sweet crab together.

    Pan-fried until golden brown. Serve with a simple remoulade or lemon wedges. Fancy enough for company, easy enough for a Tuesday.

    Ingredients

    Makes 6-8 crab cakes (serves 3-4).

    • 1 lb lump crab meat (fresh or refrigerated, not canned)
    • ⅓ cup panko breadcrumbs
    • ¼ cup mayonnaise
    • 1 egg, lightly beaten
    • 1 tablespoon Dijon mustard
    • 1 tablespoon Worcestershire sauce
    • 1 teaspoon Old Bay seasoning (essential)
    • 1 tablespoon fresh parsley, chopped
    • 2 tablespoons butter or oil for frying
    • Lemon wedges for serving

    Simple Remoulade (optional):

    • ¼ cup mayo, 1 tbsp hot sauce, 1 tsp capers, 1 tsp lemon juice

    Step-by-Step Instructions

    Step 1: Pick Through the Crab

    1. Gently pick through the crab meat to remove any shells. Be careful not to break up the big lumps.

    Step 2: Mix the Binder

    1. In a bowl, whisk together mayonnaise, egg, Dijon, Worcestershire, Old Bay, and parsley.

    Step 3: Combine Gently

    1. Add crab meat and panko to the bowl.
    2. Fold gently with a spatula until just combined (overmixing = dense crab cakes).

    Step 4: Form the Cakes

    1. Shape mixture into 6-8 patties, about ½-inch thick.
    2. Place on a plate and refrigerate for 15-30 minutes (helps them hold together).

    Step 5: Pan Fry Until Golden

    1. Heat butter or oil in a large skillet over medium heat.
    2. Cook crab cakes for 3-4 minutes per side until deep golden brown and crispy.
    3. Drain on paper towels.

    Step 6: Serve Hot

    1. Serve with lemon wedges and remoulade. Try not to eat all of them before they reach the table.

    Summary

    Prep Time: 15 minutes + chilling | Cook Time: 8 minutes | Total Time: 30 minutes + chilling

    Yield: 6-8 crab cakes (3-4 servings)

    Difficulty: Medium

    Storage Notes

    Fridge:

    Store uncooked crab cakes (before frying) for up to 1 day. Store cooked crab cakes in an airtight container for up to 3 days.

    Reheating:

    Air fryer at 375°F for 4-5 minutes. Skillet over medium heat for 2 minutes per side. Oven at 375°F for 8 minutes.

    Freezing:

    Freeze uncooked crab cakes on a tray, then transfer to a bag. Freeze for up to 2 months. Cook from frozen (add 2-3 minutes per side).

    Pro Tip:

    Lump crab is worth the splurge. “Special” or “claw” meat works too but has smaller pieces. Never use imitation crab.

  • Crispy Pork Belly: The Loudest Crunch You’ll Ever Hear

    Crispy Pork Belly: The Loudest Crunch You’ll Ever Hear

    Great pork belly is a texture bomb. A salty, shattering crust on top. Meltingly tender, juicy meat underneath. The contrast is what makes you close your eyes when you bite it.

    This recipe uses a classic method: dry the skin, score it, salt it, and roast it high. The skin puffs into golden crackling. The meat stays soft. Pure magic.

    Ingredients

    Serves 4-6.

    • 2 lbs pork belly (one square piece, skin-on)
    • 1 tablespoon coarse sea salt (for the skin)
    • 1 teaspoon white pepper
    • 1 teaspoon five-spice powder (optional)
    • 2 teaspoons rice vinegar or white vinegar (for drying skin)
    • 1 tablespoon oil (for rubbing)

    Step-by-Step Instructions

    Step 1: Prep the Pork Belly

    1. Pat the pork belly completely dry with paper towels.
    2. Using a sharp knife or meat scorer, poke tiny holes all over the skin. Lots of holes. More holes = crispier skin.
    3. Flip it over. Score the meat side lightly (don’t cut through the skin).

    Step 2: Season and Dry (Overnight Best)

    1. Rub meat side (not skin) with white pepper and five-spice powder.
    2. Rub skin side with vinegar (helps dry it out).
    3. Sprinkle coarse salt thickly over the skin.
    4. Place in fridge UNCOVERED for at least 4 hours, ideally overnight. This dries the skin out.

    Step 3: Roast the Pork Belly

    1. Preheat oven to 300°F (150°C).
    2. Scrape off the salt from the skin. Pat dry again.
    3. Rub skin with a thin layer of oil.
    4. Place pork belly on a wire rack over a baking sheet (skin side up).
    5. Roast for 1 hour 30 minutes.

    Step 4: Blast the Skin (The Crackling Moment)

    1. Increase oven temperature to 450°F (230°C).
    2. Roast for 15-20 minutes until the skin puffs and crackles like glass. Watch closely—it goes fast.

    Step 5: Rest and Chop

    1. Let rest for 10 minutes. Then flip it skin-side down and chop into bite-sized squares with a cleaver or heavy knife (the skin is loud).
    2. Serve with hoisin sauce, mustard, or just straight into your mouth.

    Summary

    Prep Time: 15 minutes + overnight drying | Cook Time: 2 hours | Total Time: 2 hours 15 minutes + drying

    Yield: 4-6 servings

    Difficulty: Medium

    Storage Notes

    Leftovers:

    Store in an airtight container in the fridge for up to 4 days. The crackling softens but the meat stays amazing.

    Reheating (Save That Crunch):

    Air fryer at 375°F for 3-4 minutes. Oven at 400°F for 5-7 minutes on a wire rack. Microwave ruins everything.

    Freezing:

    Freeze cooked pork belly for up to 2 months. Reheat from frozen in a hot oven or air fryer.

    Pro Tip:

    Leftover crispy pork belly is incredible in fried rice, ramen, or bao buns. You’re welcome.

  • Spicy Korean Fried Chicken: Crackly, Saucy, Insane

    Spicy Korean Fried Chicken: Crackly, Saucy, Insane

    Korean fried chicken is different. It’s lighter, cracklier, and glossier than American-style. The secret is double-frying and a thin, starch-based batter.

    Then comes the sauce: sweet, spicy, sticky, and packed with gochujang (Korean chili paste). This chicken doesn’t just taste good—it glows.

    Ingredients

    Serves 4.

    • 2 lbs chicken wings or drumettes
    • ½ cup potato starch or cornstarch
    • ¼ cup all-purpose flour
    • 1 teaspoon salt
    • ½ teaspoon black pepper
    • Oil for frying (peanut or vegetable)

    Spicy Gochujang Sauce:

    • ¼ cup gochujang (Korean red pepper paste)
    • ¼ cup honey (or corn syrup)
    • 2 tablespoons soy sauce
    • 2 tablespoons rice vinegar
    • 4 cloves garlic, minced
    • 1 tablespoon sesame oil

    Garnish:

    • Sesame seeds, chopped green onions

    Step-by-Step Instructions

    Step 1: Prep and Coat the Chicken

    1. Pat chicken completely dry.
    2. In a large bowl, mix potato starch, flour, salt, and pepper.
    3. Toss chicken in the mixture until well coated.

    Step 2: First Fry (Cook Through)

    1. Heat oil to 325°F (160°C).
    2. Fry chicken in batches for 6-8 minutes until cooked but not brown.
    3. Drain on a wire rack. Let rest for 5 minutes.

    Step 3: Second Fry (Get Crackly)

    1. Increase oil temperature to 375°F (190°C).
    2. Fry chicken again for 2-3 minutes until deep golden and super crispy.

    Step 4: Make the Sauce

    1. In a small saucepan, combine gochujang, honey, soy sauce, vinegar, garlic, and sesame oil.
    2. Simmer over medium-low heat for 3-4 minutes until slightly thickened.

    Step 5: Toss and Serve

    1. Place hot chicken in a large bowl. Pour sauce over and toss to coat.
    2. Sprinkle with sesame seeds and green onions. Serve immediately with pickled radish (or cold beer).

    Summary

    Prep Time: 15 minutes | Cook Time: 25 minutes | Total Time: 40 minutes

    Yield: 4 servings

    Difficulty: Medium

    Storage Notes

    Leftovers:

    Store in the fridge for up to 3 days. The sauce soaks in and softens the crunch—but it’s still delicious.

    Reheating:

    Air fryer at 375°F for 6-8 minutes (best). Oven at 375°F for 12-15 minutes. Microwave = lost crunch.

    Make-Ahead Frying:

    Do the first fry, cool completely, and freeze. Second fry straight from frozen (add 2-3 minutes). Sauce when ready.

    Heat Level:

    Add 1-2 tablespoons extra gochujang or a chopped fresh chili for more fire. Reduce honey for less sweet.

  • Breakfast Sliders: Little Sandwiches, Big Energy

    Breakfast Sliders: Little Sandwiches, Big Energy

    Sliders are fun. Breakfast sliders are a movement. Soft rolls, cheesy eggs, crispy breakfast meat, and a golden, buttery top. Bake them all together in one pan.

    These disappear fast. Make two batches. You’ve been warned.

    Ingredients

    Makes 12 sliders.

    • 12 slider rolls (Hawaiian or dinner rolls)
    • 8 large eggs
    • ¼ cup milk
    • ½ teaspoon salt
    • ¼ teaspoon black pepper
    • 12 slices cheddar or American cheese
    • 12 slices bacon or 12 breakfast sausage patties (cooked)
    • 3 tablespoons butter, melted
    • Optional: 1 teaspoon garlic powder or everything bagel seasoning

    Step-by-Step Instructions

    Step 1: Prep the Pan

    1. Preheat oven to 350°F (175°C).
    2. Grease a 9×13 baking dish.

    Step 2: Scramble the Eggs

    1. In a bowl, whisk eggs, milk, salt, and pepper.
    2. Scramble in a skillet over medium heat until just set (slightly undercooked—they’ll finish in the oven).

    Step 3: Assemble the Sliders

    1. Slice the entire block of rolls in half horizontally (keeping them connected).
    2. Place bottom half in the baking dish.
    3. Layer: cooked meat, scrambled eggs, cheese slices.
    4. Place top half of rolls on the cheese.

    Step 4: Butter and Bake

    1. Mix melted butter with garlic powder or seasoning (if using).
    2. Brush generously over the tops of the rolls.
    3. Bake for 10-15 minutes until cheese is melted and tops are golden.

    Step 5: Pull Apart and Devour

    1. Let cool for 2 minutes. Use a knife to separate sliders. Pull apart and try not to eat six of them.

    Summary

    Prep Time: 10 minutes | Cook Time: 20 minutes | Total Time: 30 minutes

    Yield: 12 sliders

    Difficulty: Easy

    Storage Notes

    Fridge:

    Store in an airtight container for up to 4 days. Reheat in the microwave (30 seconds) or oven at 350°F for 5 minutes.

    Freezing:

    Freeze assembled but unbaked sliders for up to 2 months. Bake from frozen at 350°F for 20-25 minutes.

    Make-Ahead Morning:

    Assemble the night before. Cover and refrigerate. Brush with butter and bake in the morning. Hero move.

    Mix It Up:

    Spinach + feta, ham + Swiss, or veggie + pepper jack. Sliders take orders.

  • Baked Egg in Zucchini Boats: Low-Carb Breakfast Magic

    Baked Egg in Zucchini Boats: Low-Carb Breakfast Magic

    Zucchini boats are the veggie vessel you didn’t know you needed. Hollow out a zucchini, crack an egg inside, bake, and suddenly breakfast feels fancy.

    This is low-carb, high-protein, and endlessly customizable. The zucchini gets tender, the egg bakes up perfectly runny or set (your call), and the cheese on top gets golden and bubbly.

    Ingredients

    Serves 2.

    • 2 medium zucchini (firm, straight ones work best)
    • 2 large eggs
    • ¼ cup shredded Parmesan or mozzarella cheese
    • 1 tablespoon olive oil
    • ¼ teaspoon salt
    • ¼ teaspoon black pepper
    • ¼ teaspoon garlic powder
    • Fresh parsley or chives for garnish
    • Optional: red pepper flakes, crumbled bacon, or diced tomato

    Step-by-Step Instructions

    Step 1: Prep the Zucchini Boats

    1. Preheat oven to 400°F (200°C). Line a baking dish with parchment paper.
    2. Cut each zucchini in half lengthwise.
    3. Scoop out the center seeds and some flesh to create a canoe-like boat. Leave about ¼-inch walls.
    4. Chop the scooped-out flesh and save for another use (or add to eggs).

    Step 2: Season and Bake First

    1. Brush zucchini boats with olive oil. Sprinkle with salt, pepper, and garlic powder.
    2. Place in baking dish and bake for 10 minutes (this prevents soggy bottoms).

    Step 3: Add the Egg

    1. Remove from oven. Carefully crack one egg into each zucchini boat.
    2. If egg white spills over, just trim it off or let it bake into a crispy edge.

    Step 4: Top and Finish Baking

    1. Sprinkle cheese over the eggs.
    2. Bake for 12-15 minutes until egg whites are set and yolks reach your desired doneness.

    Step 5: Garnish and Serve

    1. Top with fresh herbs and red pepper flakes. Eat with a fork right out of the boat.

    Summary

    Prep Time: 10 minutes | Cook Time: 25 minutes | Total Time: 35 minutes

    Yield: 2 servings (4 boats)

    Difficulty: Easy

    Storage Notes

    Leftovers:

    These are best fresh. The zucchini releases water as it sits. Store in the fridge for up to 2 days, but expect softer boats.

    Reheating:

    Reheat in a 350°F oven for 5-7 minutes or in an air fryer at 325°F for 4 minutes. Microwave makes them watery.

    Make-Ahead Prep:

    Scoop and season the zucchini boats up to 2 days ahead. Store covered in the fridge. Add eggs and bake when ready.

  • Egg Muffins with Ham & Veggies: Grab & Go Greatness

    Egg Muffins with Ham & Veggies: Grab & Go Greatness

    Mornings are chaos. These egg muffins are the solution. Ham, veggies, cheese, and eggs baked into perfect little portable cups.

    Make them once. Eat all week. Microwave for 30 seconds and you’re out the door with actual protein in your belly.

    Ingredients

    Makes 12 muffins.

    • 10 large eggs
    • ½ cup milk (any kind)
    • 1 cup diced ham (about 6 oz)
    • ½ cup bell pepper, finely diced (any color)
    • ½ cup chopped spinach (fresh or frozen, thawed and squeezed)
    • ¼ cup diced onion (optional)
    • 1 cup shredded cheddar or Swiss cheese
    • ½ teaspoon salt
    • ¼ teaspoon black pepper
    • ¼ teaspoon garlic powder

    Step-by-Step Instructions

    Step 1: Preheat and Prep

    1. Preheat oven to 375°F (190°C).
    2. Grease a 12-cup muffin tin generously with nonstick spray or butter.

    Step 2: Whisk the Eggs

    1. In a large bowl, whisk eggs, milk, salt, pepper, and garlic powder until frothy and well combined.

    Step 3: Divide the Fillings

    1. Evenly distribute ham, bell pepper, spinach, and onion into each muffin cup.
    2. Sprinkle cheese over the fillings.

    Step 4: Pour and Fill

    1. Pour egg mixture into each cup, filling about ¾ full.
    2. Stir gently with a fork to distribute fillings.

    Step 5: Bake and Cool

    1. Bake for 18-20 minutes until puffed and golden.
    2. A toothpick inserted in the center should come out clean.
    3. Let cool in the pan for 5 minutes. Run a knife around the edges and pop them out.

    Step 6: Store and Reheat

    1. Let cool completely before storing. Refrigerate or freeze. Reheat and run out the door.

    Summary

    Prep Time: 10 minutes | Cook Time: 20 minutes | Total Time: 30 minutes

    Yield: 12 muffins

    Difficulty: Easy

    Storage Notes

    Fridge:

    Store in an airtight container for up to 5 days. Reheat in microwave for 30-45 seconds.

    Freezer (Best for Meal Prep):

    Cool completely. Freeze in a single layer on a tray, then transfer to a freezer bag. Store for up to 3 months. Reheat from frozen for 60-90 seconds.

    Pro Tip:

    Use a silicone muffin tin or liners for easier removal. Grease well regardless—eggs love to stick.

    Mix It Up:

    Swap ham for cooked sausage, bacon, or turkey. Use any veggies you have: mushrooms, zucchini, or broccoli all work.

  • Fish Tacos: Crispy, Creamy, Bright & Briny

    Fish Tacos: Crispy, Creamy, Bright & Briny

    Fish tacos are the perfect balance: crispy or grilled fish, crunchy slaw, creamy sauce, and a hit of lime. One bite and you’re at a Baja beach shack.

    This version works with whatever white fish you have. Make the slaw and sauce ahead. Then cook the fish and assemble. Dinner in 20 minutes.

    Ingredients

    Serves 4 (makes 8-10 tacos).

    • 1 lb white fish (cod, halibut, tilapia, or mahi-mahi)
    • 8-10 small corn or flour tortillas
    • 1 cup shredded cabbage or coleslaw mix
    • Lime wedges for serving

    For the Fish (choose one method):

    • Grilled: 1 tbsp oil, 1 tsp chili powder, ½ tsp salt
    • Crispy (beer batter): ½ cup flour, ½ cup beer, ½ tsp salt, oil for frying

    Creamy Sauce (Chipotle Crema):

    • ½ cup sour cream or Greek yogurt
    • 2 tablespoons mayonnaise
    • 1 tablespoon lime juice
    • 1 teaspoon chipotle powder or hot sauce
    • ¼ teaspoon salt

    Optional Toppings:

    • Pico de gallo, pickled onions, cilantro, avocado

    Step-by-Step Instructions

    Step 1: Make the Sauce

    1. Whisk together sour cream, mayo, lime juice, chipotle powder, and salt. Refrigerate until ready.

    Step 2: Prep the Slaw and Tortillas

    1. Toss shredded cabbage with a squeeze of lime and pinch of salt.
    2. Warm tortillas in a dry skillet, microwave, or over a gas flame.

    Step 3: Cook the Fish

    1. Grilled: Rub fish with oil, chili powder, and salt. Grill over medium-high heat for 3-4 minutes per side.
    2. Crispy: Whisk flour, beer, and salt. Dip fish in batter. Fry in 350°F oil for 3-4 minutes until golden. Drain on paper towels.

    Step 4: Assemble the Tacos

    1. Break fish into large chunks.
    2. Layer: tortilla → slaw → fish → drizzle of crema → any toppings.

    Step 5: Serve With Lime

    1. Squeeze fresh lime over everything. Eat immediately. Make more.

    Summary

    Prep Time: 10 minutes | Cook Time: 10 minutes | Total Time: 20 minutes

    Yield: 8-10 tacos (4 servings)

    Difficulty: Easy

    Storage Notes

    Fridge (Components):

    • Cooked fish: 2 days (best re-crisped in air fryer)
    • Cream sauce: 5 days
    • Slaw: 1 day (gets soggy)
    • Tortillas: Keep separate

    Reheating Fish:

    Air fryer at 375°F for 3-4 minutes. Oven at 375°F for 5-7 minutes. Microwave not recommended (soggy fish tragedy).

    Make Taco Bar:

    Set everything out separately. Let everyone build their own. Best party move ever.

  • Beef Empanadas: Golden Pockets of Joy

    Beef Empanadas: Golden Pockets of Joy

    Empanadas are the perfect food. A golden, flaky pocket wrapped around a juicy, spiced beef filling. They’re portable, freezer-friendly, and impossible to eat just one.

    This version is baked (not fried), uses a simple dough, and packs a filling with garlic, cumin, paprika, and briny olives. Make a batch. Watch them vanish.

    Ingredients

    Makes 12-14 empanadas.

    For the Dough:

    • 2½ cups all-purpose flour
    • ½ teaspoon salt
    • ½ cup cold butter, cubed
    • 1 egg
    • ⅓ cup cold water

    For the Filling:

    • 1 lb ground beef
    • 1 small onion, finely chopped
    • 2 cloves garlic, minced
    • 1 teaspoon ground cumin
    • 1 teaspoon paprika
    • ½ teaspoon chili powder
    • ½ teaspoon salt
    • ¼ cup green olives, chopped
    • ¼ cup raisins (optional, but traditional)
    • 2 hard-boiled eggs, chopped (optional)

    For Egg Wash:

    • 1 egg beaten with 1 tablespoon water

    Step-by-Step Instructions

    Step 1: Make the Dough

    1. In a bowl, mix flour and salt. Cut in cold butter until it looks like coarse crumbs.
    2. Add egg and cold water. Mix until just combined (don’t overwork).
    3. Form into a disc, wrap in plastic, and refrigerate for 30 minutes.

    Step 2: Cook the Filling

    1. In a skillet over medium heat, cook ground beef until browned. Drain excess fat.
    2. Add onion and garlic. Cook for 3 minutes until soft.
    3. Stir in cumin, paprika, chili powder, and salt. Cook for 1 minute.
    4. Remove from heat. Stir in olives, raisins, and chopped eggs (if using). Let cool.

    Step 3: Preheat and Roll

    1. Preheat oven to 375°F (190°C). Line a baking sheet with parchment paper.
    2. Roll dough on a floured surface until ⅛-inch thick.
    3. Cut into 4-5 inch circles using a cutter or bowl.

    Step 4: Fill and Seal

    1. Place 1-2 tablespoons of filling in the center of each circle.
    2. Fold over into a half-moon. Press edges with a fork to seal.
    3. Place on baking sheet. Brush with egg wash.

    Step 5: Bake and Serve

    1. Bake for 20-25 minutes until golden brown.
    2. Cool for 5 minutes. Serve with chimichurri or hot sauce.

    Summary

    Prep Time: 30 minutes + chilling | Cook Time: 25 minutes | Total Time: 55 minutes + chilling

    Yield: 12-14 empanadas

    Difficulty: Medium

    Storage Notes

    Fridge:

    Store baked empanadas in an airtight container for up to 4 days. Reheat in a 350°F oven for 8-10 minutes.

    Freezer (Perfect for Meal Prep):

    Freeze unbaked empanadas on a tray, then transfer to a bag. Freeze for up to 3 months. Bake from frozen at 375°F for 25-30 minutes.

    Make-Ahead:

    Make the dough and filling separately up to 2 days ahead. Assemble and bake when ready.

    Dough Tip:

    Store-bought pie crust or empanada discs work great if you’re short on time. No judgment.