Author: user

  • The Lazy Sunday Lemon Herb Roast Chicken (So Juicy, So Easy)

    The Lazy Sunday Lemon Herb Roast Chicken (So Juicy, So Easy)

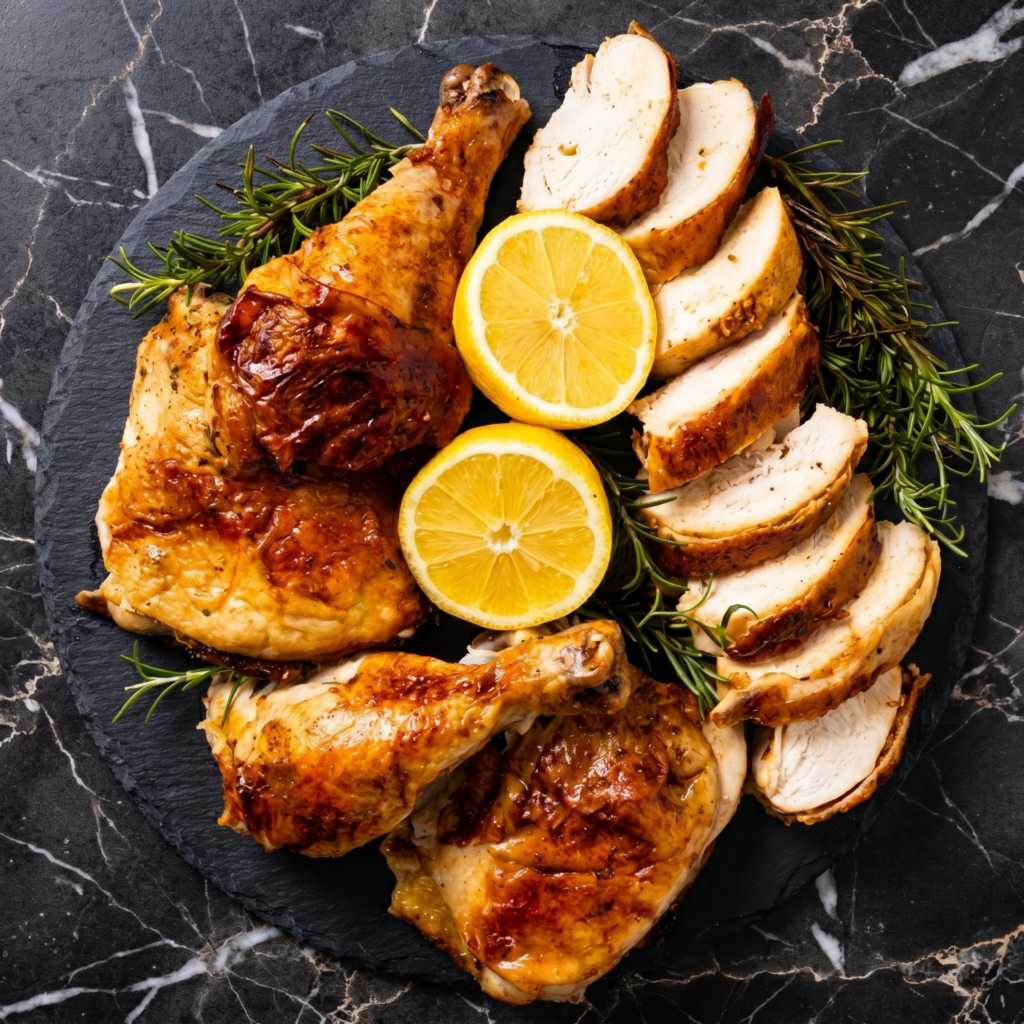
    Let’s be honest: most roast chicken recipes are boring. Dry breast, sad skin, and a sink full of dishes. Not this one.

    This lemon herb roast chicken is sticky, golden, fragrant, and almost embarrassingly easy. You need one pan, a handful of ingredients, and about 15 minutes of hands-on time. The oven does the rest. Serve it for Sunday dinner, meal prep it for the week, or just impress yourself on a Tuesday.

    Ingredients

    Serves 4-6.

    • 1 whole chicken (about 4-5 lbs / 1.8-2.2 kg)
    • 2 lemons (1 sliced, 1 juiced)
    • 4 cloves garlic, smashed
    • 3 sprigs fresh rosemary
    • 3 sprigs fresh thyme
    • 2 tablespoons olive oil
    • 1 teaspoon salt
    • ½ teaspoon black pepper
    • Optional: 1 onion (quartered), 4 carrots (cut into chunks)

    Step-by-Step Instructions

    Step 1: Preheat and Prep

    1. Preheat oven to 425°F (220°C).
    2. Pat the chicken completely dry with paper towels. This = crispy skin.

    Step 2: Season Like You Mean It

    1. In a small bowl, mix olive oil, lemon juice, salt, and pepper.
    2. Rub this all over the chicken, including under the breast skin.

    Step 3: Stuff It

    1. Stuff the cavity with lemon slices, smashed garlic, rosemary, and thyme.

    Step 4: Roast

    1. Place chicken in a roasting pan or cast iron skillet. Add optional veggies around it.
    2. Roast for 50-60 minutes, until juices run clear or thigh hits 165°F (74°C).
    3. Halfway through, spoon pan juices over the chicken.

    Step 5: Rest and Serve

    1. Let chicken rest for 10 minutes before carving. Don’t skip this!
    2. Pour pan juices over everything. Serve with the roasted lemons and herbs.

    Summary

    Prep Time: 15 minutes | Cook Time: 55 minutes | Total Time: 1 hour 10 minutes

    Yield: 4-6 servings

    Difficulty: Easy

    Storage Notes

    • Fridge: Shredded or sliced chicken keeps for 3-4 days in an airtight container.
    • Freezer: Shredded chicken freezes well for up to 3 months.
    • Reheat: Warm in a covered skillet with a splash of broth or water to keep it juicy.
    • Leftover magic: Use in salads, sandwiches, soups, or tacos.
  • Nashville Hot Chicken (Crispy, Spicy, Finger-Licking Fury)

    Nashville Hot Chicken (Crispy, Spicy, Finger-Licking Fury)

    This isn’t spicy chicken. This is an event.

    Nashville hot chicken is fried chicken + cayenne-laced oil + white bread + pickles. The heat doesn’t mess around. Neither should you. Make it. Cry a little. Love every bite.

    Ingredients

    Serves 4.

    For the Chicken:

    • 4 chicken thighs
    • 2 cups buttermilk
    • 2 cups flour
    • 1 tablespoon salt
    • 1 tablespoon black pepper
    • Vegetable oil for frying

    For the Hot Oil:

    • ½ cup frying oil (from the pot)
    • 3 tablespoons cayenne pepper (reduce for less heat)
    • 1 tablespoon brown sugar
    • 1 teaspoon paprika
    • 1 teaspoon garlic powder

    For Serving:

    • 4 slices white bread
    • Pickle slices

    Step-by-Step Instructions

    Step 1: Brine

    1. Soak chicken in buttermilk for 2 hours (or overnight).

    Step 2: Dredge

    1. Mix flour, salt, and pepper. Remove chicken from buttermilk, letting excess drip.
    2. Dredge in flour mixture. Repeat for extra crunch.

    Step 3: Fry

    1. Heat 2 inches of oil to 350°F (175°C). Fry chicken 10-12 minutes per side until golden and 165°F internal.
    2. Drain on a wire rack (not paper towels—stays crispier).

    Step 4: Make Hot Oil

    1. Carefully scoop ½ cup hot frying oil into a heatproof bowl.
    2. Whisk in cayenne, brown sugar, paprika, and garlic powder.

    Step 5: Coat

    1. Brush or dunk hot chicken into the spicy oil. Both sides.

    Step 6: Serve

    1. Place chicken on white bread. Top with pickles. Add second bread if desired.
    2. Serve with extra pickles and a cold drink. Maybe milk.

    Summary

    Prep Time: 15 minutes | Brine Time: 2+ hours | Cook Time: 25 minutes | Total Time: ~3 hours

    Yield: 4 servings

    Difficulty: Medium

    Storage Notes

    Best Fresh:

    Nashville hot chicken loses its crunch and spicy kick by next day. Make only what you’ll eat immediately.

    Refrigerate Leftovers:

    Store in an airtight container for up to 2 days. Reheat in oven at 375°F for 10-15 minutes. Not microwave-friendly.

    Heat Levels:

    • Mild: 1 tablespoon cayenne
    • Medium: 2 tablespoons
    • Hot: 3+ tablespoons (you’ve been warned)

    Pro Tip:

    White bread and pickles aren’t garnish—they’re essential. The bread soaks up the spicy oil. Don’t skip.

  • Stuffed Portobello Mushrooms (Meaty, Juicy, Meat-Free Winner)

    Stuffed Portobello Mushrooms (Meaty, Juicy, Meat-Free Winner)

    Portobellos are nature’s edible bowls.

    These are stuffed with spinach, cream cheese, Parmesan, and breadcrumbs. Bake until tender and golden. They’re hearty, flavorful, and nobody misses the meat. Plus: 10 minutes of prep.

    Ingredients

    Serves 4 as main, 8 as appetizer.

    • 4 large portobello mushrooms, stems removed
    • 2 tablespoons olive oil
    • ½ cup ricotta cheese
    • ¼ cup cream cheese, softened
    • ¼ cup grated Parmesan
    • ½ cup shredded mozzarella
    • 2 cups fresh spinach, chopped
    • 2 cloves garlic, minced
    • ¼ cup breadcrumbs (panko preferred)
    • Salt and black pepper to taste

    Step-by-Step Instructions

    Step 1: Prep Mushrooms

    1. Preheat oven to 375°F (190°C). Line a baking sheet with parchment.
    2. Wipe mushroom caps clean. Remove stems and scrape out gills with a spoon.
    3. Brush caps inside and out with olive oil. Season with salt and pepper.

    Step 2: Make Filling

    1. In a bowl, mix ricotta, cream cheese, Parmesan, mozzarella, spinach, and garlic.
    2. Season with salt and pepper.

    Step 3: Stuff

    1. Divide filling among mushroom caps. Press down gently.
    2. Sprinkle breadcrumbs on top.

    Step 4: Bake

    1. Bake 15-20 minutes until mushrooms are tender and tops are golden and bubbly.

    Step 5: Serve

    1. Let cool 5 minutes. Serve warm with a side salad or crusty bread.

    Summary

    Prep Time: 10 minutes | Cook Time: 20 minutes | Total Time: 30 minutes

    Yield: 4 servings

    Difficulty: Easy

    Storage Notes

    Refrigerate:

    Store cooked mushrooms in an airtight container for up to 3 days. Reheat at 350°F for 8-10 minutes. Not microwave-friendly (soggy mushrooms).

    Prep Ahead:

    Stuff mushrooms up to 1 day ahead. Cover and refrigerate. Add 5 minutes to bake time.

    Freeze Unbaked:

    Freeze on a tray, then transfer to a bag. Bake from frozen at 375°F for 25-30 minutes.

    Customize It:

    Add cooked sausage (for meat lovers), sun-dried tomatoes, or chopped artichoke hearts.

  • Potato Pavé (The Fancy Potato That’s Totally Worth It)

    Potato Pavé (The Fancy Potato That’s Totally Worth It)

    This potato sounds French. It is. But don’t run.

    Potato pavé is thinly sliced potatoes layered with cream and herbs, pressed overnight, then cut into bricks and fried until crispy. Crunchy outside. Velvety inside. Yes, it takes time. Yes, it’s worth it.

    Ingredients

    Serves 6-8 as side.

    • 3 lbs (1.4kg) russet or Yukon Gold potatoes
    • 1 cup heavy cream
    • 4 cloves garlic, minced
    • 2 tbsp fresh thyme (or rosemary)
    • 1 tsp salt
    • ½ tsp black pepper
    • 2 tbsp butter (for pressing pan)
    • Vegetable oil for frying

    Step-by-Step Instructions

    Step 1: Prep

    1. Preheat oven to 350°F (175°C). Line a loaf pan with parchment paper (overhang on sides).
    2. Peel potatoes. Slice paper-thin (use a mandoline, 1/16 inch).

    Step 2: Make Cream Mixture

    1. Mix cream, garlic, thyme, salt, and pepper in a bowl.

    Step 3: Layer

    1. Layer potatoes in the loaf pan, brushing/drizzling cream mixture every few layers.
    2. Press down firmly after every few layers. Fill to the top.

    Step 4: Bake and Press

    1. Cover with parchment. Weigh down with another loaf pan or foil-wrapped bricks.
    2. Bake for 1.5-2 hours until potatoes are tender and edges are brown.
    3. Cool completely. Refrigerate overnight (still weighted).

    Step 5: Slice and Fry

    1. Remove potato block from pan. Slice into 1-inch thick rectangles.
    2. Heat ¼ inch oil in a skillet over medium-high heat.
    3. Fry each brick until golden and crispy on both sides (2-3 minutes per side).

    Step 6: Serve

    1. Drain on paper towels. Sprinkle with salt. Serve immediately.

    Summary

    Prep Time: 30 minutes | Bake Time: 2 hours | Chill Time: Overnight | Fry Time: 10 minutes | Total Time: ~13 hours (mostly hands-off)

    Yield: 6-8 servings

    Difficulty: Medium (needs planning)

    Storage Notes

    Make Ahead Hero:

    Baked and pressed potato pavé keeps in the fridge for 4 days before frying. Fry when ready to serve.

    Freeze Sliced:

    Freeze unbaked slices on a tray. Bake from frozen at 350°F for 25 minutes.

    Reheat Leftover Fried Pavé:

    Oven at 375°F for 5-7 minutes (not microwave—soggy).

    Pro Tip:

    Don’t skip the overnight press. That weight is what gives pavé its dense, layered structure.

  • Ground Beef Quesadilla: Cheesy, Beefy, 15-Minute Hero

    Ground Beef Quesadilla: Cheesy, Beefy, 15-Minute Hero

    Quesadillas are the ultimate lazy dinner. But when you stuff them with seasoned ground beef? Now we’re talking. Crispy tortilla. Oozy cheese. Savory, spiced beef.

    Fifteen minutes. One skillet. Zero regrets. Serve with salsa, sour cream, or just eat it over the sink like a champion.

    Ingredients

    Serves 2-3 (makes 2 large quesadillas).

    • 2 large flour tortillas (burrito size)
    • ½ lb ground beef (85/15 is good)
    • 1½ cups shredded cheese (cheddar, Monterey Jack, or Mexican blend)
    • ¼ small onion, diced
    • 1 clove garlic, minced
    • ½ teaspoon chili powder
    • ½ teaspoon cumin
    • ¼ teaspoon salt
    • 1 tablespoon oil or butter
    • Optional toppings: salsa, sour cream, avocado, hot sauce

    Step-by-Step Instructions

    Step 1: Cook the Ground Beef

    1. Heat a skillet over medium-high heat. Add ground beef.
    2. Cook for 5-6 minutes, breaking it apart, until browned.
    3. Add onion and garlic. Cook for 2 minutes until soft.
    4. Stir in chili powder, cumin, and salt. Remove from heat.

    Step 2: Assemble the Quesadilla

    1. Wipe the skillet clean. Return to medium heat.
    2. Place one tortilla in the dry skillet.
    3. Sprinkle half the cheese over half the tortilla.
    4. Top cheese with half the beef mixture.
    5. Sprinkle with a little more cheese (the glue that holds it together).
    6. Fold the empty half over the filling.

    Step 3: Cook Until Golden and Crispy

    1. Cook for 2-3 minutes until bottom is golden brown.
    2. Flip carefully. Cook second side for 2 minutes until cheese is melted and tortilla is crispy.
    3. Repeat with second quesadilla.

    Step 4: Slice and Serve

    1. Let rest for 1 minute. Slice into wedges.
    2. Serve with salsa, sour cream, or guac. Maybe all three.

    Summary

    Prep Time: 5 minutes | Cook Time: 12 minutes | Total Time: 17 minutes

    Yield: 2 large quesadillas (2-3 servings)

    Difficulty: Easy

    Storage Notes

    Fridge:

    Store leftover quesadillas in an airtight container for up to 4 days.

    Reheating (Don’t Microwave):

    Air fryer at 375°F for 3-4 minutes. Dry skillet over medium heat for 2 minutes per side. Oven at 375°F for 8 minutes. Microwave = sad and floppy.

    Freezing:

    Freeze cooked and cooled quesadillas for up to 2 months. Reheat from frozen in a skillet or air fryer.

    Make It Yours:

    Add black beans, corn, jalapeños, or bell peppers to the beef. Everything works.

  • BBQ Ribs (Fall-Off-the-Bone, No Smoker Required)

    BBQ Ribs (Fall-Off-the-Bone, No Smoker Required)

    No smoker? No problem.

    These ribs bake low and slow in the oven until they’re practically falling apart. Then you slather them with BBQ sauce and blast ’em under the broiler for that sticky, caramelized finish. Fork-tender. Finger-licking. Foolproof.

    Ingredients

    Serves 4.

    • 2 racks baby back ribs (about 2 lbs each)
    • 2 tbsp yellow mustard (binder)
    • ¼ cup brown sugar
    • 2 tbsp paprika
    • 1 tbsp garlic powder
    • 1 tbsp onion powder
    • 1 tsp black pepper
    • 1 tsp salt
    • 1 cup BBQ sauce (your favorite)

    Step-by-Step Instructions

    Step 1: Prep Ribs

    1. Preheat oven to 275°F (135°C). Line a baking sheet with foil.
    2. Remove membrane from back of ribs (grab with paper towel and pull).
    3. Brush ribs lightly with mustard.

    Step 2: Season

    1. Mix brown sugar, paprika, garlic powder, onion powder, pepper, and salt.
    2. Rub generously all over ribs.

    Step 3: Bake Low & Slow

    1. Wrap ribs tightly in foil. Place on baking sheet.
    2. Bake for 2.5 to 3 hours until meat is very tender.

    Step 4: Sauce and Sear

    1. Unwrap ribs. Brush both sides with BBQ sauce.
    2. Set oven to broil. Broil 2-3 minutes per side until sticky and charred.

    Step 5: Serve

    1. Rest 10 minutes. Slice between bones. Serve with extra sauce.

    Summary

    Prep Time: 15 minutes | Cook Time: 3 hours | Total Time: ~3.5 hours

    Yield: 4 servings

    Difficulty: Easy (needs patience)

    Storage Notes

    Refrigerate:

    Store ribs in an airtight container for up to 4 days. Reheat in oven at 300°F for 15 minutes, covered with foil.

    Freeze:

    Wrap tightly in foil and bag. Freeze for up to 3 months. Thaw overnight. Reheat at 300°F.

    Pro Tip:

    Don’t skip the membrane—it gets chewy. And don’t boil ribs (washes away flavor). Low oven only.

  • Pork Belly Buns (Soft, Sticky, Bao-tiful)

    Pork Belly Buns (Soft, Sticky, Bao-tiful)

    Bao buns are clouds. Clouds that hold pork belly.

    Sticky, tender, five-spice pork belly tucked into a fluffy steamed bun with crunchy slaw and hoisin. It’s sweet, savory, soft, and crisp all at once. Impressive? Yes. Hard? Not at all.

    Ingredients

    Makes 8 buns.

    For the Pork Belly:

    • 1 lb (450g) pork belly, sliced into ½-inch thick pieces
    • ¼ cup soy sauce
    • 2 tbsp hoisin sauce
    • 2 tbsp brown sugar
    • 1 tsp five-spice powder
    • 2 cloves garlic, minced

    For the Buns:

    • 8 pre-made bao buns (or homemade)

    For Toppings:

    • ½ cucumber, julienned
    • 2 green onions, sliced
    • Extra hoisin sauce
    • Sriracha (optional)

    Step-by-Step Instructions

    Step 1: Marinate Pork

    1. In a bowl, mix soy sauce, hoisin, brown sugar, five-spice, and garlic.
    2. Coat pork belly slices. Marinate 30 minutes (or overnight).

    Step 2: Cook Pork

    1. Heat a skillet over medium-high heat. Sear pork 2-3 minutes per side until caramelized.
    2. Add leftover marinade + ¼ cup water. Simmer 5 minutes until sticky and thick.

    Step 3: Steam Buns

    1. Steam bao buns according to package instructions (usually 3-5 minutes).

    Step 4: Assemble

    1. Open each bun. Spread hoisin inside.
    2. Add pork belly, cucumber, and green onions.
    3. Drizzle with extra hoisin and sriracha if desired.

    Step 5: Serve

    1. Serve warm. Eat with your hands. Smile.

    Summary

    Prep Time: 10 minutes | Marinate Time: 30 minutes | Cook Time: 15 minutes | Total Time: ~55 minutes

    Yield: 8 buns

    Difficulty: Easy

    Storage Notes

    Store Components Separately:

    • Pork belly: Refrigerate for up to 4 days. Reheat in a skillet.
    • Bao buns: Freeze for up to 2 months. Re-steam from frozen.
    • Toppings: Cucumber is best fresh.

    Do Not Store Assembled:

    Buns get soggy. Assemble right before eating.

    Quick Sub:

    No homemade bao? Use King’s Hawaiian rolls or small burger buns. Different, still delicious.

    Make It Spicy:

    Add chili crisp or sriracha mayo to the bun.

  • Elotes (Mexican Street Corn That Steals Every Cookout)

    Elotes (Mexican Street Corn That Steals Every Cookout)

    Plain buttered corn is fine. Elotes is a party.

    Smoky grilled corn + creamy sauce + salty cotija + chili lime dust. It’s messy to eat. That’s the point. Serve it on a stick or scoop it into a cup (that’s esquites, equally amazing).

    Ingredients

    Serves 4.

    • 4 ears of corn, husked
    • ¼ cup mayonnaise
    • ¼ cup sour cream (or Mexican crema)
    • ½ cup cotija cheese, crumbled (plus more for topping)
    • 1 teaspoon chili powder (plus more for topping)
    • ½ teaspoon garlic powder
    • 2 tablespoons fresh cilantro, chopped
    • 1 lime, cut into wedges
    • Salt to taste

    Step-by-Step Instructions

    Step 1: Make Sauce

    1. In a bowl, mix mayo, sour cream, garlic powder, and a pinch of chili powder.

    Step 2: Grill Corn

    1. Heat grill to medium-high. Husk corn (leave stems on for handles if desired).
    2. Grill 8-10 minutes, turning occasionally, until charred in spots.

    Step 3: Coat

    1. Remove corn. Brush each ear with sauce while still hot.
    2. Roll in cotija cheese on a plate.

    Step 4: Finish

    1. Sprinkle with chili powder, cilantro, and salt.
    2. Serve with lime wedges. Squeeze before eating.

    Summary

    Prep Time: 5 minutes | Cook Time: 10 minutes | Total Time: 15 minutes

    Yield: 4 ears

    Difficulty: Easy

    Storage Notes

    Best Fresh

    Elotes are a now-or-never food. Leftover sauced corn gets soggy. Grill only what you’ll eat.

    Leftover Corn Kernels?

    Cut off the cob. Turn into esquites (Mexican corn salad). Mix with leftover sauce, cotija, and lime. Serve in a cup with a spoon.

    No Grill?

    Use a cast-iron skillet. Char corn over high heat, turning frequently.

    Cotija Substitute:

    Parmesan or feta in a pinch. But cotija is worth finding.

  • Chicken Burrito (A Whole Meal Wrapped in a Tortilla)

    Chicken Burrito (A Whole Meal Wrapped in a Tortilla)

    A great burrito is a miracle of engineering. All the flavors inside. None of them falling out.

    This chicken burrito packs rice, beans, chicken, cheese, and avocado into one beautiful, foil-wrapped package.

    Ingredients

    Makes 2 large burritos.

    • 2 large flour tortillas (10–12 inch, burrito size)
    • 1 cup (150g) cooked shredded chicken (rotisserie works great)
    • 1 cup (200g) cooked rice (white or cilantro-lime)
    • ½ cup (120g) canned black beans, drained and warmed
    • ½ cup (50g) shredded cheese (cheddar or Monterey Jack)
    • ¼ cup sour cream
    • ¼ cup salsa or pico de gallo
    • ½ avocado, sliced
    • Optional: hot sauce, cilantro, pickled onions, corn

    Step-by-Step Instructions

    Step 1: Warm the Tortilla

    1. Microwave tortillas for 20 seconds or heat in a dry pan until pliable. Warm tortillas don’t crack.

    Step 2: Layer Fillings Down the Middle

    1. In a line down the center (not edge to edge): rice → beans → chicken → cheese → sour cream → salsa → avocado.
    2. Don’t overstuff. Less is more for rolling.

    Step 3: Fold & Roll

    1. Fold the sides inward over the filling.
    2. Fold the bottom edge up and over. Roll tightly away from you, tucking as you go.
    3. Optional: Sear the seam side in a dry pan for 30 seconds to seal.

    Step 4: Wrap & Serve

    1. Wrap tightly in foil to hold the shape. Slice in half. Eat with hot sauce.

    Summary

    Prep Time: 10 minutes | Cook Time: 0 minutes (if using leftovers) | Total Time: 10 minutes

    Yield: 2 large burritos

    Difficulty: Easy (rolling takes practice)

    Storage Notes

    • Fridge: Wrap tightly in foil and refrigerate for up to 2 days. Reheat in a dry pan or air fryer. Microwave = soggy.
    • Freezer: Freeze foil-wrapped burritos for up to 2 months. Reheat from frozen at 375°F for 20–25 minutes.

    Pro tip: For the best roll, don’t put wet ingredients (salsa, sour cream) near the edges. Keep them in the middle.

  • Beef Enchiladas (Roll, Smother, Bake, Devour)

    Beef Enchiladas (Roll, Smother, Bake, Devour)

    Enchiladas are the perfect math: beef + cheese + sauce + tortillas = happiness.

    These beef enchilatas come together fast, bake until bubbly, and taste like a hug from the inside out.

    Ingredients

    Serves 4–6. Makes 8 enchiladas.

    • 8 corn or flour tortillas (soft taco size)
    • 1 lb (450g) ground beef
    • 1 small onion, diced
    • 2 cloves garlic, minced
    • 2 cups (200g) shredded cheese (cheddar, Monterey Jack, or Mexican blend)
    • 1 can (10 oz / 300g) red enchilada sauce
    • 1 tablespoon oil
    • Salt, pepper, cumin, chili powder to taste

    Optional Toppings:

    • Sour cream, cilantro, diced onion, jalapeños, hot sauce

    Step-by-Step Instructions

    Step 1: Cook Filling

    1. Heat oil in a skillet over medium heat. Cook onion until soft, 3 minutes.
    2. Add ground beef and garlic. Cook until browned. Drain fat.
    3. Season with salt, pepper, cumin, and chili powder. Stir in ¼ cup enchilada sauce. Remove from heat.

    Step 2: Prep

    1. Preheat oven to 375°F (190°C).
    2. Spread ½ cup enchilada sauce on the bottom of a 9×13 baking dish.

    Step 3: Roll

    1. Warm tortillas to make them pliable (microwave 30 seconds wrapped in a damp towel).
    2. Place beef mixture and a handful of cheese down the center of each tortilla.
    3. Roll tightly and place seam-side down in the dish.

    Step 4: Smother & Bake

    1. Pour remaining enchilada sauce over the rolled tortillas.
    2. Sprinkle remaining cheese on top.
    3. Bake for 15–20 minutes until bubbly and cheese is golden.

    Step 5: Serve

    1. Let cool 5 minutes. Top with sour cream, cilantro, or whatever you love.

    Summary

    Prep Time: 15 minutes | Cook Time: 20 minutes | Total Time: 35 minutes

    Yield: 8 enchiladas (4–6 servings)

    Difficulty: Easy

    Storage Notes

    • Fridge: Store in an airtight container for up to 4 days. Reheat in oven or microwave.
    • Freezer: Freeze unbaked or baked for up to 2 months. Bake from frozen at 375°F for 30–35 minutes.

    Pro tip: Warm your tortillas before rolling — cold tortillas crack and break.