Category: quick_meals

  • Chicken Gyros (Greek Street Food That Steals the Show)

    Chicken Gyros (Greek Street Food That Steals the Show)

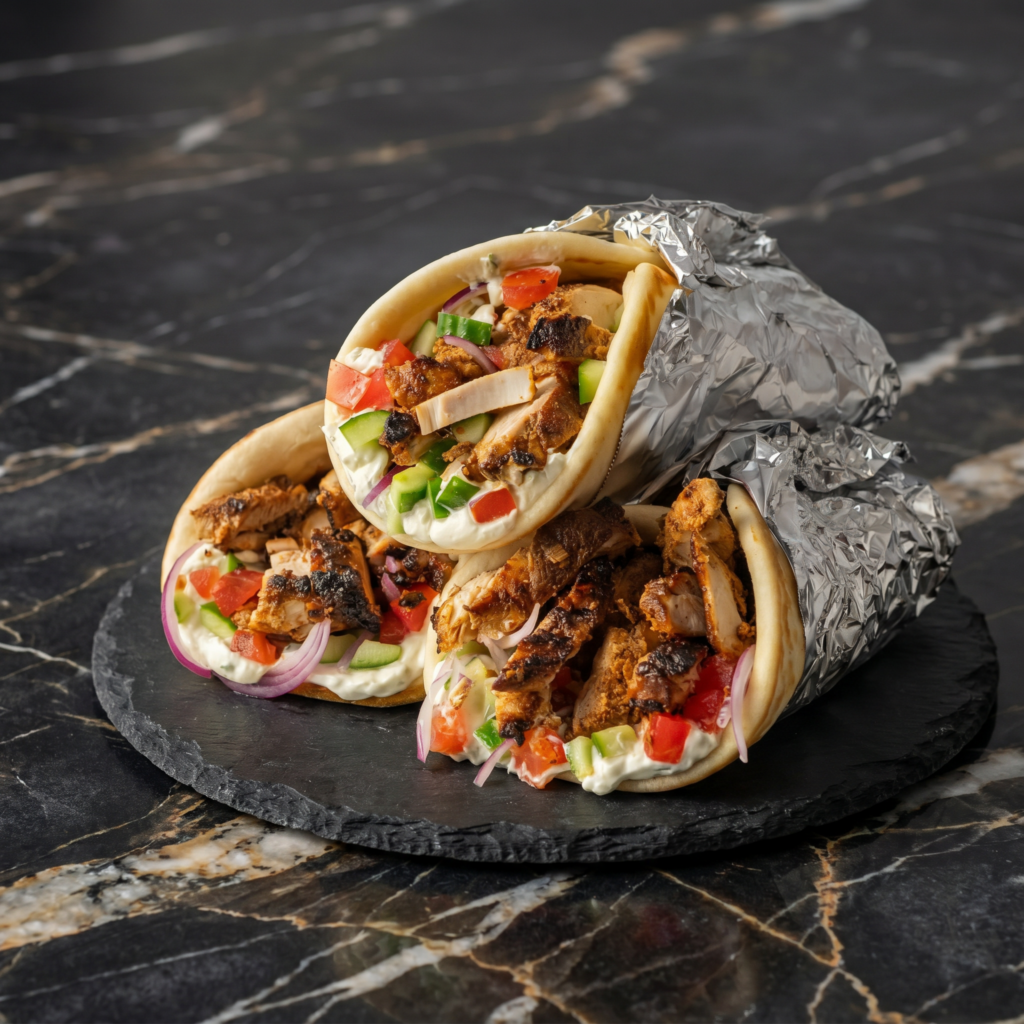
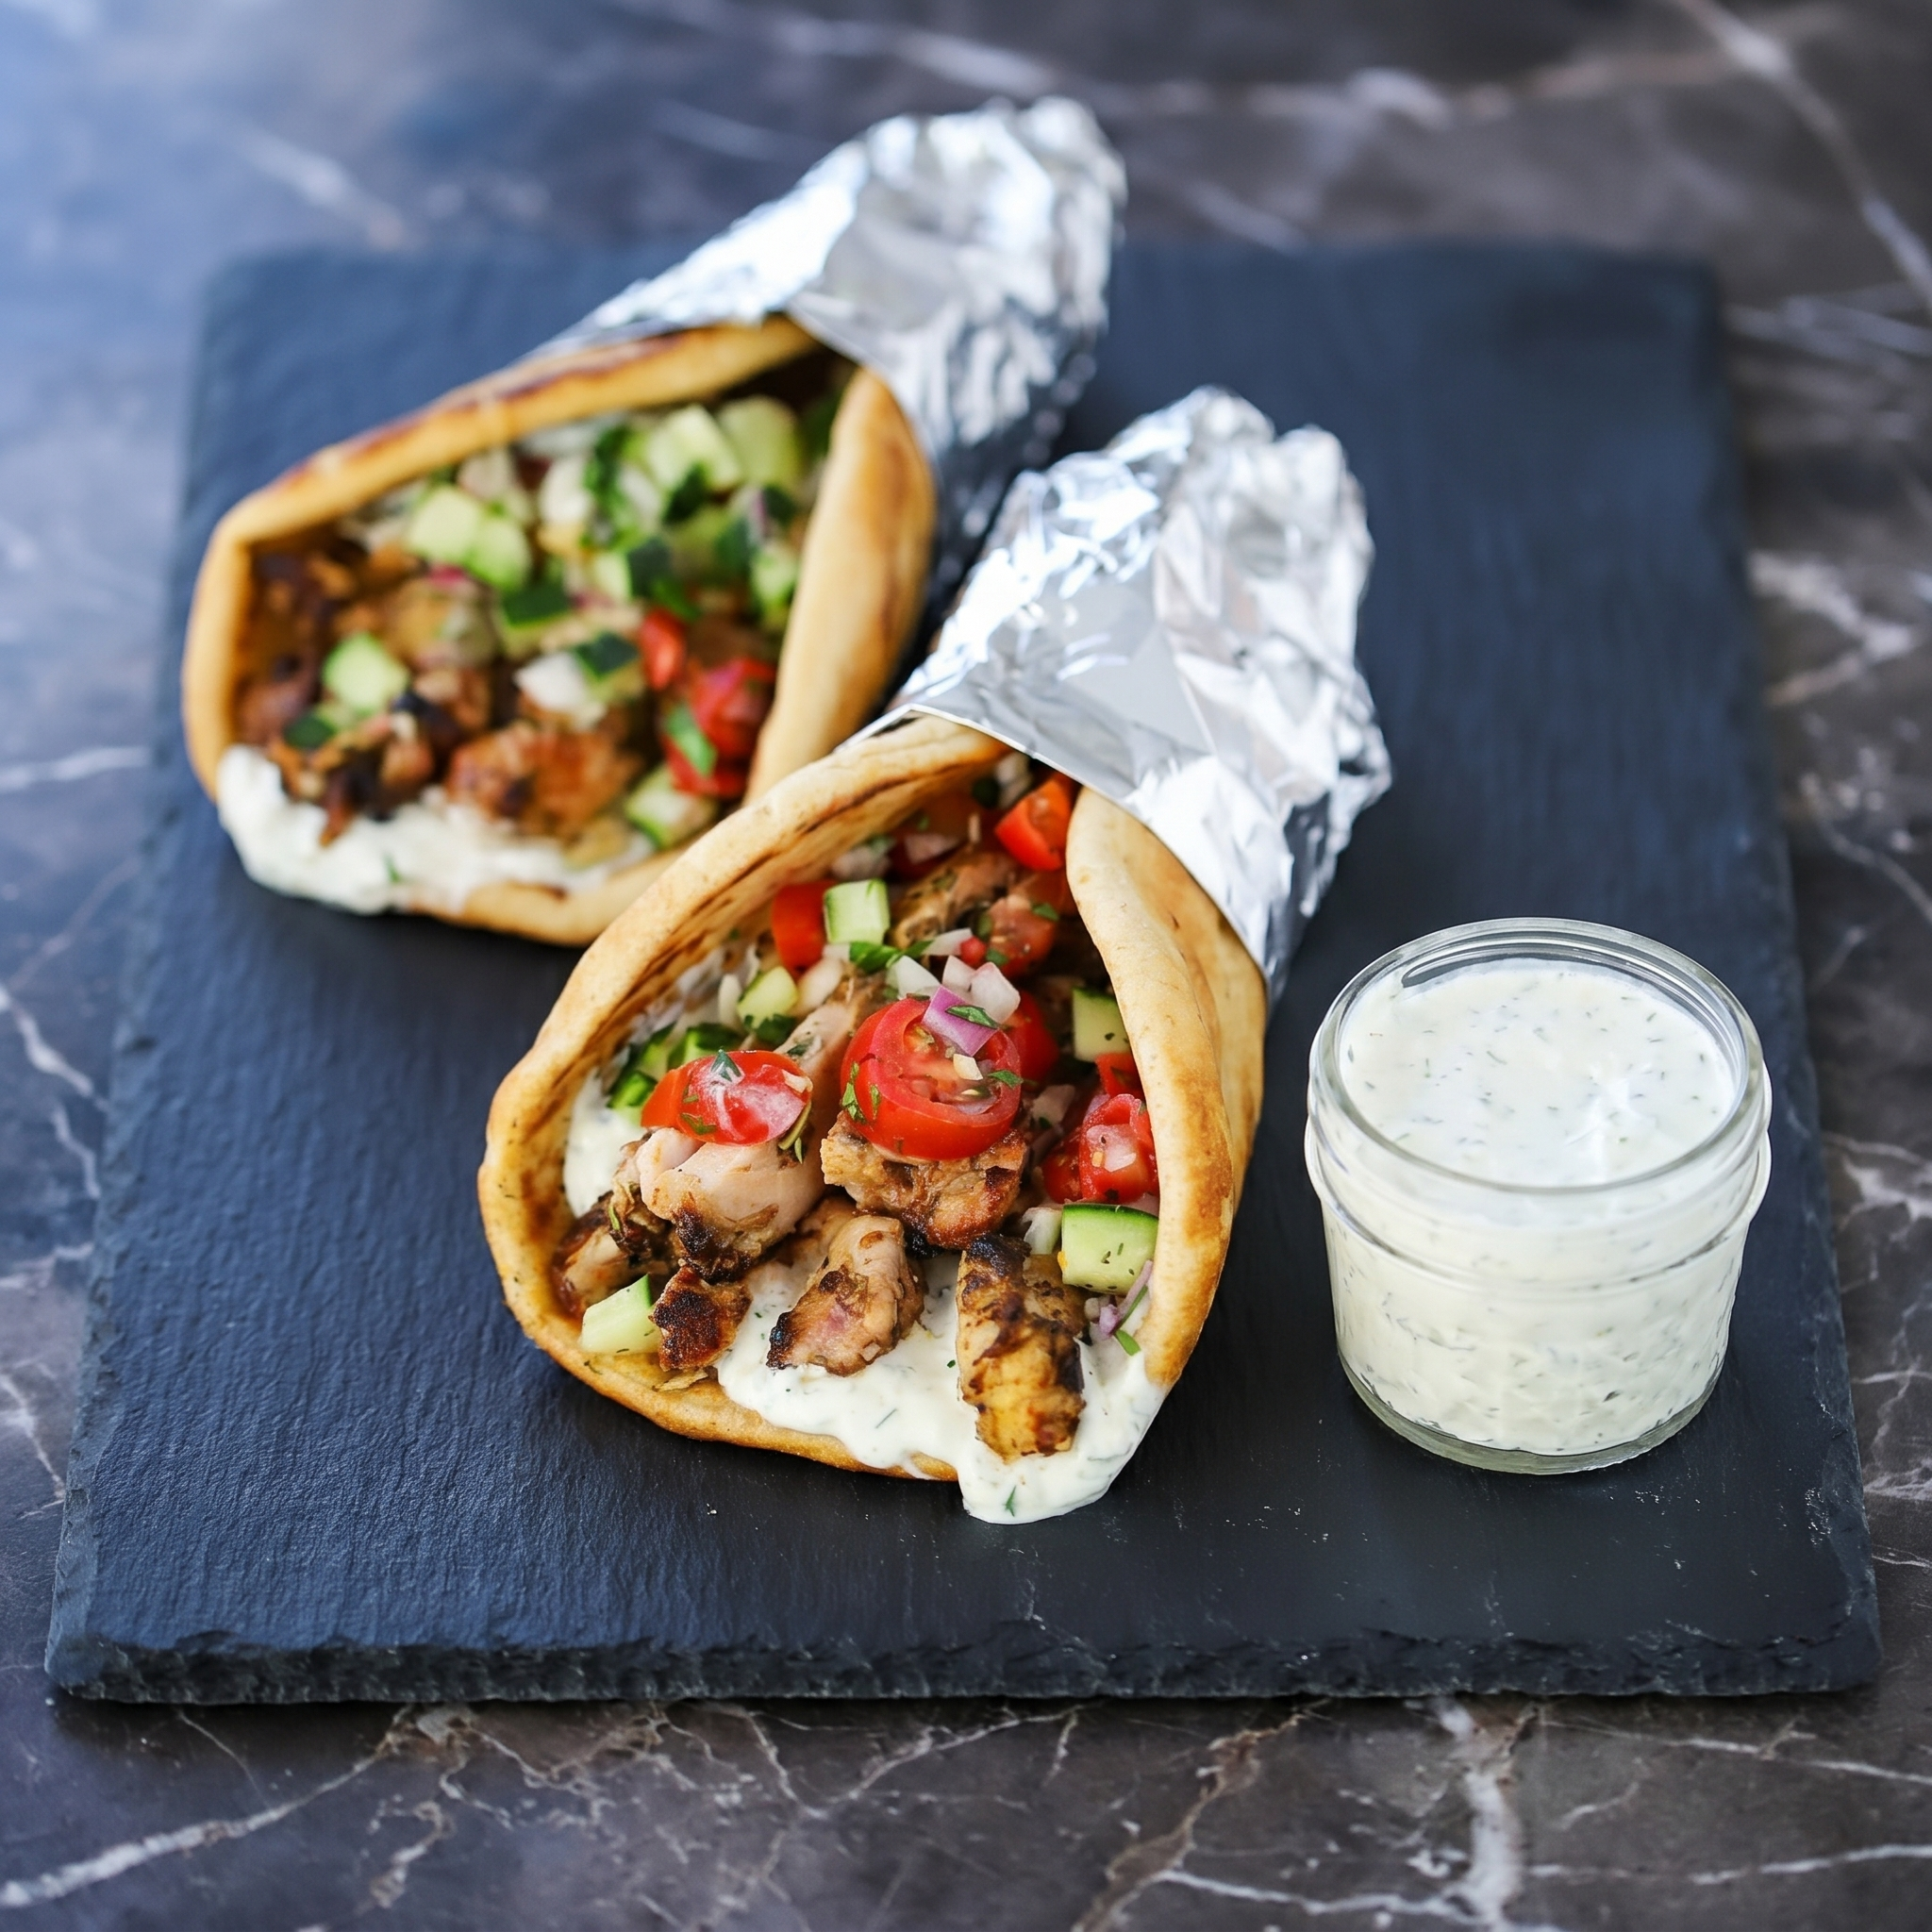
    Gyros should be juicy, not dry. Flavorful, not bland. This chicken version delivers: marinated in lemon, garlic, and oregano. Grilled to charred perfection. Wrapped in soft pita with creamy tzatziki. Close your eyes. You’re in Athens.

    Ingredients

    Serves 4.

    For the Chicken:

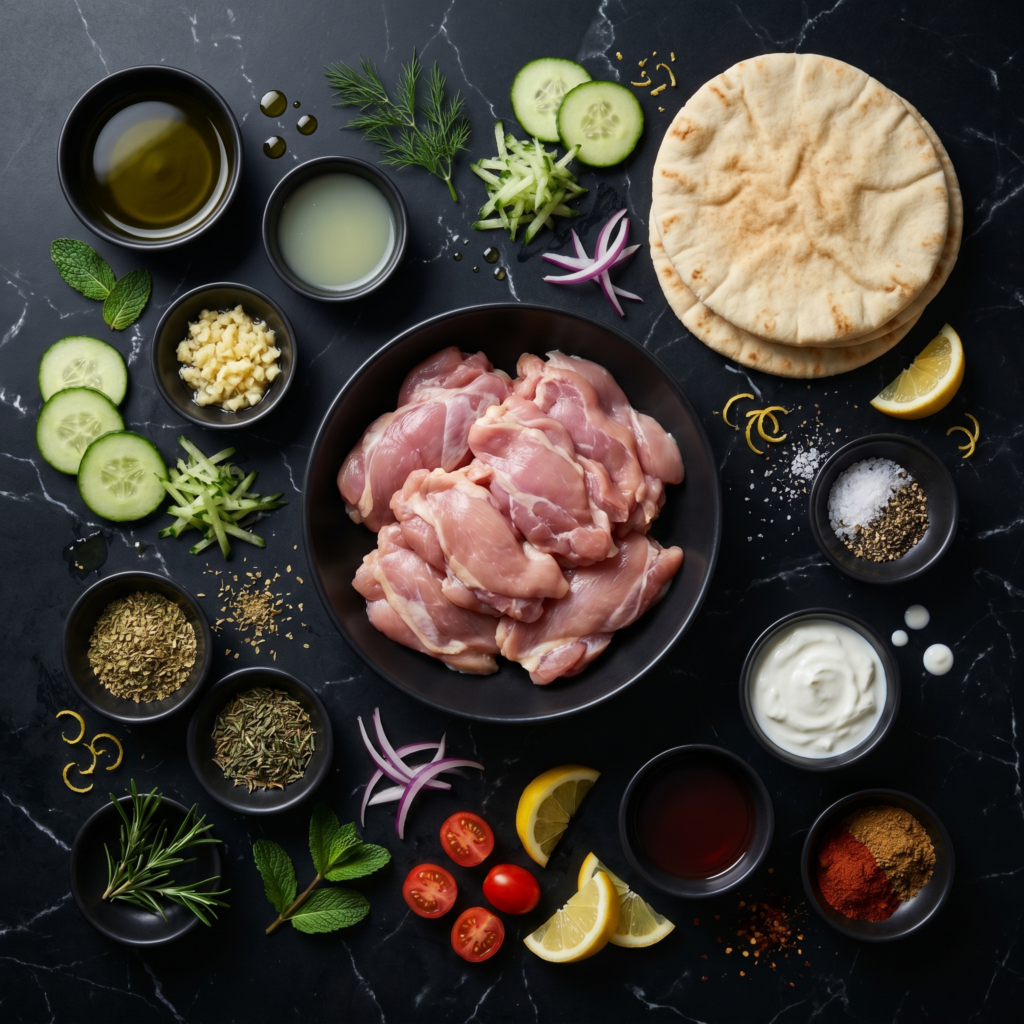
    • 1½ lbs (675g) chicken thighs, boneless skinless
    • ¼ cup (60ml) olive oil
    • 3 tbsp lemon juice
    • 4 cloves garlic, minced
    • 1 tbsp dried oregano
    • 1 tsp paprika
    • 1 tsp salt
    • ½ tsp black pepper

    For the Tzatziki:

    • 1 cup Greek yogurt
    • ½ cucumber, grated and squeezed dry
    • 2 cloves garlic, minced
    • 1 tbsp olive oil
    • 1 tbsp lemon juice
    • 1 tbsp fresh dill or 1 tsp dried
    • Salt to taste

    For Serving:

    • 4 pita breads
    • Tomato, sliced
    • Red onion, thinly sliced
    • French fries (optional but authentic)

    Step-by-Step Instructions

    Step 1: Marinate Chicken

    1. Whisk olive oil, lemon juice, garlic, oregano, paprika, salt, and pepper.
    2. Add chicken. Toss to coat. Marinate 2-8 hours (overnight even better).

    Step 2: Make Tzatziki

    1. Mix all tzatziki ingredients in a bowl. Refrigerate until serving.

    Step 3: Cook Chicken

    1. Heat grill or grill pan to medium-high.
    2. Cook chicken 5-7 minutes per side until charred and cooked through (165°F / 74°C internal).
    3. Rest 5 minutes. Slice into strips.

    Step 4: Warm Pita

    1. Warm pitas on the grill or in a dry pan for 30 seconds per side.

    Step 5: Assemble

    1. Spread tzatziki on pita. Add sliced chicken. Top with tomato, onion, and fries if using.
    2. Fold like a taco or roll tightly. Eat immediately. Let it drip.

    Summary

    Prep Time: 15 min + marinate | Cook Time: 15 min | Total: 30 min + marinate

    Yield: 4 gyros | Difficulty: Easy

    Storage Notes

    Leftover chicken: Fridge 3 days. Reheat in skillet or air fryer. Tzatziki: 5 days. Don’t assemble ahead — soggy pita is a tragedy. Keep everything separate until you’re ready to eat.

  • Lumpia Shanghai (The Crunchiest, Most Addictive Spring Roll)

    Lumpia Shanghai (The Crunchiest, Most Addictive Spring Roll)

    Lumpia Shanghai are the life of any party. Tiny, crispy, meat-packed rolls that shatter when you bite them. Filipino-style spring rolls. Dangerously snackable. Make extra. You’ve been warned.

    Ingredients

    Makes about 40-50 lumpia.

    For the Filling:

    • 1 lb (450g) ground pork
    • ½ cup finely chopped carrots
    • ½ cup finely chopped onion
    • 3 cloves garlic, minced
    • ¼ cup finely chopped green onions
    • 1 egg
    • 2 tbsp soy sauce
    • 1 tbsp oyster sauce
    • 1 tsp black pepper
    • ½ tsp salt

    For Wrapping & Frying:

    • 1 pack lumpia wrappers (spring roll wrappers, about 50)
    • 1 egg white (for sealing)
    • Vegetable oil for deep frying

    For Dipping:

    • Sweet chili sauce or vinegar + garlic + soy sauce

    Step-by-Step Instructions

    Step 1: Make Filling

    1. In a large bowl, mix ground pork, carrots, onion, garlic, green onions, egg, soy sauce, oyster sauce, pepper, and salt. Mix until well combined (hands work best).

    Step 2: Wrap Lumpia

    1. Place a lumpia wrapper in a diamond shape. Put 1-2 teaspoons of filling near the bottom corner, shaping into a log.
    2. Roll the bottom corner over the filling. Fold in the sides. Continue rolling tightly. Brush the top corner with egg white to seal.
    3. Repeat. Keep finished lumpia covered with a damp towel so wrappers don’t dry out.

    Step 3: Fry

    1. Heat 2 inches of oil to 350°F (175°C).
    2. Fry lumpia in batches, 2-3 minutes, until golden brown and crispy. Don’t overcrowd.
    3. Drain on paper towels or a wire rack.

    Step 4: Serve

    1. Serve hot with sweet chili sauce. Listen for the crunch.

    Summary

    Prep Time: 30 min | Cook Time: 15 min | Total: 45 min

    Yield: 40-50 lumpia | Difficulty: Medium (wrapping practice)

    Storage Notes

    Freeze uncooked: Arrange on a tray, freeze solid, then transfer to a bag. Fry from frozen (add 1-2 minutes). Cooked leftovers: Reheat in oven or air fryer at 375°F for 5-6 minutes. Never microwave (soggy sadness).

  • Falafel (Crispy, Green, and Way Better Than Takeout)

    Falafel (Crispy, Green, and Way Better Than Takeout)

    Real falafel is green. And crispy. And fluffy. And nothing like the dry, brown pucks you’ve had. The secret? Use dried chickpeas (not canned). One bite and you’re in Cairo or Tel Aviv. Let’s fry.

    Ingredients

    Makes about 20 falafel balls.

    For the Falafel:

    • 1 cup (200g) dried chickpeas (not canned), soaked 24 hours
    • ½ cup fresh parsley, packed
    • ½ cup fresh cilantro, packed
    • ¼ cup fresh dill (or more parsley)
    • 1 small onion, quartered
    • 4 cloves garlic
    • 1 tsp salt
    • 1 tsp black pepper
    • 1 tsp cumin
    • 1 tsp coriander
    • ½ tsp cayenne (optional)
    • 1 tsp baking powder
    • 2 tbsp flour or chickpea flour

    For Frying:

    • Vegetable oil (for deep frying)

    For Tahini Sauce:

    • ¼ cup tahini
    • ¼ cup water
    • 2 tbsp lemon juice
    • 1 clove garlic, minced
    • Salt

    Step-by-Step Instructions

    Step 1: Soak Chickpeas

    1. Cover dried chickpeas with lots of water. Soak 24 hours. Drain well.

    Step 2: Make Falafel Mix

    1. In a food processor, pulse soaked chickpeas, parsley, cilantro, dill, onion, and garlic until finely ground (not puréed — texture is key).
    2. Add salt, pepper, cumin, coriander, cayenne, baking powder, and flour. Pulse to combine.
    3. Refrigerate for 30–60 minutes (helps hold shape).

    Step 3: Make Tahini Sauce

    1. Whisk tahini, water, lemon juice, garlic, and salt until smooth. Add more water for drizzling consistency.

    Step 4: Heat Oil

    1. Heat 2 inches of oil to 350°F (175°C).

    Step 5: Shape & Fry

    1. Scoop falafel mix using a scoop or spoon. Roll into 1-inch balls.
    2. Gently drop into hot oil. Fry 3–4 minutes until deep brown and crispy.
    3. Drain on paper towels.

    Step 6: Serve

    1. Stuff into warm pita with tahini, tomato, cucumber, and pickles. Or just eat straight off the tray.

    Summary

    Prep Time: 20 min + soak + chill | Cook Time: 15 min | Total: 35 min + overnight

    Yield: 20 falafel | Difficulty: Medium

    Storage Notes

    Uncooked falafel mix: Fridge 2 days. Cooked falafel: Fridge 3 days, freeze 3 months. Reheat in oven or air fryer at 375°F for 5–7 minutes. Never microwave (soggy sadness).

  • Loukoumades (Greek Honey Donut Holes That Steal Hearts)

    Loukoumades (Greek Honey Donut Holes That Steal Hearts)

    Loukoumades are little clouds of fried heaven. Crispy outside. Fluffy inside. Swimming in honey syrup and dusted with cinnamon and walnuts. These were served to Olympic athletes in ancient Greece. Now they’re all yours.

    Ingredients

    Makes about 30 loukoumades.

    For the Dough:

    • 2 cups (250g) all-purpose flour
    • 1 packet (2¼ tsp) instant yeast
    • ¼ cup (50g) sugar
    • ½ tsp salt
    • 1 cup (240ml) warm water (110°F / 45°C)
    • 1 tbsp olive oil

    For the Honey Syrup:

    • 1 cup (240ml) honey
    • ½ cup (120ml) water
    • ¼ cup (50g) sugar
    • 1 cinnamon stick
    • 1 strip lemon peel

    For Topping & Frying:

    • Vegetable oil for frying
    • Ground cinnamon
    • Chopped walnuts

    Step-by-Step Instructions

    Step 1: Make Dough

    1. Whisk flour, yeast, sugar, and salt. Add warm water and olive oil. Stir into a sticky, thick batter (like pancake batter).
    2. Cover and rise 1–2 hours until bubbly and doubled.

    Step 2: Make Syrup

    1. Combine honey, water, sugar, cinnamon stick, and lemon peel in a saucepan.
    2. Simmer 5–7 minutes until slightly thickened. Remove cinnamon and lemon. Set aside.

    Step 3: Heat Oil

    1. Heat 2 inches of oil to 350°F (175°C).

    Step 4: Fry

    1. Using a small cookie scoop or two spoons, drop tablespoon-sized balls of batter into hot oil.
    2. Fry 2–3 minutes, turning occasionally, until golden brown and puffed.
    3. Drain briefly on paper towels.

    Step 5: Syrup & Serve

    1. Toss warm loukoumades in honey syrup until coated.
    2. Pile onto a plate. Sprinkle generously with cinnamon and walnuts.
    3. Eat immediately. Sticky fingers = happiness.

    Summary

    Prep Time: 15 min + rise | Cook Time: 15 min | Total: 30 min + rise

    Yield: 30 loukoumades | Difficulty: Easy

    Storage Notes

    Best fresh. Loukoumades are a same-day affair. Soggy leftovers make Zeus cry. If you must, reheat in oven at 375°F for 5 minutes and re-syrup. But really… just eat them all.

  • BBQ Beef Biscuit Cups: Biscuit Meets BBQ in a Muffin Tin

    BBQ Beef Biscuit Cups: Biscuit Meets BBQ in a Muffin Tin

    Biscuits are great. BBQ beef is great. Together in a cup? Genius.

    Flaky biscuit dough pressed into a muffin tin. Filled with tangy BBQ beef and cheddar. Baked until golden. 30 minutes. Handheld happiness.

    Ingredients

    Makes 10 biscuit cups.

    • 1 can (16 oz) refrigerated biscuit dough (10 biscuits)
    • 1 lb ground beef
    • ½ cup BBQ sauce (plus extra for drizzling)
    • ½ small onion, diced
    • 1 tbsp brown sugar (optional)
    • 1 cup shredded cheddar cheese
    • Fresh parsley or green onions for garnish (optional)

    Step-by-Step Instructions

    Step 1: Preheat and Cook Beef

    1. Preheat oven to 375°F (190°C). Grease a 10-cup muffin tin.
    2. In a skillet, cook ground beef and onion over medium heat until browned (5-7 minutes). Drain fat.
    3. Stir in BBQ sauce and brown sugar. Simmer 2 minutes.

    Step 2: Press the Biscuits

    1. Press each biscuit into the bottom and up the sides of a muffin cup, forming a cup shape.

    Step 3: Fill the Cups

    1. Spoon BBQ beef mixture into each biscuit cup.
    2. Top with shredded cheddar cheese.

    Step 4: Bake

    1. Bake 12-15 minutes until biscuits are golden brown and cheese is melted.

    Step 5: Serve

    1. Let cool 5 minutes. Run a knife around edges to loosen.
    2. Drizzle with extra BBQ sauce. Garnish with parsley or green onions. Serve warm.

    Summary

    Prep Time: 10 minutes | Cook Time: 15-20 minutes | Total Time: 25-30 minutes

    Yield: 10 biscuit cups

    Difficulty: Easy

    Storage Notes

    Fridge:

    Store leftovers in an airtight container for 3 days.

    Reheat:

    Oven at 350°F for 5-7 minutes. Microwave for 20-30 seconds.

    Freezer Friendly:

    Freeze baked cups for 2 months. Reheat in oven from frozen at 350°F for 10-12 minutes.

    Pro Tip:

    Use Grands-style biscuits for deeper cups. Flaky layers work best.

  • Bacon Wrapped Sausages: Two Meats, One Stick, Zero Remorse

    Bacon Wrapped Sausages: Two Meats, One Stick, Zero Remorse

    Bacon makes everything better. Sausages are already great. Together? Meat perfection.

    Wrap sausage in bacon. Brush with BBQ glaze. Bake until crispy. Secure with a toothpick. 25 minutes. These disappear faster than you can make them. Make two batches.

    Ingredients

    Makes 16-20 pieces.

    • 1 package (16 oz) little smoked sausages or cocktail wieners (about 16-20)
    • 1 package (16 oz) thin-cut bacon, cut into thirds
    • ½ cup BBQ sauce
    • 2 tbsp brown sugar
    • 1 tsp garlic powder
    • ½ tsp black pepper
    • Toothpicks (soaked in water 10 minutes to prevent burning)

    Optional glaze add-ins: Honey, sriracha, maple syrup

    Step-by-Step Instructions

    Step 1: Preheat and Prep

    1. Preheat oven to 375°F (190°C). Line a baking sheet with foil and place a wire rack on top.
    2. Cut bacon strips into thirds.

    Step 2: Wrap the Sausages

    1. Wrap one piece of bacon around each sausage. Secure with a toothpick.
    2. Place on wire rack seam-side down.

    Step 3: Make the Glaze

    1. Mix BBQ sauce, brown sugar, garlic powder, and black pepper in a small bowl.

    Step 4: Glaze and Bake

    1. Brush glaze over each bacon-wrapped sausage.
    2. Bake 15-20 minutes until bacon is crispy and caramelized.

    Step 5: Serve

    1. Let cool 5 minutes. Transfer to a platter. Serve warm with extra BBQ sauce for dipping.

    Summary

    Prep Time: 10 minutes | Cook Time: 15-20 minutes | Total Time: 25-30 minutes

    Yield: 16-20 pieces

    Difficulty: Easy

    Storage Notes

    Fridge:

    Store leftovers for 3 days. Reheat in oven or air fryer to restore crispiness.

    Reheat:

    Air fryer at 350°F for 5 minutes. Oven at 375°F for 8-10 minutes.

    Freezer Friendly:

    Freeze baked or unbaked for 2 months. Bake from frozen at 375°F for 20-25 minutes.

    Pro Tip:

    Use thin-cut bacon. Thick-cut won’t crisp up properly in the oven.

  • Cajun Blackened Salmon: Bold, Smoky, 10 Minutes

    Cajun Blackened Salmon: Bold, Smoky, 10 Minutes

    Salmon in 10 minutes? Yes. Salmon this good? Also yes.

    Cajun spices. Screaming-hot cast iron. A dark, smoky crust. Buttery, flaky inside. 10 minutes. No marinating. No fuss. Just heat and eat.

    Ingredients

    Serves 4.

    • 4 salmon fillets (6 oz each, skin on or off)
    • 2 tbsp butter or high smoke-point oil
    • Lemon wedges for serving
    • Fresh parsley for garnish

    Cajun Blackening Seasoning:

    • 1 tbsp paprika
    • 1 tsp garlic powder
    • 1 tsp onion powder
    • 1 tsp dried thyme
    • 1 tsp dried oregano
    • ½ tsp cayenne pepper (less for mild, more for brave)
    • 1 tsp black pepper
    • 1 tsp salt

    Step-by-Step Instructions

    Step 1: Make the Seasoning

    1. Mix all seasoning ingredients in a small bowl.

    Step 2: Season the Salmon

    1. Pat salmon fillets completely dry with paper towels.
    2. Generously coat the flesh side with Cajun seasoning. Press to adhere.

    Step 3: Heat the Skillet

    1. Heat a cast iron skillet over medium-high heat until screaming hot (3-5 minutes).
    2. Add butter or oil. It should shimmer immediately.

    Step 4: Blacken the Salmon

    1. Place salmon in skillet seasoned-side down. Don’t overcrowd (cook in batches if needed).
    2. Cook 3-4 minutes until dark crust forms. Flip.
    3. Cook 2-3 minutes more for medium (internal temp 130-135°F) or 3-4 minutes for well done (145°F).

    Step 5: Serve

    1. Squeeze lemon over salmon. Garnish with parsley. Serve immediately.

    Summary

    Prep Time: 5 minutes | Cook Time: 5-7 minutes | Total Time: 10-12 minutes

    Yield: 4 servings

    Difficulty: Easy

    Storage Notes

    Best Fresh:

    Salmon is best eaten immediately. Leftovers are still tasty but less crispy.

    Reheat:

    Skillet over medium heat for 2-3 minutes per side. Microwave not recommended.

    Pro Tip:

    Cast iron is essential. Non-stick pans can’t handle the high heat needed for blackening.

  • Crispy Fried Chicken Tenders: Crunchy, Juicy, 30 Minutes

    Crispy Fried Chicken Tenders: Crunchy, Juicy, 30 Minutes

    Chicken tenders aren’t just for kids. These are for everyone.

    Buttermilk brine keeps them juicy. Double dredge makes them extra craggy. Fried until golden. 30 minutes. Skip the drive-thru. Make these instead.

    Ingredients

    Serves 4.

    • 1.5 lbs chicken tenders (or chicken breasts sliced into strips)
    • 2 cups buttermilk
    • 1 tbsp hot sauce (optional)
    • 2 cups all-purpose flour
    • ¼ cup cornstarch
    • 1 tsp baking powder
    • 1 tsp garlic powder
    • 1 tsp paprika
    • 1 tsp salt
    • ½ tsp black pepper
    • ¼ tsp cayenne (optional)
    • Oil for frying (vegetable or canola)

    For serving: Ranch, honey mustard, or BBQ sauce

    Step-by-Step Instructions

    Step 1: Brine the Chicken

    1. Mix buttermilk and hot sauce in a bowl. Add chicken tenders.
    2. Brine for 15 minutes (or up to 4 hours in fridge).

    Step 2: Make the Breading

    1. In a separate bowl, whisk flour, cornstarch, baking powder, garlic powder, paprika, salt, pepper, and cayenne.

    Step 3: Dredge the Chicken

    1. Remove chicken from buttermilk, letting excess drip off.
    2. Coat in flour mixture. Dip back in buttermilk. Coat again in flour (double dredge = extra crispy).
    3. Place on a wire rack while oil heats.

    Step 4: Heat Oil and Fry

    1. Heat 1 inch of oil in a deep skillet to 350°F (175°C).
    2. Fry tenders in batches, 3-4 minutes per side, until golden brown and cooked through (165°F internal).
    3. Drain on paper towels or wire rack.

    Step 5: Serve

    1. Sprinkle with salt. Serve immediately with your favorite dipping sauce.

    Summary

    Prep Time: 15 minutes | Cook Time: 8-10 minutes | Total Time: 25-30 minutes

    Yield: 4 servings

    Difficulty: Easy

    Storage Notes

    Best Fresh:

    Tenders are crispiest straight from the fryer.

    Reheat:

    Air fryer at 375°F for 5-6 minutes. Oven at 400°F for 10 minutes. Never microwave.

    Freezer Friendly:

    Freeze cooked tenders for 2 months. Reheat from frozen in air fryer or oven.

    Pro Tip:

    Let breaded tenders rest 5 minutes before frying. Helps coating stick better.

  • Garlic Herb Chicken Drumsticks: Juicy. Crispy. Addictive.

    Garlic Herb Chicken Drumsticks: Juicy. Crispy. Addictive.

    Drumsticks are cheap. Drumsticks are forgiving. Drumsticks are delicious.

    Toss them in garlic and fresh herbs. Bake until skin is crispy and meat is juicy. 10 minutes of prep. The oven does the rest. Weeknight win.

    Ingredients

    Serves 4.

    • 8-10 chicken drumsticks (about 2 lbs)
    • 4 tbsp unsalted butter, melted
    • 6 garlic cloves, minced
    • 2 tbsp fresh rosemary, finely chopped
    • 2 tbsp fresh thyme, finely chopped
    • 1 tbsp fresh parsley, chopped (plus extra for garnish)
    • 1 tsp salt
    • ½ tsp black pepper
    • 1 tsp paprika (optional, for color)
    • Lemon wedges for serving

    Step-by-Step Instructions

    Step 1: Preheat and Prep

    1. Preheat oven to 425°F (220°C). Line a baking sheet with foil and place a wire rack on top.
    2. Pat drumsticks completely dry with paper towels.

    Step 2: Make Garlic Herb Butter

    1. Mix melted butter, garlic, rosemary, thyme, parsley, salt, pepper, and paprika.

    Step 3: Coat the Drumsticks

    1. Place drumsticks in a large bowl. Pour garlic herb butter over. Toss to coat.
    2. Arrange on wire rack in a single layer.

    Step 4: Bake

    1. Bake 35-40 minutes, flipping halfway, until skin is crispy and internal temp reaches 175°F (80°C).

    Step 5: Serve

    1. Garnish with fresh parsley and squeeze lemon over the top. Serve hot.

    Summary

    Prep Time: 10 minutes | Cook Time: 35-40 minutes | Total Time: 45-50 minutes

    Yield: 4 servings

    Difficulty: Easy

    Storage Notes

    Fridge:

    Store in an airtight container for 4 days.

    Reheat:

    Oven at 375°F for 10-12 minutes. Air fryer at 350°F for 5-6 minutes.

    Freezer Friendly:

    Freeze cooked drumsticks for 2 months. Thaw overnight. Reheat in oven.

    Pro Tip:

    Dry skin = crispy skin. Don’t skip patting them dry before adding butter.

  • Beef and Cheese Chimichangas: Deep-Fried Burrito Dreams

    Beef and Cheese Chimichangas: Deep-Fried Burrito Dreams

    A chimichanga is a burrito that went for a swim in hot oil. Best decision ever.

    Seasoned beef. Refried beans. Melty cheese. Wrapped tight. Fried until golden and crispy. Topped with sour cream, salsa, and guac. 40 minutes. Dangerously good.

    Ingredients

    Serves 4.

    • 4 large flour tortillas (10-inch or burrito size)
    • 1 lb ground beef
    • 1 small onion, diced
    • 2 garlic cloves, minced
    • 1 tbsp chili powder
    • 1 tsp cumin
    • ½ tsp paprika
    • ½ tsp salt
    • 1 cup refried beans
    • 1½ cups shredded cheddar or Mexican blend cheese
    • Oil for frying (vegetable or canola)

    For topping: Sour cream, salsa, guacamole, fresh cilantro, lime wedges

    Step-by-Step Instructions

    Step 1: Cook the Beef

    1. In a skillet, cook ground beef and onion over medium heat until browned (5-7 minutes). Drain fat.
    2. Add garlic, chili powder, cumin, paprika, and salt. Cook 1 minute.

    Step 2: Assemble Chimichangas

    1. Warm tortillas in microwave for 20 seconds to make pliable.
    2. Spread 2 tbsp refried beans in center of each tortilla.
    3. Top with beef mixture and shredded cheese.
    4. Fold in sides. Roll tightly like a burrito. Secure with toothpicks if needed.

    Step 3: Heat Oil

    1. Heat 1 inch of oil in a deep skillet to 375°F (190°C).

    Step 4: Fry

    1. Place chimichangas seam-side down in hot oil. Fry 1-2 minutes per side until golden brown and crispy.
    2. Drain on paper towels. Remove toothpicks.

    Step 5: Serve

    1. Top with sour cream, salsa, guacamole, and cilantro. Squeeze lime. Eat immediately.

    Summary

    Prep Time: 15 minutes | Cook Time: 10-15 minutes | Total Time: 25-30 minutes

    Yield: 4 chimichangas

    Difficulty: Easy

    Storage Notes

    Best Fresh:

    Chimichangas are best eaten immediately. Leftovers lose crispiness.

    Reheat:

    Air fryer at 375°F for 8-10 minutes. Oven at 400°F for 10-12 minutes. Never microwave.

    Pro Tip:

    Bake instead of fry: Brush with oil and bake at 425°F for 15-20 minutes. Still crispy, less mess.