Author: user

  • Fresh Spring Rolls (So Pretty, You’ll Feel Fancy)

    Fresh Spring Rolls (So Pretty, You’ll Feel Fancy)

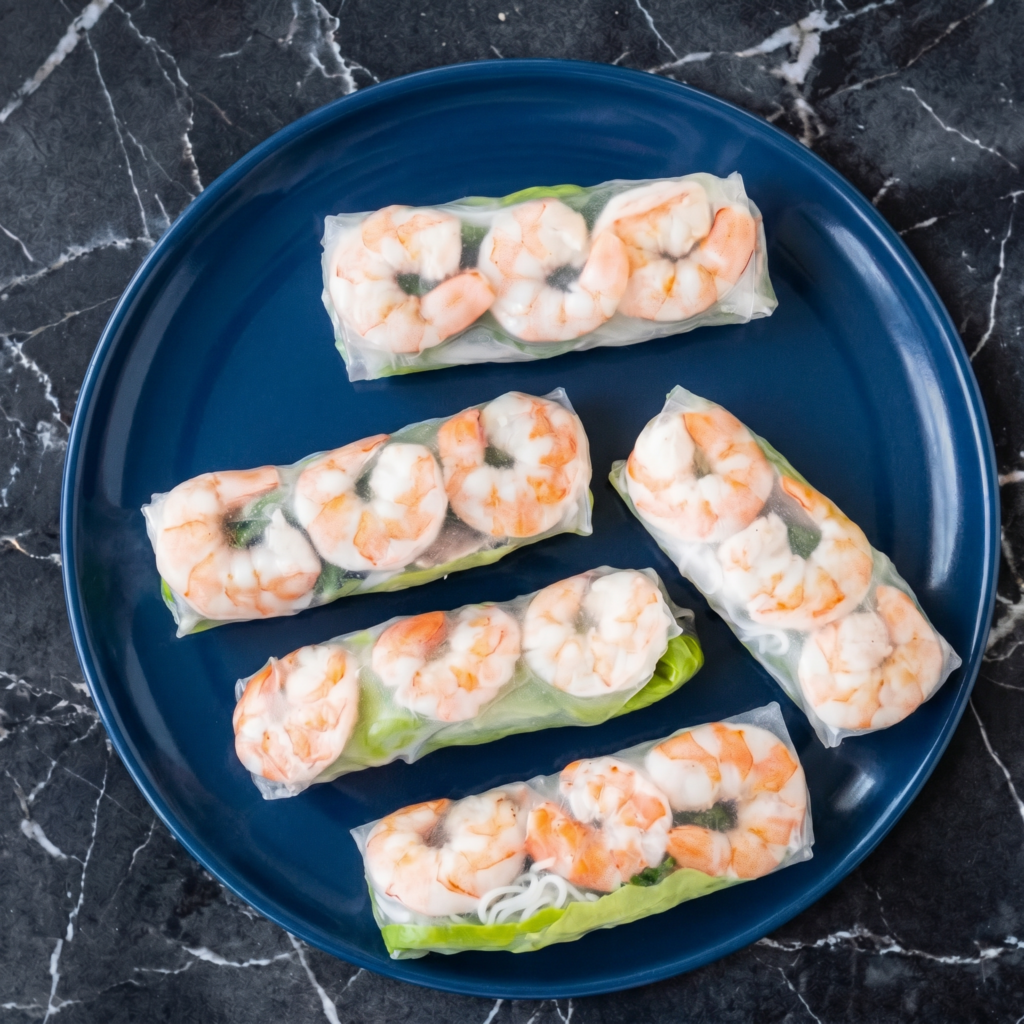
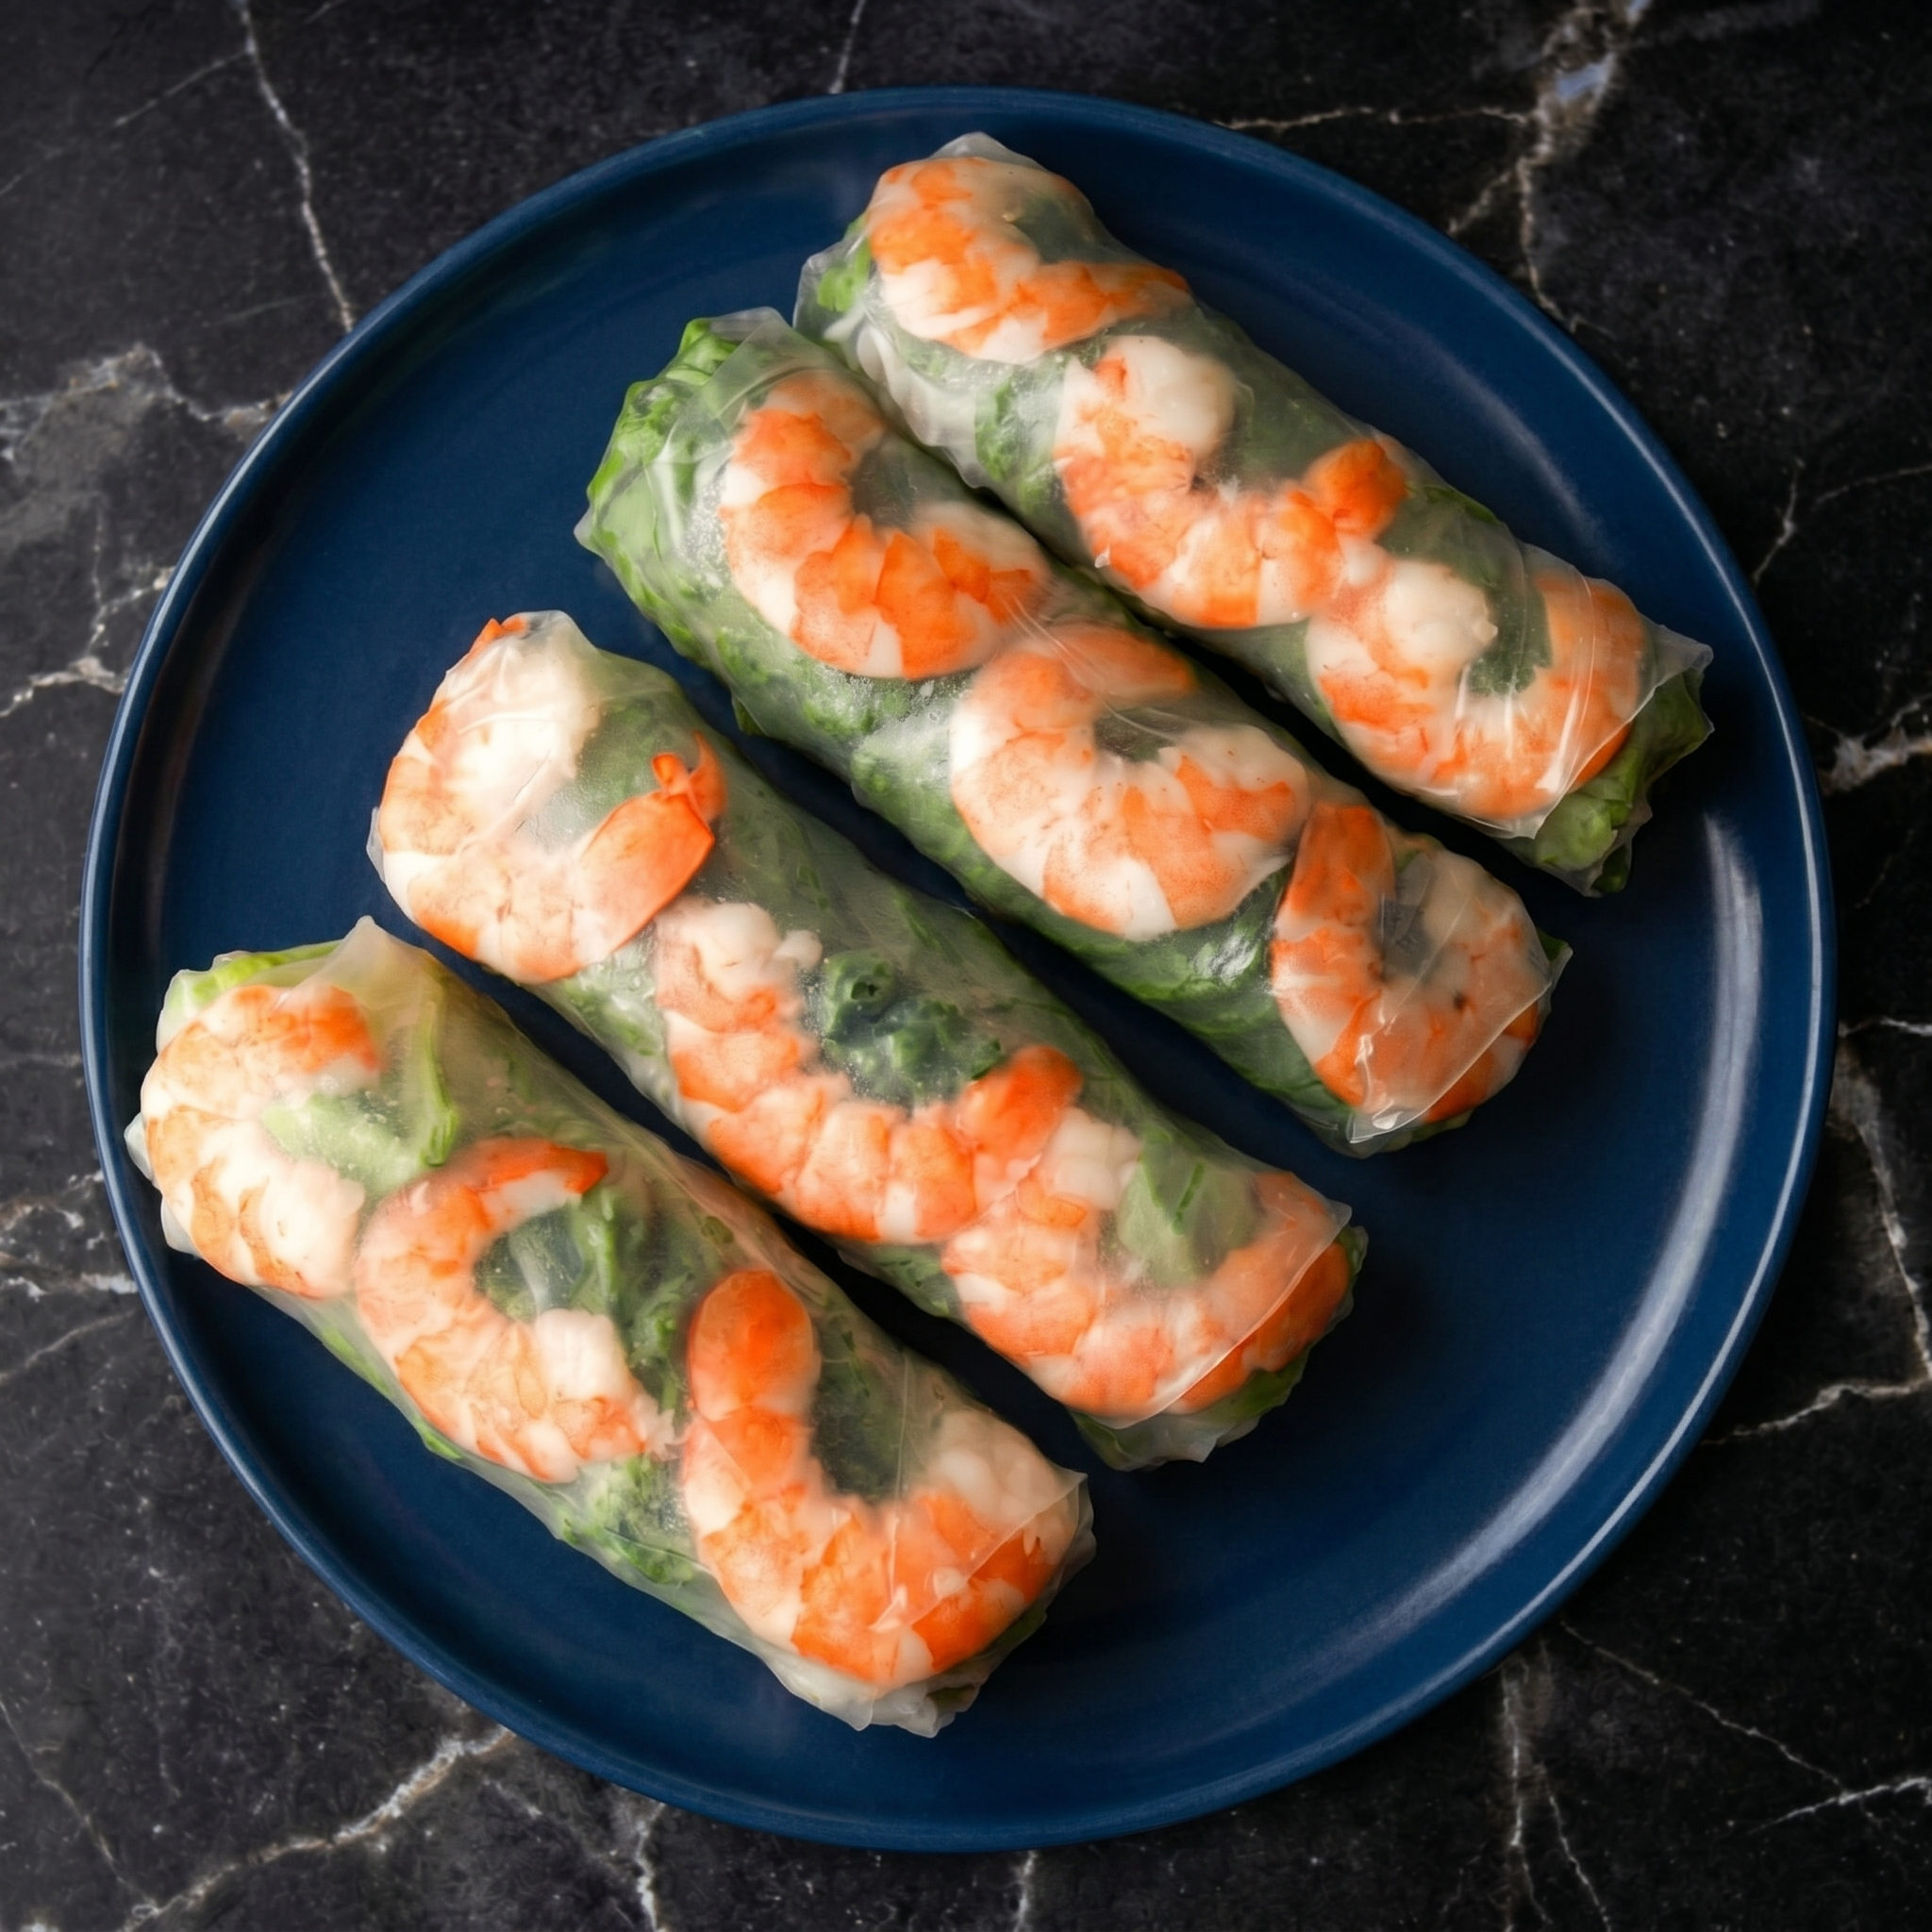
    Spring rolls look impressive. Translucent wrappers. Bright pink shrimp. Colorful veggies peeking through. But here’s the secret: they’re basically adult Lunchables. Assemble. Roll. Dip. Eat.

    No fancy skills required. Just rice paper, your favorite fillings, and that creamy peanut sauce. Perfect for hot days, lazy dinners, or when you want to feel like you tried really hard (you didn’t).

    Ingredients

    Makes 8 rolls.

    • 8 round rice paper wrappers (22cm size)
    • 8 large cooked shrimp, halved lengthwise
    • 4 oz (115g) rice vermicelli noodles
    • 1 cup shredded lettuce or butter lettuce leaves
    • 1 cucumber, julienned
    • 1 carrot, julienned
    • ½ cup fresh mint leaves
    • ½ cup fresh cilantro leaves
    • Optional: Thai basil, avocado slices, bean sprouts

    For the Peanut Dipping Sauce:

    • ¼ cup creamy peanut butter
    • 2 tablespoons hoisin sauce
    • 1 tablespoon lime juice
    • 2-3 tablespoons warm water
    • 1 teaspoon sriracha (optional)

    Step-by-Step Instructions

    Step 1: Prep the Fillings

    1. Cook vermicelli according to package directions. Drain and cool.
    2. Slice shrimp in half lengthwise. Julienne cucumber and carrot. Pick herb leaves.
    3. Arrange all fillings within easy reach (assembly line style).

    Step 2: Make the Sauce

    1. Whisk peanut butter, hoisin, lime juice, and sriracha. Add warm water until smooth and dippable.

    Step 3: Dip and Fill

    1. Fill a large shallow dish with warm water. Dip one rice paper wrapper for 5-10 seconds—just until pliable. It will soften more as you work.
    2. Lay wrapper on a damp cutting board.

    Step 4: Layer and Roll

    1. Arrange shrimp halves (cut side up) in a row on the lower third of wrapper—they’ll show through.
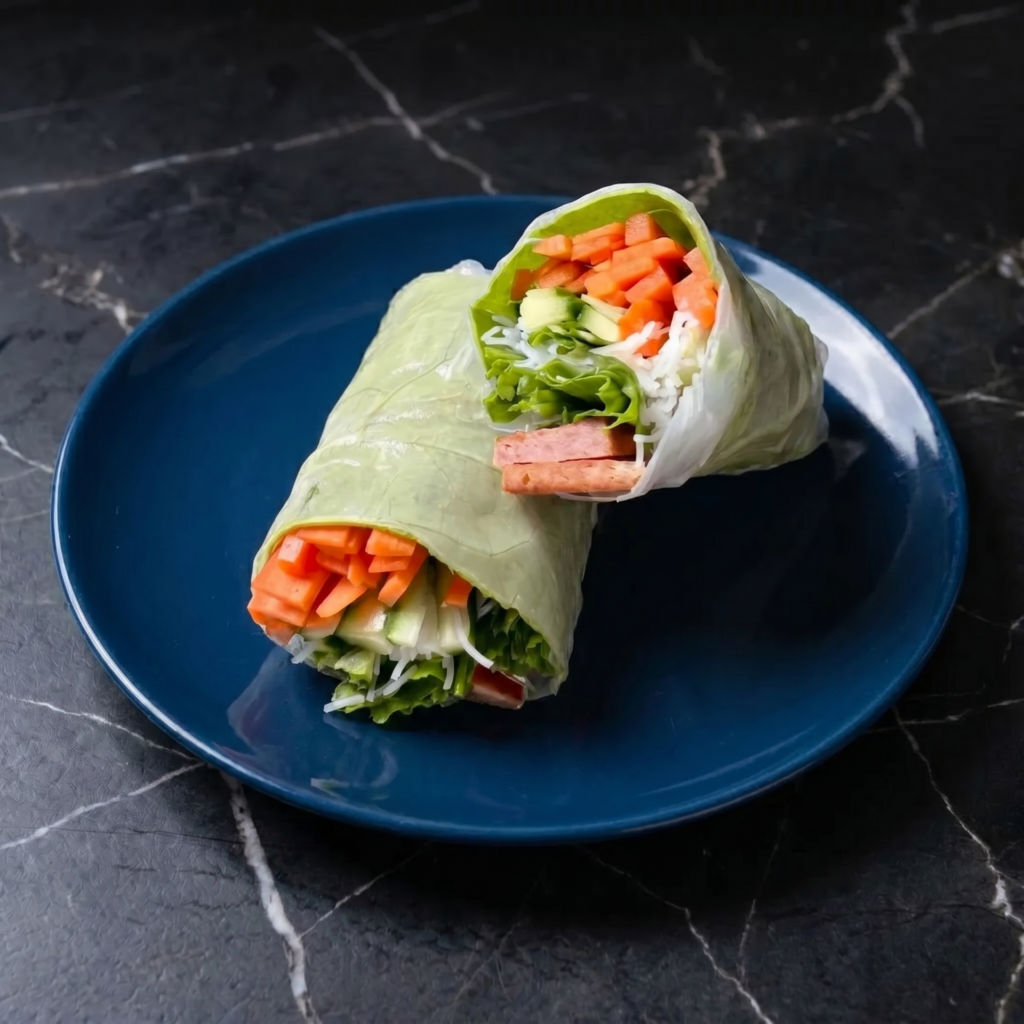
    2. Top with lettuce, noodles, cucumber, carrot, and herbs. Don’t overstuff.
    3. Fold bottom over filling, fold in sides, then roll tightly.

    Step 5: Serve

    1. Repeat with remaining wrappers. Serve immediately with peanut sauce.

    Summary

    Prep Time: 20 mins | Cook Time: 5 mins | Total Time: 25 minutes

    Yield: 8 spring rolls

    Difficulty: Easy (first one’s ugly, third one’s perfect)

    Storage Notes

    Spring rolls are best eaten within 2 hours. Rice paper hardens in the fridge. If you must store them, wrap each tightly in plastic wrap and refrigerate for 1 day (they won’t be as soft). Never freeze. Make the peanut sauce ahead—it lasts 1 week in the fridge.

  • Lobster Rolls (Butter, Bun, and a Pile of Lobster)

    Lobster Rolls (Butter, Bun, and a Pile of Lobster)

    There are two kinds of people: mayo people and butter people. This recipe is for the butter people. Connecticut style. Warm lobster. Hot butter. Toasted bun. No distractions.

    Chunks of sweet, briny lobster get gently warmed in melted butter, then piled high into a crispy, golden split-top bun. It’s simple. It’s luxurious. And it’s ready in 10 minutes.

    Ingredients

    Serves 2.

    • 1 lb (450g) cooked lobster meat (claws, knuckles, tails), chopped into chunks
    • 4 tablespoons (½ stick) unsalted butter
    • 2 split-top hot dog buns (or New England style buns)
    • 1 teaspoon lemon juice (optional)
    • Salt and pepper, to taste
    • Fresh chives or parsley, for garnish

    Step-by-Step Instructions

    Step 1: Toast the Buns

    1. Melt 2 tablespoons of butter in a skillet over medium heat.
    2. Place buns cut-side down in the skillet. Toast until golden brown and crispy (about 2 minutes). Set aside.

    Step 2: Warm the Lobster

    1. In the same skillet, melt remaining 2 tablespoons of butter.
    2. Add lobster chunks. Gently warm for 1-2 minutes—just until heated through. Do not overcook (rubber lobster is a crime).
    3. Season with salt, pepper, and lemon juice if using.

    Step 3: Assemble the Rolls

    1. Pile warm lobster into each toasted bun. Let it overflow. That’s the point.
    2. Drizzle any remaining butter from the pan over the top.
    3. Garnish with chives or parsley.

    Step 4: Serve Immediately

    1. Eat with napkins. Many napkins. Don’t share.

    Summary

    Prep Time: 5 mins | Cook Time: 5 mins | Total Time: 10 minutes

    Yield: 2 lobster rolls

    Difficulty: Easy

    Storage Notes

    Do not make lobster rolls ahead. The buns get soggy. The lobster gets sad. If you have leftover lobster (unlikely), store it in the fridge for 1 day and reheat gently in butter. Never microwave lobster. Just… don’t.

  • Crab Cakes (All Lump, No Fillers)

    Crab Cakes (All Lump, No Fillers)

    Bad crab cakes are a tragedy. Too much breadcrumb. Too little crab. Sad, mushy imposters. Not these. These are golden, crispy, and PACKED with jumbo lump crab. You’ll actually taste the crab—imagine that.

    Pan-fried to perfection. Lightly seasoned. Finished with a bright pop of lemon or a swipe of tangy remoulade. Let’s restore your faith in crab cakes.

    Ingredients

    Makes 6-8 crab cakes.

    • 1 lb (450g) jumbo lump crab meat, picked over for shells
    • ⅓ cup (40g) panko breadcrumbs
    • ¼ cup (60g) mayonnaise
    • 1 large egg, lightly beaten
    • 1 tablespoon Dijon mustard
    • 1 tablespoon Worcestershire sauce
    • 1 tablespoon fresh lemon juice
    • 1 teaspoon Old Bay seasoning
    • 2 tablespoons fresh parsley, chopped
    • 2 tablespoons butter or oil, for frying

    For Remoulade (Optional):

    • ¼ cup mayo + 1 tbsp hot sauce + 1 tsp capers + 1 tsp lemon juice

    Step-by-Step Instructions

    Step 1: Mix Gently

    1. In a large bowl, whisk mayo, egg, mustard, Worcestershire, lemon juice, Old Bay, and parsley.
    2. Gently fold in crab meat and panko. Be gentle—you want crab lumps, not crab paste.
    3. Cover and refrigerate for 30 minutes (this prevents falling apart).

    Step 2: Form the Cakes

    1. Shape mixture into 6-8 patties, about ½ inch thick. Don’t pack too tight.

    Step 3: Pan Fry

    1. Heat butter or oil in a skillet over medium-high heat.
    2. Cook crab cakes for 3-4 minutes per side until golden brown and crispy.
    3. Drain on paper towels.

    Step 4: Serve

    1. Serve hot with lemon wedges and remoulade. Eat with your hands. No judgment.

    Summary

    Prep Time: 15 mins + 30 mins chill | Cook Time: 8 mins | Total Time: ~1 hour

    Yield: 6-8 crab cakes

    Difficulty: Easy (handle gently)

    Storage Notes

    Store uncooked crab cakes in the fridge for up to 1 day. Cooked crab cakes last 3 days in the fridge. Reheat in a 350°F oven or air fryer for 5 minutes (not microwave—soggy sadness). Freeze uncooked patties for up to 3 months. Cook from frozen, adding 2 minutes per side.

  • Coconut Shrimp (Crunchy, Juicy, and Gone in 60 Seconds)

    Coconut Shrimp (Crunchy, Juicy, and Gone in 60 Seconds)

    Coconut shrimp is the ultimate crowd-pleaser. Sweet. Crunchy. Dippable. The kind of appetizer that disappears before it hits the table. And honestly? They’re stupidly easy to make at home.

    No deep fryer required. Just dredge, coat, bake (or fry), and watch people lose their minds. That orange marmalade dipping sauce? Mandatory. Let’s go.

    Ingredients

    Serves 4 as an appetizer.

    • 1 lb (450g) large shrimp, peeled and deveined (tails on)
    • ½ cup (65g) all-purpose flour
    • ½ teaspoon salt
    • ¼ teaspoon black pepper
    • 2 large eggs, beaten
    • 1 cup (80g) panko breadcrumbs
    • 1 cup (80g) sweetened shredded coconut
    • Cooking spray or oil for frying

    For the Dipping Sauce:

    • ½ cup (160g) orange marmalade
    • 2 tablespoons soy sauce
    • 1 teaspoon sriracha (optional, for heat)
    • 1 teaspoon rice vinegar

    Step-by-Step Instructions

    Step 1: Prep Your Stations

    1. Preheat oven to 400°F (200°C) if baking. Line a baking sheet with parchment.
    2. Set up three bowls: (1) flour + salt + pepper, (2) beaten eggs, (3) panko + coconut mixed together.

    Step 2: Dredge and Coat

    1. Pat shrimp dry. Dip each shrimp into flour, then egg, then coconut-panko mixture. Press gently so it sticks.
    2. Place on baking sheet. Repeat with all shrimp.

    Step 3: Cook

    1. Baking: Spray shrimp with cooking spray. Bake 10-12 minutes, flip halfway, until golden and crispy.
    2. Frying: Heat 1 inch of oil in a pan to 350°F (175°C). Fry shrimp 1-2 minutes per side until golden.

    Step 4: Make the Sauce

    1. Whisk marmalade, soy sauce, sriracha, and vinegar in a small bowl.

    Step 5: Serve

    1. Serve hot with sauce on the side. Watch them vanish.

    Summary

    Prep Time: 15 mins | Cook Time: 10-12 mins | Total Time: 25 mins

    Yield: 4 appetizer servings

    Difficulty: Easy

    Storage Notes

    Coconut shrimp is best eaten fresh. Leftovers get soggy. If you must, reheat in an air fryer at 375°F for 3-4 minutes or in the oven. Never microwave—rubber shrimp is sadness. Make extra sauce. It’s good on everything.

  • Red Velvet Cheesecake Bars (Swirled to Perfection)

    Red Velvet Cheesecake Bars (Swirled to Perfection)

    Can’t decide between red velvet cake and cheesecake? Good news: you don’t have to. These bars are both. A tender, tangy red velvet base swirled with a creamy cheesecake layer. Each bite gives you chocolatey red velvet and smooth, rich cream cheese.

    They’re easy. They’re gorgeous. And they slice into perfect little squares of happiness. Bake them for holidays, parties, or just because it’s Tuesday.

    Ingredients

    Makes 16 bars.

    For the Red Velvet Layer:

    • ½ cup (115g) unsalted butter, softened
    • ¾ cup (150g) granulated sugar
    • 1 large egg, room temp
    • 1 tsp vanilla extract
    • 1 tbsp red food coloring (or 2 tsp beet powder for natural)
    • 1 cup (125g) all-purpose flour
    • 2 tbsp cocoa powder
    • ¼ tsp salt
    • ¼ cup (60ml) buttermilk
    • 1 tsp white vinegar
    • ½ tsp baking soda

    For the Cheesecake Swirl:

    • 8 oz (225g) cream cheese, softened
    • ¼ cup (50g) granulated sugar
    • 1 large egg yolk
    • ½ tsp vanilla extract

    Step-by-Step Instructions

    Step 1: Prep

    1. Preheat oven to 350°F (175°C). Line an 8×8 inch pan with parchment paper.

    Step 2: Make Red Velvet Batter

    1. Beat butter and sugar until fluffy. Add egg, vanilla, and red coloring.
    2. Whisk flour, cocoa, salt in a separate bowl.
    3. Mix buttermilk with vinegar and baking soda (it will fizz!).
    4. Alternate adding dry and wet ingredients to butter mixture. Mix just until combined.

    Step 3: Make Cheesecake Swirl

    1. Beat cream cheese and sugar until smooth. Add egg yolk and vanilla.

    Step 4: Swirl and Bake

    1. Spread red velvet batter into the pan.
    2. Dollop cheesecake mixture on top in spoonfuls.
    3. Use a knife to swirl them together (don’t over-swirl or it turns muddy).
    4. Bake for 25-30 minutes until a toothpick comes out clean.

    Step 5: Cool and Slice

    1. Cool completely in pan, then refrigerate for 1 hour.
    2. Lift out using parchment. Slice into 16 bars. Serve cold or at room temp.

    Summary

    Prep Time: 15 mins | Bake Time: 30 mins | Chill: 1 hour | Total: ~1.5 hours

    Yield: 16 bars

    Difficulty: Easy

    Storage Notes

    Store in the fridge for up to 5 days. These actually taste better cold. Freeze for up to 3 months—wrap individually. Thaw in the fridge overnight. Do not leave out on the counter (cream cheese needs chill).

  • Strawberry Cheesecake (No Water Bath, No Cracks, All Glory)

    Strawberry Cheesecake (No Water Bath, No Cracks, All Glory)

    Strawberry cheesecake is the people’s champion. It’s creamy. It’s fruity. It’s pink and pretty. And this version skips all the drama—no water bath, no cracks, no fuss.

    We’re making a silky, dense cheesecake (New York style) and topping it with a glossy, sweet strawberry sauce made from real berries. Fresh or frozen? Either works. Just be prepared to fight for the last slice.

    Ingredients

    Serves 8-10.

    For the Crust:

    • 1½ cups (150g) graham cracker crumbs
    • ¼ cup (50g) sugar
    • 6 tbsp (85g) unsalted butter, melted

    For the Cheesecake Filling:

    • 32 oz (900g) cream cheese, softened
    • 1 cup (200g) sugar
    • 3 large eggs, room temp
    • 1 cup (240g) sour cream, room temp
    • 1 tbsp vanilla extract

    For the Strawberry Topping:

    • 2 cups (300g) fresh or frozen strawberries, chopped
    • ¼ cup (50g) sugar
    • 1 tbsp lemon juice
    • 1 tsp cornstarch + 1 tbsp water

    Step-by-Step Instructions

    Step 1: Make the Crust

    1. Preheat oven to 350°F (175°C). Grease a 9-inch springform pan.
    2. Mix crumbs, sugar, and butter. Press firmly into bottom.
    3. Bake 10 minutes. Cool. Reduce oven to 325°F (160°C).

    Step 2: Make the Filling

    1. Beat cream cheese and sugar until smooth.
    2. Add eggs one at a time (low speed = no cracks).
    3. Mix in sour cream and vanilla.

    Step 3: Bake

    1. Pour filling over crust. Smooth top.
    2. Bake at 325°F for 50-60 minutes. Edges set, center still jiggly.
    3. Turn off oven. Crack door. Cool inside for 1 hour.
    4. Refrigerate at least 6 hours.

    Step 4: Make Strawberry Topping

    1. Simmer strawberries, sugar, and lemon juice for 5 minutes.
    2. Add cornstarch slurry. Cook 1 minute until thickened. Cool completely.
    3. Spoon over chilled cheesecake. Slice. Devour.

    Summary

    Prep Time: 20 mins | Bake Time: 60 mins | Chill: 7+ hours | Total: ~9 hours

    Yield: 8-10 slices

    Difficulty: Easy (patience required)

    Storage Notes

    Store covered in fridge for up to 5 days. Freeze slices (without topping) for 3 months. Thaw overnight. Add fresh topping after thawing. Don’t freeze with berries—they get weepy.

  • S’mores Bars: Campfire Vibes, Zero Mosquitoes, All the Gooey Glory

    S’mores Bars: Campfire Vibes, Zero Mosquitoes, All the Gooey Glory

    S’mores are amazing. Building a campfire to have one? Less amazing. Enter s’mores bars. A buttery graham cracker crust gets layered with chocolate chips and marshmallows, then baked until the marshmallows turn golden and the chocolate gets all melty. No skewers. No flames. Just pure, sticky, chocolatey perfection in bar form. Cut them warm for maximum goo or cool for clean slices. Either way, gone in minutes.

    Ingredients

    Makes one 9×9 pan (9-12 bars).

    • 2 cups graham cracker crumbs (about 14 full sheets)
    • ½ cup (1 stick) unsalted butter, melted
    • ¼ cup granulated sugar
    • 1 pinch salt
    • 1½ cups semi-sweet chocolate chips (or chopped Hershey’s bars)
    • 3 cups mini marshmallows (about half a 10oz bag)
    • ½ cup chocolate chunks (optional, for extra decadence)

    Step-by-Step Instructions

    Step 1: Make the Crust

    1. Preheat oven to 350°F (175°C). Line an 8×8 or 9×9 pan with parchment paper.
    2. Mix graham cracker crumbs, melted butter, sugar, and salt until sandy.
    3. Press firmly into the bottom of the pan.
    4. Bake for 8 minutes. Let cool slightly.

    Step 2: Layer It Up

    1. Sprinkle chocolate chips evenly over the warm crust.
    2. Scatter mini marshmallows all over the chocolate.
    3. Top with optional chocolate chunks for extra gooeyness.

    Step 3: Bake Until Golden

    1. Return pan to the oven. Bake for 10-15 minutes.
    2. Marshmallows should be puffed and golden brown on top.
    3. Watch closely near the end—they go from golden to burnt fast.

    Step 4: Cool (Or Don’t)

    1. For gooey, messy, eat-with-a-spoon bars: cool for 10 minutes, then dig in.
    2. For sliceable bars: cool completely at room temperature (about 2 hours).
    3. Lift out with parchment. Cut into squares.

    Summary

    Prep Time: 10 minutes | Cook Time: 23 minutes | Cooling (optional): 2 hours | Total Time: 35 minutes to 2.5 hours

    Yield: 9-12 bars

    Difficulty: Very Easy (no mixer needed)

    Storage Notes

    How to Store:

    Keep in an airtight container at room temperature for up to 3 days. The crust stays crunchy, but marshmallows will lose some puff.

    Pro Tip for Next-Day Goo:

    Microwave a bar for 8-10 seconds to bring back that fresh-from-the-oven marshmallow pull. Serve with vanilla ice cream for the ultimate dessert.

    Freezing:

    Freeze uncut bars in the pan, tightly wrapped, for up to 2 months. Thaw at room temperature. Texture changes slightly, but still delicious.

    Make Them Pretty:

    For picture-perfect bars, broil the top for 30 seconds at the end of baking. Watch like a hawk—burnt marshmallows are sad marshmallows.

  • Fried Oysters: Golden, Briny, Crunchy Little Clouds from the Sea

    Fried Oysters: Golden, Briny, Crunchy Little Clouds from the Sea

    Fried oysters are the seafood appetizer that disappears fastest. A light, crunchy cornmeal crust gives way to a warm, briny, barely-cooked center that tastes like the ocean in the best way. No rubbery over-frying here. Just quick, hot, and golden. Pile them on a po’boy, tuck into a salad, or eat them straight off the cooling rack with remoulade and lemon. Let’s fry.

    Ingredients

    Serves 4 as an appetizer (about 24 oysters).

    For the Oysters:

    • 24 shucked oysters, drained (about 12 oz)
    • 1 cup buttermilk
    • 1 cup cornmeal (fine or medium grind)
    • ½ cup all-purpose flour
    • 1 teaspoon Cajun or Old Bay seasoning
    • ½ teaspoon garlic powder
    • ½ teaspoon paprika
    • Salt and black pepper
    • Neutral oil for frying

    For the Remoulade (Optional):

    • ½ cup mayonnaise
    • 1 tablespoon creole or yellow mustard
    • 1 tablespoon hot sauce
    • 1 teaspoon paprika
    • 1 teaspoon lemon juice
    • 1 garlic clove, minced

    Step-by-Step Instructions

    Step 1: Soak the Oysters

    1. Place drained oysters in a bowl. Cover with buttermilk.
    2. Let soak for 15-30 minutes (this tenderizes and removes any fishy taste).

    Step 2: Make the Coating

    1. In a shallow dish, mix cornmeal, flour, Cajun seasoning, garlic powder, paprika, salt, and pepper.

    Step 3: Dredge the Oysters

    1. Remove oysters from buttermilk, letting excess drip off.
    2. Drop into cornmeal mixture. Toss gently to coat completely.
    3. Place on a wire rack while you heat the oil.

    Step 4: Fry Hot and Fast

    1. Heat 2 inches of oil to 375°F (190°C).
    2. Fry oysters in small batches for 60-90 seconds until golden brown.
    3. Do not crowd—oysters release moisture and will drop the temperature.
    4. Drain on a wire rack (paper towels trap steam and ruin crispiness).

    Step 5: Serve Immediately

    1. Squeeze fresh lemon over hot oysters. Serve with remoulade, cocktail sauce, or hot sauce.
    2. Po’boy option: pile into a toasted French roll with lettuce, tomato, pickles, and remoulade.

    Summary

    Prep Time: 20 minutes | Cook Time: 5 minutes | Total Time: 25 minutes

    Yield: 24 oysters (4 appetizer servings)

    Difficulty: Medium (oil temp control is key)

    Storage Notes

    Best Eaten Immediately:

    Fried oysters have a 10-minute window of glory. After that, the crust softens and the magic fades.

    Leftovers (Rare):

    Reheat in an air fryer at 400°F (200°C) for 2-3 minutes or in a hot oven on a wire rack. Never microwave—rubbery oysters are a tragedy.

    Make-Ahead Hack:

    Bread the oysters up to 2 hours ahead and keep them on a wire rack in the fridge. Fry right before serving.

    Pro Tips:

    Pat oysters dry before buttermilk soak for better coating adhesion. Use a thermometer for oil—too cool = greasy, too hot = burnt outside/raw inside. And don’t skip the wire rack drain; it’s the difference between crispy and soggy.

  • Fried Boudin Balls: Louisiana’s Crispy, Spicy, Porky Little Orbs of Joy

    Fried Boudin Balls: Louisiana’s Crispy, Spicy, Porky Little Orbs of Joy

    Boudin balls are what happen when Louisiana decides to deep-fry perfection. Boudin is already amazing—a spicy mix of pork, rice, and Cajun seasonings stuffed in a sausage casing. But rolling that filling into balls, breading them, and frying until crispy? That’s next-level. The outside shatters. The inside stays soft, creamy, and packed with smoky heat. Dip in remoulade or hot sauce and pretend you’re in Lafayette.

    Ingredients

    Makes about 20 boudin balls (serves 4-6 as an appetizer).

    For the Boudin (or Buy Pre-Made):

    • 1 lb pork shoulder, cut into chunks
    • 1 cup chicken liver (optional but traditional)
    • 1 cup white rice, cooked
    • 1 onion, finely chopped
    • 3 garlic cloves, minced
    • 2 green onions, chopped
    • 1 teaspoon Cajun seasoning
    • ½ teaspoon cayenne pepper
    • ½ teaspoon black pepper
    • 1 teaspoon salt
    • 1 cup chicken broth

    For the Breading & Frying:

    • 1 cup all-purpose flour
    • 2 large eggs, beaten
    • 1½ cups panko breadcrumbs or fine breadcrumbs
    • Neutral oil for frying

    Step-by-Step Instructions

    Step 1: Make the Boudin (or Skip)

    1. Simmer pork and livers in broth with onion, garlic, and seasonings until tender, about 1 hour.
    2. Remove meat, reserving broth. Shred or finely chop meat.
    3. In a bowl, mix meat with cooked rice, green onions, and enough reserved broth to make a moist, stuffing-like consistency.
    4. Alternatively: buy 1½ lbs pre-made boudin sausage and remove the casing.

    Step 2: Form the Balls

    1. Scoop boudin mixture and roll into 1.5-inch balls (about golf-ball size).
    2. Place on a parchment-lined tray.

    Step 3: Set Up Breading Station

    1. Three bowls: flour in one, beaten eggs in second, breadcrumbs in third.
    2. Roll each boudin ball in flour, then egg, then breadcrumbs.

    Step 4: Fry Until Golden

    1. Heat 2 inches of oil to 350°F (175°C).
    2. Fry balls in batches for 3-4 minutes until deep golden brown and crispy.
    3. Drain on a wire rack.

    Step 5: Serve Hot

    1. Serve immediately with remoulade sauce, hot sauce, or Cajun ranch. Don’t burn your mouth (but you will anyway).

    Summary

    Prep Time: 30 minutes | Cook Time: 20 minutes | Total Time: 50 minutes (plus optional simmer time)

    Yield: 20 balls (4-6 servings)

    Difficulty: Medium (rolling and breading takes practice)

    Storage Notes

    How to Store:

    Keep fried boudin balls in an airtight container in the fridge for up to 3 days.

    Reheating (Crucial):

    Reheat in an air fryer at 375°F (190°C) for 4-5 minutes or in an oven on a wire rack at 400°F for 8-10 minutes. Microwave = soggy, sad balls. Don’t do it.

    Freezing (Best Hack):

    Freeze unbreaded or breaded balls on a tray until solid, then transfer to a freezer bag. Fry directly from frozen—add 1-2 minutes to cook time. Freeze for up to 3 months.

    Pro Tip:

    Double-bread for extra crunch: flour → egg → breadcrumbs → egg → breadcrumbs again. Your taste buds will thank you.

  • Apple Pie Bars: All the Flavor, None of the Fuss (No Rolling Pin Required)

    Apple Pie Bars: All the Flavor, None of the Fuss (No Rolling Pin Required)

    Love apple pie? Hate rolling dough? Meet apple pie bars. A buttery shortbread crust gets pressed into the pan—no rolling pin required. Top it with tender cinnamon apples and a brown sugar oat crumble. Bake, cool, and slice into perfect portable squares. They taste exactly like homemade pie, but you’ll finish making them in the time it takes to chill pie dough. This is apple pie for lazy geniuses.

    Ingredients

    Makes one 9×13 pan (15-20 bars).

    For the Crust:

    • 1 cup (2 sticks) unsalted butter, softened
    • ½ cup granulated sugar
    • 2 cups all-purpose flour
    • ¼ teaspoon salt

    For the Apple Filling:

    • 4 cups apples, peeled and diced (about 4 medium apples, Granny Smith or Honeycrisp)
    • ¼ cup granulated sugar
    • 2 tablespoons brown sugar
    • 1 tablespoon lemon juice
    • 1 teaspoon cinnamon
    • ¼ teaspoon nutmeg
    • 2 tablespoons cornstarch

    For the Crumble Topping:

    • 1 cup old-fashioned oats
    • ½ cup brown sugar, packed
    • ½ cup all-purpose flour
    • ½ teaspoon cinnamon
    • ½ cup (1 stick) cold butter, cubed

    Step-by-Step Instructions

    Step 1: Make the Crust

    1. Preheat oven to 350°F (175°C). Line a 9×13 pan with parchment paper.
    2. Beat softened butter and sugar until creamy. Mix in flour and salt until crumbly.
    3. Press mixture firmly and evenly into the bottom of the pan.
    4. Bake for 15 minutes until lightly golden.

    Step 2: Prep the Apples

    1. In a bowl, toss diced apples with sugars, lemon juice, cinnamon, nutmeg, and cornstarch.

    Step 3: Make the Crumble Topping

    1. In a separate bowl, mix oats, brown sugar, flour, and cinnamon.
    2. Cut in cold butter using a pastry cutter or your fingers until mixture resembles coarse crumbs.

    Step 4: Assemble and Bake

    1. Spread apple filling evenly over the baked crust.
    2. Sprinkle crumble topping all over the apples.
    3. Bake for 35-40 minutes until apples are bubbly and topping is golden brown.

    Step 5: Cool and Slice

    1. Let bars cool completely in the pan (at least 2 hours).
    2. Lift out using parchment paper. Slice into squares.
    3. Dust with powdered sugar if feeling fancy. Devour.

    Summary

    Prep Time: 20 minutes | Cook Time: 50 minutes | Cooling: 2 hours | Total Time: ~3 hours

    Yield: 15-20 bars

    Difficulty: Easy (no rolling required)

    Storage Notes

    How to Store:

    Keep apple pie bars in an airtight container at room temperature for up to 3 days, or in the fridge for up to a week. They’re delicious cold, room temp, or warmed up.

    Reheating:

    Microwave a bar for 15 seconds and top with vanilla ice cream. You’re welcome.

    Freezing:

    Freeze baked and cooled bars (whole or sliced) for up to 3 months. Wrap tightly in plastic wrap then foil. Thaw overnight in the fridge or at room temperature for 30 minutes.

    Pro Tip:

    Don’t skip the cooling step. Cutting into warm bars = crumbly mess. Patience yields perfect clean slices.