Author: user

  • Patty Melt (Diner Classic, No Greasy Booth Required)

    Patty Melt (Diner Classic, No Greasy Booth Required)

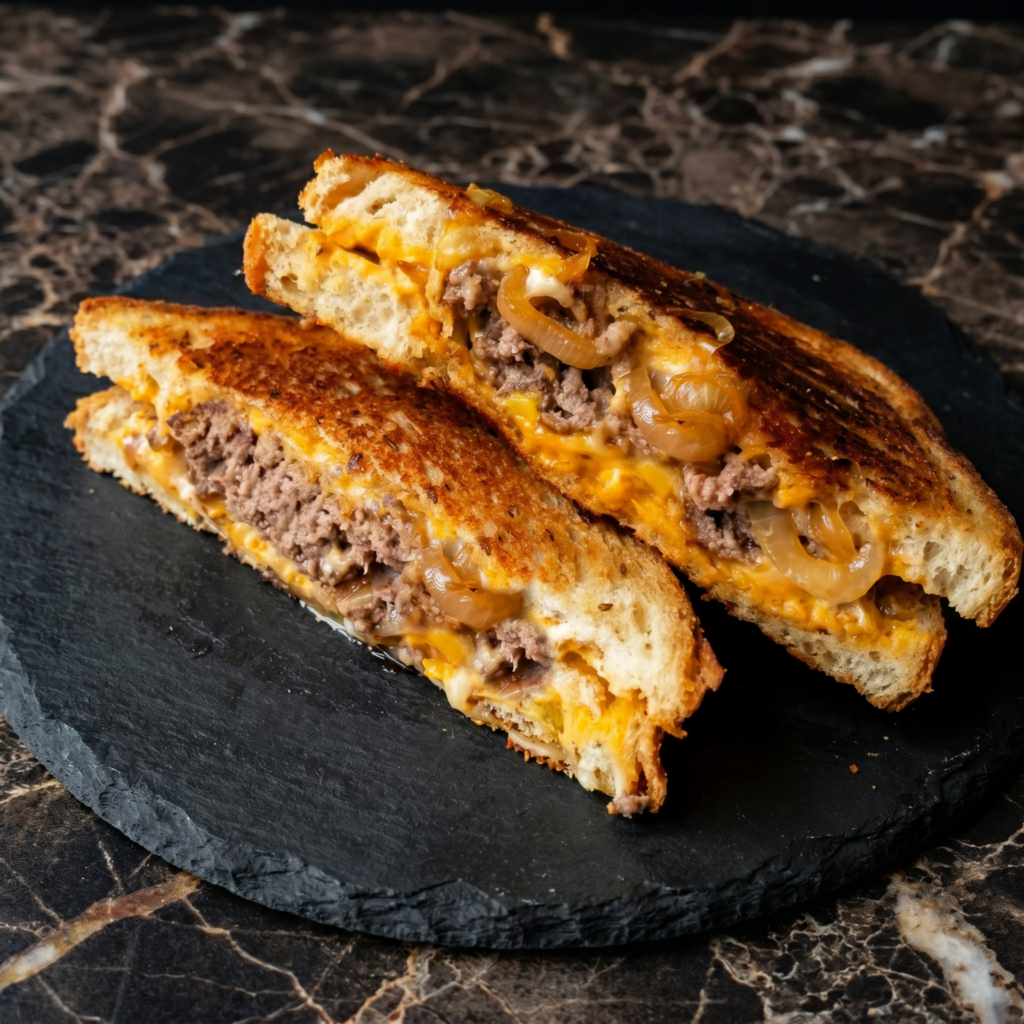
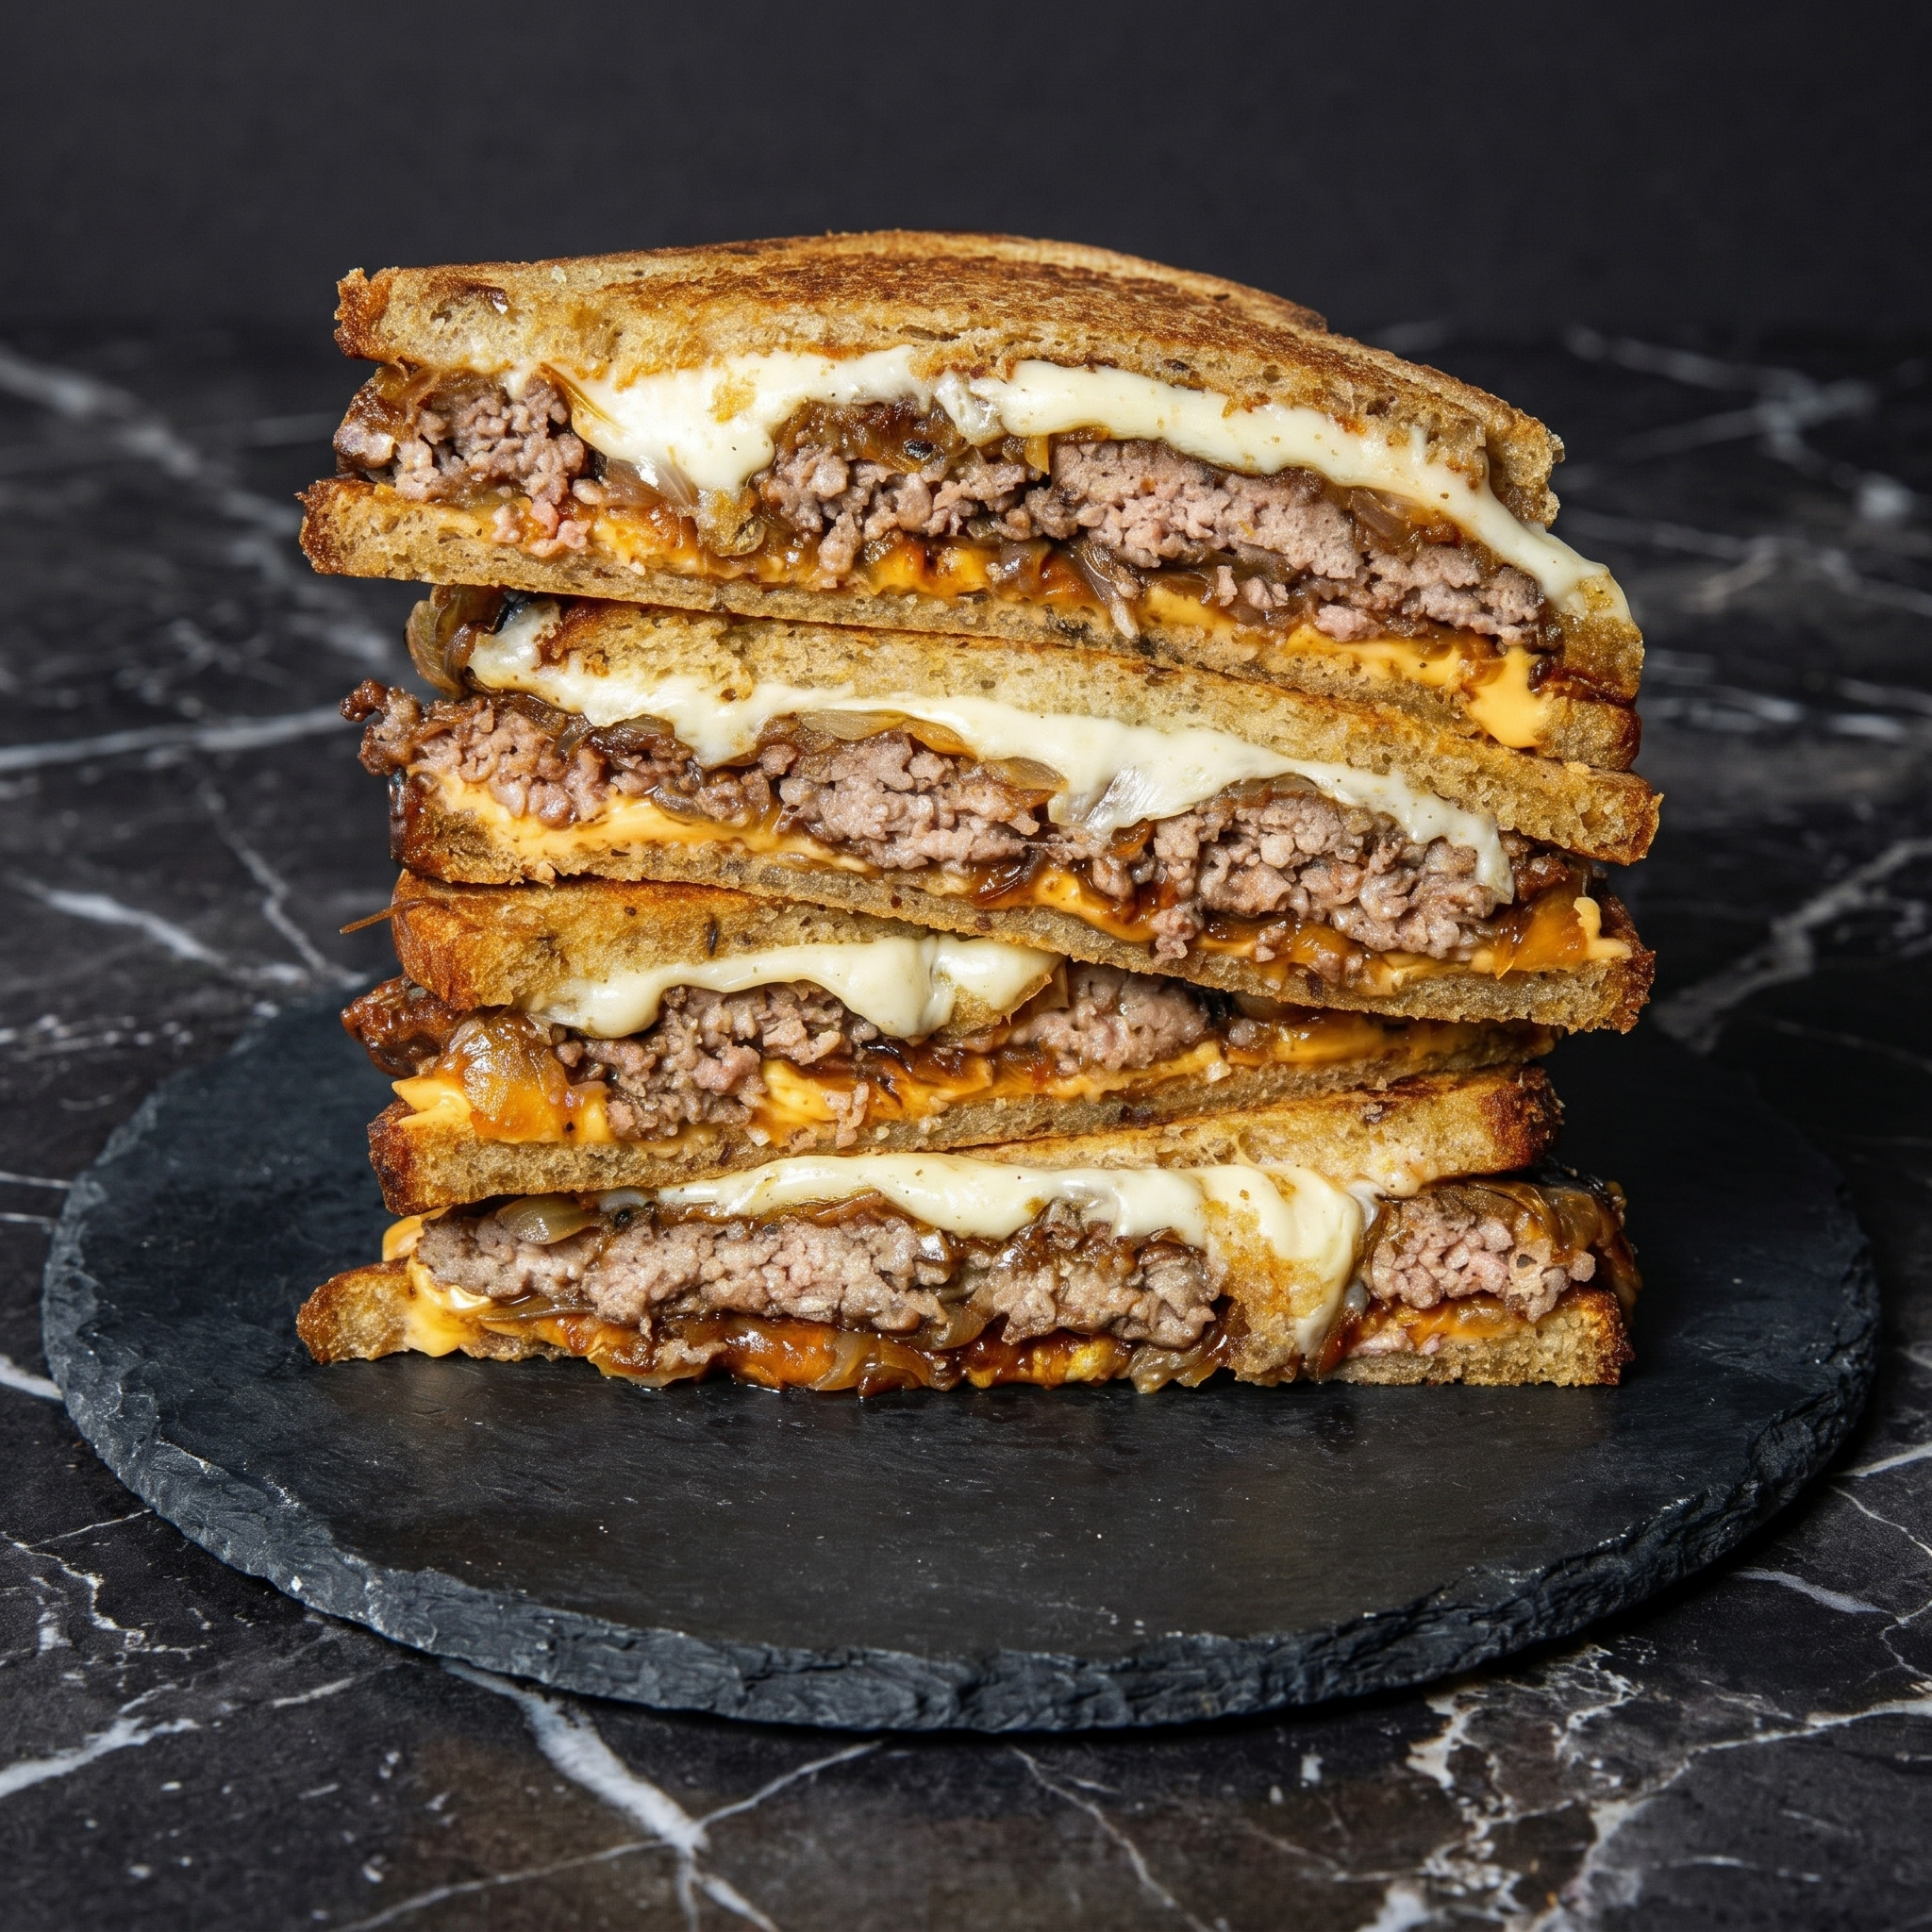
    The patty melt is what happens when a burger and a grilled cheese fall in love.

    It’s thinner than a burger. Crispier than a sandwich. And the sauce? Thousand Island (or Russian dressing) is the secret weapon. No fancy equipment. Just a skillet, some patience for onions, and a serious craving.

    Ingredients

    Serves 2 (makes 2 patty melts).

    • 8 slices marble or seeded rye bread
    • 1 lb (450g) ground beef (80/20 is perfect)
    • 8 slices Swiss cheese
    • 1 large yellow onion, thinly sliced
    • 2 tablespoons butter (for toasting bread)
    • 1 tablespoon olive oil (for onions)
    • Thousand Island dressing (or Russian dressing)
    • Salt and black pepper

    Step-by-Step Instructions

    Step 1: Caramelize the Onions

    1. Heat olive oil in a skillet over medium-low heat. Add sliced onions and a pinch of salt.
    2. Cook for 15-20 minutes, stirring occasionally, until deep golden brown and sweet. Set aside.

    Step 2: Shape the Patties

    1. Divide beef into 4 equal balls (4 oz each).
    2. Season generously with salt and pepper. Don’t overwork the meat.

    Step 3: Smash and Cook Patties

    1. Heat a large skillet or griddle over medium-high heat.
    2. Place beef balls in the pan. Smash flat with a spatula until thin.
    3. Cook 2 minutes until crispy edges form. Flip and cook 1 more minute. Set aside.

    Step 4: Assemble Sandwiches

    1. Spread Thousand Island on one side of each bread slice.
    2. Layer: bread (dressing side up) → Swiss cheese → patty → caramelized onions → patty → Swiss cheese → bread (dressing side down).

    Step 5: Griddle the Melts

    1. Butter the outside of each sandwich (the bread tops).
    2. Cook over medium heat for 2-3 minutes per side until golden brown and cheese is melted.

    Step 6: Serve

    1. Slice diagonally (it tastes better that way, science says so). Serve with pickles and fries.

    Summary

    Prep Time: 10 minutes | Cook Time: 25 minutes | Total Time: 35 minutes

    Yield: 2 patty melts

    Difficulty: Easy

    Storage Notes

    Not for meal prep: Patty melts are best fresh. Reheated bread gets sad.

    Make ahead: Caramelize onions up to 5 days ahead. Cook patties up to 1 day ahead – reheat gently before assembling.

    Leftover components: Cooked patties keep 3 days. Reheat in skillet, then build fresh sandwiches.

  • Chicken Fried Steak (Southern Comfort on a Plate)

    Chicken Fried Steak (Southern Comfort on a Plate)

    Don’t let the name confuse you. There’s no chicken here. Just tenderized beef, fried to golden perfection, and smothered in cream gravy.

    It’s crispy, juicy, and exactly what you want on a cold night or a Sunday afternoon. Yes, it’s indulgent. Yes, it’s worth every bite.

    Ingredients

    Serves 4.

    • 4 cube steaks (about 1.5 lbs / 700g total)
    • 1 cup all-purpose flour
    • 1 teaspoon paprika
    • 1 teaspoon garlic powder
    • 1 teaspoon onion powder
    • ½ teaspoon cayenne (optional)
    • Salt and black pepper (lots of pepper)
    • 2 large eggs
    • ¼ cup milk
    • Vegetable oil (for frying, about ½ cup)

    For the Cream Gravy:

    • 3 tablespoons pan drippings + flour
    • 2 cups whole milk
    • Salt and black pepper (lots again)

    Step-by-Step Instructions

    Step 1: Prep the Dredge

    1. In a shallow dish, mix flour, paprika, garlic powder, onion powder, cayenne, 1 teaspoon salt, and 1 teaspoon black pepper.
    2. In another dish, whisk eggs and milk.

    Step 2: Dredge the Steaks

    1. Pat steaks dry. Season both sides with salt and pepper.
    2. Dip each steak in flour mixture (shake off excess), then egg mixture, then flour again. Press to adhere.

    Step 3: Fry

    1. Heat ½ inch of oil in a large skillet over medium-high heat (350°F/175°C).
    2. Fry steaks 3-4 minutes per side until golden brown and crispy. Don’t crowd the pan.
    3. Drain on a wire rack (not paper towels—keeps crispy).

    Step 4: Make the Gravy

    1. Pour off all but 3 tablespoons of oil from the pan. Leave the browned bits.
    2. Whisk in 3 tablespoons of leftover dredging flour. Cook 1-2 minutes until golden.
    3. Slowly whisk in milk. Simmer until thick (3-5 minutes). Season with lots of black pepper and salt.

    Step 5: Serve

    1. Pour gravy generously over the steak. Serve with mashed potatoes and green beans.

    Summary

    Prep Time: 15 minutes | Cook Time: 15 minutes | Total Time: 30 minutes

    Yield: 4 servings

    Difficulty: Medium (hot oil = pay attention)

    Storage Notes

    Fridge (un-gravied): Steaks keep 3 days. Reheat in oven at 375°F for 10 minutes (keeps crispy).

    Don’t freeze: Breaded steak gets sad and soggy. Make fresh.

    Leftover gravy: Fridge 3 days. Reheat on stovetop with a splash of milk, whisking constantly.

    Make ahead tip: Dredge steaks up to 4 hours ahead. Keep on a tray in the fridge. Fry when ready.

  • Homemade Pretzels: Soft, Buttery, Better Than the Mall

    Homemade Pretzels: Soft, Buttery, Better Than the Mall

    Mall pretzels are fine. Homemade pretzels are a religious experience.

    These are soft, chewy, shiny, and begging for mustard or cheese sauce. The secret? A quick baking soda bath before baking. No lye. No drama. Just twisted, salty perfection in under an hour.

    Ingredients

    Makes 8 pretzels.

    For the Dough:

    • 3 cups all-purpose flour
    • 1 packet (2 ¼ tsp) instant yeast
    • 1 tablespoon sugar
    • 1 teaspoon salt
    • 1 cup warm water (about 110°F)
    • 2 tablespoons melted butter

    For the Baking Soda Bath:

    • 10 cups water
    • ⅔ cup baking soda

    For Topping:

    • 1 egg yolk beaten with 1 tablespoon water
    • Coarse sea salt or pretzel salt
    • ¼ cup melted butter (for brushing after baking)

    Step-by-Step Instructions

    Step 1: Make the Dough

    1. Whisk flour, yeast, sugar, and salt in a bowl.
    2. Add warm water and melted butter. Mix until a dough forms.
    3. Knead for 5-7 minutes until smooth.
    4. Let rise in a greased bowl for 30 minutes.

    Step 2: Shape the Pretzels

    1. Preheat oven to 450°F (230°C). Line a baking sheet with parchment.
    2. Divide dough into 8 pieces. Roll each into a 20-inch rope.
    3. Form a U-shape. Cross the ends twice. Flip down to the bottom of the U.

    Step 3: The Baking Soda Bath

    1. Bring 10 cups water to a boil. Add baking soda (it will bubble).
    2. Drop each pretzel in for 20-30 seconds. Remove with slotted spoon.
    3. Place on baking sheet.

    Step 4: Bake & Butter

    1. Brush pretzels with egg wash. Sprinkle with coarse salt.
    2. Bake for 10-12 minutes until deep golden brown.
    3. Brush hot pretzels with melted butter. Serve warm with mustard or cheese sauce.

    Summary

    Prep Time: 15 minutes | Rise Time: 30 minutes | Bake Time: 12 minutes

    Yield: 8 pretzels | Difficulty: Easy

    Storage Notes

    Store in an airtight container for up to 3 days. Freeze for up to 3 months. To reheat, spritz with water and air fry at 350°F for 3-4 minutes or bake at 350°F for 5 minutes. Microwave makes them rubbery—don’t do it.

  • Challah Bread: Braided, Golden, and Absolutely Gorgeous

    Challah Bread: Braided, Golden, and Absolutely Gorgeous

    Challah is the prettiest bread you’ll ever make. And somehow, also the easiest.

    It’s rich, soft, slightly sweet, and absolutely stunning on any table. The braid looks intimidating, but it’s just loops and tucks. This recipe walks you through it. No tears. No tantrums. Just gorgeous, egg-washed perfection.

    Ingredients

    Makes 1 large braided loaf.

    • 4 cups all-purpose flour (plus more for dusting)
    • ¼ cup sugar
    • 1 packet (2 ¼ tsp) instant yeast
    • 1 ½ teaspoons salt
    • 3 large eggs
    • 1 large egg yolk (save the white for egg wash)
    • ½ cup warm water (about 110°F)
    • ¼ cup vegetable oil
    • 2 tablespoons honey

    For the Egg Wash:

    • Reserved egg white + 1 tablespoon water
    • Optional: poppy seeds or sesame seeds

    Step-by-Step Instructions

    Step 1: Make the Dough

    1. Whisk flour, sugar, yeast, and salt in a large bowl.
    2. Add eggs, egg yolk, warm water, oil, and honey. Mix until a shaggy dough forms.
    3. Knead for 8-10 minutes until smooth and elastic.
    4. Let rise in a greased bowl for 1-2 hours until doubled.

    Step 2: Braid the Challah

    1. Punch down dough. Divide into 6 equal pieces.
    2. Roll each piece into a 12-inch rope.
    3. Line up the ropes. Pinch tops together.
    4. 6-strand braid: Move the far-right rope over 2, under 1, over 2. Repeat starting from the right each time. Or just do a 3-strand braid (easier, still beautiful).
    5. Pinch ends together and tuck under.

    Step 3: Second Rise

    1. Transfer braided loaf to a parchment-lined baking sheet.
    2. Cover and let rise for 45-60 minutes until puffy.

    Step 4: Bake

    1. Preheat oven to 375°F (190°C).
    2. Brush loaf generously with egg wash. Sprinkle with seeds if using.
    3. Bake for 25-30 minutes until deep golden brown. The loaf should sound hollow when tapped.
    4. Cool on a wire rack. Try not to tear off the end while it’s hot.

    Summary

    Prep Time: 20 minutes | Rise Time: 2-3 hours | Bake Time: 30 minutes

    Yield: 1 large loaf | Difficulty: Medium (braiding takes practice)

    Storage Notes

    Store at room temperature in an airtight container for up to 4 days. Freeze for up to 3 months. Challah makes the world’s best French toast—use stale slices, soak overnight, thank us later.

  • Chocolate Knots: Twisted, Gooey, Dangerously Good

    Chocolate Knots: Twisted, Gooey, Dangerously Good

    Chocolate + puff pastry + a simple twist = happiness.

    These chocolate knots are flaky, buttery, and packed with warm, gooey chocolate. They take 20 minutes from start to finish and look like you tried way too hard. You didn’t. Let’s knot.

    Ingredients

    Makes 8 knots.

    • 1 sheet frozen puff pastry, thawed
    • ½ cup chocolate chips or chopped dark chocolate
    • 2 tablespoons unsalted butter, melted
    • 2 tablespoons sugar
    • 1 teaspoon cinnamon (optional)
    • Powdered sugar for dusting
    • 1 egg, beaten (for egg wash)

    Step-by-Step Instructions

    Step 1: Prep

    1. Preheat oven to 375°F (190°C). Line a baking sheet with parchment.
    2. Roll puff pastry into a 10×12-inch rectangle.

    Step 2: Fill

    1. Brush pastry with melted butter.
    2. Sprinkle with sugar and cinnamon (if using).
    3. Scatter chocolate chips evenly over the surface. Press in lightly.

    Step 3: Cut & Twist

    1. Cut pastry into 8 strips (each about 1.5 inches wide and 10 inches long).
    2. Gently twist each strip several times.
    3. Tie each twisted strip into a loose knot. Tuck ends underneath.

    Step 4: Bake & Dust

    1. Place knots on the baking sheet. Brush with beaten egg.
    2. Bake for 12-15 minutes until puffed and golden brown.
    3. Cool for 5 minutes. Dust generously with powdered sugar.
    4. Eat while chocolate is still warm and lava-like.

    Summary

    Prep Time: 8 minutes | Bake Time: 15 minutes | Total Time: 23 minutes

    Yield: 8 knots | Difficulty: Super Easy

    Storage Notes

    Best eaten day-of. Store leftovers in an airtight container for up to 2 days. Reheat in an air fryer at 350°F for 3-4 minutes or in an oven for 5 minutes. Never microwave—chocolate becomes napalm, pastry turns sad.

  • Homemade Naan: Bubble-y, Buttery, and Obsession-Worthy

    Homemade Naan: Bubble-y, Buttery, and Obsession-Worthy

    Store-bought naan is a sad, dry cracker pretending to be bread. Let’s fix that.

    This homemade naan is soft, chewy, blistered, and slathered in garlic butter. No tandoor? No problem. A regular skillet does the job. Ten minutes of work. Unlimited dipping potential.

    Ingredients

    Makes 6 large naan.

    For the Dough:

    • 2 cups all-purpose flour (plus more for dusting)
    • ½ cup plain yogurt (full-fat works best)
    • ¼ cup warm water
    • 2 tablespoons oil or melted butter
    • 1 teaspoon sugar
    • 1 teaspoon baking powder
    • ½ teaspoon baking soda
    • ½ teaspoon salt

    For the Garlic Butter Topping:

    • 3 tablespoons melted butter
    • 3 cloves garlic, minced
    • 2 tablespoons fresh cilantro, chopped (optional)

    Step-by-Step Instructions

    Step 1: Make the Dough

    1. In a large bowl, whisk flour, sugar, baking powder, baking soda, and salt.
    2. Add yogurt, warm water, and oil. Mix until a shaggy dough forms.
    3. Knead for 5-7 minutes until smooth and soft.
    4. Cover and rest for 30 minutes (or up to 2 hours).

    Step 2: Shape the Naan

    1. Divide dough into 6 equal balls.
    2. On a floured surface, roll each ball into a 6-8 inch oval or teardrop shape. Don’t make it too thin.

    Step 3: Cook on the Stovetop

    1. Heat a cast-iron skillet or heavy pan over high heat until screaming hot.
    2. Place one naan in the dry skillet. Cook for 1-2 minutes until bubbles appear on top.
    3. Flip and cook for another 1-2 minutes until dark blistered spots appear.
    4. Repeat with all naan.

    Step 4: Butter and Serve

    1. Mix melted butter and minced garlic.
    2. Brush hot naan with garlic butter. Sprinkle with cilantro.
    3. Serve warm with curry, hummus, or just eat it plain. No judgment.

    Summary

    Prep Time: 10 minutes | Rest Time: 30 minutes | Cook Time: 10 minutes

    Yield: 6 naan | Difficulty: Easy

    Storage Notes

    Store in an airtight container for up to 3 days. Freeze for up to 3 months. To reheat, spritz with water and warm in a skillet or air fryer at 350°F for 3 minutes. Microwaving works but kills the texture.

  • Chicken Caesar Wraps (The Lunch You’ll Actually Crave)

    Chicken Caesar Wraps (The Lunch You’ll Actually Crave)

    Caesar salad is great. But eating it with a fork? Boring. Wrapping it in a warm, toasty tortilla and taking it on a walk? Genius.

    This chicken Caesar wrap has it all: juicy chicken, crisp romaine, salty Parmesan, crunchy croutons, and that creamy, tangy Caesar dressing. Roll it up. Toast it if you’re fancy. Eat it with one hand while pretending to be productive.

    Ingredients

    Makes 2 large wraps.

    • 2 large flour tortillas (10-12 inch)
    • 2 cups cooked chicken (shredded or chopped, rotisserie works great)
    • 2 cups romaine lettuce, chopped
    • ½ cup shredded Parmesan cheese
    • ¼ cup Caesar dressing (plus more for drizzling)
    • ¼ cup croutons, crushed (for crunch)
    • Optional: black pepper, lemon wedge, anchovies (if you’re brave)

    Step-by-Step Instructions

    Step 1: Prep the Fillings

    1. In a large bowl, toss chicken, romaine, Parmesan, and Caesar dressing until coated.
    2. Add crushed croutons and toss gently (so they stay crunchy).

    Step 2: Warm the Tortilla

    1. Microwave tortillas for 10 seconds or warm in a dry skillet to make them pliable.

    Step 3: Assemble

    1. Spread a little extra Caesar dressing on the tortilla.
    2. Pile the chicken Caesar mixture in the center.

    Step 4: Roll It Tight

    1. Fold in the sides, then roll from the bottom up, tucking firmly.
    2. Should be snug but not bursting.

    Step 5: Toast (Optional But Great)

    1. Place wrap seam-side down in a dry skillet over medium heat.
    2. Toast for 1-2 minutes per side until golden and sealed.

    Step 6: Serve

    1. Slice in half on a diagonal. Serve with extra Caesar for dipping.

    Summary

    Prep Time: 10 minutes | Cook Time: 2 minutes (toasting optional) | Total Time: 10-12 minutes

    Yield: 2 wraps

    Difficulty: Easy

    Storage Notes

    • Fridge: Wrapped tightly in foil, keeps for 1 day. Lettuce will soften, croutons won’t stay crunchy.
    • Meal prep tip: Keep components separate (chicken, lettuce, dressing, croutons). Assemble fresh for best crunch.
    • Make ahead: Cook chicken up to 3 days in advance. Chop lettuce and store in a bag with a paper towel.
    • Crouton hack: Add them last or pack separately until you’re ready to eat.
  • Grilled Balsamic Chicken (Sweet, Tangy, and Smoky)

    Grilled Balsamic Chicken (Sweet, Tangy, and Smoky)

    Chicken breast has a reputation for being boring. This recipe exists to destroy that reputation.

    Sweet, tangy, garlicky balsamic marinade. Juicy, tender grilled chicken. Caramelized edges from the grill. This balsamic chicken makes zero sense for how easy it is. Throw it on a salad, stuff it in a sandwich, or eat it straight off the cutting board.

    Ingredients

    Serves 4.

    • 4 boneless, skinless chicken breasts (about 6 oz / 170g each)
    • ½ cup balsamic vinegar
    • ¼ cup olive oil
    • 2 tablespoons Dijon mustard
    • 2 tablespoons honey (or brown sugar)
    • 4 cloves garlic, minced
    • 1 teaspoon salt
    • ½ teaspoon black pepper
    • 1 teaspoon dried oregano (or rosemary)

    Step-by-Step Instructions

    Step 1: Make the Marinade

    1. In a bowl or zip-top bag, whisk balsamic vinegar, olive oil, Dijon, honey, garlic, salt, pepper, and oregano.

    Step 2: Marinate the Chicken

    1. Add chicken to the marinade. Coat well.
    2. Marinate for at least 30 minutes at room temp or up to 8 hours in the fridge.

    Step 3: Preheat the Grill

    1. Preheat grill to medium-high heat (about 400°F / 200°C).
    2. Remove chicken from marinade. Let excess drip off.

    Step 4: Grill

    1. Grill chicken for 5-7 minutes per side, until internal temp hits 165°F (74°C).
    2. Baste with leftover marinade during the last 2 minutes (only if it hasn’t touched raw chicken).

    Step 5: Rest and Serve

    1. Let chicken rest for 5 minutes before slicing.
    2. Serve with grilled veggies, rice, pasta, or on a salad.

    Summary

    Prep Time: 5 minutes + marinating | Cook Time: 12 minutes | Total Time: 20 minutes + marinating

    Yield: 4 servings

    Difficulty: Easy

    Storage Notes

    • Fridge: Cooked chicken keeps for 4 days in an airtight container.
    • Freezer: Marinate raw chicken and freeze for up to 3 months. Thaw in fridge before grilling.
    • Reheat: Skillet or oven at 325°F. Microwave works but dries it out.
    • Leftover magic: Slice over salads, add to wraps, or pile onto sandwiches.
  • Chimichangas (Deep-Fried Burritos = Best Idea Ever)

    Chimichangas (Deep-Fried Burritos = Best Idea Ever)

    Someone, somewhere, looked at a burrito and thought: “This needs to be fried.”

    That person was a genius. The chimichanga is a golden, crispy, shatteringly delicious masterpiece. A flour tortilla stuffed with seasoned meat, beans, and cheese, then fried until crackly-crunchy. Baked version included if you’re being healthy (no judgment… okay, a little).

    Ingredients

    Makes 6 chimichangas.

    • 6 large flour tortillas (burrito-size)
    • 1 lb (450g) ground beef (or shredded chicken)
    • 1 packet taco seasoning (or homemade)
    • ⅓ cup water
    • 1 can (15 oz) refried beans
    • 1 cup shredded Mexican cheese blend
    • Oil for frying (vegetable or canola)

    For Toppings:

    • Sour cream
    • Salsa or pico de gallo
    • Guacamole or sliced avocado
    • Shredded lettuce
    • Hot sauce

    Step-by-Step Instructions

    Step 1: Cook the Filling

    1. Brown ground beef in a skillet over medium-high heat. Drain grease.
    2. Add taco seasoning and water. Simmer 3 minutes until thickened.

    Step 2: Warm the Tortillas

    1. Microwave tortillas for 20 seconds or warm in a dry skillet. This prevents cracking.

    Step 3: Assemble

    1. Spread 2 tablespoons refried beans in the center of each tortilla.
    2. Top with seasoned beef and shredded cheese.
    3. Fold in the sides, then roll tightly from the bottom up.
    4. Secure with toothpicks if needed.

    Step 4: Fry or Bake

    1. Fry: Heat 1 inch oil to 350°F (175°C). Fry chimichangas seam-side down for 2-3 minutes per side until golden brown.
    2. Bake (healthier): Brush with oil. Bake at 425°F (220°C) for 15-20 minutes, flipping halfway.
    3. Air fry: 375°F (190°C) for 8-10 minutes.

    Step 5: Serve

    1. Remove toothpicks. Top with sour cream, salsa, guacamole, lettuce, and hot sauce.
    2. Eat with your hands. Napkins required.

    Summary

    Prep Time: 15 minutes | Cook Time: 15 minutes | Total Time: 30 minutes

    Yield: 6 chimichangas

    Difficulty: Easy

    Storage Notes

    • Fridge: Fried chimichangas keep for 3 days. They will lose crispiness.
    • Reheat: Air fryer at 375°F for 6-8 minutes or oven at 400°F for 10 minutes. No microwave (soggy disaster).
    • Freezer: Freeze uncooked, assembled chimichangas for up to 2 months. Fry or bake from frozen (add 5-10 minutes).
    • Pro tip: Bake or air fry for leftovers. Re-frying is messy.
  • Shrimp Tostadas (Crunchy, Citrusy, 15-Minute Magic)

    Shrimp Tostadas (Crunchy, Citrusy, 15-Minute Magic)

    Tostadas are what happens when tacos decide to get crispy and dramatic.

    These shrimp tostadas start with a crunchy fried corn tortilla. Then: creamy refried beans, zesty lime shrimp, crunchy cabbage, cool crema, and fresh avocado. No deep fryer needed (buy tostada shells or bake your own). Ready in 15 minutes. Messy in the best way.

    Ingredients

    Makes 6 tostadas (serves 3-4).

    • 6 tostada shells (store-bought or homemade)
    • 1 lb (450g) small or medium shrimp, peeled and deveined
    • 2 tablespoons olive oil
    • 3 cloves garlic, minced
    • 1 teaspoon chili powder
    • ½ teaspoon cumin
    • Juice of 2 limes (plus wedges for serving)
    • Salt and pepper to taste

    For Assembly:

    • 1 cup refried beans (canned or homemade), warmed
    • 1 cup shredded cabbage or slaw mix
    • ½ cup sour cream mixed with 2 tablespoons lime juice (lime crema)
    • 1 avocado, sliced
    • 1 tomato, diced
    • Hot sauce (optional)
    • Fresh cilantro and crumbled cotija or feta cheese

    Step-by-Step Instructions

    Step 1: Cook the Shrimp

    1. Pat shrimp dry. Season with salt, pepper, chili powder, and cumin.
    2. Heat olive oil in a skillet over medium-high heat.
    3. Add shrimp and garlic. Cook 2-3 minutes, flipping once, until pink and curled.
    4. Remove from heat. Squeeze lime juice over shrimp. Set aside.

    Step 2: Warm the Toppings

    1. Warm refried beans in a small pot or microwave.
    2. Make lime crema: stir sour cream and lime juice together.

    Step 3: Assemble

    1. Spread refried beans on each tostada shell.
    2. Top with shredded cabbage.
    3. Add lime shrimp, avocado slices, and diced tomato.
    4. Drizzle with lime crema and hot sauce.
    5. Sprinkle with cilantro and cotija cheese.

    Step 4: Serve

    1. Serve immediately with extra lime wedges.
    2. Eat fast before they get soggy. Your hands will be messy. Embrace it.

    Summary

    Prep Time: 10 minutes | Cook Time: 5 minutes | Total Time: 15 minutes

    Yield: 6 tostadas

    Difficulty: Easy

    Storage Notes

    • Fridge: Cooked shrimp keeps for 2 days. Store separately from shells and toppings.
    • Never assemble ahead: Tostadas get soggy FAST. Build fresh or set up a tostada bar.
    • Leftover shrimp: Great in tacos, salads, or rice bowls.
    • Make your own shells: Fry corn tortillas in ½ inch oil until crisp. Drain on paper towels.