Author: user

  • Lobster Thermidor: The Ultimate French Classic

    Lobster Thermidor: The Ultimate French Classic

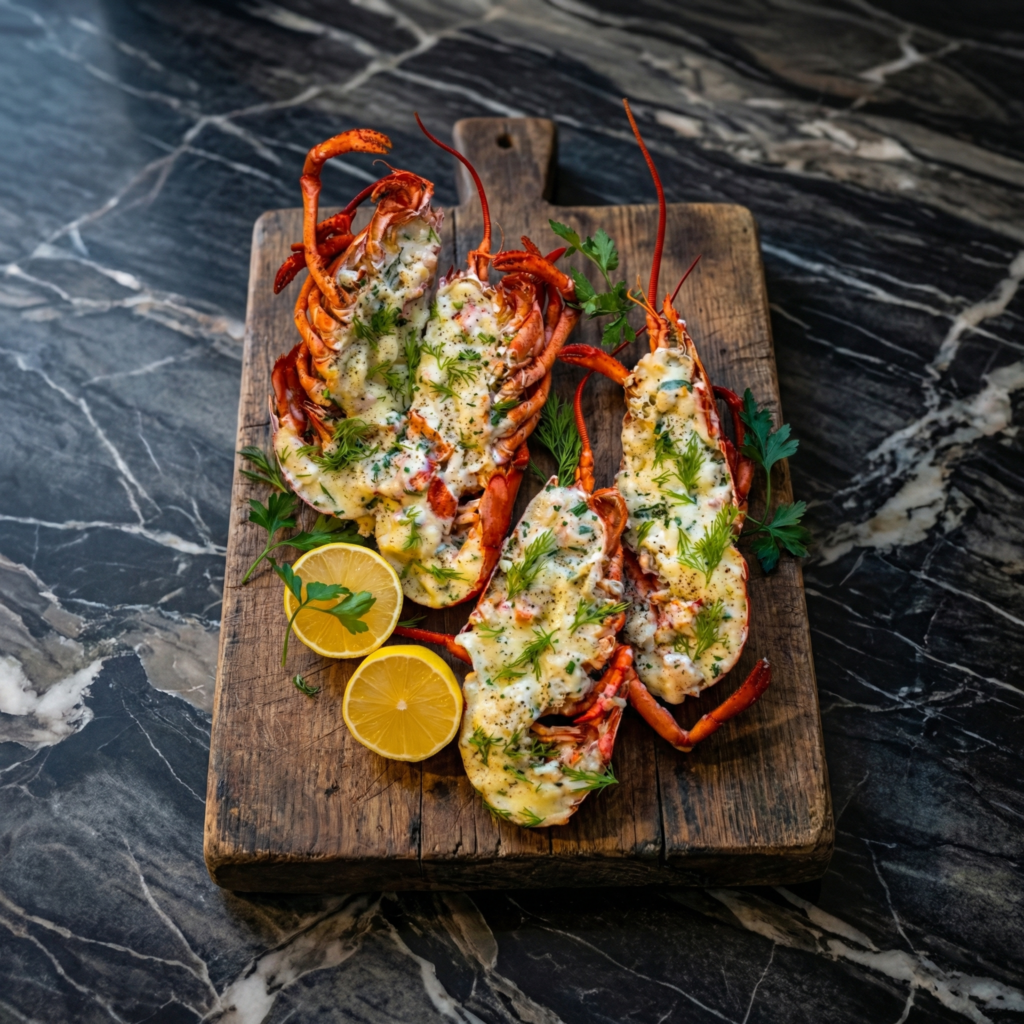
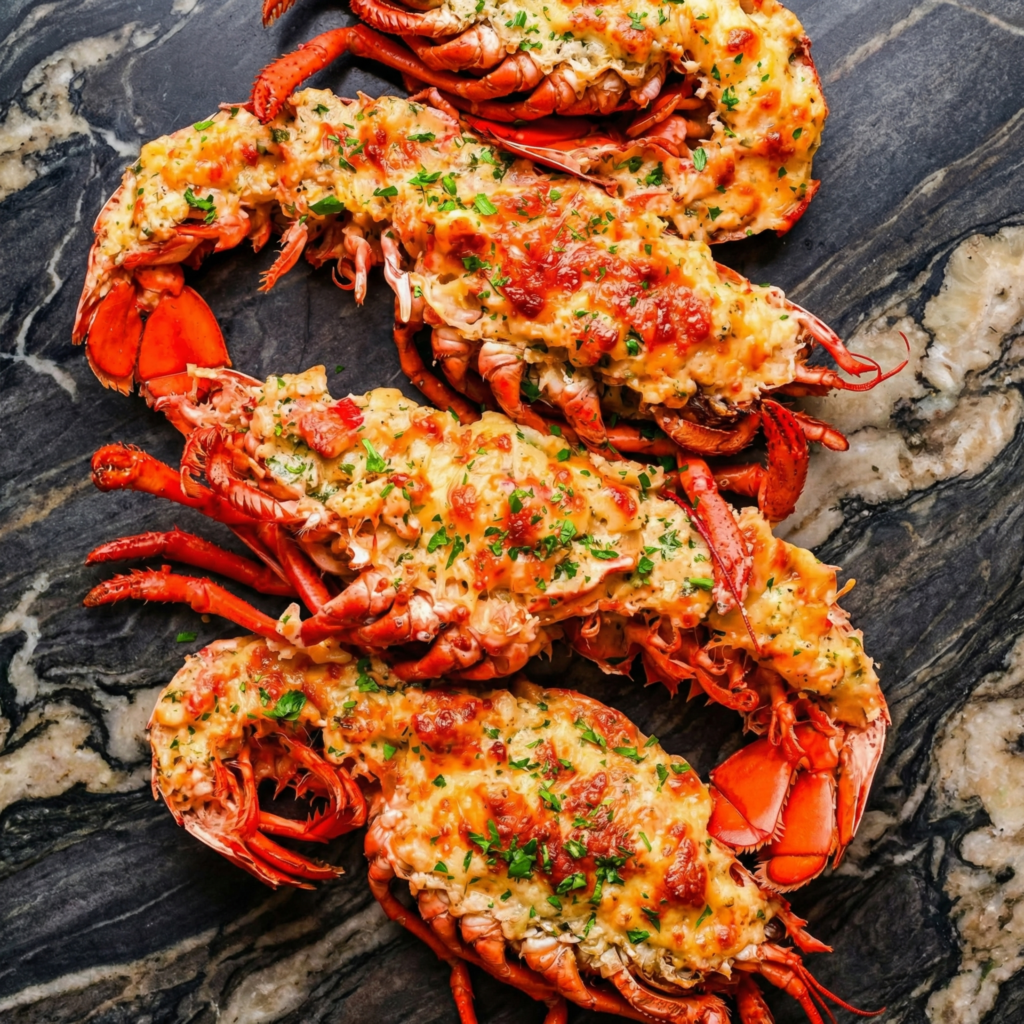
    Lobster Thermidor sounds like a dish from another era—and it is. Created in 1890s Paris to celebrate a play, it became the ultimate symbol of French culinary elegance. Lobster meat bathed in a velvety brandy-cream sauce, perfumed with mustard and tarragon, then stuffed back into the shell and gratinéed under the broiler. It’s decadent. It’s dramatic. And it’s surprisingly achievable at home.

    This version breaks down the classic technique into manageable steps. Cook the lobster. Make the sauce. Stuff and broil. The result is a dish that feels like a celebration—whether it’s an anniversary, a milestone, or just a Tuesday when you feel like treating yourself. Serve with Champagne and savor every bite.

    Ingredients

    Serves 2.

    For the Lobster:

    • 2 live lobsters (1½-2 lbs each), or 4 lobster tails
    • Salt, for boiling water

    For the Sauce:

    • 4 tbsp unsalted butter, divided
    • 1 shallot, finely chopped
    • 1 tbsp fresh tarragon, finely chopped (plus extra for garnish)
    • 2 tbsp brandy or cognac
    • ½ cup dry white wine
    • 1 cup heavy cream
    • 1 tbsp Dijon mustard
    • 1 tsp lemon juice
    • Salt and white pepper, to taste
    • Pinch of cayenne pepper (optional)

    For the Topping:

    • ½ cup grated Parmesan cheese or Gruyère
    • 2 tbsp panko breadcrumbs (optional, for extra crunch)

    For Garnish:

    • Fresh parsley or tarragon
    • Lemon wedges

    Step-by-Step Instructions

    Step 1: Cook the Lobster

    1. Bring a large pot of salted water to a rolling boil.
    2. Plunge lobsters head-first into the water. Cover and cook for 8-10 minutes (about 1 minute per ounce).
    3. Remove and transfer to an ice bath to stop cooking. Let cool completely.

    Step 2: Remove the Meat

    1. Twist off the claws and tails. Crack claws with a nutcracker or the back of a knife to remove meat.
    2. Cut the tail shell lengthwise along the underside. Gently remove the tail meat in one piece.
    3. Remove and discard the dark intestinal vein. Chop the lobster meat into bite-sized chunks.
    4. Clean the tail shells and reserve them for serving. Set the meat aside.

    Step 3: Make the Sauce

    1. In a large skillet, melt 2 tbsp butter over medium heat. Add shallot and cook until softened, about 2 minutes.
    2. Add tarragon and cook for 30 seconds until fragrant.
    3. Add brandy and carefully ignite to flambé (or simply simmer for 1-2 minutes to burn off alcohol).
    4. Add white wine and simmer until reduced by half, about 3 minutes.
    5. Add heavy cream, Dijon mustard, lemon juice, salt, white pepper, and cayenne. Simmer until sauce thickens enough to coat the back of a spoon, about 5-7 minutes.
    6. Remove from heat. Whisk in remaining 2 tbsp butter until melted and glossy.

    Step 4: Combine Lobster and Sauce

    1. Add chopped lobster meat to the sauce. Gently fold to coat.
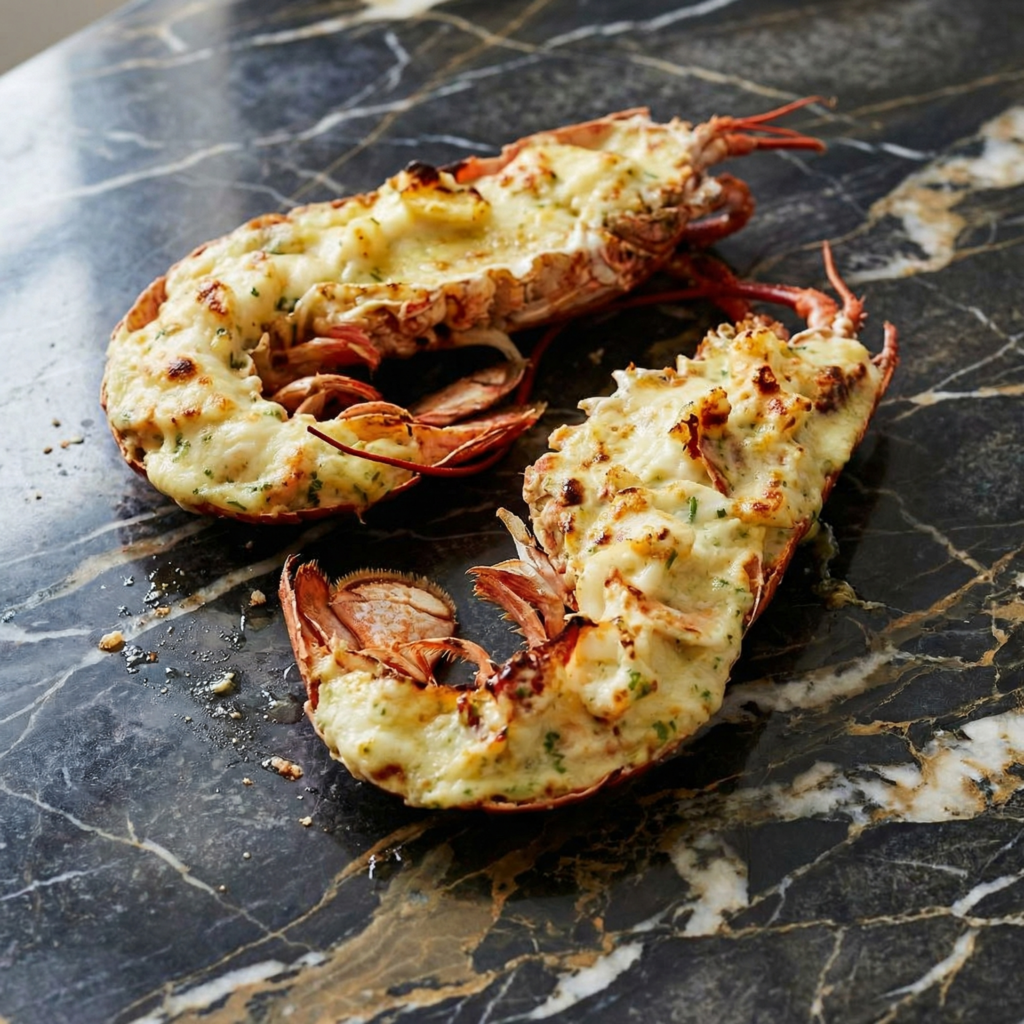
    2. Spoon the lobster mixture back into the reserved tail shells. Mound it slightly for an elegant presentation.

    Step 5: Top and Broil

    1. Preheat broiler to high with a rack 6 inches from the heat source.
    2. Sprinkle filled shells with Parmesan (and panko if using).
    3. Place shells on a baking sheet. Broil for 2-4 minutes until golden, bubbly, and lightly charred in spots. Watch closely to prevent burning.

    Step 6: Serve Immediately

    1. Transfer shells to a serving platter. Garnish with fresh tarragon or parsley and lemon wedges.
    2. Serve immediately with crusty bread to soak up any extra sauce.
    3. Take a bite. Rich, creamy, luxurious. This is French cooking at its most indulgent.

    Summary

    Prep Time: 20 minutes | Cook Time: 30 minutes | Total Time: 50 minutes

    Yield: 2 servings

    Difficulty: Special occasion spectacular

    Storage Notes

    Leftovers (Rare, But Possible):

    Lobster Thermidor is best enjoyed fresh. If you have leftovers, store in an airtight container in the fridge for up to 2 days. The sauce may separate slightly upon reheating.

    Reheating:

    Oven (best): 350°F for 8-10 minutes until warmed through. Microwave: 1-2 minutes at reduced power, but expect a softer texture. Do not reheat under the broiler—the cheese may burn before the interior warms.

    Make Ahead:

    You can cook the lobster and prepare the sauce up to 1 day in advance. Store lobster meat and sauce separately in the refrigerator. Combine, fill shells, and broil just before serving.

    What to Serve With Lobster Thermidor:

    • Crusty baguette (essential for sauce)
    • Steamed asparagus or green beans
    • Buttered new potatoes
    • Simple green salad with lemon vinaigrette
    • Champagne or white Burgundy (Chardonnay)

  • Char Siu Bao (Fluffy BBQ Pork Buns)

    Char Siu Bao (Fluffy BBQ Pork Buns)

    Char siu bao are the dim sum classic that everyone fights over. Soft, pillowy steamed buns, cloud-like and slightly sweet, wrapped around a filling of sticky, savory, caramelized BBQ pork. One bite, and you understand why people wait in line at dim sum restaurants for these little bundles of joy.

    Making them at home is a labor of love—but it’s deeply satisfying. The dough comes together like a dream. The filling is simple but packed with flavor. And the moment you lift the lid of the steamer to reveal those glossy, perfect buns? Pure magic. Make a batch, invite friends over, and pretend you’re in a Chinatown teahouse.

    Ingredients

    Makes 12 buns.

    For the Char Siu (BBQ Pork):

    • 1 lb pork shoulder or pork butt (or pre-made char siu from a Chinese BBQ shop)
    • 2 tbsp hoisin sauce
    • 1 tbsp soy sauce
    • 1 tbsp oyster sauce
    • 1 tbsp honey
    • 1 tbsp sugar
    • 1 tsp five-spice powder
    • 1 tsp sesame oil
    • 2 cloves garlic, minced
    • 1 tsp red food coloring or red yeast rice powder (optional, for color)

    For the Filling:

    • 1 cup prepared char siu, finely diced
    • 1 shallot, finely chopped
    • 1 tbsp oil
    • 2 tbsp oyster sauce
    • 1 tbsp soy sauce
    • 1 tbsp hoisin sauce
    • 1 tbsp sugar
    • ½ cup water
    • 1 tbsp cornstarch mixed with 2 tbsp water (slurry)

    For the Dough:

    • 2 cups all-purpose flour, plus more for dusting
    • ½ cup cake flour (or all-purpose flour substitute)
    • 2 tsp baking powder
    • 3 tbsp sugar
    • ½ tsp salt
    • ¾ cup warm water (110°F)
    • 1 tbsp vegetable oil
    • 1 tsp active dry yeast

    Step-by-Step Instructions

    Step 1: Make the Char Siu (or Use Store-Bought)

    1. If using store-bought char siu, skip to Step 2.
    2. Combine hoisin, soy sauce, oyster sauce, honey, sugar, five-spice powder, sesame oil, garlic, and food coloring (if using) in a bowl.
    3. Marinate pork for at least 4 hours or overnight in the refrigerator.
    4. Preheat oven to 400°F (200°C). Roast pork on a wire rack for 20-25 minutes, flipping halfway, until caramelized and cooked through.
    5. Let cool, then finely dice. Set aside 1 cup for the filling.

    Step 2: Make the Filling

    1. Heat oil in a skillet over medium heat. Add shallot and cook until softened, about 2 minutes.
    2. Add diced char siu and stir-fry for 1-2 minutes.
    3. Add oyster sauce, soy sauce, hoisin sauce, sugar, and water. Stir to combine.
    4. Bring to a simmer, then add cornstarch slurry. Cook until thickened, about 1 minute.
    5. Remove from heat and let cool completely. The filling should be thick and glossy.

    Step 3: Make the Dough

    1. In a small bowl, combine warm water, sugar, and yeast. Let sit for 5-10 minutes until foamy.
    2. In a large bowl, whisk together all-purpose flour, cake flour, baking powder, and salt.
    3. Add yeast mixture and oil. Stir until a shaggy dough forms.
    4. Knead on a lightly floured surface for 8-10 minutes until smooth and elastic.
    5. Place in a lightly oiled bowl, cover, and let rise in a warm place for 1-2 hours until doubled in size.

    Step 4: Shape the Buns

    1. Punch down dough and knead briefly. Divide into 12 equal pieces (about 1.5 oz each).
    2. Roll each piece into a ball, then flatten into a 4-inch circle. The edges should be thinner than the center.
    3. Place 1-2 tablespoons of filling in the center.
    4. Gather edges and pleat to seal, pinching the top closed. Place seam-side down on a square of parchment paper.
    5. Repeat with remaining dough and filling.

    Step 5: Second Rise

    1. Place buns in a steamer basket or on a baking sheet, leaving space between them.
    2. Cover and let rise for 30-45 minutes until slightly puffed.

    Step 6: Steam the Buns

    1. Fill a wok or large pot with water and bring to a simmer.
    2. Place steamer basket over the water. Steam buns in batches for 12-15 minutes.
    3. Do not open the lid during steaming—the steam keeps the buns fluffy.
    4. After steaming, turn off heat and let buns sit for 5 minutes before opening the lid to prevent collapsing.

    Step 7: Serve Immediately

    1. Remove buns from steamer and serve warm.
    2. Take a bite. Fluffy, cloud-like dough. Sweet, savory, sticky pork filling. This is dim sum heaven.

    Summary

    Prep Time: 45 minutes + marinating/rising | Cook Time: 30 minutes | Total Time: 4 hours (mostly hands-off)

    Yield: 12 buns

    Difficulty: Labor of love (so worth it)

    Storage Notes

    Leftovers:

    Store steamed buns in an airtight container in the fridge for up to 3 days. Reheat by steaming for 5 minutes until fluffy again.

    Freezer-Friendly (The Dream):

    Freeze uncooked, shaped buns on a baking sheet until solid, then transfer to a zip-top bag for up to 3 months. Steam from frozen—add 3-5 minutes to steaming time. No need to thaw. Steamed buns can also be frozen after cooking and reheated by steaming.

    Reheating:

    Steamer (best): Reheat for 5-7 minutes until fluffy and warmed through. Microwave: 30-45 seconds wrapped in a damp paper towel—this helps keep them soft. Oven: Not recommended—they’ll dry out.

    Make Ahead:

    Filling can be made up to 3 days in advance and refrigerated. Dough is best made fresh, but shaped buns can be refrigerated overnight for the second rise before steaming.

  • Pork Egg Rolls: Crispy, Savory and Better Than Takeout

    Pork Egg Rolls: Crispy, Savory and Better Than Takeout

    Egg rolls are the appetizer that makes takeout worth the wait. That first crack of crispy, golden wrapper giving way to a savory, steaming filling of pork and cabbage. But homemade egg rolls? They’re a revelation. Crispier. Filling-ier. And you control exactly what goes inside.

    This recipe keeps things classic: ground pork, shredded cabbage, carrots, and a few pantry staples. The filling comes together quickly. The wrapping takes a little practice but becomes second nature. And the frying? That’s where the magic happens. Serve them with sweet and sour sauce or hot mustard, and watch them vanish.

    Ingredients

    Makes about 20-24 egg rolls.

    For the Filling:

    • 1 lb ground pork
    • 3 cups green cabbage, finely shredded
    • 1 cup carrots, julienned or grated
    • 3 cloves garlic, minced
    • 1 tbsp fresh ginger, grated
    • 2 green onions, thinly sliced
    • 2 tbsp soy sauce
    • 1 tbsp oyster sauce
    • 1 tsp sesame oil
    • 1 tsp sugar
    • ½ tsp white pepper (or black pepper)
    • 1 tbsp vegetable oil (for sautéing)

    For the Egg Rolls:

    • 20-24 egg roll wrappers (square, about 6-7 inches)
    • 1 egg, beaten (for sealing)
    • Neutral oil, for frying (vegetable, canola, or peanut)

    For Serving:

    • Sweet and sour sauce
    • Hot mustard
    • Soy sauce
    • Pickled ginger (optional)

    Step-by-Step Instructions

    Step 1: Cook the Filling

    1. Heat vegetable oil in a large skillet or wok over medium-high heat.
    2. Add ground pork and cook, breaking it up with a spoon, until browned and cooked through, about 5-6 minutes.
    3. Add garlic and ginger. Cook for 30 seconds until fragrant.
    4. Add cabbage and carrots. Stir-fry for 2-3 minutes until vegetables begin to soften.
    5. Add soy sauce, oyster sauce, sesame oil, sugar, and white pepper. Stir to combine.
    6. Cook for another 2-3 minutes until vegetables are tender and liquid has evaporated.
    7. Stir in green onions. Remove from heat and let filling cool completely before wrapping. (Hot filling can tear the wrappers.)

    Step 2: Prepare Wrappers and Sealant

    1. Beat the egg in a small bowl with 1 tablespoon of water. This is your glue for sealing.
    2. Lay an egg roll wrapper on a clean surface with one corner pointing toward you (diamond orientation).

    Step 3: Assemble the Egg Rolls

    1. Place about 2-3 tablespoons of filling in the center of the wrapper, shaping it into a log.
    2. Fold the bottom corner up over the filling, tucking it snugly.
    3. Fold in the left and right corners, like an envelope.
    4. Roll tightly toward the top corner, keeping the roll straight.
    5. Brush the top corner with beaten egg and press to seal. The seam should be on the bottom.
    6. Place finished egg rolls on a baking sheet, seam-side down, and keep covered with a damp towel to prevent drying.

    Step 4: Heat the Oil

    1. Pour oil into a heavy-bottomed pot or Dutch oven to a depth of 2-3 inches.
    2. Heat oil to 350°F (175°C). Use a thermometer for accuracy.

    Step 5: Fry the Egg Rolls

    1. Working in batches (don’t crowd the pot), carefully lower egg rolls into the hot oil, seam-side down to start.
    2. Fry for 3-4 minutes, turning occasionally, until golden brown and crispy all over.
    3. Remove with a slotted spoon and drain on a wire rack (not paper towels—paper towels trap steam and soften the crust).

    Step 6: Serve Immediately

    1. Arrange crispy egg rolls on a platter with sweet and sour sauce and hot mustard.
    2. Garnish with sliced green onions or sesame seeds if desired.
    3. Take a bite. Hear that crunch. Taste the savory filling. You just made the best egg rolls of your life.

    Summary

    Prep Time: 25 minutes | Cook Time: 20 minutes | Total Time: 45 minutes

    Yield: 20-24 egg rolls

    Difficulty: Worth the effort

    Storage Notes

    Leftovers:

    Store cooked egg rolls in an airtight container in the fridge for up to 3 days. They’ll lose crispiness but can be reheated.

    Reheating (Bring Back the Crunch):

    Oven or air fryer (best): 375°F for 5-7 minutes until hot and crispy. Skillet: Reheat in a dry pan over medium heat. Microwave: Not recommended—makes them soggy.

    Freezer-Friendly (Meal Prep Dream):

    Freeze uncooked, assembled egg rolls in a single layer on a baking sheet. Once frozen, transfer to a zip-top bag for up to 3 months. Fry from frozen—add 1-2 minutes to cooking time. No need to thaw.

    Make Ahead:

    Filling can be made up to 3 days in advance and refrigerated. Assemble and fry just before serving for maximum crispiness.

    What to Serve With Pork Egg Rolls:

    • Fried rice (pork, shrimp, or vegetable)
    • Lo mein or chow mein
    • Hot and sour soup or egg drop soup
    • Steamed dumplings or potstickers
    • Simple cucumber salad
    • Cold beer or jasmine tea

    Egg Roll vs. Spring Roll:

    Egg rolls use a thicker, wheat-based wrapper that bubbles and crisps when fried, creating that signature crunchy texture. Spring rolls use a thinner, lighter wrapper (often rice-based) that’s more delicate. Both are delicious, but egg rolls are the classic American-Chinese takeout favorite with that satisfying crunch.

  • Pajeon (Korean Scallion Pancake)

    Pajeon (Korean Scallion Pancake)

    Pajeon is Korea’s answer to the pancake question—and it’s not sweet. It’s savory, crispy, packed with fresh scallions, and served with a tangy soy dipping sauce that makes every bite sing. It’s the kind of food that brings people to the table, perfect for sharing, and dangerously easy to eat.

    The magic is in the texture: crispy, lacy edges giving way to a tender, scallion-studded center. A simple batter, a hot pan, and plenty of oil create that signature crunch. Serve it as an appetizer, a snack with drinks, or a light meal with rice and kimchi. Once you start, it’s hard to stop.

    Ingredients

    Serves 2-4 (makes 2 pancakes).

    For the Pancake:

    • 1 cup all-purpose flour
    • ½ cup cornstarch or potato starch (for extra crispiness)
    • 1 cup cold water
    • 1 large egg, beaten
    • 1 tsp salt
    • ½ tsp sugar
    • 1 bunch scallions (about 8-10), cut into 2-inch lengths
    • Neutral oil, for frying (vegetable or canola)

    Optional Add-Ins:

    • ½ cup seafood (shrimp, squid, mussels), chopped
    • ½ cup kimchi, chopped (squeeze out excess liquid)
    • ¼ cup carrots, julienned
    • 1 fresh red chili, thinly sliced
    • ¼ cup zucchini, thinly sliced

    For the Dipping Sauce:

    • ¼ cup soy sauce
    • 1 tbsp rice vinegar
    • 1 tbsp water
    • 1 tsp sugar
    • ½ tsp gochugaru (Korean red pepper flakes) or regular red pepper flakes
    • 1 tsp sesame oil
    • 1 clove garlic, minced
    • 1 tbsp chopped scallion (optional)
    • ½ tsp toasted sesame seeds (optional)

    Step-by-Step Instructions

    Step 1: Make the Dipping Sauce

    1. In a small bowl, combine soy sauce, rice vinegar, water, sugar, gochugaru, sesame oil, garlic, scallion, and sesame seeds.
    2. Stir until sugar dissolves. Set aside to let flavors meld.

    Step 2: Make the Batter

    1. In a large bowl, whisk together flour, cornstarch, salt, and sugar.
    2. Add cold water and beaten egg. Whisk until just combined—a few lumps are okay. Do not overmix.
    3. The batter should be thin and pourable, like heavy cream. If too thick, add a tablespoon of water at a time.

    Step 3: Prepare the Scallions

    1. Wash and dry scallions thoroughly. Cut into 2-inch lengths. Pat dry—excess water can make the pancake soggy.
    2. If using add-ins (seafood, kimchi, vegetables), prepare them now and have them ready.

    Step 4: Heat the Pan

    1. Heat a large non-stick skillet or cast-iron pan over medium-high heat.
    2. Add 2-3 tablespoons of oil—enough to generously coat the bottom. The oil is key to crispy edges.

    Step 5: First Pancake

    1. Pour half the batter into the hot pan, tilting to spread into a thin, even round.
    2. Immediately scatter half the scallions (and any add-ins) evenly over the batter. Press them in gently with a spatula so they adhere.
    3. Cook for 3-4 minutes until the bottom is golden brown and crispy. Peek at the edges to check.
    4. Flip carefully using a wide spatula. Add another tablespoon of oil around the edges if needed.
    5. Cook for another 3-4 minutes until the second side is golden and crispy and the pancake is cooked through.

    Step 6: Second Pancake

    1. Repeat with remaining batter, scallions, and add-ins. Add more oil as needed between pancakes.

    Step 7: Serve Immediately

    1. Transfer pajeon to a cutting board and cut into wedges.
    2. Serve hot with the dipping sauce on the side.
    3. Take a bite. Crispy edges, tender center, bursts of scallion. Dip in the tangy sauce. This is Korean comfort food at its best.

    Summary

    Prep Time: 10 minutes | Cook Time: 15 minutes | Total Time: 25 minutes

    Yield: 2 pancakes (serves 2-4)

    Difficulty: Crispy, easy, addictive

    Storage Notes

    Leftovers:

    Store in an airtight container in the fridge for up to 2 days. The texture will soften but still tastes great.

    Reheating (Bring Back the Crunch):

    Skillet (best): Reheat in a dry pan over medium heat for 2-3 minutes per side until crispy. Air fryer: 375°F for 3-4 minutes. Oven: 400°F for 5-7 minutes on a wire rack. Microwave: Not recommended—makes it soggy.

    Make Ahead:

    Mix the batter up to 2 hours in advance and refrigerate. Stir before using. The pancake is best cooked fresh and served immediately for maximum crispiness.

    What to Serve With Pajeon:

    • Makgeolli (Korean rice wine)—the classic pairing
    • Soju or beer
    • Steamed rice
    • Kimchi (the essential Korean side dish)
    • Pickled vegetables
    • Doenjang jjigae (soybean paste stew)

  • Tamagoyaki (Japanese Rolled Omelette)

    Tamagoyaki (Japanese Rolled Omelette)

    Tamagoyaki is the Japanese omelette that looks like art. Thin layers of seasoned egg, rolled into a perfect golden log, sliced to reveal a beautiful spiral of tender, slightly sweet custard. It’s served for breakfast, tucked into bento boxes, draped over sushi rice, and admired for its delicate beauty.

    The technique takes practice—but that’s part of the joy. Each roll teaches you something. The first few might be rustic, but with a little patience (and a rectangular pan), you’ll be making restaurant-quality tamagoyaki that tastes as good as it looks. Sweet, savory, and deeply satisfying.

    Ingredients

    Serves 2 (makes 1 roll).

    For the Tamagoyaki:

    • 3 large eggs
    • 2 tbsp dashi (or 2 tbsp water + ¼ tsp dashi powder)
    • 1 tsp soy sauce
    • 1 tsp mirin
    • ½ tsp sugar
    • Pinch of salt
    • Neutral oil, for cooking (vegetable or canola)

    Optional Additions:

    • Chopped green onions
    • Finely chopped nori (seaweed)
    • Grated cheese
    • Cooked shrimp or salmon flakes

    For Serving:

    • Grated daikon radish (optional)
    • Soy sauce for dipping
    • Fresh parsley or shiso leaf

    Step-by-Step Instructions

    Step 1: Make the Egg Mixture

    1. In a small bowl, combine dashi, soy sauce, mirin, sugar, and salt. Stir until sugar dissolves.
    2. Crack eggs into a separate bowl. Using chopsticks or a fork, stir eggs in a cutting motion (not whisking) to combine whites and yolks without incorporating too much air. You want a smooth, uniform mixture.
    3. Pour the seasoned liquid into the eggs and gently mix until combined. Strain through a fine-mesh sieve if you want an ultra-smooth texture (optional but recommended).

    Step 2: Heat the Pan

    1. Heat a rectangular tamagoyaki pan (or small non-stick skillet) over medium-low heat.
    2. Lightly oil the pan using a paper towel or brush. You’ll need to re-oil between each layer.

    Step 3: First Layer

    1. Pour a thin layer of egg mixture into the pan, tilting to cover the bottom evenly. Use about ⅓ of the mixture.
    2. Cook until the edges are set and the surface is slightly runny, about 30-45 seconds.
    3. Using chopsticks or a spatula, gently roll the egg from one end to the other. Push the rolled egg to the far side of the pan.

    Step 4: Second Layer

    1. Re-oil the empty side of the pan. Pour another thin layer of egg mixture, tilting to cover the bottom.
    2. Lift the existing roll slightly to let uncooked egg flow underneath.
    3. Cook until set, then roll again, wrapping the new layer around the existing roll.
    4. Push the roll back to the far side of the pan.

    Step 5: Remaining Layers

    1. Repeat the process with the remaining egg mixture (usually 2-3 more layers).
    2. After each roll, gently press the tamagoyaki with a spatula to shape it into a neat rectangular log.
    3. If adding fillings like green onions, sprinkle them on before rolling each layer.

    Step 6: Shape and Rest

    1. Once all egg mixture is used, press the tamagoyaki gently with the spatula to create a uniform rectangular shape.
    2. Transfer to a bamboo sushi mat or a piece of plastic wrap and roll to tighten. Let rest for 5 minutes to set the shape.

    Step 7: Slice and Serve

    1. Slice the tamagoyaki into ½-inch thick pieces.
    2. Arrange on a plate with grated daikon and soy sauce for dipping.
    3. Take a bite. Tender, layered, sweet-savory perfection. You’ve just mastered Japanese home cooking.

    Summary

    Prep Time: 5 minutes | Cook Time: 10 minutes | Total Time: 15 minutes

    Yield: 1 roll (serves 2)

    Difficulty: Practice makes perfect

    Storage Notes

    Leftovers:

    Store tamagoyaki in an airtight container in the fridge for up to 3 days. It’s delicious cold or at room temperature—perfect for bento boxes.

    Reheating:

    Skillet (gentle): Reheat over low heat for 1-2 minutes per side. Microwave: 20-30 seconds at reduced power—be careful not to overcook. Cold tamagoyaki is traditional in bento and equally delicious.

    Make Ahead:

    Tamagoyaki can be made a day in advance and stored in the fridge. Slice just before serving. It’s a staple of Japanese bento lunches precisely because it keeps so well.

    What to Serve With Tamagoyaki:

    • Steamed rice and miso soup (traditional Japanese breakfast)
    • As a topping for sushi rice (tamago nigiri)
    • In a bento box with pickled vegetables and grilled fish
    • As a side dish for ramen or udon
    • With grated daikon and soy sauce as an appetizer
    • Cold, as a snack or picnic food

  • Spinach Feta Omelette: Fluffy and Fresh, 10-Minute Breakfast

    Spinach Feta Omelette: Fluffy and Fresh, 10-Minute Breakfast

    The spinach feta omelette is the breakfast that makes you feel like you have your life together. It’s elegant enough for a brunch gathering, simple enough for a Tuesday morning, and packed with protein to keep you going until lunch. Creamy, tangy feta. Tender, garlicky spinach. All wrapped in a light, fluffy egg blanket.

    The key is technique: a non-stick pan, medium heat, and patience. Let the eggs set before you add the filling. Fold gently. Serve immediately. Ten minutes from start to finish, and you’ve got a breakfast that rivals any café.

    Ingredients

    Serves 1 (easily doubled).

    For the Omelette:

    • 3 large eggs
    • 1 tbsp milk or water (optional, for fluffiness)
    • Salt and black pepper, to taste
    • 1 tbsp butter or olive oil
    • 2 cups fresh spinach, roughly chopped
    • 1 clove garlic, minced (optional)
    • ¼ cup crumbled feta cheese
    • Fresh dill or parsley, for garnish (optional)

    Optional Additions:

    • Red pepper flakes for heat
    • Cherry tomatoes, halved
    • Mushrooms, sliced
    • Red onion, thinly sliced
    • Avocado, for serving

    Step-by-Step Instructions

    Step 1: Sauté the Spinach

    1. In a small non-stick skillet (8 or 10-inch), heat ½ tbsp butter or olive oil over medium heat.
    2. Add minced garlic (if using) and cook for 30 seconds until fragrant.
    3. Add spinach and cook for 1-2 minutes until wilted. Season with a pinch of salt.
    4. Remove spinach to a plate and wipe the skillet clean.

    Step 2: Whisk the Eggs

    1. In a small bowl, whisk eggs with milk (if using), salt, and pepper until frothy and pale yellow. Whisk vigorously for at least 30 seconds—this creates a fluffy omelette.

    Step 3: Cook the Omelette

    1. Return the skillet to medium heat. Add remaining butter or oil and swirl to coat.
    2. Pour in the eggs. Let them sit undisturbed for 30-45 seconds until the edges begin to set.
    3. Using a spatula, gently push the cooked edges toward the center, tilting the pan to let uncooked egg flow to the edges. Repeat until the eggs are mostly set but still slightly soft on top, about 2-3 minutes.

    Step 4: Add the Filling

    1. Sprinkle the sautéed spinach and crumbled feta over half of the omelette.
    2. If using additional toppings (tomatoes, mushrooms), add them now.

    Step 5: Fold and Finish

    1. Using a spatula, gently fold the empty half of the omelette over the filling.
    2. Let it cook for 30-60 seconds to melt the feta and warm the filling.
    3. Slide onto a plate.

    Step 6: Serve Immediately

    1. Garnish with fresh dill or parsley. Add red pepper flakes for heat if desired.
    2. Serve with toast, avocado, or a side of fresh fruit.
    3. Take a bite. Fluffy eggs, creamy feta, tender spinach. Breakfast is served.

    Summary

    Prep Time: 5 minutes | Cook Time: 8 minutes | Total Time: 13 minutes

    Yield: 1 serving

    Difficulty: Easy, elegant, fast

    Storage Notes

    Leftovers:

    Omelettes are best eaten fresh. If you have leftovers, store in an airtight container in the fridge for up to 2 days.

    Reheating:

    Skillet (best): Reheat gently over medium-low heat for 1-2 minutes per side. Microwave: 30-45 seconds at reduced power—the texture will be slightly softer but still delicious.

    Make Ahead:

    Sauté the spinach up to 3 days in advance and refrigerate. Whisk and cook eggs fresh for best results.

    Pro Tips for Omelette Greatness:

    • Whisk eggs vigorously. At least 30 seconds of whisking incorporates air for a fluffy texture.
    • Use medium heat, not high. High heat burns the eggs before they set properly. Low and slow is the way.
    • Let the edges set before pushing. Patience is key—don’t rush the first 30-45 seconds.
    • Non-stick pan is essential. A good non-stick skillet makes flipping and folding effortless.
    • Add milk or water for fluffiness. A tablespoon of liquid creates steam that lightens the eggs.
    • Don’t overfill. Too much filling makes the omelette hard to fold and prone to breaking.
    • Fold and serve immediately. Omelettes wait for no one—they’re at their peak right out of the pan.

  • Sausage and Egg Sandwich: The Ultimate Breakfast Sandwich

    Sausage and Egg Sandwich: The Ultimate Breakfast Sandwich

    The breakfast sandwich is a morning ritual. It’s the thing you crave on sleepy weekends, the grab-and-go hero that makes getting out of bed worth it. But the drive-thru version? It’s fine. The homemade version? It’s transcendent.

    This is the breakfast sandwich of your dreams. A juicy, perfectly seasoned sausage patty. A fried egg with a golden, crispy-edged white and a yolk that runs like liquid gold. Melted American cheese doing its creamy, clingy thing. All tucked into a buttered, griddled English muffin that’s crisp on the outside and soft inside. Fifteen minutes. One skillet. Breakfast is served.

    Ingredients

    Serves 2.

    For the Sausage Patties (or use store-bought):

    • ½ lb ground pork
    • ½ tsp salt
    • ½ tsp black pepper
    • ½ tsp fennel seeds, crushed
    • ¼ tsp sage
    • ¼ tsp garlic powder
    • ¼ tsp onion powder
    • ⅛ tsp red pepper flakes (optional)

    For the Sandwich:

    • 2 English muffins, split
    • 2 tbsp butter, softened
    • 2 large eggs
    • 2 slices American cheese (or cheddar, provolone, or Swiss)
    • Salt and black pepper, to taste
    • Optional toppings: avocado slices, hot sauce, spinach, or tomato

    Step-by-Step Instructions

    Step 1: Make the Sausage Patties

    1. In a small bowl, combine ground pork, salt, pepper, fennel seeds, sage, garlic powder, onion powder, and red pepper flakes (if using). Mix until just combined—don’t overwork.
    2. Divide mixture into 2 equal portions. Shape each into a patty slightly wider than your English muffins (they’ll shrink as they cook).
    3. If using store-bought sausage patties, skip to step 2.

    Step 2: Cook the Sausage Patties

    1. Heat a large skillet or griddle over medium heat. Add sausage patties.
    2. Cook for 3-4 minutes per side until golden brown and cooked through (internal temp 160°F). Remove to a plate and tent loosely with foil.

    Step 3: Toast the English Muffins

    1. Wipe the skillet clean. Butter the cut sides of each English muffin half.
    2. Place muffins buttered-side down in the skillet over medium heat. Cook for 2-3 minutes until golden brown and crisp. Set aside.

    Step 4: Fry the Eggs

    1. In the same skillet, crack the eggs into the pan. Season with salt and pepper.
    2. Cook for 2-3 minutes until the whites are set and the edges are slightly crispy. For a runny yolk (recommended), do not flip. For over-easy, flip carefully and cook for 1 more minute.
    3. During the last minute, place a slice of American cheese on each sausage patty to melt (or place directly on the eggs).

    Step 5: Assemble the Sandwich

    1. Place the bottom half of each English muffin on a plate.
    2. Top with the cheesy sausage patty, then the fried egg, and any additional toppings.
    3. Close with the top half of the English muffin. Press down gently.

    Step 6: Serve Immediately

    1. Serve hot with a side of fruit, hash browns, or just as-is.
    2. Take a bite. The yolk runs. The cheese stretches. The sausage is juicy. This is the breakfast sandwich you’ve been waiting for.

    Summary

    Prep Time: 5 minutes | Cook Time: 15 minutes | Total Time: 20 minutes

    Yield: 2 sandwiches

    Difficulty: Easy breakfast perfection

    Storage Notes

    Leftovers:

    These sandwiches are best eaten fresh. If you have leftovers, store in an airtight container in the fridge for up to 2 days.

    Reheating:

    Skillet (best): Reheat over medium-low heat, covered, for 3-4 minutes until warmed through. Air fryer: 350°F for 3-4 minutes. Microwave: 45-60 seconds—the muffin will be softer but still tasty.

    Make Ahead:

    Cook sausage patties up to 3 days in advance and refrigerate. Assemble and cook eggs fresh for best results.

    Freezer-Friendly:

    Assemble fully cooked sandwiches, wrap tightly in foil, and freeze for up to 3 months. Reheat from frozen in a 350°F oven for 15-20 minutes or in the microwave for 2-3 minutes.

    Pro Tips for Breakfast Sandwich Greatness:

    • Season the sausage yourself. Store-bought works, but homemade is juicier and more flavorful.
    • Don’t overwork the sausage. Mix just until combined—overworking makes tough patties.
    • Butter and toast the muffins. This creates a barrier against sogginess and adds flavor.
    • Cook eggs with crispy edges. The contrast of crispy lace and runny yolk is perfection.
    • Melt the cheese on the sausage or egg. Residual heat creates that gooey, stretchy texture.
    • Assemble just before serving. This prevents the muffin from getting soggy.

  • Thai Egg Rolls, Better Than Takeout

    Thai Egg Rolls, Better Than Takeout

    Thai egg rolls are the appetizer that disappears first. Crispy, golden wrappers shattering to reveal a savory filling of ground pork, cabbage, carrots, and glass noodles, perfumed with garlic, white pepper, and a hint of fish sauce. They’re the reason you order extra at Thai restaurants—and now you can make them at home.

    The filling comes together quickly. The wrapping takes a little practice but becomes second nature. And the frying? That’s where the magic happens. Serve them with a sweet and tangy dipping sauce, and watch your guests hover by the platter. These are worth every minute.

    Ingredients

    Makes about 20-24 egg rolls.

    For the Filling:

    • ½ lb ground pork (or ground chicken, turkey, or tofu)
    • 2 cups green cabbage, finely shredded
    • 1 cup carrots, julienned or grated
    • ½ cup glass noodles (cellophane noodles), soaked in warm water until soft, then chopped
    • 3 cloves garlic, minced
    • 2 green onions, thinly sliced
    • 2 tbsp fish sauce
    • 1 tbsp oyster sauce
    • 1 tsp sugar
    • ½ tsp white pepper (black pepper works too)
    • 1 tbsp vegetable oil (for sautéing)

    For the Egg Rolls:

    • 20-24 egg roll wrappers (square, about 6-7 inches)
    • 1 egg, beaten (for sealing)
    • Neutral oil, for frying (vegetable, canola, or peanut)

    For the Dipping Sauce:

    • ½ cup sweet chili sauce (store-bought or homemade)
    • 2 tbsp rice vinegar
    • 1 tbsp fish sauce
    • 1 tbsp lime juice
    • 1 clove garlic, minced
    • 1 tsp chili flakes (optional)

    For Serving:

    • Fresh cilantro or mint, for garnish
    • Lime wedges

    Step-by-Step Instructions

    Step 1: Soak the Glass Noodles

    1. Place glass noodles in a bowl and cover with warm water. Let soak for 10-15 minutes until softened.
    2. Drain, squeeze out excess water, and roughly chop into 1-2 inch pieces. Set aside.

    Step 2: Cook the Filling

    1. Heat vegetable oil in a large skillet or wok over medium-high heat.
    2. Add garlic and cook for 30 seconds until fragrant.
    3. Add ground pork and cook, breaking it up with a spoon, until browned and cooked through, about 4-5 minutes.
    4. Add cabbage and carrots. Stir-fry for 2-3 minutes until vegetables begin to soften.
    5. Add soaked glass noodles, fish sauce, oyster sauce, sugar, and white pepper. Stir-fry for 1-2 minutes until everything is well combined and heated through.
    6. Stir in green onions. Remove from heat and let filling cool completely before wrapping. (This is important—hot filling can tear the wrappers.)

    Step 3: Prepare Wrappers and Sealant

    1. Beat the egg in a small bowl with 1 tablespoon of water. This is your glue for sealing.
    2. Lay an egg roll wrapper on a clean surface with one corner pointing toward you (diamond orientation).

    Step 4: Assemble the Egg Rolls

    1. Place about 2 tablespoons of filling in the center of the wrapper, shaping it into a log.
    2. Fold the bottom corner up over the filling, tucking it snugly.
    3. Fold in the left and right corners, like an envelope.
    4. Roll tightly toward the top corner, keeping the roll straight.
    5. Brush the top corner with beaten egg and press to seal. The seam should be on the bottom.
    6. Place finished egg rolls on a baking sheet, seam-side down, and keep covered with a damp towel to prevent drying.

    Step 5: Heat the Oil

    1. Pour oil into a heavy-bottomed pot or Dutch oven to a depth of 2-3 inches.
    2. Heat oil to 350°F (175°C). Use a thermometer for accuracy.

    Step 6: Fry the Egg Rolls

    1. Working in batches (don’t crowd the pot), carefully lower egg rolls into the hot oil, seam-side down to start.
    2. Fry for 3-4 minutes, turning occasionally, until golden brown and crispy all over.
    3. Remove with a slotted spoon and drain on a wire rack (not paper towels—paper towels trap steam and soften the crust).

    Step 7: Make the Dipping Sauce

    1. In a small bowl, whisk together sweet chili sauce, rice vinegar, fish sauce, lime juice, minced garlic, and chili flakes (if using).
    2. Set aside for flavors to meld.

    Step 8: Serve Immediately

    1. Arrange crispy egg rolls on a platter with fresh herbs and lime wedges.
    2. Serve with the sweet and tangy dipping sauce.
    3. Take a bite. Hear that crunch. Taste the savory filling. You just made the best egg rolls of your life.

    Summary

    Prep Time: 30 minutes | Cook Time: 20 minutes | Total Time: 50 minutes

    Yield: 20-24 egg rolls

    Difficulty: Worth the effort

    Storage Notes

    Leftovers:

    Store cooked egg rolls in an airtight container in the fridge for up to 3 days. They lose crispiness but can be reheated.

    Reheating (Bring Back the Crunch):

    Oven or air fryer (best): 375°F for 5-7 minutes until hot and crispy. Skillet: Reheat in a dry pan over medium heat. Microwave: Not recommended—makes them soggy.

    Freezer-Friendly (Meal Prep Dream):

    Freeze uncooked, assembled egg rolls in a single layer on a baking sheet. Once frozen, transfer to a zip-top bag for up to 3 months. Fry from frozen—add 1-2 minutes to cooking time. No need to thaw.

    Make Ahead:

    Filling can be made up to 3 days in advance and refrigerated. Assemble and fry just before serving for maximum crispiness.

  • Homemade Chicken Nuggets: Better Than Fast Food and Ready in 20

    Homemade Chicken Nuggets: Better Than Fast Food and Ready in 20

    Chicken nuggets have a special place in our hearts. They’re the childhood favorite, the picky-eater pleaser, the thing you order without thinking at the drive-thru. But homemade nuggets? They’re a revelation. Real chicken breast. A crispy, seasoned crust. Juicy on the inside, golden on the outside. No mystery meat. No regrets.

    These nuggets come together faster than you think. A simple dredge in seasoned flour, a dip in egg, and a coat of panko breadcrumbs.

    Bake them for a healthier version, or fry them for that deep golden crunch. Either way, they’re about to become your new weeknight hero. Serve with ketchup, honey mustard, or your favorite dipping sauce—and watch them disappear.

    Ingredients

    Serves 4.

    For the Nuggets:

    • 1½ lbs boneless, skinless chicken breasts (about 2 large)
    • 1 cup all-purpose flour
    • 1 tsp garlic powder
    • 1 tsp paprika
    • ½ tsp salt
    • ½ tsp black pepper
    • 2 large eggs, beaten
    • 1½ cups panko breadcrumbs
    • ¼ cup grated Parmesan cheese (optional, for extra flavor)
    • Cooking spray or neutral oil (for baking or frying)

    For Serving:

    • Ketchup
    • Honey mustard
    • Ranch dressing
    • BBQ sauce
    • Spicy mayo

    Step-by-Step Instructions

    Step 1: Prep the Chicken

    1. Cut chicken breasts into 1½-inch bite-sized pieces. Try to make them uniform for even cooking.
    2. Pat chicken pieces dry with paper towels. This helps the coating stick.

    Step 2: Set Up Dredging Station

    1. In a shallow dish, combine flour, garlic powder, paprika, salt, and pepper.
    2. In a second shallow dish, beat the eggs.
    3. In a third shallow dish, combine panko breadcrumbs and Parmesan cheese (if using).

    Step 3: Coat the Nuggets

    1. Dredge each chicken piece in the flour mixture, shaking off excess.
    2. Dip into beaten eggs, letting excess drip off.
    3. Coat in panko mixture, pressing gently to adhere.
    4. Place coated nuggets on a wire rack or baking sheet. Let rest for 10 minutes if time allows—this helps the coating set.

    Step 4: Choose Your Cooking Method

    1. Baking method (healthier): Preheat oven to 425°F (220°C). Place nuggets on a wire rack over a baking sheet. Spray generously with cooking spray. Bake for 10-12 minutes, flip, and bake another 5-7 minutes until golden and cooked through (internal temp 165°F).
    2. Frying method (crispier): Heat ½ inch of oil in a large skillet over medium-high heat to 350°F. Fry nuggets in batches for 2-3 minutes per side until golden brown and cooked through. Drain on paper towels.
    3. Air fryer method (best of both): Preheat air fryer to 400°F. Place nuggets in a single layer, spray with oil, and cook for 8-10 minutes, flipping halfway, until crispy and cooked through.

    Step 5: Serve Immediately

    1. Arrange nuggets on a platter with your favorite dipping sauces.
    2. Garnish with fresh parsley if desired.
    3. Take a bite. Crispy coating, juicy chicken, pure satisfaction. You’ll never buy frozen nuggets again.

    Summary

    Prep Time: 15 minutes | Cook Time: 15 minutes | Total Time: 30 minutes

    Yield: 4 servings (about 20-25 nuggets)

    Difficulty: Kid-friendly easy

    Storage Notes

    Leftovers:

    Store in an airtight container in the fridge for up to 3 days. Nuggets will lose crispiness but still taste great.

    Reheating (Bring Back the Crunch):

    Oven or air fryer (best): 375°F for 5-7 minutes until hot and crispy. Skillet: Reheat in a dry pan over medium heat, flipping once. Microwave: Works in a pinch but will be softer.

    Freezer-Friendly (Meal Prep Dream):

    These freeze beautifully! Arrange uncooked, coated nuggets on a baking sheet in a single layer. Freeze until solid, then transfer to a zip-top bag for up to 3 months. Cook from frozen—add 3-5 minutes to baking time or 1-2 minutes to frying time.

    Make Ahead:

    Coat nuggets up to 4 hours in advance and refrigerate on a wire rack. Cook just before serving for maximum crispiness.

  • Baked Potato Wedges

    Baked Potato Wedges

    Potato wedges are the unsung heroes of the potato world. Thicker than fries, crispier than roasted potatoes, and infinitely dippable. They’re the side dish that makes burgers better, the snack that disappears at parties, and the weeknight dinner companion that asks for very little but delivers everything.

    The secret to crispy baked wedges isn’t complicated. Soak them to remove starch. Season them generously. Give them space on a hot baking sheet. The result? Wedges that are golden and crunchy on the outside, soft and fluffy on the inside. No deep fryer needed. Just potatoes, oil, seasoning, and a little oven magic.

    Ingredients

    Serves 4.

    For the Wedges:

    • 4 large russet potatoes (about 2-2½ lbs)
    • 3 tbsp olive oil or avocado oil
    • 1 tsp garlic powder
    • 1 tsp smoked paprika
    • ½ tsp onion powder
    • ½ tsp salt (or more to taste)
    • ¼ tsp black pepper
    • ¼ tsp cayenne pepper (optional, for heat)
    • Fresh parsley, chopped (for garnish)

    For Serving (Optional):

    • Ketchup
    • Ranch dressing
    • Garlic aioli
    • Spicy mayo
    • Parmesan cheese, grated

    Step-by-Step Instructions

    Step 1: Prep the Potatoes

    1. Preheat oven to 425°F (220°C). Line a large baking sheet with parchment paper or foil for easy cleanup.
    2. Scrub potatoes clean. Cut each potato in half lengthwise, then cut each half into 3-4 wedges (about 1-inch thick at the widest part). Try to keep them uniform for even cooking.

    Step 2: Soak the Wedges (The Secret to Crispy)

    1. Place potato wedges in a large bowl and cover with cold water. Let soak for 30 minutes (or up to 2 hours). This removes excess starch, which helps them crisp up in the oven.
    2. Drain and pat wedges completely dry with paper towels. Any moisture left will create steam instead of crispiness.

    Step 3: Season the Wedges

    1. Return dried wedges to the bowl. Drizzle with oil and toss to coat evenly.
    2. In a small bowl, combine garlic powder, smoked paprika, onion powder, salt, pepper, and cayenne (if using).
    3. Sprinkle the seasoning mixture over the wedges and toss until every wedge is well coated.

    Step 4: Arrange on Baking Sheet

    1. Arrange wedges on the prepared baking sheet in a single layer, skin-side down. Don’t crowd them—give each wedge some space for air to circulate. Use two baking sheets if needed.

    Step 5: Bake to Crispy Perfection

    1. Bake for 20 minutes. Remove from oven and flip each wedge using tongs.
    2. Return to oven and bake for another 15-20 minutes until the wedges are golden brown, crispy on the edges, and easily pierced with a fork.
    3. For extra crispiness, broil for the final 2-3 minutes—watch closely to prevent burning.

    Step 6: Serve Immediately

    1. Transfer wedges to a serving platter. Sprinkle with fresh parsley and an extra pinch of salt.
    2. Serve with your favorite dipping sauces.
    3. Take a bite. Crispy exterior, fluffy interior, perfectly seasoned. You won’t miss the fryer.

    Summary

    Prep Time: 15 minutes + soaking | Cook Time: 35-40 minutes | Total Time: 1 hour

    Yield: 4 servings

    Difficulty: Easy, crispy, addictive

    Storage Notes

    Leftovers:

    Store in an airtight container in the fridge for up to 3 days. They’ll lose crispiness but still taste great.

    Reheating (Bring Back the Crunch):

    Oven or air fryer (best): 400°F for 5-8 minutes until hot and crispy. Skillet: Reheat in a dry pan over medium heat, flipping occasionally. Microwave: Not recommended—makes them soggy.

    Make Ahead:

    Soak and cut wedges up to 24 hours in advance. Store in a bowl of cold water in the fridge. Drain, dry, and season just before baking.

    Pro Tips for Baked Wedge Greatness:

    • Russet potatoes are essential. Their high starch content gives you that fluffy interior and crispy exterior.
    • Don’t skip the soak. Removing excess starch is the key to crispiness. 30 minutes minimum—2 hours is even better.
    • Dry them thoroughly. Moisture creates steam, and steam creates soft wedges. Pat them completely dry.
    • Don’t crowd the pan. Overcrowding traps steam and prevents crisping. Use two baking sheets if needed.
    • Flip halfway through. Flipping ensures even browning on both sides.
    • Skin-side down to start. Placing wedges skin-side down helps them hold their shape and prevents sticking.
    • Use high heat. 425°F is the sweet spot—hot enough to crisp without burning.
    • Season immediately after baking. A final sprinkle of salt while they’re hot makes a big difference.