Author: user

  • Cornish Pasties: A Handheld Savory Pocket (No Mining Helmet Required)

    Cornish Pasties: A Handheld Savory Pocket (No Mining Helmet Required)

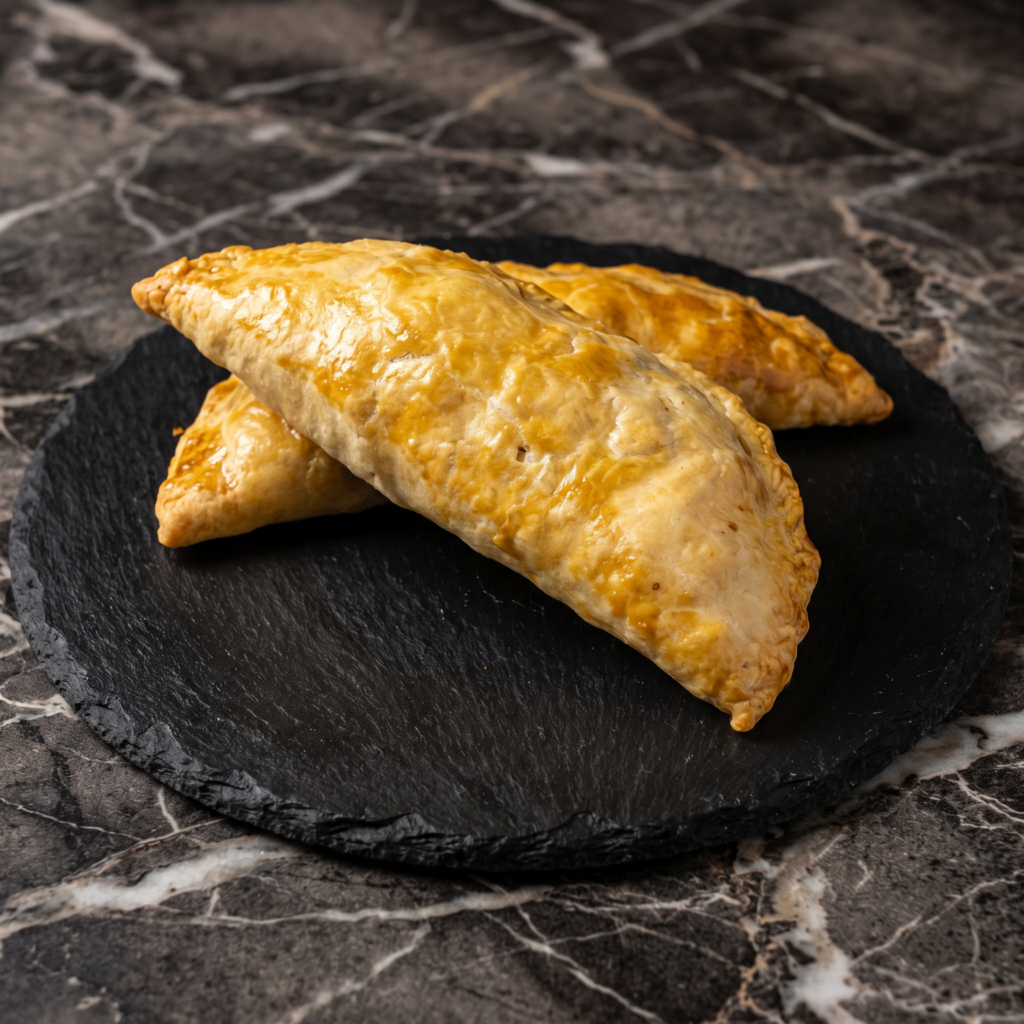
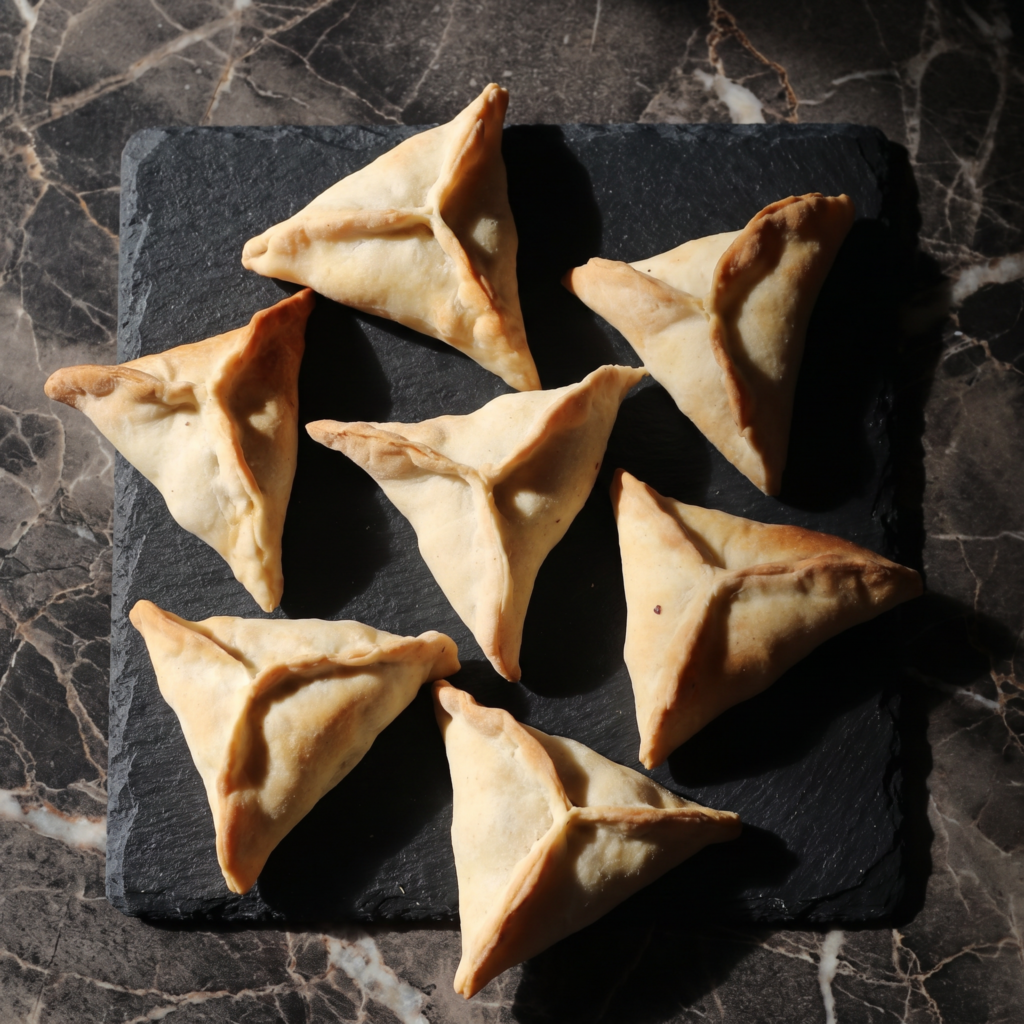
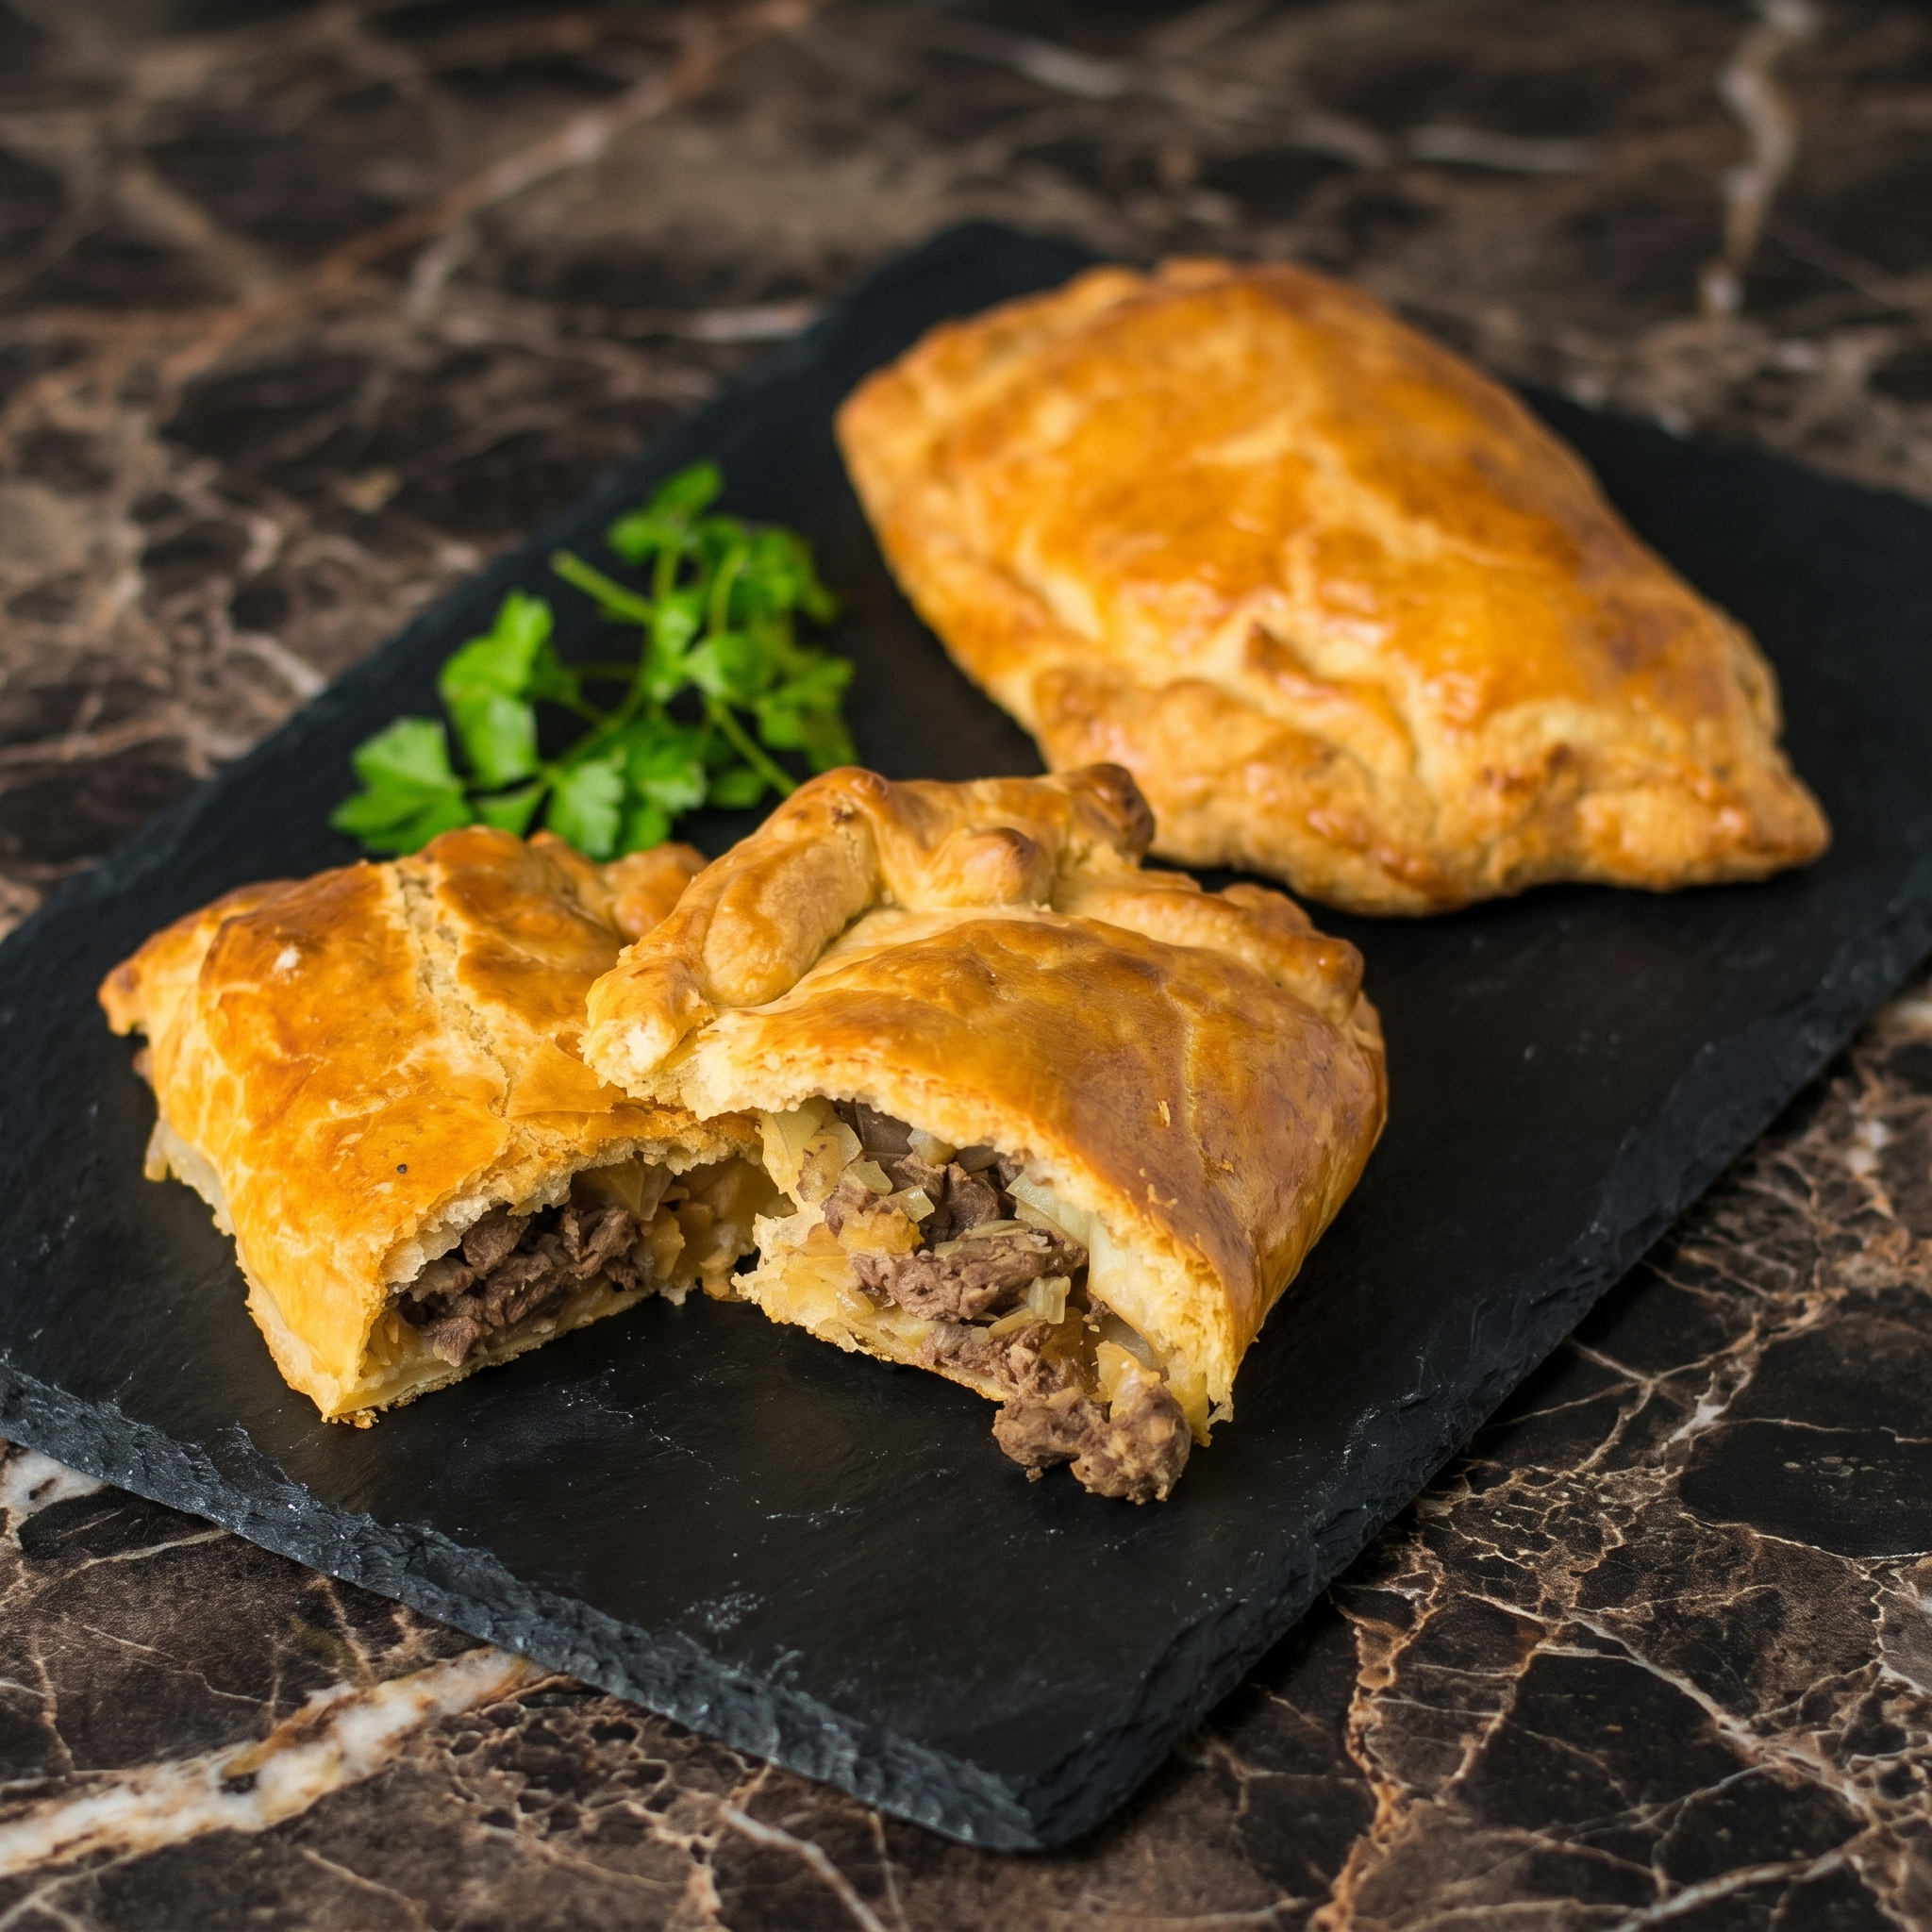
    Before energy bars and drive-thrus, there was the Cornish pasty. Miners in Cornwall needed a hearty, handheld meal that could survive a dark, dusty shift—and wouldn’t poison them with arsenic from their fingers. So they held the crimped crust like a handle and ate the rest. Genius.

    Today, you get the same flaky, golden pocket packed with beef, potato, onion, and rutabaga (swede, if you’re fancy). It’s savory, satisfying, and surprisingly easy to make at home. No tin mine required.

    Ingredients

    Makes 4 pasties.

    For the Dough:

    • 3 cups (375g) all-purpose flour
    • 1 cup (225g) cold unsalted butter, cubed
    • ½ cup (120ml) ice water
    • 1 teaspoon salt

    For the Filling:

    • ½ lb (225g) beef skirt or sirloin, finely chopped (not ground)
    • 1 medium potato, diced small (¼-inch)
    • ½ small rutabaga (swede), diced small
    • ½ medium onion, finely chopped
    • Salt and black pepper to taste
    • 1 egg, beaten (for egg wash)

    Step-by-Step Instructions

    Step 1: Make the Dough

    1. Mix flour and salt. Cut in cold butter until it looks like coarse crumbs.
    2. Add ice water gradually, mixing until dough just comes together. Don’t overwork.
    3. Divide into 4 balls, flatten into discs, wrap, and chill 30 minutes.

    Step 2: Prep the Filling

    1. Chop beef into small cubes (¼-inch). Do the same with potato, rutabaga, and onion.
    2. Mix everything in a bowl. Season generously with salt and pepper. That’s it—no pre-cooking.

    Step 3: Assemble the Pasties

    1. Roll each dough disc into an 8-inch circle.
    2. Place a generous ½ cup of filling on one half, leaving a border.
    3. Add a small pat of butter on top (secret to moist filling).
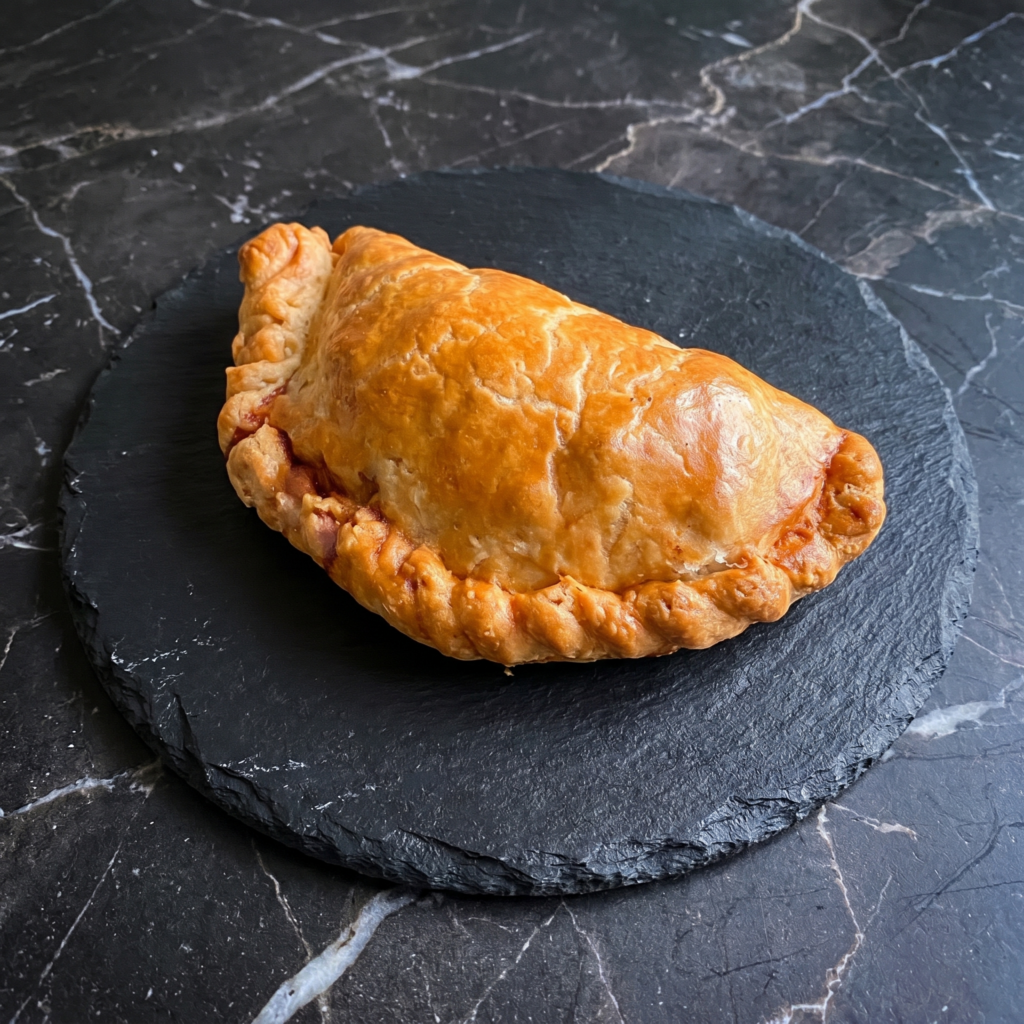
    4. Fold the empty half over. Crimp the edge firmly—twist or flute it like a rope.

    Step 4: Bake

    1. Place pasties on a parchment-lined baking sheet. Cut two small slits on top for steam.
    2. Brush with beaten egg.
    3. Bake at 400°F (200°C) for 45–50 minutes, until deep golden brown.

    Step 5: Cool and Eat

    1. Let rest 10 minutes. Hold the crimped edge, bite the other end, and pretend you’re in Cornwall.

    Summary

    Prep Time: 30 minutes (plus 30 min chill) | Cook Time: 50 minutes | Total Time: 1 hour 50 minutes

    Yield: 4 pasties

    Difficulty: Medium

    Storage Notes

    How to Store:

    • Fridge: Baked pasties keep 3–4 days. Reheat in oven (not microwave) to keep crust crisp.
    • Freezer (unbaked): Freeze assembled pasties on a tray, then wrap tightly. Bake from frozen, adding 15–20 minutes.
    • Freezer (baked): Cool completely, wrap, freeze up to 3 months. Reheat at 350°F for 20 minutes.

    Pro Tip:

    Don’t skip the rutabaga. Traditional Cornish pasties require it by law (seriously—it has protected status).

  • Curry Pan: Japan’s Crunchy, Curry-Filled Donut (No Deep Fryer Fear)

    Curry Pan: Japan’s Crunchy, Curry-Filled Donut (No Deep Fryer Fear)

    Imagine a soft dinner roll. Now imagine it’s stuffed with rich, mildly spiced Japanese curry, rolled in panko, and fried until golden and crunchy. That’s curry pan—a vending machine legend and convenience store hero in Japan.

    It’s savory, sweet, crunchy, and fluffy all at once. And no, you don’t need a deep fryer. A pot with oil works fine. Just don’t wear white.

    Ingredients

    Makes 6 curry pan.

    For the Dough:

    • 2 cups (250g) bread flour
    • 2 tablespoons sugar
    • ½ teaspoon salt
    • 1 teaspoon instant yeast
    • ½ cup (120ml) warm milk
    • 1 egg
    • 1 tablespoon unsalted butter, softened

    For the Filling & Coating:

    • 1 cup leftover Japanese curry (thick, not watery)
    • 1 cup panko breadcrumbs
    • 1 egg (for egg wash)
    • 2 cups vegetable oil (for frying)

    Step-by-Step Instructions

    Step 1: Make the Dough

    1. Mix flour, sugar, salt, and yeast. Add warm milk and egg. Knead until combined.
    2. Add softened butter. Kneat 8–10 minutes until smooth.
    3. Let rise 1 hour, until doubled.

    Step 2: Prep the Curry

    1. Your curry must be THICK. If it’s runny, chill it. You need a scoopable paste, not soup.
    2. Divide chilled curry into 6 balls (about 2 tablespoons each).

    Step 3: Assemble

    1. Punch down dough. Divide into 6 pieces.
    2. Flatten each into a 4-inch circle.
    3. Place a curry ball in the center. Fold edges over and pinch tightly to seal.
    4. Roll each into a smooth ball.

    Step 4: Coat and Fry

    1. Brush each ball with beaten egg. Roll in panko until fully covered.
    2. Heat oil to 340°F (170°C). Fry 2–3 at a time, 2–3 minutes per side, until dark golden.
    3. Drain on paper towels.

    Step 5: Serve Hot

    1. Eat immediately. The contrast of crunchy outside, soft bread, and warm curry is magic. Burn your mouth happily.

    Summary

    Prep Time: 20 minutes | Rise Time: 1 hour | Cook Time: 15 minutes | Total Time: 1 hour 35 minutes

    Yield: 6 curry pan

    Difficulty: Medium

    Storage Notes

    How to Store:

    • Best eaten fresh. Curry pan is a crispy-first, ask-questions-later situation.
    • Fridge: Not recommended. Bread gets sad.
    • Reheat: Air fryer at 350°F for 3–4 minutes. Microwave will make it soggy (don’t do it).
    • Freeze (unfried): Assemble and coat, then freeze on a tray. Fry from frozen, adding 1–2 minutes.

    Pro Tip:

    Use leftover curry from yesterday. It’s thicker and easier to handle. Plus, zero waste.

  • Spinach Fatayer: Little Lebanese Spinach Pies (One Bite, You’re Hooked)

    Spinach Fatayer: Little Lebanese Spinach Pies (One Bite, You’re Hooked)

    Meet the MVP of Lebanese baking: fatayer. These soft, triangular spinach pies are tangy, earthy, and impossible to stop eating. The filling is bright from lemon, warm from sumac, and the dough is pillowy perfection.

    They’re wildly popular across the Middle East for good reason. Make a batch. Watch them vanish.

    Ingredients

    Makes 12 fatayer.

    For the Dough:

    • 3 cups (375g) all-purpose flour
    • 1 tablespoon sugar
    • 1 teaspoon salt
    • 2 teaspoons instant yeast
    • ¾ cup (180ml) warm water
    • ¼ cup (60ml) olive oil

    For the Filling:

    • 10 oz (280g) fresh spinach, finely chopped
    • 1 small onion, finely diced
    • ¼ cup (60ml) lemon juice (fresh is best)
    • 2 tablespoons sumac
    • 2 tablespoons olive oil
    • ½ teaspoon salt

    Step-by-Step Instructions

    Step 1: Make the Dough

    1. Mix flour, sugar, salt, and yeast. Add warm water and olive oil.
    2. Knead 8–10 minutes until smooth. Cover and let rise 1 hour.

    Step 2: Prep the Filling

    1. Mix chopped spinach, onion, lemon juice, sumac, olive oil, and salt.
    2. Let sit 10 minutes. Squeeze out excess liquid (critical—wet filling kills dough).

    Step 3: Assemble Triangles

    1. Punch down dough. Divide into 12 balls.
    2. Roll each into a 4-inch circle.
    3. Place 1 tablespoon filling in the center.
    4. Pinch three sides to form a triangle, leaving a small opening in the center.

    Step 4: Bake

    1. Place on a parchment-lined baking sheet. Brush with olive oil.
    2. Bake at 375°F (190°C) for 15–18 minutes, until golden.

    Step 5: Devour

    1. Serve warm or at room temperature. Dip in yogurt or just eat straight.

    Summary

    Prep Time: 20 minutes | Rise Time: 1 hour | Cook Time: 18 minutes | Total Time: 1 hour 40 minutes

    Yield: 12 fatayer

    Difficulty: Easy

    Storage Notes

    How to Store:

    • Fridge: Keeps 4–5 days. Reheat in oven at 350°F for 5 minutes.
    • Freezer (baked): Freeze up to 3 months. Reheat from frozen, 10 minutes at 350°F.
    • Freezer (unbaked): Freeze assembled triangles on a tray, then bag. Bake from frozen, add 5–7 minutes.

    Pro Tip:

    Don’t skip squeezing the spinach. Wet filling = soggy bottoms. Also, sumac is non-negotiable—it’s the secret tang.

  • Crispy Onion Strings: The Topping That Steals the Show

    Crispy Onion Strings: The Topping That Steals the Show

    You know those crispy little onion things on green bean casserole? Imagine those, but infinitely better. Thinner. Crispier. More flavorful. These onion strings take 15 minutes and make everything better—burgers, steaks, salads, your life.

    Fair warning: They vanish fast.

    Ingredients

    Serves 4 as a topping (or 2 as a snack).

    • 1 large yellow or sweet onion
    • 1 cup buttermilk (or regular milk + 1 teaspoon vinegar)
    • 1 cup all-purpose flour
    • ½ teaspoon salt
    • ½ teaspoon black pepper
    • ½ teaspoon paprika
    • ¼ teaspoon garlic powder
    • Vegetable oil (for frying)

    Step-by-Step Instructions

    Step 1: Slice and Soak

    1. Slice onion paper-thin (use a mandoline if you have one).
    2. Soak in buttermilk for 10 minutes. This tames the bite and helps coating stick.

    Step 2: Make the Coating

    1. Mix flour, salt, pepper, paprika, and garlic powder in a bowl.

    Step 3: Dredge

    1. Grab a handful of onion strings from buttermilk. Let excess drip off.
    2. Toss in flour mixture until fully separated and coated.

    Step 4: Fry

    1. Heat 1 inch of oil in a pot to 375°F (190°C).
    2. Fry in small batches for 1-2 minutes until golden brown.
    3. Drain on paper towels. Sprinkle with extra salt immediately.

    Summary

    Prep Time: 10 minutes | Cook Time: 5 minutes | Total Time: 15 minutes

    Yield: About 2 cups of onion strings

    Difficulty: Easy

    Storage Notes

    How to Store:

    • Same day only. These are best fresh and crispy. They get sad overnight.
    • Reheat trick: Air fryer at 350°F for 2-3 minutes brings some crunch back. Microwave? Never.
    • Make ahead: Slice and soak onions up to 2 hours before frying. Fry right before serving.

    Pro Tip:

    Thin slices are everything. Thick slices = raw centers. Use a mandoline or a very sharp knife. Also, don’t overcrowd the pot—it drops the oil temp and makes greasy strings.

  • Lemon Garlic Chicken Thighs: Bright, Juicy, 10-Minute Prep

    Lemon Garlic Chicken Thighs: Bright, Juicy, 10-Minute Prep

    Chicken breasts are boring. Chicken thighs are heroes. They’re juicier, more forgiving, and packed with flavor. Add bright lemon and lots of garlic, and you’ve got dinner in under 30 minutes.

    One skillet. Five minutes of prep. Zero dry chicken.

    Ingredients

    Serves 4.

    • 6 bone-in, skin-on chicken thighs
    • 1 teaspoon salt
    • ½ teaspoon black pepper
    • 1 tablespoon olive oil
    • 6 garlic cloves, smashed or minced
    • ¼ cup lemon juice (about 2 lemons)
    • 1 tablespoon lemon zest
    • ½ cup chicken broth
    • 2 tablespoons butter
    • 2 tablespoons fresh parsley or thyme (optional)

    Step-by-Step Instructions

    Step 1: Season and Sear

    1. Pat chicken thighs dry. Season both sides with salt and pepper.
    2. Heat oil in a large skillet over medium-high heat. Place chicken skin-side down.
    3. Sear 5-6 minutes until skin is golden and crispy. Flip and cook 2 more minutes. Remove and set aside.

    Step 2: Make the Sauce

    1. Lower heat to medium. Add garlic, cook 30 seconds until fragrant.
    2. Add lemon juice, lemon zest, and chicken broth. Scrape up brown bits.
    3. Simmer 2-3 minutes. Stir in butter until melted.

    Step 3: Finish Chicken

    1. Return chicken to skillet, skin-side up. Spoon sauce over the top.
    2. Simmer 8-10 minutes until chicken hits 165°F (74°C) internal.

    Step 4: Serve

    1. Sprinkle with parsley or thyme. Serve with rice, roasted potatoes, or crusty bread to soak up the sauce.

    Summary

    Prep Time: 5 minutes | Cook Time: 20 minutes | Total Time: 25 minutes

    Yield: 6 thighs (4 servings)

    Difficulty: Easy

    Storage Notes

    How to Store:

    • Fridge: Keeps 3-4 days. Reheat in skillet or oven at 350°F for 10 minutes.
    • Freezer (cooked): Up to 3 months. Thaw overnight, reheat in oven.
    • Meal prep: Make sauce and sear chicken ahead. Finish in skillet day-of.

    Pro Tip:

    Pat the skin DRY before searing. Moisture is the enemy of crispiness. Also, don’t crowd the pan—chicken needs room to brown. Do two batches if needed.

  • Teriyaki Chicken Skewers: Sweet, Sticky, Better Than Takeout

    Teriyaki Chicken Skewers: Sweet, Sticky, Better Than Takeout

    Chicken on sticks. Sweet, garlicky, sticky glaze. What’s not to love? Teriyaki chicken skewers come together fast, cook faster, and disappear fastest. No fancy ingredients. No complicated steps.

    Just juicy chicken and that glossy, addictive sauce.

    Ingredients

    Makes 8-10 skewers (serves 4).

    For the Skewers:

    • 1.5 lbs (675g) boneless, skinless chicken thighs (or breasts)
    • 2 green onions, sliced (for garnish)
    • 1 teaspoon sesame seeds (optional)

    For the Teriyaki Sauce:

    • ½ cup soy sauce
    • ¼ cup water
    • ¼ cup brown sugar
    • 2 tablespoons mirin (or honey + 1 tbsp rice vinegar)
    • 2 garlic cloves, minced
    • 1 teaspoon ginger, grated
    • 1 tablespoon cornstarch + 2 tablespoons water (slurry)

    Step-by-Step Instructions

    Step 1: Make the Sauce

    1. Combine soy sauce, water, brown sugar, mirin, garlic, and ginger in a small pot.
    2. Simmer 3 minutes. Add cornstarch slurry. Stir until thick (1 minute).
    3. Reserve half the sauce for serving. Use the other half for basting.

    Step 2: Prep Skewers

    1. Cut chicken into 1-inch chunks. Thread onto skewers (metal or soaked bamboo).

    Step 3: Grill or Broil

    1. Grill: Medium-high heat. Cook 3-4 minutes per side, basting with sauce.
    2. Broiler: Place skewers on foil-lined tray. Broil 4 minutes, flip and baste, broil 3 more minutes.

    Step 4: Finish

    1. Brush with reserved sauce. Top with green onions and sesame seeds. Serve with rice.

    Summary

    Prep Time: 10 minutes | Cook Time: 10 minutes | Total Time: 20 minutes

    Yield: 8-10 skewers

    Difficulty: Easy

    Storage Notes

    How to Store:

    • Fridge: Keeps 3-4 days. Reheat in skillet or air fryer (not microwave).
    • Freezer (uncooked, skewered): Freeze on a tray, then bag. Cook from frozen, add 2-3 minutes per side.
    • Freezer (cooked): Up to 2 months. Reheat at 350°F for 10 minutes.

    Pro Tip:

    Use chicken thighs. Breasts work, but thighs stay juicy even if you overcook them slightly. Also, reserve half the sauce—using raw basting sauce that touched chicken is a no-go.

  • Stuffed Portobello Mushrooms (So Meaty, You Won’t Miss the Meat)

    Stuffed Portobello Mushrooms (So Meaty, You Won’t Miss the Meat)

    Portobello mushrooms are nature’s burger buns, pizza crusts, and now—stuffing vessels. This recipe takes the meaty, umami-rich caps and fills them with a simple mix of cheese, garlic, and breadcrumbs. It’s vegetarian comfort food that actually satisfies. Twenty minutes, one pan, zero regrets.

    Ingredients

    Serves 4 as a main, 8 as a side.

    • 4 large portobello mushrooms, stems removed
    • 2 tablespoons olive oil, divided
    • 3 cloves garlic, minced
    • ½ cup breadcrumbs (panko preferred)
    • ½ cup grated Parmesan cheese
    • ½ cup shredded mozzarella cheese
    • 2 tablespoons fresh parsley, chopped
    • Salt and black pepper

    Step-by-Step Instructions

    Step 1: Prep the Mushrooms

    1. Preheat oven to 400°F (200°C).
    2. Gently wipe mushrooms clean with a damp paper towel. Don’t rinse them—they soak up water like sponges.
    3. Remove stems (save for another use or chop into the filling).
    4. Using a spoon, scrape out the dark gills if desired (optional, but prevents dark liquid).

    Step 2: Roast the Caps

    1. Brush mushroom caps with 1 tablespoon olive oil inside and out.
    2. Place gill-side up on a baking sheet. Sprinkle with salt and pepper.
    3. Roast for 5 minutes to release moisture.

    Step 3: Make the Filling

    1. In a bowl, combine breadcrumbs, Parmesan, mozzarella, garlic, parsley, remaining olive oil, and a pinch of pepper.
    2. Mix until crumbs are evenly moistened.

    Step 4: Stuff and Bake

    1. Remove mushrooms from oven. Pour out any liquid collected in the caps.
    2. Divide filling evenly among the four caps, pressing gently.
    3. Bake for 10-12 minutes until tops are golden and mushrooms are tender.

    Step 5: Serve Hot

    1. Let rest for 2 minutes. Garnish with extra parsley.
    2. Serve as a main with a side salad or as a hearty appetizer.

    Summary

    Prep Time: 8 minutes | Cook Time: 17 minutes | Total Time: 25 minutes

    Yield: 4 main or 8 side servings

    Difficulty: Easy

    Storage Notes

    Store leftovers in an airtight container for up to 3 days. Reheat in a 375°F oven for 5-7 minutes (microwave makes them soggy). These are not freezer-friendly—the mushrooms become watery when thawed.

  • Pain au Chocolat (French Pastry That’s Easier Than You Think)

    Pain au Chocolat (French Pastry That’s Easier Than You Think)

    Pain au chocolat. Chocolate croissant. Call it whatever. It’s buttery, flaky, chocolatey heaven.

    The secret? You don’t need to laminate dough for days. Store-bought puff pastry does the heavy lifting. Roll. Cut. Bake. Boom. French bakery vibes, zero airfare.

    Ingredients

    Makes 8 pastries.

    • 2 sheets frozen puff pastry, thawed
    • 16 dark chocolate batons or 4 oz (115g) dark chocolate, cut into 16 sticks
    • 1 egg, beaten (for egg wash)
    • 1 tablespoon milk (optional, for egg wash)
    • Optional: Powdered sugar for dusting

    Step-by-Step Instructions

    Step 1: Prep

    1. Preheat oven to 400°F (200°C). Line a baking sheet with parchment.
    2. Unfold puff pastry sheets. Cut each sheet into 4 rectangles (8 total).

    Step 2: Fill

    1. Place 2 chocolate sticks near one short edge of each rectangle.
    2. Roll tightly away from you, enclosing the chocolate.
    3. Place seam-side down on the baking sheet.

    Step 3: Egg Wash and Bake

    1. Mix egg with milk. Brush generously over each pastry.
    2. Bake for 15-18 minutes until puffed, golden, and flaky.

    Step 4: Cool (If You Can Wait)

    1. Let cool 5 minutes on a wire rack. Dust with powdered sugar if feeling fancy.
    2. Eat warm. Chocolate should be melty. Napkins required.

    Summary

    Prep Time: 10 minutes | Cook Time: 18 minutes | Total Time: 28 minutes

    Yield: 8 pastries

    Difficulty: Super Easy

    Storage Notes

    Best eaten fresh and warm. But leftovers keep in an airtight container for 2 days.

    Reheat: Air fryer at 350°F for 3 minutes or oven at 375°F for 5 minutes. Microwave kills the flakiness.

    Freeze (unbaked): Assemble pastries, freeze on a tray, then bag. Bake from frozen at 400°F for 20-22 minutes.

  • Puff Pastry Cinnamon Twists (Lazy Person’s Cinnamon Roll)

    Puff Pastry Cinnamon Twists (Lazy Person’s Cinnamon Roll)

    Love cinnamon rolls? Hate waiting for dough to rise?

    Meet puff pastry cinnamon twists. All the buttery, cinnamon-sugar magic. None of the yeast, kneading, or patience. Twenty minutes from frozen to face. You’re welcome.

    Ingredients

    Makes 8-10 twists.

    • 1 sheet frozen puff pastry, thawed
    • ¼ cup (55g) unsalted butter, melted
    • ½ cup (100g) brown sugar or granulated sugar
    • 1 tablespoon cinnamon
    • 1 egg, beaten (for egg wash)

    For the Glaze (Optional but Recommended):

    • ½ cup (60g) powdered sugar
    • 1-2 tablespoons milk
    • ¼ teaspoon vanilla extract

    Step-by-Step Instructions

    Step 1: Prep

    1. Preheat oven to 400°F (200°C). Line a baking sheet with parchment.
    2. Mix sugar and cinnamon in a small bowl.

    Step 2: Assemble

    1. Unroll puff pastry on a lightly floured surface.
    2. Brush with melted butter. Sprinkle cinnamon sugar evenly over the whole sheet.
    3. Fold the pastry in half (like closing a book). Press gently.

    Step 3: Cut and Twist

    1. Cut into 8-10 strips (about 1 inch wide).
    2. Twist each strip 3-4 times. Place on baking sheet.
    3. Brush tops with beaten egg (makes them shiny).

    Step 4: Bake and Glaze

    1. Bake for 12-15 minutes until golden brown and puffed.
    2. While warm, whisk powdered sugar, milk, and vanilla into a drizzle.
    3. Drizzle glaze over twists. Eat immediately. Try not to eat all eight.

    Summary

    Prep Time: 8 minutes | Cook Time: 12 minutes | Total Time: 20 minutes

    Yield: 8-10 twists

    Difficulty: Super Easy

    Storage Notes

    Best day-of. But leftovers keep in an airtight container for 2 days.

    Reheat: Air fryer at 350°F for 2-3 minutes or toaster oven. Microwave makes them sad and chewy.

    Freeze (unbaked): Assemble and twist, freeze on a tray, then bag. Bake from frozen at 400°F for 15-18 minutes.

  • Maple Pecan Rolls (Sticky, Nutty, Absolutely Dangerous)

    Maple Pecan Rolls (Sticky, Nutty, Absolutely Dangerous)

    Cinnamon rolls are great. Maple pecan rolls are next-level.

    Pillowy dough. Buttery brown sugar filling. Toasted pecans. A maple glaze that soaks into every swirl. They’re sticky, nutty, and absolutely dangerous. Make them for a holiday morning or a random Tuesday. No judgment.

    Ingredients

    Makes 9-12 rolls.

    For the Dough (Quick or Overnight):

    • 3 cups (375g) all-purpose flour
    • ¼ cup (50g) sugar
    • 2¼ teaspoons instant yeast (one packet)
    • ½ teaspoon salt
    • ½ cup (120ml) warm milk
    • ¼ cup (60ml) warm water
    • ¼ cup (55g) unsalted butter, melted
    • 1 egg

    For the Filling:

    • ½ cup (115g) unsalted butter, softened
    • ¾ cup (150g) brown sugar, packed
    • 1 tablespoon cinnamon
    • 1 cup (120g) pecans, chopped and toasted

    For the Maple Glaze:

    • 1 cup (120g) powdered sugar
    • ¼ cup (60ml) pure maple syrup
    • 2 tablespoons milk or cream
    • 1 teaspoon vanilla extract

    Step-by-Step Instructions

    Step 1: Make the Dough

    1. Mix flour, sugar, yeast, and salt. Add warm milk, water, melted butter, and egg. Knead 8-10 minutes until smooth.
    2. Let rise 1 hour until doubled. (Or refrigerate overnight for better flavor.)

    Step 2: Roll and Fill

    1. Roll dough into a 12×18-inch rectangle. Spread softened butter over dough.
    2. Sprinkle brown sugar, cinnamon, and chopped pecans evenly.
    3. Roll tightly from the long side. Slice into 9-12 rolls.

    Step 3: Second Rise and Bake

    1. Place rolls in a greased 9×13-inch pan. Cover and rise 30-45 minutes.
    2. Preheat oven to 350°F (175°C). Bake 20-25 minutes until golden brown.

    Step 4: Glaze and Devour

    1. Whisk powdered sugar, maple syrup, milk, and vanilla until smooth.
    2. Pour warm glaze over warm rolls. Let it soak in for 5 minutes.
    3. Serve with extra pecans on top. Lick the pan. No one’s watching.

    Summary

    Prep Time: 20 minutes | Rise Time: 1.5 – 12 hours | Bake Time: 25 minutes | Total Time: ~2 – 13 hours

    Yield: 9-12 rolls

    Difficulty: Easy

    Storage Notes

    Counter: Store covered for 2-3 days. Microwave 10 seconds to revive.

    Freezer: Freeze baked (unglazed) rolls for up to 3 months. Thaw, warm, then add glaze.

    Overnight hack: Assemble rolls the night before. Refrigerate after step 3 (second rise). In the morning, let sit 30 minutes, then bake.