Author: user

  • Chicken Satay: Juicy Skewers with the Best Peanut Sauce Ever

    Chicken Satay: Juicy Skewers with the Best Peanut Sauce Ever

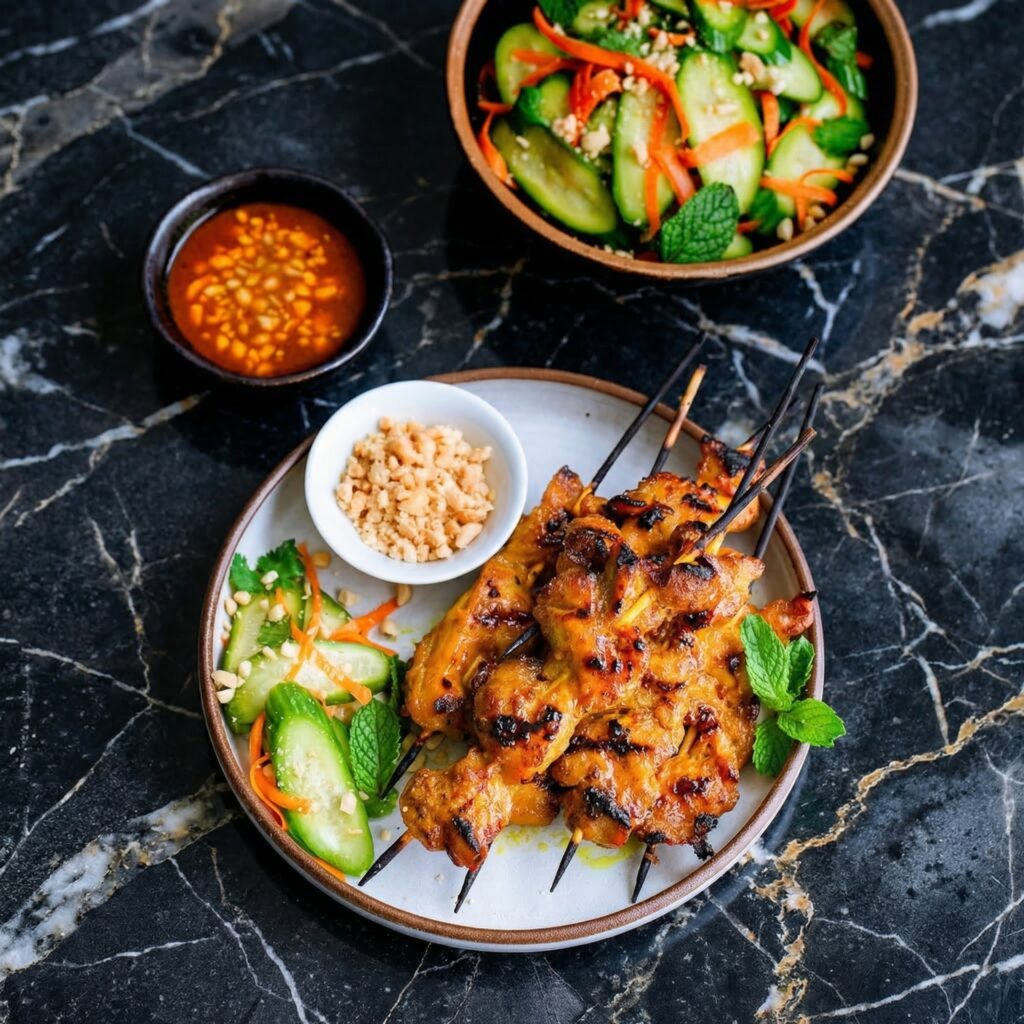
    Chicken satay is the dish that disappears first at every party. Little skewers of juicy, golden-charred chicken, marinated in all the good stuff—turmeric, coconut milk, lemongrass—and served with a peanut sauce so good you’ll want to drink it.

    The magic is in the marinade. It tenderizes the chicken, infuses it with warm spices, and helps it get those beautiful grill marks. Then comes the dipping sauce: creamy, slightly spicy, a little sweet, with a hit of lime to brighten everything up. Fire up the grill (or a grill pan) and get ready to be the most popular person at the table.

    Ingredients

    Serves 4 as an appetizer, 2 as a main.

    For the Chicken:

    • 1.5 lbs boneless, skinless chicken thighs (or breasts, but thighs are juicier)
    • 2 tbsp soy sauce
    • 2 tbsp fish sauce
    • 2 tbsp brown sugar
    • ½ cup coconut milk
    • 1 tbsp turmeric
    • 1 tbsp curry powder
    • 2 cloves garlic, minced
    • 1 stalk lemongrass, tender inner part only, finely minced (or 2 tbsp frozen lemongrass paste)
    • Wooden skewers, soaked in water for 30 minutes

    For the Peanut Sauce:

    • ½ cup creamy peanut butter
    • ½ cup coconut milk
    • 2 tbsp red curry paste
    • 2 tbsp brown sugar
    • 1 tbsp soy sauce
    • 1 tbsp lime juice
    • 2 tbsp water (to thin, as needed)

    For Serving:

    • Lime wedges
    • Fresh cilantro
    • Chopped peanuts
    • Cucumber salad (sliced cucumbers, red onion, rice vinegar, sugar, salt)

    Step-by-Step Instructions

    Step 1: Cut and Skewer

    1. Slice chicken thighs lengthwise into long, thin strips (about 1-inch wide). This helps them cook quickly and evenly on skewers.
    2. Thread each strip onto a soaked wooden skewer, weaving back and forth so it stays flat. Don’t pack them too tight—you want air to circulate.

    Step 2: Make the Magic Marinade

    1. In a bowl, whisk together soy sauce, fish sauce, brown sugar, coconut milk, turmeric, curry powder, garlic, and lemongrass.
    2. Place skewers in a dish or zip-top bag and pour the marinade over. Make sure every piece is coated.
    3. Cover and refrigerate for at least 1 hour (overnight is even better).

    Step 3: Whip Up the Peanut Sauce

    1. While chicken marinates, make the sauce. In a small saucepan over medium-low heat, combine peanut butter, coconut milk, red curry paste, brown sugar, and soy sauce.
    2. Whisk until smooth and warm. Add lime juice and thin with water until it’s thick but pourable (like heavy cream).
    3. Taste and adjust—more lime for brightness, more sugar for sweetness, more curry paste for heat. Set aside.

    Step 4: Grill Time

    1. Heat your grill, grill pan, or outdoor grill to medium-high. Brush grates with a little oil to prevent sticking.
    2. Remove skewers from marinade (let excess drip off). Grill for 3-4 minutes per side until the chicken is cooked through and has those gorgeous char marks.
    3. Don’t walk away—chicken thighs cook fast, and you want juicy, not dry.

    Step 5: Rest and Serve

    1. Transfer skewers to a plate and let them rest for 5 minutes. This keeps them juicy.
    2. Arrange on a platter with a bowl of warm peanut sauce for dipping.
    3. Sprinkle with chopped peanuts and fresh cilantro. Serve with lime wedges and cucumber salad on the side.
    4. Watch people grab three skewers at once. It’s fine. Make more next time.

    Summary

    Prep Time: 20 minutes (plus marinating) | Cook Time: 8 minutes | Total Time: 1.5 hours (mostly hands-off)

    Yield: 8-10 skewers

    Difficulty: Easy enough for a BBQ

    Storage Notes

    Leftovers:

    Store cooked skewers in an airtight container in the fridge for up to 3 days. Keep peanut sauce separate—it thickens when chilled.

    Reheating:

    Skillet or grill pan over medium heat for 2-3 minutes per side brings back the char and warmth. Microwave works but loses the texture. Peanut sauce can be gently reheated with a splash of water or coconut milk to thin it out.

    Make Ahead:

    Marinate chicken up to 24 hours in advance. Peanut sauce keeps in the fridge for a week—great for veggies, spring rolls, or just eating with a spoon.

    Freezer-Friendly:

    Freeze uncooked marinated skewers for up to 3 months. Thaw overnight in the fridge and grill as directed. You’re always 20 minutes away from satay night.

  • Gyudon (Japanese Beef Bowl)

    Gyudon (Japanese Beef Bowl)

    There are some meals that feel like a warm hug in a bowl. Gyudon is exactly that. It’s the kind of thing you crave on a cold evening or a busy weeknight when you need something satisfying fast. Thinly shaved beef, sweet onions, and a deeply savory sauce all mingling together over a bed of fluffy rice.

    In Japan, it’s the ultimate fast food—chains like Yoshinoya built empires on this bowl. But homemade gyudon? It’s even better. You control the sauce, the ratio of beef to onions, and exactly how much of that broth you want to soak into your rice. Twenty minutes, one pan, and dinner is served.

    Ingredients

    Serves 2 hungry humans.

    For the Bowl:

    • 1 lb thinly sliced beef (ribeye, sirloin, or shaved beef—freeze for 30 minutes to slice easier)
    • 1 large yellow or white onion, thinly sliced
    • 2 cups cooked Japanese short-grain rice (warm, for serving)
    • 2 green onions, sliced (for garnish)
    • Pickled red ginger (beni shoga or gari), for serving
    • Optional: Toasted sesame seeds, nori strips

    For the Sauce:

    • ½ cup dashi (or ½ cup water + ½ tsp dashi powder)
    • 3 tbsp soy sauce
    • 2 tbsp mirin
    • 1 tbsp sake (or dry white wine)
    • 1 tbsp sugar

    Step-by-Step Instructions

    Step 1: Prep Your Beef

    1. If your beef isn’t pre-shaved, pop it in the freezer for 30-60 minutes. A partially frozen piece slices much thinner and easier. Aim for paper-thin slices—they’ll cook in seconds and stay tender.

    Step 2: Mix the Sauce

    1. In a small bowl or measuring cup, combine dashi, soy sauce, mirin, sake, and sugar. Stir until the sugar dissolves. Taste it—it should be savory with a hint of sweetness.

    Step 3: Simmer the Onions

    1. Pour the sauce into a medium skillet or pan. Add the sliced onions in a single layer.
    2. Bring to a simmer over medium heat and cook for 3-4 minutes until the onions start to soften and become translucent.

    Step 4: Add the Beef

    1. Spread the beef slices over the onions, separating them so they cook evenly. Don’t stir too much at first—let the beef sit in the simmering liquid to cook through.
    2. Cook for 2-3 minutes until the beef is no longer pink. Use chopsticks or tongs to gently turn and separate the slices. Simmer another minute or two—the sauce will reduce slightly and coat everything beautifully.

    Step 5: Rest (Yes, Really)

    1. Turn off the heat and let everything sit for 2-3 minutes. This allows the flavors to meld and the beef to soak up all that goodness.

    Step 6: Assemble Your Bowl

    1. Scoop warm rice into two deep bowls. Spoon the beef and onion mixture over the top, letting some of that precious sauce cascade down into the rice.
    2. Garnish with green onions, sesame seeds, and a small pile of pickled red ginger on the side. The ginger cuts through the richness and adds a bright, tangy pop.

    Step 7: Slurp and Smile

    1. Mix everything together so the rice gets coated in that savory sauce. Take a big bite. Close your eyes. You’re in a cozy Tokyo diner now.

    Summary

    Prep Time: 5 minutes | Cook Time: 15 minutes | Total Time: 20 minutes

    Yield: 2 servings

    Difficulty: Weeknight hero

    Storage Notes

    Leftovers:

    Store beef and onions in an airtight container in the fridge for up to 3 days. Keep rice separate to avoid sogginess.

    Reheating:

    Gently reheat the beef mixture in a small pan with a splash of water or dashi to refresh the sauce. Microwave works, but stovetop brings back the texture.

    Make It Ahead:

    You can double the batch and freeze the beef mixture (without rice) for up to 2 months. Thaw overnight in the fridge, reheat, and make fresh rice. Instant comfort on demand.

    Pro Tip:

    Top with a soft-poached or onsen egg for the ultimate experience. The runny yolk mixing with the sauce and rice? Perfection.

  • Garlic Butter Lobster Tail: Fancy Dinner, Zero Stress

    Garlic Butter Lobster Tail: Fancy Dinner, Zero Stress

    Lobster tail has this reputation. It’s the fancy thing you order on special occasions, the meal that feels like a celebration. But here’s the secret: it’s one of the easiest things you can make in your own kitchen. Like, embarrassingly easy.

    This version is all about the garlic butter. Lots of it. You’ll slather it on, broil until the meat is tender and the edges are slightly caramelized, and then you’ll have more of that butter for dipping. Serve with a simple salad, some crusty bread, and a bottle of something bubbly. Special occasion or not, you deserve this.

    Ingredients

    Serves 2 (or 1 very happy person).

    For the Lobster:

    • 2 lobster tails (about 5-6 oz each), fresh or frozen and thawed
    • 4 tbsp unsalted butter, melted
    • 3 cloves garlic, minced (or grated on a microplane)
    • 1 tbsp fresh lemon juice
    • 1 tsp lemon zest
    • 1 tbsp fresh parsley, finely chopped
    • ½ tsp paprika (sweet or smoked both work)
    • Salt and pepper, to taste

    For Serving:

    • Lemon wedges
    • Melted butter for dipping (because why not?)
    • Fresh parsley for garnish

    Step-by-Step Instructions

    Step 1: Thaw (If Needed)

    1. If using frozen lobster tails, thaw them overnight in the fridge or place them in a bowl of cold water for 30-60 minutes. Pat dry with paper towels.

    Step 2: Butterfly That Tail

    1. Place a lobster tail on a cutting board, shell-side up. Using sturdy kitchen shears, cut lengthwise down the center of the hard shell, stopping before the tail fin.
    2. Carefully pull the shell apart slightly to expose the meat.
    3. Gently lift the meat up and out of the shell, keeping it attached at the base near the fin. Press the meat on top of the shell. This is called “butterflying” and makes for a gorgeous presentation.
    4. Repeat with the second tail.

    Step 3: Make the Magic Butter

    1. In a small bowl, combine the melted butter, minced garlic, lemon juice, lemon zest, parsley, paprika, and a pinch of salt and pepper. Stir to combine. Try not to drink it.

    Step 4: Slather and Rest

    1. Place the butterflied lobster tails on a baking sheet or in an oven-safe skillet.
    2. Spoon half the garlic butter over the exposed meat, making sure it gets into every crevice. Let them sit at room temperature for 10-15 minutes while you preheat the oven.

    Step 5: Broil to Perfection

    1. Preheat your broiler to high and position a rack about 6-8 inches from the heat source.
    2. Broil the lobster tails for 5-8 minutes, depending on size. The meat should be opaque and firm to the touch, and the edges should be starting to brown and bubble.
    3. Watch closely—lobster goes from perfect to overcooked in seconds. An internal temperature of 140°F is your target.

    Step 6: Butter Bath, Round Two

    1. Remove from the oven and immediately spoon the remaining garlic butter over the hot lobster. The residual heat will melt it into all the right places.
    2. Garnish with fresh parsley and lemon wedges.

    Step 7: Serve and Swoon

    1. Serve immediately with extra melted butter on the side, because you’re not a monster.
    2. Squeeze lemon over everything. Take a photo. Take a bite. Realize you’re now the person who makes lobster at home on a Tuesday.

    Summary

    Prep Time: 10 minutes | Cook Time: 8 minutes | Total Time: 18 minutes

    Yield: 2 servings

    Difficulty: Surprisingly easy

    Storage Notes

    Leftovers (Rare, But Possible):

    Store leftover lobster meat in an airtight container in the fridge for up to 2 days. It’s best enjoyed immediately, but we get it—life happens.

    Reheating:

    The microwave is not your friend here—it turns lobster into rubber. Gently reheat in a buttered skillet over low heat just until warmed through, or enjoy cold on a salad or in lobster rolls the next day.

    Pro Tip:

    Make extra garlic butter. It keeps in the fridge for weeks and makes everything better—steak, veggies, bread, your morning scrambled eggs. You’re welcome.

  • Birria Tacos: The Legendary, Dip-Worthy Slow-Cooked Sensation

    Birria Tacos: The Legendary, Dip-Worthy Slow-Cooked Sensation

    Have you ever taken a bite of something and immediately understood the hype? That’s birria tacos. They’ve taken over menus and social feeds for good reason: tender, shredded beef bathed in a deep, smoky, slightly spicy chile broth, all stuffed into a tortilla that’s been fried in that same liquid gold until crispy. And then? You dip it.

    The consommé on the side isn’t just broth—it’s the soul of the dish. Rich, complex, and meant for dunking. This recipe walks you through the whole process, from simmering the beef to assembling the crispiest tacos. Yes, it takes time. No, you won’t regret a single minute.

    Ingredients

    Serves 6-8 (or 4 very hungry people).

    For the Birria (Beef and Braise):

    • 3 lbs beef chuck or brisket, cut into large chunks
    • 2 lbs beef short ribs (optional, but adds richness)
    • 4 dried guajillo chiles, stems and seeds removed
    • 2 dried ancho chiles, stems and seeds removed
    • 2 dried chiles de árbol (optional, for heat)
    • 1 onion, quartered
    • 5 garlic cloves, peeled
    • 2 tomatoes, quartered
    • 1 tbsp cumin seeds
    • 1 tbsp Mexican oregano
    • 4 whole cloves
    • 1 cinnamon stick
    • 2 bay leaves
    • 4 cups beef broth
    • 2 tbsp apple cider vinegar
    • Salt and pepper, to taste

    For the Tacos:

    • Corn tortillas (white or yellow)
    • 2 cups Oaxaca cheese or mozzarella, shredded
    • 1 white onion, finely chopped
    • Fresh cilantro, chopped
    • Lime wedges

    Step-by-Step Instructions

    Step 1: Prep the Chiles

    1. Toast the dried chiles in a dry skillet over medium heat for 20-30 seconds per side until fragrant. Don’t burn them or they’ll turn bitter.
    2. Place them in a bowl, cover with hot water, and let soak for 20 minutes until softened.

    Step 2: Make the Sauce

    1. In that same skillet, toast the cumin seeds, oregano, and cloves for 1 minute until fragrant.
    2. Transfer soaked chiles, toasted spices, onion, garlic, tomatoes, and 1 cup of the chile soaking water to a blender. Blend until completely smooth.
    3. Strain the sauce through a fine-mesh sieve into a bowl—this ensures a silky consommé later.

    Step 3: Sear the Beef

    1. Season beef chunks generously with salt and pepper. Heat a large Dutch oven over medium-high heat with a splash of oil.
    2. Sear the beef in batches until deeply browned on all sides. Don’t crowd the pan—browning equals flavor.
    3. Remove beef and set aside.

    Step 4: Braise Low and Slow

    1. Pour the chile sauce into the pot, scraping up any browned bits. Add beef broth, apple cider vinegar, bay leaves, and cinnamon stick. Stir to combine.
    2. Return the beef to the pot. Bring to a simmer, then cover and transfer to a 325°F oven (or keep on stovetop over lowest heat).
    3. Cook for 3-4 hours until the beef is fall-apart tender. Check occasionally and add more broth if needed.

    Step 5: Separate Meat and Magic

    1. Remove beef from the pot and shred with two forks. Discard any bones.
    2. Strain the braising liquid—this is your consommé. Skim excess fat, but save some for frying tacos.
    3. Season consommé with salt to taste. Keep warm for dipping.

    Step 6: Assemble the Tacos

    1. Dip each corn tortilla into the reserved fat or consommé (this is the secret to flavor and crispiness).
    2. Place tortilla in a hot skillet over medium heat. Top with shredded cheese, then a generous pile of shredded beef.
    3. Fold in half and press gently. Cook 2-3 minutes per side until crispy and golden, and the cheese is gloriously melted.

    Step 7: Serve with Style

    1. Arrange tacos on a plate with a bowl of warm consommé on the side for dipping.
    2. Top with chopped onion and cilantro. Serve with lime wedges for squeezing.
    3. Dip. Bite. Swoon. Repeat until every last taco and drop of consommé is gone.

    Summary

    Prep Time: 30 minutes | Cook Time: 3-4 hours | Total Time: 4ish hours of patience

    Yield: 12-15 tacos

    Difficulty: Weekend project (worth every second)

    Storage Notes

    Leftovers (If You’re Lucky):

    Store shredded beef and consommé separately in airtight containers in the fridge for up to 5 days. The flavors actually get better overnight.

    Freezer-Friendly:

    Both the shredded beef and consommé freeze beautifully for up to 3 months. Thaw overnight in the fridge before reheating.

    Reheating:

    Warm the consommé on the stovetop. For tacos, reheat the shredded beef in a pan with a splash of consommé, then assemble fresh tortillas. Leftover assembled tacos can be crisped back up in a dry skillet.

    Pro Tip:

    Make a double batch. You’ll thank yourself next month when you’re one pot away from taco heaven.

  • Crispy Spinach Cheese Borek: Flaky, Cheesy, and Utterly Irresistible

    Crispy Spinach Cheese Borek: Flaky, Cheesy, and Utterly Irresistible

    Let me introduce you to borek: the flaky, golden, stuffed pastry that makes everything in life feel a little bit better. This spinach and cheese version is the one you’ll make on repeat. It’s crisp on the outside, warm and gooey on the inside, and absolutely piled high with garlicky spinach and two kinds of cheese.

    The best part? It looks like you spent all day in the kitchen, but store-bought phyllo does the heavy lifting. You just layer, fill, roll (or stack), brush with butter, and bake until golden brown. Whether you serve it for brunch, as an appetizer, or with a side salad for a light dinner, this borek is pure magic.

    Ingredients

    Serves 4-6 as an appetizer, 2-3 as a main.

    For the Filling:

    • 10 oz (300g) frozen spinach, thawed and squeezed absolutely dry
    • 1 cup (200g) feta cheese, crumbled
    • 1 cup (100g) mozzarella cheese, shredded (or use halloumi for a saltier bite)
    • 1 small onion, finely chopped
    • 2 cloves garlic, minced
    • 2 tbsp olive oil
    • 1 egg, lightly beaten
    • Salt and black pepper to taste (go easy on salt—feta is salty)
    • Fresh dill or parsley, chopped (optional, but brightens everything up)

    For the Assembly:

    • 1 package phyllo dough, thawed (about 12-16 sheets)
    • ½ cup (1 stick) unsalted butter, melted
    • ¼ cup olive oil (mixed with butter for easier brushing)
    • Sesame seeds and nigella seeds (optional, for topping)

    Step-by-Step Instructions

    Step 1: Squeeze That Spinach

    1. Thaw your frozen spinach completely, then transfer to a clean kitchen towel. Gather the towel and wring it out over the sink like your life depends on it. Get every last drop of water out—soggy spinach is the enemy of crisp borek.

    Step 2: Make the Filling

    1. Heat olive oil in a small pan over medium heat. Sauté the onion until soft and translucent, about 5 minutes. Add garlic and cook another minute until fragrant. Let cool slightly.
    2. In a bowl, combine the squeezed spinach, sautéed onion and garlic, feta, mozzarella, beaten egg, and fresh herbs if using. Mix well. Season with pepper (and salt only if needed).

    Step 3: Phyllo Prep 101

    1. Preheat your oven to 375°F (190°C).
    2. Combine melted butter and olive oil in a small bowl. This mixture brushes more easily than butter alone.
    3. Unroll your phyllo dough and cover it with a slightly damp kitchen towel. Phyllo dries out in seconds and becomes brittle—keep it covered while you work.

    Step 4: Layer and Fill (Two Ways)

    1. For a rolled borek: Place one sheet of phyllo on your work surface. Brush with butter mixture. Top with another sheet, brush again. Repeat for 4-5 layers. Spoon filling along one long edge, roll tightly, and curl into a spiral or coil in your baking dish.
    2. For a stacked borek (easier!): Brush a baking dish with butter. Lay one sheet of phyllo in the dish, letting edges hang over. Brush with butter. Repeat with 4-5 sheets, brushing each layer. Spread filling evenly over the top. Fold the overhanging edges inward, then layer 4-5 more buttered sheets on top, tucking in edges.

    Step 5: Score and Seed

    1. Brush the top generously with the butter mixture.
    2. Using a sharp knife, score the top layers into serving pieces (don’t cut all the way through if stacking).
    3. Sprinkle with sesame seeds and nigella seeds if using—they add amazing texture and flavor.

    Step 6: Bake to Golden Glory

    1. Bake for 35-45 minutes until the top is deeply golden brown and crisp. If it’s browning too fast, tent loosely with foil.
    2. Let it rest for at least 10 minutes before cutting. This is crucial—the filling sets and you won’t burn your mouth.
    3. Serve warm or at room temperature with a squeeze of lemon and maybe some yogurt on the side. Watch people fight over the last piece.

    Summary

    Prep Time: 20 minutes | Cook Time: 40 minutes | Total Time: 1 hour

    Yield: 4-6 appetizer servings

    Difficulty: Easier than it looks

    Storage Notes

    Leftovers:

    Store in an airtight container in the fridge for up to 4 days. The phyllo will soften slightly, but reheating brings back the crunch.

    Reheating:

    Pop it back in a 350°F oven for 5-10 minutes until crisp again. The microwave works but makes the phyllo sad and chewy—avoid if possible.

    Freezer-Friendly:

    You can freeze baked borek! Let it cool completely, wrap tightly in foil, and freeze for up to 3 months. Reheat from frozen in a 350°F oven until warmed through and crisp. You can also freeze unbaked assembled borek—just add 10-15 minutes to the bake time.

  • Layered Comfort: How to Make the Perfect Homemade Lasagna

    Layered Comfort: How to Make the Perfect Homemade Lasagna

    Few dishes capture the feeling of comfort and tradition quite like a classic homemade lasagna.

    With layers of tender pasta, rich meat sauce, creamy cheese, and bubbling melted mozzarella, lasagna is the ultimate crowd-pleasing meal. It’s hearty, satisfying, and perfect for family dinners, holidays, or special gatherings.

    Although lasagna may look complicated, it’s actually quite simple once you break the process into steps.

    The key is building flavorful layers and allowing the dish to bake slowly so everything melds together beautifully. When done right, the result is a bubbling, golden masterpiece that fills the kitchen with irresistible aroma.

    In this step-by-step guide, you’ll learn how to make delicious homemade lasagna from scratch, complete with tips for achieving perfect layers and rich flavor every time.


    Why Lasagna Is So Loved

    Lasagna is one of the most iconic Italian dishes, known for its comforting layers and deep flavor. What makes it special is the balance between three main elements: pasta, sauce, and cheese.

    The pasta provides structure, the sauce delivers rich savory flavor, and the cheese adds creamy richness. When baked together, these ingredients transform into a dish that is far more than the sum of its parts.

    Lasagna is also incredibly versatile. While the classic version uses meat sauce and ricotta, it can easily be adapted with vegetables, different cheeses, or even seafood.


    Ingredients

    To make a classic 9×13-inch pan of lasagna, you will need:

    For the meat sauce:

    • 1 pound ground beef
    • ½ pound Italian sausage (optional but recommended)
    • 1 small onion, diced
    • 3 cloves garlic, minced
    • 1 jar (24 ounces) marinara sauce
    • 1 can (14 ounces) crushed tomatoes
    • 1 teaspoon dried oregano
    • 1 teaspoon dried basil
    • Salt and black pepper to taste

    For the cheese mixture:

    • 15 ounces ricotta cheese
    • 1 large egg
    • ½ cup grated Parmesan cheese
    • 2 tablespoons chopped fresh parsley (optional)

    Other ingredients:

    • 12 lasagna noodles
    • 2 cups shredded mozzarella cheese

    Step 1: Cook the Lasagna Noodles

    Bring a large pot of salted water to a boil.

    Add the lasagna noodles and cook them according to the package instructions until al dente. They should be tender but still firm enough to hold their shape.

    Drain the noodles and lay them flat on a baking sheet or parchment paper to prevent sticking.


    Step 2: Prepare the Meat Sauce

    Heat a large skillet over medium heat.

    Add the ground beef and Italian sausage, breaking them apart with a spoon as they cook. Cook until browned and no longer pink.

    Add the diced onion and cook for about 3–4 minutes until softened. Then stir in the minced garlic and cook for another minute.


    Step 3: Build the Sauce Flavor

    Pour the marinara sauce and crushed tomatoes into the skillet with the cooked meat.

    Add oregano, basil, salt, and black pepper. Stir everything together and let the sauce simmer for 10–15 minutes.

    This simmering time allows the flavors to blend and develop a deeper, richer taste.


    Step 4: Prepare the Ricotta Mixture

    In a medium bowl, combine the ricotta cheese, egg, Parmesan cheese, and chopped parsley.

    Mix until smooth and evenly combined.

    This creamy mixture adds richness and helps create the signature layered texture of lasagna.


    Step 5: Preheat the Oven

    Preheat your oven to 375°F (190°C).

    Lightly grease a 9×13-inch baking dish with cooking spray or a small amount of olive oil.


    Step 6: Start the First Layer

    Spread a thin layer of meat sauce across the bottom of the baking dish.

    This prevents the noodles from sticking and helps distribute flavor throughout the dish.

    Place three or four lasagna noodles on top of the sauce to create the first pasta layer.


    Step 7: Add Cheese and Sauce

    Spread about one-third of the ricotta mixture over the noodles.

    Next, add a layer of meat sauce, spreading it evenly.

    Sprinkle a handful of shredded mozzarella cheese over the sauce.


    Step 8: Repeat the Layers

    Repeat the layering process two more times.

    Each layer should include noodles, ricotta mixture, meat sauce, and mozzarella cheese.

    Try to spread each layer evenly so the lasagna cooks uniformly.


    Step 9: Finish with Cheese

    For the final layer, place the last noodles on top and cover them with the remaining meat sauce.

    Finish by sprinkling the remaining mozzarella cheese across the surface.

    This top layer of cheese will melt and turn golden during baking.


    Step 10: Bake the Lasagna

    Cover the baking dish with aluminum foil and place it in the oven.

    Bake for 25 minutes, then remove the foil and bake for another 15–20 minutes until the cheese is melted and bubbly.

    The top should be lightly golden and the edges should be gently bubbling.


    Step 11: Let It Rest

    Once baked, remove the lasagna from the oven and allow it to rest for 10–15 minutes.

    This step is important because it helps the layers set, making the lasagna easier to slice and serve.


    Step 12: Slice and Serve

    Cut the lasagna into squares using a sharp knife or spatula.

    Serve it warm and garnish with extra Parmesan cheese or fresh basil if desired.

    Each slice should reveal beautiful layers of pasta, sauce, and melted cheese.


    Tips for Perfect Lasagna

    Don’t overcook the noodles. Slightly firm noodles hold up better during baking.

    Let the sauce simmer. This step builds flavor and improves texture.

    Allow resting time. Resting prevents the lasagna from falling apart when sliced.

    Use good-quality cheese. Freshly grated cheese melts better and tastes richer.


    Serving Suggestions

    Lasagna pairs wonderfully with simple side dishes such as:

    • Garlic bread
    • Caesar salad
    • Roasted vegetables
    • A light green salad with vinaigrette

    These sides balance the richness of the dish and create a complete meal.


    Final Thoughts

    Homemade lasagna is one of the most comforting and satisfying meals you can prepare. With its rich layers of pasta, savory meat sauce, and creamy cheese, it’s a dish that brings people together around the table.

    While it takes a little time to assemble, the process is simple and the results are always worth it. Once you master this classic recipe, you’ll have a timeless dish that’s perfect for family dinners, celebrations, and leftovers that taste even better the next day.

    Serve it hot, enjoy every cheesy bite, and experience the warmth of a truly classic comfort food.

  • Classic Vanilla Pound Cake

    Classic Vanilla Pound Cake

    A great vanilla pound cake is a thing of simple beauty. It doesn’t need fancy frosting or complicated decorations. It stands proudly on its own—a tall, golden loaf with a crackly top, a tender, dense crumb, and the unmistakable flavor of real butter and vanilla.

    This is that pound cake. The one your grandmother might have made, the one that disappears slice by slice from the kitchen counter, the one that’s just as good for breakfast with coffee as it is for dessert with berries and whipped cream.

    Made with the classic pound cake ratio (a pound each of butter, sugar, eggs, and flour), this recipe delivers the perfect texture every time. Let’s bake a timeless classic.

    Ingredients

    Makes one 9×5 inch loaf cake (10-12 servings) or one 10-cup bundt cake.

    For the Vanilla Pound Cake:

    • 2 cups (250g) all-purpose flour
    • ½ teaspoon baking powder
    • ¼ teaspoon baking soda
    • ½ teaspoon salt
    • 1 cup (225g) unsalted butter, softened
    • 1 ½ cups (300g) granulated sugar
    • 4 large eggs, at room temperature
    • 2 tablespoons vanilla extract (yes, tablespoons!)
    • ½ cup (120g) sour cream or plain Greek yogurt, at room temperature

    For the Vanilla Glaze (Optional):

    • 1 cup (120g) powdered sugar, sifted
    • 2-3 tablespoons milk or cream
    • 1 teaspoon vanilla extract

    Step-by-Step Instructions

    1. Preheat and Prepare:

    1. Preheat your oven to 325°F (160°C). Grease a 9×5 inch loaf pan thoroughly, then dust with flour, tapping out the excess. If using a bundt pan, grease and flour every crevice well. Alternatively, line the loaf pan with parchment paper, leaving overhang on the long sides for easy removal.

    2. Combine Dry Ingredients:

    1. In a medium bowl, whisk together the flour, baking powder, baking soda, and salt. Set aside.

    3. Cream Butter and Sugar:

    1. In a large bowl, beat the softened butter with an electric mixer on medium speed until creamy, about 1 minute.
    2. Gradually add the sugar and continue beating until light, fluffy, and pale in color, about 3-5 minutes. This step is crucial—scrape down the sides and bottom of the bowl several times. Proper creaming creates the tender crumb pound cake is known for.

    4. Add Eggs and Vanilla:

    1. Add the eggs one at a time, beating well after each addition and scraping down the bowl as needed. The mixture should be smooth, glossy, and look like soft mayonnaise.
    2. Beat in the vanilla extract. Yes, 2 tablespoons—this is the secret to an intensely vanilla-flavored cake!

    5. Alternate Dry and Wet:

    1. With the mixer on low speed, add half of the flour mixture, mixing until just combined.
    2. Add all of the sour cream, mixing until just combined.
    3. Add the remaining flour mixture and mix until just combined and no streaks of flour remain. Do not overmix. Scrape the bottom of the bowl with a spatula to ensure everything is incorporated.
    4. The batter will be thick and luxurious.

    6. Bake:

    1. Pour the batter into the prepared pan and spread it evenly. Tap the pan gently on the counter a few times to release any air bubbles.
    2. Bake for 65-75 minutes for a loaf pan, or 50-60 minutes for a bundt pan, until a toothpick inserted into the center comes out clean or with a few moist crumbs.
    3. If the top is browning too quickly, tent loosely with foil for the last 15-20 minutes of baking.
    4. Let the cake cool in the pan for 15-20 minutes, then carefully turn it out onto a wire rack to cool completely.

    7. Add Glaze (Optional):

    1. If making the glaze, whisk together the sifted powdered sugar, 2 tablespoons milk, and vanilla extract until smooth. Add more milk a teaspoon at a time until you reach a thick but pourable consistency.
    2. Drizzle over the cooled cake and let set before slicing.

    8. Serve:

    1. Slice and serve at room temperature. This cake is perfect on its own, toasted with butter, or served with fresh berries and whipped cream.

    Summary

    Prep Time: 20 minutes | Bake Time: 65-75 minutes (loaf) or 50-60 minutes (bundt) | Cooling Time: 30 minutes | Total Time: 2 hours

    Yield: One 9×5 inch loaf (10-12 servings) or one 10-cup bundt cake

    Difficulty: Easy to Intermediate

    Storage and Make-Ahead Tips

    How to Store:

    Store vanilla pound cake tightly wrapped in plastic wrap or in an airtight container at room temperature for up to 5 days. The flavor actually improves after a day or two! If glazed, store in a single layer to prevent the glaze from sticking.

    Can You Freeze Pound Cake?

    Absolutely! Pound cake freezes beautifully. Wrap the cooled cake tightly in plastic wrap, then in foil, and place in a freezer bag. Freeze for up to 3 months. Thaw at room temperature. Add glaze after thawing if desired.

    Freezing Slices:

    Slice the cake and wrap individual slices in plastic wrap, then place in a freezer bag. This way you can grab just one slice at a time. Toast frozen slices directly from the freezer!

    Make-Ahead for Parties:

    This cake is perfect for making ahead. Bake it 1-2 days before your event, store at room temperature, and add glaze the day of serving if using.

    Toasted Pound Cake:

    Leftover pound cake is amazing toasted. Slice, butter lightly if desired, and toast in a skillet or toaster until golden. Serve with jam or honey.

  • Perfect Lemon Bars (Tangy, Creamy & Irresistible)

    Perfect Lemon Bars (Tangy, Creamy & Irresistible)

    There are desserts that satisfy a chocolate craving, and then there are desserts that make you feel like you’re sitting in a sunbeam. Lemon bars fall firmly into the second category—bright, tangy, and impossibly cheerful, they’re the perfect pick-me-up any time of year.

    These classic lemon bars start with a buttery shortbread crust that’s sturdy enough to hold the filling but tender enough to melt in your mouth. On top sits a silky, creamy lemon layer that strikes the perfect balance between sweet and tangy.

    A final dusting of powdered sugar just before serving makes them as beautiful as they are delicious. Whether you’re making them for a spring brunch, a summer picnic, or just because you need a little sunshine, these lemon bars never disappoint.

    Ingredients

    Yields 16 bars (9×13 inch pan) or 12 bars (8×8 inch pan).

    For the Shortbread Crust:

    • 2 cups (250g) all-purpose flour
    • ½ cup (100g) granulated sugar
    • ¼ teaspoon salt
    • 1 cup (225g) unsalted butter, cold and cut into small cubes
    • 1 teaspoon vanilla extract (optional)

    For the Lemon Filling:

    • 4 large eggs, at room temperature
    • 1 ½ cups (300g) granulated sugar
    • 3 tablespoons all-purpose flour
    • ½ teaspoon salt
    • ¾ cup (180ml) fresh lemon juice (about 4-6 lemons)
    • 2 tablespoons lemon zest (about 2-3 lemons)
    • ¼ cup (60ml) milk or heavy cream

    For Finishing:

    • Powdered sugar, for dusting

    Step-by-Step Instructions

    1. Preheat and Prepare:

    1. Preheat your oven to 350°F (175°C). Line a 9×13 inch baking pan (or 8×8 inch for thicker bars) with parchment paper, leaving overhang on all sides for easy removal. Lightly grease the parchment.

    2. Make the Shortbread Crust:

    1. In a medium bowl, whisk together the flour, sugar, and salt.
    2. Add the cold butter cubes and vanilla extract (if using). Cut the butter into the flour using a pastry blender, two forks, or your fingertips until the mixture resembles coarse meal with some pea-sized butter pieces remaining.
    3. Press the mixture firmly and evenly into the bottom of the prepared pan. Use the bottom of a measuring cup or glass to press it down firmly—this ensures the crust holds together after baking.
    4. Bake for 18-20 minutes, until the edges are lightly golden. Remove from oven and set aside. Leave the oven on.

    3. Make the Lemon Filling:

    1. While the crust bakes, prepare the filling. In a large bowl, whisk the eggs until lightly beaten.
    2. Add the sugar, flour, and salt, and whisk until smooth and well combined.
    3. Add the lemon juice, lemon zest, and milk (or cream). Whisk until everything is fully incorporated. The mixture will be thin—that’s normal.

    4. Assemble and Bake:

    1. Pour the lemon filling over the warm crust (it’s important that the crust is still warm).
    2. Carefully return the pan to the oven and bake for 20-25 minutes (for 9×13 pan) or 25-30 minutes (for 8×8 pan), until the filling is set around the edges but still slightly jiggly in the very center. It should no longer be liquid.
    3. Remove from the oven and let cool completely at room temperature.
    4. Once cool, refrigerate for at least 2 hours, preferably 3-4 hours, until thoroughly chilled and firm. This makes for clean slicing.

    5. Slice and Serve:

    1. Use the parchment overhang to lift the entire block of lemon bars onto a cutting board.
    2. Dust generously with powdered sugar just before serving (if you dust too early, the sugar will absorb into the bars).
    3. Slice into squares with a sharp knife, wiping the blade clean between cuts for neat edges.
    4. Serve chilled or at room temperature. Store leftovers in the refrigerator.

    Summary

    Prep Time: 20 minutes | Bake Time: 40-45 minutes (total) | Chill Time: 2-3 hours | Total Time: About 3.5 hours (mostly hands-off)

    Yield: 16 bars (9×13 pan) or 12 bars (8×8 pan)

    Difficulty: Easy

    Storage and Make-Ahead Tips

    How to Store:

    Store lemon bars in an airtight container in the refrigerator for up to 5 days. Place parchment paper between layers to prevent sticking. They’re delicious cold or at room temperature.

    Can You Freeze Lemon Bars?

    Yes! Lemon bars freeze beautifully. Freeze them without the powdered sugar dusting. Place the bars in a single layer on a baking sheet and freeze until solid, then transfer to a freezer-safe container with parchment between layers. Freeze for up to 3 months. Thaw in the refrigerator overnight and dust with powdered sugar before serving.

    Make-Ahead for Parties:

    Lemon bars are perfect for making ahead. Prepare them 1-2 days in advance, keep refrigerated, and dust with powdered sugar just before serving. The flavors actually meld and deepen over time.

    Freezing the Crust:

    You can press the unbaked crust into the pan, wrap tightly, and freeze for up to 3 months. Bake directly from frozen, adding a few minutes to the baking time.

  • Banana Nut Muffins

    Banana Nut Muffins

    You know those bananas sitting on your counter, getting browner and spottier by the day? They’re not a problem—they’re an opportunity. And these banana nut muffins are the best way to seize it.

    These muffins are everything you want in a banana baked good: incredibly moist, deeply flavorful, and just sweet enough. The addition of toasted walnuts adds a wonderful crunch and nutty depth that perfectly complements the sweet banana.

    They’re like banana bread’s portable, portion-controlled cousin, with slightly crisp edges and tender, domed tops. Whether you’re packing lunches, hosting a brunch, or just treating yourself, these muffins deliver pure comfort in every bite.

    Ingredients

    Yields 12 standard muffins or 6 jumbo muffins.

    For the Banana Nut Muffins:

    • 1 ¾ cups (220g) all-purpose flour
    • 1 teaspoon baking soda
    • ½ teaspoon baking powder
    • ½ teaspoon salt
    • 1 teaspoon ground cinnamon (optional, but recommended)
    • ½ cup (115g) unsalted butter, softened
    • ¾ cup (150g) granulated sugar
    • ¼ cup (50g) light brown sugar, packed
    • 2 large eggs, at room temperature
    • 2 teaspoons vanilla extract
    • 3 medium very ripe bananas, mashed (about 1 ½ cups)
    • ¼ cup (60g) sour cream or plain Greek yogurt, at room temperature
    • 1 cup (120g) walnuts, toasted and chopped

    Optional Topping:

    • ¼ cup chopped walnuts
    • 1 tablespoon turbinado sugar for sprinkling

    Step-by-Step Instructions

    1. Preheat and Prepare:

    1. Preheat your oven to 375°F (190°C). Line a 12-cup muffin pan with paper liners or grease the cups thoroughly.

    2. Toast the Walnuts:

    1. Spread the walnuts on a baking sheet and toast in the preheating oven for 5-7 minutes, until fragrant and lightly golden. Watch carefully—they can burn quickly. Remove and set aside to cool. Chop coarsely.

    3. Combine Dry Ingredients:

    1. In a medium bowl, whisk together the flour, baking soda, baking powder, salt, and cinnamon (if using). Set aside.

    4. Cream Butter and Sugars:

    1. In a large bowl, beat the softened butter, granulated sugar, and brown sugar together with an electric mixer until light and fluffy, about 2-3 minutes. Scrape down the sides as needed.

    5. Add Wet Ingredients:

    1. Add the eggs one at a time, beating well after each addition. Scrape down the bowl again.
    2. Beat in the vanilla extract.
    3. Add the mashed bananas and sour cream, and mix until combined. The mixture may look slightly curdled—that’s perfectly normal.

    6. Combine Wet and Dry:

    1. Gradually add the dry ingredients to the wet ingredients, mixing on low speed or folding with a spatula until just combined. Do not overmix—a few streaks of flour are fine.
    2. Fold in the toasted chopped walnuts, reserving a handful for topping if desired.

    7. Fill the Muffin Cups:

    1. Scoop the batter into the prepared muffin cups, filling them almost to the top (about ¾ full for standard muffins, full for jumbo). This helps create those domed tops.
    2. If reserved, sprinkle the extra walnuts and a pinch of turbinado sugar over the tops of each muffin.

    8. Bake:

    1. Bake for 18-22 minutes for standard muffins, or 22-26 minutes for jumbo muffins, until a toothpick inserted into the center comes out clean or with a few moist crumbs.
    2. Let the muffins cool in the pan for 5-10 minutes, then transfer to a wire rack to cool completely. Serve warm or at room temperature.

    Summary

    Prep Time: 15 minutes | Bake Time: 18-22 minutes | Total Time: 35-40 minutes

    Yield: 12 standard muffins or 6 jumbo muffins

    Difficulty: Easy

    Storage and Make-Ahead Tips

    How to Store:

    Store banana nut muffins in an airtight container at room temperature for up to 4 days. The moisture from the bananas keeps them soft. For longer storage, refrigerate for up to a week.

    Can You Freeze Muffins?

    Absolutely! Muffins freeze beautifully. Cool completely, then place in a freezer bag or airtight container with parchment between layers. Freeze for up to 3 months. Thaw at room temperature or microwave for 20-30 seconds.

    Reviving Day-Old Muffins:

    To refresh muffins, microwave for 10-15 seconds or warm in a 300°F oven for 5-7 minutes. They’ll taste almost freshly baked!

    Make-Ahead for Breakfast:

    These muffins are actually better the next day as the flavors meld. Make them a day ahead and store at room temperature. Perfect for stress-free breakfasts.

    Freezing Banana Puree:

    If you have overripe bananas, peel and freeze them in a zip-top bag. Thaw and use directly in muffin batter—they’ll be even softer and more flavorful.

    Frequently Asked Questions

    Can I use frozen bananas?

    Yes! Frozen bananas work perfectly. Thaw them completely, then mash them with a fork. They’ll be very soft and may release some liquid—that’s fine, just include it in the batter.

    Can I make these without nuts?

    Absolutely! Simply omit the walnuts. The muffins will still be delicious. You can also substitute with chocolate chips, dried fruit, or leave them plain.

    Can I use other nuts?

    Yes! Pecans, almonds, or hazelnuts all work beautifully. Toast them first for the best flavor. Macadamia nuts would also be delicious.

    Why are my muffins dense instead of light?

    Dense muffins usually mean overmixing or too much flour. Mix just until the flour disappears, and measure your flour correctly (spoon and level, don’t scoop). Overmixing develops gluten, which makes muffins tough.

    Can I reduce the sugar?

    You can reduce the sugar to ¾ cup total, but keep in mind that bananas provide natural sweetness. If your bananas are very ripe and sweet, you can reduce slightly without issue. The brown sugar adds moisture as well as sweetness.

    Can I make these into banana bread?

    Yes! Pour the batter into a greased 9×5 inch loaf pan and bake at 350°F for 50-60 minutes. This recipe makes one standard loaf of banana nut bread.

    Can I use whole wheat flour?

    You can substitute up to half of the all-purpose flour with whole wheat flour. Whole wheat absorbs more liquid, so you may need to add an extra tablespoon of sour cream or milk.

    Why did my muffins sink in the middle?

    A sunken middle usually means the muffins were underbaked or the oven temperature was too low. Make sure your oven is properly preheated and bake until a toothpick comes out clean. Overmixing can also cause sinking.

    Can I add cinnamon?

    Absolutely! Cinnamon and banana are a wonderful combination. Add 1-2 teaspoons of ground cinnamon to the dry ingredients. Nutmeg or cardamom would also be delicious.

    How do I get those beautiful domed tops?

    Fill the muffin cups almost to the top, use room temperature ingredients, and make sure your baking powder and soda are fresh. Starting at 375°F (rather than lower) also helps create that initial rise.

    Can I make these dairy-free?

    Yes! Use vegan butter and substitute the sour cream with a dairy-free yogurt or coconut cream. The texture will be slightly different but still delicious.

    How ripe should the bananas be?

    The riper, the better! You want bananas with brown spots or completely black peels. They should be soft and smell very banana-y. Green or yellow bananas won’t give you the same flavor or moisture.

    Can I add a streusel topping?

    Absolutely! A simple streusel of ½ cup flour, ¼ cup brown sugar, ¼ cup melted butter, and ½ teaspoon cinnamon sprinkled on top before baking takes these muffins to the next level.

  • Classic Carrot Cake (Moist, Spiced & Cream Cheese Frosted)

    Classic Carrot Cake (Moist, Spiced & Cream Cheese Frosted)

    Carrot cake has a reputation for being the “healthy” cake, but let’s be honest—that’s not why we love it. We love it because it’s impossibly moist, warmly spiced, and topped with the most glorious tangy cream cheese frosting. The carrots are just a bonus.

    This classic carrot cake recipe is everything you want it to be. It’s tender and dense without being heavy, loaded with warm cinnamon and nutmeg, and packed with sweet shredded carrots and crunchy walnuts.

    The cream cheese frosting is silky, tangy, and perfectly balanced—not too sweet, not too tangy. Whether it’s for Easter, a birthday, or just because you deserve something special, this cake delivers every single time.

    Ingredients

    Makes one 9-inch cake or 13×9 inch sheet cake (12-16 servings).

    For the Carrot Cake:

    • 2 ½ cups (310g) all-purpose flour
    • 2 teaspoons baking soda
    • 2 teaspoons baking powder
    • 1 teaspoon salt
    • 2 teaspoons ground cinnamon
    • ½ teaspoon ground nutmeg
    • ¼ teaspoon ground ginger (optional)
    • 4 large eggs, at room temperature
    • 1 ½ cups (300g) granulated sugar
    • 1 cup (200g) light brown sugar, packed
    • 1 ½ cups (360ml) vegetable oil or canola oil
    • 1 tablespoon vanilla extract
    • 3 cups (about 4-5 medium) carrots, peeled and finely grated
    • 1 cup (120g) chopped walnuts or pecans (optional)
    • ½ cup (75g) raisins (optional)

    For the Cream Cheese Frosting:

    • 16 oz (450g) full-fat cream cheese, softened
    • 1 cup (225g) unsalted butter, softened
    • 4 cups (480g) powdered sugar, sifted
    • 2 teaspoons vanilla extract
    • Pinch of salt

    For Decoration (Optional):

    • ½ cup chopped walnuts or pecans
    • Carrot-shaped candy decorations or marzipan carrots
    • Additional cinnamon for dusting

    Step-by-Step Instructions

    1. Preheat and Prepare:

    1. Preheat your oven to 350°F (175°C). Grease two 9-inch round cake pans or one 9×13 inch sheet pan. Line the bottoms with parchment paper, then grease the parchment. Dust with flour, tapping out the excess.

    2. Combine Dry Ingredients:

    1. In a medium bowl, whisk together the flour, baking soda, baking powder, salt, cinnamon, nutmeg, and ginger (if using). Set aside.

    3. Combine Wet Ingredients:

    1. In a large bowl, whisk the eggs until lightly beaten.
    2. Add both sugars, vegetable oil, and vanilla extract. Whisk until thoroughly combined and smooth.

    4. Combine Wet and Dry:

    1. Gradually add the dry ingredients to the wet ingredients, mixing with a spatula or whisk until just combined. Do not overmix.
    2. Fold in the grated carrots, and if using, walnuts and raisins. The batter will be thick and packed with goodness.

    5. Bake:

    1. Divide the batter evenly between the prepared pans (if making layers) or pour into the sheet pan.
    2. Bake for 25-35 minutes for layer cakes (30-35 minutes for 9-inch rounds) or 35-40 minutes for a sheet cake, until a toothpick inserted into the center comes out clean or with a few moist crumbs.
    3. Let the cakes cool in the pans for 15-20 minutes, then turn out onto wire racks to cool completely. The cakes must be completely cool before frosting—warm cake will melt the cream cheese frosting.

    6. Make the Cream Cheese Frosting:

    1. In a large bowl, beat the softened cream cheese and butter together with an electric mixer until smooth, creamy, and free of lumps, about 2-3 minutes.
    2. Gradually add the sifted powdered sugar, beating on low speed until incorporated. Scrape down the sides as needed.
    3. Add the vanilla extract and salt. Increase speed to medium-high and beat for 2-3 minutes until light, fluffy, and spreadable.
    4. If the frosting seems too soft, refrigerate for 15-20 minutes to firm up before frosting the cake.

    7. Assemble the Cake:

    1. If the cake layers have domed tops, use a serrated knife to level them for even stacking.
    2. Place one layer on a cake stand or plate. Spread about 1 cup of frosting evenly over the top.
    3. Place the second layer on top, upside down for a flat surface. Apply a thin crumb coat (a thin layer of frosting) all over the cake to seal in crumbs. Refrigerate for 20-30 minutes to set.
    4. Frost the entire cake with the remaining frosting, creating swirls or smooth edges as desired.
    5. If using, press chopped walnuts onto the sides of the cake or sprinkle on top. Decorate with carrot candies if desired.

    8. Serve:

    1. For the cleanest slices, refrigerate the frosted cake for at least 1 hour before cutting. Serve at room temperature for the best flavor and texture.

    Summary

    Prep Time: 30 minutes | Bake Time: 30-35 minutes (layers) or 35-40 minutes (sheet) | Cooling/Frosting Time: 1.5 hours | Total Time: About 2.5 hours

    Yield: One 9-inch双层 cake or 13×9 inch sheet cake (12-16 servings)

    Difficulty: Intermediate

    Storage and Make-Ahead Tips

    How to Store:

    Because of the cream cheese frosting, carrot cake must be stored in the refrigerator. Place in an airtight container and refrigerate for up to 5 days. Let slices sit at room temperature for 20-30 minutes before serving for the best flavor and texture.

    Can You Freeze Cake Layers?

    Absolutely! This is a great make-ahead strategy. Wrap completely cooled cake layers tightly in plastic wrap, then in foil. Freeze for up to 3 months. Thaw at room temperature before frosting.

    Freezing Frosted Cake:

    You can freeze a fully frosted carrot cake! Place it in the freezer uncovered for 1-2 hours until the frosting is firm, then wrap tightly in plastic wrap and foil. Freeze for up to 3 months. Thaw overnight in the refrigerator.

    Make-Ahead Frosting:

    The cream cheese frosting can be made up to 3 days ahead and stored in the refrigerator. Let it come to room temperature, then re-whip for a few minutes before using.

    Make-Ahead for Parties:

    Carrot cake actually tastes even better the next day as the flavors meld. Bake the layers a day ahead, cool completely, wrap tightly, and refrigerate. Frost the day you plan to serve.