Blog

  • Spanakopita (Flaky, Spinach-Filled, Greek Happiness)

    Spanakopita (Flaky, Spinach-Filled, Greek Happiness)

    Phyllo dough sounds scary. It’s not.

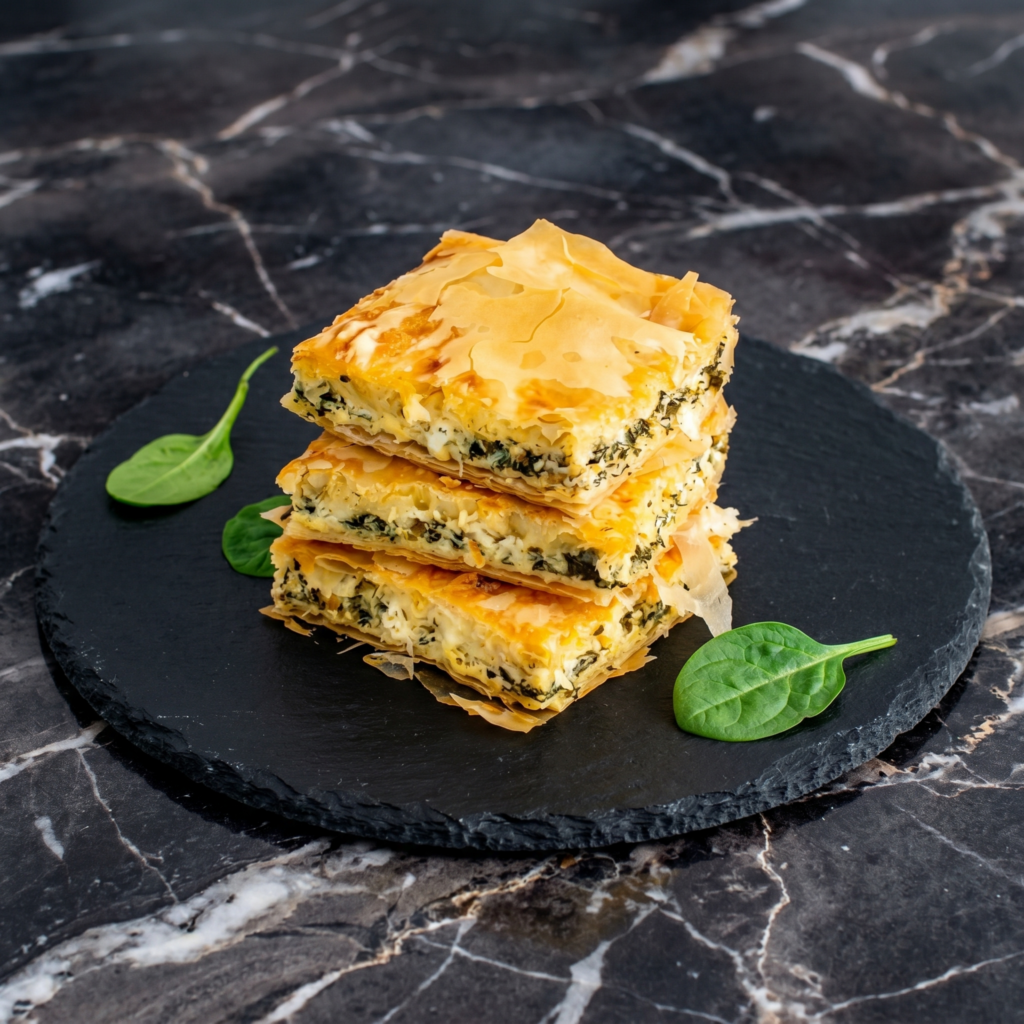
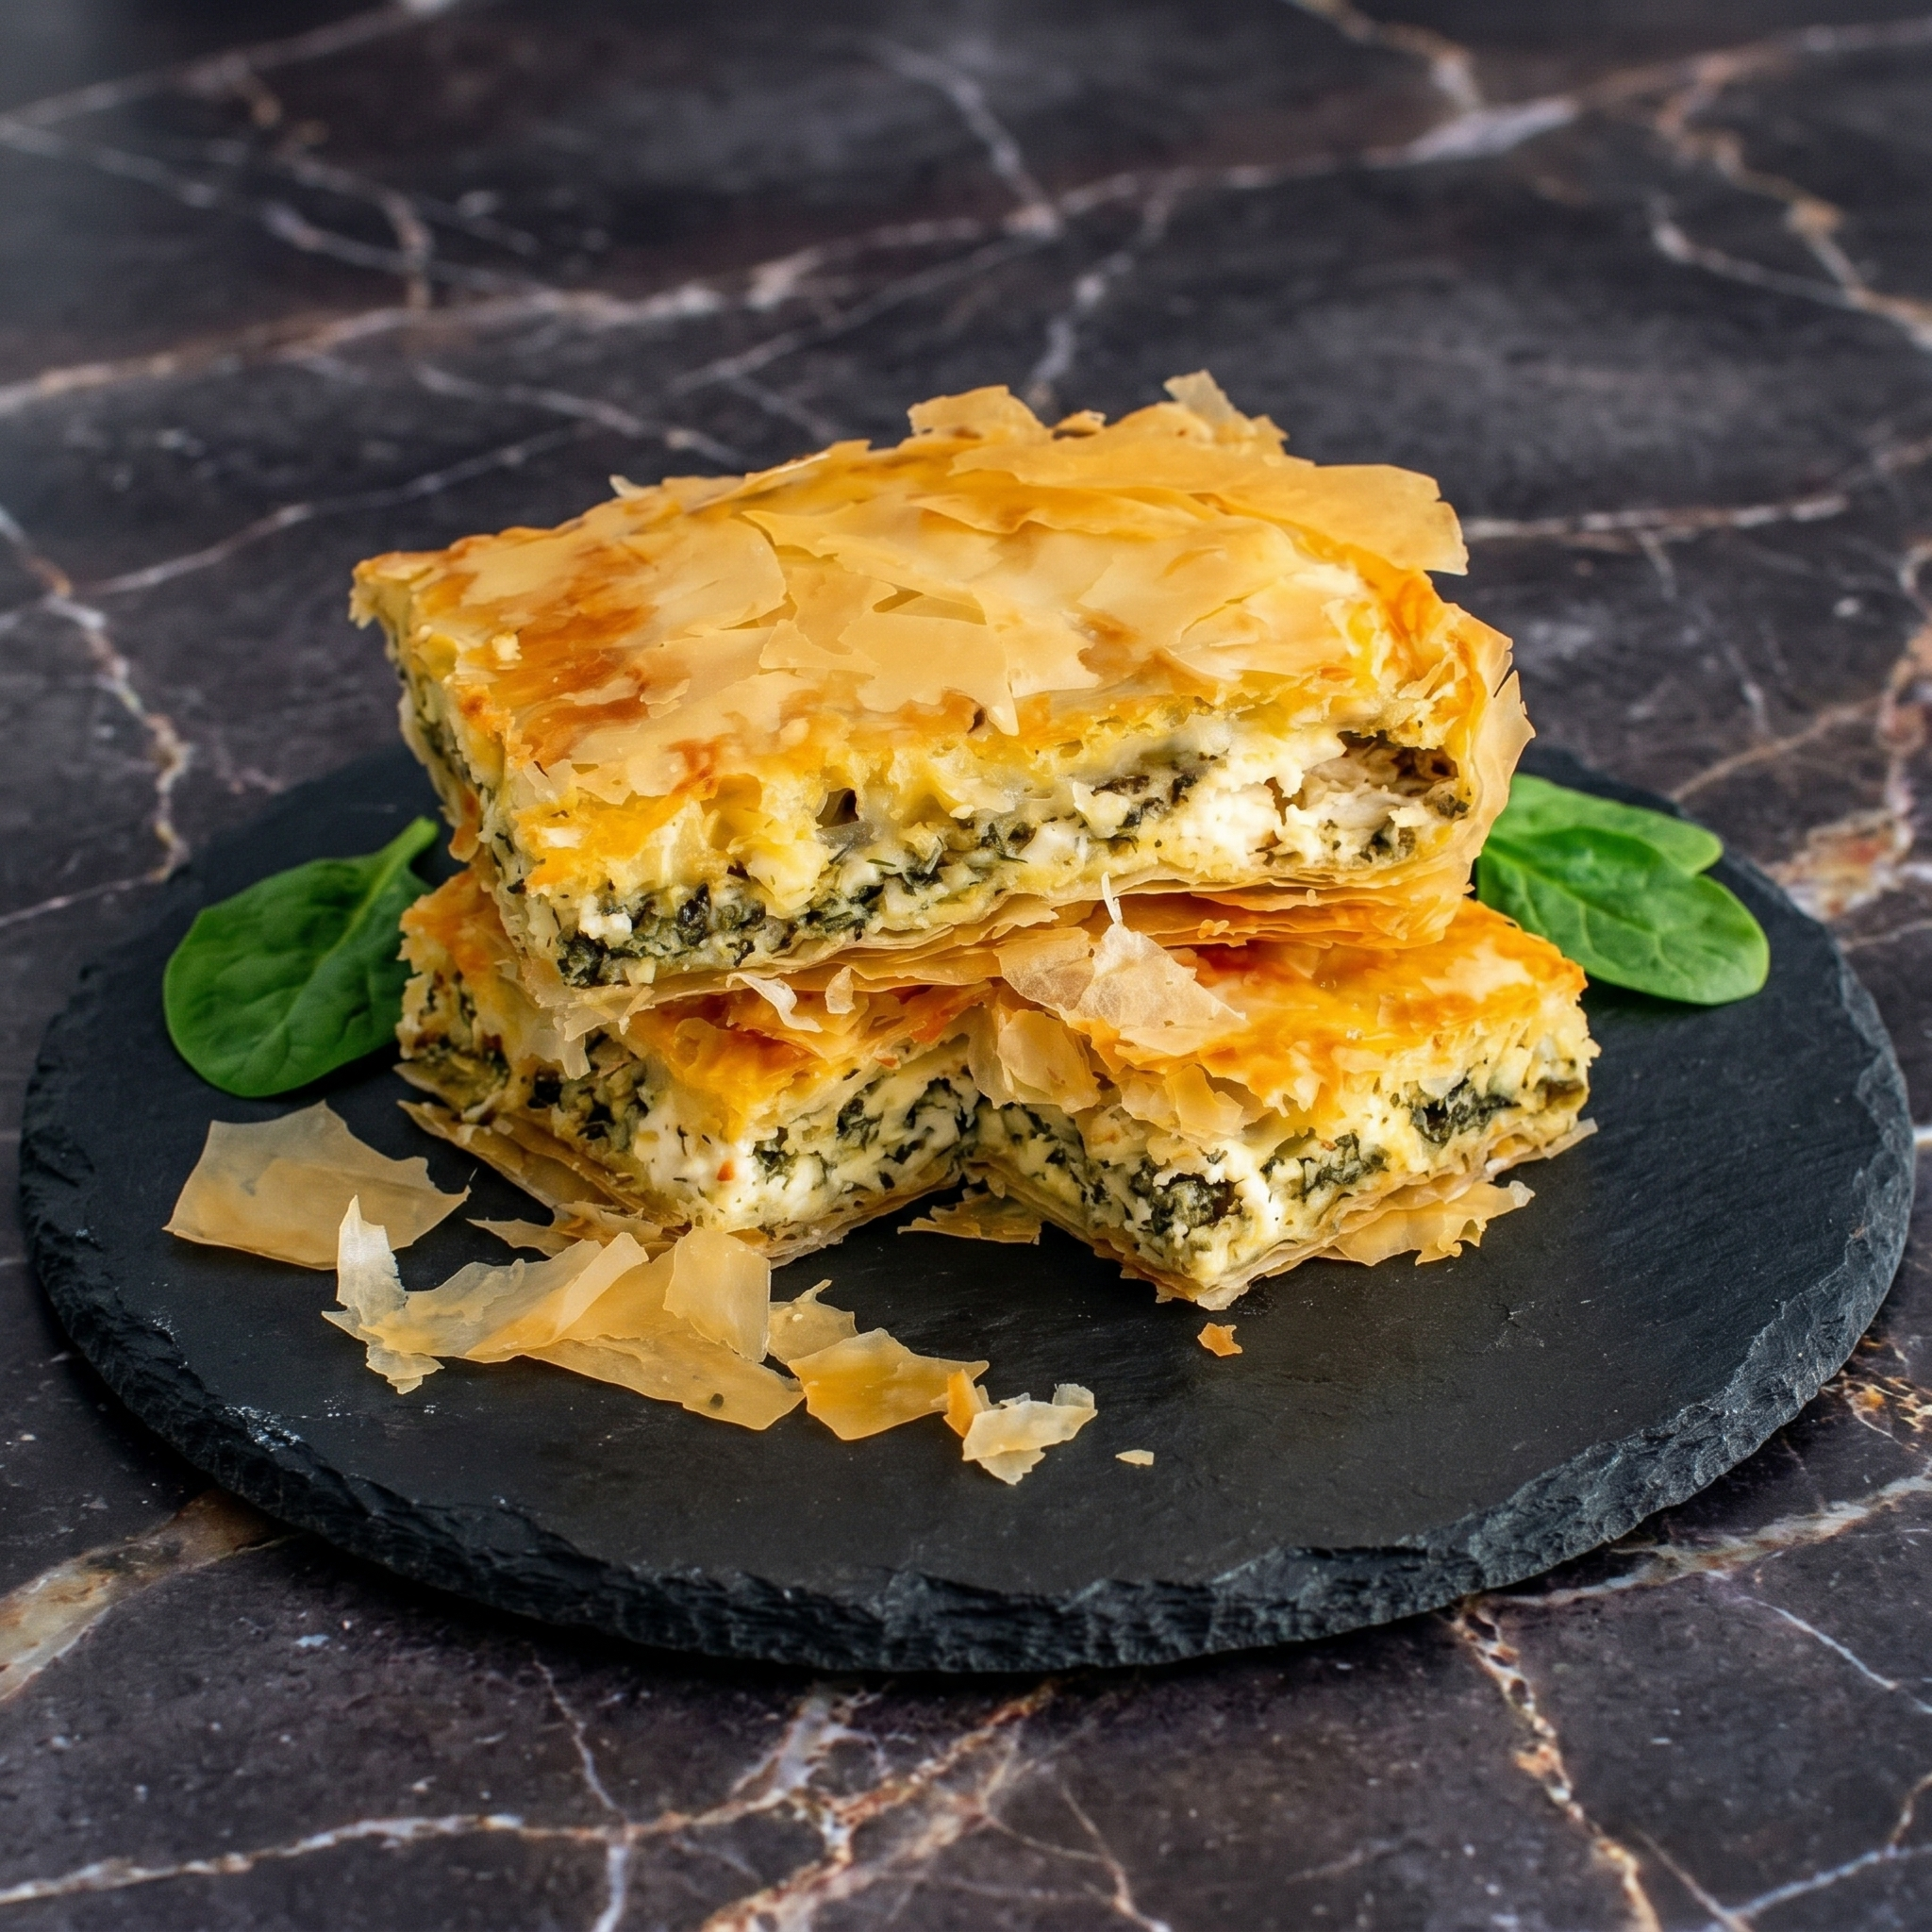
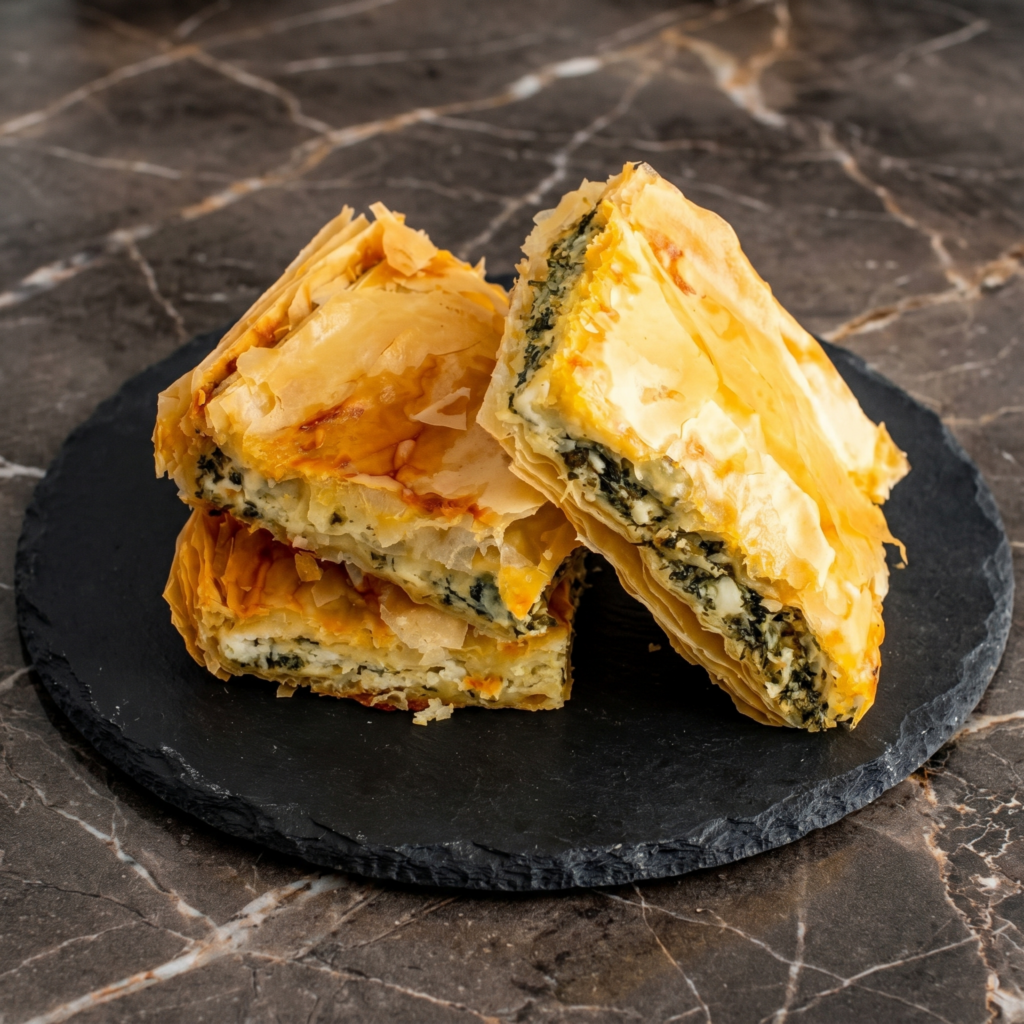
    Spanakopita is buttery, crispy, salty, and packed with tangy feta and tender spinach. Make it as a pie or individual triangles. Either way, you get golden layers that shatter when you bite in. Your Greek aunt just nodded in approval.

    Ingredients

    Makes 12 triangles or one 9×13 pie.

    • 1 box (16 oz) frozen phyllo dough, thawed
    • 10 oz fresh spinach (or 1 box frozen, thawed and squeezed)
    • 1 cup (8 oz) crumbled feta cheese
    • ½ cup ricotta or cottage cheese (optional, for creaminess)
    • 2 green onions, finely chopped
    • 2 tablespoons fresh dill (or 1 tsp dried)
    • 2 large eggs, lightly beaten
    • ½ cup (1 stick) unsalted butter, melted
    • Salt, pepper, and nutmeg to taste

    Step-by-Step Instructions

    Step 1: Prep Spinach

    1. If using fresh spinach, wilt in a hot pan for 1-2 minutes. Squeeze out ALL liquid.
    2. If frozen, thaw and squeeze dry. Wet spinach = soggy spanakopita.

    Step 2: Make Filling

    1. In a bowl, mix spinach, feta, ricotta (if using), green onions, dill, and eggs.
    2. Season with salt, pepper, and a pinch of nutmeg.

    Step 3: Prep Phyllo

    1. Unroll phyllo. Cover with a damp towel (it dries out fast).
    2. Work quickly but calmly.

    Step 4: Assemble Triangles

    1. Lay one phyllo sheet on a work surface. Brush with melted butter.
    2. Top with another sheet. Brush again.
    3. Cut into 3-inch wide strips. Place a spoonful of filling at one end.
    4. Fold into triangles like a flag.

    Step 5: Bake

    1. Place on a baking sheet. Brush tops with butter.
    2. Bake at 375°F (190°C) for 20-25 minutes, until golden and crispy.

    Summary

    Prep Time: 30 minutes | Cook Time: 25 minutes | Total Time: 55 minutes

    Yield: 12 triangles

    Difficulty: Medium (but worth it)

    Storage Notes

    Freeze Unbaked:

    Assemble triangles, freeze on a tray, then transfer to a bag. Bake from frozen at 375°F for 30-35 minutes.

    Refrigerate Baked:

    Store in an airtight container for up to 3 days. Reheat in oven or air fryer at 350°F for 5-8 minutes. Microwave kills the crunch.

    Phyllo Pro Tip:

    Leftover phyllo? Brush with butter, cut into strips, bake for homemade “fillo chips.”

  • Avocado Toast (Worth the Hype, Not the $14 Price Tag)

    Avocado Toast (Worth the Hype, Not the $14 Price Tag)

    Yes, it’s everywhere. Yes, it’s that good.

    This isn’t complicated. Toast + smashed avocado + salt = magic. But with a few small tricks (toast it darker, season it better, finish it brighter), you’ll never pay cafe prices again. Five minutes. Seriously.

    Ingredients

    Serves 1 (easily doubled).

    • 2 slices sourdough or rustic bread
    • 1 ripe avocado
    • 2 teaspoons lemon or lime juice
    • ¼ teaspoon red pepper flakes (optional)
    • Flaky sea salt and black pepper
    • Drizzle of olive oil

    Topping Ideas:

    • Everything bagel seasoning
    • Radish slices + chives
    • Soft-boiled egg
    • Cherry tomatoes + basil

    Step-by-Step Instructions

    Step 1: Toast Dark

    1. Toast bread until golden-brown and sturdy. Darker than you think—soggy toast is enemy #1.

    Step 2: Mash Avocado

    1. Cut avocado in half. Remove pit. Scoop flesh into a small bowl.
    2. Mash with a fork to your liking (chunky or smooth).

    Step 3: Season Hard

    1. Add lemon juice, pepper flakes, salt, and pepper to avocado. Mix.

    Step 4: Assemble

    1. Spread avocado evenly onto hot toast.
    2. Drizzle with olive oil.
    3. Sprinkle more flaky salt on top (don’t skip).

    Step 5: Finish and Eat

    1. Add any toppings. Eat immediately while toast is still crunchy.

    Summary

    Prep Time: 5 minutes | Cook Time: 2 minutes | Total Time: 7 minutes

    Yield: 1 serving

    Difficulty: Too easy

    Storage Notes

    Don’t Store Assembled

    Avocado turns brown. Toast turns soggy. This is a make-and-eat-immediately situation.

    Prep Ahead Instead:

    • Toast bread? No (gets stale).
    • Mash avocado? No (browns).
    • Have ripe avocados ready? Yes.
    • Mix seasoning blend? Yes—keep in a small jar.

    Leftover Avocado Hack:

    Rub cut side with lemon, wrap tightly in plastic, refrigerate. Use within 1 day.

  • Fried Calamari (Better Than Your Favorite Italian Restaurant)

    Fried Calamari (Better Than Your Favorite Italian Restaurant)

    Bad calamari is chewy rubber. Good calamari is a revelation.

    This fried calamari is light, shatteringly crisp, and tender inside. The secret? Super-hot oil, a quick fry, and a cornmeal-dredge that stays crunchy. Plate it with marinara and lemon. You just beat your local red-checkered-tablecloth joint.

    Ingredients

    Serves 4 as appetizer.

    • 1 lb (450g) calamari rings and tentacles, thawed if frozen
    • 1 cup buttermilk (or whole milk)
    • 1 cup all-purpose flour
    • ½ cup cornmeal (for extra crunch)
    • 1 teaspoon salt (plus more for finishing)
    • ½ teaspoon black pepper
    • ½ teaspoon paprika
    • ¼ teaspoon cayenne pepper (optional)
    • Vegetable oil for frying
    • Lemon wedges and marinara sauce for serving

    Step-by-Step Instructions

    Step 1: Soak

    1. Place calamari in a bowl. Cover with buttermilk.
    2. Let sit for 15 minutes (tenderizes + removes fishy taste).

    Step 2: Heat Oil

    1. Pour 2 inches of oil into a heavy pot or Dutch oven.
    2. Heat to 375°F (190°C). Use a thermometer—non-negotiable.

    Step 3: Make Dredge

    1. In a shallow bowl, whisk flour, cornmeal, salt, pepper, paprika, and cayenne.

    Step 4: Dredge

    1. Remove calamari from buttermilk, letting excess drip off.
    2. Toss in flour mixture until fully coated.
    3. Shake off extra.

    Step 5: Fry Fast

    1. Drop calamari in oil in small batches (don’t crowd).
    2. Fry 60-90 seconds only—until light golden.
    3. Overcooking = rubber. Trust the timer.

    Step 6: Drain and Serve

    1. Remove with slotted spoon. Drain on paper towels.
    2. Sprinkle immediately with salt.
    3. Serve with lemon wedges and warm marinara.

    Summary

    Prep Time: 20 minutes | Cook Time: 5 minutes | Total Time: 25 minutes

    Yield: 4 appetizer servings

    Difficulty: Easy

    Storage Notes

    Do Not Refrigerate Leftovers (Seriously)

    Fried calamari becomes chewy and sad within hours. Make only what you’ll eat immediately.

    Prep Ahead Instead:

    • Soak calamari in buttermilk up to 4 hours ahead. Keep refrigerated.
    • Mix dry dredge up to 1 week ahead, stored in a bag or jar.

    Reheat Fail:

    There’s no good way to reheat fried calamari. Air fryer helps a little, but fresh is the only real answer.

  • Potato Croquettes (Crispy Cream Bombs That Disappear Fast)

    Potato Croquettes (Crispy Cream Bombs That Disappear Fast)

    Leftover mashed potatoes just found their destiny.

    These potato croquettes are what happens when mashed potatoes get dressed up for a party. Rolled in breadcrumbs, fried to a crisp, and impossibly creamy inside. They vanish within minutes. Make extra. You’ve been warned.

    Ingredients

    Makes 12-15 croquettes.

    • 2 cups cold mashed potatoes (leftover is perfect)
    • ½ cup shredded Parmesan or cheddar cheese
    • 1 large egg yolk
    • 2 tablespoons chopped fresh parsley or chives
    • ½ cup all-purpose flour
    • 2 large eggs, beaten (for coating)
    • 1 cup panko breadcrumbs
    • ½ teaspoon salt
    • Vegetable oil for frying

    Step-by-Step Instructions

    Step 1: Make the Mix

    1. In a bowl, combine cold mashed potatoes, cheese, egg yolk, and parsley.
    2. Mix until uniform. Season with salt.

    Step 2: Shape

    1. Scoop mixture and roll into 2-inch logs or balls.
    2. Place on a parchment-lined tray.

    Step 3: Set Up Breading Station

    1. Bowl 1: flour. Bowl 2: beaten eggs. Bowl 3: panko.
    2. Roll each croquette: flour → egg → panko.

    Step 4: Chill (Important)

    1. Freeze shaped croquettes for 15 minutes. This prevents falling apart in the fryer.

    Step 5: Fry

    1. Heat 1 inch of oil to 350°F (175°C).
    2. Fry croquettes in batches, 2-3 minutes, until golden brown.
    3. Don’t overcrowd.

    Step 6: Drain and Serve

    1. Drain on paper towels. Sprinkle with salt immediately.
    2. Serve with marinara, aioli, or just alone.

    Summary

    Prep Time: 20 minutes | Chill Time: 15 minutes | Cook Time: 10 minutes | Total Time: 45 minutes

    Yield: 12-15 croquettes

    Difficulty: Easy

    Storage Notes

    Freeze Before Frying (Best Method):

    Freeze shaped, breaded croquettes on a tray, then transfer to a bag. Fry from frozen—add 1-2 minutes.

    Refrigerate Cooked:

    Store in an airtight container for up to 3 days. Reheat in air fryer or oven (375°F for 5-8 minutes). Microwave makes them sad and soggy.

    Do Not Refrigerate Raw:

    Breaded raw croquettes get mushy in the fridge. Freeze only.

  • Lamb Chops (Fancy Enough for Company, Fast Enough for Tuesday)

    Lamb Chops (Fancy Enough for Company, Fast Enough for Tuesday)

    Lamb chops feel like a splurge. But here’s the secret: they cook faster than chicken.

    These pan-seared lamb chops are crusted with garlic, rosemary, and thyme, then seared until golden. Inside, they’re pink, juicy, and ridiculously tender. From fridge to plate in 15 minutes. Impress your date. Impress yourself.

    Ingredients

    Serves 2-3.

    • 8 lamb loin chops (about 1.5 inches thick)
    • 2 tablespoons olive oil
    • 4 cloves garlic, minced
    • 2 tablespoons fresh rosemary, finely chopped
    • 1 tablespoon fresh thyme leaves
    • 1 teaspoon salt
    • ½ teaspoon black pepper
    • 2 tablespoons butter (for basting)
    • Optional: lemon wedges for serving

    Step-by-Step Instructions

    Step 1: Prep the Chops

    1. Pat lamb chops completely dry with paper towels. This = better sear.
    2. In a small bowl, mix garlic, rosemary, thyme, salt, and pepper.
    3. Rub mixture all over both sides of each chop.

    Step 2: Heat the Pan

    1. Heat olive oil in a large cast-iron or heavy skillet over medium-high heat.
    2. Oil should shimmer—almost smoking.

    Step 3: Sear Hard

    1. Place chops in pan without crowding (work in batches if needed).
    2. Sear 2-3 minutes per side for medium-rare. Do not move them while searing.

    Step 4: Butter Baste

    1. Add butter to pan during last minute of cooking.
    2. Tilt pan and spoon melted butter over chops repeatedly.

    Step 5: Rest

    1. Transfer chops to a plate. Let rest 5 minutes—non-negotiable.
    2. Resting keeps the juices inside, not on your plate.

    Step 6: Serve

    1. Squeeze fresh lemon over chops. Serve immediately.

    Summary

    Prep Time: 5 minutes | Cook Time: 10 minutes | Total Time: 15 minutes (plus 5 min rest)

    Yield: 8 chops (2-3 servings)

    Difficulty: Easy

    Storage Notes

    Refrigerate Leftovers:

    Store in an airtight container for up to 3 days. Reheat gently in a skillet over low heat (microwave ruins lamb).

    Best Enjoyed Fresh:

    Lamb chops really shine right off the pan. Leftovers work for salads or pitas, but that perfect medium-rare is a one-time event.

    Doneness Guide:

    • Medium-rare: 130-135°F internal (recommended)
    • Medium: 140-145°F
    • Well-done: Not recommended (dry lamb is sad lamb)
  • Salmon Croquettes (Crispy Outside, Flaky Inside, Zero Canned-Fish Sadness)

    Salmon Croquettes (Crispy Outside, Flaky Inside, Zero Canned-Fish Sadness)

    Let’s rescue canned salmon from its sad, forgotten corner of the pantry.

    These salmon croquettes are crispy on the outside, tender on the inside, and taste nothing like cafeteria food. They’re cheap, fast, and legitimately craveable. Serve with hot sauce, remoulade, or just a squeeze of lemon. Dinner in 20 minutes. You’re welcome.

    Ingredients

    Makes 8 croquettes (serves 4).

    • 2 cans (14.75 oz each) pink or red salmon, drained
    • ½ cup plain breadcrumbs (plus more for coating)
    • 2 large eggs, lightly beaten
    • ¼ cup finely diced onion
    • 2 tablespoons mayonnaise
    • 1 tablespoon lemon juice
    • 1 teaspoon garlic powder
    • 1 teaspoon Old Bay or Cajun seasoning
    • ¼ cup vegetable oil (for frying)
    • Salt and black pepper to taste

    Step-by-Step Instructions

    Step 1: Drain and Flake

    1. Open salmon cans. Drain liquid completely. Remove any large bones or skin (or mash them in—they’re edible and calcium-rich).
    2. Flake salmon with a fork in a large bowl.

    Step 2: Mix It Up

    1. Add breadcrumbs, eggs, onion, mayo, lemon juice, garlic powder, and seasoning.
    2. Mix until just combined. Don’t overmix—you want flaky, not pasty.

    Step 3: Form Patties

    1. Shape mixture into 8 patties, about ½-inch thick.
    2. Coat each patty lightly in extra breadcrumbs.

    Step 4: Heat the Pan

    1. Heat oil in a large skillet over medium heat.
    2. Test with a breadcrumb—it should sizzle immediately.

    Step 5: Fry ‘Em Up

    1. Cook croquettes in batches, 3-4 minutes per side, until golden brown and crispy.
    2. Drain on paper towels.

    Step 6: Serve Hot

    1. Sprinkle with salt immediately. Serve with lemon wedges, tartar sauce, or hot sauce.

    Summary

    Prep Time: 10 minutes | Cook Time: 10 minutes | Total Time: 20 minutes

    Yield: 8 croquettes (4 servings)

    Difficulty: Easy

    Storage Notes

    Refrigerate:

    Cooked croquettes keep in an airtight container for up to 3 days. Reheat in a skillet or air fryer—not the microwave (soggy danger).

    Freeze (Uncooked):

    Form patties, freeze on a baking sheet, then transfer to a bag. Cook from frozen, adding 2-3 minutes per side.

    Pro Tip:

    These are not air fryer friendly from raw (they fall apart). Stick to pan-frying for the crunch.

  • Ahi Tuna Tostada (Sushi Meets Crunchy, No Passport Needed)

    Ahi Tuna Tostada (Sushi Meets Crunchy, No Passport Needed)

    Imagine sushi and a crispy taco had a beautiful, flavor-packed baby. That’s this ahi tuna tostada.

    Cool, buttery raw tuna. Crunchy fried tostada shell. Creamy avocado. Spicy mayo. It’s bright, fast, and dangerously addictive. No stove, no oven, and absolutely no cooking skills required—just sharp knife skills and good fish.

    Ingredients

    Serves 4 as appetizer or 2 as light meal.

    • 8 oz (225g) sushi-grade ahi tuna
    • 4 tostada shells (crispy flat tortillas)
    • 1 ripe avocado
    • ¼ cup sriracha mayo
    • 2 tablespoons soy sauce
    • 1 teaspoon sesame oil
    • 1 tablespoon lime juice (plus wedges for serving)
    • 2 tablespoons sliced green onions
    • 1 teaspoon sesame seeds (black or white)
    • Optional: thin jalapeño slices, fresh cilantro

    Step-by-Step Instructions

    Step 1: Prep the Tuna

    1. Pat tuna dry with paper towels. Cut into small ¼-inch cubes.

    Step 2: Make the Sauce

    1. In a small bowl, whisk together sriracha mayo, soy sauce, sesame oil, and lime juice.

    Step 3: Toss It Together

    1. Place cubed tuna in a medium bowl. Pour half the sauce over it. Gently toss to coat.
    2. Save the remaining sauce for drizzling.

    Step 4: Mash or Slice Avocado

    1. Mash avocado lightly with a fork (or slice thinly). Season with a pinch of salt.

    Step 5: Assemble

    1. Spread mashed avocado on each tostada shell.
    2. Top with the sauced tuna.
    3. Drizzle remaining sauce on top.

    Step 6: Garnish and Serve

    1. Sprinkle with green onions, sesame seeds, and jalapeño if using.
    2. Serve immediately with lime wedges. Eat within 5 minutes—soggy tostadas are sad tostadas.

    Summary

    Prep Time: 15 minutes | Cook Time: 0 minutes | Total Time: 15 minutes

    Yield: 4 appetizer servings

    Difficulty: Easy

    Storage Notes

    Do Not Store Assembled

    Tostadas get soggy almost immediately. This is a eat-right-now recipe.

    Prep Ahead Instead:

    • Tuna: Cube and mix with sauce up to 2 hours ahead. Keep refrigerated.
    • Avocado: Mash just before serving (it browns fast).
    • Tostada shells: Store in a sealed bag at room temperature for weeks.

    Leftover Tuna Warning:

    Raw tuna does not keep once mixed with sauce. Make only what you’ll eat immediately.

  • Classic Biscotti (The One You Dip Without Fear of Crumbling)

    Classic Biscotti (The One You Dip Without Fear of Crumbling)

    Let’s be honest: most store-bought biscotti are glorified jawbreakers. Not these.

    These classic almond biscotti are crunchy but not tooth-shattering, lightly sweet, and absolutely perfect for dunking. They’re twice-baked, which sounds fancy, but really just means you get a cookie that stays crisp for weeks. No stand mixer needed. No weird ingredients. Just butter, sugar, almonds, and a little patience.

    Ingredients

    Makes about 24 biscotti.

    • 2 cups (260g) all-purpose flour
    • 1 cup (200g) granulated sugar
    • 1 teaspoon baking powder
    • ¼ teaspoon salt
    • 3 large eggs
    • 4 tablespoons (60g) unsalted butter, melted and cooled
    • 1 teaspoon vanilla extract
    • ½ teaspoon almond extract
    • 1 cup (120g) whole raw almonds, lightly toasted

    Step-by-Step Instructions

    Step 1: Heat Up

    1. Preheat oven to 350°F (175°C). Line a baking sheet with parchment paper.

    Step 2: Mix Dry

    1. In a medium bowl, whisk together flour, sugar, baking powder, and salt.

    Step 3: Mix Wet

    1. In a large bowl, whisk eggs, melted butter, vanilla, and almond extract until combined.

    Step 4: Combine

    1. Pour dry ingredients into wet. Stir with a spatula until a sticky dough forms.
    2. Fold in the toasted almonds.

    Step 5: Shape First Log

    1. Divide dough in half. On the prepared baking sheet, shape each half into a log about 10 inches long and 2 inches wide.
    2. Wet your hands slightly to prevent sticking—the dough is sticky by design.

    Step 6: First Bake

    1. Bake logs for 25 minutes, until golden and firm to the touch.
    2. Remove from oven and let cool on the sheet for 10 minutes. Don’t turn off the oven—reduce heat to 325°F (160°C).

    Step 7: Slice

    1. Transfer logs to a cutting board. Use a serrated knife to slice each log diagonally into ½-inch thick cookies.
    2. Place slices cut-side down back on the baking sheet.

    Step 8: Second Bake

    1. Bake for 10 minutes, flip each biscotti, then bake another 10 minutes.
    2. They should be golden, dry, and lightly browned at the edges.

    Step 9: Cool and Crunch

    1. Let biscotti cool completely on the baking sheet. They will crisp up further as they cool.
    2. Dip one in your coffee. Smile. You did it.

    Summary

    Prep Time: 15 minutes | Cook Time: 45 minutes | Total Time: 1 hour

    Yield: 24 biscotti

    Difficulty: Easy

    Storage Notes

    How to Store:

    • Room temperature: In an airtight container for up to 2 weeks. They actually get better after day one.
    • Freezer: Freeze baked biscotti for up to 3 months. Thaw on the counter—no need to reheat.

    Pro Tip:

    Do not refrigerate biscotti. The fridge introduces moisture and ruins the crunch. These are dry-storage cookies only.

  • Chipotle Honey Chicken: Sweet, Smoky, Sticky Magic

    Chipotle Honey Chicken: Sweet, Smoky, Sticky Magic

    This is the chicken that disappears first at every dinner. A sticky, smoky, sweet glaze that clings to every bite. The heat from chipotle hits first, then honey smooths it out.

    One skillet. Under 30 minutes. Serve with rice, tacos, or just eat it straight off the pan. No judgment.

    Ingredients

    Serves 4.

    • 1.5 lbs boneless, skinless chicken thighs (or breasts)
    • 3 tablespoons honey
    • 2 tablespoons chipotle peppers in adobo sauce (minced, from a can)
    • 2 cloves garlic, minced
    • 2 tablespoons lime juice (about 1 lime)
    • 1 tablespoon olive oil
    • 1 teaspoon salt
    • Optional garnish: fresh cilantro, lime wedges

    Step-by-Step Instructions

    Step 1: Make the Glaze

    1. In a small bowl, whisk together honey, minced chipotle (plus 1 teaspoon adobo sauce), garlic, lime juice, and a pinch of salt.

    Step 2: Sear the Chicken

    1. Heat olive oil in a large skillet over medium-high heat.
    2. Season chicken with salt. Add to skillet and cook 5-6 minutes per side until deeply browned.

    Step 3: Glaze and Sticky-ify

    1. Pour the chipotle honey mixture over the chicken.
    2. Reduce heat to medium-low. Let it simmer for 2-3 minutes, flipping chicken to coat.
    3. The sauce will thicken into a sticky glaze. Keep flipping until chicken is glossy and coated.

    Step 4: Finish and Serve

    1. Remove from heat. Garnish with cilantro and a squeeze of lime.
    2. Serve over rice, in tacos, or on a bowl with avocado and black beans.

    Summary

    Prep Time: 5 minutes | Cook Time: 18 minutes | Total Time: 23 minutes

    Yield: 4 servings

    Difficulty: Easy

    Storage Notes

    Fridge:

    Store in an airtight container for up to 4 days. The glaze soaks into the chicken and gets even better.

    Freezing:

    Freeze cooked chicken with glaze for up to 3 months. Thaw overnight in the fridge.

    Reheating:

    Reheat in a skillet over medium-low heat with a splash of water to loosen the glaze. Microwave works too (30-45 seconds).

    Heat Control:

    Start with 1 tablespoon of chipotle for less heat, add more for extra fire. The honey balances nicely either way.

  • Buffalo Wings: Crispy, Saucy, Game Day Royalty

    Buffalo Wings: Crispy, Saucy, Game Day Royalty

    Buffalo wings are a vibe. Spicy, buttery, tangy, and just messy enough to be fun. The secret to crispy baked wings? Baking powder and a hot oven.

    These wings come out shatteringly crisp without a drop of frying oil. Toss them in homemade Buffalo sauce and prepare for a napkin avalanche.

    Ingredients

    Serves 4 (2-3 people if they’re hungry).

    • 2 lbs chicken wings (drumettes and flats)
    • 1 tablespoon baking powder (NOT baking soda)
    • 1 teaspoon salt
    • ½ teaspoon garlic powder

    Buffalo Sauce:

    • ½ cup hot sauce (Frank’s RedHot is the classic)
    • 4 tablespoons unsalted butter, melted
    • 1 tablespoon honey (optional, for balance)
    • Serve with: ranch or blue cheese dressing, celery sticks

    Step-by-Step Instructions

    Step 1: Dry the Wings (Crucial)

    1. Pat wings completely dry with paper towels. Like, really dry. Moisture is the enemy of crispiness.

    Step 2: Coat with Baking Powder

    1. In a bowl, mix baking powder, salt, and garlic powder.
    2. Toss wings in the mixture until evenly coated.

    Step 3: Bake Until Crispy

    1. Preheat oven to 425°F (220°C). Line a baking sheet with foil and place a wire rack on top.
    2. Arrange wings on the rack (not touching).
    3. Bake for 45-50 minutes, flipping halfway, until golden brown and super crispy.

    Step 4: Make the Sauce

    1. While wings bake, whisk together hot sauce, melted butter, and honey (if using).

    Step 5: Toss and Serve

    1. Transfer hot wings to a large bowl. Pour sauce over and toss to coat.
    2. Serve immediately with ranch or blue cheese and plenty of napkins.

    Summary

    Prep Time: 10 minutes | Cook Time: 50 minutes | Total Time: 1 hour

    Yield: 4 servings

    Difficulty: Easy

    Storage Notes

    Leftover Wings:

    Store in the fridge for up to 3 days. The sauce soaks in and they’ll be less crispy but still tasty.

    Reheating (Critical):

    Air fryer at 375°F for 5-7 minutes. Oven at 400°F for 8-10 minutes on a wire rack. Never microwave (rubbery wings are a crime).

    Make-Ahead Baking:

    Bake wings without sauce, cool completely, and refrigerate. Reheat in a hot oven, then toss in warm sauce. Almost as good as fresh.