Blog

  • Homemade Crescent Rolls: Buttery, Flaky, Better Than the Can

    Homemade Crescent Rolls: Buttery, Flaky, Better Than the Can

    That pop of the can? Satisfying. What’s inside? Fine.

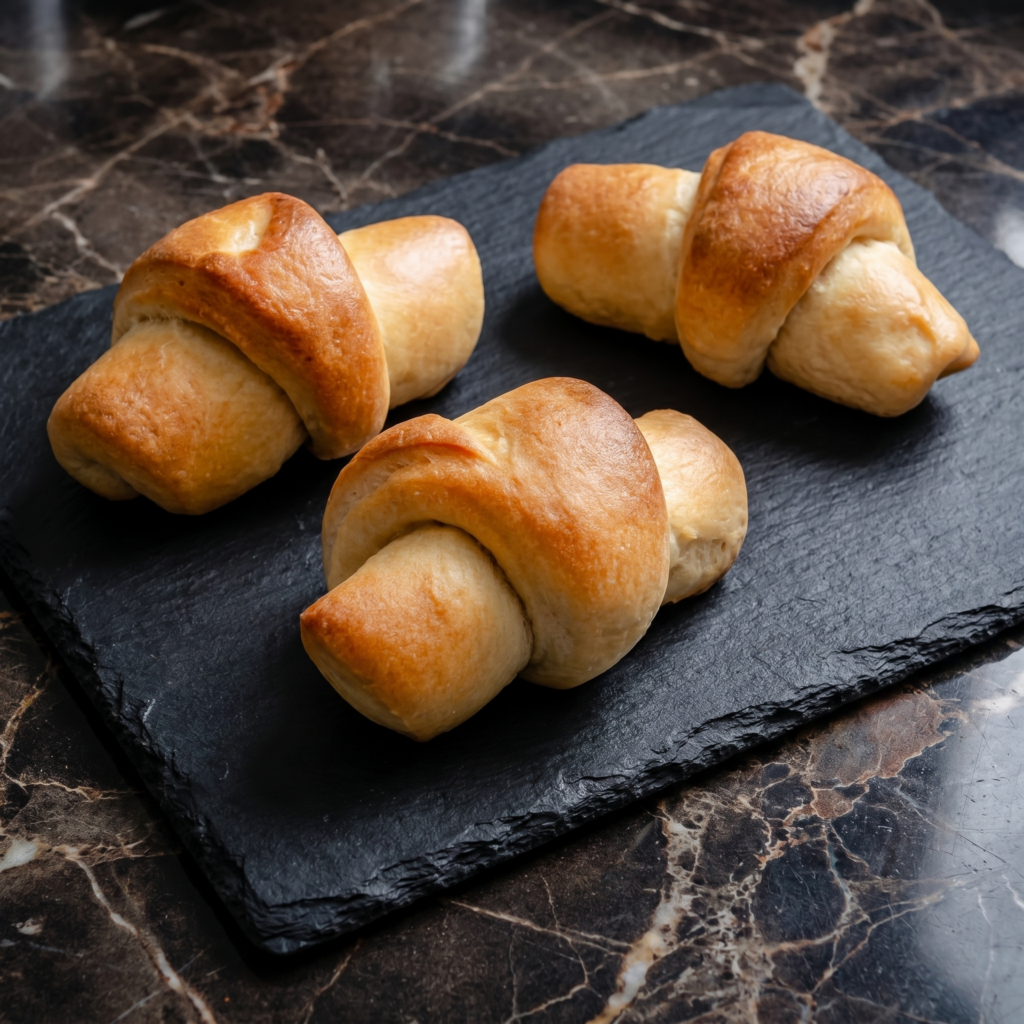
    These homemade crescent rolls are not fine. They’re incredible. Soft, buttery, flaky, and made from scratch with zero drama. One bowl. No fancy techniques. Just you, some butter, and a tray of golden crescents that’ll steal every dinner.

    Ingredients

    Makes 12 crescent rolls.

    • 3 cups all-purpose flour
    • ¼ cup sugar
    • 1 packet (2 ¼ tsp) instant yeast
    • 1 teaspoon salt
    • ½ cup warm milk (about 110°F)
    • ¼ cup warm water
    • 1 large egg
    • 6 tablespoons unsalted butter, softened (divided)

    Step-by-Step Instructions

    Step 1: Make the Dough

    1. Whisk flour, sugar, yeast, and salt in a large bowl.
    2. Add warm milk, warm water, egg, and 4 tablespoons softened butter.
    3. Mix until a shaggy dough forms. Knead for 8-10 minutes until smooth.
    4. Let rise in a greased bowl for 1 hour, until doubled.

    Step 2: Roll & Shape

    1. Preheat oven to 375°F (190°C). Line a baking sheet with parchment.
    2. Punch down dough. Roll into a 12-inch circle.
    3. Spread remaining 2 tablespoons softened butter over the dough.
    4. Cut into 12 wedges (like a pizza).
    5. Roll each wedge from the wide end to the tip. Curve into a crescent shape.

    Step 3: Rise & Bake

    1. Place crescents on the baking sheet. Cover and let rise for 30 minutes.
    2. Bake for 12-15 minutes until golden brown.
    3. Brush with more melted butter right out of the oven.
    4. Serve warm. Watch them vanish.

    Summary

    Prep Time: 15 minutes | Rise Time: 1.5 hours | Bake Time: 15 minutes

    Yield: 12 rolls | Difficulty: Easy

    Storage Notes

    Store in an airtight container at room temperature for up to 3 days. Freeze baked rolls for up to 3 months. To reheat, wrap in foil and warm at 350°F for 10 minutes. Never microwave—they get rubbery and sad.

  • Korean Cream Cheese Bread: Soft, Sweet, and Suspiciously Good

    Korean Cream Cheese Bread: Soft, Sweet, and Suspiciously Good

    Korean bakeries know something we don’t. Actually, they know this bread.

    It’s absurdly soft. Like, cloud-soft. Inside, a sweet, tangy cream cheese filling that’s not too heavy. Topped with a dusting of powdered sugar and a sprinkle of nostalgia. This is the bread that disappears before it cools.

    Ingredients

    Makes 6 buns.

    For the Dough:

    • 2 ½ cups all-purpose flour
    • ¼ cup sugar
    • 1 packet (2 ¼ tsp) instant yeast
    • ½ teaspoon salt
    • ½ cup warm milk
    • ¼ cup warm water
    • 1 large egg
    • 3 tablespoons unsalted butter, softened

    For the Cream Cheese Filling:

    • 8 oz cream cheese, softened
    • ¼ cup sugar
    • 1 teaspoon vanilla extract
    • 2 tablespoons heavy cream (optional, for fluffiness)

    For Topping:

    • Powdered sugar for dusting

    Step-by-Step Instructions

    Step 1: Make the Dough

    1. Whisk flour, sugar, yeast, and salt in a large bowl.
    2. Add warm milk, warm water, and egg. Mix into a shaggy dough.
    3. Knead for 8 minutes. Add softened butter and knead 5 more minutes until smooth.
    4. Let rise in a greased bowl for 1 hour, until doubled.

    Step 2: Make the Filling

    1. Beat cream cheese, sugar, vanilla, and heavy cream until smooth and fluffy.
    2. Refrigerate while dough rises.

    Step 3: Fill & Shape

    1. Punch down dough. Divide into 6 equal balls.
    2. Flatten each ball into a 4-inch circle. Place 2 tablespoons of cream cheese filling in the center.
    3. Pinch edges to seal tightly. Place seam-side down on a parchment-lined baking sheet.
    4. Let rise for 30 minutes.

    Step 4: Bake & Dust

    1. Preheat oven to 350°F (175°C).
    2. Bake for 18-20 minutes until golden brown.
    3. Cool for 5 minutes. Dust generously with powdered sugar.
    4. Serve slightly warm. Watch people lose their minds.

    Summary

    Prep Time: 20 minutes | Rise Time: 1.5 hours | Bake Time: 20 minutes

    Yield: 6 buns | Difficulty: Medium

    Storage Notes

    Store in an airtight container in the fridge for up to 4 days. Bring to room temperature or microwave for 10 seconds before serving. Freeze unfilled dough for up to 2 months. Filled buns do not freeze well (the cream cheese gets grainy).

  • Classic Palmiers: Fancy Cookies That Fake Being Hard

    Classic Palmiers: Fancy Cookies That Fake Being Hard

    French pastries have a reputation for being fussy. Palmiers said “nah.”

    These crispy, caramelized butterfly cookies are just puff pastry, sugar, and butter. No rolling pin gymnastics. No chill time. Just fold, slice, bake, and pretend you spent hours in the kitchen.

    Ingredients

    Makes about 20 palmiers.

    • 1 sheet frozen puff pastry, thawed
    • ½ cup granulated sugar, plus more for rolling
    • 2 tablespoons unsalted butter, very soft

    Step-by-Step Instructions

    Step 1: Prep

    1. Preheat oven to 400°F (200°C). Line a baking sheet with parchment.
    2. Sprinkle a clean surface with a thick layer of sugar.

    Step 2: Sugar the Dough

    1. Unfold puff pastry onto the sugar. Lightly roll it to press sugar into both sides.
    2. Spread soft butter over the top. Sprinkle with remaining sugar.

    Step 3: Fold Like a Letter

    1. Fold the left edge toward the center. Fold the right edge to meet it.
    2. Fold again like a book (left over right). You’ll have a 4-layer strip.
    3. Chill for 10 minutes to firm up.

    Step 4: Slice & Bake

    1. Slice the log into ¼-inch slices. Dip cut sides in sugar.
    2. Place on baking sheet, 2 inches apart. Flatten slightly.
    3. Bake for 10-12 minutes. Flip and bake 3-5 more minutes until deep golden and caramelized.
    4. Cool on a wire rack. Try not to eat all twenty.

    Summary

    Prep Time: 10 minutes | Bake Time: 15 minutes | Total Time: 25 minutes

    Yield: 20 palmiers | Difficulty: Easy

    Storage Notes

    Store in an airtight container at room temperature for up to 5 days (if they last that long). Freeze baked palmiers for up to 2 months. To re-crisp, bake at 350°F for 5 minutes.

  • Cinnamon Twists: Twisted, Sugary, Dangerously Snackable

    Cinnamon Twists: Twisted, Sugary, Dangerously Snackable

    Don’t have time for cinnamon rolls? Same. Enter cinnamon twists.

    These are faster, crunchier, and somehow more addictive. Puff pastry + butter + cinnamon sugar + a quick twist = a snack that disappears before the coffee is done brewing. Let’s twist.

    Ingredients

    Makes 12 twists.

    For the Twists:

    • 1 sheet frozen puff pastry, thawed
    • 3 tablespoons unsalted butter, melted
    • ½ cup granulated sugar
    • 1 tablespoon ground cinnamon

    For the Glaze (Optional but Mandatory):

    • ½ cup powdered sugar
    • 1-2 tablespoons milk
    • ¼ teaspoon vanilla extract

    Step-by-Step Instructions

    Step 1: Prep

    1. Preheat oven to 375°F (190°C). Line a baking sheet with parchment.
    2. Mix sugar and cinnamon in a shallow bowl.

    Step 2: Assemble

    1. Roll puff pastry into a 10×12-inch rectangle.
    2. Brush generously with melted butter.
    3. Sprinkle cinnamon sugar evenly over the entire surface.
    4. Fold the pastry in half lengthwise, like closing a book.

    Step 3: Twist

    1. Cut the folded pastry into 12 strips (each about 1 inch wide).
    2. Hold each strip at both ends and twist in opposite directions 3-4 times.
    3. Place twists on the baking sheet, pressing down the ends gently.

    Step 4: Bake & Glaze

    1. Bake for 12-15 minutes until golden brown and puffed.
    2. Whisk powdered sugar, milk, and vanilla until smooth.
    3. Drizzle glaze over warm twists. Let set for 5 minutes. Then fight for the last one.

    Summary

    Prep Time: 10 minutes | Bake Time: 15 minutes | Total Time: 25 minutes

    Yield: 12 twists | Difficulty: Easy

    Storage Notes

    Store in an airtight container for up to 3 days. To re-crisp, pop in an air fryer at 350°F for 3 minutes or in an oven for 5 minutes. They’re still good cold, but warm is a religious experience.

  • Pain au Chocolat: Chocolate for Breakfast (As the French Intended)

    Pain au Chocolat: Chocolate for Breakfast (As the French Intended)

    Pain au Chocolat means “chocolate bread.” But really, it means “the best thing to ever happen to breakfast.”

    This version uses store-bought puff pastry. No lamination. No butter blocks. No tears. Just crispy, golden layers and warm, melty chocolate. Ten minutes of assembly. Eight minutes in the oven. You’re welcome.

    Ingredients

    Makes 8 pastries.

    • 1 sheet frozen puff pastry (thawed, about 9×10 inches)
    • 4 oz dark or semi-sweet chocolate (baking bar, not chips)
    • 1 large egg, beaten (for egg wash)
    • Optional: powdered sugar for dusting

    Step-by-Step Instructions

    Step 1: Prep

    1. Preheat oven to 400°F (200°C). Line a baking sheet with parchment.
    2. Cut chocolate bar into 8 equal sticks (about 2 inches long and ½ inch thick).

    Step 2: Cut the Dough

    1. Roll puff pastry slightly to smooth it. Cut into 8 rectangles (about 4×5 inches each).

    Step 3: Fill & Roll

    1. Place 2 chocolate sticks at one short end of each rectangle.
    2. Roll the dough tightly around the chocolate, like a sleeping bag.
    3. Place seam-side down on the baking sheet.

    Step 4: Egg Wash & Bake

    1. Brush tops with beaten egg.
    2. Bake for 15-18 minutes until puffed, golden, and crispy.
    3. Cool for 5 minutes. Dust with powdered sugar. Eat while chocolate is still lava.

    Summary

    Prep Time: 10 minutes | Bake Time: 18 minutes | Total Time: 28 minutes

    Yield: 8 pastries | Difficulty: Easy

    Storage Notes

    Best eaten day-of. Store leftovers in an airtight container for up to 2 days. Reheat in an oven or air fryer at 350°F for 5 minutes. Never microwave—you’ll destroy the flaky layers and turn the chocolate into a weapon.

  • Ham and Cheese Croissants: Flaky, Gooey, Gone in 60 Seconds

    Ham and Cheese Croissants: Flaky, Gooey, Gone in 60 Seconds

    Croissants are already perfect. Then you add ham. Then you add cheese. Then you bake it until the cheese tries to escape.

    These ham and cheese croissants are dangerous. Flaky, buttery layers. Warm, salty ham. Stretchy, nutty Gruyère. Fifteen minutes from fridge to face. Let’s get melty.

    Ingredients

    Makes 4 croissants.

    • 4 large butter croissants (day-old is fine)
    • 4 oz (115g) thinly sliced ham (honey or black forest)
    • 4 oz (115g) Gruyère cheese, shredded or thinly sliced
    • 2 tablespoons Dijon mustard (optional but clutch)
    • 2 tablespoons unsalted butter, melted

    Step-by-Step Instructions

    Step 1: Prep & Preheat

    1. Preheat oven to 375°F (190°C). Line a baking sheet with parchment.

    Step 2: Assemble

    1. Slice each croissant in half horizontally, like a book.
    2. Spread Dijon mustard on the bottom half (if using).
    3. Layer ham on the mustard, folding it to fit.
    4. Pile on the Gruyère cheese generously.
    5. Close with the top croissant half.

    Step 3: Butter & Bake

    1. Brush the tops of the croissants with melted butter.
    2. Place on the baking sheet. Bake for 8-10 minutes until golden brown and the cheese is bubbling out the sides.

    Step 4: Serve Hot

    1. Let cool for 1 minute (or burn your mouth immediately—your choice).
    2. Serve warm with a pickle or a green salad.

    Summary

    Prep Time: 5 minutes | Bake Time: 10 minutes | Total Time: 15 minutes

    Yield: 4 croissants | Difficulty: So Easy

    Storage Notes

    Best eaten fresh. To reheat leftover assembled croissants, air fry at 350°F for 3-4 minutes or bake at 350°F for 5 minutes. Do not microwave—soggy croissants are a tragedy.

  • Everything Bagels: Better Than Your Local Bakery (Seriously)

    Everything Bagels: Better Than Your Local Bakery (Seriously)

    Store-bought bagels are lying to you. Real bagels are boiled. That’s what gives them that chewy, snappy crust.

    These everything bagels are the real deal. Golden, blistered, coated in garlicky, seedy goodness. Make a batch once and you’ll never go back to the sad supermarket ones again.

    Ingredients

    Makes 8 bagels.

    For the Dough:

    • 4 cups bread flour (or all-purpose)
    • 1 packet (2 ¼ tsp) instant yeast
    • 1 ½ teaspoons salt
    • 1 tablespoon brown sugar
    • 1 ¼ cups warm water (about 110°F)

    For the Boil:

    • 10 cups water
    • 1 tablespoon brown sugar or honey

    For Topping:

    • ¼ cup everything bagel seasoning (store-bought or homemade)
    • 1 egg white beaten with 1 tablespoon water (for sticking)

    Step-by-Step Instructions

    Step 1: Make the Dough

    1. In a large bowl, whisk flour, yeast, salt, and brown sugar.
    2. Add warm water. Mix until a shaggy dough forms.
    3. Knead for 8-10 minutes until smooth and elastic.
    4. Let rise in a greased bowl for 1 hour, until doubled.

    Step 2: Shape the Bagels

    1. Punch down dough. Divide into 8 equal pieces.
    2. Roll each into a ball. Poke a hole through the center with your thumb.
    3. Gently stretch the hole to about 1 inch wide.
    4. Place on a parchment-lined baking sheet. Cover and rest for 10 minutes.

    Step 3: Boil ‘Em

    1. Preheat oven to 425°F (220°C).
    2. Bring 10 cups water and 1 tablespoon brown sugar to a boil.
    3. Drop 2-3 bagels into the water. Boil for 45 seconds per side.
    4. Remove with a slotted spoon. Return to baking sheet.

    Step 4: Top & Bake

    1. Brush bagels with egg white wash.
    2. Sprinkle generously with everything seasoning (press it in gently).
    3. Bake for 18-20 minutes until deep golden brown.
    4. Cool on a wire rack for 10 minutes. Then schmear, eat, repeat.

    Summary

    Prep Time: 20 minutes | Rise Time: 1 hour 10 minutes | Bake Time: 20 minutes

    Yield: 8 bagels | Difficulty: Medium

    Storage Notes

    Store in an airtight container for up to 3 days. Freeze for up to 3 months. To reheat, slice and toast straight from frozen. Never microwave. Never.

  • Homemade Sourdough: Loud, Proud, and Perfectly Crusted

    Homemade Sourdough: Loud, Proud, and Perfectly Crusted

    Making sourdough feels like a rite of passage. But it shouldn’t feel like a chemistry exam.

    This recipe is simple, forgiving, and produces a loaf that cracks, pops, and tastes like a bakery threw up in your kitchen (in the best way). You’ll need an active starter. Everything else is patience and your two hands.

    Ingredients

    Makes 1 large loaf.

    • 100g active sourdough starter (fed 4-8 hours ago)
    • 350g warm water (about 80°F)
    • 500g bread flour (or all-purpose in a pinch)
    • 10g salt (about 2 teaspoons)

    Tools: Dutch oven, parchment paper, scoring knife or razor blade

    Step-by-Step Instructions

    Step 1: Mix the Dough

    1. In a large bowl, whisk starter and warm water until milky.
    2. Add flour and salt. Mix with your hands until no dry bits remain. It will look shaggy. That’s fine.
    3. Cover and rest for 30 minutes (autolyse).

    Step 2: Stretch & Folds

    1. Over 2 hours, perform 4 sets of stretch and folds. Every 30 minutes.
    2. To do a set: wet your hands, grab a side of dough, stretch it up, and fold it over the center. Rotate bowl and repeat 4 times.
    3. After the last fold, cover and let dough finish bulk fermenting until it’s puffy, jiggly, and has bubbles on top (about 2-4 more hours depending on your kitchen temp).

    Step 3: Shape & Cold Proof

    1. Turn dough onto a lightly floured surface. Shape into a tight round.
    2. Place seam-side up into a floured proofing basket or a bowl lined with a floured towel.
    3. Cover and refrigerate for 8-12 hours (overnight).

    Step 4: Bake

    1. Preheat Dutch oven inside your oven to 500°F (260°C) for 30 minutes.
    2. Turn dough onto parchment paper. Score the top with a razor blade (one deep slash).
    3. Lower dough into Dutch oven using parchment. Cover with lid.
    4. Bake covered for 20 minutes. Remove lid, lower heat to 450°F (230°C), and bake uncovered for 15-20 minutes until dark golden brown.
    5. Cool completely on a wire rack before slicing (at least 1 hour or it will be gummy).

    Summary

    Prep Time: 30 minutes | Ferment + Proof: 12-16 hours | Bake Time: 40 minutes

    Yield: 1 large loaf | Difficulty: Medium (requires patience, not skill)

    Storage Notes

    Store cut side down on a cutting board at room temperature for up to 3 days. Never refrigerate (it stales faster). Freeze whole or sliced for up to 3 months. Toast frozen slices straight from the freezer.

  • Lumpiang Shanghai (Little Crunchy Packets of Joy)

    Lumpiang Shanghai (Little Crunchy Packets of Joy)

    Small size. Big crunch. Huge flavor.

    Lumpiang Shanghai are the crispy, golden, pork-filled spring rolls that disappear faster than you can fry them. Make a batch. Hide some for yourself.

    Ingredients

    Makes 25–30 rolls.

    • 25–30 small spring roll wrappers (lumpia wrappers)
    • ½ lb (225g) ground pork
    • ¼ cup (25g) finely chopped carrot
    • ¼ cup (30g) finely chopped onion
    • 2 green onions, minced
    • 1 egg (for filling + separate for sealing)
    • 1 tablespoon soy sauce
    • ½ teaspoon black pepper
    • Oil for frying

    Step-by-Step Instructions

    Step 1: Make Filling

    1. Mix pork, carrot, onion, green onions, 1 egg, soy sauce, and pepper in a bowl.

    Step 2: Roll

    1. Place 1½ teaspoons filling near one corner of a wrapper.
    2. Fold corner over filling. Fold in sides. Roll tightly.
    3. Seal edge with beaten egg (the extra egg).
    4. Repeat. They should be cigar-thin.

    Step 3: Fry

    1. Heat 1 inch of oil to 350°F (175°C).
    2. Fry rolls in batches for 3–4 minutes until golden brown and crispy.
    3. Drain on paper towels.

    Summary

    Prep Time: 20 minutes | Cook Time: 10 minutes | Total Time: 30 minutes

    Yield: 25–30 rolls

    Difficulty: Medium (rolling takes patience)

    Storage Notes

    • Fridge (uncooked): Keep rolled lumpia in a single layer, covered, for up to 1 day.
    • Freezer (uncooked): Freeze on a tray, then transfer to a bag. Fry from frozen—add 1–2 minutes.
    • Leftovers (cooked): Reheat in air fryer at 350°F for 3–4 minutes or oven at 375°F for 8 minutes.

    Pro tip: Serve with sweet chili sauce or vinegar with garlic. Don’t skip the dip.

  • Buffalo Wings (Spicy, Tangy & 35 Minutes)

    Buffalo Wings (Spicy, Tangy & 35 Minutes)

    Buffalo wings are a game day legend. Spicy. Tangy. Buttery. Crispy baked wings tossed in classic Frank’s RedHot sauce. 35 minutes. Ranch or blue cheese on the side. Celery sticks mandatory.

    Keep napkins close.

    Ingredients

    Serves 4 (about 2 lbs wings).

    For the Wings:

    • 2 lbs chicken wings (drumettes and flats)
    • 1 tbsp baking powder (not baking soda—crispy secret!)
    • ½ tsp salt
    • ¼ tsp black pepper
    • ½ tsp garlic powder

    For the Buffalo Sauce:

    • ½ cup Frank’s RedHot sauce (or similar)
    • 4 tbsp unsalted butter, melted
    • 1 tbsp white vinegar
    • ½ tsp garlic powder
    • ¼ tsp cayenne pepper (optional, for extra heat)

    For Serving:

    • Ranch or blue cheese dressing
    • Celery sticks
    • Carrot sticks (optional)

    Step-by-Step Instructions

    Step 1: Preheat & Prep Wings

    1. Preheat oven to 425°F (220°C). Line a baking sheet with foil and place a wire rack on top.
    2. Pat wings completely dry with paper towels.
    3. In a bowl, toss wings with baking powder, salt, pepper, and garlic powder.

    Step 2: Bake the Wings

    1. Arrange wings on the wire rack in a single layer.
    2. Bake for 20 minutes. Flip. Bake 10-15 more minutes until golden and crispy.

    Step 3: Make the Buffalo Sauce

    1. In a bowl, whisk together Frank’s RedHot, melted butter, vinegar, garlic powder, and cayenne.

    Step 4: Toss & Serve

    1. Place baked wings in a large bowl. Pour buffalo sauce over wings. Toss to coat.
    2. Serve hot with ranch or blue cheese dressing and celery sticks.

    Summary

    Prep Time: 10 minutes | Cook Time: 30-35 minutes | Total Time: 40-45 minutes

    Yield: 4 servings

    Difficulty: Easy

    Storage Notes

    Best fresh and crispy. Keeps in fridge for 3 days. Reheat in oven or air fryer at 375°F for 5-7 minutes (microwave makes skin soft). The sauce-soaked wings are still delicious the next day.