Category: desserts

  • Deep-Fried Oreos: State Fair Magic at Home

    Deep-Fried Oreos: State Fair Magic at Home

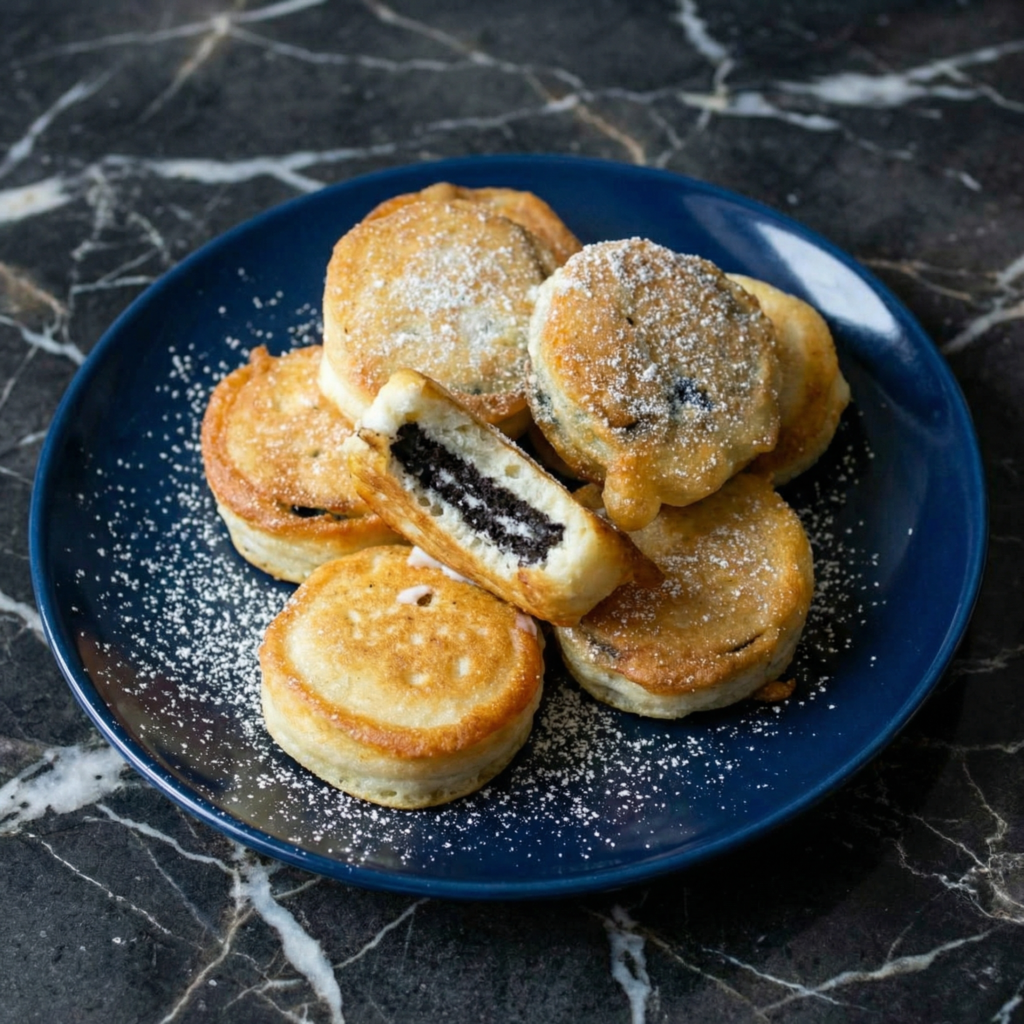
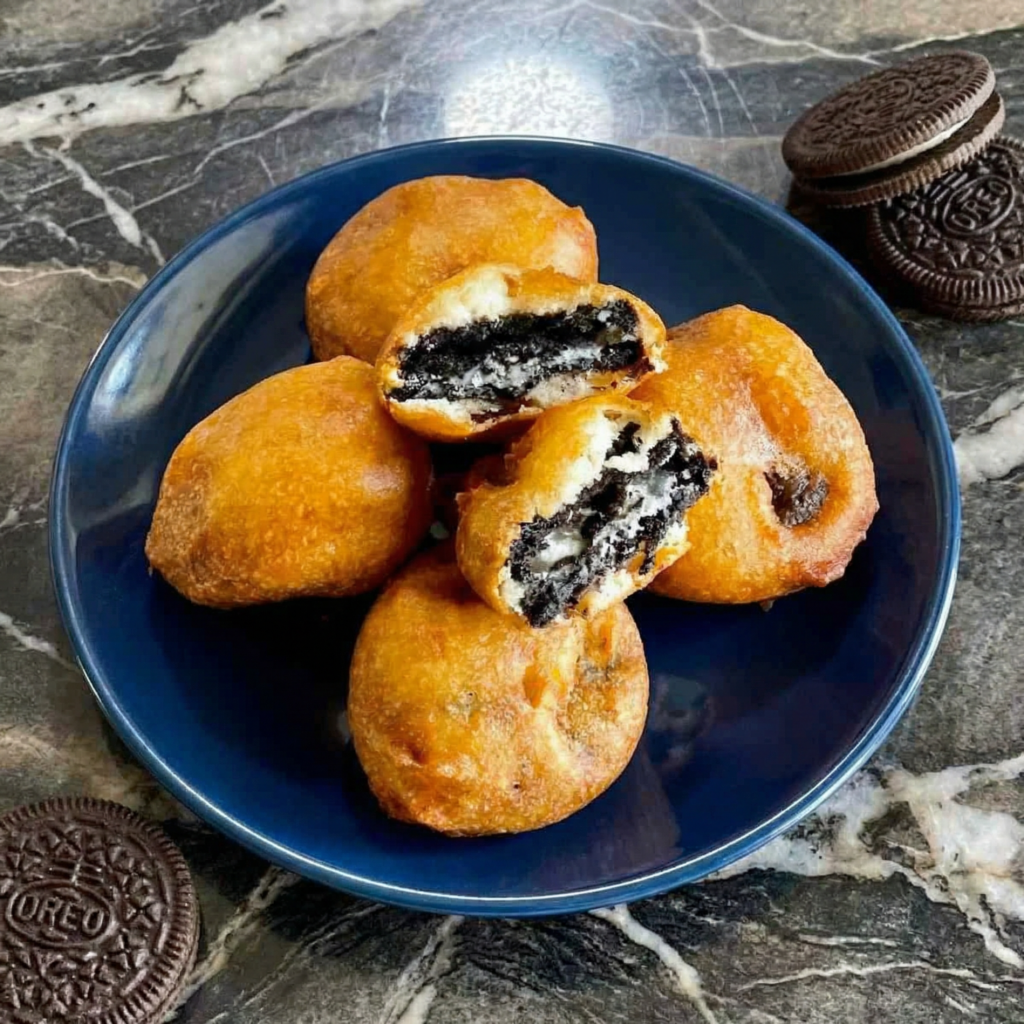
    Deep-fried Oreos are the quintessential state fair indulgence. The cookie that becomes something else entirely—warm, melty, with a crispy, golden exterior that gives way to a soft, chocolatey center. It’s the kind of treat that makes you wait in long lines and spend too many tickets.

    But here’s the secret: you can make them at home. No carnival required. A simple pancake-like batter, a pot of hot oil, and about 10 minutes. They come out just as crispy, just as melty, and infinitely more satisfying because you made them yourself.

    Ingredients

    Serves 4-6 (makes 12-16 Oreos).

    For the Fried Oreos:

    • 1 package Oreo cookies (regular, not Double Stuf—they can split)
    • 1 cup all-purpose flour
    • 1 tbsp sugar
    • 1 tsp baking powder
    • ¼ tsp salt
    • 1 cup milk
    • 1 large egg
    • 1 tsp vanilla extract
    • Neutral oil, for frying (vegetable, canola, or peanut)

    For Serving:

    • Powdered sugar, for dusting
    • Chocolate syrup (optional)
    • Whipped cream (optional)
    • Strawberries or raspberries (optional)

    Step-by-Step Instructions

    Step 1: Make the Batter

    1. In a medium bowl, whisk together flour, sugar, baking powder, and salt.
    2. In a separate bowl, whisk together milk, egg, and vanilla.
    3. Pour wet ingredients into dry and whisk until just combined. A few small lumps are okay—don’t overmix. The batter should be thick enough to coat a spoon.
    4. Let the batter rest for 5-10 minutes while the oil heats.

    Step 2: Heat the Oil

    1. Pour oil into a heavy-bottomed pot or Dutch oven to a depth of about 2 inches.
    2. Heat oil to 375°F (190°C). Use a thermometer—temperature control is key.

    Step 3: Dip and Coat

    1. Working one at a time, dip an Oreo into the batter, turning to coat completely. Let any excess drip off.
    2. Carefully lower the battered Oreo into the hot oil. Don’t crowd the pot—fry 3-4 at a time.

    Step 4: Fry to Golden Perfection

    1. Fry for 1-2 minutes per side, flipping once, until deep golden brown and puffed.
    2. Remove with a slotted spoon and drain briefly on a paper towel-lined plate.

    Step 5: Serve Immediately

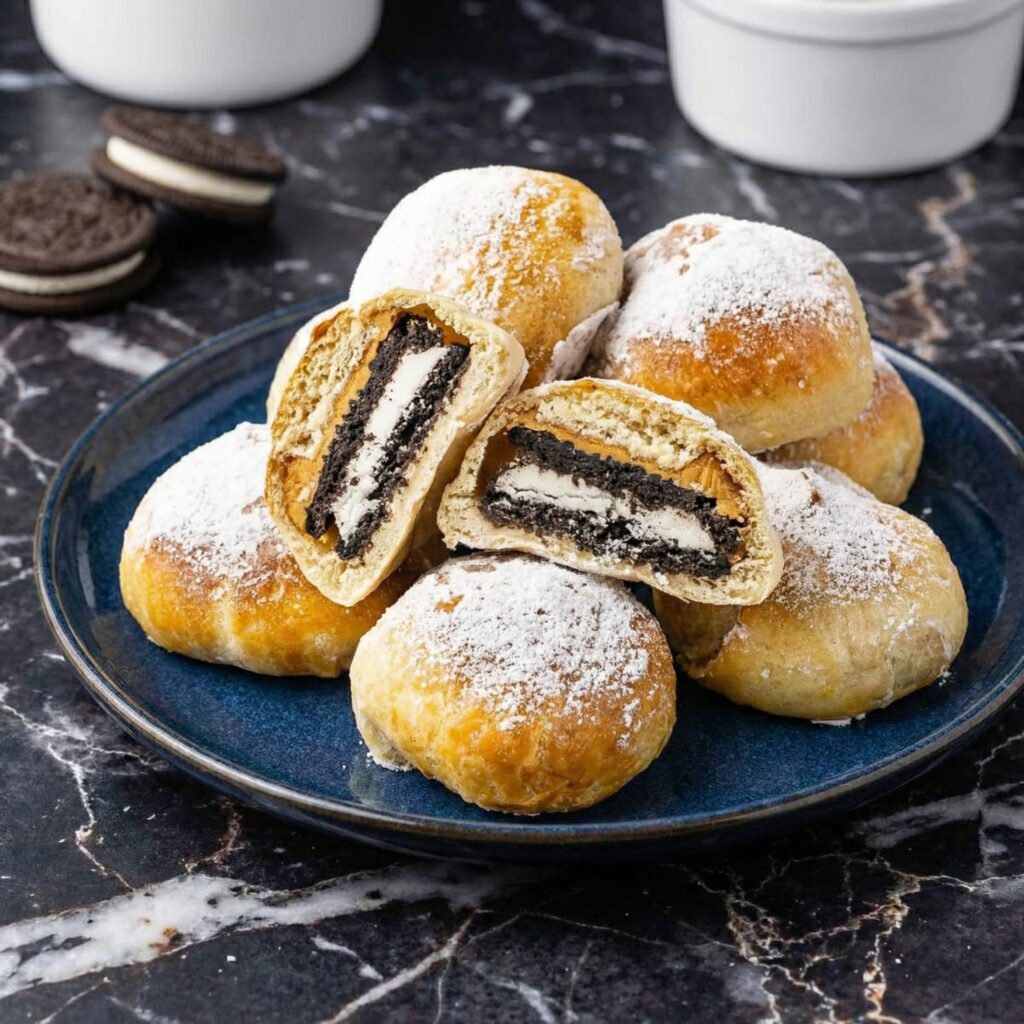
    1. Arrange fried Oreos on a serving platter. Dust generously with powdered sugar.
    2. Drizzle with chocolate syrup and add a dollop of whipped cream if you’re going all out.
    3. Take a bite while they’re still warm. The outside is crispy. The inside is melty. The Oreo has transformed. This is fair food magic.

    Summary

    Prep Time: 10 minutes | Cook Time: 10 minutes | Total Time: 20 minutes

    Yield: 12-16 Oreos

    Difficulty: Carnival-easy

    Storage Notes

    Leftovers (If They Last):

    Deep-fried Oreos are best eaten immediately—they lose their crispiness within an hour. If you must store, keep in an airtight container at room temperature for up to 1 day. Reheat briefly in the oven or air fryer to restore some crunch.

    Reheating:

    Air fryer (best): 350°F for 2-3 minutes. Oven: 375°F for 3-4 minutes on a wire rack. Microwave: Not recommended—they’ll become soggy and sad.

    Make Ahead:

    The batter can be made up to 1 hour ahead and refrigerated. Stir before using. Fry just before serving for maximum crispiness.

    Pro Tips for Deep-Fried Oreo Greatness:

    • Regular Oreos work best. Double Stuf can split open during frying. The classic holds up better.
    • Don’t overmix the batter. A few lumps are fine. Overmixing develops gluten and makes the coating tough.
    • Let the batter rest. 5-10 minutes gives the baking powder time to activate and the gluten to relax.
    • Maintain oil temperature. 375°F is the sweet spot. Too cool = greasy Oreos. Too hot = burnt outside, raw inside.
    • Work in small batches. Overcrowding drops the oil temperature. Fry 3-4 at a time.
    • Drain briefly, then serve. A quick drain on paper towels removes excess oil. But serve immediately—they wait for no one.
    • Powdered sugar is essential. It adds sweetness and makes them look like they came from a fair booth.
  • Chocolate Éclairs That Would Make a French Baker Weep, With Joy

    Chocolate Éclairs That Would Make a French Baker Weep, With Joy

    Let’s be honest: biting into a perfect chocolate éclair is a near-religious experience. First, your teeth crack through that impossibly crisp, golden shell. Then you sink into a cloud of cool, velvety vanilla pastry cream.

    Finally, the whole thing is crowned by a thick, bittersweet chocolate glaze that shatters ever so slightly. It’s a symphony of textures, and it’s pure magic.

    Ingredients

    Makes about 12-14 éclairs.

    For the Pâte à Choux (Cream Puff Dough):

    • 1 cup (240ml) water
    • ½ cup (115g) unsalted butter, cut into cubes
    • 1 tablespoon granulated sugar
    • ¼ teaspoon salt
    • 1 cup (125g) all-purpose flour
    • 4 large eggs, at room temperature
    • 1 egg beaten with 1 teaspoon water (for egg wash)

    For the Vanilla Pastry Cream:

    • 2 cups (480ml) whole milk
    • 1 vanilla bean, split and scraped (or 2 teaspoons vanilla extract)
    • 5 large egg yolks
    • ½ cup (100g) granulated sugar
    • ¼ cup (30g) cornstarch
    • 2 tablespoons (30g) unsalted butter, cubed
    • Pinch of salt

    For the Chocolate Glaze:

    • 4 oz (115g) semi-sweet or bittersweet chocolate, finely chopped
    • ½ cup (120ml) heavy cream
    • 2 tablespoons unsalted butter, softened
    • 1 tablespoon light corn syrup (optional, for extra shine)

    Step-by-Step Instructions

    Part 1: Make the Pastry Cream (Can be done a day ahead)

    Step 1: Heat the Milk

    1. In a medium saucepan, combine the milk and the scraped vanilla bean seeds (and the pod, if using). Heat over medium heat until it just begins to simmer. Remove from heat, cover, and let it steep for 15-20 minutes to infuse the vanilla flavor. Remove the pod.

    Step 2: Whisk Egg Yolks and Sugar

    1. In a separate large bowl, whisk the egg yolks and sugar together until the mixture is pale and thick. This takes about 2 minutes of vigorous whisking.
    2. Whisk in the cornstarch and a pinch of salt until smooth and no lumps remain.

    Step 3: Temper the Egg Mixture

    1. Slowly pour about ¼ of the hot milk into the egg yolk mixture while whisking constantly. This tempers the eggs and prevents them from scrambling.
    2. Pour the tempered egg mixture back into the saucepan with the remaining milk, whisking continuously.

    Step 4: Thicken the Cream

    1. Return the saucepan to medium heat and cook, whisking constantly and vigorously, until the mixture thickens and comes to a boil. It will become very thick and start to bubble. Cook for one more minute to cook out the cornstarch taste.
    2. Remove from heat and whisk in the cubed butter until completely melted and smooth.

    Step 5: Chill the Pastry Cream

    1. Pour the pastry cream through a fine-mesh sieve into a shallow bowl to remove any potential lumps.
    2. Press a piece of plastic wrap directly onto the surface of the cream to prevent a skin from forming. Refrigerate for at least 2 hours, or until completely cold.

    Part 2: Make the Pâte à Choux (Éclair Shells)

    Step 6: Cook the Dough on the Stove

    1. Preheat your oven to 425°F (220°C). Line two baking sheets with parchment paper.
    2. In a medium saucepan, combine the water, butter, sugar, and salt. Bring to a boil over medium heat, stirring occasionally, until the butter is completely melted.
    3. Once boiling, remove the pan from the heat and add all the flour at once. Stir vigorously with a wooden spoon until the flour is fully incorporated.
    4. Return the pan to medium heat and cook, stirring constantly, for 2-3 minutes. You’ll see a thin film form on the bottom of the pan, and the dough will pull away from the sides and form a smooth ball.

    Step 7: Add the Eggs

    1. Transfer the dough to the bowl of a stand mixer fitted with the paddle attachment. Mix on low speed for a minute to let it cool down slightly.
    2. With the mixer on medium speed, add the eggs one at a time, beating well after each addition until the dough is smooth and glossy. After the last egg, beat for another minute. The dough should be thick, shiny, and fall from the paddle in a thick ribbon.

    Step 8: Pipe the Éclairs

    1. Transfer the dough to a large piping bag fitted with a large (½-inch) plain or star tip.
    2. Pipe 4-inch long strips of dough onto the prepared baking sheets, leaving about 2 inches between each to allow for puffing.
    3. Lightly beat the remaining egg with a teaspoon of water to make an egg wash. Gently brush the tops of the piped dough strips with the egg wash, smoothing down any peaks.
    4. Use the tines of a fork to gently score a light line down the length of each éclair. This helps them rise evenly.

    Step 9: Bake the Shells

    1. Bake at 425°F for 10 minutes, then reduce the oven temperature to 350°F (175°C) and bake for another 20-25 minutes, until the éclairs are puffed, deep golden brown, and feel light and hollow when lifted.
    2. Turn off the oven, prop the door open slightly with a wooden spoon, and let the shells cool completely in the oven. This helps them dry out and stay crisp.

    Part 3: Assemble the Éclairs

    Step 10: Fill the Éclairs

    1. Once the shells are completely cool, prepare the pastry cream for piping by whisking it briefly to loosen it up.
    2. Fit a piping bag with a long, thin filling tip (like a Bismarck tip). Fill the bag with pastry cream.
    3. Using the tip, poke three small holes in the bottom of each éclair (one near each end and one in the middle). Gently pipe the cream into each hole until the éclair feels heavy and full.

    Step 11: Make the Chocolate Glaze

    1. Place the finely chopped chocolate in a medium heat-proof bowl.
    2. In a small saucepan, heat the heavy cream over medium heat until it just begins to simmer (small bubbles around the edges).
    3. Pour the hot cream over the chocolate and let it sit for 2-3 minutes.
    4. Gently whisk until the chocolate is completely melted and the mixture is smooth and glossy. Whisk in the softened butter and corn syrup (if using) until combined and shiny.

    Step 12: Glaze and Serve

    1. Let the glaze cool for a few minutes until it thickens slightly but is still pourable.
    2. Hold each filled éclair by its ends and dip the top into the glaze, gently twisting as you lift it to let the excess drip off.
    3. Place the glazed éclairs on a wire rack set over a baking sheet to catch any drips.
    4. Allow the glaze to set for about 30 minutes before serving. These are best enjoyed the day they are made.

    Summary

    Prep Time: 1 hour (plus chilling) | Bake Time: 35 minutes | Assembly Time: 30 minutes | Total Time: About 3 hours (mostly hands-off chilling)

    Yield: 12-14 éclairs

    Difficulty: Advanced (but so worth it!)

    Storage and Make-Ahead Tips

    How to Store:

    Éclairs are truly at their peak the day they are made and assembled. The shells are crispiest and the texture is perfect. However, you can store filled and glazed éclairs in the refrigerator for up to 24 hours. Be aware that the shells will soften over time.

    Make-Ahead Components:

    Pastry Cream: Can be made up to 3 days in advance and stored in the refrigerator with plastic wrap pressed onto the surface.

    Éclair Shells: This is the best make-ahead option. Bake the shells completely, let them cool, and then store them in an airtight container at room temperature for up to 2 days. You can also freeze them in a freezer bag for up to a month. To re-crisp, place them in a 300°F oven for 5-7 minutes before cooling and filling.

    Can You Freeze Assembled Éclairs?

    It is not recommended. The cream filling will become icy and the shells will be very soft upon thawing. It’s much better to freeze the components separately.

  • Fudgy Brownies

    Fudgy Brownies

    Let’s talk about brownies. Not cakey brownies, not borderline-brownie muffins, but the real deal: dense, fudgy, intensely chocolate brownies with that iconic crackly, paper-thin top that shatters ever so slightly when you bite into them.

    This is that recipe. The one you’ll come back to again and again, the one that disappears from bake sales in minutes, the one that friends will beg you to share. Made with cocoa powder for that deep chocolate flavor and a technique that guarantees that beautiful crackly crust, these brownies are pure perfection.

    They’re rich without being overwhelming, fudgy without being underbaked, and absolutely deadly with a glass of cold milk. Let’s bake the best brownies of your life.

    Ingredients

    Yields 16 brownies (8×8 inch pan).

    For the Brownies:

    • ¾ cup (170g) unsalted butter
    • 1 ¼ cups (250g) granulated sugar
    • ¾ cup (75g) unsweetened cocoa powder (Dutch-process recommended)
    • ½ teaspoon salt
    • 2 large eggs, cold
    • 1 teaspoon vanilla extract
    • ¾ cup (95g) all-purpose flour
    • ¼ teaspoon baking powder (optional, for slightly cakier brownies)

    Optional Add-Ins:

    • 1 cup (175g) semi-sweet chocolate chips or chunks
    • ½ cup chopped walnuts or pecans
    • Flaky sea salt for sprinkling

    Step-by-Step Instructions

    1. Preheat and Prepare:

    1. Preheat your oven to 350°F (175°C). Line an 8×8 inch baking pan with parchment paper, leaving overhang on two opposite sides for easy removal. Lightly grease the parchment.

    2. Melt the Butter:

    1. In a medium saucepan over low heat, melt the butter completely. Remove from heat as soon as it’s melted.
    2. Add the sugar, cocoa powder, and salt to the warm melted butter. Whisk vigorously until everything is combined and the mixture looks like a thick, grainy paste. It will be quite thick—this is normal.
    3. Let the mixture cool for 2-3 minutes. It should be warm but not hot to the touch. This is important so you don’t scramble the eggs.

    3. Add the Eggs and Vanilla:

    1. Add the cold eggs one at a time, whisking vigorously after each addition. The mixture will go from thick and pasty to smooth, glossy, and beautifully fudgy. This is where that crackly top magic starts to happen!
    2. Whisk in the vanilla extract.

    4. Add the Flour:

    1. Sprinkle the flour (and baking powder if using) over the chocolate mixture.
    2. Fold gently with a spatula until just combined. Be careful not to overmix. If you’re adding chocolate chips or nuts, fold them in now.
    3. The batter will be thick, fudgy, and glossy—exactly what you want.

    5. Bake:

    1. Pour the batter into the prepared pan and spread it into an even layer.
    2. If desired, sprinkle a few extra chocolate chips or a pinch of flaky sea salt on top.
    3. Bake for 25-30 minutes, until a toothpick inserted into the center comes out with a few moist crumbs (not wet batter). The edges should look set and the top should be crackly and shiny.
    4. Let the brownies cool completely in the pan on a wire rack. This is important for clean slices and the perfect fudgy texture.

    6. Slice and Serve:

    1. Once completely cool, use the parchment overhang to lift the entire block of brownies onto a cutting board.
    2. Slice into 16 squares with a sharp knife, wiping the blade clean between cuts for neat edges.
    3. Serve at room temperature. Store leftovers in an airtight container.

    Summary

    Prep Time: 10 minutes | Bake Time: 25-30 minutes | Cooling Time: 1 hour | Total Time: 1 hour 40 minutes

    Yield: 16 brownies

    Difficulty: Easy

    Storage and Make-Ahead Tips

    How to Store:

    Store brownies in an airtight container at room temperature for up to 5 days. Place a piece of parchment paper between layers to prevent sticking. They actually get even fudgier the next day!

    Can You Freeze Brownies?

    Absolutely! Brownies freeze beautifully. Wrap individual brownies or the whole slab tightly in plastic wrap, then in foil, and place in a freezer bag. Freeze for up to 3 months. Thaw at room temperature.

    Freezing Brownie Batter:

    You can freeze the brownie batter in the pan. Prepare the batter, pour into the parchment-lined pan, cover tightly with plastic wrap and foil, and freeze for up to 3 months. Bake from frozen, adding 5-10 minutes to the baking time.

    Make-Ahead for Parties:

    Brownies are actually better the next day. Make them a day ahead, store at room temperature, and slice just before serving.

    Reviving Stale Brownies:

    If your brownies have been around for a few days and are starting to dry out, microwave them for 10-15 seconds. They’ll taste almost freshly baked!

  • Perfect Blondies

    Perfect Blondies

    Brownies get all the attention, but let’s take a moment to appreciate their equally delicious cousin: the blondie. Where brownies are deep, dark, and intense, blondies are buttery, caramel-y, and just pure comfort in bar form.

    These perfect blondies are everything you want them to be—chewy around the edges, soft and tender in the middle, with that unmistakable brown sugar and butter flavor that reminds you of the best chocolate chip cookie you’ve ever had.

    Load them up with chocolate chips, nuts, or anything else your heart desires. They come together in one bowl with no mixer required, and they disappear just as fast as you can bake them. Let’s give blondies the spotlight they deserve.

    Ingredients

    Yields 16 blondies (8×8 inch pan).

    For the Blondies:

    • ½ cup (115g) unsalted butter, melted and slightly cooled
    • 1 cup (200g) light brown sugar, packed
    • 1 large egg, at room temperature
    • 1 teaspoon vanilla extract
    • 1 cup (125g) all-purpose flour
    • ½ teaspoon baking powder
    • ¼ teaspoon baking soda
    • ½ teaspoon salt

    Optional Add-Ins (Choose Your Adventure):

    • 1 cup (175g) semi-sweet or milk chocolate chips
    • ½ cup chopped walnuts or pecans
    • ½ cup white chocolate chips
    • ½ cup butterscotch chips
    • ½ cup dried cranberries or cherries
    • Flaky sea salt for sprinkling

    Step-by-Step Instructions

    1. Preheat and Prepare:

    1. Preheat your oven to 350°F (175°C). Line an 8×8 inch baking pan with parchment paper, leaving overhang on two opposite sides for easy removal. Lightly grease the parchment.

    2. Combine Wet Ingredients:

    1. In a large bowl, combine the melted butter and brown sugar. Whisk until smooth and well combined, with no lumps of brown sugar remaining.
    2. Add the egg and vanilla extract. Whisk vigorously until the mixture is smooth, glossy, and slightly lighter in color, about 30-60 seconds.

    3. Add Dry Ingredients:

    1. Add the flour, baking powder, baking soda, and salt to the bowl.
    2. Fold gently with a spatula until just combined and no streaks of flour remain. Do not overmix.
    3. Fold in your desired add-ins (chocolate chips, nuts, etc.), reserving a handful to press into the top if desired.

    4. Bake:

    1. Spread the batter evenly into the prepared pan. It will be thick—use a spatula to press it into the corners.
    2. If reserved, press a few extra chocolate chips into the top of the batter for a bakery-style look.
    3. Bake for 20-25 minutes, until the edges are golden brown and a toothpick inserted into the center comes out clean or with a few moist crumbs. The center should still look slightly soft.
    4. Let the blondies cool completely in the pan on a wire rack. This is important for clean slices.

    5. Slice and Serve:

    1. Once completely cool, use the parchment overhang to lift the entire block of blondies onto a cutting board.
    2. Slice into 16 squares with a sharp knife, wiping the blade clean between cuts for neat edges.
    3. Serve at room temperature. Store leftovers in an airtight container.

    Summary

    Prep Time: 10 minutes | Bake Time: 20-25 minutes | Cooling Time: 1 hour | Total Time: 1 hour 35 minutes

    Yield: 16 blondies

    Difficulty: Super Easy

    Storage and Make-Ahead Tips

    How to Store:

    Store blondies in an airtight container at room temperature for up to 5 days. Place parchment paper between layers to prevent sticking. They actually get even better after a day or two!

    Can You Freeze Blondies?

    Absolutely! Blondies freeze beautifully. Wrap individual blondies or the whole slab tightly in plastic wrap, then in foil, and place in a freezer bag. Freeze for up to 3 months. Thaw at room temperature.

    Freezing Blondie Batter:

    You can freeze the batter in the pan. Prepare the batter, spread it into the parchment-lined pan, cover tightly with plastic wrap and foil, and freeze for up to 3 months. Bake from frozen, adding 5-10 minutes to the baking time.

    Make-Ahead for Parties:

    Blondies are perfect for making ahead. Bake them a day or two before your event, store at room temperature, and slice just before serving. The flavor actually improves over time.

    Reviving Stale Blondies:

    If your blondies have been around for a few days and are starting to dry out, microwave them for 10-15 seconds. They’ll taste almost freshly baked!

  • Classic Coffee Cake

    Classic Coffee Cake

    Let’s clear something up right away: coffee cake doesn’t actually have coffee in it. It’s called coffee cake because it’s meant to be enjoyed alongside a hot cup of coffee—and honestly, is there a better pairing in the world?

    This classic coffee cake is everything you want it to be. A tender, buttery sour cream cake forms the base, with a ribbon of cinnamon sugar running through the middle and an absolutely generous layer of buttery streusel crumb on top.

    It’s not too sweet, perfectly moist, and that crumb topping? It’s the kind you’ll find yourself picking off piece by piece. Whether it’s for breakfast, brunch, or a midday treat, this cake will make your coffee taste better.

    Ingredients

    Makes one 9-inch square or round cake (9-12 servings).

    For the Streusel Topping & Filling:

    • 1 cup (125g) all-purpose flour
    • ¾ cup (150g) light brown sugar, packed
    • 2 teaspoons ground cinnamon
    • ¼ teaspoon salt
    • ½ cup (115g) unsalted butter, melted
    • 1 teaspoon vanilla extract
    • ¾ cup chopped walnuts or pecans (optional)

    For the Coffee Cake:

    • 1 ½ cups (190g) all-purpose flour
    • 1 teaspoon baking powder
    • ½ teaspoon baking soda
    • ½ teaspoon salt
    • ½ cup (115g) unsalted butter, softened
    • ¾ cup (150g) granulated sugar
    • 2 large eggs, at room temperature
    • 1 ½ teaspoons vanilla extract
    • 1 cup (240g) sour cream, at room temperature

    Step-by-Step Instructions

    1. Preheat and Prepare:

    1. Preheat your oven to 350°F (175°C). Grease a 9-inch square baking pan or 9-inch round springform pan. If using a square pan, line with parchment paper leaving overhang for easy removal.

    2. Make the Streusel:

    1. In a medium bowl, whisk together the flour, brown sugar, cinnamon, and salt.
    2. Pour in the melted butter and vanilla extract. Stir with a fork until the mixture forms clumps and resembles wet sand. If using nuts, stir them in now.
    3. Set aside. This will serve as both your filling and your topping.

    3. Make the Cake Batter:

    1. In a medium bowl, whisk together the flour, baking powder, baking soda, and salt. Set aside.
    2. In a large bowl, beat the softened butter and granulated sugar together with an electric mixer until light and fluffy, about 2-3 minutes. Scrape down the sides as needed.
    3. Add the eggs one at a time, beating well after each addition. Scrape down the bowl again.
    4. Beat in the vanilla extract.
    5. With the mixer on low speed, add half of the flour mixture, mixing until just combined. Add all of the sour cream, then the remaining flour mixture. Mix until just combined and no streaks of flour remain. Do not overmix.

    4. Assemble the Cake:

    1. Spread half of the cake batter evenly into the prepared pan. It will be a thick layer—use an offset spatula to spread it to the edges.
    2. Sprinkle about half of the streusel mixture evenly over the batter. This will be the cinnamon swirl layer.
    3. Carefully spread the remaining batter over the streusel layer. This takes a little patience—drop spoonfuls of batter over the streusel and gently spread to cover as best you can. It doesn’t have to be perfect.
    4. Sprinkle the remaining streusel evenly over the top, pressing it gently so it adheres.

    5. Bake:

    1. Bake for 35-45 minutes, until a toothpick inserted into the center comes out clean or with a few moist crumbs.
    2. If the top is browning too quickly, tent loosely with foil for the last 10-15 minutes.
    3. Let the cake cool in the pan on a wire rack for at least 30 minutes before serving. It can be served warm or at room temperature.

    6. Serve:

    1. Slice and serve with a hot cup of coffee. The cake is delicious on its own, but a dusting of powdered sugar or a drizzle of simple glaze is always welcome.

    Summary

    Prep Time: 20 minutes | Bake Time: 35-45 minutes | Cooling Time: 30 minutes | Total Time: 1 hour 30 minutes

    Yield: 9-inch cake (9-12 servings)

    Difficulty: Easy

    Storage and Make-Ahead Tips

    How to Store:

    Store coffee cake tightly covered at room temperature for up to 4 days. The streusel will soften slightly over time, which is part of its charm. You can also store in the refrigerator, but bring to room temperature before serving.

    Can You Freeze Coffee Cake?

    Absolutely! Coffee cake freezes beautifully. Wrap the cooled cake (whole or in slices) tightly in plastic wrap, then in foil, and place in a freezer bag. Freeze for up to 3 months. Thaw at room temperature.

    Make-Ahead for Brunch:

    Coffee cake is perfect for making ahead. Bake it a day before, store at room temperature, and it’ll be ready to serve. The flavors actually meld and deepen overnight.

    Freezing Unbaked:

    You can assemble the entire cake in the pan, cover tightly, and freeze for up to 3 months. Bake from frozen, adding 10-15 minutes to the baking time.

    Reviving Day-Old Coffee Cake:

    If your coffee cake is a day or two old, warm individual slices in the microwave for 10-15 seconds. It’ll taste almost freshly baked!

  • Perfect Chocolate Chip Cookies (Soft, Chewy & Loaded with Chips)

    Perfect Chocolate Chip Cookies (Soft, Chewy & Loaded with Chips)

    Let’s be honest—the world does not need another chocolate chip cookie recipe. But it does need *this* one. After countless batches, dozens of tweaks, and more taste tests than I care to admit, I’ve finally landed on what I truly believe is the perfect chocolate chip cookie.

    What makes these so special? They have that ideal contrast—edges that are golden and slightly crisp, centers that are soft, chewy, and almost doughy (in the best way possible).

    They’re loaded with chocolate in every bite, have a hint of salt to balance the sweetness, and they stay soft for days. Whether you’re a classic purist or someone who loves a good bakery-style jumbo cookie, this recipe is about to become your new favorite.

    Ingredients

    Yields 14-16 large cookies.

    For the Cookies:

    • 2 ¼ cups (280g) all-purpose flour
    • 1 teaspoon baking soda
    • 1 ½ teaspoons cornstarch
    • ½ teaspoon salt
    • ¾ cup (170g) unsalted butter, melted and slightly cooled
    • ¾ cup (150g) light brown sugar, packed
    • ½ cup (100g) granulated sugar
    • 1 large egg + 1 egg yolk, at room temperature
    • 2 teaspoons vanilla extract
    • 2 cups (340g) semi-sweet chocolate chips (or chopped chocolate bar)

    Optional Toppings:

    • Flaky sea salt, for sprinkling
    • Extra chocolate chips for pressing into tops

    Step-by-Step Instructions

    1. Whisk Dry Ingredients:

    1. In a medium bowl, whisk together the flour, baking soda, cornstarch, and salt. Set aside.

    2. Combine Wet Ingredients:

    1. In a large bowl, whisk together the melted butter, brown sugar, and granulated sugar until well combined and no lumps remain.
    2. Add the egg, egg yolk, and vanilla extract. Whisk vigorously for about 30-60 seconds until the mixture becomes smooth, glossy, and slightly lighter in color. This step is important—it helps create that chewy texture!

    3. Bring It Together:

    1. Pour the dry ingredients into the wet ingredients. Fold with a rubber spatula until just combined and no streaks of flour remain. Be careful not to overmix.
    2. Gently fold in the chocolate chips, reserving a handful to press into the tops of the cookies later.
    3. The dough will be soft and slightly sticky. That’s exactly what you want.

    4. Chill the Dough (Crucial Step!):

    1. Cover the bowl tightly with plastic wrap and refrigerate for at least 2 hours, or up to 3 days. Chilling is non-negotiable—it prevents spreading, deepens the flavor, and creates that perfect texture.
    2. If you’re in a hurry, you can chill for 1 hour, but 2+ hours is better. Overnight is best.

    5. Preheat and Prep:

    1. When ready to bake, preheat your oven to 350°F (175°C). Line two baking sheets with parchment paper or silicone baking mats.

    6. Scoop and Bake:

    1. Scoop the chilled dough into large balls (about 3 tablespoons each). I recommend using a cookie scoop for even sizing.
    2. Place them on the prepared baking sheets, spacing about 3 inches apart.
    3. Press a few extra chocolate chips into the tops of each dough ball—this makes them look bakery-style and beautiful.
    4. Bake for 10-12 minutes, until the edges are golden brown and the centers still look slightly soft and underdone.
    5. Let the cookies cool on the baking sheet for 10 minutes. They will continue to bake and set up during this time.
    6. Transfer to a wire rack to cool completely, or enjoy warm with a glass of cold milk.

    Summary

    Prep Time: 15 minutes | Chill Time: 2 hours (minimum) | Bake Time: 12 minutes | Total Time: 2 hours 30 minutes

    Yield: 14-16 large cookies

    Difficulty: Easy

    Storage and Make-Ahead Tips

    How to Store:

    Store baked cookies in an airtight container at room temperature for up to 5 days. Place a slice of white bread in the container to keep them extra soft—the cookies will absorb moisture from the bread.

    Can You Freeze the Dough?

    Absolutely! This is my favorite make-ahead trick. Scoop the dough into balls and place them on a parchment-lined baking sheet. Freeze until solid, then transfer the frozen dough balls to a freezer bag. Bake from frozen, adding 1-2 minutes to the baking time. Fresh cookies anytime!

    Freezing Baked Cookies:

    Baked cookies freeze beautifully. Place them in a single layer in a freezer-safe container with parchment between layers. Freeze for up to 3 months. Thaw at room temperature or warm gently in the microwave for a few seconds.

    Make-Ahead Dough:

    The dough can be refrigerated for up to 3 days before baking. In fact, longer chilling (24-72 hours) develops even more flavor. Just let it sit at room temperature for 10-15 minutes to soften slightly before scooping.

  • Ultimate Moist Banana Bread (The Only Recipe You’ll Ever Need)

    Ultimate Moist Banana Bread (The Only Recipe You’ll Ever Need)

    We all have that moment—you know, when the bananas on your counter have turned completely brown and spotty, and you’re wondering what to do with them. That, my friend, is the universe telling you it’s time to make banana bread.

    This recipe has been in my family for years, and it’s the one I come back to again and again. It produces a loaf that’s incredibly moist, deeply flavored with sweet bananas, and topped with a slightly crunchy, caramelized crust that is simply perfection.

    It’s not fancy or complicated—just simple, honest, soul-warming banana bread that never disappoints. Whether you’re a seasoned baker or making banana bread for the first time, this recipe is about to become your go-to.

    Ingredients

    Makes 1 loaf (9×5 inch loaf pan).

    For the Banana Bread:

    • 1 ¾ cups (220g) all-purpose flour
    • 1 teaspoon baking soda
    • ½ teaspoon salt
    • ½ teaspoon ground cinnamon (optional, but highly recommended)
    • ½ cup (115g) unsalted butter, softened
    • ¾ cup (150g) granulated sugar
    • ¼ cup (50g) light brown sugar, packed
    • 2 large eggs, at room temperature
    • 2 teaspoons vanilla extract
    • 4 medium very ripe bananas, mashed (about 1 ½ cups)
    • ¼ cup (60g) sour cream or plain Greek yogurt, at room temperature

    Optional Add-Ins:

    • ½ cup chopped walnuts or pecans
    • ½ cup chocolate chips
    • 1 tablespoon turbinado sugar (for sprinkling on top)

    Step-by-Step Instructions

    1. Preheat and Prepare:

    1. Preheat your oven to 350°F (175°C). Grease a 9×5 inch loaf pan and line with parchment paper, leaving overhang on the long sides for easy removal.

    2. Combine Dry Ingredients:

    1. In a medium bowl, whisk together the flour, baking soda, salt, and cinnamon (if using). Set aside.

    3. Cream Butter and Sugars:

    1. In a large bowl, beat the softened butter, granulated sugar, and brown sugar together with an electric mixer until light and fluffy, about 2-3 minutes.

    4. Add Wet Ingredients:

    1. Add the eggs one at a time, beating well after each addition. Scrape down the sides of the bowl.
    2. Beat in the vanilla extract.
    3. Add the mashed bananas and sour cream, and mix until combined. The mixture may look slightly curdled—that’s perfectly normal.

    5. Combine Wet and Dry:

    1. Gradually add the dry ingredients to the wet ingredients, mixing on low speed or folding with a spatula until just combined. Do not overmix—a few streaks of flour are fine.
    2. If adding nuts or chocolate chips, fold them in gently now.

    6. Bake:

    1. Pour the batter into the prepared loaf pan and spread it evenly.
    2. If desired, sprinkle turbinado sugar over the top for a crunchy crust.
    3. Bake for 55-65 minutes, until a toothpick inserted into the center comes out clean or with just a few moist crumbs.
    4. If the top is browning too quickly, tent loosely with foil for the last 15-20 minutes.

    7. Cool and Serve:

    1. Let the banana bread cool in the pan for 15-20 minutes.
    2. Use the parchment overhang to lift the loaf onto a wire rack to cool completely before slicing. I know it’s hard to wait, but this prevents the bread from becoming gummy!

    Summary

    Prep Time: 15 minutes | Bake Time: 55-65 minutes | Cooling Time: 20 minutes | Total Time: 1 hour 30 minutes

    Yield: 1 loaf (10-12 slices)

    Difficulty: Easy

    Storage and Make-Ahead Tips

    How to Store:

    Wrap banana bread tightly in plastic wrap or store in an airtight container at room temperature for up to 4 days. The moisture actually improves over the first day or two!

    Can You Freeze It?

    Absolutely! Banana bread freezes beautifully. Wrap the cooled loaf (or individual slices) tightly in plastic wrap, then in foil, and place in a freezer bag. Freeze for up to 3 months. Thaw at room temperature or warm slices in the microwave for 15-20 seconds.

    Make-Ahead for Gifts or Events:

    Banana bread is actually better the next day, making it perfect for making ahead. Bake a day or two before you need it and store at room temperature.

    Using Overripe Bananas:

    If you have bananas that are too ripe to use now, peel them and freeze in a zip-top bag. Thaw and use directly in banana bread—they’ll be even softer and more flavorful!