Category: desserts

  • New York Cheesecake (The Big, Bold, No-Nonsense One)

    New York Cheesecake (The Big, Bold, No-Nonsense One)

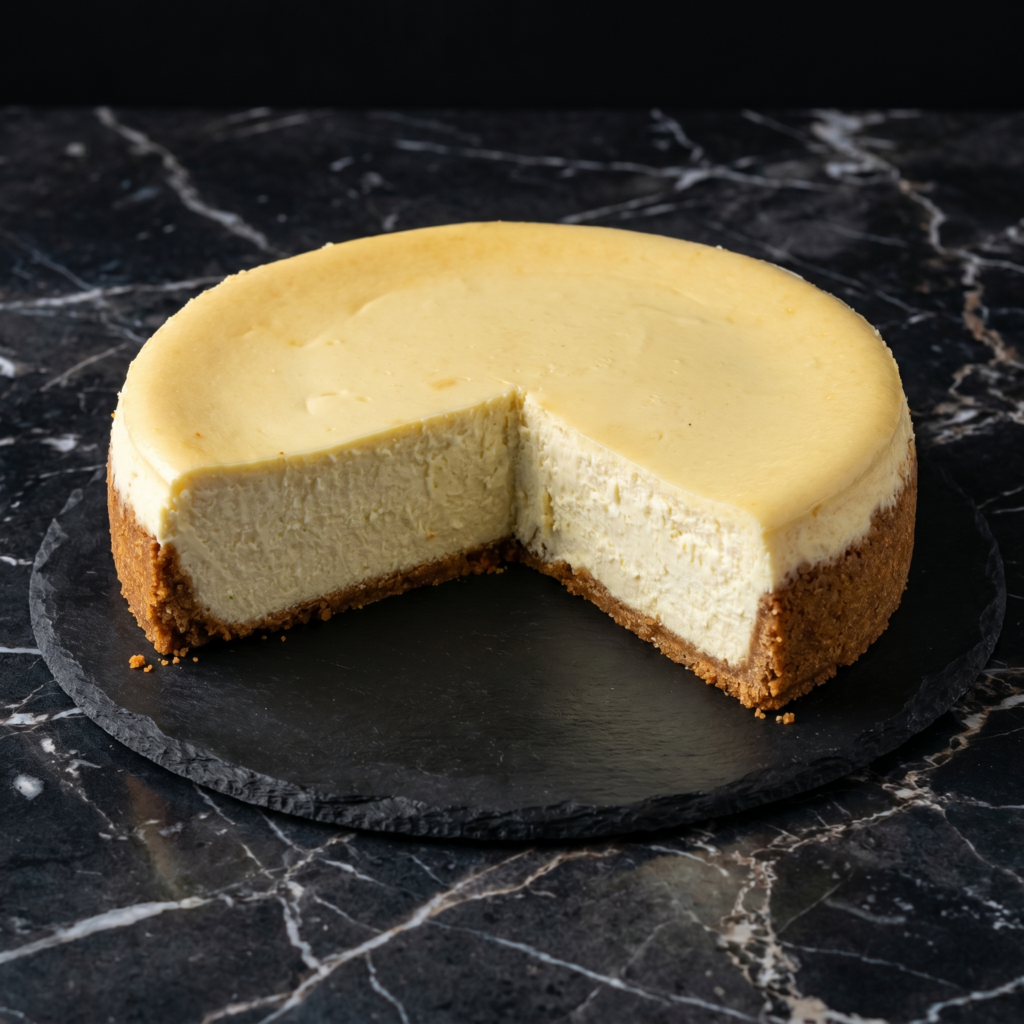
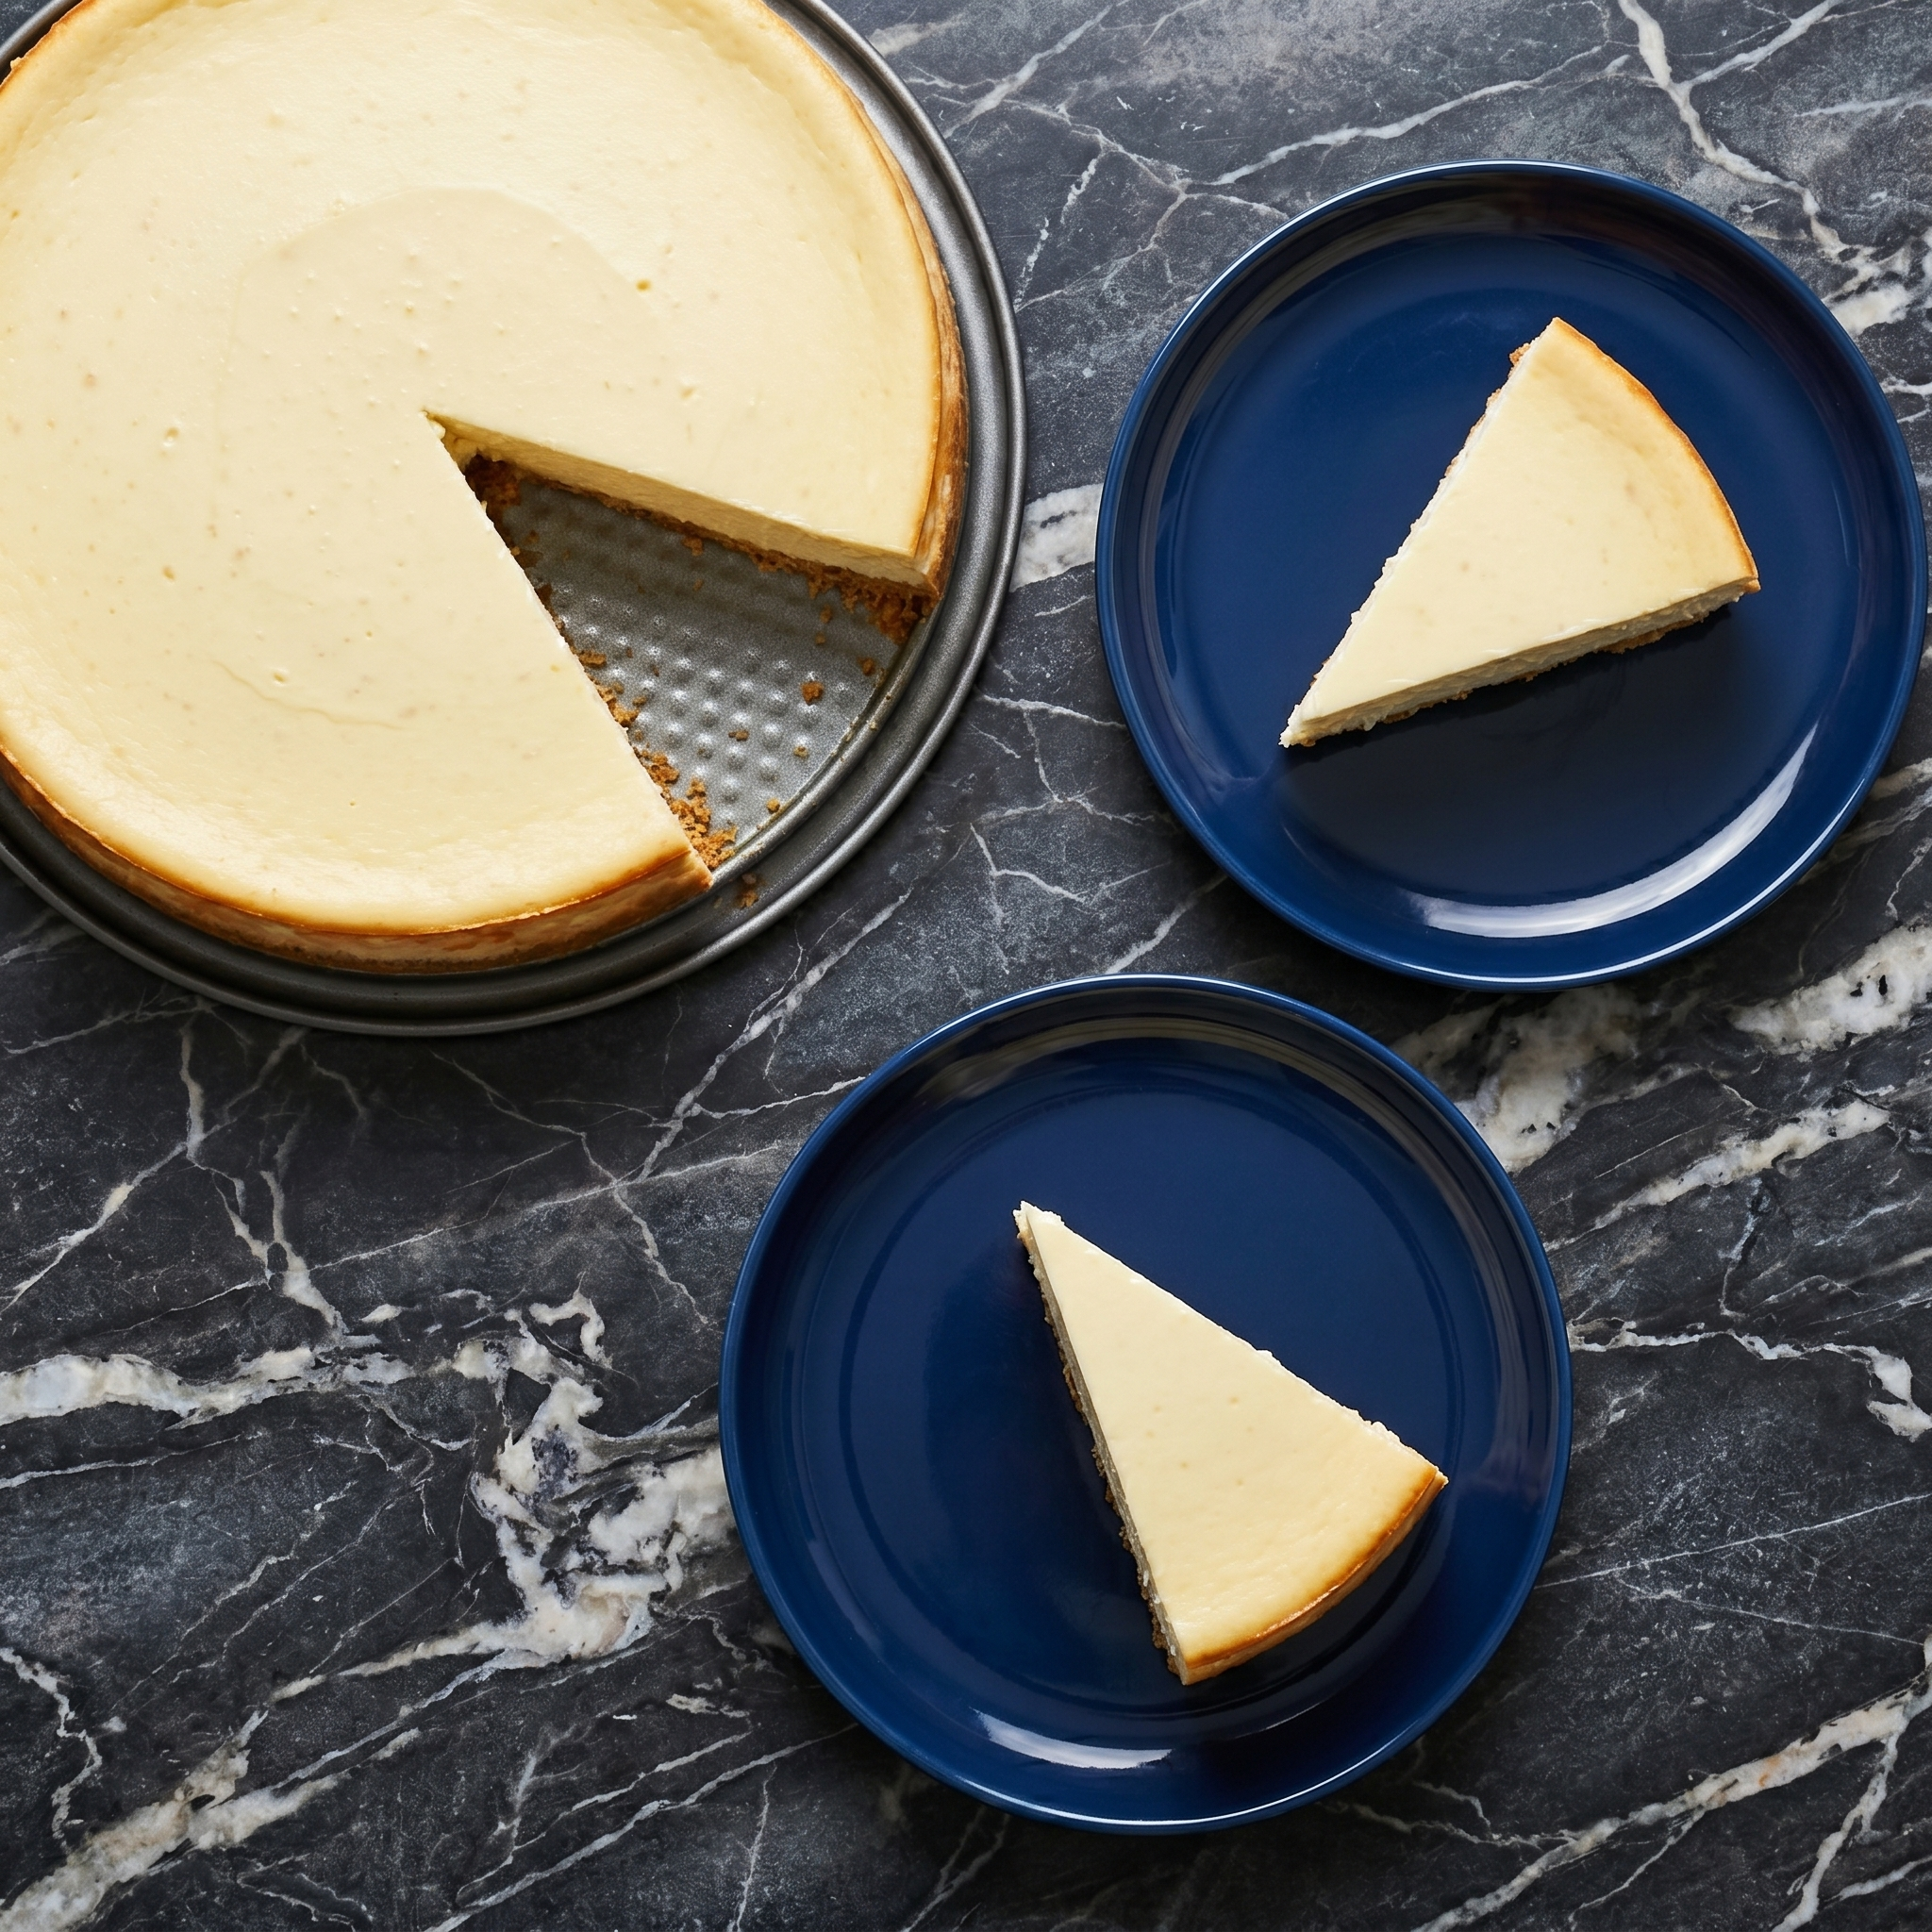
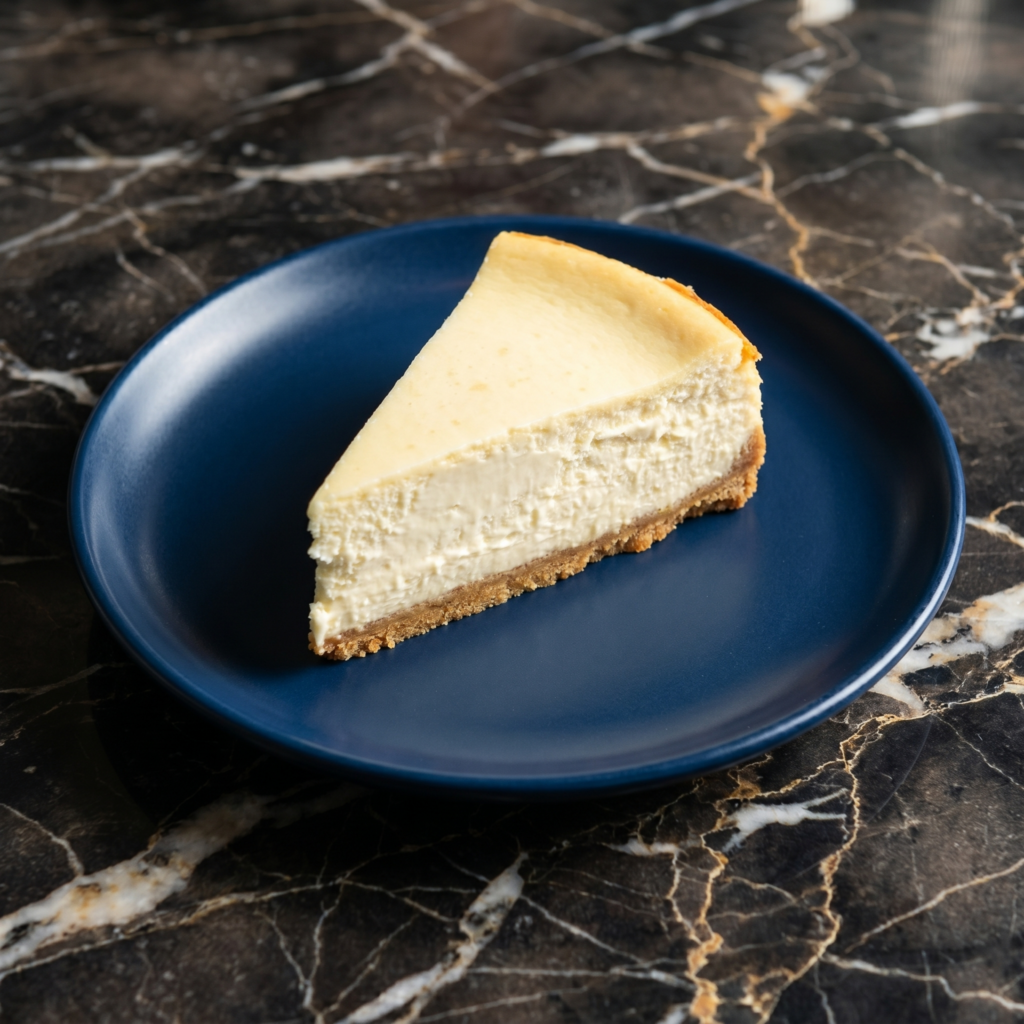
    New York cheesecake doesn’t mess around. It’s not light. It’s not fluffy. It’s dense, rich, and creamy—like someone took a regular cheesecake and told it to go to the gym. No sour cream topping. No fruit swirls. Just pure, unapologetic cheesecake.

    This is the real deal. The one that stands tall on a plate. The one that needs nothing but a fork and a moment of silence. Let’s make it.

    Ingredients

    Serves 10-12.

    For the Crust:

    • 2 cups (200g) graham cracker crumbs
    • ¼ cup (50g) granulated sugar
    • ½ cup (115g) unsalted butter, melted

    For the Cheesecake Filling:

    • 40 oz (1.1kg) cream cheese, softened (five 8oz blocks, full-fat)
    • 1¾ cups (350g) granulated sugar
    • ¼ cup (30g) cornstarch
    • 4 large eggs, room temperature
    • 1 cup (240ml) sour cream, room temperature
    • 2 teaspoons vanilla extract
    • 2 teaspoons lemon juice

    Step-by-Step Instructions

    Step 1: Make the Crust

    1. Preheat oven to 375°F (190°C). Wrap outside of a 9-inch springform pan with foil.
    2. Mix crumbs, sugar, and butter. Press firmly into bottom and halfway up the sides.
    3. Bake for 10 minutes. Cool. Reduce oven to 325°F (160°C).

    Step 2: Make the Filling

    1. Beat cream cheese until completely smooth. No lumps. Take your time.
    2. Add sugar and cornstarch. Beat until combined.
    3. Add eggs one at a time. Mix on low—overmixing = cracks.
    4. Mix in sour cream, vanilla, and lemon juice until just combined.

    Step 3: Bake

    1. Pour filling into crust. Smooth the top.
    2. Place springform pan in a larger roasting pan. Add hot water to the roasting pan (water bath).
    3. Bake at 325°F for 60-70 minutes. Edges should be set, center still wobbly.
    4. Turn off oven. Crack door open. Cool inside for 1 hour.

    Step 4: Chill Completely

    1. Remove from water bath. Run a knife around the edge.
    2. Cool to room temperature, then refrigerate for at least 6 hours (overnight is better).
    3. Serve plain or with berries. Don’t you dare add caramel.

    Summary

    Prep Time: 30 minutes | Bake Time: 70 minutes | Cool/Chill: 7+ hours | Total Time: ~9 hours

    Yield: 10-12 slices

    Difficulty: Medium (water bath required)

    Storage Notes

    Refrigerate tightly covered for up to 7 days (yes, a whole week). Freeze for up to 3 months—wrap individual slices in plastic then foil. Thaw overnight in the fridge. Serve cold or let sit for 20 minutes. Room temperature New York cheesecake is a religious experience.

  • Crème Brûlée (And the Most Satisfying Crack You’ll Ever Hear)

    Crème Brûlée (And the Most Satisfying Crack You’ll Ever Hear)

    Crème brûlée sounds fancy. French name. Torches involved. But here’s the secret: it’s basically a really good vanilla pudding with a sugar hat. And you don’t need a blowtorch to make it. Your oven broiler does the job perfectly.

    Creamy custard. Real vanilla. That dramatic crack when your spoon breaks through. It’s impressive, romantic, and surprisingly hard to mess up. Let’s do this.

    Ingredients

    Serves 4.

    • 2 cups (480ml) heavy cream
    • 1 vanilla bean (or 2 teaspoons vanilla bean paste/extract)
    • 5 large egg yolks
    • ½ cup (100g) granulated sugar, plus more for topping
    • Pinch of salt
    • Boiling water (for the water bath)

    Step-by-Step Instructions

    Step 1: Infuse the Cream

    1. Preheat oven to 325°F (160°C).
    2. Heat cream in a saucepan until hot but not boiling. If using a vanilla bean, scrape the seeds into the cream and drop the pod in too. Let steep for 10 minutes.

    Step 2: Make the Custard

    1. Whisk egg yolks, sugar, and salt until pale and thick (about 2 minutes).
    2. Slowly pour warm cream into the yolk mixture while whisking constantly. Don’t scramble the eggs.
    3. Remove vanilla pod if using.

    Step 3: Bake in a Water Bath

    1. Place four ramekins in a baking dish. Divide custard between them.
    2. Pour boiling water into the baking dish until it reaches halfway up the ramekins.
    3. Bake for 30-35 minutes until edges are set but center still jiggles like Jell-O.

    Step 4: Chill and Caramelize

    1. Cool ramekins, then refrigerate for at least 4 hours (overnight is better).
    2. Sprinkle a thin, even layer of sugar over each custard.
    3. Melt sugar under a broiler or with a torch until amber and bubbly.
    4. Let the sugar harden for 2 minutes. Then crack away.

    Summary

    Prep Time: 15 minutes | Bake Time: 30-35 minutes | Chill Time: 4+ hours | Total Time: ~5 hours

    Yield: 4 servings

    Difficulty: Easy (patience required)

    Storage Notes

    Make the custard up to 3 days ahead—just keep it chilled without the sugar crust. Add the sugar and caramelize right before serving. Once bruleed, eat within 2 hours or the sugar gets soft. Do not freeze. The custard will weep and ruin the texture.

  • Millionaire’s Shortbread (Three Layers of Pure Greed)

    Millionaire’s Shortbread (Three Layers of Pure Greed)

    Here’s the thing about millionaire’s shortbread: it sounds fancy, but it’s really just a spectacularly greedy combination of three simple things. Crumbly shortbread. Sticky, buttery caramel. A thick chocolate ceiling. That’s it. That’s the whole magic trick.

    No candy thermometer. No complicated caramel pulling. Just a saucepan, some patience, and the self-control not to eat the entire pan in one sitting (good luck with that).

    Ingredients

    Serves 16 squares.

    For the Shortbread Crust:

    • 1½ cups (190g) all-purpose flour
    • ½ cup (100g) granulated sugar
    • ½ teaspoon salt
    • ¾ cup (170g) unsalted butter, cold and cubed

    For the Caramel Layer:

    • 1 can (14oz/395g) sweetened condensed milk
    • ½ cup (115g) unsalted butter
    • ½ cup (100g) brown sugar, packed
    • 2 tablespoons golden syrup or corn syrup
    • Pinch of salt

    For the Chocolate Topping:

    • 1½ cups (255g) semi-sweet or dark chocolate chips
    • 1 tablespoon coconut oil or butter (for shine)
    • Flaky sea salt (optional, but do it)

    Step-by-Step Instructions

    Step 1: Make the Shortbread

    1. Preheat oven to 350°F (175°C). Line an 8×8 inch pan with parchment paper.
    2. Whisk flour, sugar, and salt. Cut in cold butter until it looks like wet sand.
    3. Press firmly into the pan. Bake for 18-20 minutes until lightly golden. Cool slightly.

    Step 2: Make the Caramel

    1. In a saucepan, combine condensed milk, butter, brown sugar, syrup, and salt.
    2. Cook over medium-low heat, stirring constantly, for 8-10 minutes until thick and golden.
    3. Pour over the shortbread. Let set for 15 minutes.

    Step 3: Add the Chocolate

    1. Melt chocolate chips and coconut oil in the microwave in 30-second bursts.
    2. Pour over the caramel layer. Spread smooth.
    3. Sprinkle with flaky sea salt while wet.

    Step 4: Chill and Cut

    1. Refrigerate for at least 2 hours until fully set.
    2. Use a hot knife to cut into squares. Wipe the knife clean between cuts for neat edges.

    Summary

    Prep Time: 20 minutes | Bake Time: 20 minutes | Chill Time: 2 hours | Total Time: ~2.5 hours

    Yield: 16 rich squares

    Difficulty: Medium (caramel requires attention)

    Storage Notes

    Store in an airtight container at room temperature for up to 1 week. Yes, a whole week. They also freeze beautifully for up to 3 months—just wrap individually. The caramel gets softer at room temperature, which is a feature, not a bug. If you refrigerate them, let them sit out for 10 minutes before eating.

  • Molten Chocolate Lava Cakes (That Actually Have a Lava)

    Molten Chocolate Lava Cakes (That Actually Have a Lava)

    Let’s clear something up: a lava cake with a solid center is just a sad, underperforming chocolate cake. The real deal? You cut into it, and chocolate literally spills out like hot lava. That’s what we’re making today.

    It looks fancy. It sounds impressive. But here’s the secret: these are stupidly easy. Six ingredients. Fifteen minutes. Zero special skills. Serve them warm with a scoop of vanilla ice cream, and watch people lose their minds.

    Ingredients

    Serves 2 (or 1 very generous human).

    • 4 oz (115g) semi-sweet or dark chocolate, chopped
    • ½ cup (115g) unsalted butter
    • 2 large eggs
    • 2 large egg yolks
    • ¼ cup (50g) granulated sugar
    • 2 tablespoons all-purpose flour
    • Pinch of salt
    • Optional: Powdered sugar and vanilla ice cream for serving

    Step-by-Step Instructions

    Step 1: Prep and Preheat

    1. Preheat oven to 425°F (220°C).
    2. Grease two 6-oz ramekins with butter and dust with cocoa powder or flour (trust me, they will stick otherwise).

    Step 2: Melt the Chocolate

    1. Microwave chocolate and butter together in 30-second bursts, stirring until smooth. Set aside.

    Step 3: Whisk the Batter

    1. In a bowl, whisk eggs, egg yolks, and sugar until thick and pale (about 2 minutes).
    2. Pour in the melted chocolate mixture and whisk until combined.
    3. Add flour and salt, then fold gently until just mixed. Do not overwork.

    Step 4: Bake Immediately

    1. Divide batter between the two ramekins.
    2. Bake for exactly 10-12 minutes. The edges should look set, but the center will still jiggle slightly.
    3. Do not overbake. I repeat: DO NOT OVERBAKE. That’s how you kill the lava.

    Step 5: Unmold and Serve

    1. Let cool for 1 minute. Run a knife around the edge.
    2. Invert onto a plate. Give the ramekin a gentle tap—the cake should release.
    3. Dust with powdered sugar. Add ice cream. Cut open. Watch the magic happen.

    Summary

    Prep Time: 5 minutes | Cook Time: 10-12 minutes | Total Time: 15-17 minutes

    Yield: 2 lava cakes

    Difficulty: Easy (as long as you don’t overbake)

    Storage Notes

    Lava cakes are meant to be eaten immediately. You can prep the batter ahead (without baking) and refrigerate for up to 24 hours. Just add 1-2 minutes to the bake time. Baked and cooled? The lava sets. Reheating won’t bring it back. So bake fresh, eat hot, and thank yourself later.

  • The No-Fail Tiramisu (That Tastes Like You Flew to Italy)

    The No-Fail Tiramisu (That Tastes Like You Flew to Italy)

    Let’s be honest: most people are intimidated by tiramisu. Raw eggs? Precise folding? Please. This version skips all the drama and delivers pure, creamy, coffee-soaked perfection. It’s rich, it’s dreamy, and it tastes like you spent hours in a Roman trattoria—when really, you spent about 20 minutes assembling it.

    Ladyfingers get a quick dunk in strong coffee, then layer up with a cloud-like mascarpone filling. A final dusting of cocoa, a few hours in the fridge, and boom. Dessert magic.

    Ingredients

    Serves 6-8.

    • 2 cups (480ml) strong brewed coffee or espresso, cooled
    • 2 tablespoons coffee liqueur (optional, but highly recommended)
    • 3 large egg yolks (or use pasteurized if worried)
    • ½ cup (100g) granulated sugar
    • 8 oz (225g) mascarpone cheese, room temperature
    • 1 cup (240ml) heavy cream, cold
    • 24-30 ladyfingers (savoiardi cookies)
    • Unsweetened cocoa powder, for dusting
    • Dark chocolate shavings (optional, for fancy points)

    Step-by-Step Instructions

    Step 1: Make the Coffee Bath

    1. Brew your coffee and let it cool completely. Stir in the coffee liqueur if using. Pour into a shallow dish.

    Step 2: Whip the Mascarpone Cream

    1. In a bowl, whisk egg yolks and sugar until pale and fluffy (about 2 minutes).
    2. Add mascarpone and mix until smooth.
    3. In a separate bowl, whip cold heavy cream to stiff peaks.
    4. Gently fold the whipped cream into the mascarpone mixture. Don’t overmix—keep it airy.

    Step 3: Assemble the Layers

    1. Quickly dip each ladyfinger into the coffee—just 1-2 seconds per side. Soggy ladyfingers = sad tiramisu.
    2. Arrange a single layer of dipped ladyfingers in an 8×8 inch dish.
    3. Spread half the mascarpone cream over them.
    4. Repeat with another layer of dipped ladyfingers and the remaining cream.

    Step 4: Chill and Finish

    1. Cover and refrigerate for at least 4 hours (overnight is better).
    2. Right before serving, dust generously with cocoa powder through a fine sieve.
    3. Add chocolate shavings if you’re feeling extra.

    Summary

    Prep Time: 20 minutes | Chill Time: 4+ hours | Total Time: 4 hours 20 minutes

    Yield: 6-8 servings

    Difficulty: Easy

    Storage Notes

    Tiramisu actually gets better after a day in the fridge. Cover tightly and store for up to 3 days. Do not freeze—the texture turns weird and watery. Also, wait to dust with cocoa until serving, or it’ll absorb into the cream and look muddy.

  • Pumpkin Pie: Silky, Spiced, and Nobody Will Know It’s This Easy

    Pumpkin Pie: Silky, Spiced, and Nobody Will Know It’s This Easy

    Pumpkin pie gets a bad rap for being basic. But a good one? Silky, spiced, and perfect against a flaky crust—it’s a masterpiece. This recipe uses real pumpkin (canned is fine, we don’t judge) and a custard that sets like velvet. No water bath. No fancy techniques. Just a pie that disappears before the whipped cream runs out.

    Ingredients

    Makes one 9-inch pie (8 slices).

    For the Crust:

    • 1¼ cups all-purpose flour
    • ½ teaspoon salt
    • ½ cup (1 stick) cold unsalted butter, cubed
    • 3-4 tablespoons ice water

    For the Filling:

    • 1 can (15 oz) pumpkin purée (not pie filling)
    • 1 can (12 oz) evaporated milk
    • ¾ cup granulated sugar
    • 2 large eggs
    • 1 teaspoon cinnamon
    • ½ teaspoon ground ginger
    • ¼ teaspoon ground nutmeg
    • ¼ teaspoon ground cloves
    • ½ teaspoon salt

    Step-by-Step Instructions

    Step 1: Make the Crust

    1. Mix flour and salt. Cut in cold butter until pea-sized crumbs form.
    2. Add ice water, 1 tablespoon at a time, until dough comes together.
    3. Form into a disc, wrap, and chill for 30 minutes.
    4. Roll out and press into a 9-inch pie pan. Crimp edges.

    Step 2: Preheat and Par-Bake (Optional but Recommended)

    1. Preheat oven to 375°F (190°C).
    2. Line crust with parchment and fill with pie weights or dried beans.
    3. Bake for 10 minutes. Remove weights. Bake 5 more minutes.

    Step 3: Make the Filling

    1. In a bowl, whisk pumpkin, evaporated milk, sugar, eggs, spices, and salt until smooth.

    Step 4: Bake the Pie

    1. Pour filling into warm crust.
    2. Bake at 375°F for 50-60 minutes.
    3. Pie is done when edges are set but center still jiggles slightly like Jell-O.

    Step 5: Cool and Serve

    1. Cool completely on a wire rack (at least 2 hours).
    2. Serve with whipped cream. Cold or room temperature.

    Summary

    Prep Time: 20 minutes + 30 minutes chill | Cook Time: 1 hour 15 minutes | Cooling: 2 hours | Total Time: ~4 hours

    Yield: 8 slices

    Difficulty: Easy (patience for cooling)

    Storage Notes

    How to Store:

    Keep pumpkin pie in the fridge for up to 4 days. Cover loosely with foil or plastic wrap.

    Serving Temperature:

    Pumpkin pie is delicious cold, at room temperature, or gently warmed. For warm pie: microwave a slice for 15 seconds.

    Freezing:

    Freeze baked and cooled whole pie or slices for up to 2 months. Wrap tightly. Thaw overnight in the fridge.

    Pro Tips:

    Don’t use pumpkin pie filling—it’s pre-spiced and sweetened and will throw off the ratios. Par-baking the crust prevents a soggy bottom. And the center should still jiggle when you pull it from the oven; carryover heat finishes the job. Overbaked pumpkin pie = cracked, rubbery sadness.

  • Éclairs: Fancy French Pastry That’s Actually Easier Than You Think

    Éclairs: Fancy French Pastry That’s Actually Easier Than You Think

    Éclairs sound fancy. They look fancy. But here’s the secret: choux pastry is just flour, butter, eggs, and water—no yeast, no complicated folds. Pipe it, bake it until puffed and golden, then fill with silky vanilla pastry cream. Top with a crackly chocolate ganache. That’s it. Your friends will think you trained in Paris. Let them.

    Ingredients

    Makes 10-12 éclairs.

    For the Choux Pastry (Pâte à Choux):

    • ½ cup water
    • ½ cup whole milk
    • ½ cup (1 stick) unsalted butter, cubed
    • 1 tablespoon sugar
    • ¼ teaspoon salt
    • 1 cup all-purpose flour
    • 4 large eggs, at room temperature

    For the Pastry Cream (Crème Pâtissière):

    • 2 cups whole milk
    • ½ cup sugar
    • 4 egg yolks
    • ¼ cup cornstarch
    • 2 teaspoons vanilla extract
    • 2 tablespoons unsalted butter

    For the Chocolate Ganache:

    • ½ cup semi-sweet chocolate chips
    • ¼ cup heavy cream

    Step-by-Step Instructions

    Step 1: Make the Choux Pastry

    1. Preheat oven to 400°F (200°C). Line a baking sheet with parchment.
    2. In a saucepan, heat water, milk, butter, sugar, and salt until boiling.
    3. Reduce heat. Add flour all at once. Stir vigorously until dough forms a ball and pulls away from the sides.
    4. Transfer to a bowl. Let cool 5 minutes.
    5. Add eggs one at a time, mixing completely after each. Dough should be shiny and pipeable.

    Step 2: Pipe and Bake

    1. Pipe 4-inch logs onto the baking sheet.
    2. Bake for 20 minutes at 400°F, then reduce to 350°F (175°C) and bake 10-15 more minutes until deep golden.
    3. Poke a small hole in each to let steam escape. Cool completely.

    Step 3: Make the Pastry Cream

    1. Heat milk until steaming. Whisk sugar, yolks, and cornstarch in a bowl.
    2. Slowly pour hot milk into yolk mixture while whisking. Return to pan.
    3. Cook until thickened. Remove from heat. Stir in vanilla and butter. Chill completely.

    Step 4: Make the Ganache

    1. Heat cream until steaming. Pour over chocolate chips. Let sit 2 minutes. Stir until smooth.

    Step 5: Assemble

    1. Pipe pastry cream into éclairs through the poke holes or slice open.
    2. Dip tops in ganache. Let set for 15 minutes. Serve.

    Summary

    Prep Time: 45 minutes | Cook Time: 35 minutes | Cooling: 1 hour | Total Time: ~2.5 hours

    Yield: 10-12 éclairs

    Difficulty: Medium (choux technique matters)

    Storage Notes

    Best Eaten Fresh:

    Éclairs are happiest within 4-6 hours of filling. The pastry stays crisp; the cream stays silky.

    How to Store Components:

    Baked unfilled shells last 2 days in an airtight container at room temperature. Pastry cream keeps 3 days in the fridge. Fill just before serving.

    Freezing Shells:

    Freeze baked unfilled éclairs for up to 2 months. Re-crisp in a 350°F oven for 5 minutes before filling.

    Pro Tips:

    Don’t open the oven during baking—choux needs steady heat to puff. Poke steam holes immediately after baking to prevent sogginess. And use whole milk for pastry cream; skim won’t cut it.

  • Double Chocolate Muffins: Bakery Style, Deeply Chocolatey, Dangerously Easy

    Double Chocolate Muffins: Bakery Style, Deeply Chocolatey, Dangerously Easy

    Some muffins pretend to be healthy. These do not. Double chocolate muffins are dark, moist, and loaded with melting chocolate chunks. Bakery-style tall domes. Crackly tops. Deep cocoa flavor. No mixer needed, no fancy tricks—just a bowl, a whisk, and a serious chocolate craving. Breakfast? Dessert? Both. Eat warm with milk or coffee and feel zero guilt.

    Ingredients

    Makes 12 muffins.

    • 1¾ cups all-purpose flour
    • ¾ cup unsweetened cocoa powder
    • 1½ teaspoons baking powder
    • ½ teaspoon baking soda
    • ½ teaspoon salt
    • 2 large eggs
    • 1 cup granulated sugar
    • ½ cup brown sugar, packed
    • ½ cup vegetable oil
    • 1 cup buttermilk (or milk + 1 tablespoon vinegar)
    • 2 teaspoons vanilla extract
    • 1½ cups chocolate chips or chunks (semi-sweet or dark)

    Step-by-Step Instructions

    Step 1: Preheat and Prep

    1. Preheat oven to 425°F (220°C). Line a 12-cup muffin tin with liners.

    Step 2: Mix Dry Ingredients

    1. In a large bowl, whisk flour, cocoa powder, baking powder, baking soda, and salt.

    Step 3: Mix Wet Ingredients

    1. In another bowl, whisk eggs, both sugars, oil, buttermilk, and vanilla until smooth.

    Step 4: Combine and Fold

    1. Pour wet into dry. Mix until just combined—lumps are fine, don’t overmix.
    2. Fold in chocolate chips.

    Step 5: Bake Hot and Drop Temp

    1. Fill muffin liners all the way to the top (for tall domes).
    2. Bake at 425°F for 5 minutes, then reduce to 350°F (175°C) and bake 12-15 more minutes.
    3. Muffins are done when a toothpick comes out with a few moist crumbs.
    4. Cool in pan for 5 minutes, then transfer to a wire rack.

    Summary

    Prep Time: 15 minutes | Cook Time: 20 minutes | Total Time: 35 minutes

    Yield: 12 muffins

    Difficulty: Easy (don’t overmix)

    Storage Notes

    How to Store:

    Keep in an airtight container at room temperature for up to 4 days. Microwave for 10 seconds to bring back that fresh-baked warmth.

    Freezing:

    Freeze cooled muffins in a ziplock bag for up to 3 months. Thaw at room temperature or microwave for 20-30 seconds.

    Pro Tips:

    The high-then-low oven trick gives you those iconic bakery domes—don’t skip it. Use buttermilk for tenderness; if you don’t have any, add 1 tablespoon of white vinegar to regular milk and let sit for 5 minutes. And please, fill those liners to the top. Scant fillings make flat, sad muffins.

  • Homemade Chocolate Pop Tarts: Store-Bought Could Never

    Homemade Chocolate Pop Tarts: Store-Bought Could Never

    Remember pop tarts? The dry, crumbly, vaguely chocolate rectangles from a foil pouch? Yeah, these are nothing like that. Homemade chocolate pop tarts have a buttery, tender crust, a fudgy dark chocolate center, and a thick layer of chocolate icing on top. One bite and you’ll never go back to the boxed version. Plus, you get bragging rights. Let’s make pastry.

    Ingredients

    Makes 8 pop tarts.

    For the Crust:

    • 2 cups all-purpose flour
    • 1 tablespoon sugar
    • ½ teaspoon salt
    • 1 cup (2 sticks) cold unsalted butter, cubed
    • ¼ cup ice water (plus more as needed)

    For the Chocolate Filling:

    • ½ cup semi-sweet chocolate chips
    • 2 tablespoons heavy cream
    • 1 tablespoon unsalted butter

    For the Chocolate Icing:

    • 1 cup powdered sugar
    • 2 tablespoons cocoa powder
    • 2 tablespoons milk
    • Sprinkles (mandatory for authenticity)

    Step-by-Step Instructions

    Step 1: Make the Crust

    1. In a bowl, mix flour, sugar, and salt. Cut in cold butter until pea-sized crumbs form.
    2. Add ice water 1 tablespoon at a time until dough just comes together.
    3. Divide into two discs. Wrap and chill for 1 hour.

    Step 2: Make the Filling

    1. Microwave chocolate chips, cream, and butter in 15-second bursts until smooth. Let cool slightly.

    Step 3: Assemble the Pop Tarts

    1. Preheat oven to 375°F (190°C). Line a baking sheet with parchment.
    2. Roll out each dough disc into a 9×12 rectangle. Cut into eight 3×4 rectangles.
    3. Place 4 rectangles on the baking sheet. Spoon 1 tablespoon filling onto each, leaving a border.
    4. Top with remaining rectangles. Press edges with a fork to seal. Poke vent holes.

    Step 4: Bake

    1. Bake for 20-25 minutes until golden brown. Cool completely on a wire rack.

    Step 5: Ice and Sprinkle

    1. Whisk powdered sugar, cocoa powder, and milk until smooth.
    2. Spread icing over cooled pop tarts. Add sprinkles immediately.
    3. Let icing set for 15 minutes. Toast or eat at room temp.

    Summary

    Prep Time: 30 minutes + 1 hour chill | Cook Time: 25 minutes | Total Time: ~2 hours

    Yield: 8 pop tarts

    Difficulty: Medium (dough handling)

    Storage Notes

    How to Store:

    Keep in an airtight container at room temperature for up to 5 days. They actually stay pretty fresh.

    Freezing (Best Hack):

    Freeze unbaked assembled pop tarts on a tray, then transfer to a bag. Bake from frozen—add 5 minutes to bake time. Bake only what you want. This is the move.

    Toasting:

    Pop a baked pop tart in the toaster or toaster oven for 1-2 minutes to warm the filling. Yes, like the old days. But better.

    Pro Tip:

    Don’t overfill. Too much chocolate = blowouts in the oven. One tablespoon is plenty. Also, chill the assembled tarts for 15 minutes before baking—it prevents shrinkage and keeps the shape perfect.

  • Fried Oreos: State Fair Magic in Your Own Kitchen (No Tickets Required)

    Fried Oreos: State Fair Magic in Your Own Kitchen (No Tickets Required)

    Fried Oreos shouldn’t work. But they do. A humble Oreo gets wrapped in a sweet pancake-like batter, dropped into hot oil, and transformed into a warm, gooey, crunchy-on-the-outside, melty-on-the-inside ball of carnival magic. Dust with powdered sugar, drizzle with chocolate sauce, or just eat them straight off the rack. This is fair food at its finest—no tickets, no lines, no regrets.

    Ingredients

    Serves 4 (about 12-15 fried Oreos).

    • 1 package Oreos (regular, not Double Stuf—they puff too much)
    • 1 cup pancake mix (or all-purpose flour)
    • 1 cup milk
    • 1 egg
    • 1 tablespoon vegetable oil (plus more for frying)
    • 1 teaspoon vanilla extract
    • Powdered sugar for dusting
    • Optional: chocolate sauce, caramel, or strawberry syrup

    Step-by-Step Instructions

    Step 1: Make the Batter

    1. In a bowl, whisk pancake mix, milk, egg, 1 tablespoon oil, and vanilla.
    2. Batter should be thick enough to coat a spoon—not too runny.
    3. Chill batter for 10 minutes if you have time (helps it stick).

    Step 2: Heat the Oil

    1. Heat 2 inches of neutral oil in a pot to 365°F (185°C).
    2. Test with a drop of batter—it should sizzle and float immediately.

    Step 3: Dip and Fry

    1. Dip each Oreo into batter, coating completely. Let excess drip off.
    2. Carefully drop into hot oil. Fry 3-4 at a time—don’t crowd.
    3. Fry for 45-60 seconds per side until golden brown and puffed.

    Step 4: Drain and Dust

    1. Remove with a slotted spoon. Drain on a wire rack (not paper towels—they trap steam).
    2. Let cool for 60 seconds (the inside is lava).
    3. Dust generously with powdered sugar.

    Step 5: Serve Immediately

    1. Serve warm with chocolate sauce for dipping. Accept compliments.

    Summary

    Prep Time: 10 minutes | Cook Time: 10 minutes | Total Time: 20 minutes

    Yield: 12-15 fried Oreos (4 servings)

    Difficulty: Easy (watch the heat)

    Storage Notes

    Don’t Even Think About It:

    Fried Oreos are a fresh-only food. Within an hour, they become sad, soggy, and chewy. Eat them all immediately. That’s the rule.

    Make-Ahead (Not Really):

    You can’t fry ahead. But you can set up a fried Oreo bar at a party and fry in small batches while people watch. It’s entertainment AND dessert.

    Pro Tips:

    Use regular Oreos, not Double Stuf—the extra cream makes them explode in the fryer. Freeze Oreos for 15 minutes before dipping; they hold together better. And seriously: let them cool slightly. The molten cream center will burn your mouth. You’ve been warned.