Category: desserts

  • Apple Hand Pies: Pocket-Sized Fall. All Year.

    Apple Hand Pies: Pocket-Sized Fall. All Year.

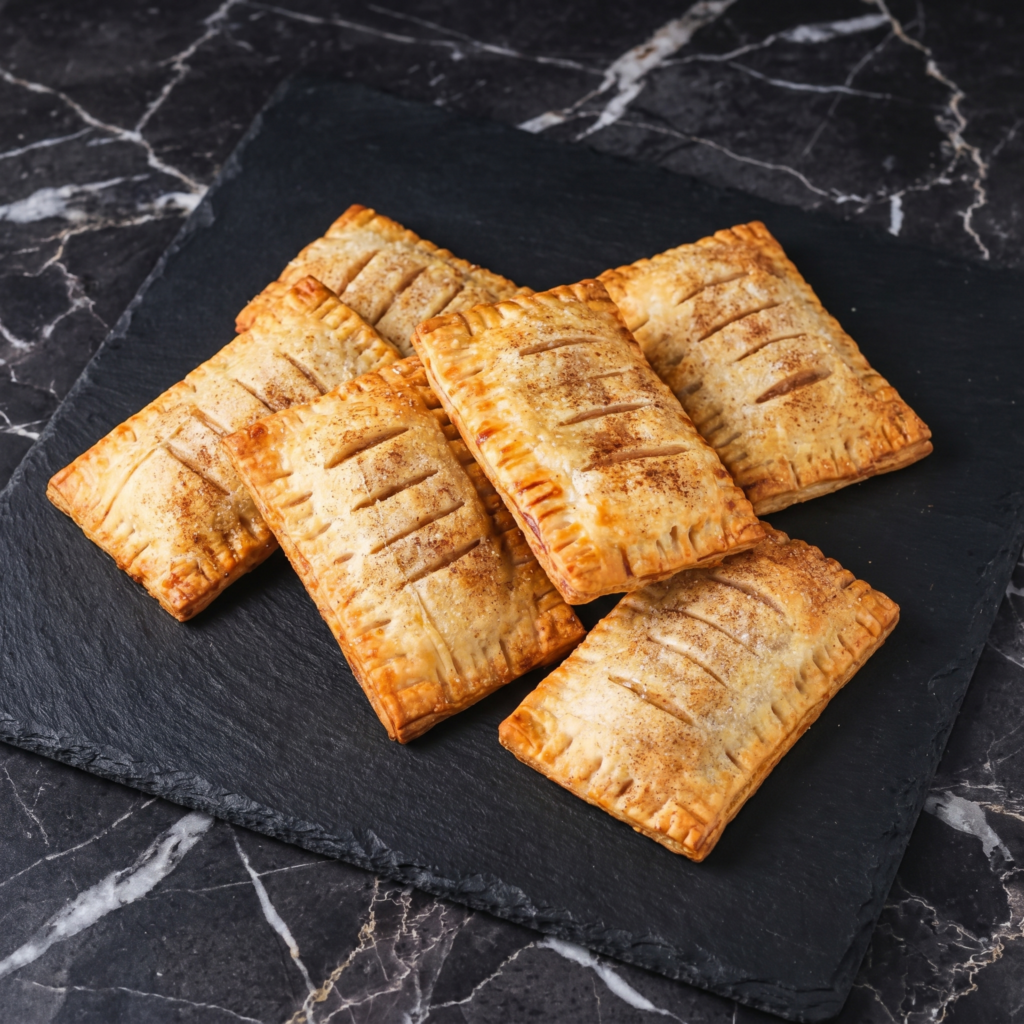
    Apple pie is great. Apple pie you can eat with your hands? Genius.

    Flaky crust. Warm cinnamon-spiced apples. Baked until golden. Dusted with sugar. No fork required. No plate required. Just hungry hands.
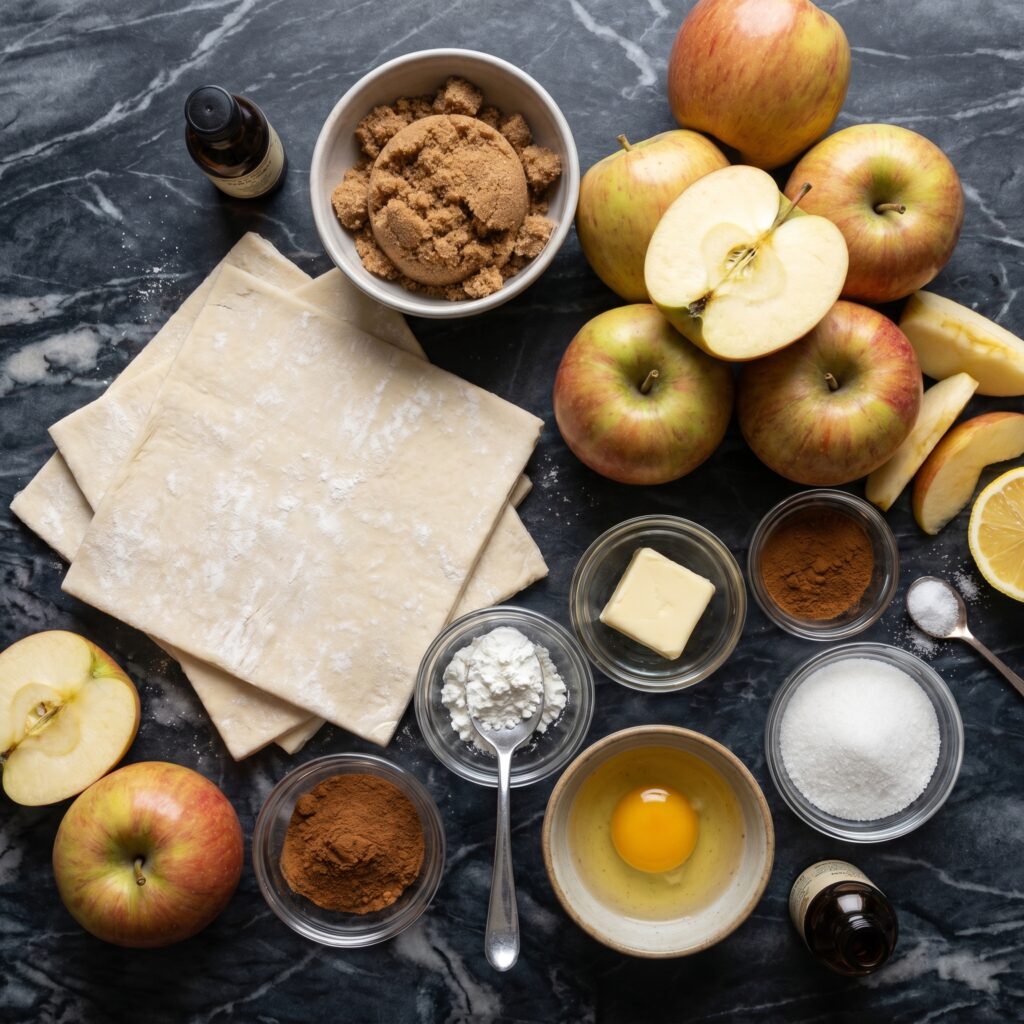
    Ingredients

    Makes 8-10 hand pies.

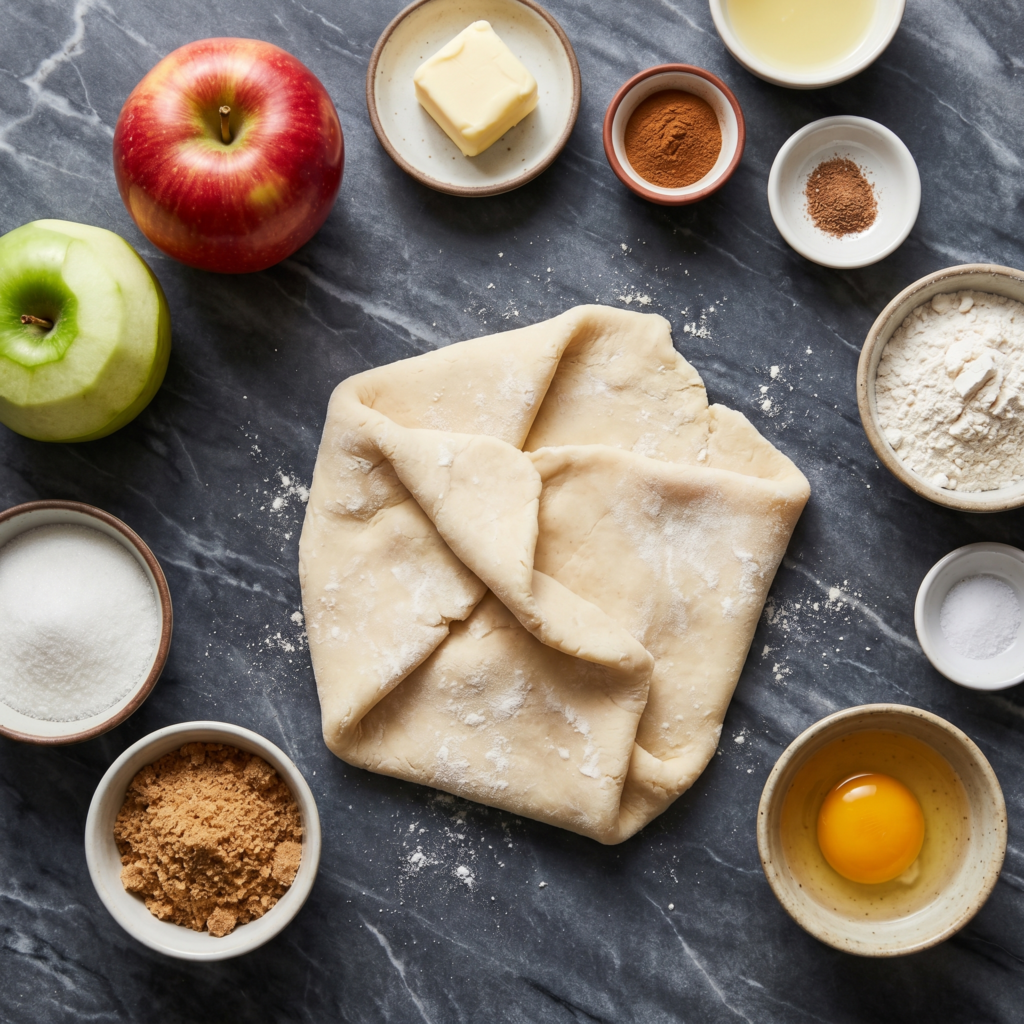
    • 1 box (14 oz) refrigerated pie crust (2 crusts) or homemade
    • 2 medium apples (Granny Smith or Honeycrisp), peeled and diced
    • 2 tbsp brown sugar
    • 1 tbsp granulated sugar
    • 1 tsp cinnamon
    • 1 tbsp butter
    • 1 tsp lemon juice
    • 1 tbsp cornstarch mixed with 1 tbsp water (slurry)
    • 1 egg, beaten (for egg wash)
    • Turbinado sugar for sprinkling (optional)

    Step-by-Step Instructions

    Step 1: Preheat and Cook Filling

    1. Preheat oven to 400°F (200°C). Line baking sheet with parchment.
    2. In a skillet, cook apples, brown sugar, granulated sugar, cinnamon, butter, and lemon juice over medium heat for 5 minutes until apples soften.
    3. Stir in cornstarch slurry. Cook 1 minute until thickened. Let cool.

    Step 2: Cut the Crust

    1. Roll out pie crusts. Use a 4-inch round cutter or trace a bowl to cut circles.
    2. Reroll scraps to make more circles.

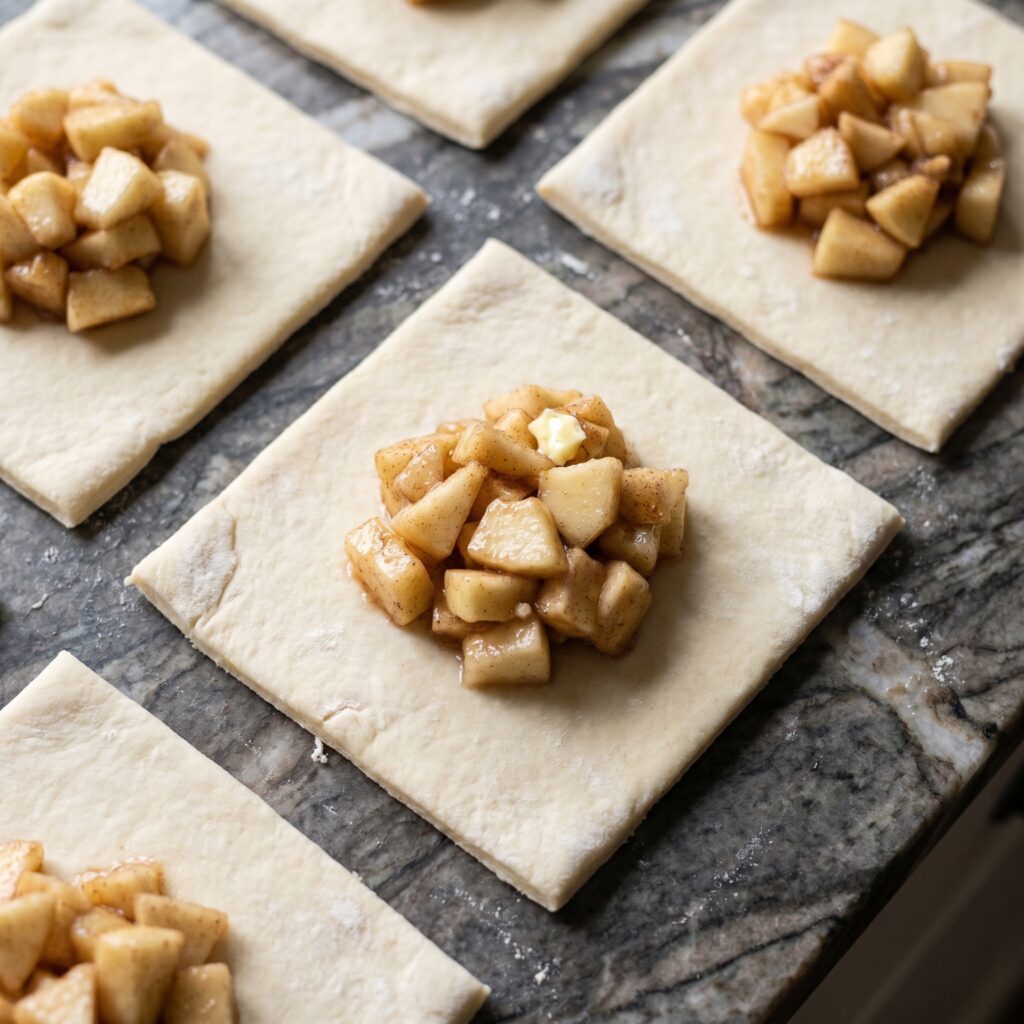
    Step 3: Fill and Seal

    1. Place 1 tbsp filling in center of each circle.
    2. Fold dough over. Press edges with a fork to seal.
    3. Cut small slits on top for steam.

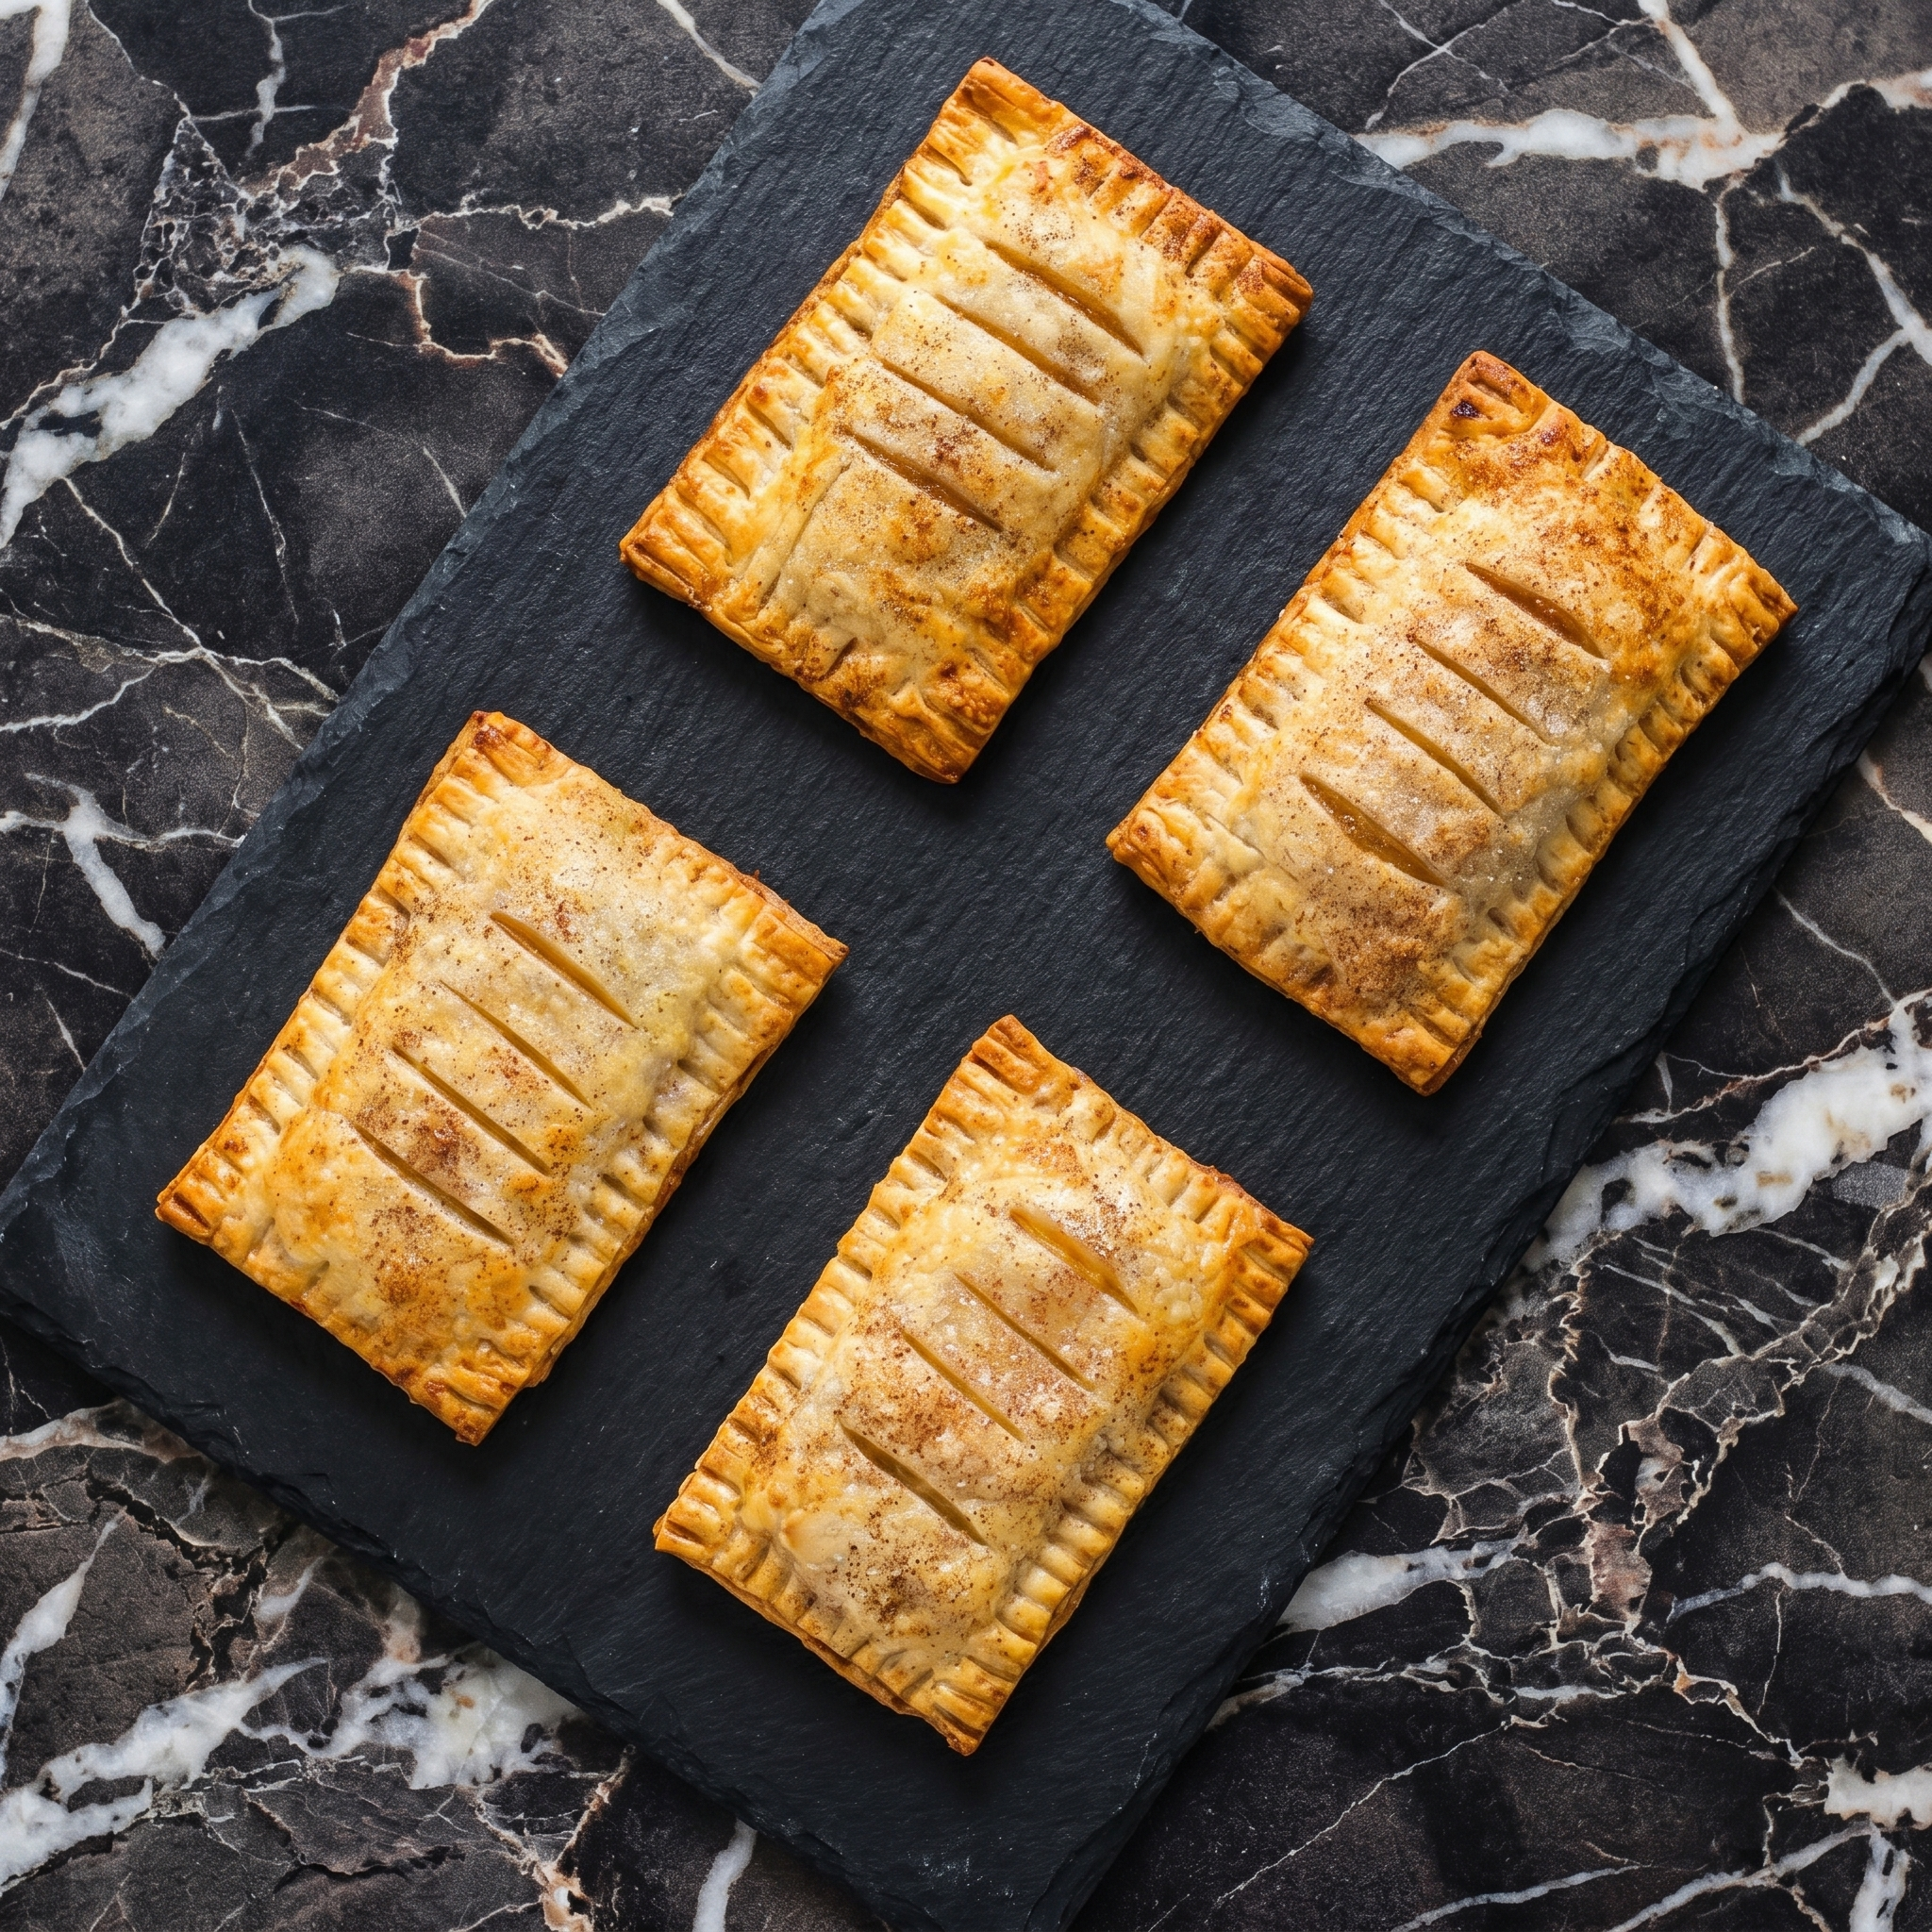
    Step 4: Egg Wash and Bake

    1. Brush with beaten egg. Sprinkle with turbinado sugar.
    2. Bake 15-18 minutes until golden brown.

    Step 5: Serve

    1. Cool 5 minutes. Serve warm. Maybe with vanilla ice cream (if you have a plate).

    Summary

    Prep Time: 15 minutes | Cook Time: 15-18 minutes | Total Time: 30 minutes

    Yield: 8-10 hand pies

    Difficulty: Easy

    Storage Notes

    Room Temp:

    Store in an airtight container for 3 days.

    Freezer Friendly:

    Freeze unbaked hand pies for 3 months. Bake from frozen at 400°F for 18-22 minutes.

    Pro Tip:

    Don’t overfill. Less filling = easier sealing = no blowouts.

  • Blueberry Cheesecake (No Cracks, No Tears, No Drama)

    Blueberry Cheesecake (No Cracks, No Tears, No Drama)

    Cheesecake has a reputation for being fussy. Water baths. Cracks. Soggy crusts. Not this one. This recipe skips all the drama and delivers a perfectly creamy, dense, no-crack cheesecake every single time.

    And the blueberry topping? Sweet, jammy, and piled on thick. Swirl some into the batter, dump the rest on top, and watch it disappear. No fancy techniques. Just a perfect cheesecake.

    Ingredients

    Serves 8-10.

    For the Crust:

    • 1½ cups (150g) graham cracker crumbs (about 12 crackers)
    • ¼ cup (50g) granulated sugar
    • 6 tablespoons (85g) unsalted butter, melted

    For the Cheesecake Filling:

    • 32 oz (900g) cream cheese, softened (full-fat, room temp)
    • 1 cup (200g) granulated sugar
    • 3 large eggs, room temperature
    • 1 cup (240g) sour cream, room temperature
    • 1 tablespoon vanilla extract

    For the Blueberry Topping:

    • 2 cups (300g) fresh or frozen blueberries
    • ¼ cup (50g) granulated sugar
    • 1 tablespoon lemon juice
    • 1 teaspoon cornstarch mixed with 1 tablespoon water

    Step-by-Step Instructions

    Step 1: Make the Crust

    1. Preheat oven to 350°F (175°C). Grease a 9-inch springform pan.
    2. Mix crumbs, sugar, and butter. Press firmly into the bottom and slightly up the sides.
    3. Bake for 10 minutes. Cool slightly.

    Step 2: Make the Filling

    1. Beat cream cheese and sugar until smooth. No lumps allowed.
    2. Add eggs one at a time, mixing just until combined.
    3. Mix in sour cream and vanilla. Do not overmix—that’s how you get cracks.

    Step 3: Bake (No Water Bath!)

    1. Pour filling over crust. Smooth the top.
    2. Bake at 350°F for 10 minutes, then lower to 325°F (160°C) for 45-50 minutes.
    3. Cheesecake is done when edges are set but the center still jiggles slightly.
    4. Turn off oven, crack the door open, and let it cool inside for 1 hour.

    Step 4: Make the Blueberry Topping

    1. Simmer blueberries, sugar, and lemon juice in a saucepan for 5 minutes.
    2. Add cornstarch slurry and cook until thickened, about 1 minute. Cool completely.

    Step 5: Assemble and Chill

    1. Spoon half the blueberry topping over the cooled cheesecake. Swirl gently with a knife.
    2. Refrigerate for at least 6 hours (overnight is best).
    3. Top with remaining blueberries before serving.

    Summary

    Prep Time: 25 minutes | Bake Time: 60 minutes | Cool/Chill: 7+ hours | Total Time: ~9 hours

    Yield: 8-10 slices

    Difficulty: Easy (patience required)

    Storage Notes

    Cheesecake loves the fridge. Store covered for up to 5 days. It actually gets better after day 2. Freeze slices (without topping) for up to 3 months—wrap individually in plastic then foil. Thaw overnight in the fridge. Add fresh blueberry topping after thawing.

  • Perfect Lemon Bars (Tart, Sweet, and Completely Addictive)

    Perfect Lemon Bars (Tart, Sweet, and Completely Addictive)

    Most lemon bars are liars. Either the filling is rubbery or the crust is cardboard. Not these. The crust is tender, buttery, and holds its shape. The filling? Pure sunshine—silky, tangy, and just sweet enough to make you go back for another.

    They’re simple enough for a Tuesday night and fancy enough for a baby shower. Plus, they travel well, freeze beautifully, and vanish from plates in record time. You’ve been warned.

    Ingredients

    Serves 16 squares.

    For the Crust:

    • 1 cup (225g) unsalted butter, softened
    • ½ cup (100g) granulated sugar
    • 2 cups (250g) all-purpose flour
    • ¼ teaspoon salt

    For the Lemon Filling:

    • 2 cups (400g) granulated sugar
    • 4 large eggs
    • 1 cup (240ml) fresh lemon juice (about 4-6 lemons)
    • ½ cup (65g) all-purpose flour
    • Zest from 2 lemons
    • Powdered sugar, for dusting

    Step-by-Step Instructions

    Step 1: Make the Crust

    1. Preheat oven to 350°F (175°C). Line a 9×13 inch pan with parchment paper.
    2. Beat butter and sugar until creamy. Mix in flour and salt until crumbly.
    3. Press firmly into the bottom of the pan. Bake for 18-20 minutes until lightly golden.

    Step 2: Make the Filling

    1. While crust bakes, whisk sugar, eggs, lemon juice, flour, and lemon zest together until smooth.
    2. No lumps. No streaks. Just yellow deliciousness.

    Step 3: Bake the Bars

    1. Pour filling over hot crust (yes, hot—it helps them stick together).
    2. Bake for 18-22 minutes. The filling should be set around the edges but still slightly jiggly in the center.

    Step 4: Cool and Dust

    1. Let cool completely at room temperature, then refrigerate for at least 2 hours.
    2. Dust generously with powdered sugar right before cutting. Use a hot knife for clean slices.

    Summary

    Prep Time: 15 minutes | Bake Time: 40 minutes | Chill Time: 2 hours | Total Time: ~3 hours

    Yield: 16 lemon bars

    Difficulty: Easy

    Storage Notes

    Store lemon bars in the fridge for up to 5 days. They actually taste better cold. For longer storage, freeze them in a single layer (without powdered sugar) for up to 3 months. Dust with powdered sugar after thawing. Do not leave them out on the counter—the filling gets weird and sticky.

  • Banana Cupcakes (Moist, Fluffy, Topped with Cream Cheese Frosting)

    Banana Cupcakes (Moist, Fluffy, Topped with Cream Cheese Frosting)

    Banana cupcakes are banana bread’s more fun cousin. Super moist. Fluffy. Packed with real banana flavor. Topped with tangy cream cheese frosting. Perfect for overripe bananas. Make a batch. Watch them vanish.

    Ingredients

    Makes 12 cupcakes.

    For the Cupcakes:

    • 1½ cups (190g) all-purpose flour
    • 1 tsp baking soda
    • ½ tsp baking powder
    • ½ tsp salt
    • ½ cup (115g) unsalted butter, softened
    • 1 cup (200g) granulated sugar
    • 2 large eggs
    • 1 tsp vanilla extract
    • 3 ripe bananas, mashed (about 1½ cups)
    • ½ cup (120ml) sour cream or Greek yogurt

    For the Cream Cheese Frosting:

    • 8 oz (225g) cream cheese, softened
    • ½ cup (115g) unsalted butter, softened
    • 3 cups (360g) powdered sugar
    • 1 tsp vanilla extract
    • Pinch of salt

    Step-by-Step Instructions

    Step 1: Preheat & Prep

    1. Preheat oven to 350°F (175°C). Line a muffin tin with 12 cupcake liners.

    Step 2: Mix Dry

    1. Whisk flour, baking soda, baking powder, and salt. Set aside.

    Step 3: Cream Butter & Sugar

    1. Beat butter and sugar until light and fluffy (3 minutes). Add eggs one at a time, then vanilla.
    2. Mix in mashed bananas and sour cream.

    Step 4: Combine & Bake

    1. Gradually add dry ingredients. Mix until just combined.
    2. Divide batter evenly among liners (fill about ⅔ full). Bake 18-22 minutes until a toothpick comes out clean.

    Step 5: Make Frosting

    1. Beat cream cheese and butter until smooth. Gradually add powdered sugar, vanilla, and salt. Beat until fluffy.

    Step 6: Frost & Serve

    1. Cool cupcakes completely. Frost generously. Devour.

    Summary

    Prep Time: 20 min | Bake Time: 22 min | Total: 42 min

    Yield: 12 cupcakes | Difficulty: Easy

    Storage Notes

    Fridge (frosted): 3 days. Freeze (unfrosted): 3 months. Thaw at room temperature, then frost. These cupcakes stay moist for days — perfect for making ahead.

  • M&M Cookies (Colorful, Chewy, Impossible to Stop Eating)

    M&M Cookies (Colorful, Chewy, Impossible to Stop Eating)

    M&M cookies are happiness in cookie form. Soft. Chewy. Buttery. Packed with colorful candy and chocolate chips. No chilling. 20 minutes. Make a double batch. They vanish fast.

    Ingredients

    Makes 24-30 cookies.

    • 1 cup (230g) unsalted butter, softened
    • 1 cup (200g) brown sugar, packed
    • ½ cup (100g) granulated sugar
    • 2 large eggs
    • 1 tsp vanilla extract
    • 2½ cups (310g) all-purpose flour
    • 1 tsp baking soda
    • ½ tsp salt
    • 1 cup M&Ms (plus extra for topping)
    • ½ cup chocolate chips (optional)

    Step-by-Step Instructions

    Step 1: Preheat & Prep

    1. Preheat oven to 350°F (175°C). Line baking sheets with parchment.

    Step 2: Cream Butter & Sugars

    1. Beat butter, brown sugar, and granulated sugar until light and fluffy (3 minutes). Add eggs one at a time, then vanilla.

    Step 3: Mix Dry

    1. Whisk flour, baking soda, and salt. Gradually add to wet mixture. Mix until just combined.
    2. Fold in M&Ms and chocolate chips (if using). Reserve some M&Ms for topping.

    Step 4: Scoop & Top

    1. Scoop 1.5-tablespoon dough balls onto baking sheets (2 inches apart). Press extra M&Ms on top.

    Step 5: Bake

    1. Bake 10-12 minutes until edges are lightly golden (centers will look soft).

    Step 6: Cool & Serve

    1. Cool on baking sheet for 5 minutes, then transfer to a wire rack. Serve with milk. Watch them disappear.

    Summary

    Prep Time: 15 min | Bake Time: 12 min | Total: 27 min

    Yield: 24-30 cookies | Difficulty: Easy

    Storage Notes

    Airtight container: 1 week at room temperature. Freeze dough balls: 3 months. Bake from frozen (add 2-3 minutes). These stay soft for days. Perfect for lunchboxes and cookie swaps.

  • Snickerdoodle Cookies (Soft, Chewy, Rolled in Cinnamon Sugar)

    Snickerdoodle Cookies (Soft, Chewy, Rolled in Cinnamon Sugar)

    Snickerdoodles are cookie jar royalty. Soft. Chewy. Buttery. Rolled in cinnamon sugar. That signature crackly top. One batch. Gone in a day. Make two.

    Ingredients

    Makes 24-30 cookies.

    For the Dough:

    • 1 cup (230g) unsalted butter, softened
    • 1½ cups (300g) granulated sugar
    • 2 large eggs
    • 2 tsp vanilla extract
    • 2¾ cups (345g) all-purpose flour
    • 2 tsp cream of tartar
    • 1 tsp baking soda
    • ½ tsp salt

    For the Cinnamon Sugar Coating:

    • ¼ cup (50g) granulated sugar
    • 2 tbsp ground cinnamon

    Step-by-Step Instructions

    Step 1: Preheat & Prep

    1. Preheat oven to 375°F (190°C). Line baking sheets with parchment.

    Step 2: Cream Butter & Sugar

    1. Beat butter and sugar until light and fluffy (3 minutes). Add eggs one at a time, then vanilla.

    Step 3: Mix Dry

    1. Whisk flour, cream of tartar, baking soda, and salt. Gradually add to wet mixture. Mix until just combined.

    Step 4: Coat & Bake

    1. Mix coating ingredients. Roll dough into 1-inch balls. Roll in cinnamon sugar.
    2. Place on baking sheets (2 inches apart). Bake 10-12 minutes until edges are set and tops are crackly.

    Step 5: Cool & Serve

    1. Cool on baking sheet for 5 minutes, then transfer to a wire rack. Serve with a tall glass of milk.

    Summary

    Prep Time: 15 min | Bake Time: 12 min | Total: 27 min

    Yield: 24-30 cookies | Difficulty: Easy

    Storage Notes

    Airtight container: 1 week at room temperature. Freeze dough balls: 3 months. Bake from frozen (add 2-3 minutes). These cookies stay soft for days. No refrigeration needed.

  • Strawberry Scones (Buttery, Tender, Bursting with Berries)

    Strawberry Scones (Buttery, Tender, Bursting with Berries)

    Strawberry scones are the perfect morning treat. Flaky, buttery, packed with sweet berry pockets. Crispy edges. Tender centers. Lemon glaze on top. Better than any coffee shop. And you don’t have to wait in line.

    Ingredients

    Makes 8 scones.

    • 2 cups (250g) all-purpose flour
    • ⅓ cup (65g) granulated sugar
    • 1 tbsp baking powder
    • ½ tsp salt
    • ½ cup (115g) cold unsalted butter, cubed
    • ½ cup (120ml) cold buttermilk (or milk + 1 tsp vinegar)
    • 1 large egg
    • 1 tsp vanilla extract
    • 1 cup (150g) fresh strawberries, diced (or frozen, not thawed)

    For the Lemon Glaze:

    • ½ cup (60g) powdered sugar
    • 1-2 tbsp lemon juice

    Step-by-Step Instructions

    Step 1: Preheat & Prep

    1. Preheat oven to 400°F (200°C). Line a baking sheet with parchment.

    Step 2: Mix Dry

    1. Whisk flour, sugar, baking powder, and salt. Cut in cold butter until mixture looks like coarse crumbs.

    Step 3: Add Wet & Berries

    1. Whisk buttermilk, egg, and vanilla. Pour into dry mixture. Stir until just combined (don’t overmix). Gently fold in strawberries.

    Step 4: Shape & Cut

    1. Turn dough onto a floured surface. Pat into an 8-inch round (about 1 inch thick).
    2. Cut into 8 wedges. Place on baking sheet (2 inches apart).

    Step 5: Bake

    1. Bake 15-18 minutes until golden brown.

    Step 6: Glaze & Serve

    1. Whisk powdered sugar and lemon juice until smooth. Drizzle over warm scones.
    2. Serve immediately. Devour with coffee or tea.

    Summary

    Prep Time: 15 min | Bake Time: 18 min | Total: 33 min

    Yield: 8 scones | Difficulty: Easy

    Storage Notes

    Best day-of. Freeze unbaked scones for 3 months. Bake from frozen (add 3-5 minutes). Baked scones freeze well for 2 months. Reheat in oven at 350°F for 5-7 minutes. Never microwave — scones dry out.

  • Cheese Danish (Creamy, Flaky, Bakery-Style at Home)

    Cheese Danish (Creamy, Flaky, Bakery-Style at Home)

    Cheese danish is the perfect breakfast pastry. Buttery, flaky puff pastry. Sweet, tangy cream cheese filling. Vanilla glaze on top. 20 minutes. Better than any bakery. Make two. They disappear fast.

    Ingredients

    Makes 8 danishes.

    • 1 sheet puff pastry (about 8 oz / 225g), thawed
    • 1 egg, beaten (for egg wash)

    For the Cream Cheese Filling:

    • 8 oz (225g) cream cheese, softened
    • ¼ cup (50g) sugar
    • 1 egg yolk
    • 1 tsp vanilla extract
    • Zest of ½ lemon (optional)

    For the Glaze:

    • ½ cup (60g) powdered sugar
    • 1-2 tbsp milk
    • ¼ tsp vanilla extract

    Step-by-Step Instructions

    Step 1: Preheat & Prep

    1. Preheat oven to 400°F (200°C). Line a baking sheet with parchment.
    2. Roll puff pastry slightly into a 10×12 inch rectangle. Cut into 8 squares (about 5 inches each).

    Step 2: Make Filling

    1. Beat cream cheese, sugar, egg yolk, vanilla, and lemon zest until smooth.

    Step 3: Assemble

    1. Place 1-2 tablespoons of filling in the center of each square. Brush edges with egg wash.
    2. Fold each corner toward the center, overlapping slightly. Press gently.
    3. Brush tops with egg wash.

    Step 4: Bake

    1. Bake 12-15 minutes until puffed and golden brown.

    Step 5: Glaze & Serve

    1. Whisk powdered sugar, milk, and vanilla. Drizzle over warm danishes.
    2. Serve immediately. Or save one for yourself before they vanish.

    Summary

    Prep Time: 10 min | Bake Time: 15 min | Total: 25 min

    Yield: 8 danishes | Difficulty: Easy

    Storage Notes

    Best fresh. Fridge 2 days (filling needs refrigeration). Reheat in oven or air fryer at 350°F for 5-7 minutes. Never microwave — pastry gets sad. Freeze unbaked danishes for 3 months. Bake from frozen (add 5-7 minutes).

  • Apple Turnovers (Flaky, Fruity, 20-Minute Magic)

    Apple Turnovers (Flaky, Fruity, 20-Minute Magic)

    Apple turnovers are apple pie’s cooler, easier cousin. Buttery, flaky puff pastry. Warm cinnamon apples. Drizzle of glaze. 20 minutes. No rolling dough. No pie crust drama. Just delicious.

    Ingredients

    Makes 8 turnovers.

    • 1 sheet puff pastry (about 8 oz / 225g), thawed
    • 2 medium apples (Granny Smith or Honeycrisp), peeled and finely diced
    • 2 tbsp brown sugar
    • 1 tbsp granulated sugar
    • 1 tsp cinnamon
    • 1 tbsp lemon juice
    • 1 tbsp butter
    • 1 egg, beaten (for egg wash)
    • 1 tbsp coarse sugar (for topping, optional)

    For the Glaze (Optional):

    • ½ cup (60g) powdered sugar
    • 1-2 tbsp milk or apple cider
    • ¼ tsp vanilla extract

    Step-by-Step Instructions

    Step 1: Cook Filling

    1. In a skillet, combine apples, brown sugar, granulated sugar, cinnamon, lemon juice, and butter. Cook over medium heat for 5-7 minutes until apples are soft and liquid thickens. Cool completely.

    Step 2: Preheat & Prep

    1. Preheat oven to 400°F (200°C). Line a baking sheet with parchment.
    2. Roll puff pastry slightly into a 10×12 inch rectangle. Cut into 8 squares (about 5 inches each).

    Step 3: Assemble

    1. Place 1-2 tablespoons of filling in the center of each square. Brush edges with egg wash. Fold diagonally into a triangle. Press edges with a fork to seal.
    2. Cut small slits on top for steam.

    Step 4: Bake

    1. Brush turnovers with egg wash. Sprinkle with coarse sugar if desired.
    2. Bake 15-18 minutes until puffed and golden brown.

    Step 5: Glaze & Serve

    1. Whisk powdered sugar, milk, and vanilla. Drizzle over warm turnovers. Serve immediately.

    Summary

    Prep Time: 15 min | Bake Time: 18 min | Total: 33 min

    Yield: 8 turnovers | Difficulty: Easy

    Storage Notes

    Best fresh. Fridge 2 days. Reheat in oven or air fryer at 350°F for 5-7 minutes (crispy returns). Never microwave — pastry gets sad and soggy. Freeze unbaked turnovers for 3 months. Bake from frozen (add 5-7 minutes).

  • Blueberry Fritters (Bursting with Berries, Dusted in Sugar)

    Blueberry Fritters (Bursting with Berries, Dusted in Sugar)

    Blueberry fritters are everything a donut wants to be. Crispy, golden outside. Soft, fluffy inside. Bursting with juicy blueberries and lemon zest. Drizzle with glaze. Eat warm. Lose your mind.

    Ingredients

    Makes 12-14 fritters.

    For the Fritters:

    • 2 cups (250g) all-purpose flour
    • ¼ cup (50g) sugar
    • 2 tsp baking powder
    • ½ tsp salt
    • ½ tsp cinnamon
    • 2 large eggs
    • ½ cup (120ml) milk
    • 2 tbsp melted butter
    • 1 tsp vanilla extract
    • Zest of 1 lemon
    • 1½ cups fresh or frozen blueberries (if frozen, don’t thaw)
    • Vegetable oil for frying

    For the Glaze (Optional):

    • 1 cup (120g) powdered sugar
    • 2 tbsp milk or lemon juice

    Step-by-Step Instructions

    Step 1: Make Batter

    1. Whisk flour, sugar, baking powder, salt, and cinnamon. In another bowl, whisk eggs, milk, melted butter, vanilla, and lemon zest.
    2. Pour wet into dry. Stir until just combined (don’t overmix). Gently fold in blueberries.

    Step 2: Heat Oil

    1. Heat 2 inches of oil to 350°F (175°C).

    Step 3: Fry Fritters

    1. Using a cookie scoop or two spoons, drop ¼-cup portions of batter into hot oil. Flatten slightly with the back of a spoon.
    2. Fry 2-3 minutes per side until deep golden brown and cooked through.
    3. Drain on paper towels.

    Step 4: Glaze (Optional)

    1. Whisk powdered sugar and milk/lemon juice until smooth. Drizzle over warm fritters.
    2. Or roll in cinnamon sugar immediately after frying.

    Step 5: Serve

    1. Serve warm. Watch them disappear.

    Summary

    Prep Time: 15 min | Cook Time: 15 min | Total: 30 min

    Yield: 12-14 fritters | Difficulty: Easy

    Storage Notes

    Best fresh day-of. Fridge 2 days. Reheat in oven or air fryer at 350°F for 5-7 minutes (crispy returns). Never microwave — gets sad and soggy. Freeze unglazed fritters for 3 months.