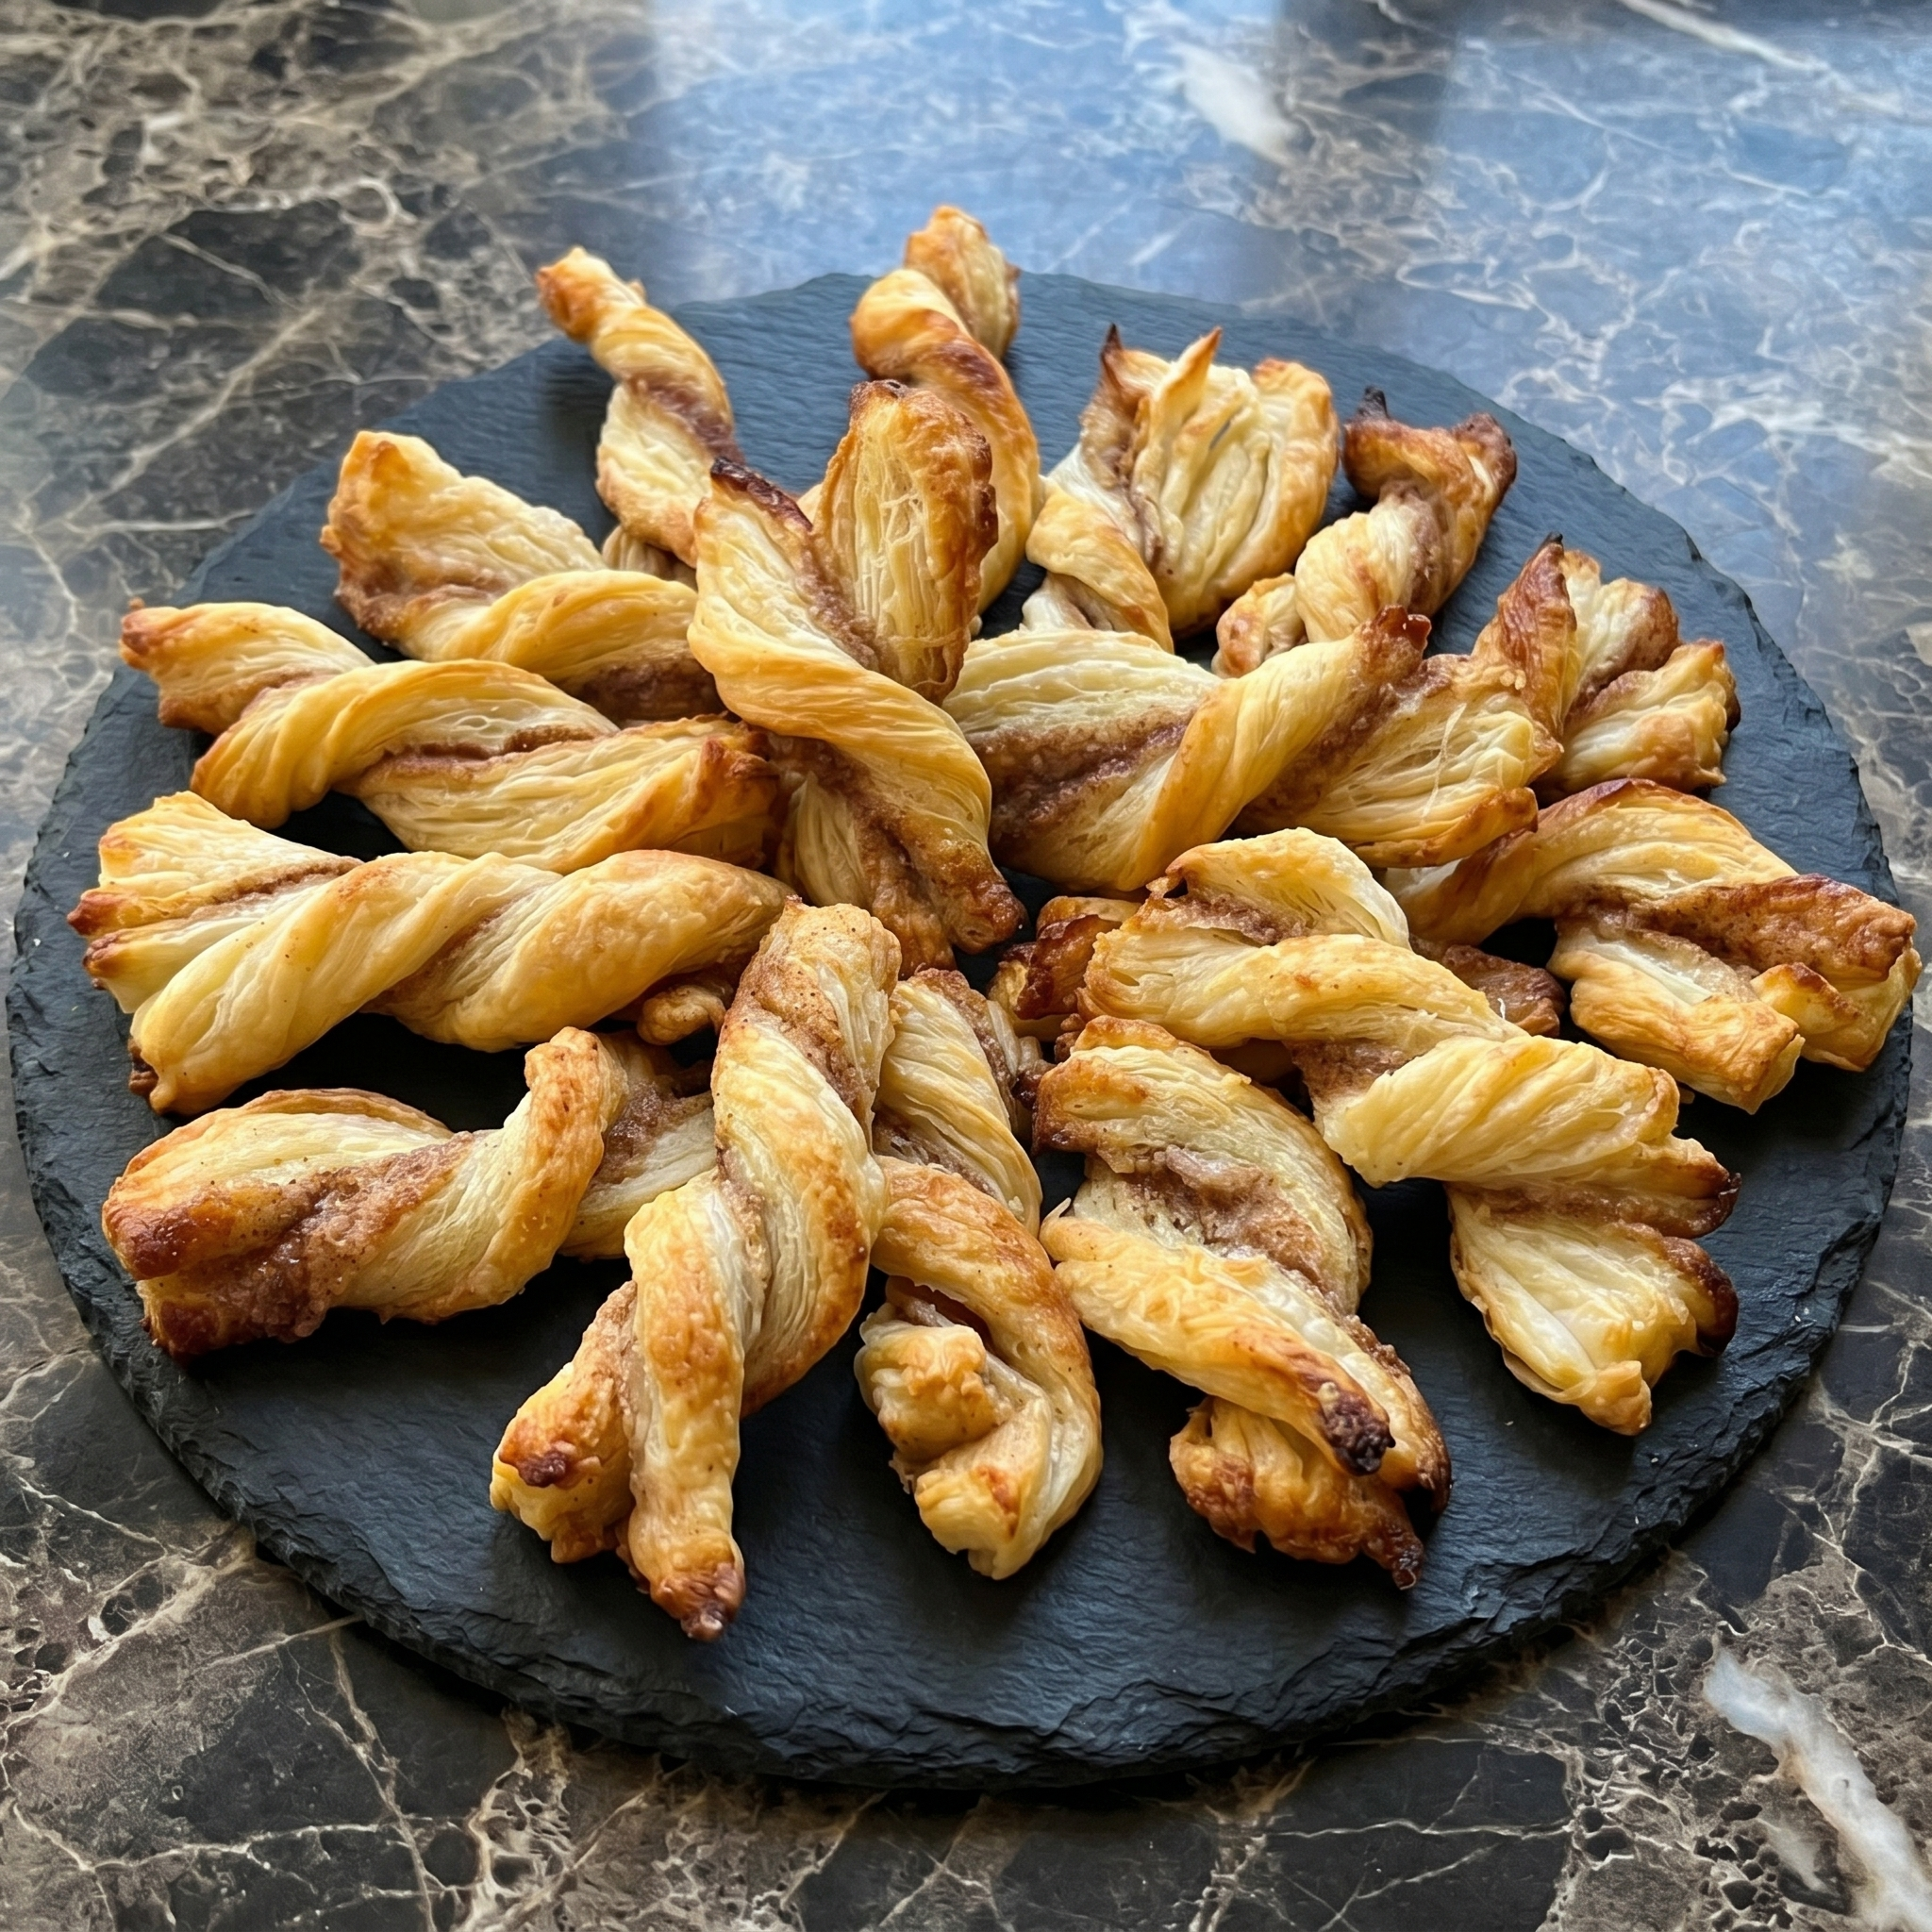
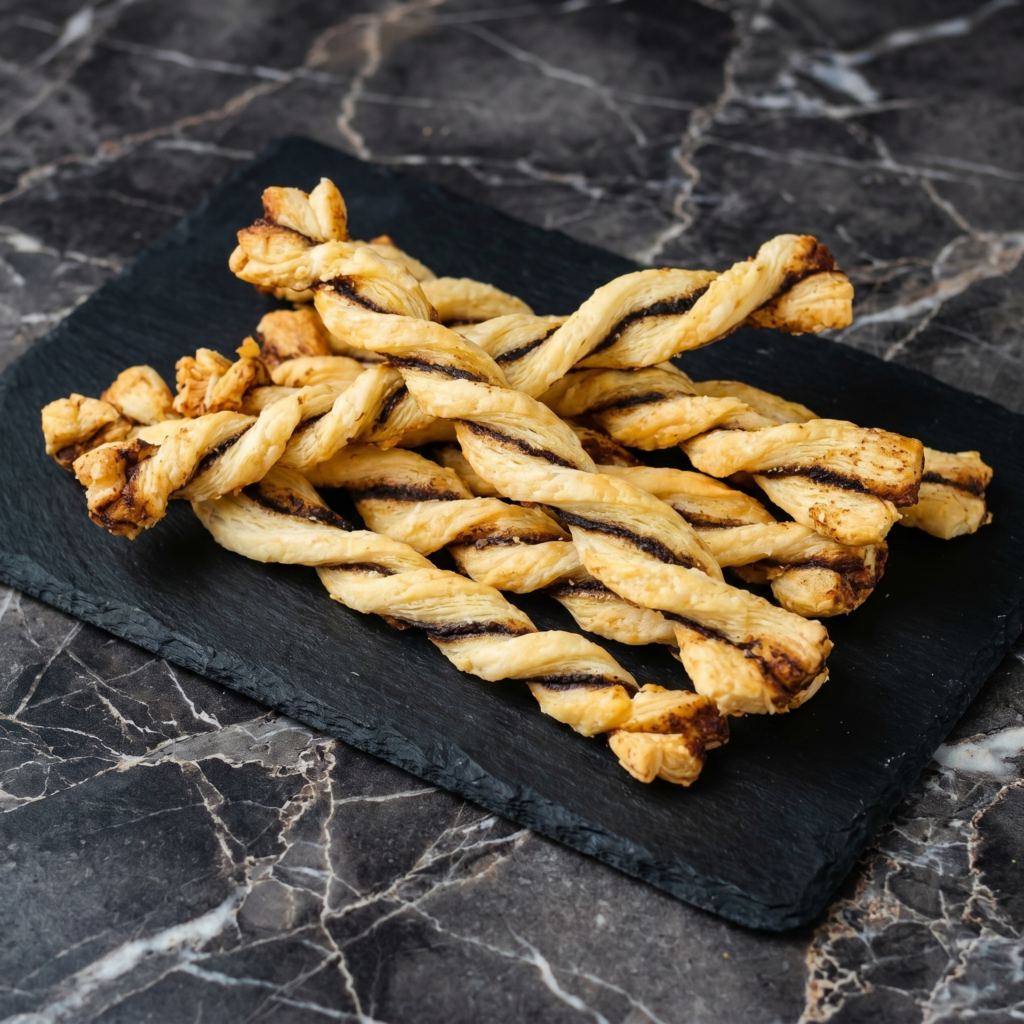
Love cinnamon rolls? Hate waiting for dough to rise?
Meet puff pastry cinnamon twists. All the buttery, cinnamon-sugar magic. None of the yeast, kneading, or patience. Twenty minutes from frozen to face. You’re welcome.
Ingredients
Makes 8-10 twists.
1 sheet frozen puff pastry, thawed
¼ cup (55g) unsalted butter, melted
½ cup (100g) brown sugar or granulated sugar
1 tablespoon cinnamon
1 egg, beaten (for egg wash)
For the Glaze (Optional but Recommended):
½ cup (60g) powdered sugar
1-2 tablespoons milk
¼ teaspoon vanilla extract
Step-by-Step Instructions
Step 1: Prep
Preheat oven to 400°F (200°C). Line a baking sheet with parchment.
Mix sugar and cinnamon in a small bowl.
Step 2: Assemble
Unroll puff pastry on a lightly floured surface.
Brush with melted butter. Sprinkle cinnamon sugar evenly over the whole sheet.
Fold the pastry in half (like closing a book). Press gently.
Step 3: Cut and Twist
Cut into 8-10 strips (about 1 inch wide).
Twist each strip 3-4 times. Place on baking sheet.
Brush tops with beaten egg (makes them shiny).
Step 4: Bake and Glaze
Bake for 12-15 minutes until golden brown and puffed.
While warm, whisk powdered sugar, milk, and vanilla into a drizzle.
Drizzle glaze over twists. Eat immediately. Try not to eat all eight.
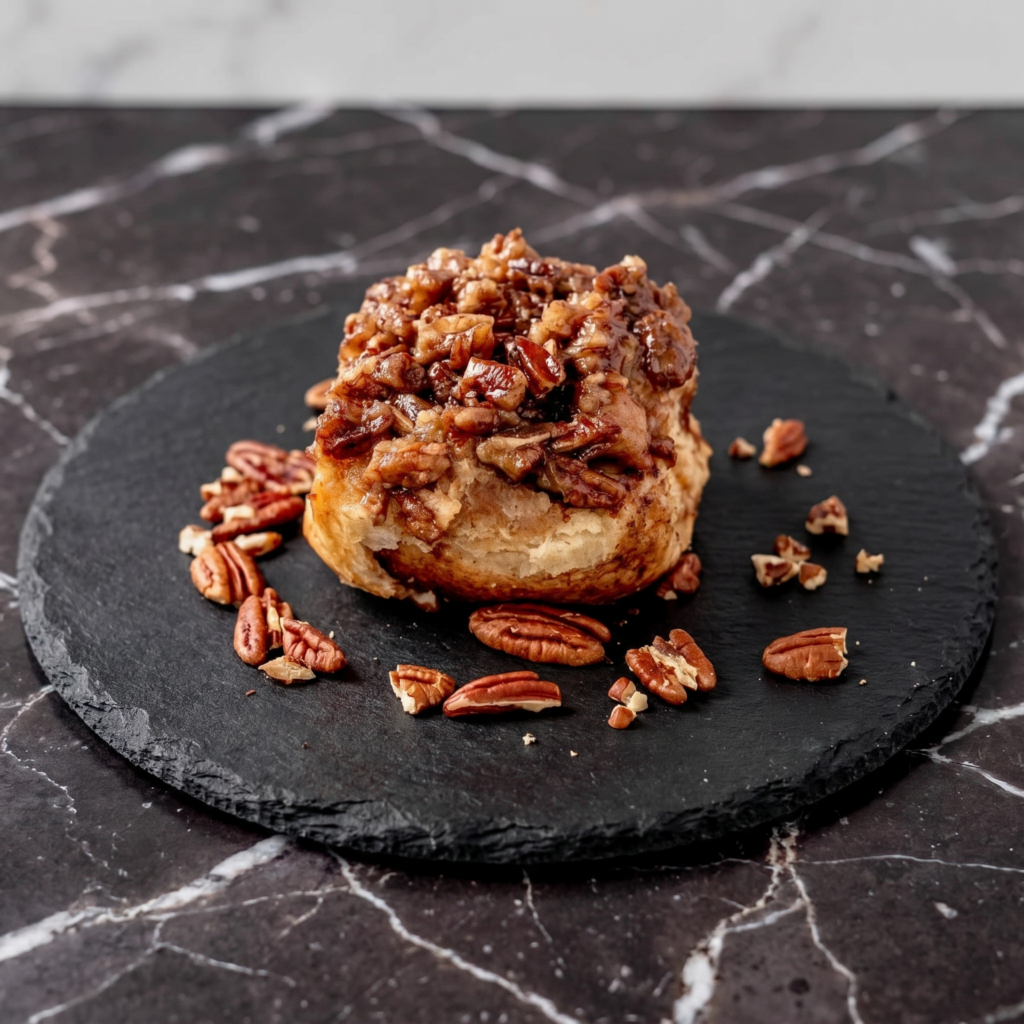
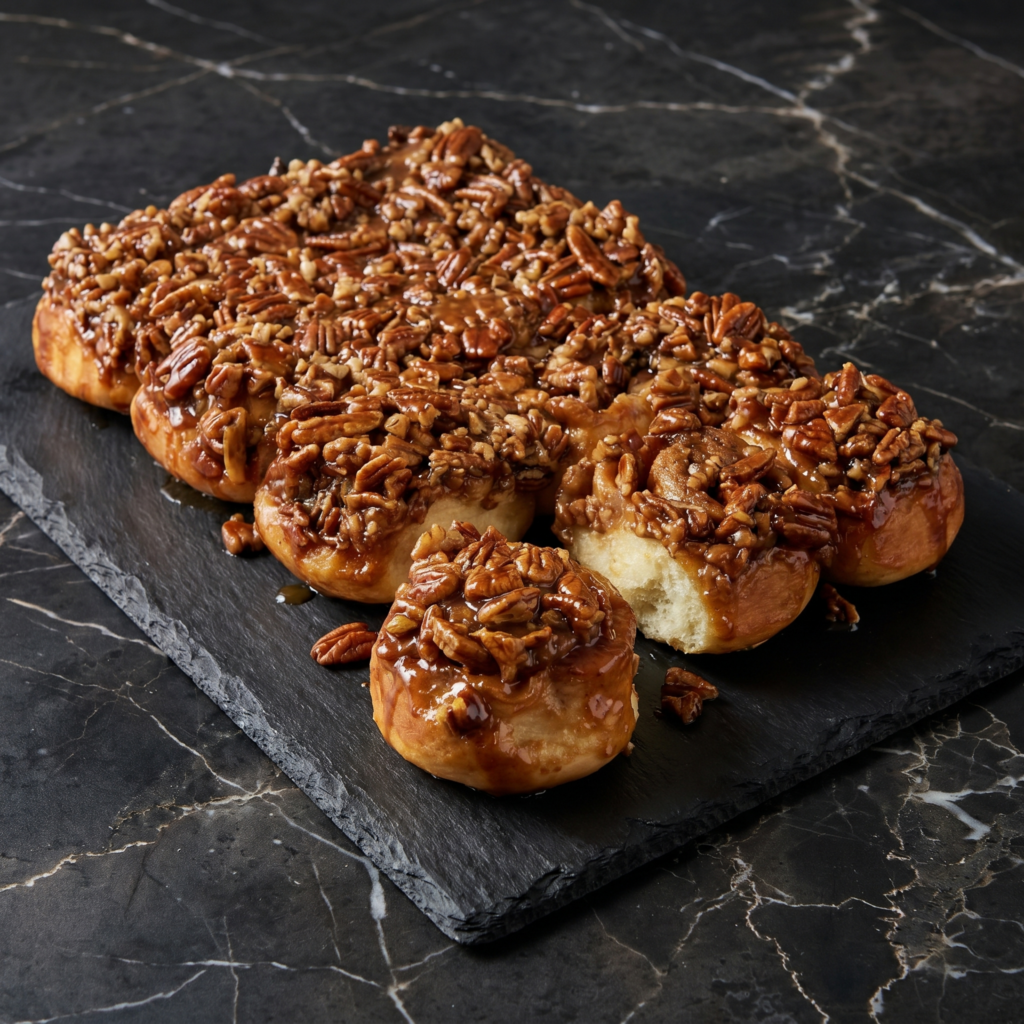
Cinnamon rolls are great. Maple pecan rolls are next-level.
Pillowy dough. Buttery brown sugar filling. Toasted pecans. A maple glaze that soaks into every swirl. They’re sticky, nutty, and absolutely dangerous. Make them for a holiday morning or a random Tuesday. No judgment.
Ingredients
Makes 9-12 rolls.
For the Dough (Quick or Overnight):
3 cups (375g) all-purpose flour
¼ cup (50g) sugar
2¼ teaspoons instant yeast (one packet)
½ teaspoon salt
½ cup (120ml) warm milk
¼ cup (60ml) warm water
¼ cup (55g) unsalted butter, melted
1 egg
For the Filling:
½ cup (115g) unsalted butter, softened
¾ cup (150g) brown sugar, packed
1 tablespoon cinnamon
1 cup (120g) pecans, chopped and toasted
For the Maple Glaze:
1 cup (120g) powdered sugar
¼ cup (60ml) pure maple syrup
2 tablespoons milk or cream
1 teaspoon vanilla extract
Step-by-Step Instructions
Step 1: Make the Dough
Mix flour, sugar, yeast, and salt. Add warm milk, water, melted butter, and egg. Knead 8-10 minutes until smooth.
Let rise 1 hour until doubled. (Or refrigerate overnight for better flavor.)
Step 2: Roll and Fill
Roll dough into a 12×18-inch rectangle. Spread softened butter over dough.
Sprinkle brown sugar, cinnamon, and chopped pecans evenly.
Roll tightly from the long side. Slice into 9-12 rolls.
Step 3: Second Rise and Bake
Place rolls in a greased 9×13-inch pan. Cover and rise 30-45 minutes.
Preheat oven to 350°F (175°C). Bake 20-25 minutes until golden brown.
Step 4: Glaze and Devour
Whisk powdered sugar, maple syrup, milk, and vanilla until smooth.
Pour warm glaze over warm rolls. Let it soak in for 5 minutes.
Serve with extra pecans on top. Lick the pan. No one’s watching.
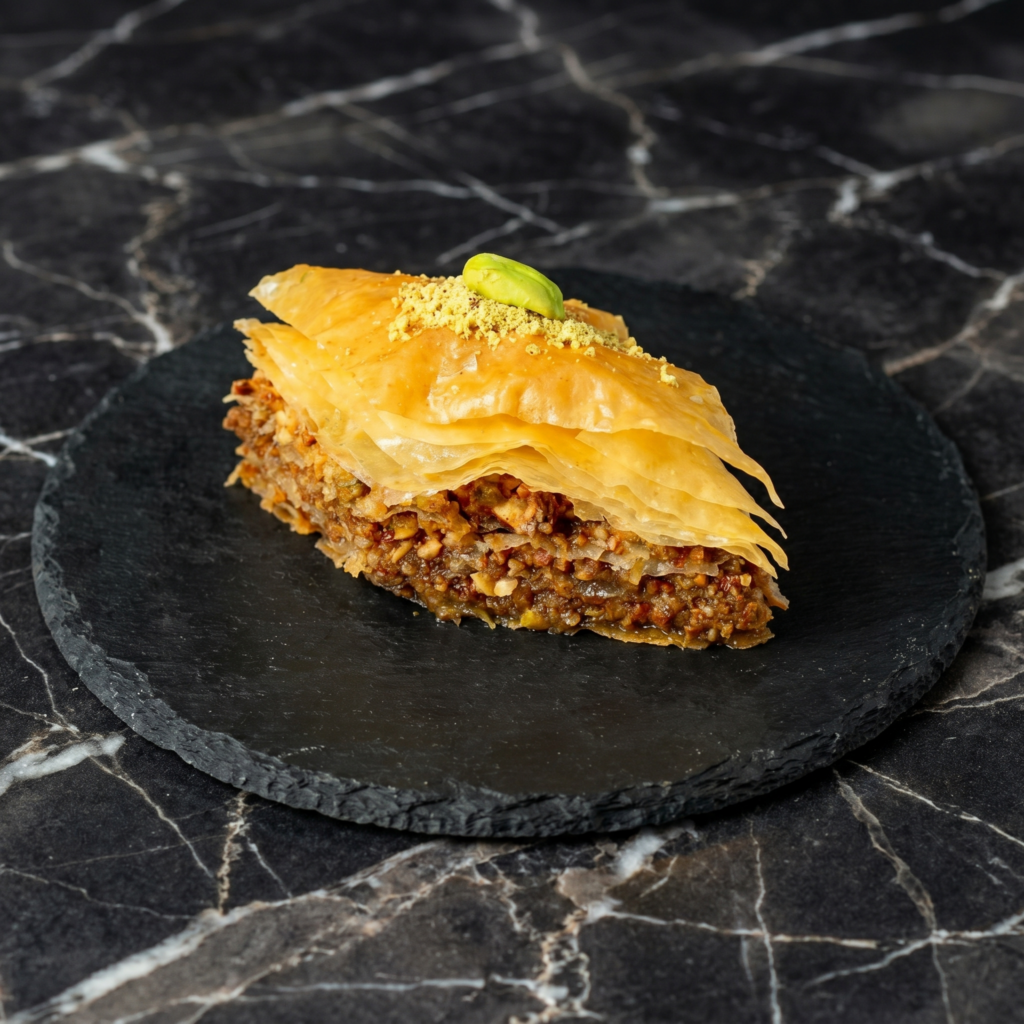
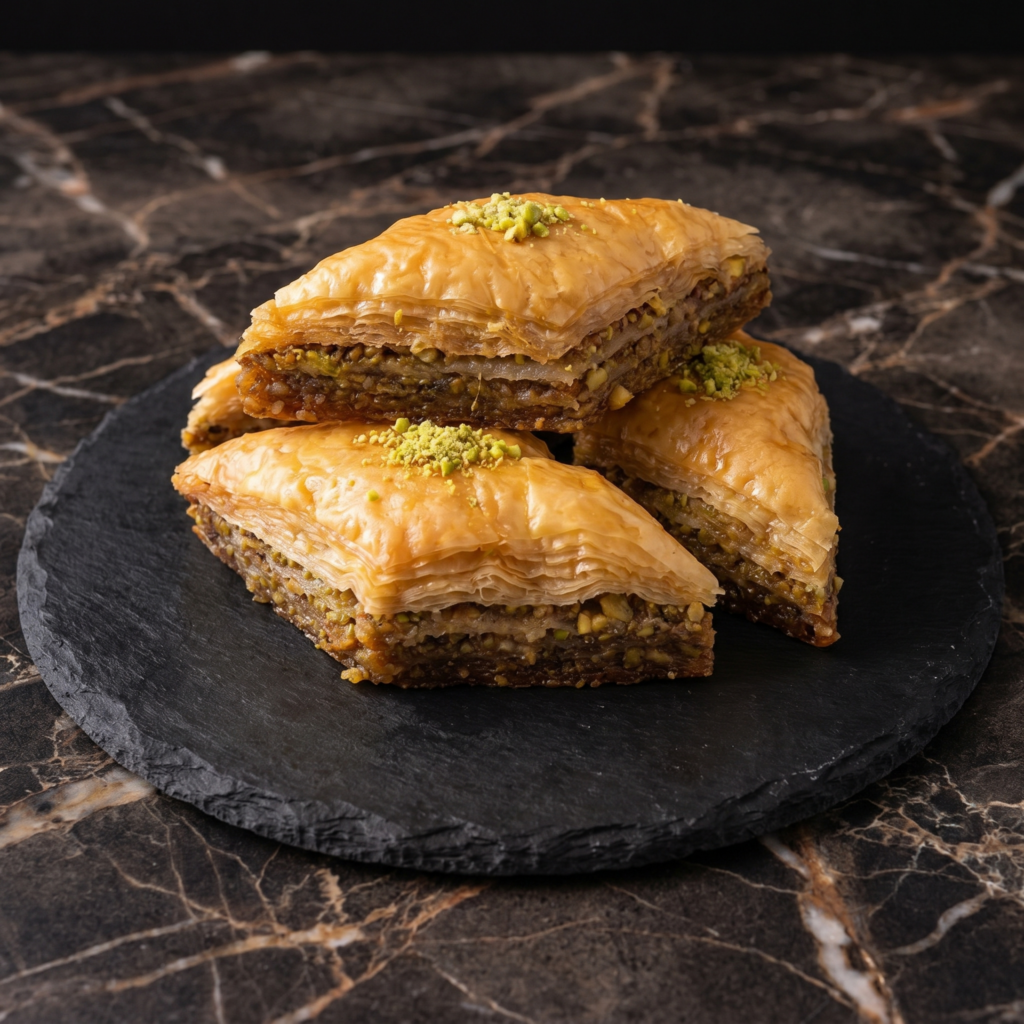
Baklava is the queen of desserts. Sticky. Nutty. Honey-soaked. Irresistible.
Layers of paper-thin phyllo brushed with butter. A crunchy walnut or pistachio filling. A sweet honey-lemon syrup that soaks in overnight. It sounds complicated. It’s not. Just go slow with the phyllo.
Ingredients
Makes one 9×13 pan (about 30-40 pieces).
1 box (16 oz / 450g) frozen phyllo dough, thawed
1½ cups (340g) unsalted butter, melted
2 cups (240g) walnuts or pistachios, finely chopped
½ cup (100g) sugar
1 teaspoon cinnamon
For the Honey Syrup:
1 cup (200g) sugar
¾ cup (180ml) water
½ cup (170g) honey
1 tablespoon lemon juice
1 cinnamon stick or ½ teaspoon cinnamon
Step-by-Step Instructions
Step 1: Prep
Preheat oven to 325°F (165°C). Grease a 9×13 baking dish.
Mix chopped nuts, ½ cup sugar, and cinnamon in a bowl.
Thaw phyllo according to package. Keep covered with a damp towel (it dries fast).
Step 2: Layer
Layer 10 sheets of phyllo in the dish, brushing each with melted butter.
Sprinkle a thin layer of nut mixture.
Add 5 more buttered phyllo sheets. More nuts. Repeat until nuts are gone.
Top with 10-15 buttered phyllo sheets. Brush the top with butter.
Step 3: Cut and Bake
Using a sharp knife, cut diamonds or squares all the way through.
Bake for 45-60 minutes until deep golden brown and crispy.
Step 4: Make Syrup and Soak
While baklava bakes, simmer sugar, water, honey, lemon juice, and cinnamon for 10 minutes. Cool slightly.
Pour warm syrup over HOT baklava right out of the oven.
Let it soak for 4-6 hours or overnight. Do not skip this step.
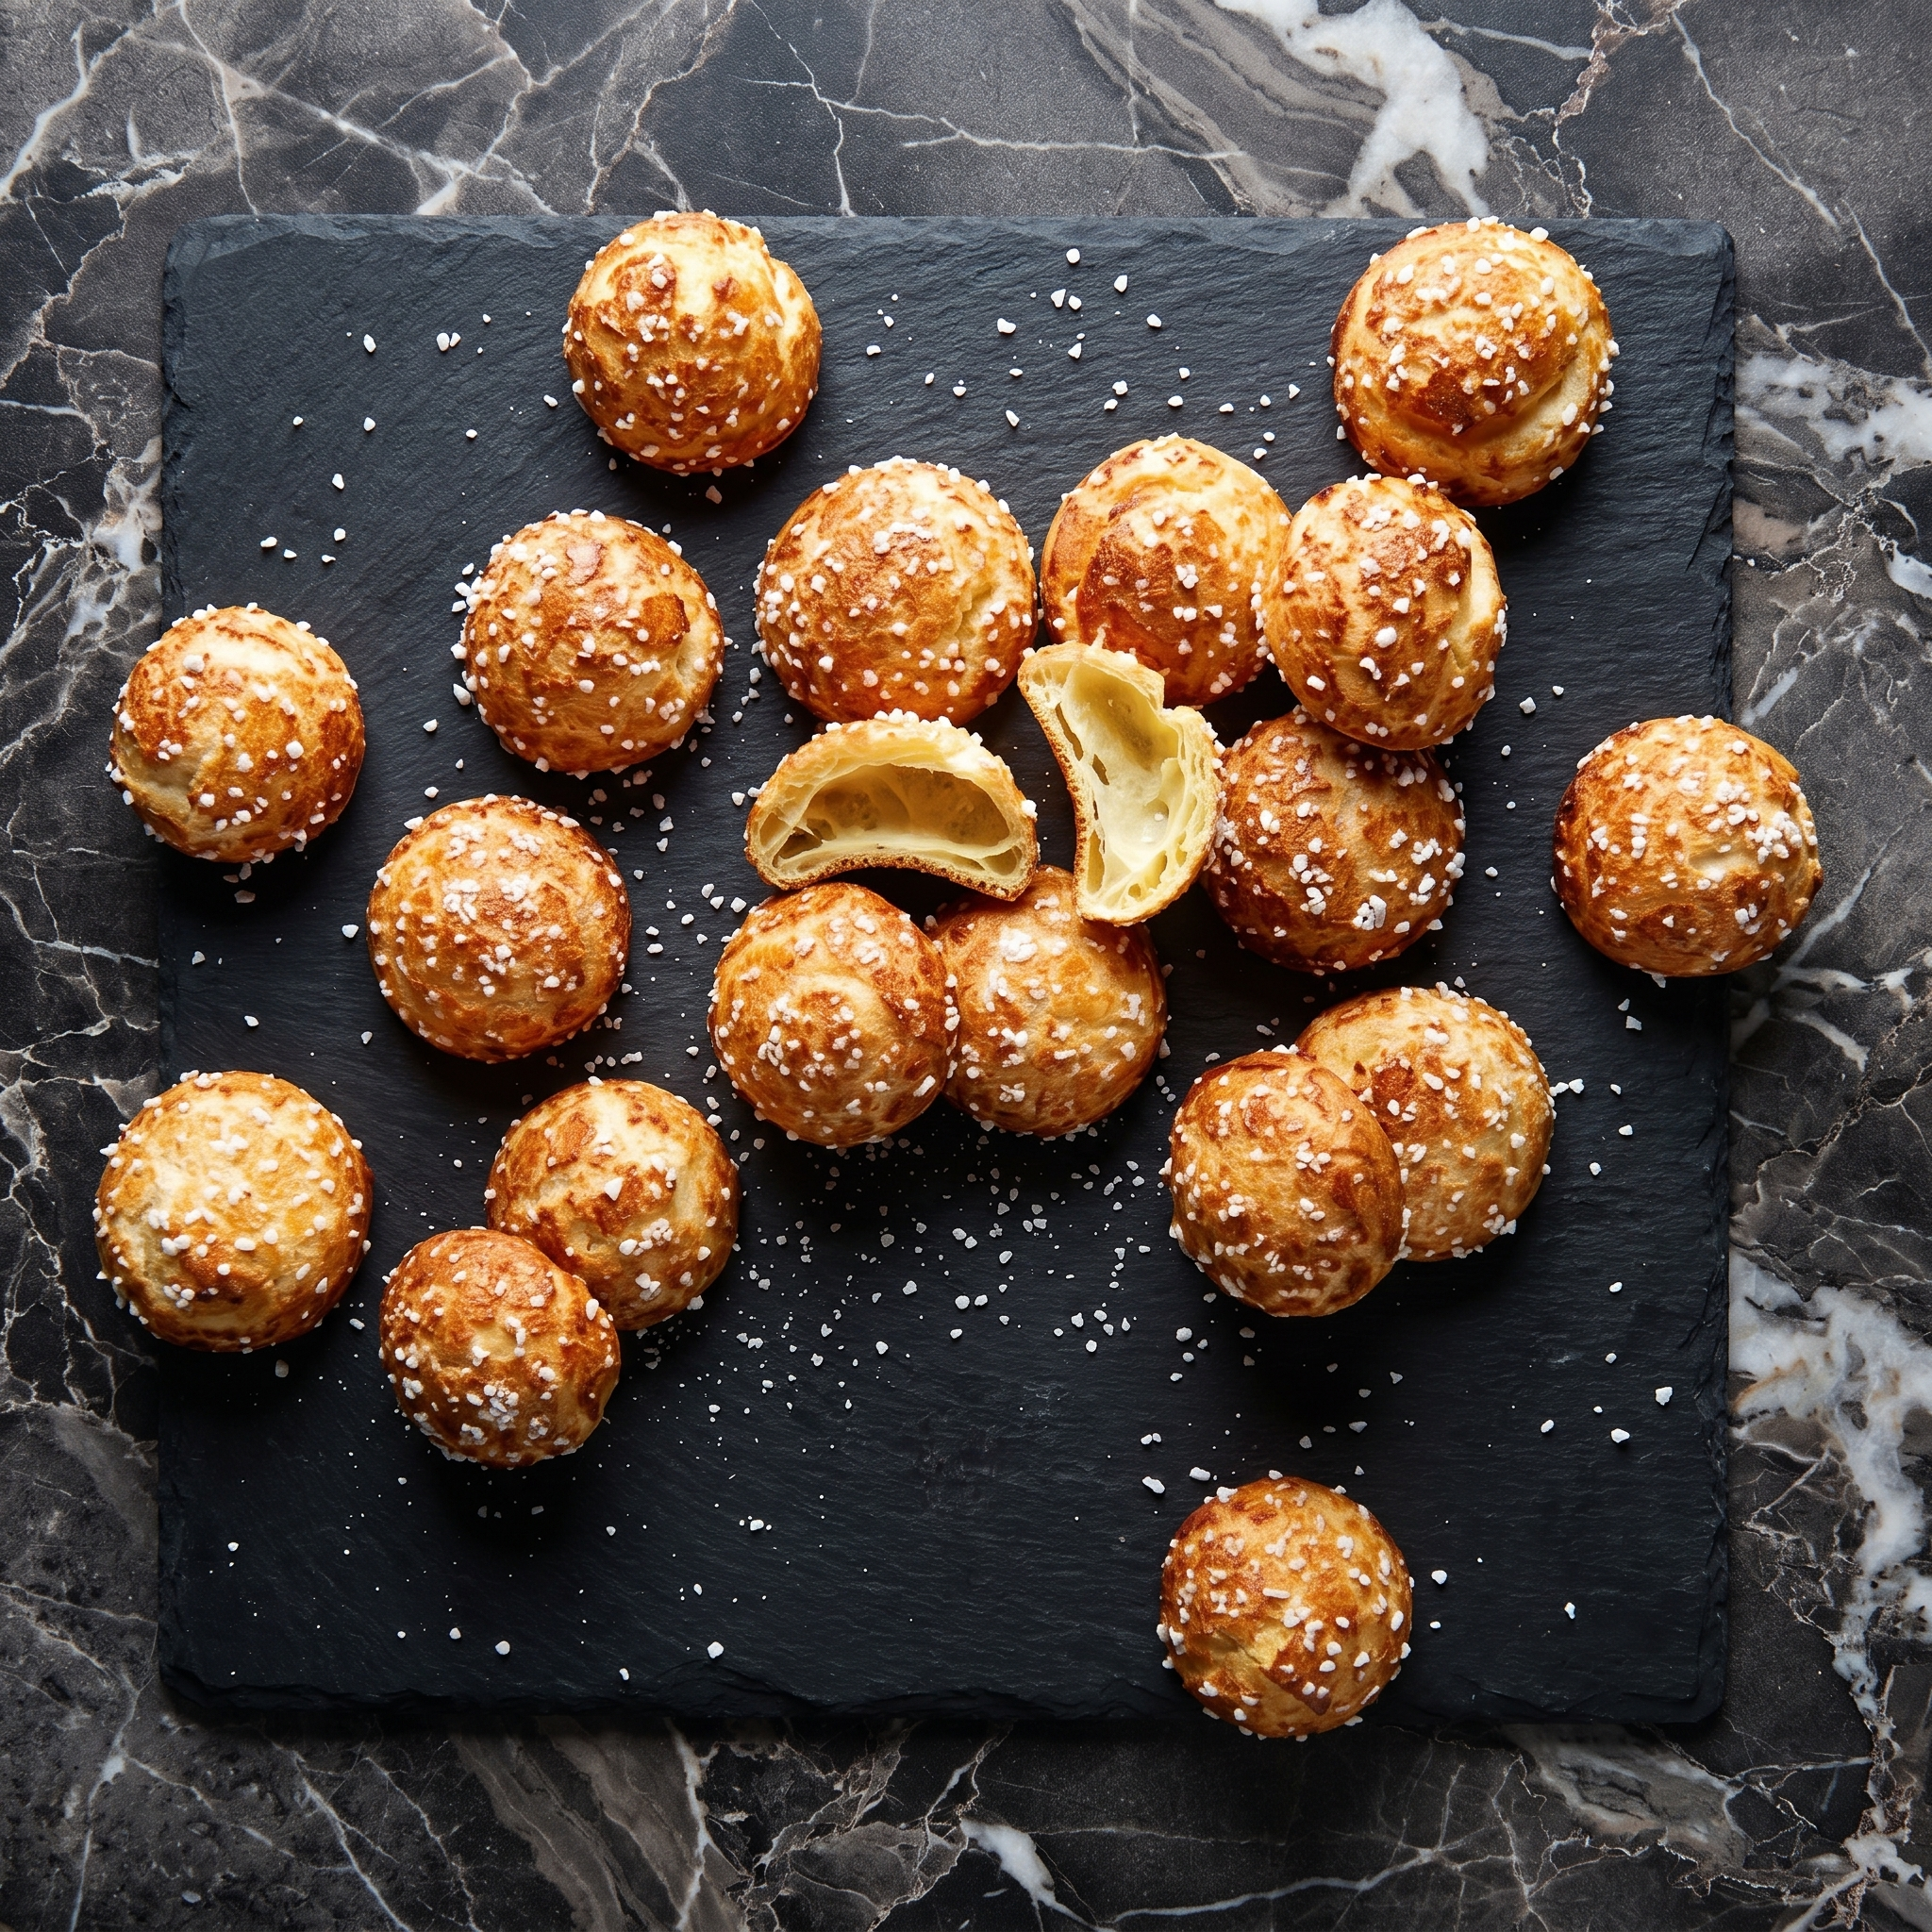
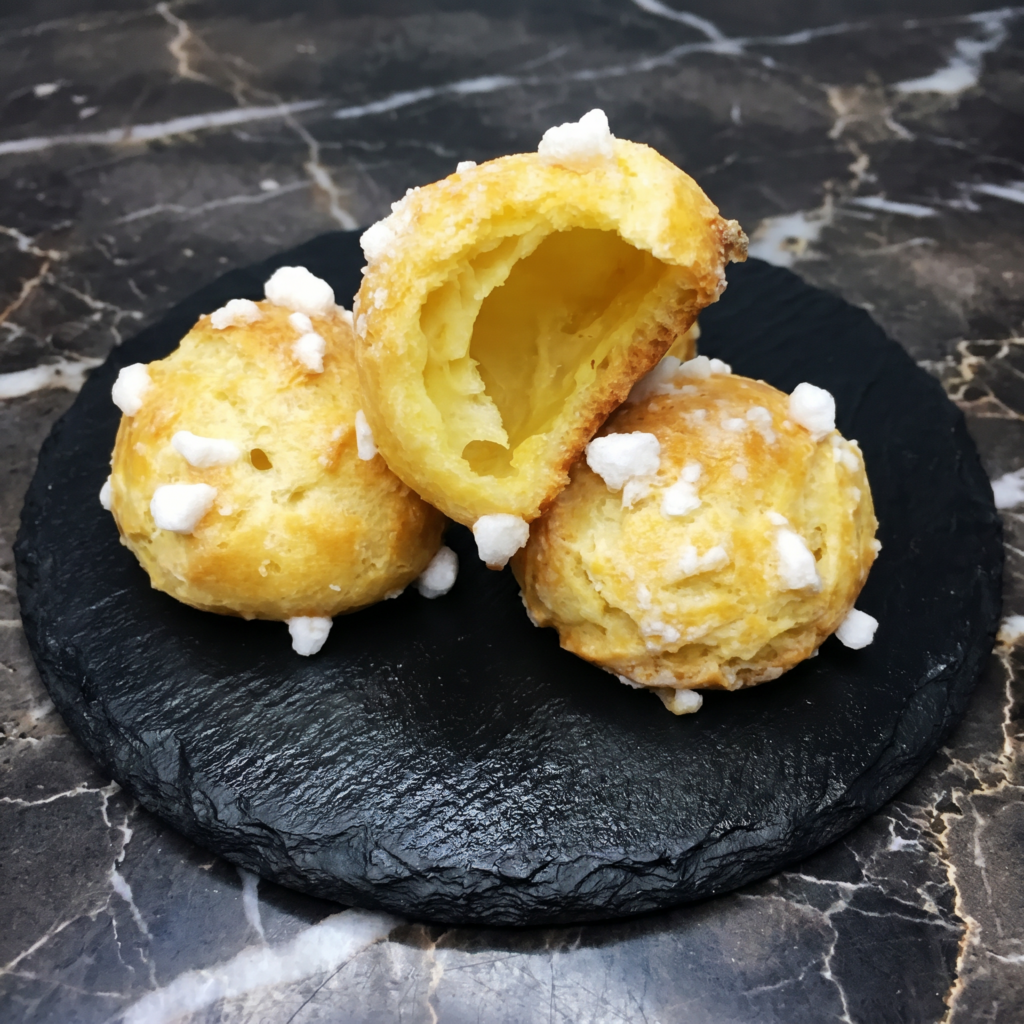
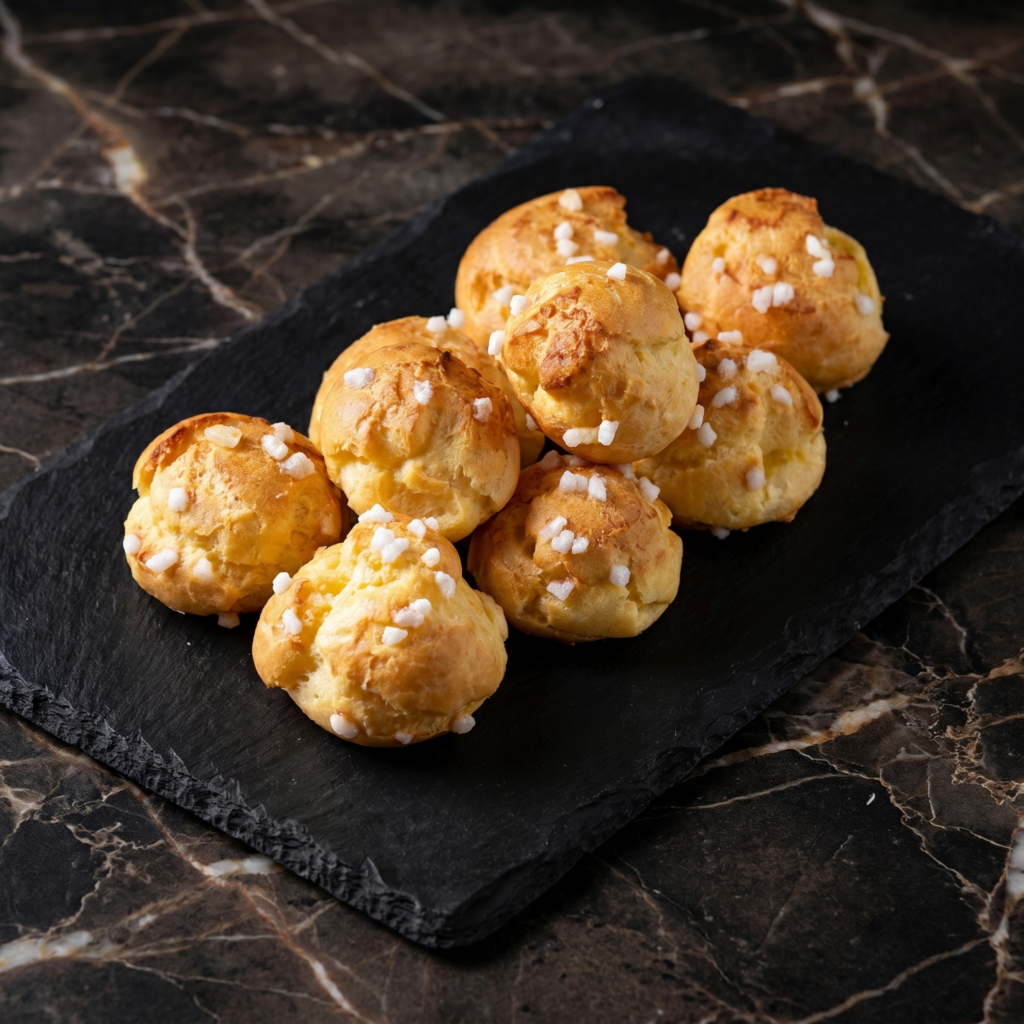
Chouquettes are what happens when choux pastry meets pearl sugar. Pure magic.
These tiny French puffs are light, airy, and topped with crunchy pearl sugar that caramelizes in the oven. No filling. No glaze. Just buttery, eggy perfection. Make a batch. Watch them disappear.
Ingredients
Makes 30-40 chouquettes.
½ cup (120ml) water
½ cup (120ml) whole milk
½ cup (115g) unsalted butter, cut into pieces
1 tablespoon sugar
¼ teaspoon salt
1 cup (125g) all-purpose flour
4 large eggs, room temperature
½ cup (75g) pearl sugar (also called nib sugar)
1 egg yolk + 1 tablespoon milk (for egg wash)
Step-by-Step Instructions
Step 1: Make the Choux Dough
Preheat oven to 400°F (200°C). Line a baking sheet with parchment.
In a saucepan, heat water, milk, butter, sugar, and salt until boiling and butter melts.
Reduce heat to low. Add flour all at once. Stir vigorously until dough forms a ball and pulls away from the sides (about 2 minutes).
Transfer to a bowl. Cool 5 minutes.
Add eggs one at a time, mixing completely after each. Dough should be smooth and glossy.
Step 2: Pipe and Top
Transfer dough to a piping bag or zip-top bag with corner snipped.
Pipe small 1-inch mounds onto the baking sheet (about 1 tablespoon each).
Brush with egg wash. Sprinkle generously with pearl sugar.
Step 3: Bake
Bake for 18-22 minutes until puffed, golden, and crisp.
Do not open the oven for the first 15 minutes.
Step 4: Devour
Cool slightly on a wire rack. Eat warm. Eat cold. Eat them all.
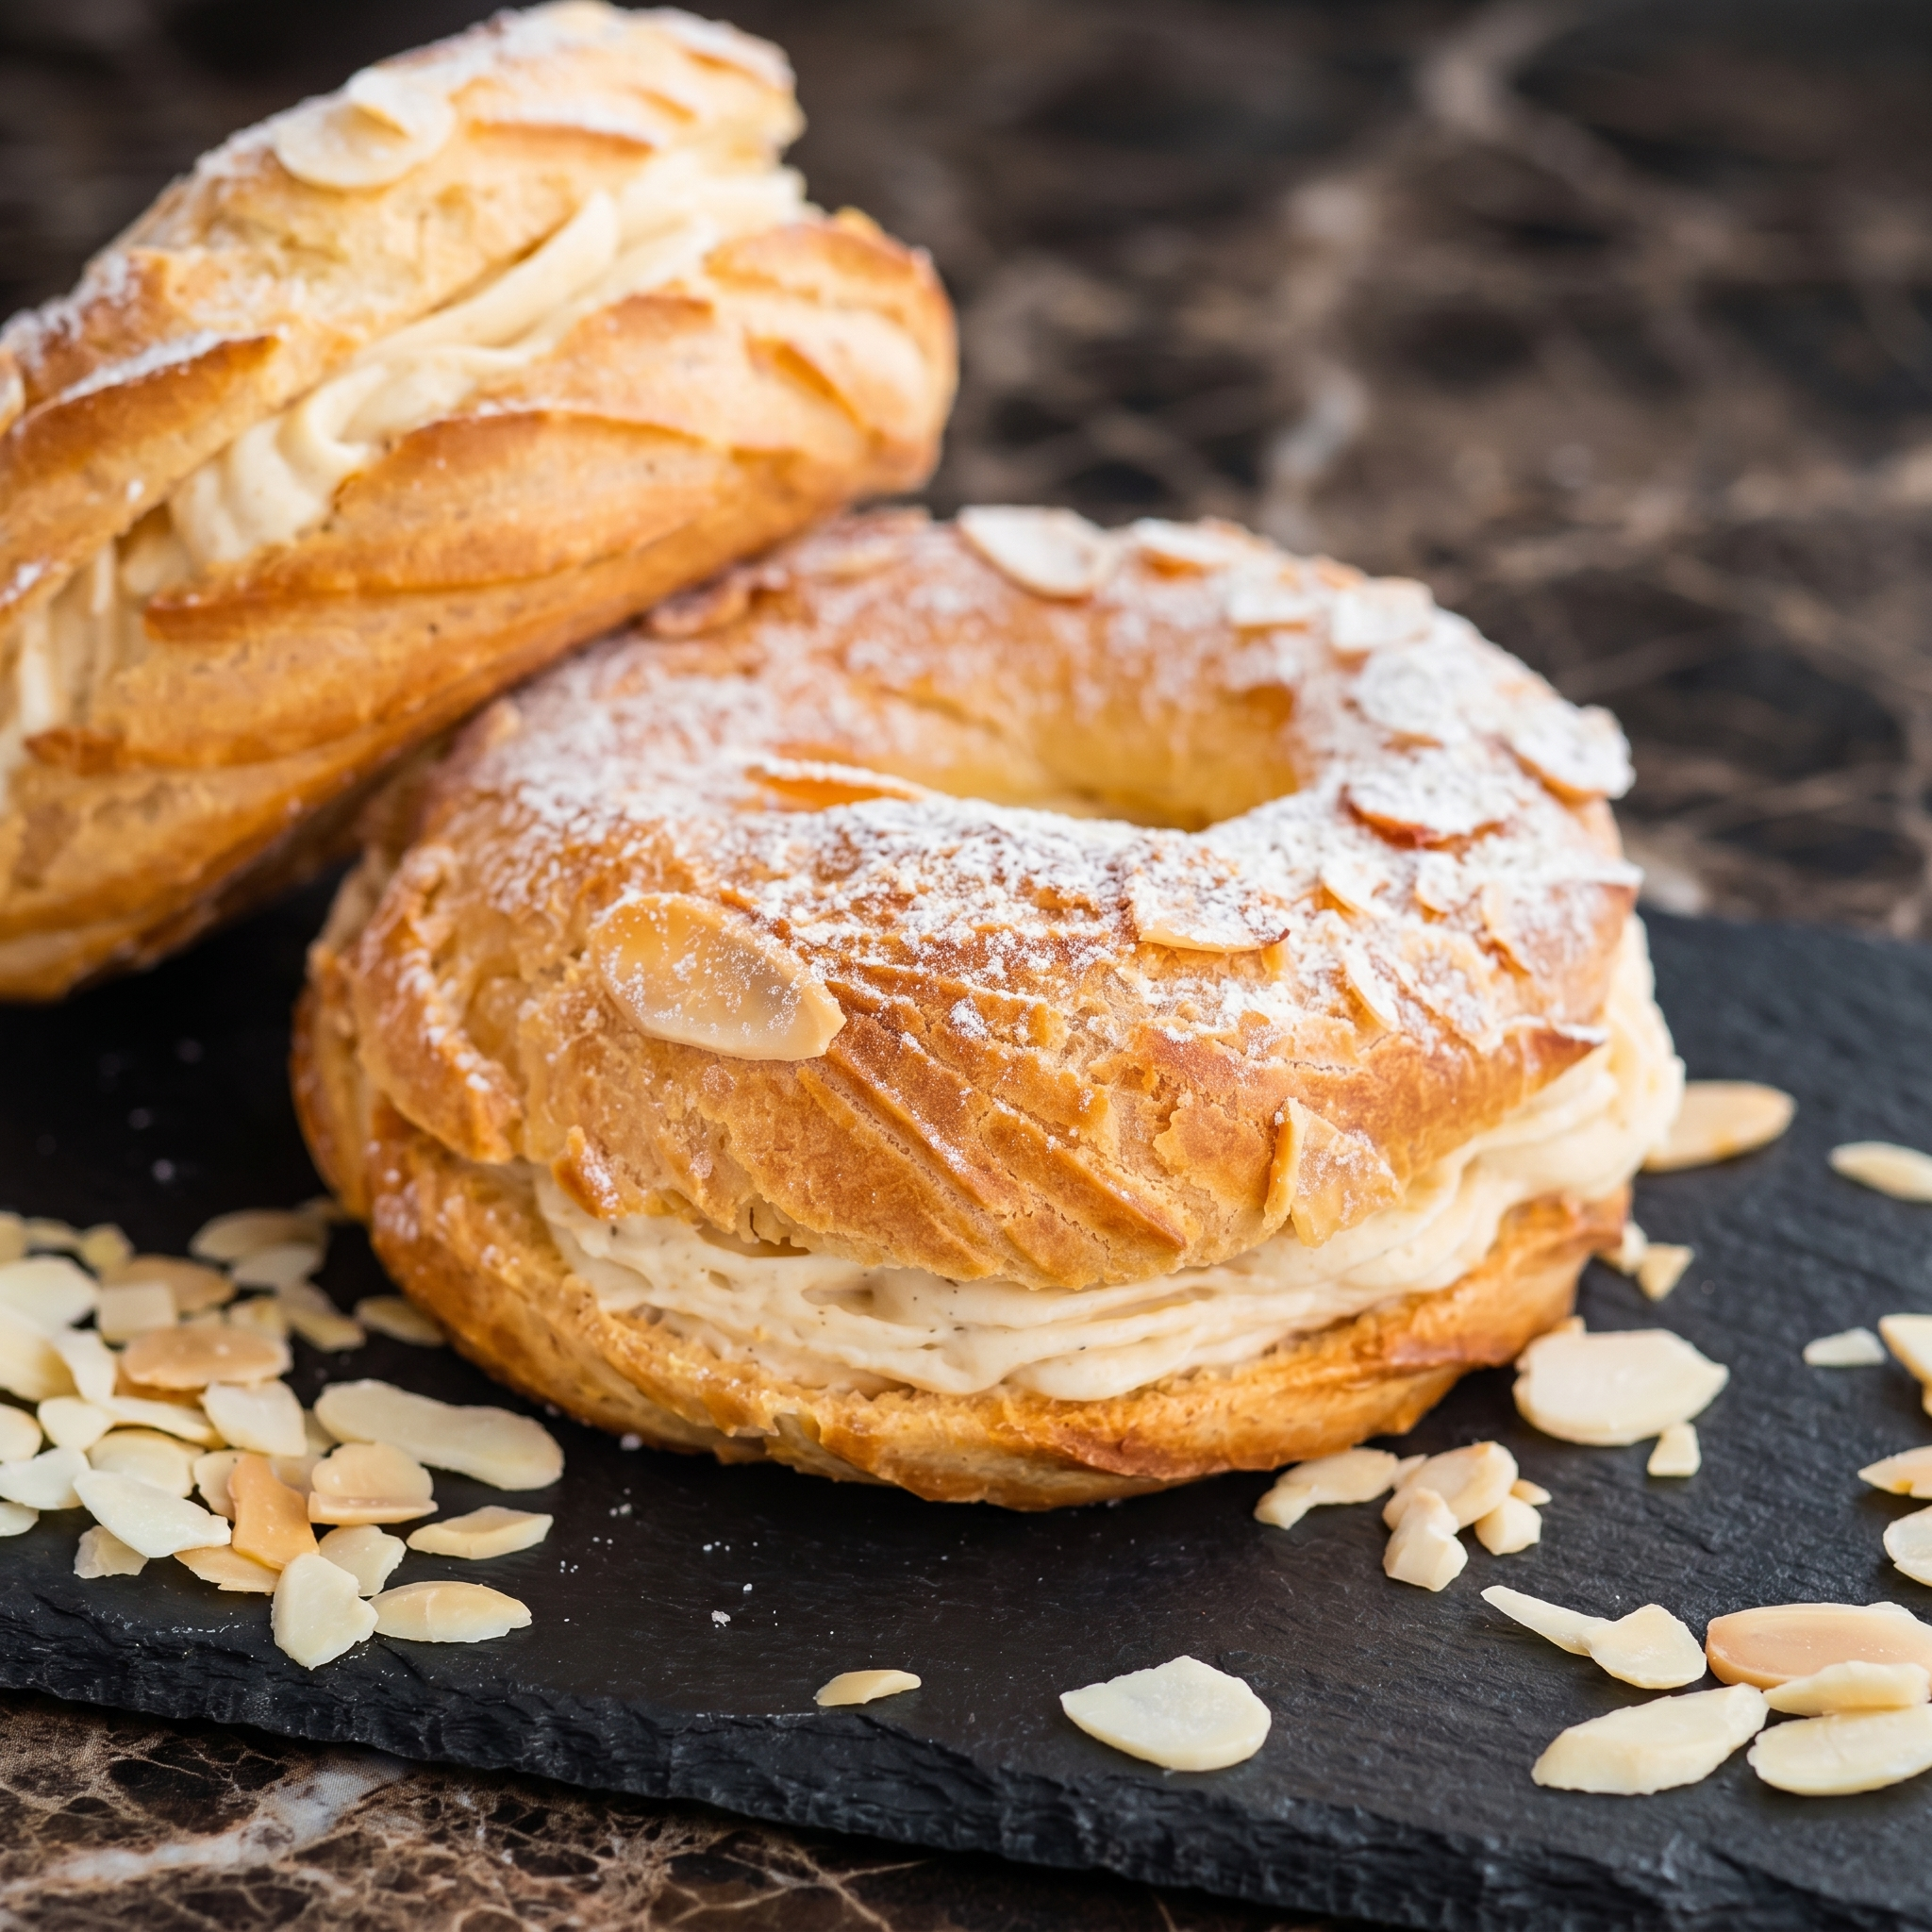
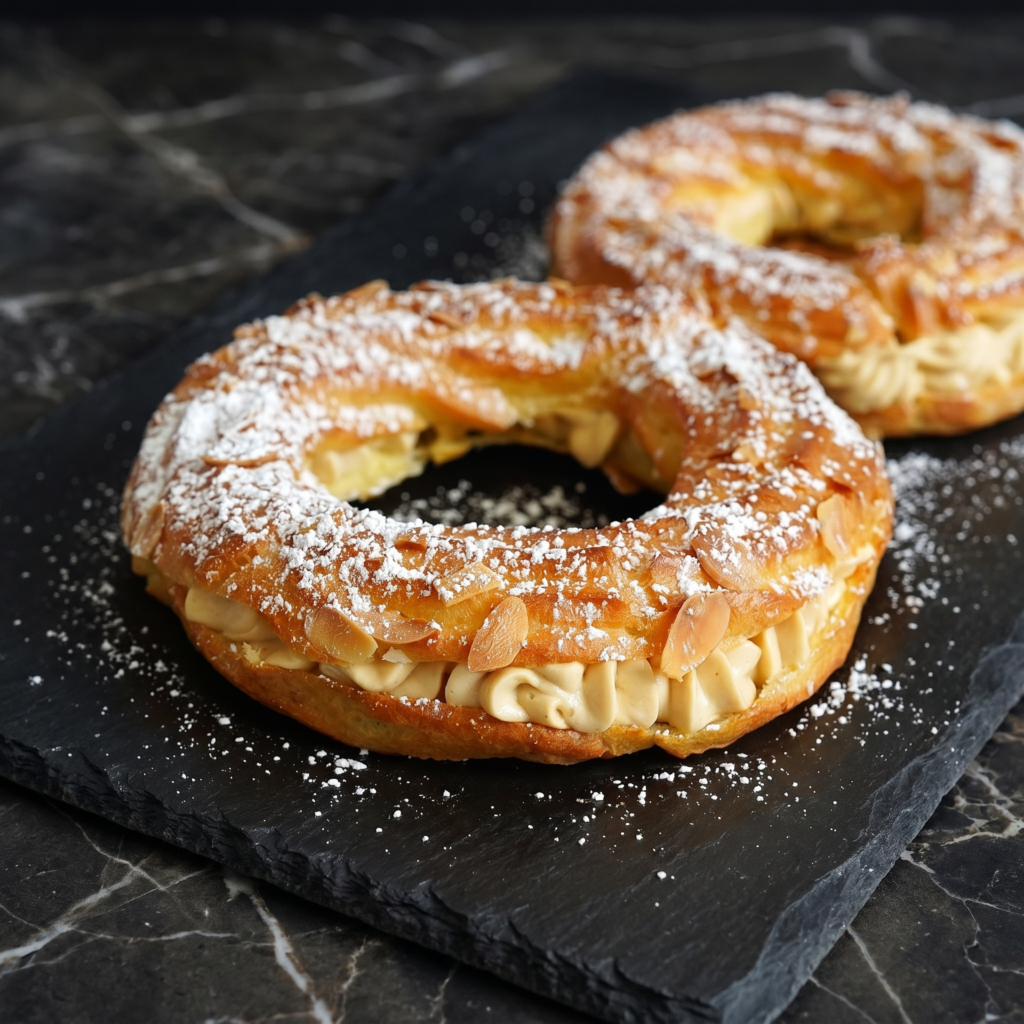
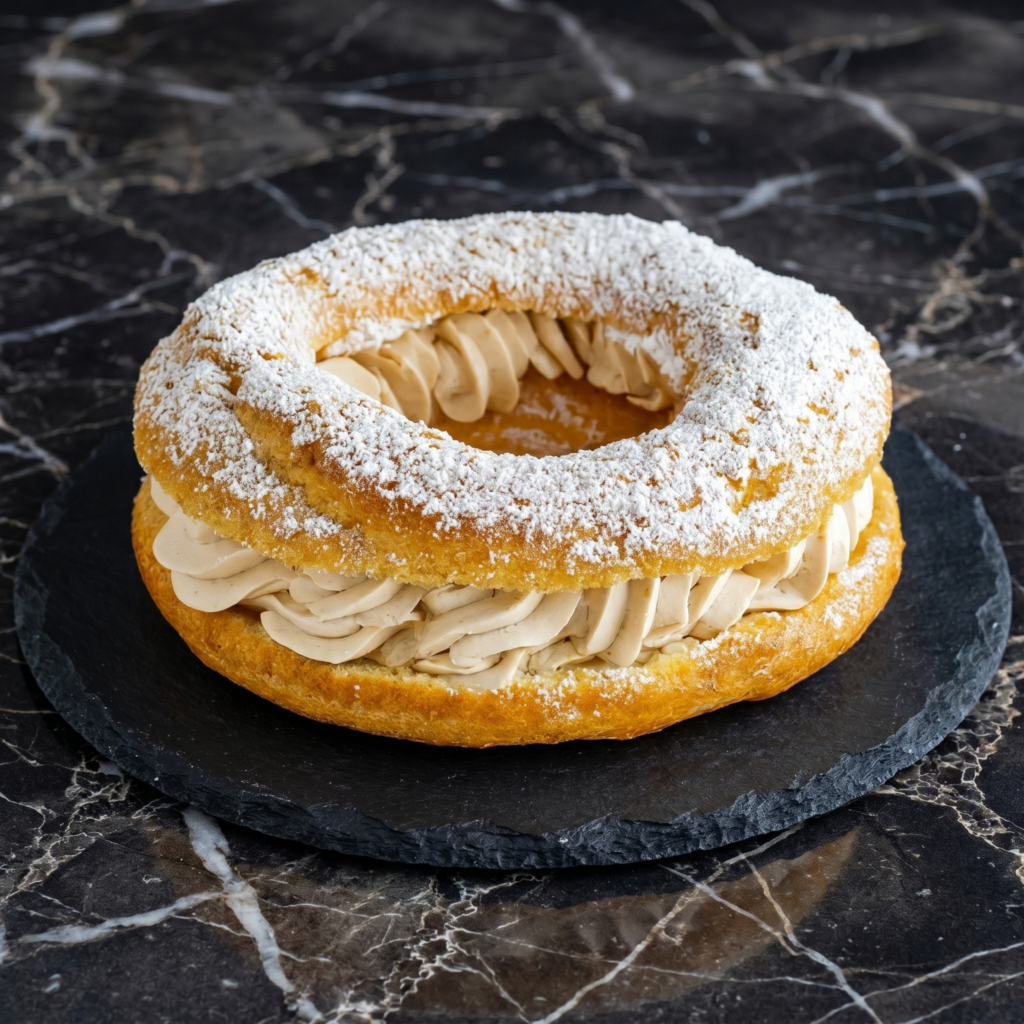
Paris-Brest. Named after a bike race. Shaped like a wheel. Tastes like heaven.
A giant, puffy choux ring. Filled with silky praline cream. Topped with crunchy almonds. It looks like a French patisserie masterpiece. But it’s just choux pastry, patience, and a little confidence. You’ve got this.
Ingredients
Serves 8-10.
For the Choux Pastry:
½ cup (120ml) water
½ cup (120ml) whole milk
½ cup (115g) unsalted butter
1 tablespoon sugar
¼ teaspoon salt
1 cup (125g) all-purpose flour
4 large eggs
¼ cup (30g) sliced almonds (for topping)
For the Praline Cream (Crème Mousseline):
2 cups (480ml) whole milk
4 egg yolks
½ cup (100g) sugar
¼ cup (30g) cornstarch
1 teaspoon vanilla
½ cup (115g) unsalted butter, softened
½ cup (75g) praline paste or hazelnut spread
Step-by-Step Instructions
Step 1: Make the Choux Ring
Preheat oven to 400°F (200°C). Trace an 8-inch circle on parchment. Flip over.
Make choux: boil water, milk, butter, sugar, salt. Add flour. Stir until dough forms a ball.
Cool 5 minutes. Add eggs one at a time until glossy.
Pipe dough in a ring following the circle. Top with sliced almonds.
Bake 25-30 minutes until puffed and golden. Cool completely.
Step 2: Make the Praline Cream
Heat milk until simmering. Whisk yolks, sugar, cornstarch.
Temper eggs with hot milk. Return to heat. Whisk until thick.
Remove from heat. Add vanilla. Cool completely.
Beat softened butter and praline paste. Add cooled pastry cream. Whip until fluffy.
Step 3: Assemble
Slice the choux ring horizontally like a hamburger bun.
Pipe or spoon praline cream onto the bottom half.
Place the top half back on. Dust with powdered sugar.
Step 4: Serve
Chill for 30 minutes before slicing. Serve cold. Watch jaws drop.
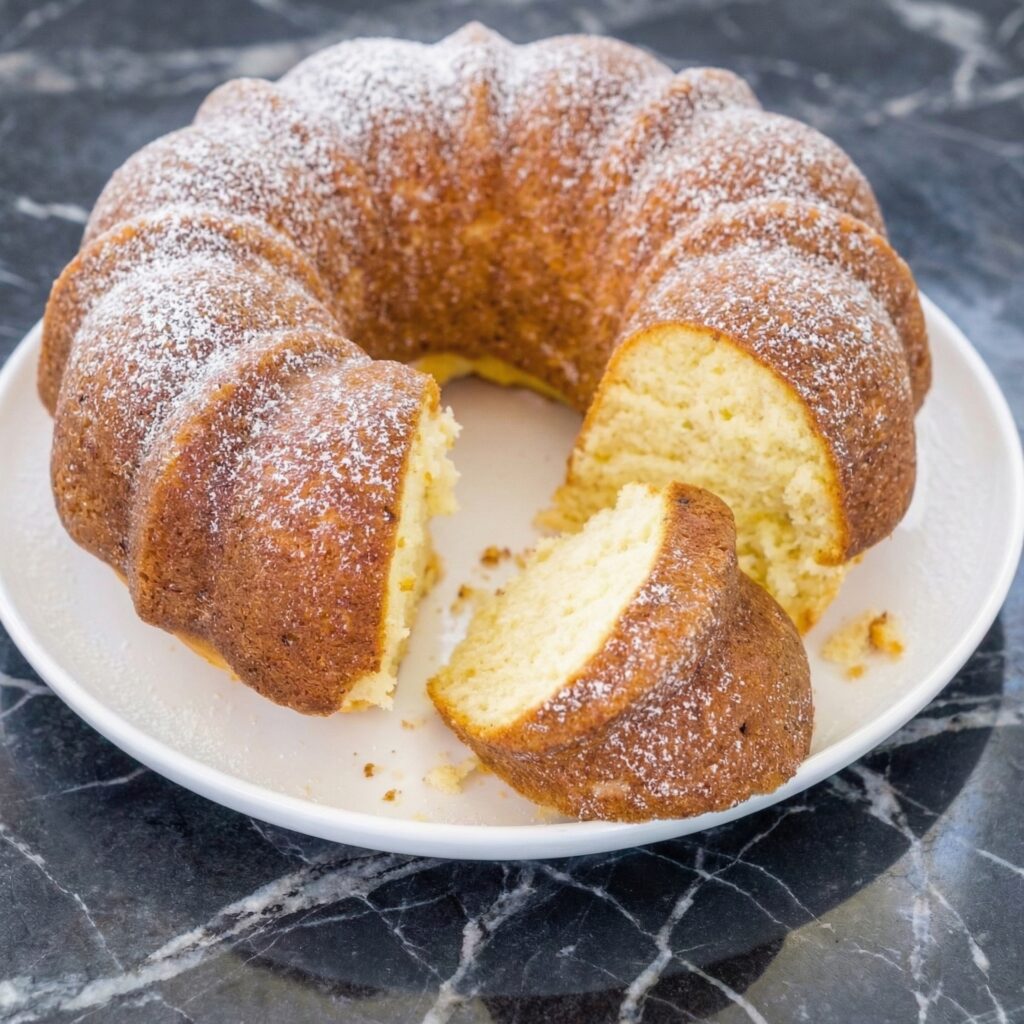
A great vanilla pound cake is a thing of simple beauty. It doesn’t need fancy frosting or complicated decorations. It stands proudly on its own—a tall, golden loaf with a crackly top, a tender, dense crumb, and the unmistakable flavor of real butter and vanilla.
This is that pound cake. The one your grandmother might have made, the one that disappears slice by slice from the kitchen counter, the one that’s just as good for breakfast with coffee as it is for dessert with berries and whipped cream.
Made with the classic pound cake ratio (a pound each of butter, sugar, eggs, and flour), this recipe delivers the perfect texture every time. Let’s bake a timeless classic.
Ingredients
Makes one 9×5 inch loaf cake (10-12 servings) or one 10-cup bundt cake.
For the Vanilla Pound Cake:
2 cups (250g) all-purpose flour
½ teaspoon baking powder
¼ teaspoon baking soda
½ teaspoon salt
1 cup (225g) unsalted butter, softened
1 ½ cups (300g) granulated sugar
4 large eggs, at room temperature
2 tablespoons vanilla extract (yes, tablespoons!)
½ cup (120g) sour cream or plain Greek yogurt, at room temperature
For the Vanilla Glaze (Optional):
1 cup (120g) powdered sugar, sifted
2-3 tablespoons milk or cream
1 teaspoon vanilla extract
Step-by-Step Instructions
1. Preheat and Prepare:
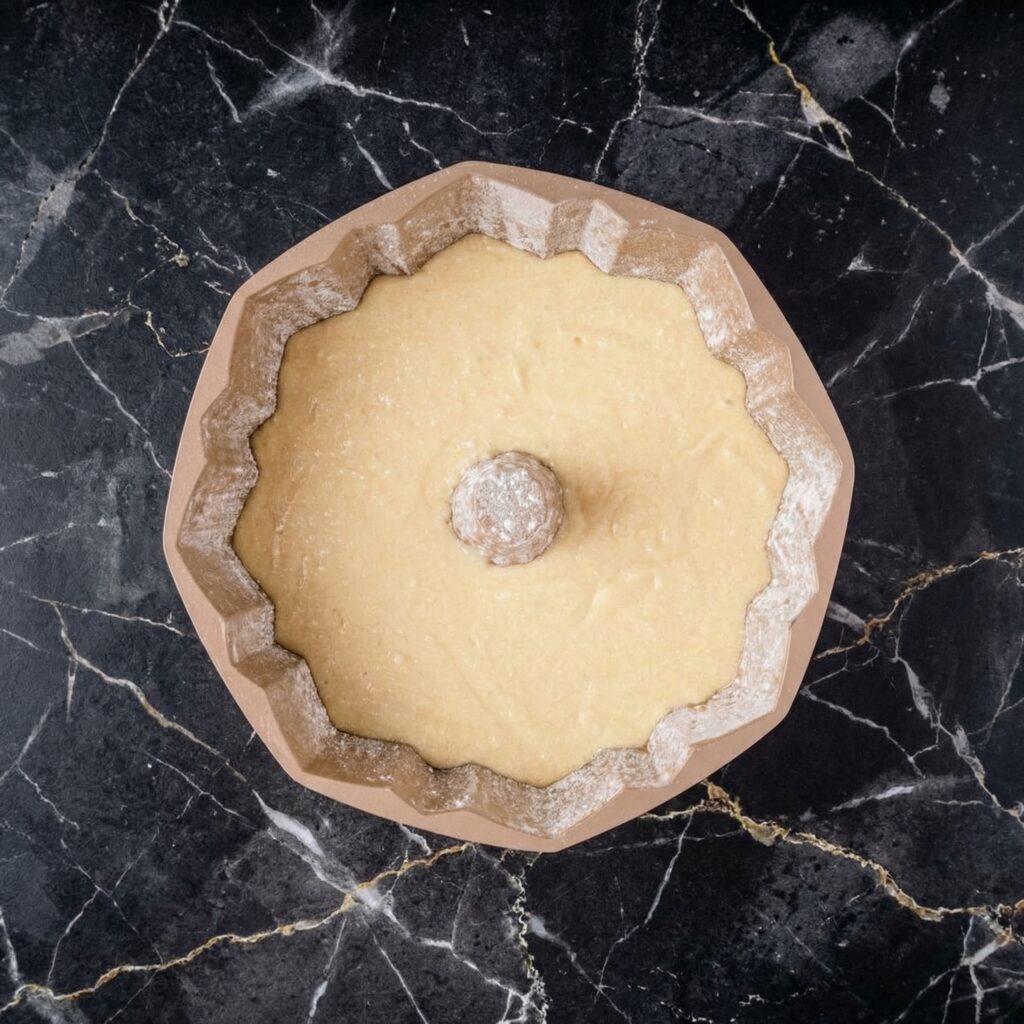
Preheat your oven to 325°F (160°C). Grease a 9×5 inch loaf pan thoroughly, then dust with flour, tapping out the excess. If using a bundt pan, grease and flour every crevice well. Alternatively, line the loaf pan with parchment paper, leaving overhang on the long sides for easy removal.
2. Combine Dry Ingredients:
In a medium bowl, whisk together the flour, baking powder, baking soda, and salt. Set aside.
3. Cream Butter and Sugar:
In a large bowl, beat the softened butter with an electric mixer on medium speed until creamy, about 1 minute.
Gradually add the sugar and continue beating until light, fluffy, and pale in color, about 3-5 minutes. This step is crucial—scrape down the sides and bottom of the bowl several times. Proper creaming creates the tender crumb pound cake is known for.
4. Add Eggs and Vanilla:
Add the eggs one at a time, beating well after each addition and scraping down the bowl as needed. The mixture should be smooth, glossy, and look like soft mayonnaise.
Beat in the vanilla extract. Yes, 2 tablespoons—this is the secret to an intensely vanilla-flavored cake!
5. Alternate Dry and Wet:
With the mixer on low speed, add half of the flour mixture, mixing until just combined.
Add all of the sour cream, mixing until just combined.
Add the remaining flour mixture and mix until just combined and no streaks of flour remain. Do not overmix. Scrape the bottom of the bowl with a spatula to ensure everything is incorporated.
The batter will be thick and luxurious.
6. Bake:
Pour the batter into the prepared pan and spread it evenly. Tap the pan gently on the counter a few times to release any air bubbles.
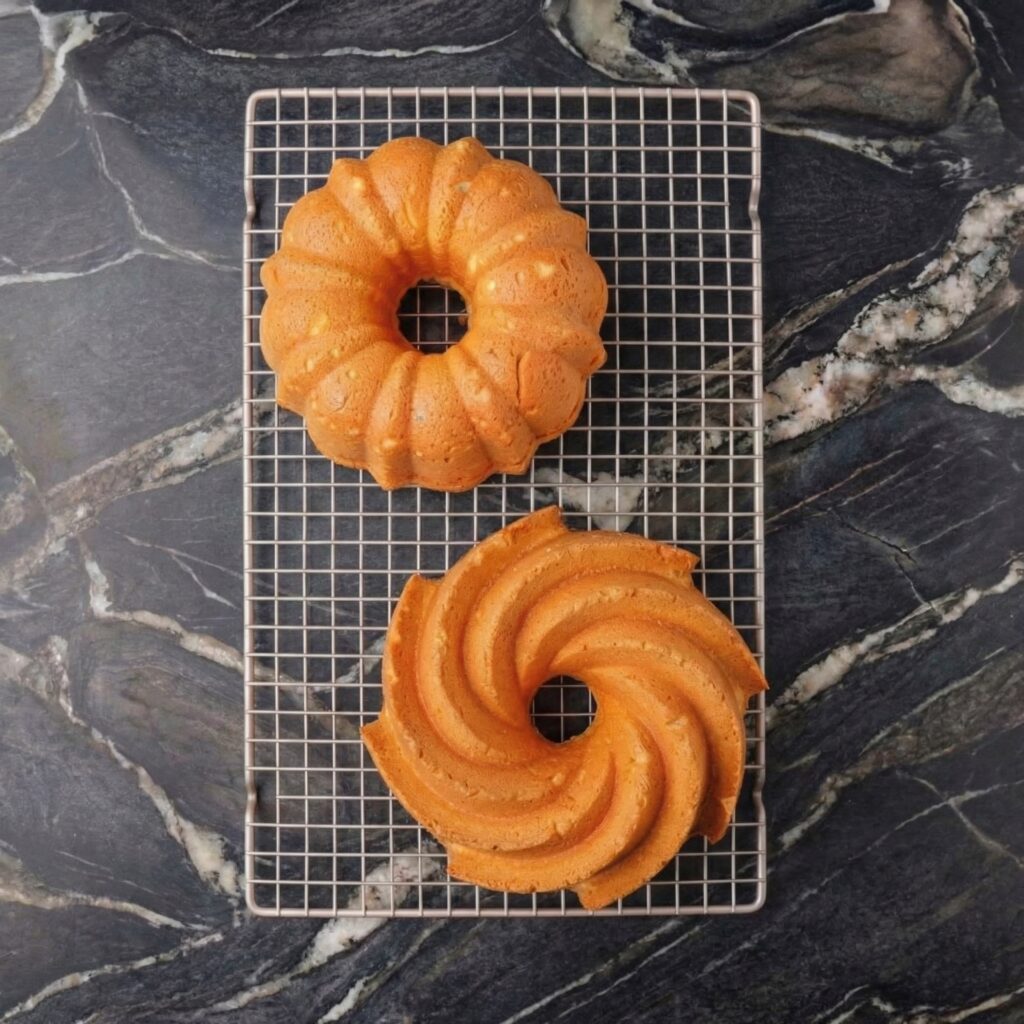
Bake for 65-75 minutes for a loaf pan, or 50-60 minutes for a bundt pan, until a toothpick inserted into the center comes out clean or with a few moist crumbs.
If the top is browning too quickly, tent loosely with foil for the last 15-20 minutes of baking.
Let the cake cool in the pan for 15-20 minutes, then carefully turn it out onto a wire rack to cool completely.
7. Add Glaze (Optional):
If making the glaze, whisk together the sifted powdered sugar, 2 tablespoons milk, and vanilla extract until smooth. Add more milk a teaspoon at a time until you reach a thick but pourable consistency.
Drizzle over the cooled cake and let set before slicing.
8. Serve:
Slice and serve at room temperature. This cake is perfect on its own, toasted with butter, or served with fresh berries and whipped cream.
Yield: One 9×5 inch loaf (10-12 servings) or one 10-cup bundt cake
Difficulty: Easy to Intermediate
Storage and Make-Ahead Tips
How to Store:
Store vanilla pound cake tightly wrapped in plastic wrap or in an airtight container at room temperature for up to 5 days. The flavor actually improves after a day or two! If glazed, store in a single layer to prevent the glaze from sticking.
Can You Freeze Pound Cake?
Absolutely! Pound cake freezes beautifully. Wrap the cooled cake tightly in plastic wrap, then in foil, and place in a freezer bag. Freeze for up to 3 months. Thaw at room temperature. Add glaze after thawing if desired.
Freezing Slices:
Slice the cake and wrap individual slices in plastic wrap, then place in a freezer bag. This way you can grab just one slice at a time. Toast frozen slices directly from the freezer!
Make-Ahead for Parties:
This cake is perfect for making ahead. Bake it 1-2 days before your event, store at room temperature, and add glaze the day of serving if using.
Toasted Pound Cake:
Leftover pound cake is amazing toasted. Slice, butter lightly if desired, and toast in a skillet or toaster until golden. Serve with jam or honey.
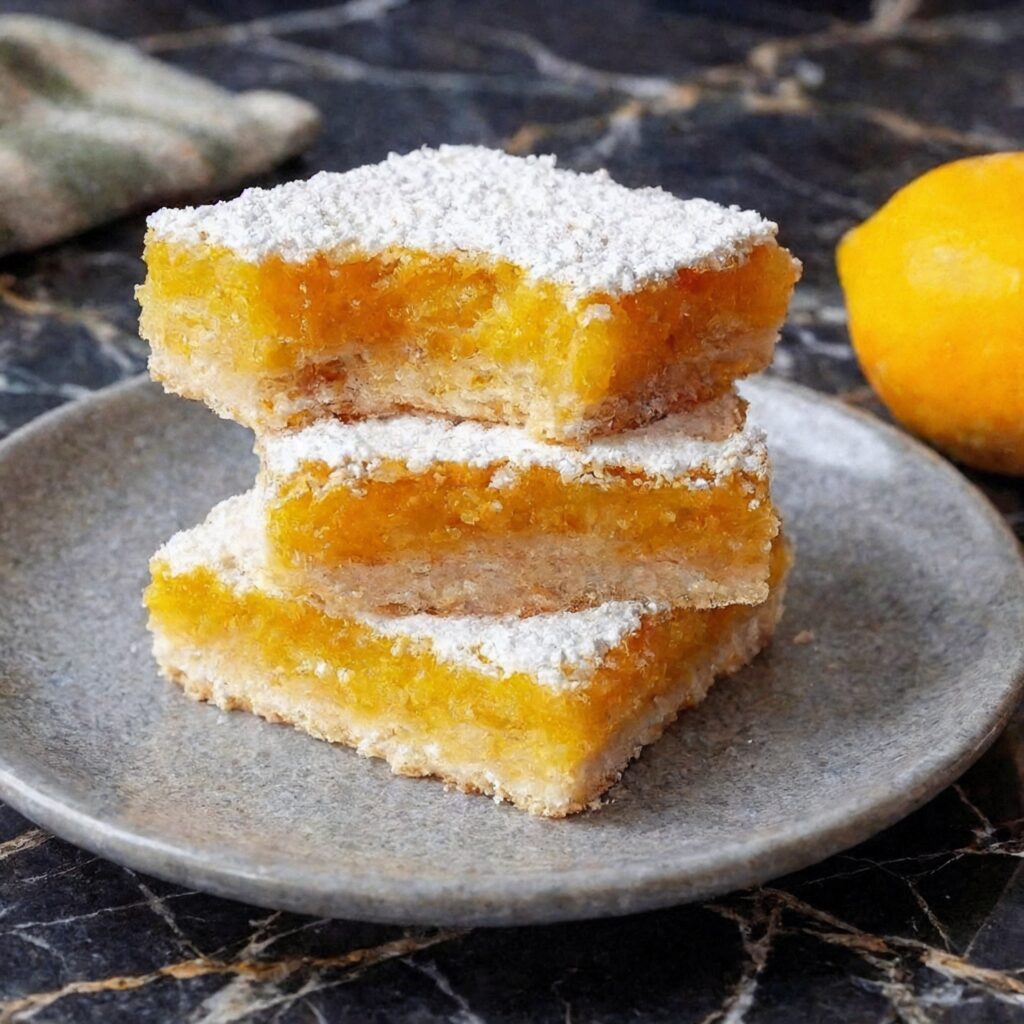
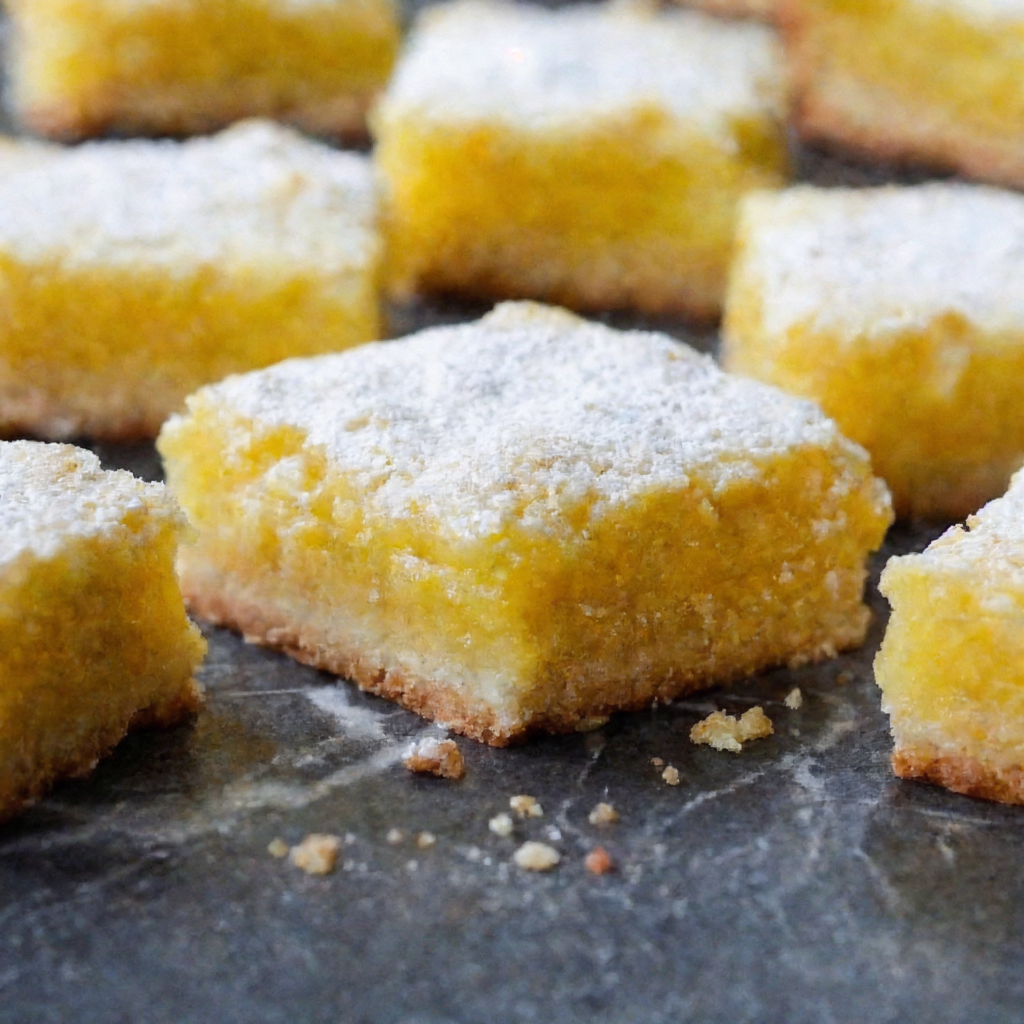
There are desserts that satisfy a chocolate craving, and then there are desserts that make you feel like you’re sitting in a sunbeam. Lemon bars fall firmly into the second category—bright, tangy, and impossibly cheerful, they’re the perfect pick-me-up any time of year.
These classic lemon bars start with a buttery shortbread crust that’s sturdy enough to hold the filling but tender enough to melt in your mouth. On top sits a silky, creamy lemon layer that strikes the perfect balance between sweet and tangy.
A final dusting of powdered sugar just before serving makes them as beautiful as they are delicious. Whether you’re making them for a spring brunch, a summer picnic, or just because you need a little sunshine, these lemon bars never disappoint.
Ingredients
Yields 16 bars (9×13 inch pan) or 12 bars (8×8 inch pan).
For the Shortbread Crust:
2 cups (250g) all-purpose flour
½ cup (100g) granulated sugar
¼ teaspoon salt
1 cup (225g) unsalted butter, cold and cut into small cubes
1 teaspoon vanilla extract (optional)
For the Lemon Filling:
4 large eggs, at room temperature
1 ½ cups (300g) granulated sugar
3 tablespoons all-purpose flour
½ teaspoon salt
¾ cup (180ml) fresh lemon juice (about 4-6 lemons)
2 tablespoons lemon zest (about 2-3 lemons)
¼ cup (60ml) milk or heavy cream
For Finishing:
Powdered sugar, for dusting
Step-by-Step Instructions
1. Preheat and Prepare:
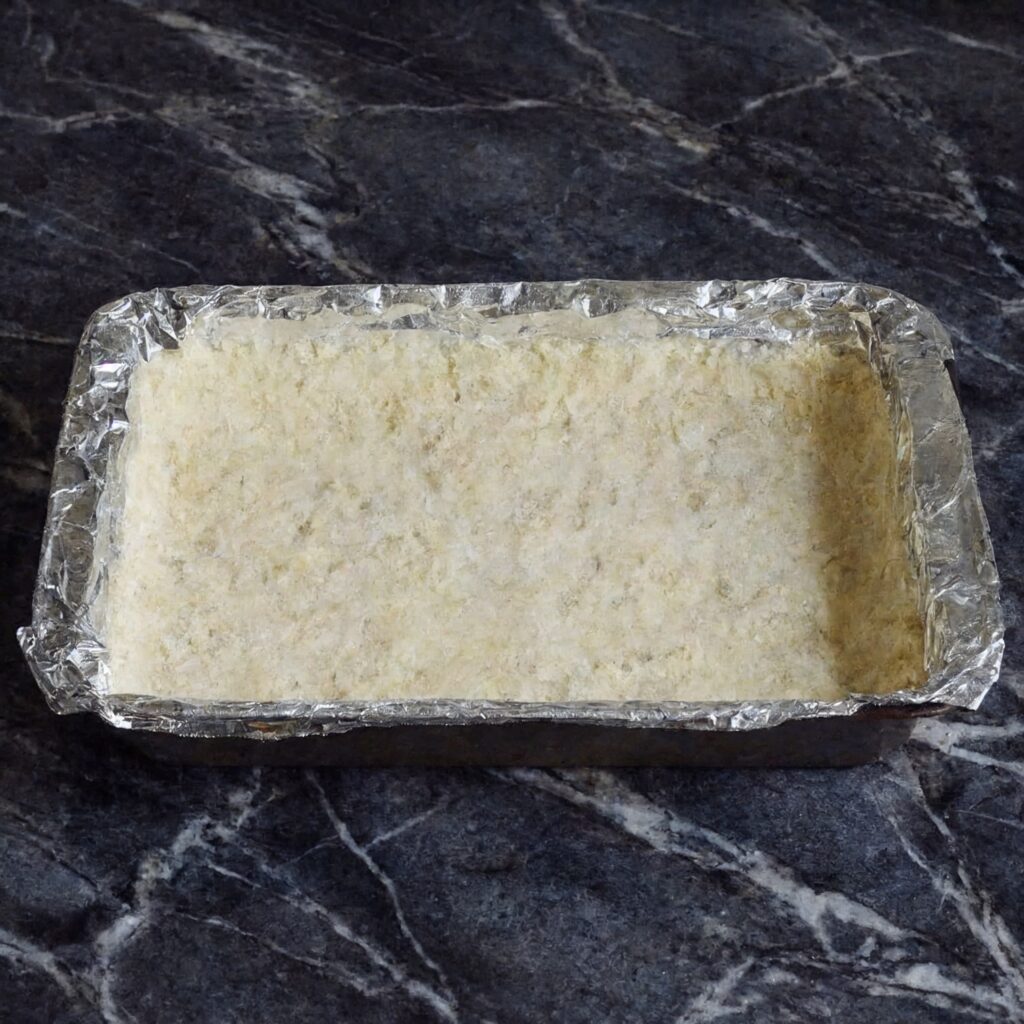
Preheat your oven to 350°F (175°C). Line a 9×13 inch baking pan (or 8×8 inch for thicker bars) with parchment paper, leaving overhang on all sides for easy removal. Lightly grease the parchment.
2. Make the Shortbread Crust:
In a medium bowl, whisk together the flour, sugar, and salt.
Add the cold butter cubes and vanilla extract (if using). Cut the butter into the flour using a pastry blender, two forks, or your fingertips until the mixture resembles coarse meal with some pea-sized butter pieces remaining.
Press the mixture firmly and evenly into the bottom of the prepared pan. Use the bottom of a measuring cup or glass to press it down firmly—this ensures the crust holds together after baking.
Bake for 18-20 minutes, until the edges are lightly golden. Remove from oven and set aside. Leave the oven on.
3. Make the Lemon Filling:
While the crust bakes, prepare the filling. In a large bowl, whisk the eggs until lightly beaten.
Add the sugar, flour, and salt, and whisk until smooth and well combined.
Add the lemon juice, lemon zest, and milk (or cream). Whisk until everything is fully incorporated. The mixture will be thin—that’s normal.
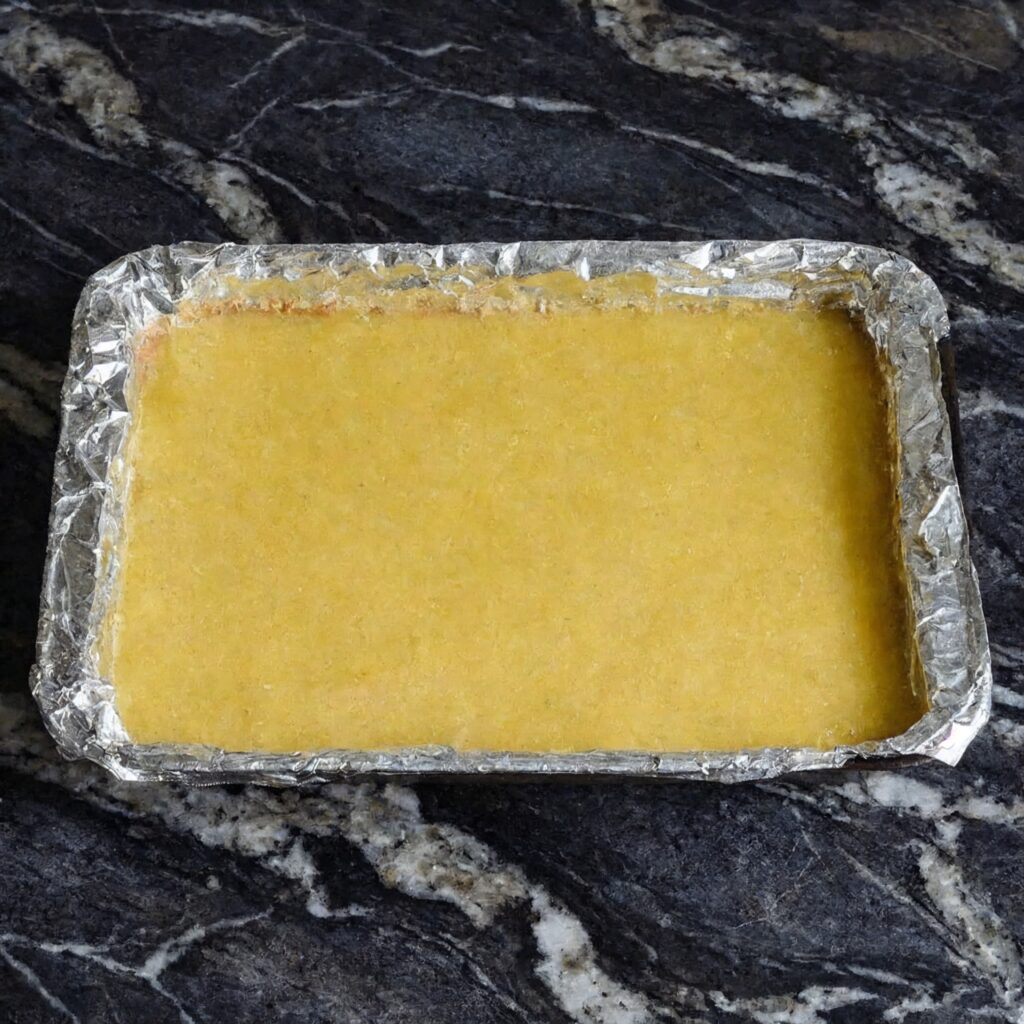
4. Assemble and Bake:
Pour the lemon filling over the warm crust (it’s important that the crust is still warm).
Carefully return the pan to the oven and bake for 20-25 minutes (for 9×13 pan) or 25-30 minutes (for 8×8 pan), until the filling is set around the edges but still slightly jiggly in the very center. It should no longer be liquid.
Remove from the oven and let cool completely at room temperature.
Once cool, refrigerate for at least 2 hours, preferably 3-4 hours, until thoroughly chilled and firm. This makes for clean slicing.
5. Slice and Serve:
Use the parchment overhang to lift the entire block of lemon bars onto a cutting board.
Dust generously with powdered sugar just before serving (if you dust too early, the sugar will absorb into the bars).
Slice into squares with a sharp knife, wiping the blade clean between cuts for neat edges.
Serve chilled or at room temperature. Store leftovers in the refrigerator.
Store lemon bars in an airtight container in the refrigerator for up to 5 days. Place parchment paper between layers to prevent sticking. They’re delicious cold or at room temperature.
Can You Freeze Lemon Bars?
Yes! Lemon bars freeze beautifully. Freeze them without the powdered sugar dusting. Place the bars in a single layer on a baking sheet and freeze until solid, then transfer to a freezer-safe container with parchment between layers. Freeze for up to 3 months. Thaw in the refrigerator overnight and dust with powdered sugar before serving.
Make-Ahead for Parties:
Lemon bars are perfect for making ahead. Prepare them 1-2 days in advance, keep refrigerated, and dust with powdered sugar just before serving. The flavors actually meld and deepen over time.
Freezing the Crust:
You can press the unbaked crust into the pan, wrap tightly, and freeze for up to 3 months. Bake directly from frozen, adding a few minutes to the baking time.
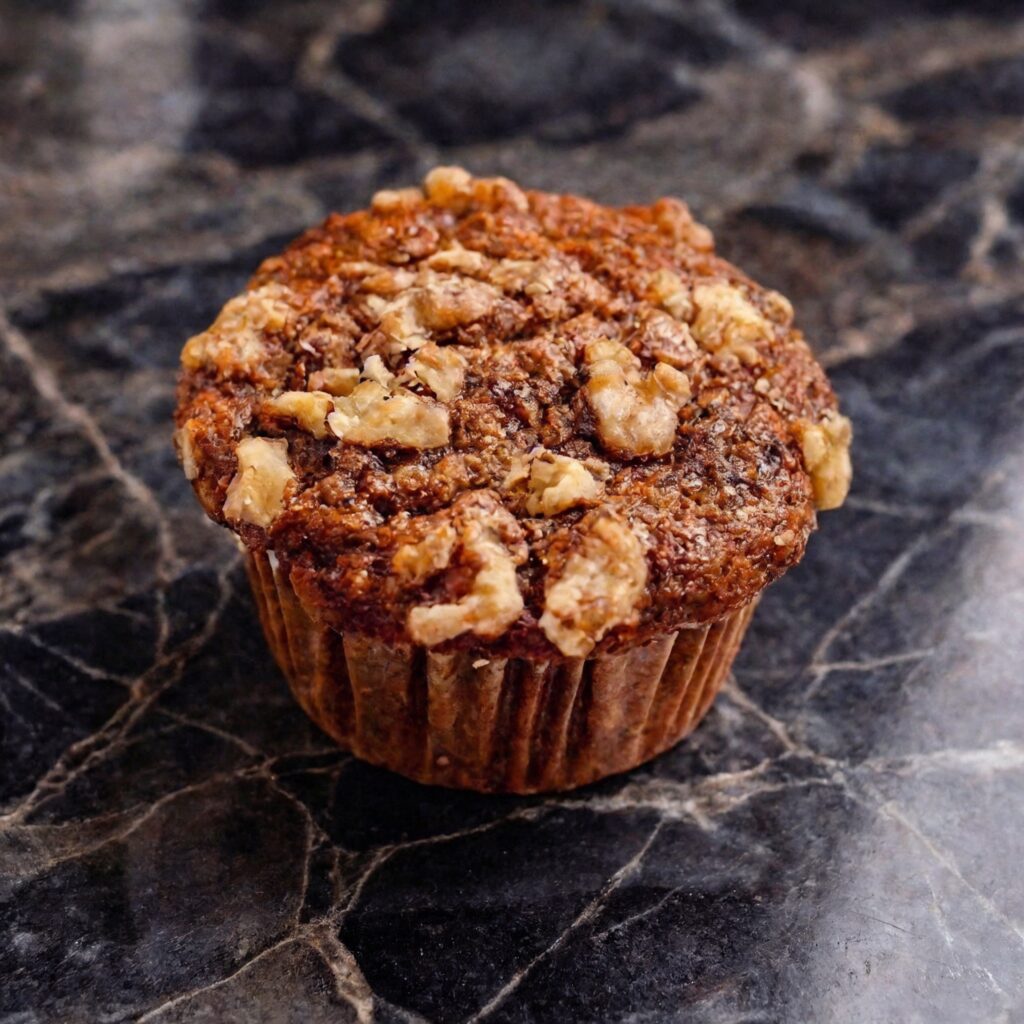
You know those bananas sitting on your counter, getting browner and spottier by the day? They’re not a problem—they’re an opportunity. And these banana nut muffins are the best way to seize it.
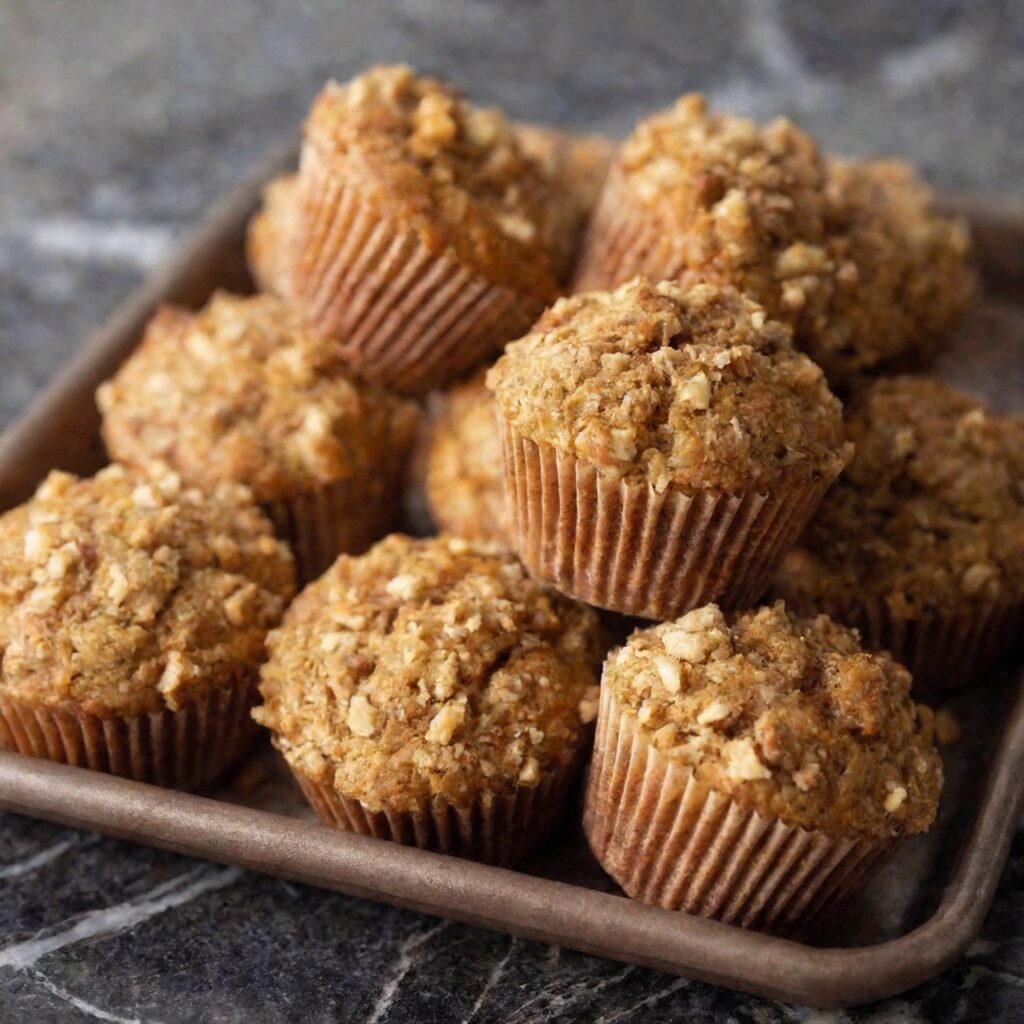
These muffins are everything you want in a banana baked good: incredibly moist, deeply flavorful, and just sweet enough. The addition of toasted walnuts adds a wonderful crunch and nutty depth that perfectly complements the sweet banana.
They’re like banana bread’s portable, portion-controlled cousin, with slightly crisp edges and tender, domed tops. Whether you’re packing lunches, hosting a brunch, or just treating yourself, these muffins deliver pure comfort in every bite.
Ingredients
Yields 12 standard muffins or 6 jumbo muffins.
For the Banana Nut Muffins:
1 ¾ cups (220g) all-purpose flour
1 teaspoon baking soda
½ teaspoon baking powder
½ teaspoon salt
1 teaspoon ground cinnamon (optional, but recommended)
½ cup (115g) unsalted butter, softened
¾ cup (150g) granulated sugar
¼ cup (50g) light brown sugar, packed
2 large eggs, at room temperature
2 teaspoons vanilla extract
3 medium very ripe bananas, mashed (about 1 ½ cups)
¼ cup (60g) sour cream or plain Greek yogurt, at room temperature
1 cup (120g) walnuts, toasted and chopped
Optional Topping:
¼ cup chopped walnuts
1 tablespoon turbinado sugar for sprinkling
Step-by-Step Instructions
1. Preheat and Prepare:
Preheat your oven to 375°F (190°C). Line a 12-cup muffin pan with paper liners or grease the cups thoroughly.
2. Toast the Walnuts:
Spread the walnuts on a baking sheet and toast in the preheating oven for 5-7 minutes, until fragrant and lightly golden. Watch carefully—they can burn quickly. Remove and set aside to cool. Chop coarsely.
3. Combine Dry Ingredients:
In a medium bowl, whisk together the flour, baking soda, baking powder, salt, and cinnamon (if using). Set aside.
4. Cream Butter and Sugars:
In a large bowl, beat the softened butter, granulated sugar, and brown sugar together with an electric mixer until light and fluffy, about 2-3 minutes. Scrape down the sides as needed.
5. Add Wet Ingredients:
Add the eggs one at a time, beating well after each addition. Scrape down the bowl again.
Beat in the vanilla extract.
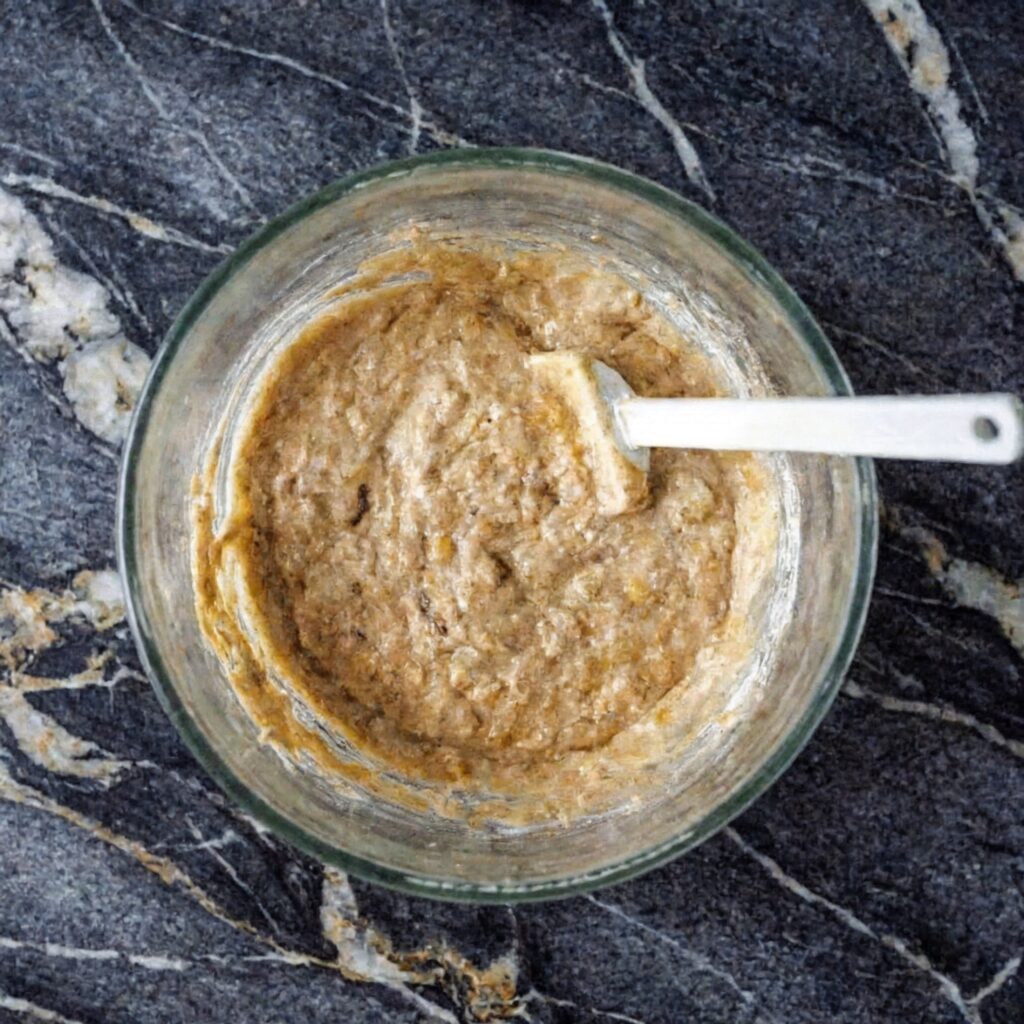
Add the mashed bananas and sour cream, and mix until combined. The mixture may look slightly curdled—that’s perfectly normal.
6. Combine Wet and Dry:
Gradually add the dry ingredients to the wet ingredients, mixing on low speed or folding with a spatula until just combined. Do not overmix—a few streaks of flour are fine.
Fold in the toasted chopped walnuts, reserving a handful for topping if desired.
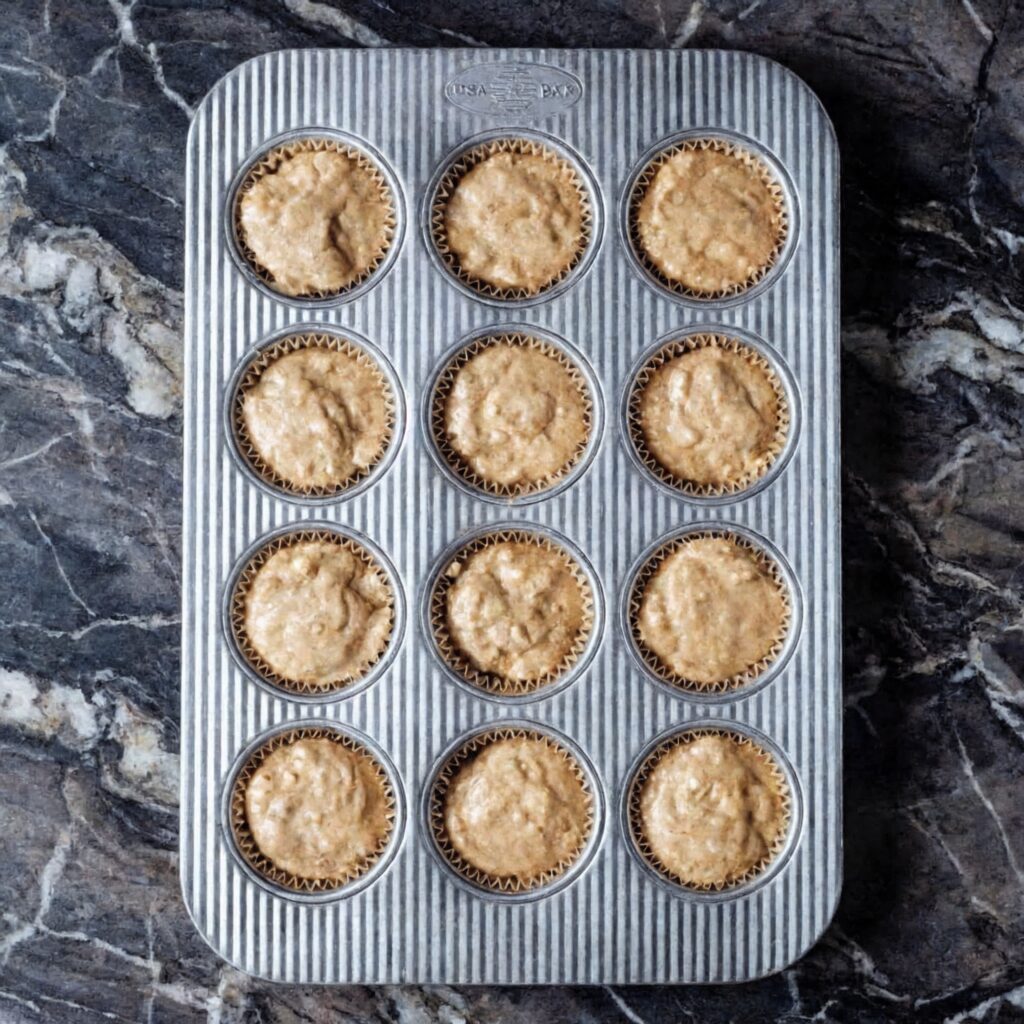
7. Fill the Muffin Cups:
Scoop the batter into the prepared muffin cups, filling them almost to the top (about ¾ full for standard muffins, full for jumbo). This helps create those domed tops.
If reserved, sprinkle the extra walnuts and a pinch of turbinado sugar over the tops of each muffin.
8. Bake:
Bake for 18-22 minutes for standard muffins, or 22-26 minutes for jumbo muffins, until a toothpick inserted into the center comes out clean or with a few moist crumbs.
Let the muffins cool in the pan for 5-10 minutes, then transfer to a wire rack to cool completely. Serve warm or at room temperature.
Store banana nut muffins in an airtight container at room temperature for up to 4 days. The moisture from the bananas keeps them soft. For longer storage, refrigerate for up to a week.
Can You Freeze Muffins?
Absolutely! Muffins freeze beautifully. Cool completely, then place in a freezer bag or airtight container with parchment between layers. Freeze for up to 3 months. Thaw at room temperature or microwave for 20-30 seconds.
Reviving Day-Old Muffins:
To refresh muffins, microwave for 10-15 seconds or warm in a 300°F oven for 5-7 minutes. They’ll taste almost freshly baked!
Make-Ahead for Breakfast:
These muffins are actually better the next day as the flavors meld. Make them a day ahead and store at room temperature. Perfect for stress-free breakfasts.
Freezing Banana Puree:
If you have overripe bananas, peel and freeze them in a zip-top bag. Thaw and use directly in muffin batter—they’ll be even softer and more flavorful.
Frequently Asked Questions
Can I use frozen bananas?
Yes! Frozen bananas work perfectly. Thaw them completely, then mash them with a fork. They’ll be very soft and may release some liquid—that’s fine, just include it in the batter.
Can I make these without nuts?
Absolutely! Simply omit the walnuts. The muffins will still be delicious. You can also substitute with chocolate chips, dried fruit, or leave them plain.
Can I use other nuts?
Yes! Pecans, almonds, or hazelnuts all work beautifully. Toast them first for the best flavor. Macadamia nuts would also be delicious.
Why are my muffins dense instead of light?
Dense muffins usually mean overmixing or too much flour. Mix just until the flour disappears, and measure your flour correctly (spoon and level, don’t scoop). Overmixing develops gluten, which makes muffins tough.
Can I reduce the sugar?
You can reduce the sugar to ¾ cup total, but keep in mind that bananas provide natural sweetness. If your bananas are very ripe and sweet, you can reduce slightly without issue. The brown sugar adds moisture as well as sweetness.
Can I make these into banana bread?
Yes! Pour the batter into a greased 9×5 inch loaf pan and bake at 350°F for 50-60 minutes. This recipe makes one standard loaf of banana nut bread.
Can I use whole wheat flour?
You can substitute up to half of the all-purpose flour with whole wheat flour. Whole wheat absorbs more liquid, so you may need to add an extra tablespoon of sour cream or milk.
Why did my muffins sink in the middle?
A sunken middle usually means the muffins were underbaked or the oven temperature was too low. Make sure your oven is properly preheated and bake until a toothpick comes out clean. Overmixing can also cause sinking.
Can I add cinnamon?
Absolutely! Cinnamon and banana are a wonderful combination. Add 1-2 teaspoons of ground cinnamon to the dry ingredients. Nutmeg or cardamom would also be delicious.
How do I get those beautiful domed tops?
Fill the muffin cups almost to the top, use room temperature ingredients, and make sure your baking powder and soda are fresh. Starting at 375°F (rather than lower) also helps create that initial rise.
Can I make these dairy-free?
Yes! Use vegan butter and substitute the sour cream with a dairy-free yogurt or coconut cream. The texture will be slightly different but still delicious.
How ripe should the bananas be?
The riper, the better! You want bananas with brown spots or completely black peels. They should be soft and smell very banana-y. Green or yellow bananas won’t give you the same flavor or moisture.
Can I add a streusel topping?
Absolutely! A simple streusel of ½ cup flour, ¼ cup brown sugar, ¼ cup melted butter, and ½ teaspoon cinnamon sprinkled on top before baking takes these muffins to the next level.
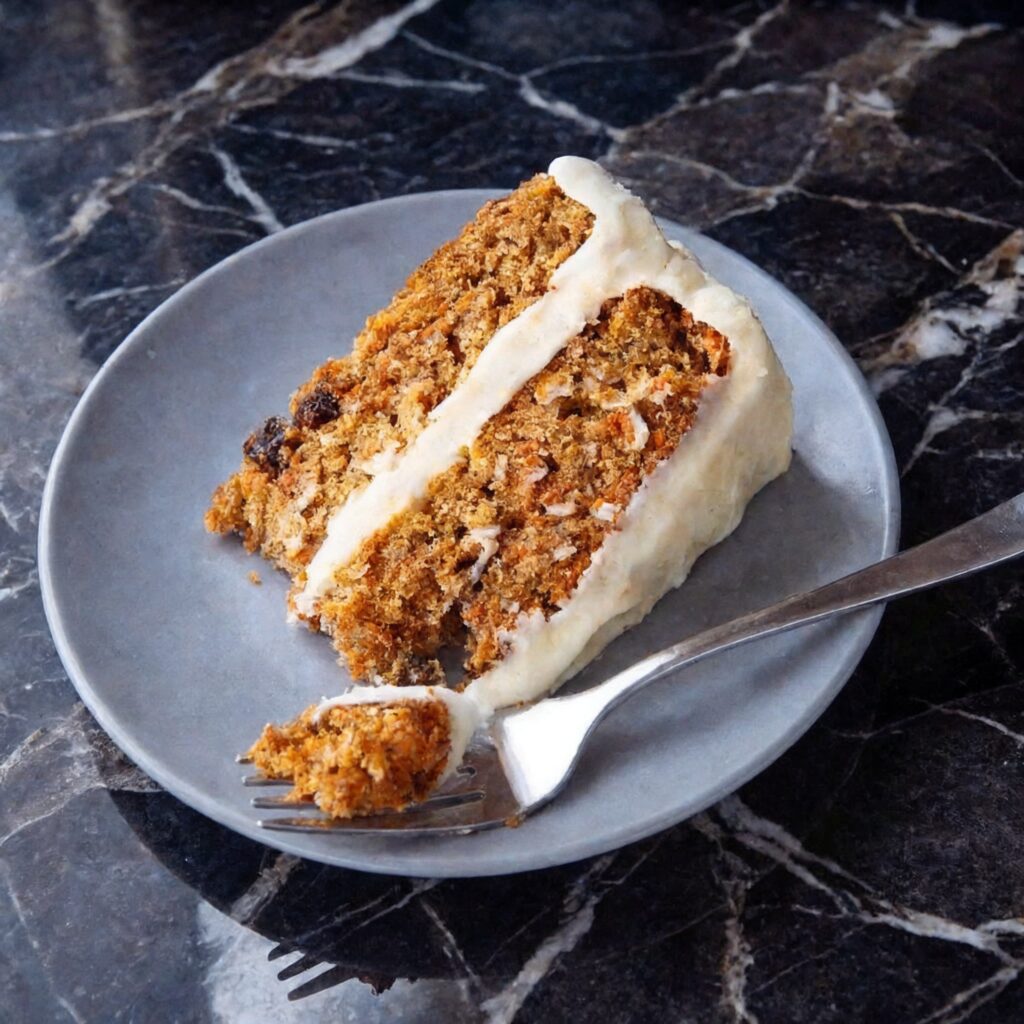
Carrot cake has a reputation for being the “healthy” cake, but let’s be honest—that’s not why we love it. We love it because it’s impossibly moist, warmly spiced, and topped with the most glorious tangy cream cheese frosting. The carrots are just a bonus.
This classic carrot cake recipe is everything you want it to be. It’s tender and dense without being heavy, loaded with warm cinnamon and nutmeg, and packed with sweet shredded carrots and crunchy walnuts.
The cream cheese frosting is silky, tangy, and perfectly balanced—not too sweet, not too tangy. Whether it’s for Easter, a birthday, or just because you deserve something special, this cake delivers every single time.
Ingredients
Makes one 9-inch cake or 13×9 inch sheet cake (12-16 servings).
For the Carrot Cake:
2 ½ cups (310g) all-purpose flour
2 teaspoons baking soda
2 teaspoons baking powder
1 teaspoon salt
2 teaspoons ground cinnamon
½ teaspoon ground nutmeg
¼ teaspoon ground ginger (optional)
4 large eggs, at room temperature
1 ½ cups (300g) granulated sugar
1 cup (200g) light brown sugar, packed
1 ½ cups (360ml) vegetable oil or canola oil
1 tablespoon vanilla extract
3 cups (about 4-5 medium) carrots, peeled and finely grated
1 cup (120g) chopped walnuts or pecans (optional)
½ cup (75g) raisins (optional)
For the Cream Cheese Frosting:
16 oz (450g) full-fat cream cheese, softened
1 cup (225g) unsalted butter, softened
4 cups (480g) powdered sugar, sifted
2 teaspoons vanilla extract
Pinch of salt
For Decoration (Optional):
½ cup chopped walnuts or pecans
Carrot-shaped candy decorations or marzipan carrots
Additional cinnamon for dusting
Step-by-Step Instructions
1. Preheat and Prepare:
Preheat your oven to 350°F (175°C). Grease two 9-inch round cake pans or one 9×13 inch sheet pan. Line the bottoms with parchment paper, then grease the parchment. Dust with flour, tapping out the excess.
2. Combine Dry Ingredients:
In a medium bowl, whisk together the flour, baking soda, baking powder, salt, cinnamon, nutmeg, and ginger (if using). Set aside.
3. Combine Wet Ingredients:
In a large bowl, whisk the eggs until lightly beaten.
Add both sugars, vegetable oil, and vanilla extract. Whisk until thoroughly combined and smooth.
4. Combine Wet and Dry:
Gradually add the dry ingredients to the wet ingredients, mixing with a spatula or whisk until just combined. Do not overmix.
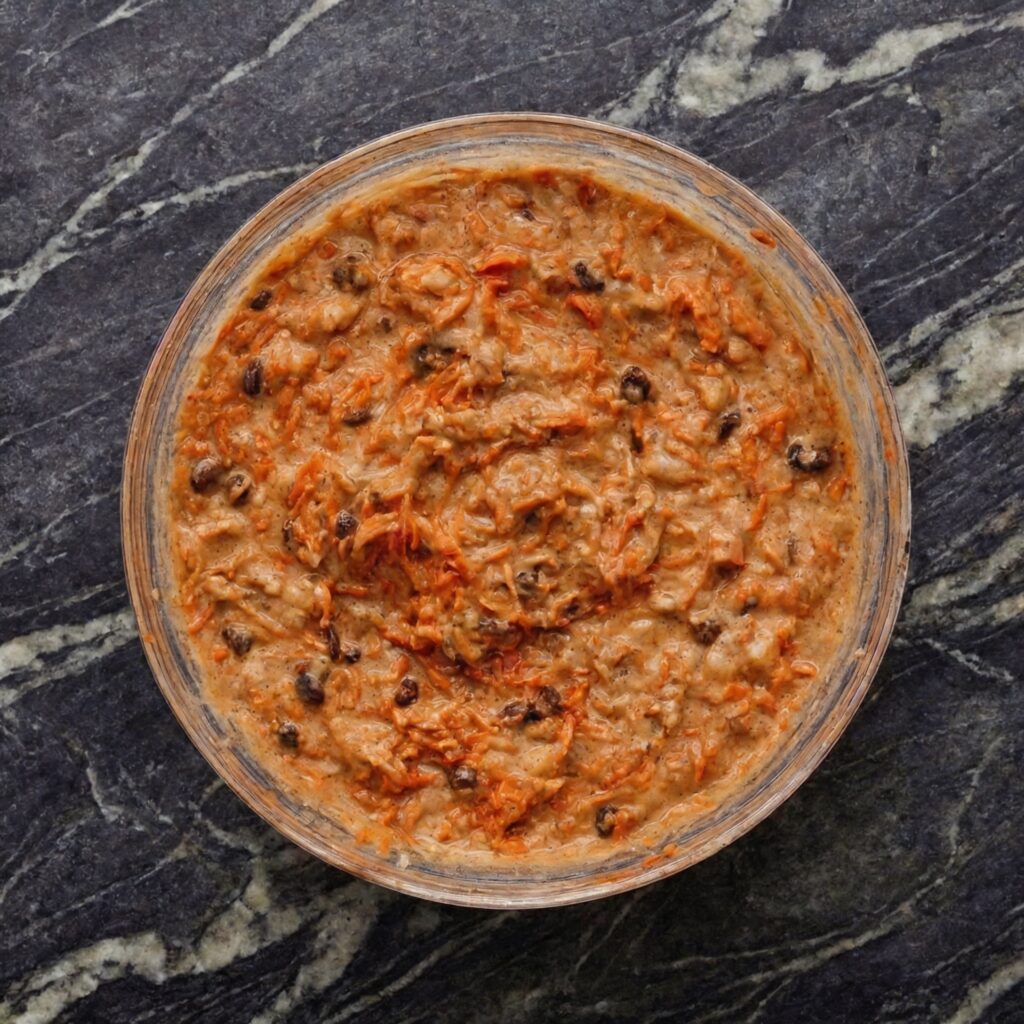
Fold in the grated carrots, and if using, walnuts and raisins. The batter will be thick and packed with goodness.
5. Bake:
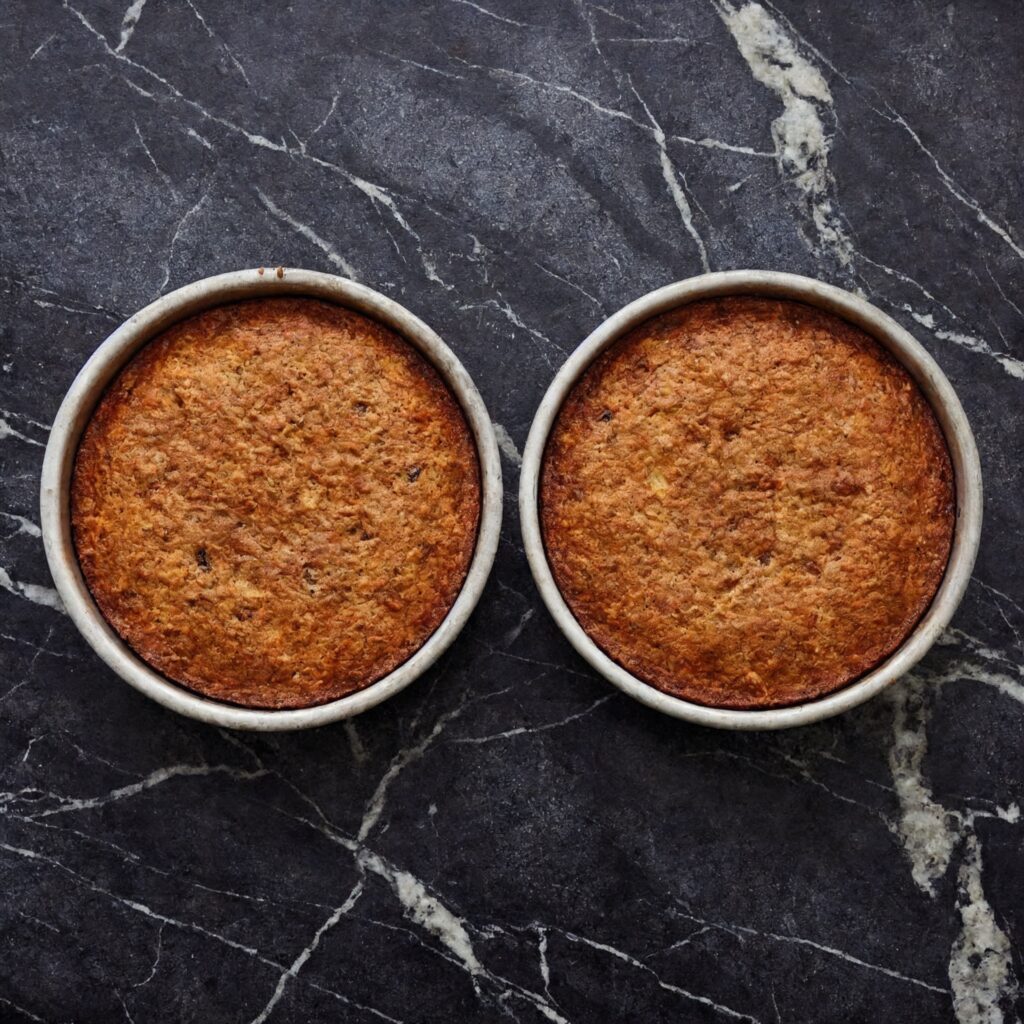
Divide the batter evenly between the prepared pans (if making layers) or pour into the sheet pan.
Bake for 25-35 minutes for layer cakes (30-35 minutes for 9-inch rounds) or 35-40 minutes for a sheet cake, until a toothpick inserted into the center comes out clean or with a few moist crumbs.
Let the cakes cool in the pans for 15-20 minutes, then turn out onto wire racks to cool completely. The cakes must be completely cool before frosting—warm cake will melt the cream cheese frosting.
6. Make the Cream Cheese Frosting:
In a large bowl, beat the softened cream cheese and butter together with an electric mixer until smooth, creamy, and free of lumps, about 2-3 minutes.
Gradually add the sifted powdered sugar, beating on low speed until incorporated. Scrape down the sides as needed.
Add the vanilla extract and salt. Increase speed to medium-high and beat for 2-3 minutes until light, fluffy, and spreadable.
If the frosting seems too soft, refrigerate for 15-20 minutes to firm up before frosting the cake.
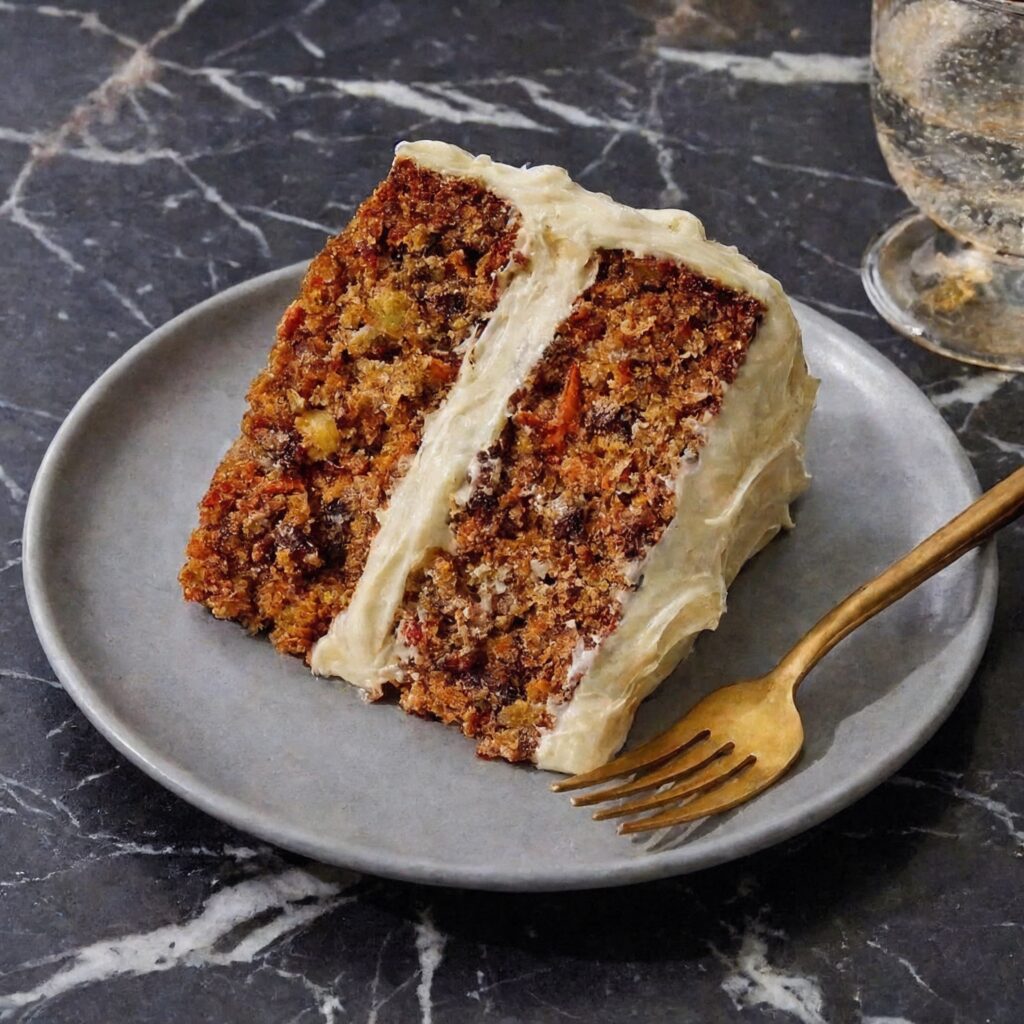
7. Assemble the Cake:
If the cake layers have domed tops, use a serrated knife to level them for even stacking.
Place one layer on a cake stand or plate. Spread about 1 cup of frosting evenly over the top.
Place the second layer on top, upside down for a flat surface. Apply a thin crumb coat (a thin layer of frosting) all over the cake to seal in crumbs. Refrigerate for 20-30 minutes to set.
Frost the entire cake with the remaining frosting, creating swirls or smooth edges as desired.
If using, press chopped walnuts onto the sides of the cake or sprinkle on top. Decorate with carrot candies if desired.
8. Serve:
For the cleanest slices, refrigerate the frosted cake for at least 1 hour before cutting. Serve at room temperature for the best flavor and texture.
Summary
Prep Time: 30 minutes | Bake Time: 30-35 minutes (layers) or 35-40 minutes (sheet) | Cooling/Frosting Time: 1.5 hours | Total Time: About 2.5 hours
Yield: One 9-inch双层 cake or 13×9 inch sheet cake (12-16 servings)
Difficulty: Intermediate
Storage and Make-Ahead Tips
How to Store:
Because of the cream cheese frosting, carrot cake must be stored in the refrigerator. Place in an airtight container and refrigerate for up to 5 days. Let slices sit at room temperature for 20-30 minutes before serving for the best flavor and texture.
Can You Freeze Cake Layers?
Absolutely! This is a great make-ahead strategy. Wrap completely cooled cake layers tightly in plastic wrap, then in foil. Freeze for up to 3 months. Thaw at room temperature before frosting.
Freezing Frosted Cake:
You can freeze a fully frosted carrot cake! Place it in the freezer uncovered for 1-2 hours until the frosting is firm, then wrap tightly in plastic wrap and foil. Freeze for up to 3 months. Thaw overnight in the refrigerator.
Make-Ahead Frosting:
The cream cheese frosting can be made up to 3 days ahead and stored in the refrigerator. Let it come to room temperature, then re-whip for a few minutes before using.
Make-Ahead for Parties:
Carrot cake actually tastes even better the next day as the flavors meld. Bake the layers a day ahead, cool completely, wrap tightly, and refrigerate. Frost the day you plan to serve.
If you love classic chocolate chip cookies but don’t feel like scooping dough and baking in batches, Chewy Chocolate Chip Bars are your new best friend.
These bars deliver everything you adore about cookies—gooey chocolate, buttery flavor, soft centers, and slightly crisp edges—but in an easy, slice-and-serve form.
Perfect for parties, potlucks, lunchboxes, or late-night cravings, this recipe comes together quickly and bakes in one pan. Let’s walk step by step through making thick, bakery-style chocolate chip bars with the ultimate chewy texture.
Why You’ll Love These Chocolate Chip Bars
Soft and chewy center
Buttery, rich flavor
Loaded with chocolate chips
Easier than individual cookies
Perfect for sharing
These bars strike the perfect balance between gooey and structured, making them easy to slice while still staying ultra-soft.
Ingredients You’ll Need
Wet Ingredients:
¾ cup unsalted butter, melted
1 cup brown sugar (packed)
½ cup granulated sugar
2 large eggs
1 tablespoon vanilla extract
Dry Ingredients:
2 ¼ cups all-purpose flour
1 teaspoon baking soda
½ teaspoon salt
Add-Ins:
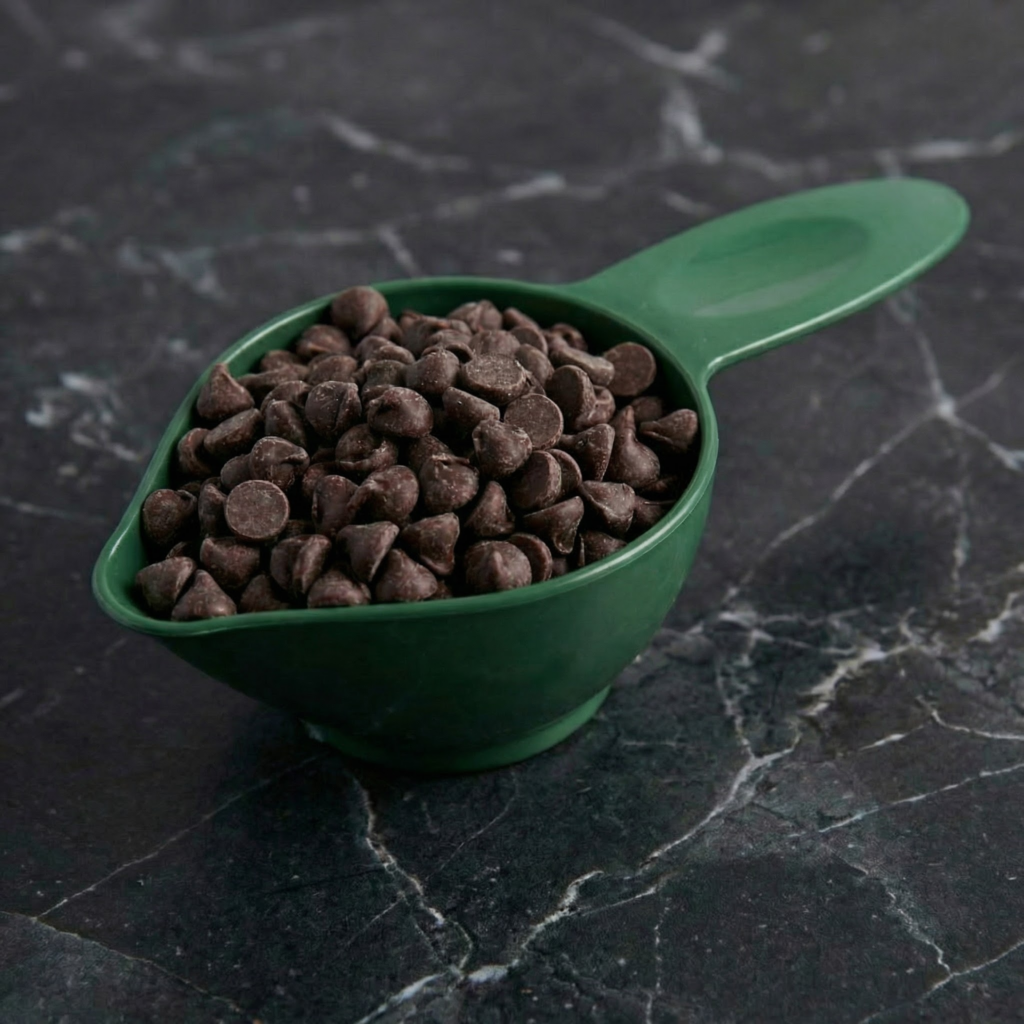
2 cups semi-sweet chocolate chips
½ cup chocolate chunks (optional for extra gooeyness)
Step 1: Preheat and Prepare the Pan
Preheat your oven to 350°F (175°C).
Line a 9×13-inch baking pan with parchment paper, leaving some overhang for easy removal. Lightly grease the paper to prevent sticking.
Using parchment ensures clean edges and effortless lifting after baking.
Step 2: Melt the Butter
Melt the butter in a microwave-safe bowl or saucepan.
Allow it to cool slightly before mixing with the sugars. Warm (not hot) butter helps create that chewy texture without scrambling the eggs.
Melted butter contributes to density and chewiness rather than a cakey texture.
Step 3: Mix the Sugars
Add brown sugar and granulated sugar to the melted butter.
Whisk thoroughly until smooth and glossy.
Brown sugar is key here—it adds moisture and chewiness thanks to its molasses content.
Step 4: Add Eggs and Vanilla
Add the eggs one at a time, whisking well after each addition.
Stir in vanilla extract.
The mixture should become thick and slightly lighter in color. Proper mixing at this stage builds structure and ensures even texture.
Step 5: Combine Dry Ingredients
In a separate bowl, whisk together:
Flour
Baking soda
Salt
Whisking ensures the leavening agent distributes evenly throughout the dough.
Step 6: Combine Wet and Dry
Gradually fold the dry ingredients into the wet mixture using a spatula.
Mix just until combined. Avoid overmixing, as that can develop gluten and make the bars tough.
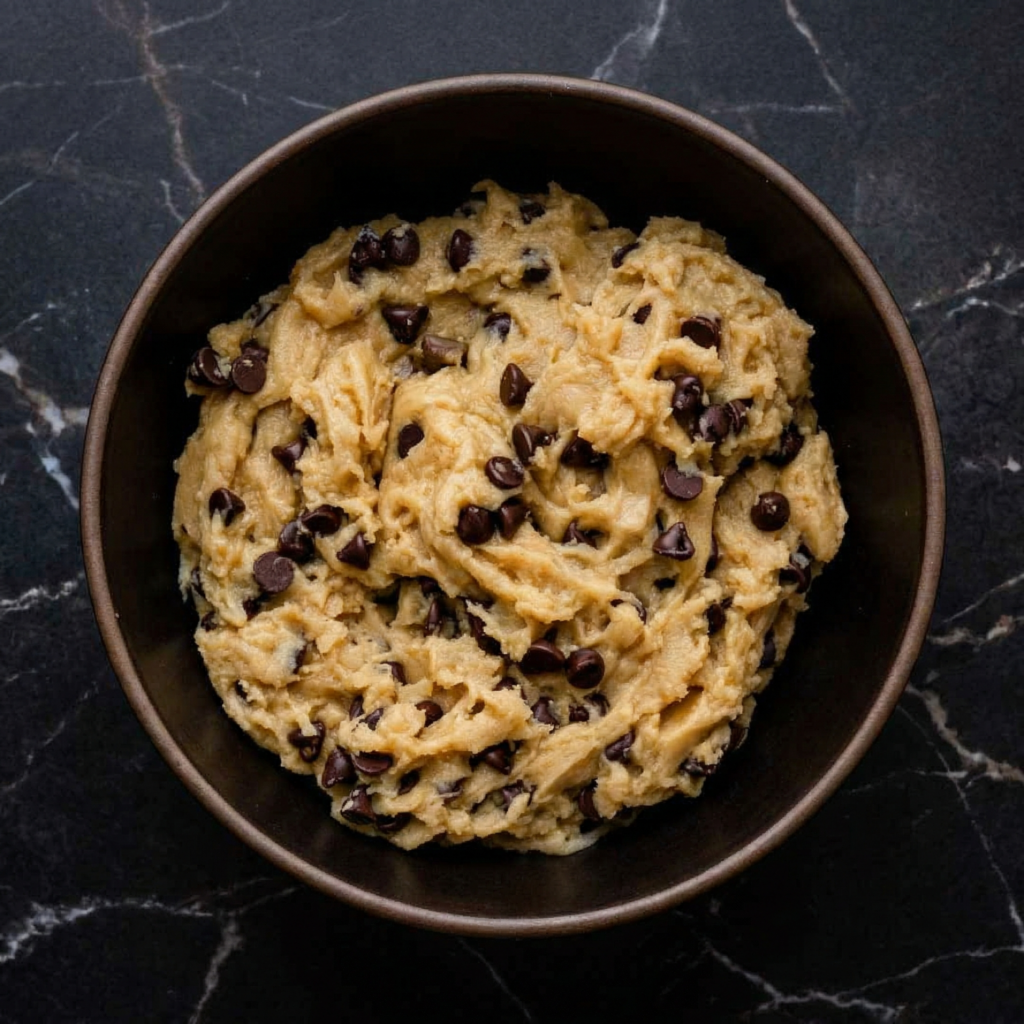
The dough will be thick and slightly sticky.
Step 7: Fold in the Chocolate
Gently fold in chocolate chips and chocolate chunks.
Reserve a handful of chips to sprinkle on top for a bakery-style finish.
Even distribution ensures every bite has melty chocolate goodness.
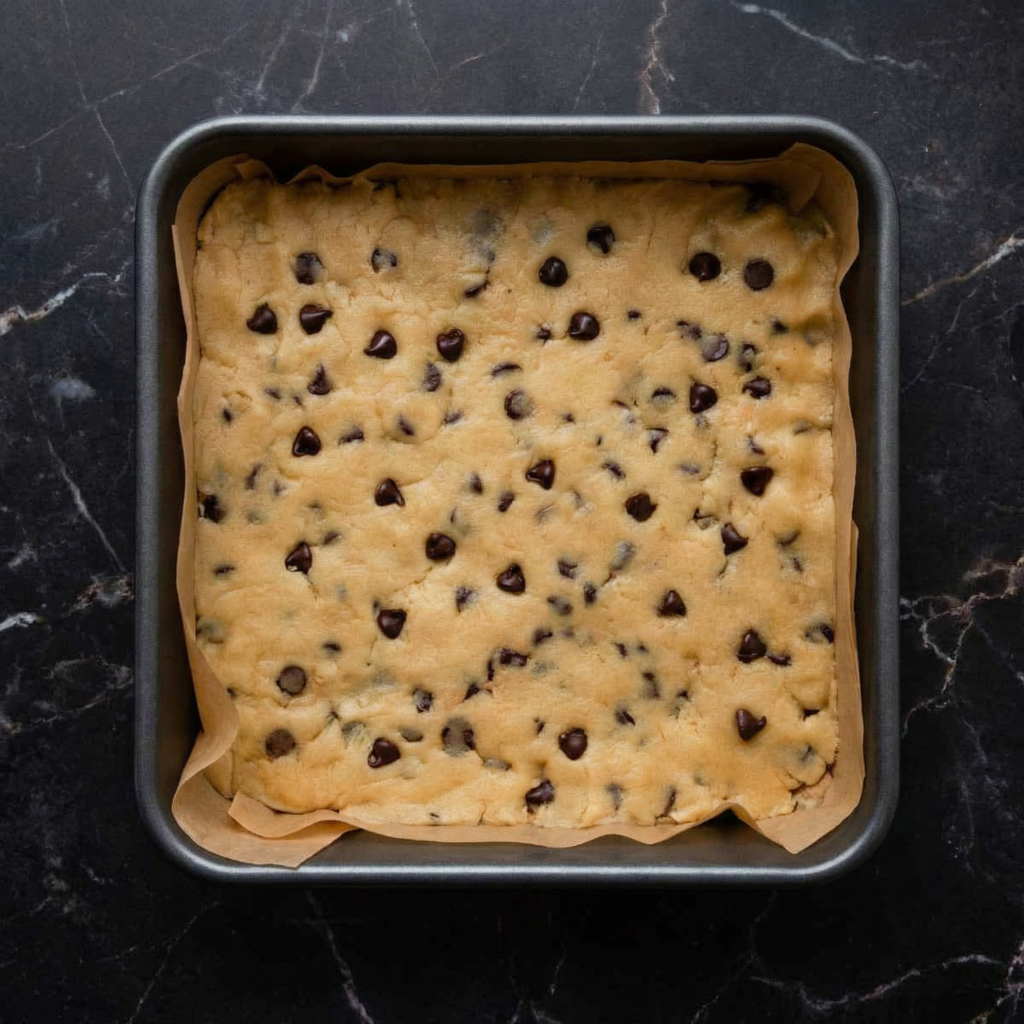
Step 8: Press into the Pan
Transfer the dough into the prepared baking pan.
Use a spatula or lightly greased hands to press the dough evenly into the corners.
Sprinkle reserved chocolate chips over the top.
For thicker bars, use a slightly smaller pan and increase baking time slightly.
Step 9: Bake to Chewy Perfection
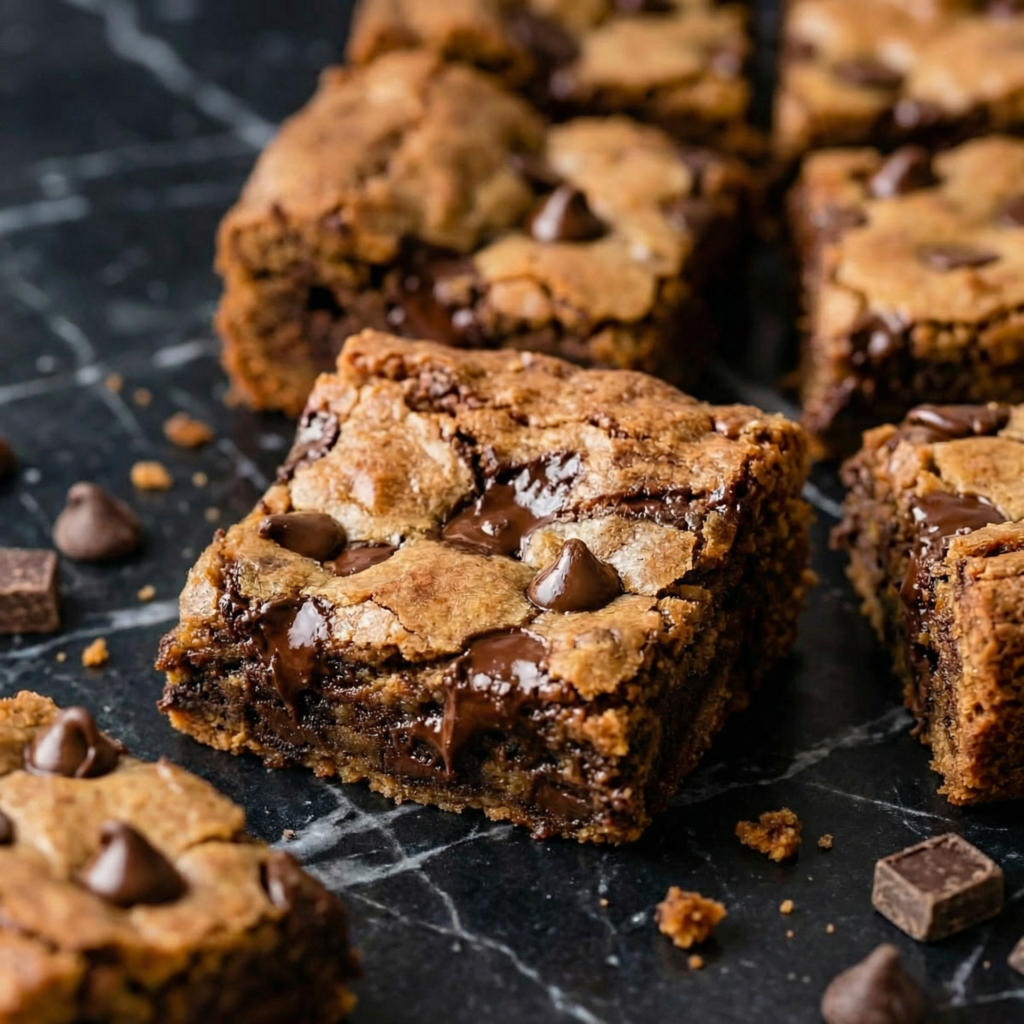
Bake for 22–28 minutes.
The edges should be golden brown, and the center should look slightly underbaked but set.
A toothpick inserted in the center should come out with moist crumbs—not raw batter.
Do not overbake. Slight underbaking is the secret to chewy bars.
Step 10: Cool Before Slicing
Allow the bars to cool in the pan for at least 30 minutes.
For cleaner slices, let them cool completely or chill briefly before cutting.
Lift out using parchment overhang and transfer to a cutting board.
Slice into squares or rectangles using a sharp knife.
Texture and Flavor Highlights
Soft, chewy center
Buttery, rich base
Slightly crisp golden edges
Gooey, melted chocolate in every bite
Balanced sweetness
These bars offer cookie flavor with a denser, more satisfying bite.
Pro Tips for Perfect Chewy Bars
Use more brown sugar than white. This guarantees chewiness.
Don’t overbake. The bars continue cooking as they cool.
Measure flour correctly. Spoon and level—don’t scoop directly from the bag.
Cool before slicing. Prevents crumbling.
Use quality chocolate. It makes a noticeable difference.
Optional Variations
Sea Salt Finish: Sprinkle flaky sea salt on top before baking.
Nutty Addition: Add ½ cup chopped walnuts or pecans.
Peanut Butter Swirl: Drop spoonfuls of peanut butter and swirl before baking.
Double Chocolate: Replace ¼ cup flour with cocoa powder.
Caramel Twist: Add caramel bits for gooey pockets of sweetness.
Storage Instructions
Store in an airtight container at room temperature for up to 4 days.
Refrigerate for up to 1 week if preferred.
Freeze individually wrapped bars for up to 3 months.
To refresh, microwave for 10–15 seconds for that just-baked warmth.
Why This Recipe Works
Chewy Chocolate Chip Bars rely on melted butter and brown sugar to create their soft texture. The ratio of fat to flour keeps them dense and moist, while proper mixing ensures structure without toughness.
Underbaking slightly locks in moisture, and cooling allows the crumb to set while maintaining chewiness. Using both chocolate chips and chunks creates pockets of melted chocolate throughout.
Chewy Chocolate Chip Bars are the perfect solution when you want all the comfort of cookies with half the effort. Thick, buttery, and loaded with chocolate, they’re guaranteed to satisfy every sweet craving.
Once you try these soft and gooey bars, they’ll quickly become a staple in your baking rotation—easy, crowd-pleasing, and absolutely irresistible.