Blog

  • General Tso’s Chicken (Better Than Takeout, Crispier Too)

    General Tso’s Chicken (Better Than Takeout, Crispier Too)

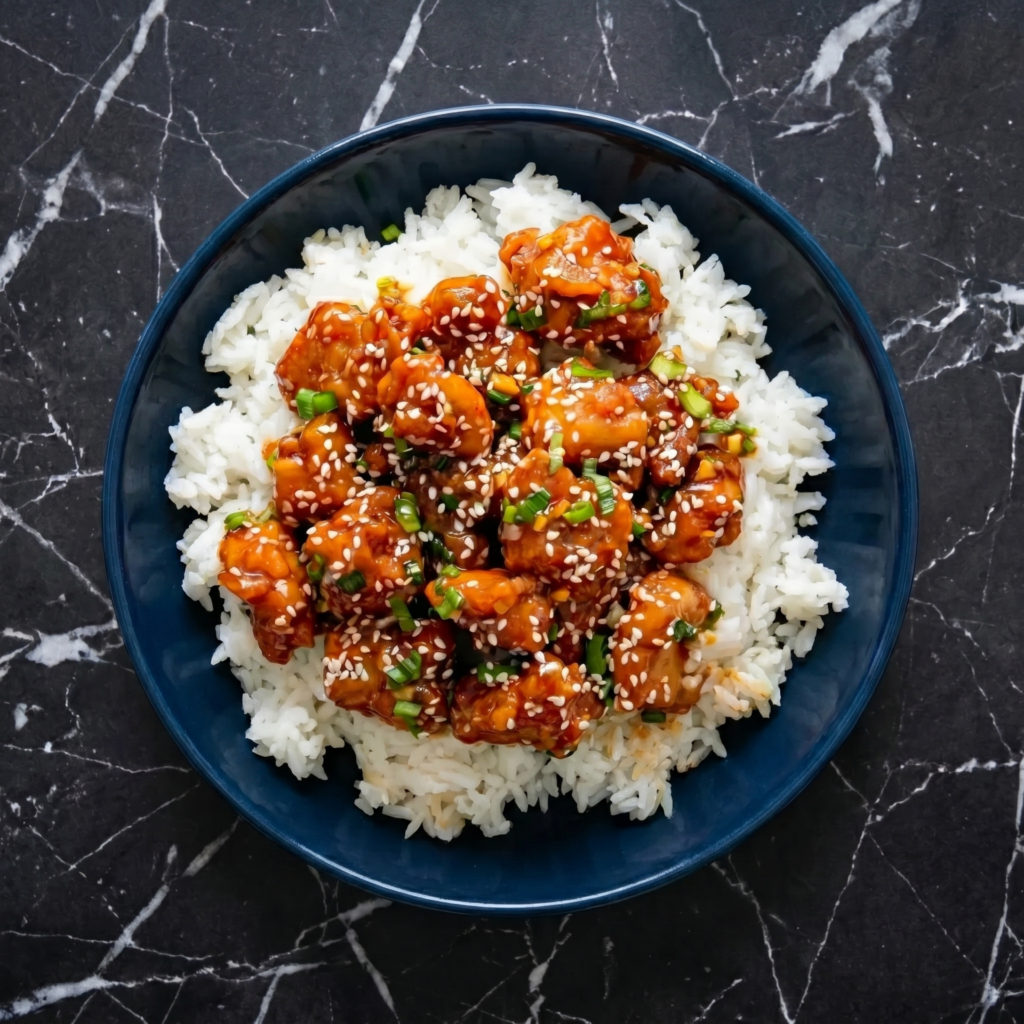
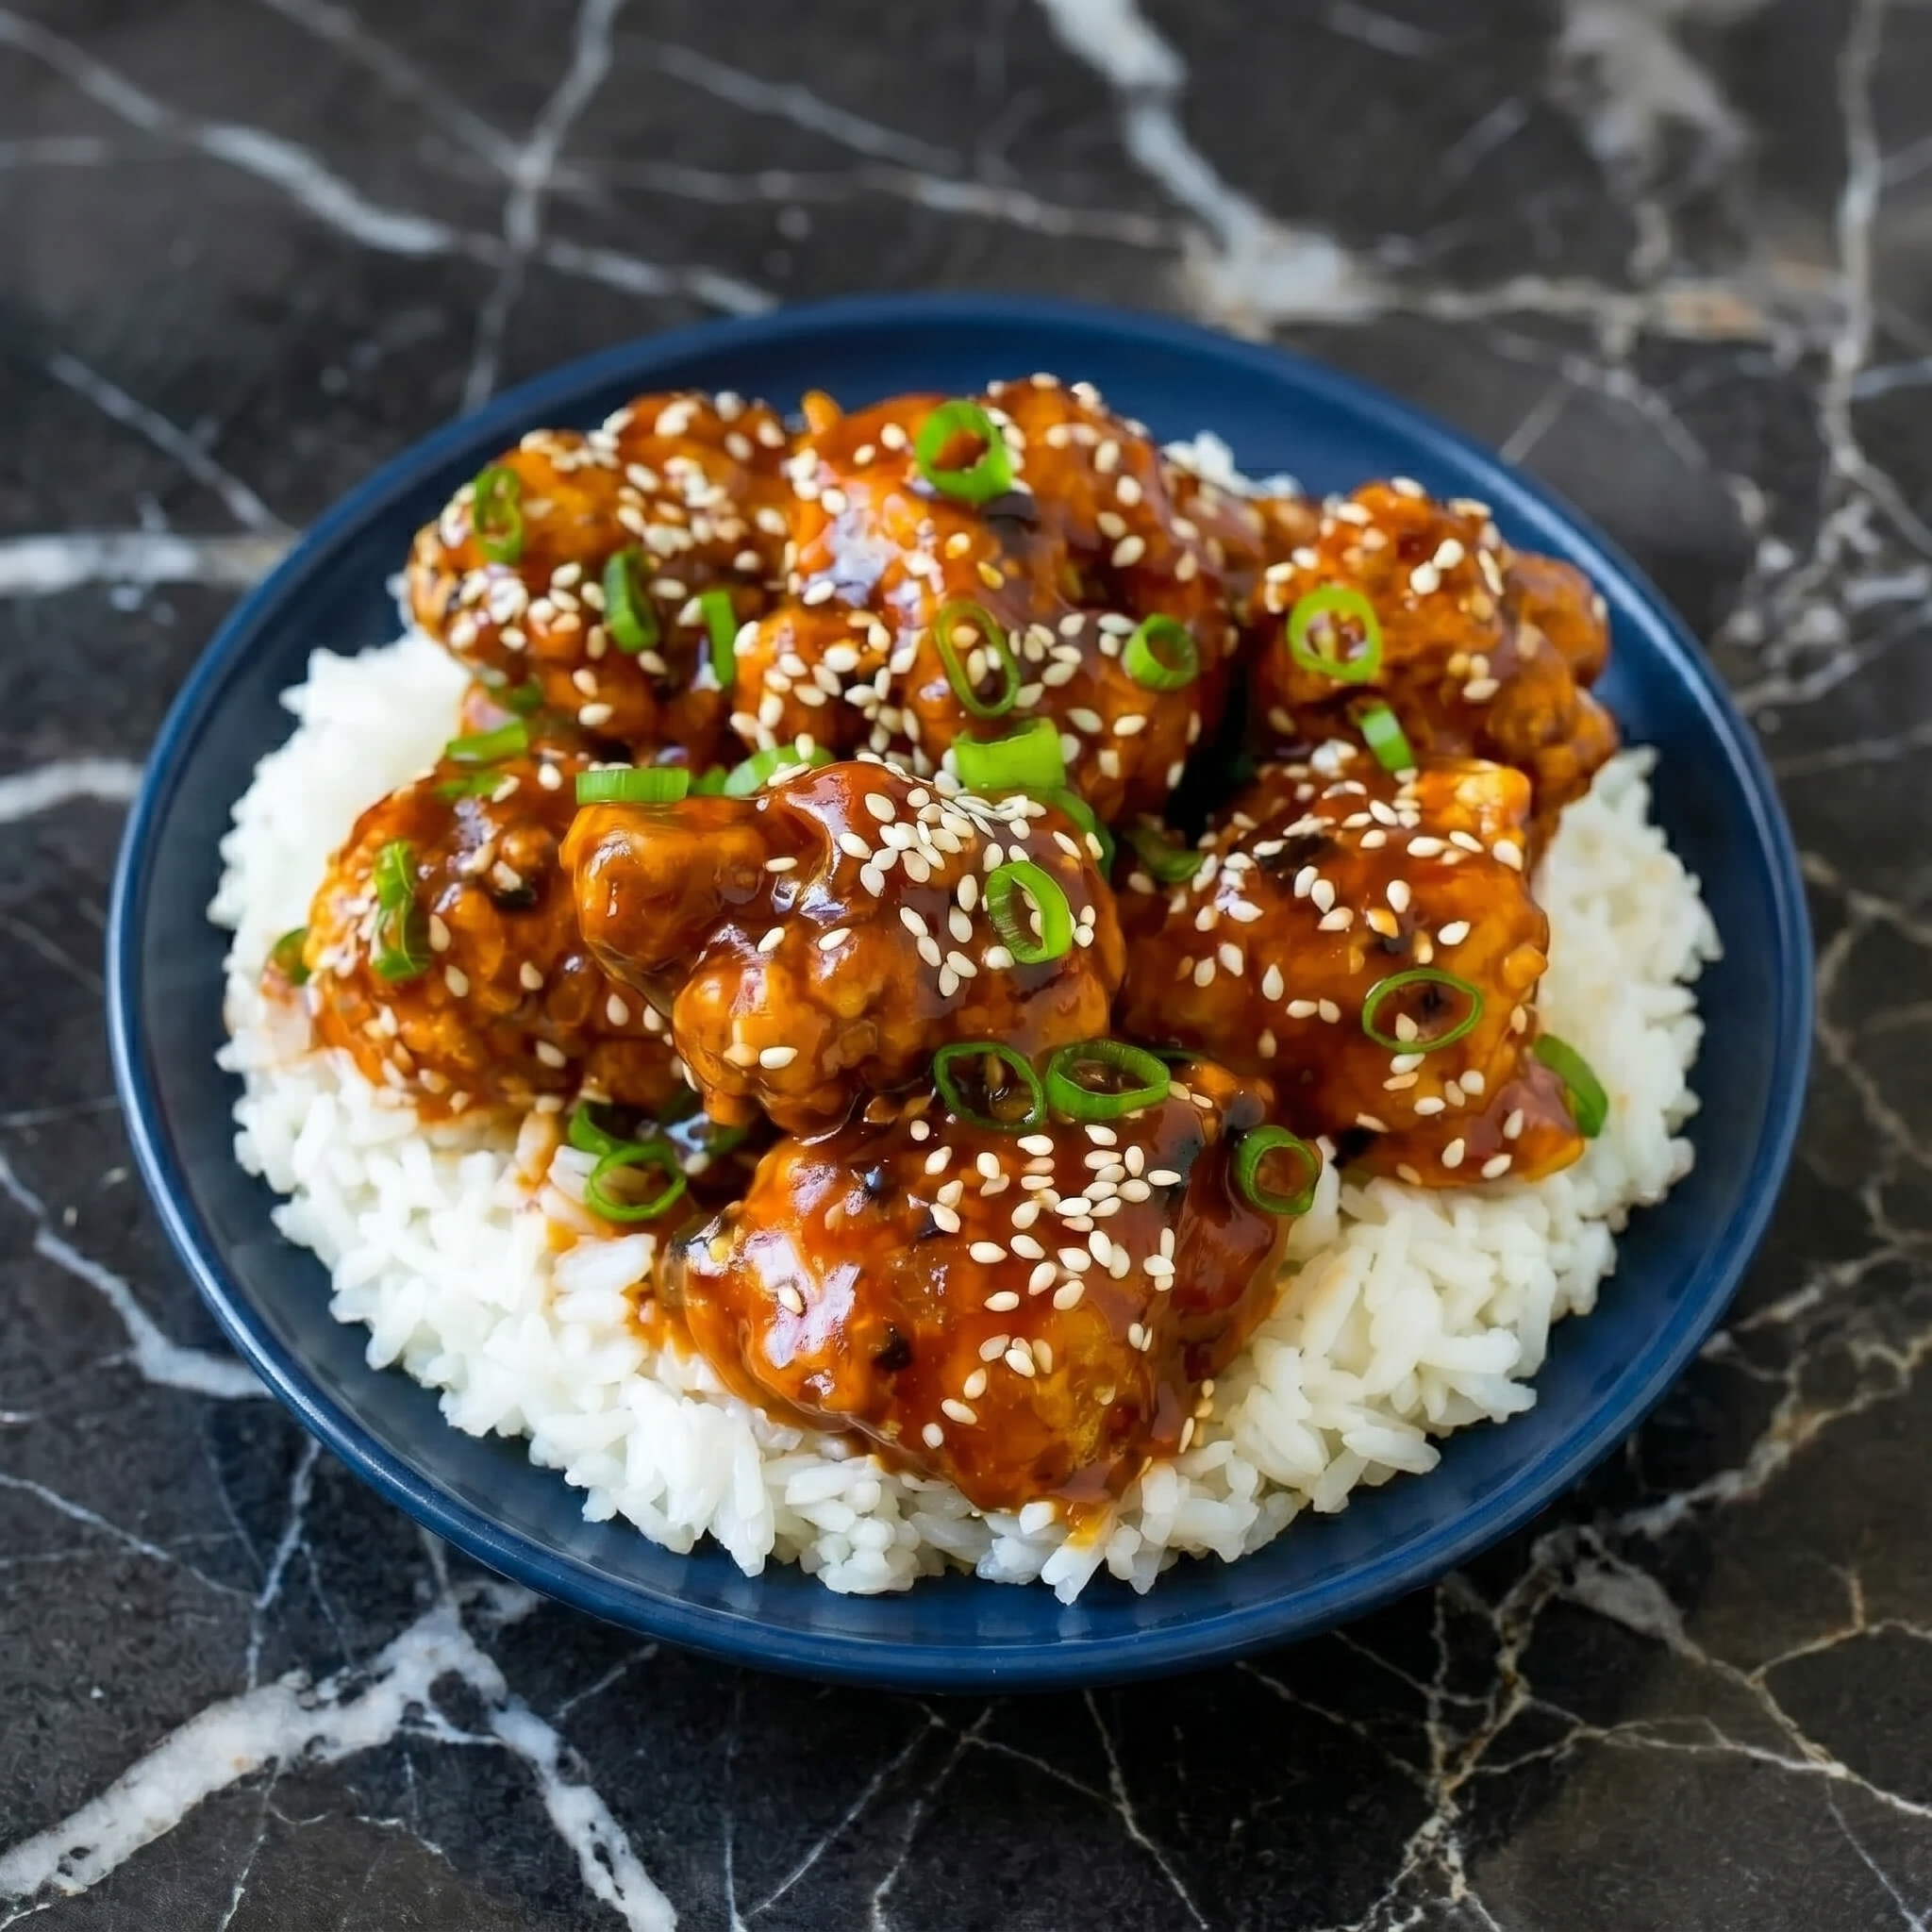
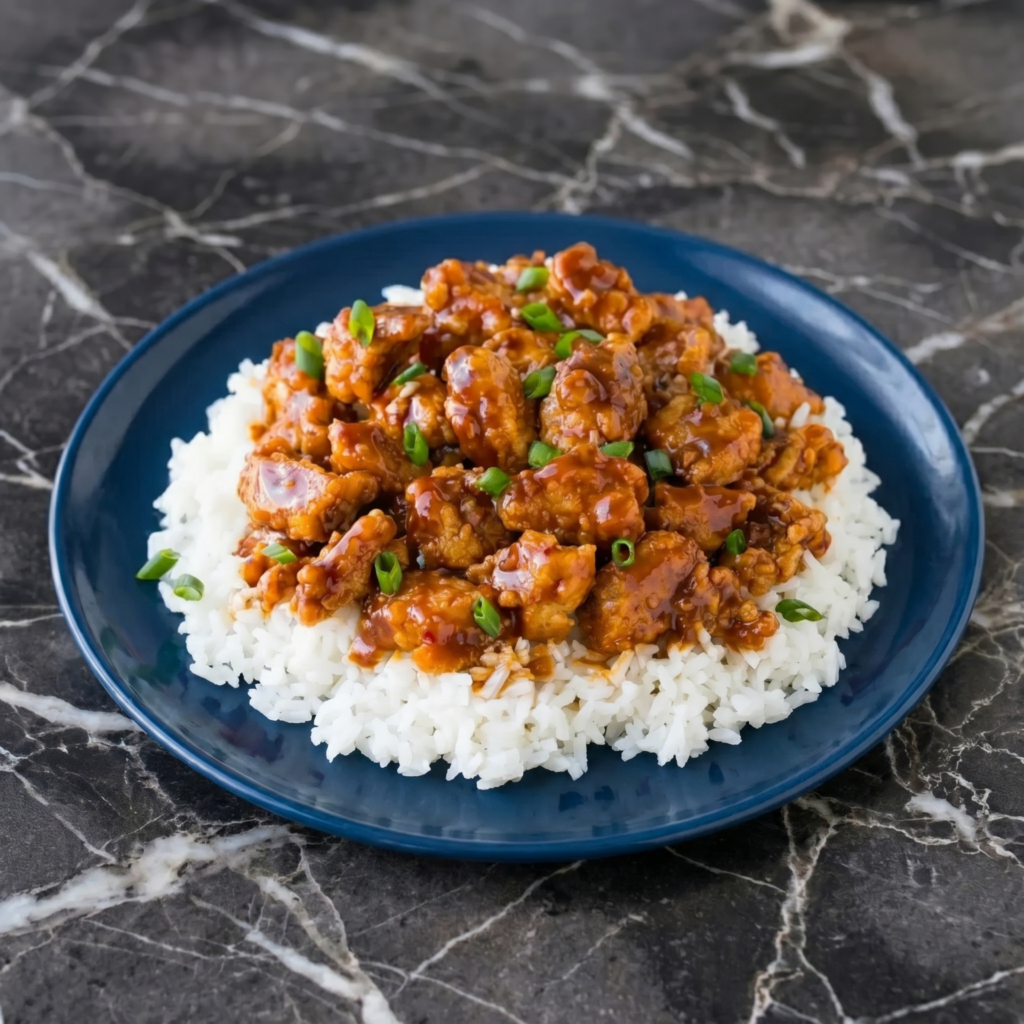
    Real General Tso’s is supposed to be crispy. Not that soggy, gloopy mess from the red carton. This version delivers shatter-crisp chicken nuggets coated in a sticky, sweet, garlicky, slightly spicy sauce. Ready in 30 minutes. Rice mandatory. Regret: zero.

    Ingredients

    Serves 4.

    For the Chicken:

    • 1.5 lbs (680g) boneless chicken thighs, cut into 1-inch pieces
    • ½ cup cornstarch
    • 2 eggs, beaten
    • Oil for frying (vegetable or canola)

    For the Sauce:

    • ¼ cup soy sauce
    • ¼ cup rice vinegar
    • ¼ cup sugar (or honey)
    • 2 tbsp hoisin sauce
    • 2 tbsp water
    • 1 tbsp cornstarch
    • 1 tsp sesame oil
    • 4 cloves garlic, minced
    • 1 tbsp ginger, grated
    • 2–3 dried red chilies (or 1 tsp chili flakes)

    For Serving:

    • Steamed rice, green onions, sesame seeds

    Step-by-Step Instructions

    Step 1: Prep Chicken

    1. Toss chicken pieces in cornstarch until coated. Dip in beaten egg, then back in cornstarch (double coat = extra crispy).

    Step 2: Fry

    1. Heat 1 inch of oil to 350°F (175°C). Fry chicken in batches for 3–4 minutes until golden and crispy. Drain on paper towels.

    Step 3: Make Sauce

    1. In a bowl, whisk soy sauce, vinegar, sugar, hoisin, water, cornstarch, and sesame oil.
    2. In a wok or large pan, heat 1 tbsp oil. Sauté garlic, ginger, and chilies for 30 seconds.
    3. Pour in sauce. Cook 1–2 minutes until thick and bubbly.

    Step 4: Toss & Serve

    1. Add fried chicken to the pan. Toss quickly to coat (30 seconds max—stay crispy!).
    2. Serve over rice. Top with green onions and sesame seeds. Eat immediately.

    Summary

    Prep Time: 15 min | Cook Time: 15 min | Total: 30 min

    Yield: 4 servings | Difficulty: Medium (frying)

    Storage Notes

    Fridge: 3 days. Reheat: Air fryer or oven at 375°F for 5–7 minutes. Do not microwave (soggy betrayal). Sauce and chicken can be prepped separately and combined fresh.

  • Sourdough Bread (Crusty, Chewy, and Way Easier Than You Think)

    Sourdough Bread (Crusty, Chewy, and Way Easier Than You Think)

    Let’s demystify sourdough. It’s not magic. It’s not a part-time job. It’s flour, water, salt, and a little patience. This recipe gives you a crusty, chewy, tangy loaf with an open crumb and a crackling crust. No slap-and-fold marathon required. Let’s bake.

    Ingredients

    Makes 1 large loaf.

    • 100g active sourdough starter (fed 4–6 hours ago, bubbly)
    • 350g warm water (about 80°F / 27°C)
    • 500g bread flour (or all-purpose)
    • 10g salt (about 2 tsp)

    Total flour + water = ~75% hydration. That’s the sweet spot.

    Step-by-Step Instructions

    Step 1: Mix

    1. In a large bowl, whisk starter and water together. Add flour and salt. Mix with your hands until a shaggy dough forms (no dry bits). Cover and rest 30 minutes.

    Step 2: Stretch & Fold

    1. Over 2 hours, do 3 sets of stretch-and-folds (every 30–45 minutes). Wet your hand, grab a side of dough, stretch up, fold over. Rotate bowl and repeat 4 times. Dough will get smoother.

    Step 3: Bulk Ferment

    1. Cover and let dough rise at room temperature for 4–6 hours until nearly doubled and bubbly on top.

    Step 4: Shape

    1. Turn dough onto a lightly floured surface. Fold into a tight round. Place seam-side up into a floured proofing basket or bowl lined with a floured towel.

    Step 5: Cold Proof

    1. Cover and refrigerate 8–24 hours (longer = tangier).

    Step 6: Bake

    1. Preheat oven to 450°F (230°C) with a Dutch oven inside for 30 minutes.
    2. Turn dough onto parchment. Score the top with a lame or knife.
    3. Lower into hot Dutch oven, cover, bake 20 minutes. Remove lid, bake 20–25 minutes more until deep brown.
    4. Cool completely on a rack (at least 1 hour) before slicing.

    Summary

    Prep Time: 20 min active | Ferment + Proof: 12–30 hours | Bake: 45 min

    Yield: 1 large loaf | Difficulty: Medium (requires starter)

    Storage Notes

    Counter (cut side down): 3 days. Freezer (sliced): 3 months. Toast frozen slices directly. Never refrigerate—it stales faster.

  • Peanut Butter Fudge (3 Ingredients, 5 Minutes, Zero Candy Thermometer)

    Peanut Butter Fudge (3 Ingredients, 5 Minutes, Zero Candy Thermometer)

    I don’t say this lightly: this is the easiest fudge you will ever make. No candy thermometer. No scorched pots. No patience required. Just peanut butter, butter, and powdered sugar doing a delicious little magic trick in your microwave. Dangerously addictive. You’ve been warned.

    Ingredients

    Makes 16 small squares.

    • 1 cup (250g) creamy peanut butter (regular, not natural/drippy)
    • ½ cup (1 stick / 115g) salted butter
    • 2 cups (240g) powdered sugar
    • 1 tsp vanilla extract (optional but recommended)

    Optional add-ins: ¼ cup crushed peanuts, chocolate chips on top, or a swirl of melted chocolate.

    Step-by-Step Instructions

    Step 1: Prep

    1. Line an 8×8 inch pan with parchment paper (leave overhang for easy lifting).

    Step 2: Melt

    1. In a large microwave-safe bowl, combine peanut butter and butter.
    2. Microwave for 45 seconds. Stir. Microwave another 20–30 seconds until completely smooth and melted.

    Step 3: Mix

    1. Stir in vanilla (if using). Add powdered sugar and mix with a spatula until fully combined. It will look crumbly at first, then come together into a thick, smooth dough.

    Step 4: Press & Chill

    1. Press mixture firmly into prepared pan. Smooth the top with a spatula or your hands.
    2. Refrigerate for 1–2 hours until completely firm.

    Step 5: Cut & Serve

    1. Lift out of pan using parchment. Cut into small squares (it’s rich!). Serve cold or at room temperature.

    Summary

    Prep Time: 5 min | Chill Time: 1 hour | Total: 65 min

    Yield: 16 pieces | Difficulty: Extremely Easy

    Storage Notes

    Fridge: 2 weeks in an airtight container. Freezer: 3 months (layer with parchment). Eat straight from the freezer—it’s like peanut butter candy.

  • Homemade Corndogs (Better Than the Fair, Zero Regrets)

    Homemade Corndogs (Better Than the Fair, Zero Regrets)

    Let’s be honest—fair corndogs are magical. But waiting in line and paying $8 for one? Less magical. These homemade corndogs are crispy, sweet, salty, and dangerously easy. The batter sticks (no sliding off drama), and they fry up golden in minutes. Get your sticks ready.

    Ingredients

    Makes 8 corndogs.

    • 8 hot dogs (beef or your favorite)
    • 8 wooden skewers or popsicle sticks
    • Vegetable or canola oil (for frying, about 4 cups)

    For the Batter:

    • 1 cup (125g) yellow cornmeal
    • 1 cup (125g) all-purpose flour
    • ¼ cup (50g) granulated sugar
    • 1 tbsp baking powder
    • ½ tsp salt
    • 1 cup (240ml) milk
    • 1 large egg
    • 2 tbsp honey or maple syrup (optional, for extra sweetness)

    Step-by-Step Instructions

    Step 1: Prep

    1. Pat hot dogs completely dry. Insert a stick halfway into each one.
    2. Heat oil in a deep pot to 350°F (175°C).

    Step 2: Make Batter

    1. In a bowl, whisk cornmeal, flour, sugar, baking powder, and salt.
    2. Add milk, egg, and honey. Whisk until smooth and thick (like pancake batter). Pour into a tall glass for easy dipping.

    Step 3: Dip & Fry

    1. Hold a hot dog by the stick. Dip into batter, rotating to coat evenly. Let excess drip off.
    2. Carefully lower into hot oil. Fry 2–3 minutes, turning once, until deep golden brown.
    3. Drain on paper towels. Repeat with remaining hot dogs.

    Step 4: Serve

    1. Serve warm with mustard, ketchup, or honey. Eat immediately—they don’t wait.

    Summary

    Prep Time: 15 min | Cook Time: 15 min | Total: 30 min

    Yield: 8 corndogs | Difficulty: Medium (frying)

    Storage Notes

    Best fresh. But you can refrigerate leftovers for 2 days. Reheat in a 375°F oven or air fryer for 3–5 minutes to restore crispiness. Do not microwave (soggy sadness).

  • The Ultimate Sourdough Chocolate Cake (Secretly Better Than Regular Cake)

    The Ultimate Sourdough Chocolate Cake (Secretly Better Than Regular Cake)

    Got sourdough discard? Good. You’re about to make the most unfairly moist chocolate cake of your life. The starter doesn’t add sourdough flavor—it adds tenderness, depth, and a secret-weapon richness that boxed mixes can only dream of. This cake is fudgy, deeply chocolatey, and dangerously easy.

    Ingredients

    Serves 8–10. One 9-inch round or loaf pan.

    • 1 cup (240g) sourdough discard (unfed, room temperature)
    • 1 cup (200g) granulated sugar
    • ½ cup (120ml) vegetable oil (or melted coconut oil)
    • 2 large eggs
    • 1 tsp vanilla extract
    • 1 cup (125g) all-purpose flour
    • ⅓ cup (30g) unsweetened cocoa powder
    • 1 tsp baking soda
    • ½ tsp salt
    • ½ cup (120ml) hot coffee or hot water (coffee = deeper chocolate)

    Optional Toppings: powdered sugar, chocolate ganache, or a dusting of sea salt.

    Step-by-Step Instructions

    Step 1: Prep

    1. Preheat oven to 350°F (175°C). Grease a 9-inch round pan or line a loaf pan with parchment.

    Step 2: Wet Mix

    1. In a large bowl, whisk together sourdough discard, sugar, oil, eggs, and vanilla until smooth.

    Step 3: Dry Mix

    1. Sift in flour, cocoa powder, baking soda, and salt. Stir until just combined (don’t overmix).

    Step 4: Hot Liquid

    1. Pour in hot coffee or water. Mix gently—batter will be thin. That’s correct.

    Step 5: Bake

    1. Pour batter into pan. Bake 30–35 minutes (round) or 45–50 minutes (loaf), until a toothpick comes out clean.

    Step 6: Cool & Serve

    1. Cool in pan 10 minutes, then transfer to a rack. Dust with powdered sugar or glaze as desired.

    Summary

    Prep Time: 10 min | Bake Time: 35 min | Total: 45 min

    Yield: 8–10 slices | Difficulty: Easy

    Storage Notes

    Counter: 3 days in an airtight container. Fridge: 1 week. Freezer: 3 months (wrap tightly).

    The cake gets more moist and chocolatey on day two. You’re welcome.