Tag: Mexican Dish

  • Sizzle & Smoke: The Ultimate Carne Asada You’ll Want Every Weekend

    Sizzle & Smoke: The Ultimate Carne Asada You’ll Want Every Weekend

    Few dishes deliver bold, vibrant flavor quite like Carne Asada. Juicy grilled steak infused with citrus, garlic, and herbs is a staple in Mexican cuisine and a guaranteed crowd-pleaser.

    Whether tucked into warm tortillas, piled onto rice bowls, or served straight off the grill with fresh salsa, carne asada is all about simple ingredients transformed through fire and marinade into something unforgettable.

    If you’ve ever wondered how to get that perfectly tender, smoky, flavor-packed steak at home, this step-by-step guide will walk you through everything you need to know.


    What Cut of Meat Is Best?

    Traditionally, carne asada is made with flank steak or skirt steak. Both cuts are lean, flavorful, and perfect for quick, high-heat grilling.

    Skirt steak tends to have a slightly beefier flavor and more tenderness when cooked properly, while flank steak is easier to find and slices beautifully when cut against the grain.

    For this recipe, you’ll need about 2 pounds of flank or skirt steak.


    Ingredients You’ll Need

    For the Marinade:

    • 2 pounds flank or skirt steak
    • ½ cup fresh orange juice
    • ¼ cup fresh lime juice
    • ¼ cup olive oil
    • 4 cloves garlic, minced
    • 1 jalapeño, finely minced (optional for heat)
    • ½ cup chopped fresh cilantro
    • 1 teaspoon ground cumin
    • 1 teaspoon chili powder
    • 1 teaspoon salt
    • ½ teaspoon black pepper

    For Serving (Optional):

    • Warm corn or flour tortillas
    • Diced white onion
    • Fresh cilantro
    • Lime wedges
    • Salsa or guacamole

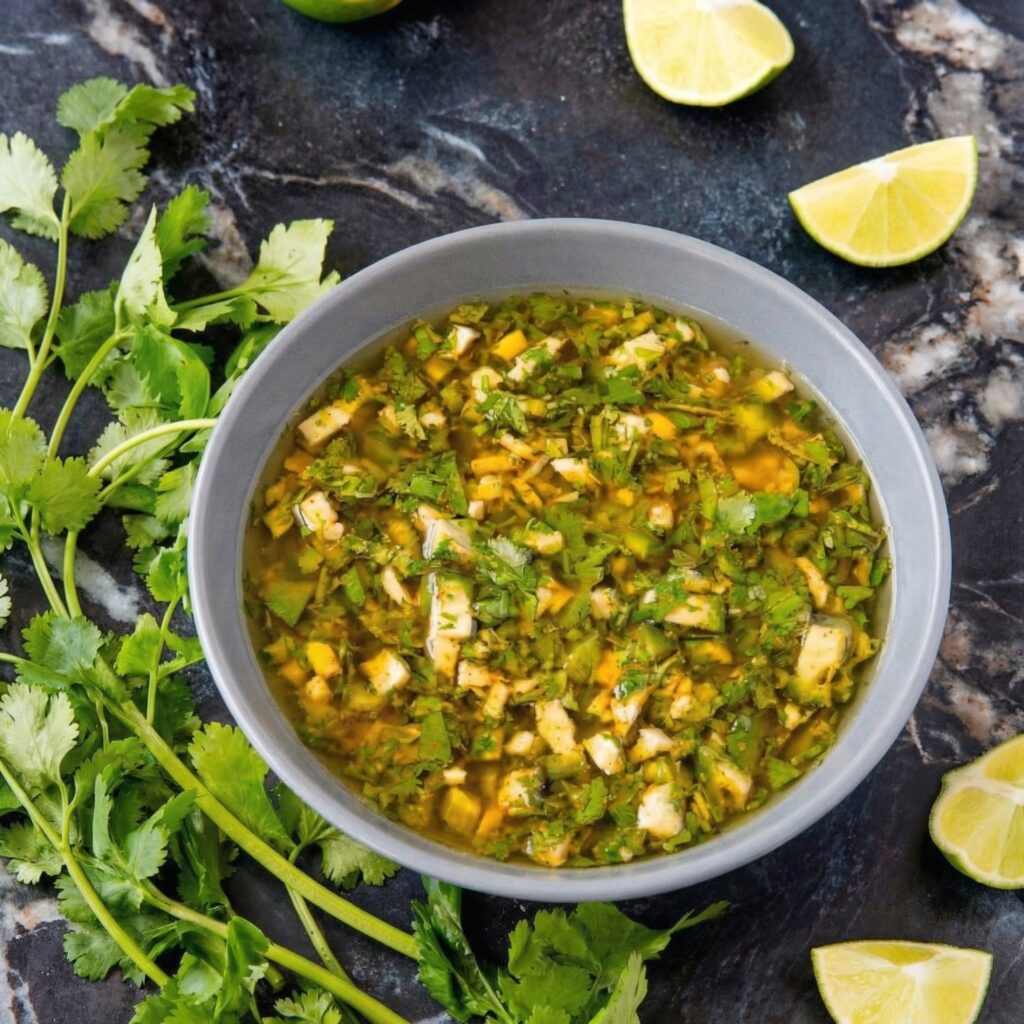
    Step 1: Prepare the Marinade

    In a large bowl, whisk together the orange juice, lime juice, olive oil, minced garlic, jalapeño, cilantro, cumin, chili powder, salt, and black pepper.

    The citrus juices help tenderize the meat while infusing it with bright flavor.

    Olive oil carries the spices evenly across the surface of the steak.


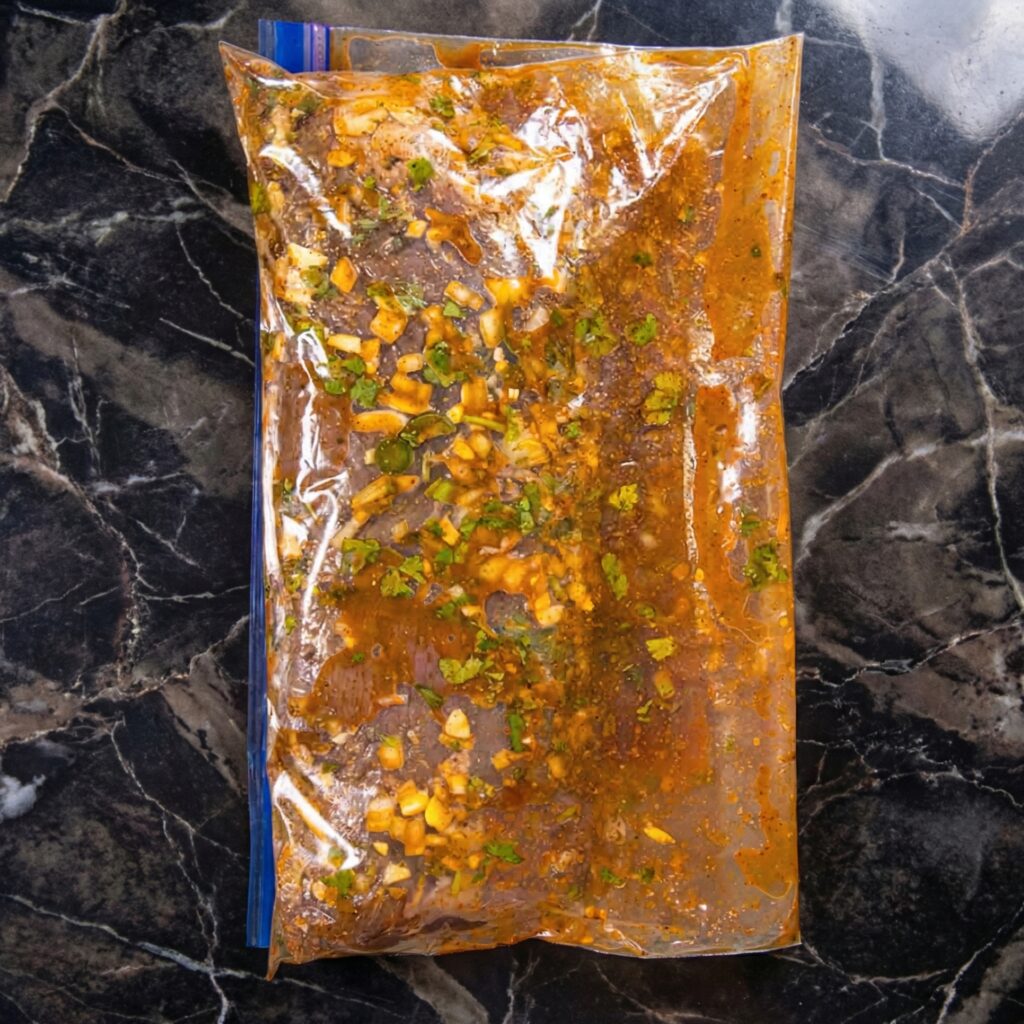
    Step 2: Marinate the Steak

    Place the steak in a large resealable plastic bag or shallow dish. Pour the marinade over the meat, ensuring it is fully coated.

    Seal or cover and refrigerate for at least 2 hours, but ideally 4–8 hours for deeper flavor.

    Avoid marinating longer than 12 hours, as the citrus can begin to break down the meat too much and affect texture.


    Step 3: Bring the Meat to Room Temperature

    Remove the steak from the refrigerator about 30 minutes before cooking.

    Allowing the meat to come to room temperature promotes even cooking and a better sear.

    Meanwhile, preheat your grill to high heat (about 450–500°F).

    If using a stovetop, heat a cast iron skillet over high heat until very hot.


    Step 4: Grill the Carne Asada

    Remove the steak from the marinade and let any excess drip off. Discard the remaining marinade.

    Place the steak directly on the hot grill.

    Cook for 3–5 minutes per side, depending on thickness and desired doneness.

    Carne asada is best served medium-rare to medium for maximum tenderness.

    Avoid moving the steak too much—let it develop a deep, caramelized crust before flipping.


    Step 5: Rest the Steak

    Once cooked, transfer the steak to a cutting board and tent loosely with foil.

    Let it rest for 10 minutes. Resting allows the juices to redistribute throughout the meat, ensuring every slice is juicy and flavorful.

    Skipping this step can result in dry steak, as the juices will run out when cut too soon.


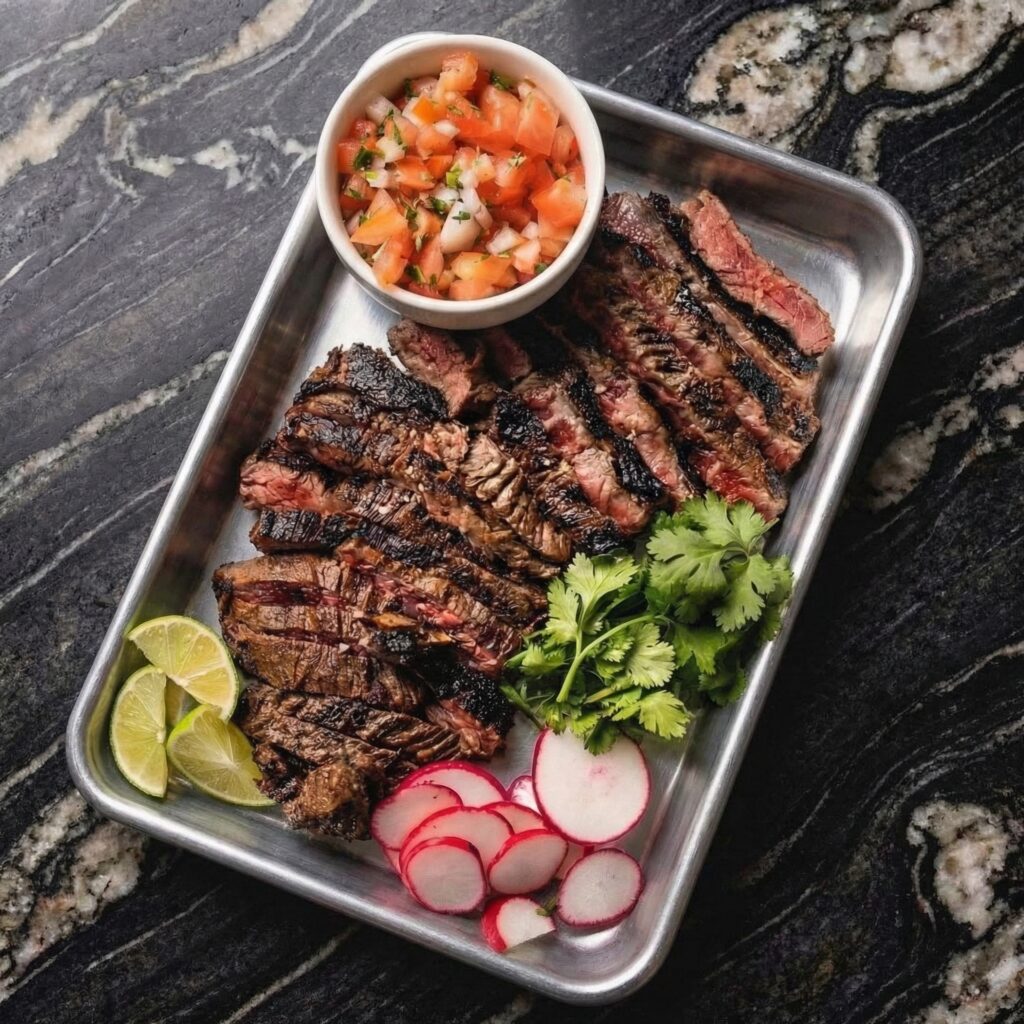
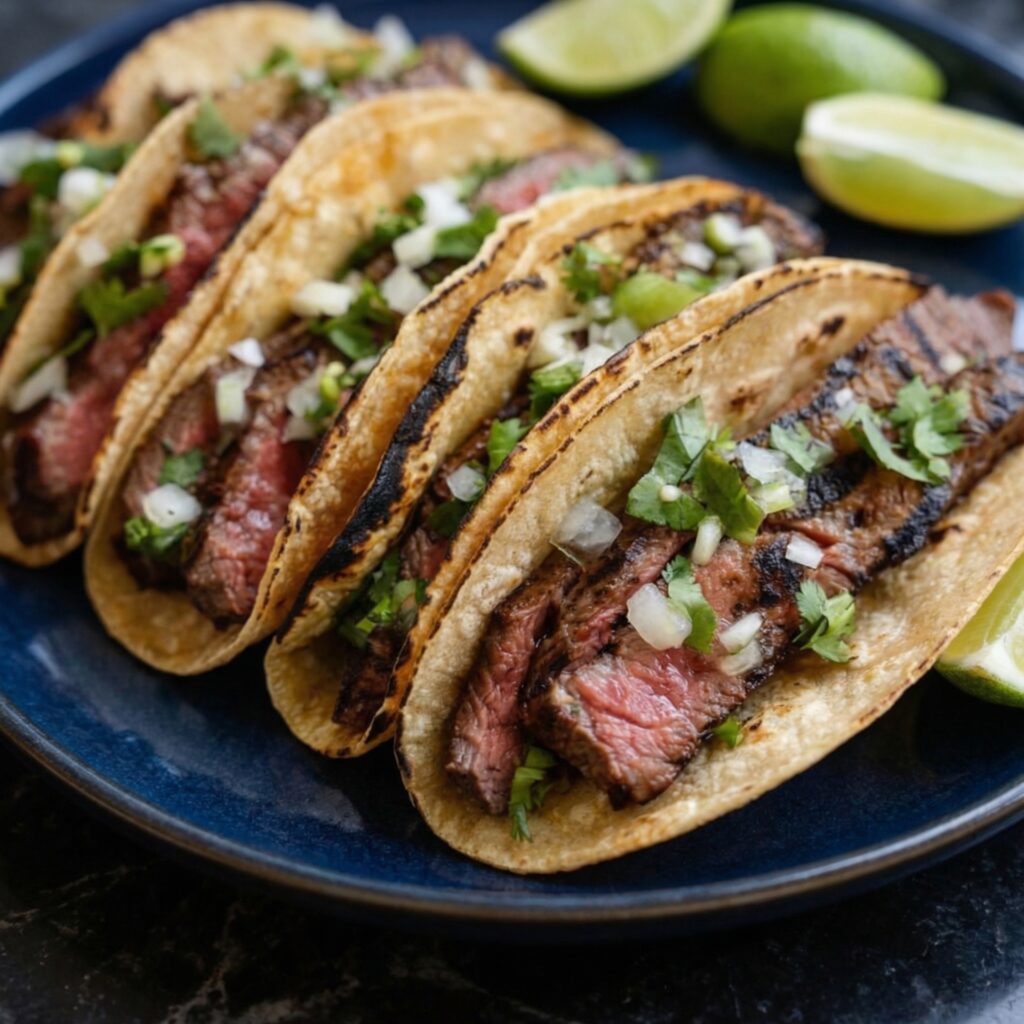
    Step 6: Slice Against the Grain

    This step is crucial. Identify the direction of the muscle fibers (the “grain”) and slice thinly across it.

    Cutting against the grain shortens the muscle fibers, making each bite significantly more tender.

    Use a sharp knife and slice at a slight angle for beautiful, restaurant-style pieces.


    Step 7: Serve and Enjoy

    Carne asada is incredibly versatile. Serve it:

    • In warm tortillas topped with diced onion and cilantro
    • Over rice with black beans and grilled vegetables
    • On a salad with avocado and fresh lime dressing
    • Alongside grilled corn and salsa

    A squeeze of fresh lime over the top brightens everything beautifully.


    Pro Tips for Perfect Carne Asada

    • High heat is key. You want a quick sear that locks in juices.
    • Don’t overcook. Lean cuts can become tough if cooked past medium.
    • Marinate properly. Even a few hours makes a big difference in flavor.
    • Slice thinly. Thin slices enhance tenderness and texture.
    • Use charcoal if possible. It adds authentic smoky flavor.

    Flavor Variations

    Once you master the classic version, try these creative twists:

    • Smoky Chipotle: Add minced chipotle peppers in adobo sauce to the marinade.
    • Beer Marinade: Replace some orange juice with Mexican lager for depth.
    • Garlic Lover’s Version: Double the garlic for bold flavor.
    • Spicy Kick: Add crushed red pepper flakes or extra jalapeño.

    Make-Ahead and Storage

    Leftover carne asada can be stored in an airtight container in the refrigerator for up to 4 days. Reheat gently in a skillet over medium heat to prevent overcooking.

    It also freezes well for up to 2 months. Slice before freezing for easier portioning.


    Why This Recipe Works

    The magic of carne asada lies in balance. The citrus tenderizes while adding brightness. The garlic and spices provide warmth and depth. High-heat grilling locks in juices and creates irresistible charred edges.

    It’s simple, bold, and endlessly customizable—everything great grilling should be.


    Final Thoughts

    Carne asada is more than just grilled steak—it’s a celebration of bold flavors, vibrant ingredients, and the joy of cooking over fire. With a well-balanced marinade, high heat, and proper slicing technique, you can create a restaurant-quality dish right in your backyard or kitchen.

    Whether you’re hosting a summer cookout or craving taco night with serious flavor, this carne asada recipe will quickly become a favorite. Fire up the grill, gather your toppings, and enjoy every juicy, citrus-kissed bite.

  • Saucy, Cheesy, and Irresistible: The Ultimate Homemade Beef Enchiladas

    Saucy, Cheesy, and Irresistible: The Ultimate Homemade Beef Enchiladas

    There’s nothing quite like a bubbling dish of Beef Enchiladas fresh from the oven.

    Tender tortillas wrapped around savory, seasoned beef, smothered in rich enchilada sauce, and topped with melty cheese—this is comfort food at its finest.

    Whether you’re cooking for a family dinner, meal prepping for the week, or hosting friends, beef enchiladas are always a crowd-pleaser.

    This step-by-step guide will walk you through creating flavorful, authentic-style beef enchiladas right in your own kitchen.


    Why You’ll Love This Recipe

    • Hearty and satisfying
    • Packed with bold, savory flavor
    • Perfect for feeding a crowd
    • Easy to customize
    • Great for leftovers and meal prep

    With simple ingredients and clear steps, you’ll have a delicious tray of enchiladas ready in under an hour.


    Ingredients You’ll Need

    For the Beef Filling:

    • 1 pound ground beef
    • 1 small onion, finely diced
    • 2 cloves garlic, minced
    • 1 tablespoon chili powder
    • 1 teaspoon ground cumin
    • ½ teaspoon smoked paprika
    • ½ teaspoon salt
    • ¼ teaspoon black pepper
    • ½ cup tomato sauce

    For Assembly:

    • 8 small flour or corn tortillas
    • 2 cups red enchilada sauce (store-bought or homemade)
    • 2 cups shredded Mexican blend or cheddar cheese
    • Optional: chopped cilantro, sliced jalapeños, sour cream

    Step 1: Preheat the Oven

    Preheat your oven to 375°F (190°C). Lightly grease a 9×13-inch baking dish with cooking spray or a thin layer of oil to prevent sticking.


    Step 2: Prepare the Beef Filling

    In a large skillet over medium heat, add the ground beef. Break it apart with a wooden spoon and cook until browned, about 5–7 minutes.

    Add the diced onion and cook for another 3–4 minutes until softened. Stir in the minced garlic and cook for 30 seconds until fragrant.

    Drain any excess grease from the pan to prevent the enchiladas from becoming oily.


    Step 3: Season the Meat

    Add chili powder, cumin, smoked paprika, salt, and black pepper to the skillet. Stir well to evenly coat the beef.

    Pour in ½ cup tomato sauce and stir to combine. Let the mixture simmer for 3–5 minutes until slightly thickened and flavorful. Remove from heat.

    The filling should be moist but not watery.


    Step 4: Warm the Tortillas

    Warming tortillas prevents cracking when rolling.

    You can:

    • Wrap them in a damp paper towel and microwave for 30 seconds, or
    • Lightly heat each tortilla in a dry skillet for 10–15 seconds per side

    Keep them covered to stay warm and pliable.


    Step 5: Prepare the Baking Dish

    Spread about ½ cup of enchilada sauce evenly across the bottom of the prepared baking dish. This prevents sticking and adds flavor to the base layer.


    Step 6: Fill and Roll the Enchiladas

    Lay one tortilla flat on a clean surface. Spoon about 2–3 tablespoons of the beef filling down the center. Sprinkle a small handful of cheese over the filling.

    Roll the tortilla tightly and place it seam-side down in the baking dish.

    Repeat with the remaining tortillas, arranging them snugly side by side.


    Step 7: Add Sauce and Cheese

    Pour the remaining enchilada sauce evenly over the rolled tortillas, making sure they’re fully covered. This keeps them moist while baking.

    Sprinkle the remaining shredded cheese generously over the top.


    Step 8: Bake to Perfection

    Cover the baking dish loosely with foil and bake for 20 minutes.

    Remove the foil and bake for another 10–15 minutes, or until the cheese is melted, bubbly, and slightly golden.

    For extra browning, broil for 1–2 minutes at the end—but watch carefully to avoid burning.


    Step 9: Let Them Rest

    Allow the enchiladas to rest for 5–10 minutes after removing them from the oven. This helps the filling set and makes serving easier.


    Step 10: Garnish and Serve

    Top with chopped cilantro, sliced jalapeños, or a dollop of sour cream for added freshness and contrast.

    Serve with:

    • Mexican rice
    • Refried beans
    • Guacamole
    • A crisp side salad

    Flavor and Texture Highlights

    • Tender tortillas soaked in savory sauce
    • Juicy, seasoned beef filling
    • Melted, gooey cheese topping
    • Rich, slightly spicy enchilada sauce

    Every bite is a balance of warmth, spice, and cheesy comfort.


    Tips for the Best Beef Enchiladas

    Don’t skip warming the tortillas. Cold tortillas crack easily when rolled.

    Use enough sauce. Dry enchiladas can ruin the dish—be generous but not excessive.

    Drain excess grease. This prevents a greasy final result.

    Customize the spice level. Add diced green chilies or extra chili powder for more heat.

    Make ahead. Assemble the enchiladas, cover tightly, and refrigerate up to 24 hours before baking. Add 5–10 extra minutes to bake time if starting cold.


    Optional Variations

    • Add Beans: Mix black beans into the beef filling.
    • Vegetable Boost: Add sautéed bell peppers or corn.
    • Creamy Version: Stir 2 tablespoons of cream cheese into the beef mixture.
    • Green Enchiladas: Swap red sauce for green enchilada sauce.
    • Low-Carb Option: Use low-carb tortillas or wrap filling in thin grilled zucchini slices.

    Storage and Reheating

    Store leftovers in an airtight container in the refrigerator for up to 4 days.

    Reheat:

    • In the oven at 350°F (175°C) for 15 minutes
    • Or microwave individual portions for 1–2 minutes

    Enchiladas also freeze beautifully. Wrap tightly and freeze for up to 2 months. Thaw overnight before reheating.


    Why This Recipe Works

    This beef enchilada recipe balances moisture, flavor, and texture perfectly. The seasoned beef creates a savory base, the sauce keeps everything tender, and the cheese adds richness and comfort. Baking allows the tortillas to absorb flavor while staying soft and cohesive.

    It’s hearty without being heavy, flavorful without being overpowering, and simple enough for a weeknight meal while impressive enough for guests.


    With its rich sauce, savory beef, and gooey melted cheese, this Beef Enchiladas recipe is guaranteed to become a family favorite. Once you master the basic technique, you can experiment with fillings, sauces, and toppings to make it your own.

    Warm, comforting, and packed with flavor—this is homemade enchilada perfection.