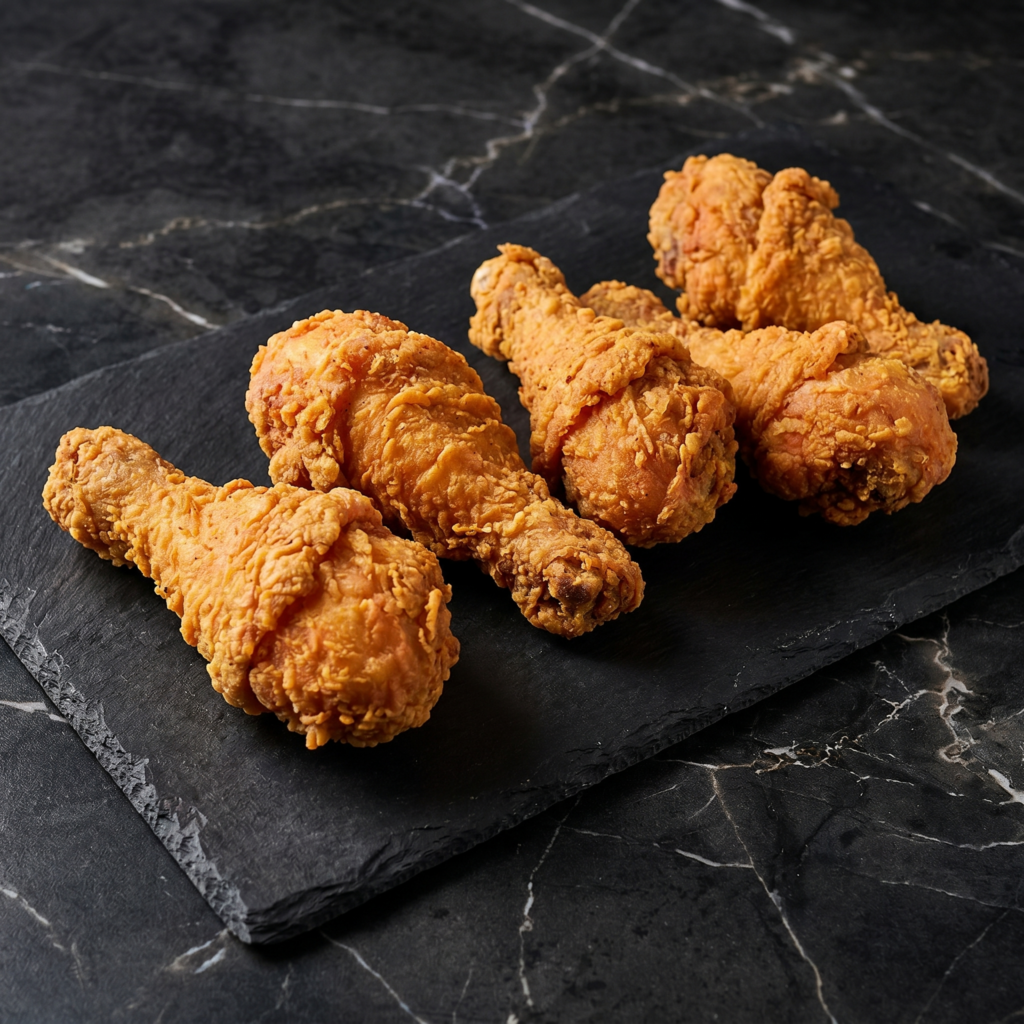
Great fried chicken is a treasure. A crust that crackles when you bite into it. Meat that’s still juicy underneath. No greasy aftertaste.
This recipe delivers all of that. Buttermilk brine tenderizes, double dredge builds the crunch, and the spice blend brings the heat. Make extra. You’ll need it.
Ingredients
Serves 4-6.
3 lbs chicken pieces (drumsticks, thighs, or a mix)
2 cups buttermilk
2 cups all-purpose flour
¼ cup cornstarch (extra crunch!)
2 large eggs
Oil for frying (peanut or vegetable)
Spice Blend:
2 teaspoons salt
2 teaspoons paprika
1 teaspoon garlic powder
1 teaspoon onion powder
1 teaspoon black pepper
½ teaspoon cayenne (optional, for heat)
Step-by-Step Instructions
Step 1: Brine the Chicken
In a bowl, combine chicken and buttermilk with 1 teaspoon of the spice blend.
Cover and refrigerate for at least 4 hours (overnight is better).
Step 2: Make the Dredge
In a large bowl, whisk flour, cornstarch, and remaining spice blend.
In another bowl, beat the eggs.
Step 3: Double Dredge
Remove chicken from buttermilk, letting excess drip off.
Dip in flour mixture, then egg, then flour mixture again. Press firmly.
Step 4: Fry to Golden Glory
Heat 1-2 inches of oil in a Dutch oven to 350°F (175°C).
Fry chicken in batches (don’t crowd) for 12-15 minutes, turning occasionally.
Internal temp should reach 165°F. Drain on a wire rack (not paper towels—keeps crunch).
Step 5: Serve Hot
Sprinkle with a little extra salt. Serve with pickles, slaw, or biscuits. Then fight over the last drumstick.
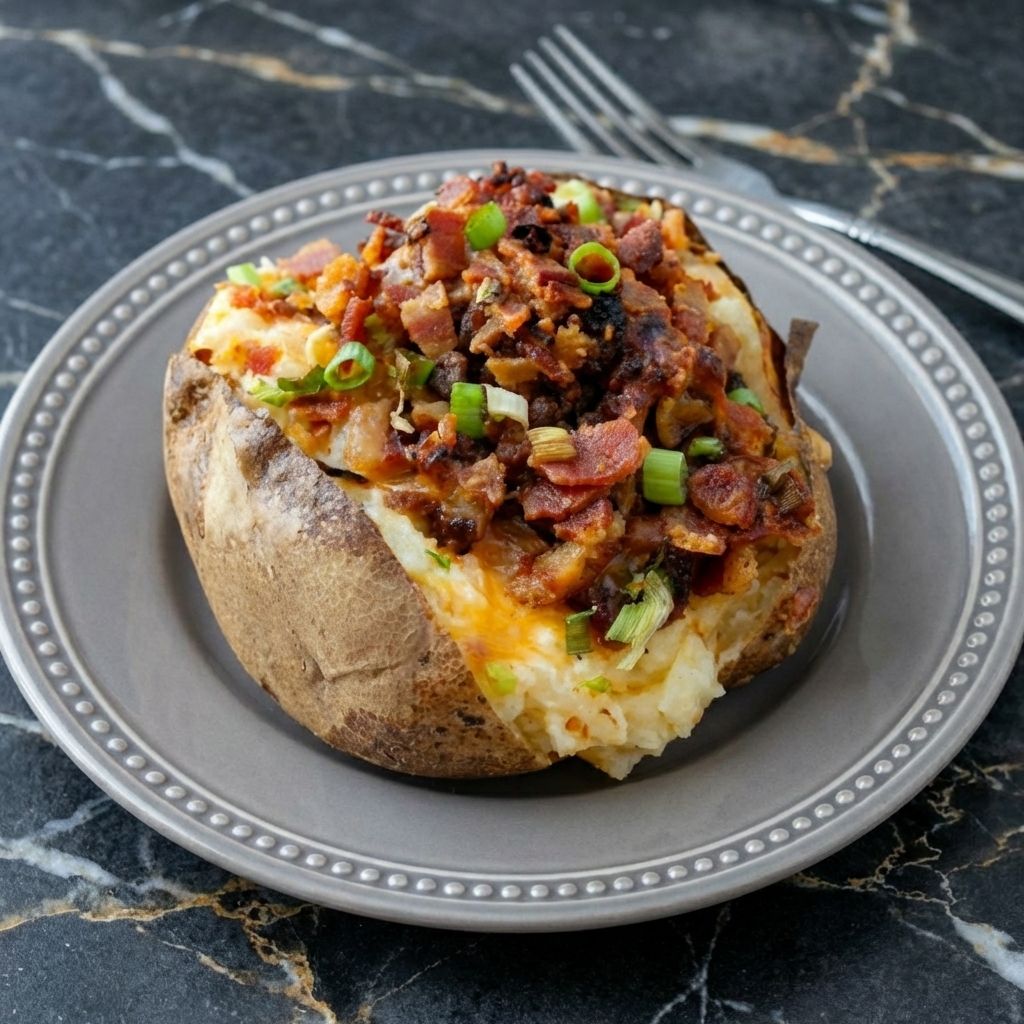
The baked potato is humble. The loaded baked potato? That’s a star. A perfectly baked potato with a crispy, salty skin and a fluffy, steam-in-the-oven interior, split open and stuffed with all the good stuff—melty cheddar, crispy bacon, cool sour cream, and fresh chives.
This is the kind of meal that asks very little of you but delivers everything. It’s a blank canvas for whatever you have in the fridge, but the classics are classic for a reason. Butter, cheese, bacon, and a dollop of sour cream. Maybe some broccoli if you’re feeling virtuous. Dinner is served.
Ingredients
Serves 4.
For the Potatoes:
4 large russet potatoes (the best for baking—high starch = fluffy interior)
1 tbsp olive oil (for rubbing)
1 tsp coarse salt (for the skin)
For the Toppings Bar:
1½ cups shredded sharp cheddar cheese
8 slices bacon, cooked crispy and crumbled
1 cup sour cream
4 tbsp unsalted butter (1 tbsp per potato, minimum)
¼ cup fresh chives or green onions, chopped
Salt and black pepper, to taste
Optional Toppings (Because Why Not?):
Steamed broccoli florets
Chili (for a fully loaded meal)
Pickled jalapeños
Hot sauce
Extra cheese (always extra cheese)
Step-by-Step Instructions
Step 1: Preheat and Prep
Preheat your oven to 400°F (200°C). Scrub potatoes clean and dry thoroughly.
Poke each potato several times with a fork. This lets steam escape so they don’t explode in your oven.
Rub each potato with olive oil and sprinkle generously with coarse salt. The oil helps the skin crisp up; the salt makes it delicious.
Step 2: Bake the Potatoes
Place potatoes directly on the oven rack (with a baking sheet on the rack below to catch any drips). This allows air to circulate and gives you crispy skin all around.
Bake for 50-60 minutes until the skin is crisp and a knife slides in easily with no resistance.
For extra fluffy potatoes, let them rest for 10 minutes before handling.
Step 3: Prep the Toppings
While potatoes bake, cook your bacon until crispy, then crumble or chop.
Shred the cheese (freshly shredded melts better than pre-shredded).
Chop your chives and set up a toppings bar if serving family-style.
Step 4: Open and Fluff
Transfer hot potatoes to a plate. Using a sharp knife, slice each potato lengthwise down the middle, but not all the way through—you want to open it like a book.
Gently squeeze the ends to push the potato open and expose the fluffy interior.
Use a fork to fluff the inside, breaking it up a bit. This creates more surface area for butter and toppings.
Step 5: Build Your Masterpiece
Drop a pat of butter into each potato and let it melt into the fluffy interior. Sprinkle with a pinch of salt and pepper.
Pile on the shredded cheddar—it will melt from the residual heat.
Sprinkle with crispy bacon and fresh chives.
Top with a generous dollop of sour cream.
Step 6: Serve Immediately
Serve hot with extra toppings on the side for those who want more.
Take a bite that includes crispy skin, fluffy potato, melted cheese, and bacon all at once. Close your eyes. This is peak comfort.
Store leftover baked potatoes (without toppings) in the fridge for up to 4 days. Store toppings separately.
Reheating:
Oven method (best): 350°F for 15-20 minutes until heated through and skin re-crisps. Air fryer: 375°F for 5-7 minutes. Microwave: Works in a pinch, but skin will be soft. Split, add butter, and reheat in 60-second bursts.
Make Ahead:
You can bake potatoes up to 2 days in advance. Store in the fridge, then reheat in a 400°F oven for 10-15 minutes before serving. Or use leftovers for twice-baked potatoes—just scoop out the insides, mix with toppings, stuff back in, and bake until golden.
Pro Tips for Potato Perfection:
Russets are non-negotiable. Waxy potatoes (red, Yukon) won’t give you that fluffy interior.
Salt the skin. It’s not just for show—it seasons the potato and helps the skin crisp.
Don’t wrap in foil. Foil steams the potato instead of baking it. You want dry heat for crispy skin.
Use a wire rack or oven rack. Air circulation is key to even cooking.
Freshly shredded cheese melts better. Anti-caking agents in pre-shredded cheese mess with meltability.
Potato Bar Party Idea:
Set up a loaded potato bar for your next gathering. Bake a bunch of potatoes, keep them warm in a low oven, and set out bowls of toppings: cheeses, bacon, sour cream, chives, broccoli, chili, pulled pork, pickled jalapeños, hot sauces. Let everyone build their own masterpiece. It’s interactive, delicious, and way easier than catering to individual preferences.
Few dishes deliver bold, vibrant flavor quite like Carne Asada. Juicy grilled steak infused with citrus, garlic, and herbs is a staple in Mexican cuisine and a guaranteed crowd-pleaser.
Whether tucked into warm tortillas, piled onto rice bowls, or served straight off the grill with fresh salsa, carne asada is all about simple ingredients transformed through fire and marinade into something unforgettable.
If you’ve ever wondered how to get that perfectly tender, smoky, flavor-packed steak at home, this step-by-step guide will walk you through everything you need to know.
What Cut of Meat Is Best?
Traditionally, carne asada is made with flank steak or skirt steak. Both cuts are lean, flavorful, and perfect for quick, high-heat grilling.
Skirt steak tends to have a slightly beefier flavor and more tenderness when cooked properly, while flank steak is easier to find and slices beautifully when cut against the grain.
For this recipe, you’ll need about 2 pounds of flank or skirt steak.
Ingredients You’ll Need
For the Marinade:
2 pounds flank or skirt steak
½ cup fresh orange juice
¼ cup fresh lime juice
¼ cup olive oil
4 cloves garlic, minced
1 jalapeño, finely minced (optional for heat)
½ cup chopped fresh cilantro
1 teaspoon ground cumin
1 teaspoon chili powder
1 teaspoon salt
½ teaspoon black pepper
For Serving (Optional):
Warm corn or flour tortillas
Diced white onion
Fresh cilantro
Lime wedges
Salsa or guacamole
Step 1: Prepare the Marinade
In a large bowl, whisk together the orange juice, lime juice, olive oil, minced garlic, jalapeño, cilantro, cumin, chili powder, salt, and black pepper.
The citrus juices help tenderize the meat while infusing it with bright flavor.
Olive oil carries the spices evenly across the surface of the steak.
Step 2: Marinate the Steak
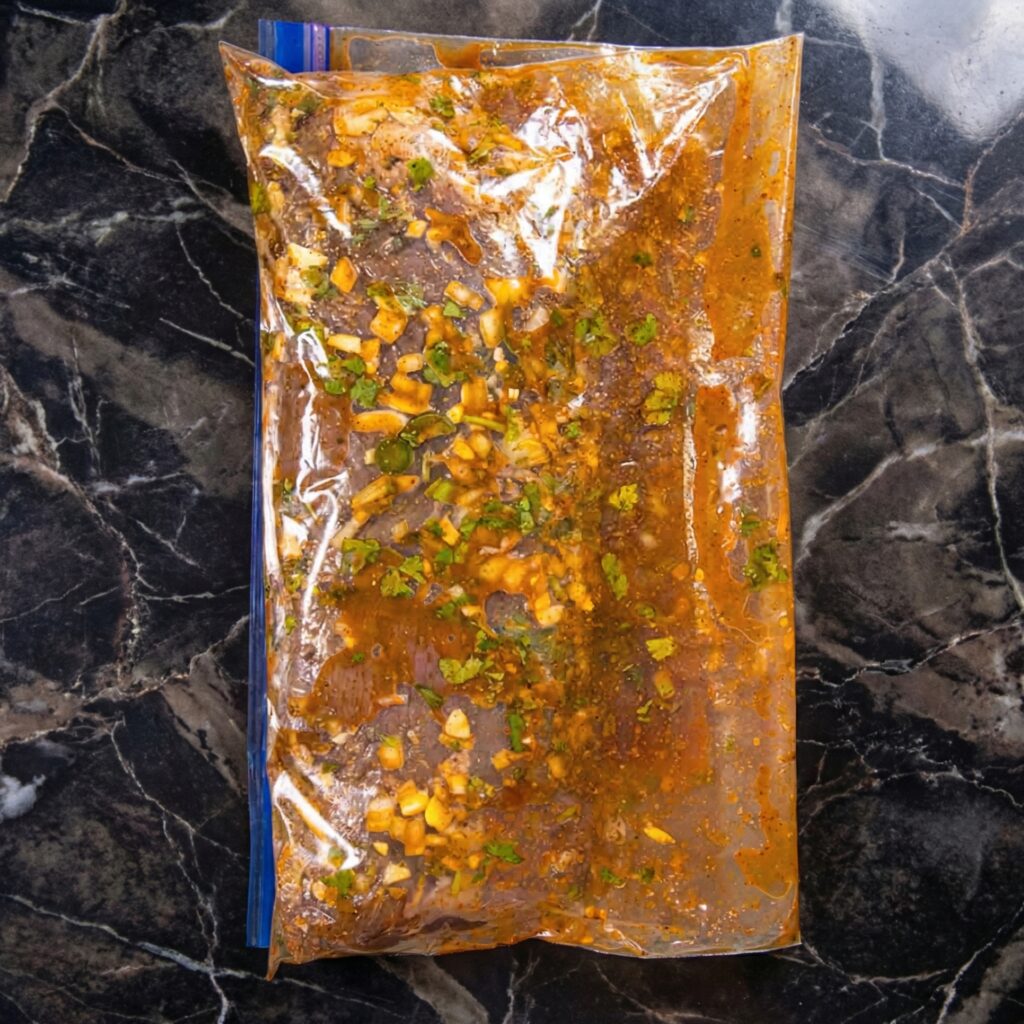
Place the steak in a large resealable plastic bag or shallow dish. Pour the marinade over the meat, ensuring it is fully coated.
Seal or cover and refrigerate for at least 2 hours, but ideally 4–8 hours for deeper flavor.
Avoid marinating longer than 12 hours, as the citrus can begin to break down the meat too much and affect texture.
Step 3: Bring the Meat to Room Temperature
Remove the steak from the refrigerator about 30 minutes before cooking.
Allowing the meat to come to room temperature promotes even cooking and a better sear.
Meanwhile, preheat your grill to high heat (about 450–500°F).
If using a stovetop, heat a cast iron skillet over high heat until very hot.
Step 4: Grill the Carne Asada
Remove the steak from the marinade and let any excess drip off. Discard the remaining marinade.
Place the steak directly on the hot grill.
Cook for 3–5 minutes per side, depending on thickness and desired doneness.
Carne asada is best served medium-rare to medium for maximum tenderness.
Avoid moving the steak too much—let it develop a deep, caramelized crust before flipping.
Step 5: Rest the Steak
Once cooked, transfer the steak to a cutting board and tent loosely with foil.
Let it rest for 10 minutes. Resting allows the juices to redistribute throughout the meat, ensuring every slice is juicy and flavorful.
Skipping this step can result in dry steak, as the juices will run out when cut too soon.
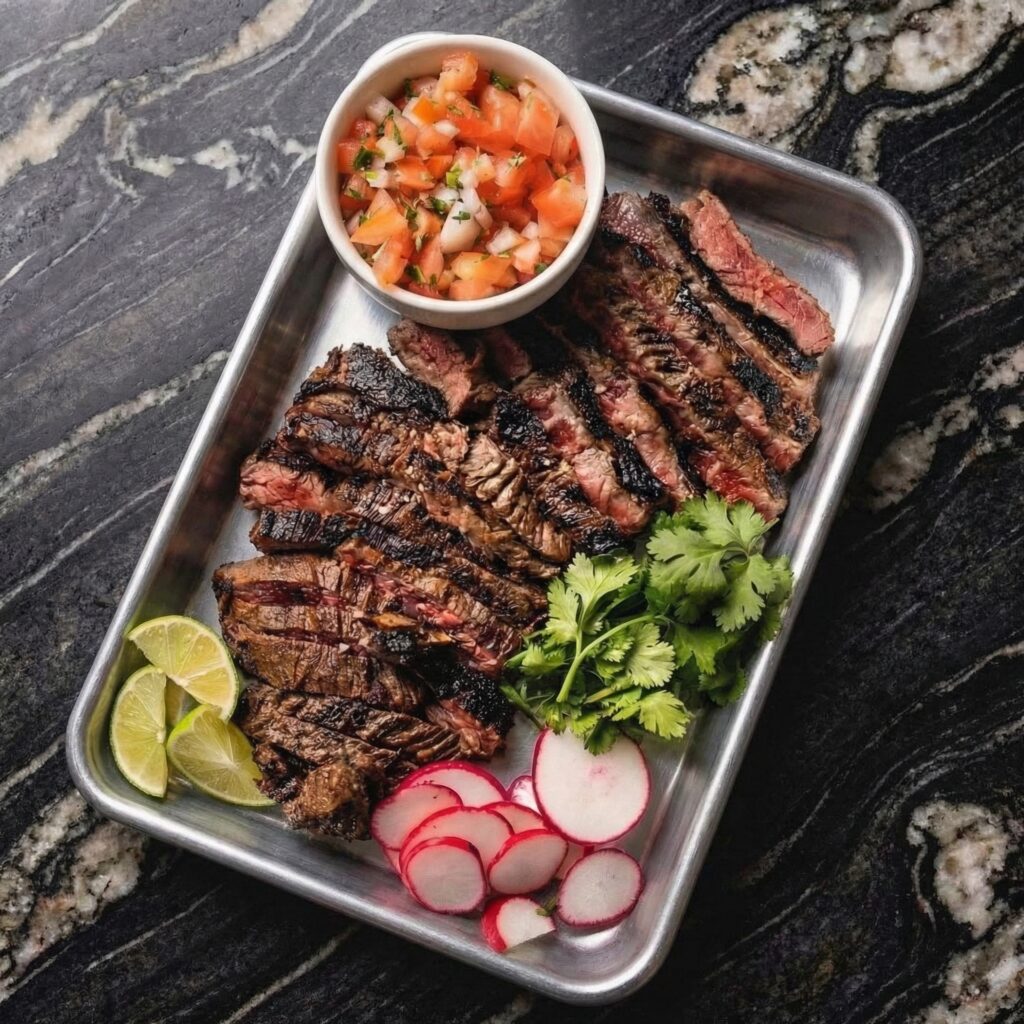
Step 6: Slice Against the Grain
This step is crucial. Identify the direction of the muscle fibers (the “grain”) and slice thinly across it.
Cutting against the grain shortens the muscle fibers, making each bite significantly more tender.
Use a sharp knife and slice at a slight angle for beautiful, restaurant-style pieces.
Step 7: Serve and Enjoy
Carne asada is incredibly versatile. Serve it:
In warm tortillas topped with diced onion and cilantro
Over rice with black beans and grilled vegetables
On a salad with avocado and fresh lime dressing
Alongside grilled corn and salsa
A squeeze of fresh lime over the top brightens everything beautifully.
Pro Tips for Perfect Carne Asada
High heat is key. You want a quick sear that locks in juices.
Don’t overcook. Lean cuts can become tough if cooked past medium.
Marinate properly. Even a few hours makes a big difference in flavor.
Slice thinly. Thin slices enhance tenderness and texture.
Use charcoal if possible. It adds authentic smoky flavor.
Flavor Variations
Once you master the classic version, try these creative twists:
Smoky Chipotle: Add minced chipotle peppers in adobo sauce to the marinade.
Beer Marinade: Replace some orange juice with Mexican lager for depth.
Garlic Lover’s Version: Double the garlic for bold flavor.
Spicy Kick: Add crushed red pepper flakes or extra jalapeño.
Make-Ahead and Storage
Leftover carne asada can be stored in an airtight container in the refrigerator for up to 4 days. Reheat gently in a skillet over medium heat to prevent overcooking.
It also freezes well for up to 2 months. Slice before freezing for easier portioning.
Why This Recipe Works
The magic of carne asada lies in balance. The citrus tenderizes while adding brightness. The garlic and spices provide warmth and depth. High-heat grilling locks in juices and creates irresistible charred edges.
It’s simple, bold, and endlessly customizable—everything great grilling should be.
Final Thoughts
Carne asada is more than just grilled steak—it’s a celebration of bold flavors, vibrant ingredients, and the joy of cooking over fire. With a well-balanced marinade, high heat, and proper slicing technique, you can create a restaurant-quality dish right in your backyard or kitchen.
Whether you’re hosting a summer cookout or craving taco night with serious flavor, this carne asada recipe will quickly become a favorite. Fire up the grill, gather your toppings, and enjoy every juicy, citrus-kissed bite.
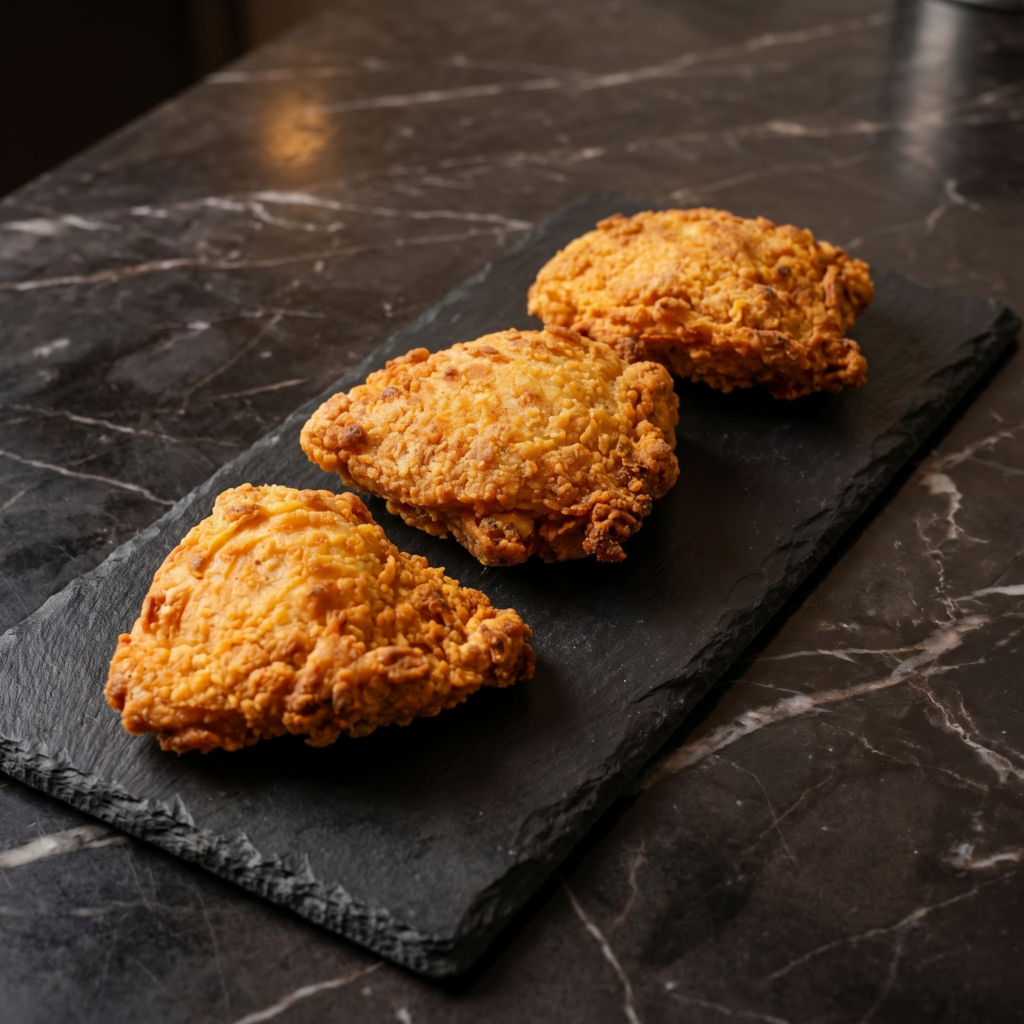
If you’re looking for a dish that feels restaurant-worthy but is completely doable in your own kitchen, Chicken Cordon Bleu is the answer.
This classic recipe features tender chicken breasts stuffed with savory ham and melted cheese, then breaded and baked (or fried) until golden and crisp. Slice into it, and you’re rewarded with a gooey, cheesy center wrapped in juicy chicken and a crunchy crust.
Despite its elegant appearance, Chicken Cordon Bleu is surprisingly straightforward when broken down step by step. Let’s walk through exactly how to make it perfectly every time.
Why You’ll Love This Chicken Cordon Bleu
Crispy golden exterior
Gooey, melty cheese center
Juicy, tender chicken
Impressive presentation
Perfect for special dinners or family meals
This dish combines textures and flavors beautifully—salty ham, creamy cheese, and seasoned chicken all in one satisfying bite.
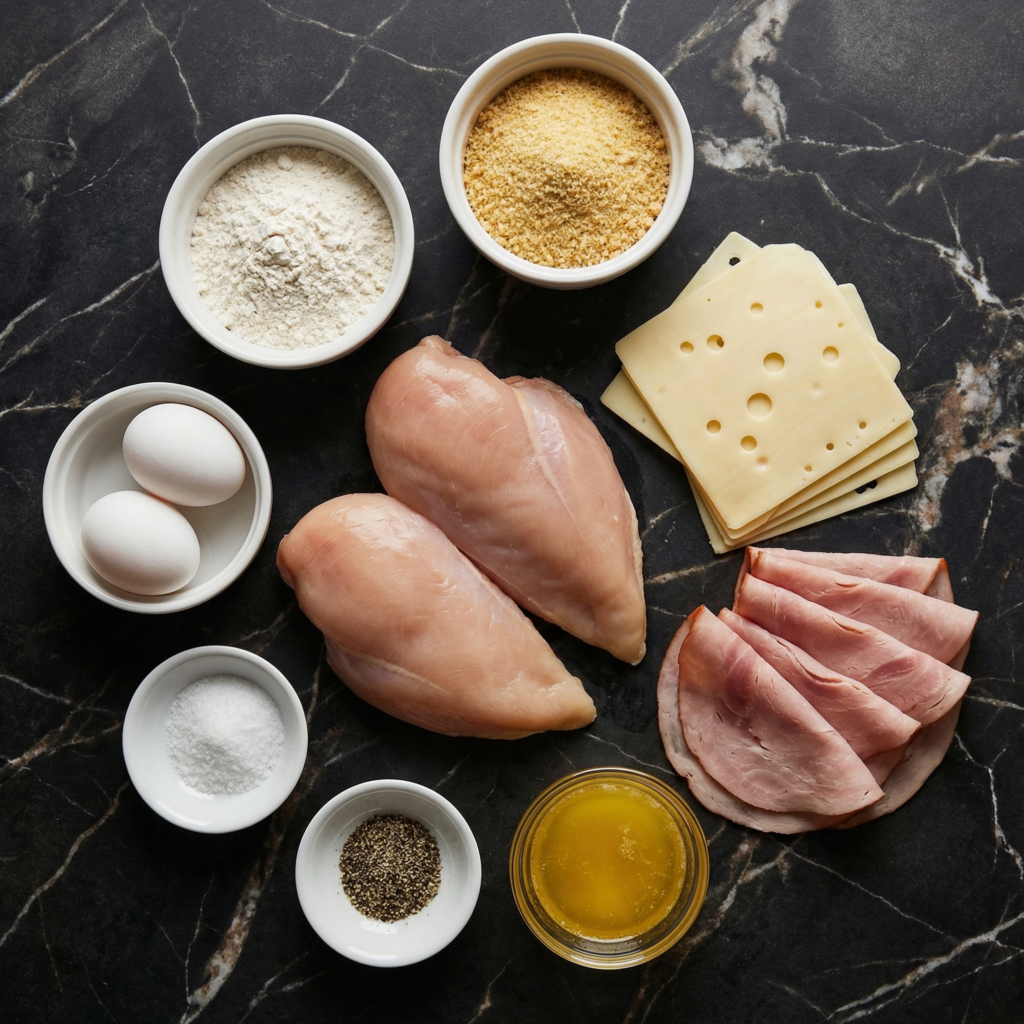
Ingredients You’ll Need
For the Chicken:
4 boneless, skinless chicken breasts
Salt and black pepper, to taste
4 slices deli ham
4 slices Swiss cheese (or Gruyère)
For the Breading:
1 cup all-purpose flour
2 large eggs
1 cup breadcrumbs (panko or regular)
½ teaspoon garlic powder
½ teaspoon paprika
For Cooking:
2 tablespoons olive oil or melted butter
Optional Cream Sauce:
2 tablespoons butter
2 tablespoons flour
1 cup milk
½ cup chicken broth
½ teaspoon Dijon mustard
Salt and pepper to taste
Step 1: Prepare the Chicken
Place each chicken breast between two sheets of plastic wrap. Using a meat mallet or rolling pin, gently pound the chicken to about ¼-inch thickness.
Pounding ensures even cooking and makes rolling easier. Be careful not to tear the meat.
Season both sides lightly with salt and pepper.
Step 2: Add the Filling
Lay one slice of ham and one slice of Swiss cheese on each flattened chicken breast.
Keep the filling centered and avoid placing it too close to the edges to prevent leakage during cooking.
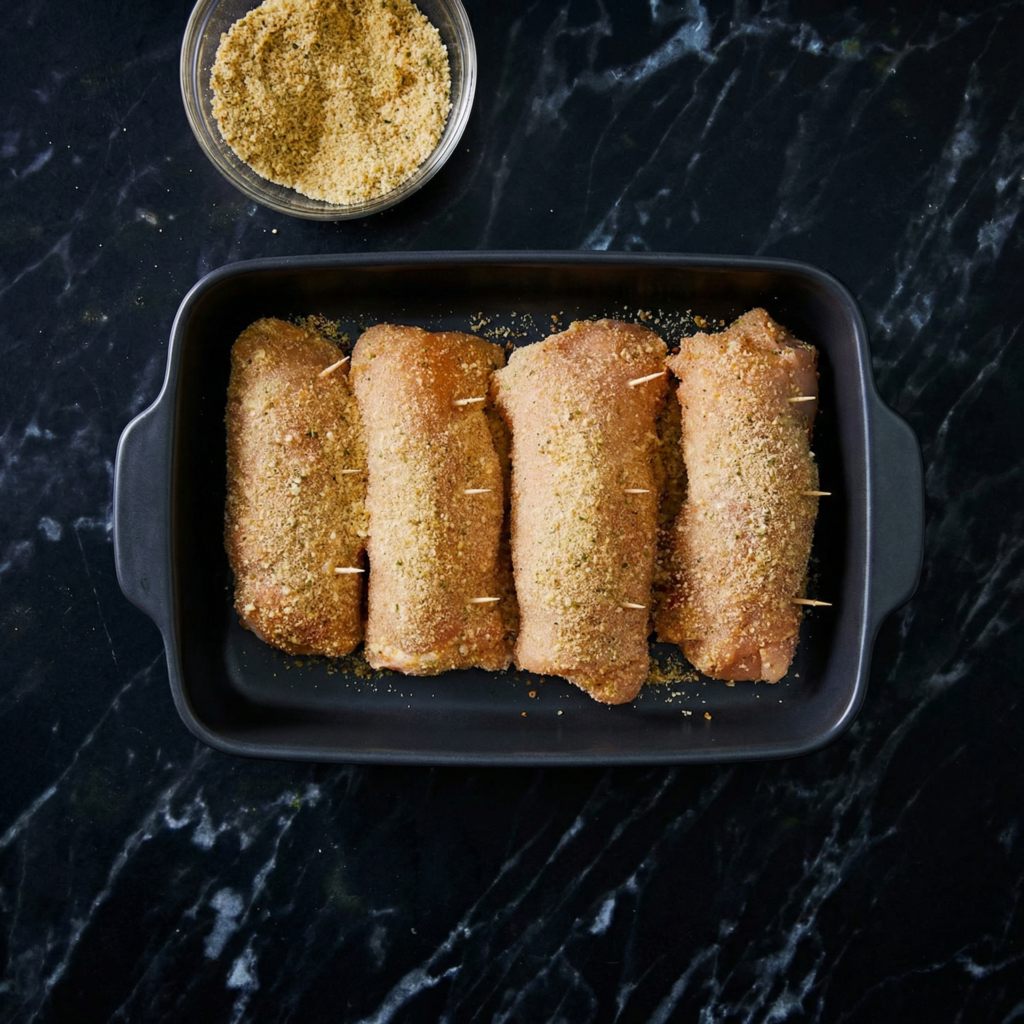
Step 3: Roll and Secure
Starting from the narrower end, tightly roll each chicken breast into a log shape.
Secure with toothpicks if necessary to keep everything tightly wrapped.
Place the rolled chicken seam-side down while preparing the breading station.
Step 4: Set Up the Breading Station
Prepare three shallow bowls:
Bowl 1: Flour
Bowl 2: Beaten eggs
Bowl 3: Breadcrumbs mixed with garlic powder and paprika
This three-step breading process ensures a crisp, even coating.
Step 5: Bread the Chicken
Roll each chicken piece first in flour, shaking off excess.
Next, dip into the beaten eggs, coating completely.
Finally, roll in the seasoned breadcrumbs, pressing gently so the crumbs adhere well.
Place breaded chicken on a plate or baking sheet.
Step 6: Preheat the Oven
Preheat your oven to 375°F (190°C).
Lightly grease a baking dish or line a baking sheet with parchment paper.
Step 7: Sear for Extra Crispiness (Optional but Recommended)
For a crispier crust, heat olive oil or melted butter in a skillet over medium heat.
Sear the chicken rolls for 2–3 minutes per side until lightly golden. This step enhances texture and flavor.
Transfer the seared chicken to the prepared baking dish.
Step 8: Bake Until Perfect
Bake for 25–30 minutes, or until the internal temperature reaches 165°F (74°C).
If the crust begins browning too quickly, loosely cover with foil.
Remove toothpicks carefully after baking.
Step 9: Prepare the Optional Cream Sauce
While the chicken bakes, melt butter in a small saucepan over medium heat.
Whisk in flour and cook for 1–2 minutes to remove raw taste.
Slowly whisk in milk and chicken broth, stirring constantly until thickened.
Add Dijon mustard, salt, and pepper. Simmer gently until smooth and creamy.
Step 10: Rest and Serve
Allow the chicken to rest for 5 minutes before slicing. Resting helps the juices redistribute and keeps the chicken moist.
Slice into rounds to reveal the beautiful spiral of ham and melted cheese.
Drizzle with cream sauce if desired and serve immediately.
Flavor and Texture Highlights
Crisp, golden breadcrumb crust
Tender, juicy chicken
Salty ham with creamy, melted cheese
Smooth, slightly tangy mustard cream sauce
Each bite offers crunch on the outside and rich, savory comfort on the inside.
Tips for Perfect Chicken Cordon Bleu
Pound evenly. Uneven thickness leads to uneven cooking.
Roll tightly. This prevents cheese from leaking out.
Secure well. Toothpicks help maintain shape during cooking.
Use good-quality cheese. Swiss or Gruyère melts beautifully and adds depth.
Don’t overbake. Overcooking dries out the chicken.
Optional Variations
Air Fryer Version: Cook at 375°F for 18–20 minutes, flipping halfway.
Spicy Twist: Add a thin layer of Dijon mustard inside before rolling.
Herb Crust: Mix dried thyme or parsley into breadcrumbs.
Prosciutto Upgrade: Substitute ham with prosciutto for a more refined flavor.
Low-Carb Option: Replace breadcrumbs with crushed pork rinds or almond flour.
Storage and Reheating
Store leftovers in an airtight container in the refrigerator for up to 3 days.
Reheat in a 350°F (175°C) oven for 10–15 minutes to maintain crispness. Avoid microwaving if possible, as it softens the crust.
Why This Recipe Works
Chicken Cordon Bleu succeeds because it balances texture and flavor. The chicken remains juicy thanks to pounding and proper baking time. The ham adds savory depth, while the melted cheese provides creamy richness. The breadcrumb coating creates a satisfying crunch that contrasts beautifully with the soft interior.
Searing before baking enhances crispness, while resting preserves moisture. The optional cream sauce adds an extra layer of indulgence without overpowering the main flavors.
With its crispy crust, tender chicken, and gooey, cheesy center, Chicken Cordon Bleu is a dish that feels luxurious yet is completely achievable at home. Whether served with roasted vegetables, mashed potatoes, or a simple green salad, it’s guaranteed to impress.
Elegant, comforting, and packed with flavor, this classic recipe will quickly become a favorite in your kitchen.
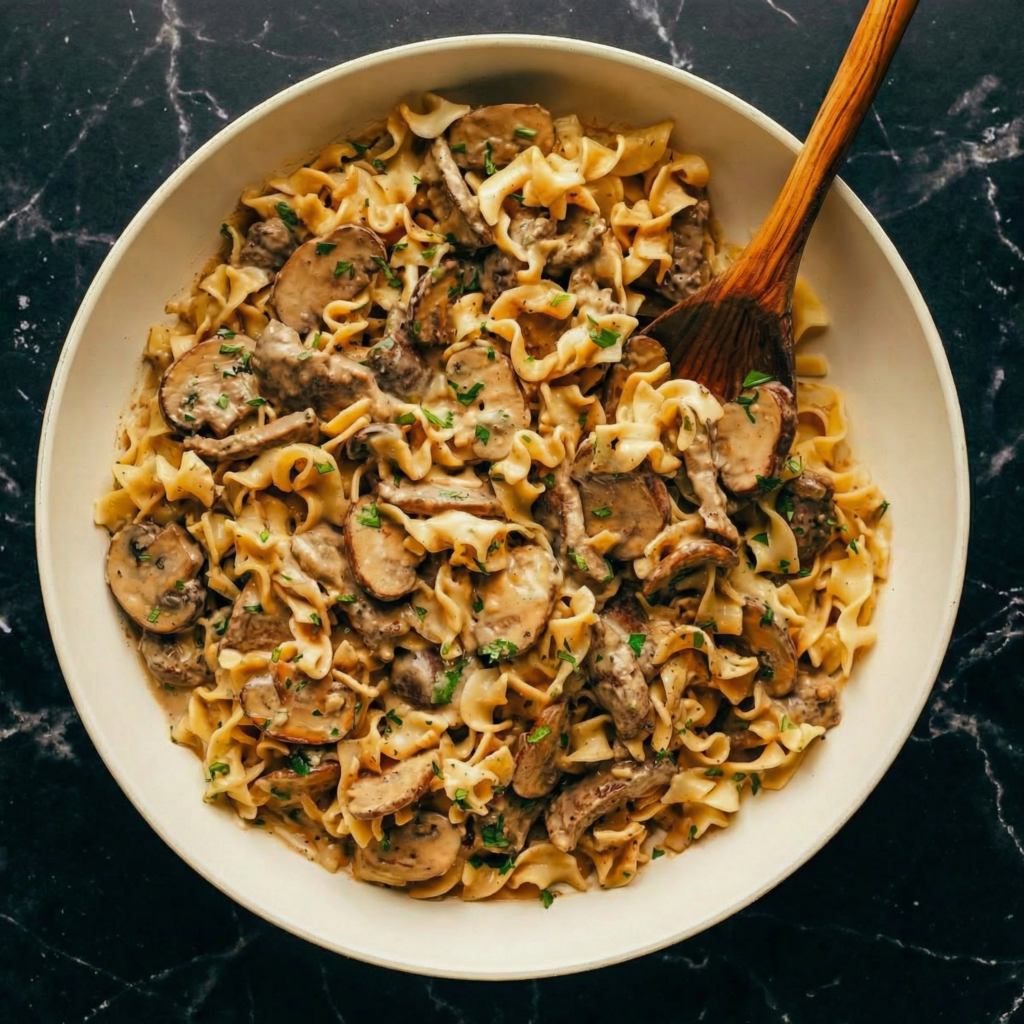
When it comes to hearty comfort food, few dishes rival the rich, creamy satisfaction of Beef Stroganoff.
Tender strips of beef, savory mushrooms, and onions simmered in a velvety sour cream sauce—served over buttery egg noodles—make this dish a timeless favorite. It’s elegant enough for guests but simple enough for a cozy weeknight dinner.
This step-by-step guide will show you exactly how to achieve perfectly tender beef and a silky, flavorful sauce every time.
Why You’ll Love This Beef Stroganoff
Rich, creamy, and deeply savory
Tender beef with perfectly cooked mushrooms
Ready in about 40 minutes
Perfect over noodles, rice, or mashed potatoes
Ideal for family dinners or special occasions
The key to an incredible stroganoff is properly searing the beef and building layers of flavor in the sauce.
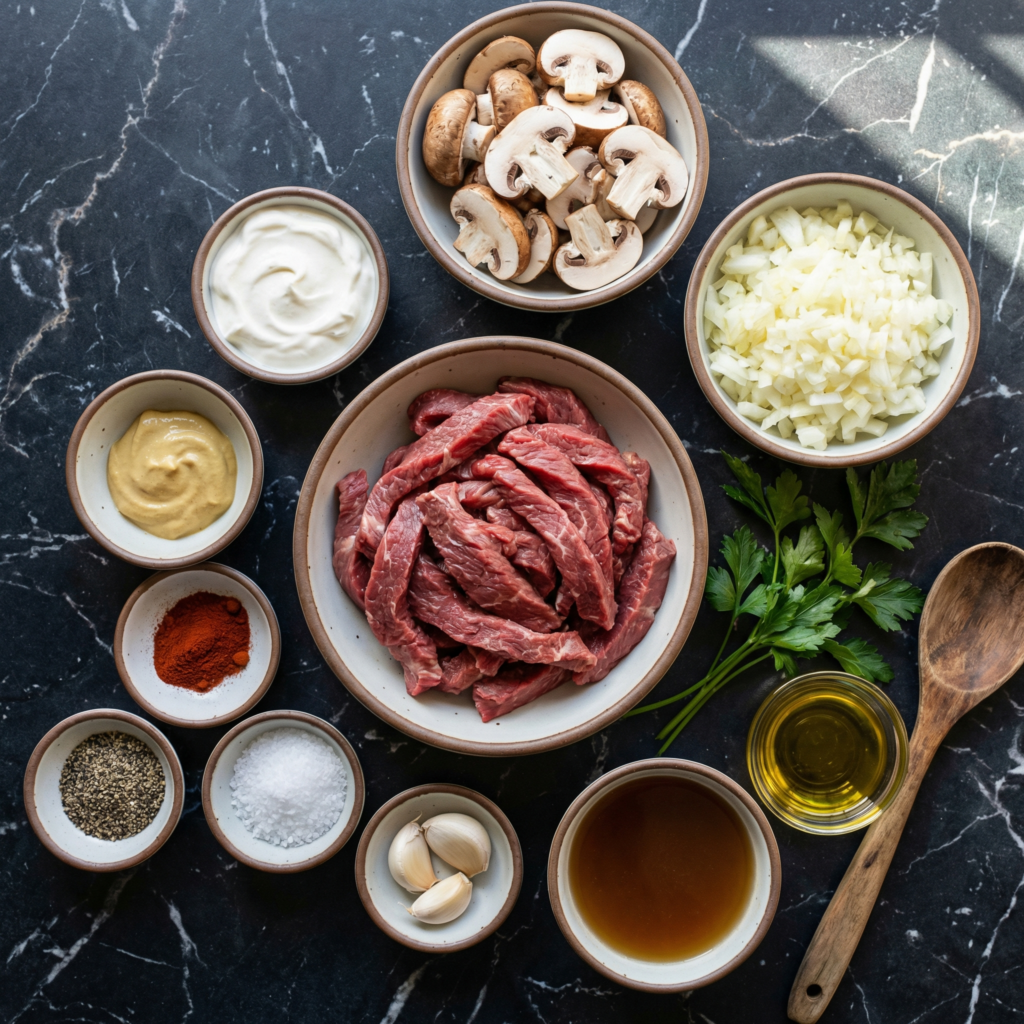
Ingredients You’ll Need
For the Stroganoff:
1 ½ pounds beef sirloin or tenderloin, thinly sliced
Salt and black pepper, to taste
2 tablespoons olive oil or butter
1 medium onion, thinly sliced
8 ounces mushrooms, sliced
2 cloves garlic, minced
2 tablespoons all-purpose flour
1 cup beef broth
1 tablespoon Worcestershire sauce
1 teaspoon Dijon mustard
1 cup sour cream
Fresh parsley, chopped (for garnish)
For Serving:
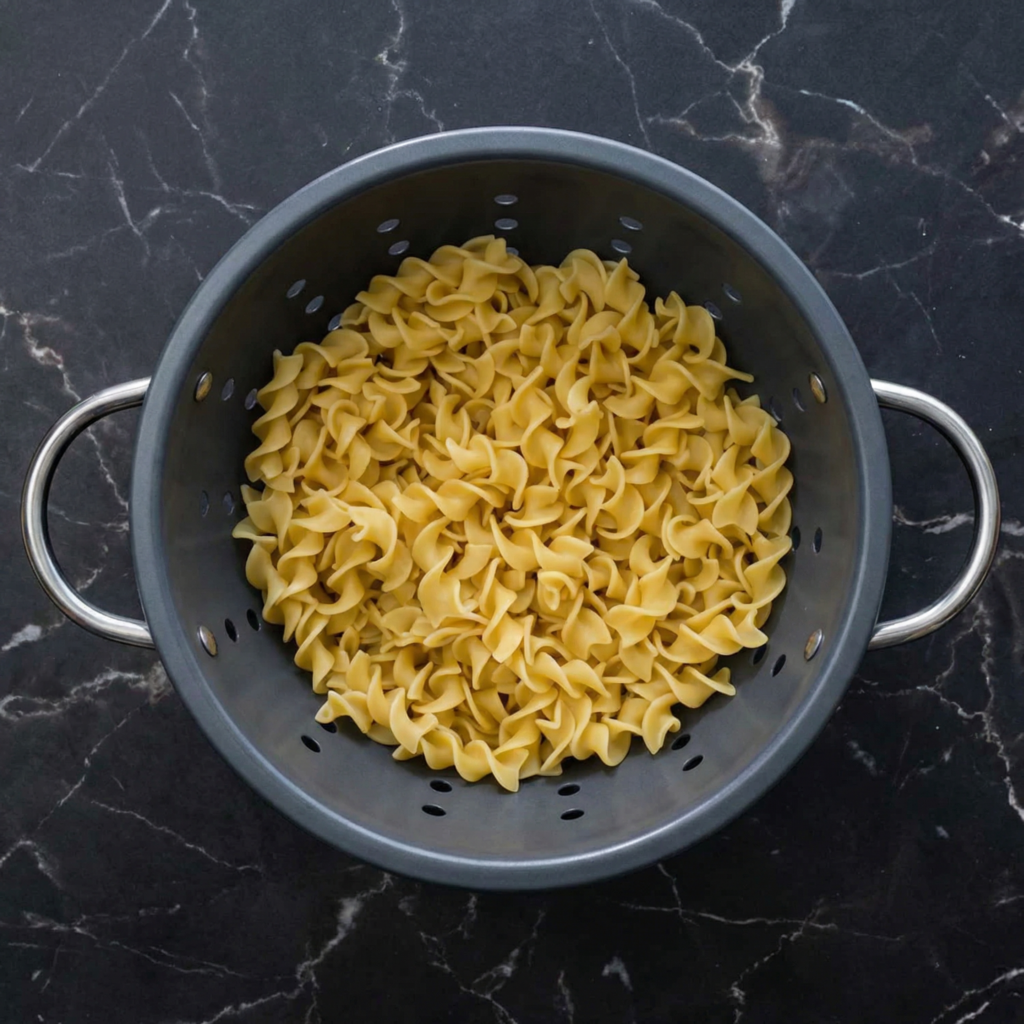
12 ounces egg noodles (or rice/mashed potatoes)
Step 1: Prepare the Beef
Slice the beef into thin strips, about ¼-inch thick. Cutting against the grain ensures tenderness.
Pat the beef dry with paper towels and season lightly with salt and black pepper. Removing excess moisture helps achieve a proper sear.
Step 2: Cook the Noodles
Bring a large pot of salted water to a boil and cook the egg noodles according to package instructions. Drain and toss lightly with butter to prevent sticking. Set aside.
Cooking the noodles early allows you to focus fully on the sauce later.
Step 3: Sear the Beef
Heat 1 tablespoon of oil or butter in a large skillet over medium-high heat.
Working in batches (to avoid overcrowding), add the beef in a single layer. Sear for about 1–2 minutes per side until browned but not fully cooked through. Remove and set aside.
Avoid overcooking at this stage—the beef will finish cooking in the sauce later.
Step 4: Sauté the Vegetables
In the same skillet, add the remaining tablespoon of oil if needed.
Add the sliced onions and cook for 3–4 minutes until softened and slightly caramelized. Stir in the mushrooms and cook for another 5–7 minutes until they release their moisture and become golden.
Add the minced garlic and cook for 30 seconds until fragrant.
These layers create the deep, savory base of the stroganoff.
Step 5: Build the Sauce
Sprinkle the flour over the mushroom mixture and stir to coat evenly. Cook for 1–2 minutes to eliminate the raw flour taste.
Slowly pour in the beef broth while stirring constantly to prevent lumps. Scrape the bottom of the pan to lift any browned bits—this adds incredible flavor.
Stir in Worcestershire sauce and Dijon mustard. Bring the mixture to a gentle simmer and let it thicken for 3–5 minutes.
Step 6: Add the Beef Back
Return the seared beef (and any accumulated juices) to the skillet. Stir gently to combine.
Simmer for 3–4 minutes, just until the beef is tender and cooked through. Avoid prolonged simmering, as it can make the beef tough.
Step 7: Stir in the Sour Cream
Reduce the heat to low and stir in the sour cream. Mix gently until fully incorporated and creamy.
Do not boil after adding sour cream, as high heat can cause it to curdle. The sauce should be smooth, rich, and velvety.
Taste and adjust seasoning with additional salt and pepper if needed.
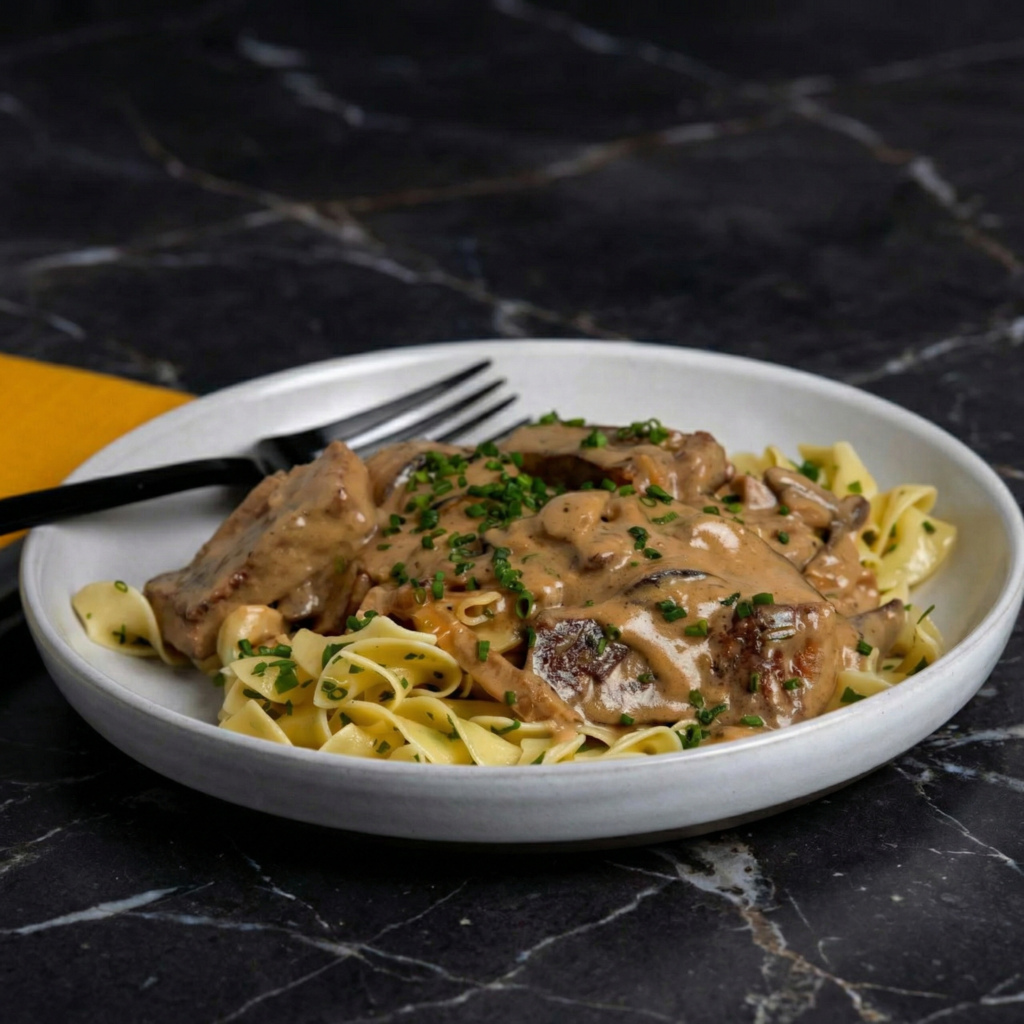
Step 8: Serve and Garnish
Spoon the beef stroganoff generously over the prepared egg noodles.
Sprinkle freshly chopped parsley on top for brightness and color.
Serve immediately while warm and creamy.
Flavor and Texture Highlights
Tender, juicy beef strips
Earthy, golden mushrooms
Silky, creamy sauce with subtle tang
Savory depth from Worcestershire and mustard
Comforting base of buttery noodles
Every bite is rich yet balanced, hearty yet elegant.
Tips for Perfect Beef Stroganoff
Choose the right cut. Sirloin or tenderloin works best for quick cooking and tenderness.
Don’t overcrowd the pan. Searing in batches ensures browning instead of steaming.
Deglaze the pan. Scraping up browned bits enhances the sauce’s flavor.
Control the heat. Keep it low after adding sour cream to maintain a smooth texture.
Slice against the grain. This is essential for tender beef.
Optional Variations
Add White Wine: Deglaze the pan with ¼ cup white wine before adding broth.
Creamier Sauce: Substitute half of the sour cream with heavy cream.
Extra Herbs: Add thyme or a bay leaf while simmering.
Mushroom Lover’s Version: Double the mushrooms for deeper earthy flavor.
Low-Carb Option: Serve over cauliflower mash or zucchini noodles.
Storage and Reheating
Store leftovers in an airtight container in the refrigerator for up to 3 days.
Reheat gently over low heat on the stovetop, adding a splash of broth or cream to loosen the sauce. Avoid microwaving at high heat to prevent sauce separation.
Beef stroganoff is best enjoyed fresh, but careful reheating keeps it delicious.
Why This Recipe Works
This Beef Stroganoff succeeds because of careful layering. Searing the beef locks in flavor, sautéing the mushrooms builds depth, and thickening the broth creates structure for the creamy finish. The sour cream adds signature tang and richness without overpowering the savory base.
Cooking the beef briefly and finishing it in the sauce ensures tenderness, while gentle heat maintains a silky texture.
With its creamy sauce, tender beef, and comforting noodles, this Beef Stroganoff recipe delivers timeless comfort in every bite. It’s hearty, satisfying, and elegant enough to impress while remaining simple enough for everyday cooking.
Whether served for a family meal or a cozy dinner for two, this dish is sure to become a repeat favorite—rich, creamy, and utterly comforting from the first forkful to the last.
There’s nothing quite like a bubbling dish of Beef Enchiladas fresh from the oven.
Tender tortillas wrapped around savory, seasoned beef, smothered in rich enchilada sauce, and topped with melty cheese—this is comfort food at its finest.
Whether you’re cooking for a family dinner, meal prepping for the week, or hosting friends, beef enchiladas are always a crowd-pleaser.
This step-by-step guide will walk you through creating flavorful, authentic-style beef enchiladas right in your own kitchen.
Why You’ll Love This Recipe
Hearty and satisfying
Packed with bold, savory flavor
Perfect for feeding a crowd
Easy to customize
Great for leftovers and meal prep
With simple ingredients and clear steps, you’ll have a delicious tray of enchiladas ready in under an hour.
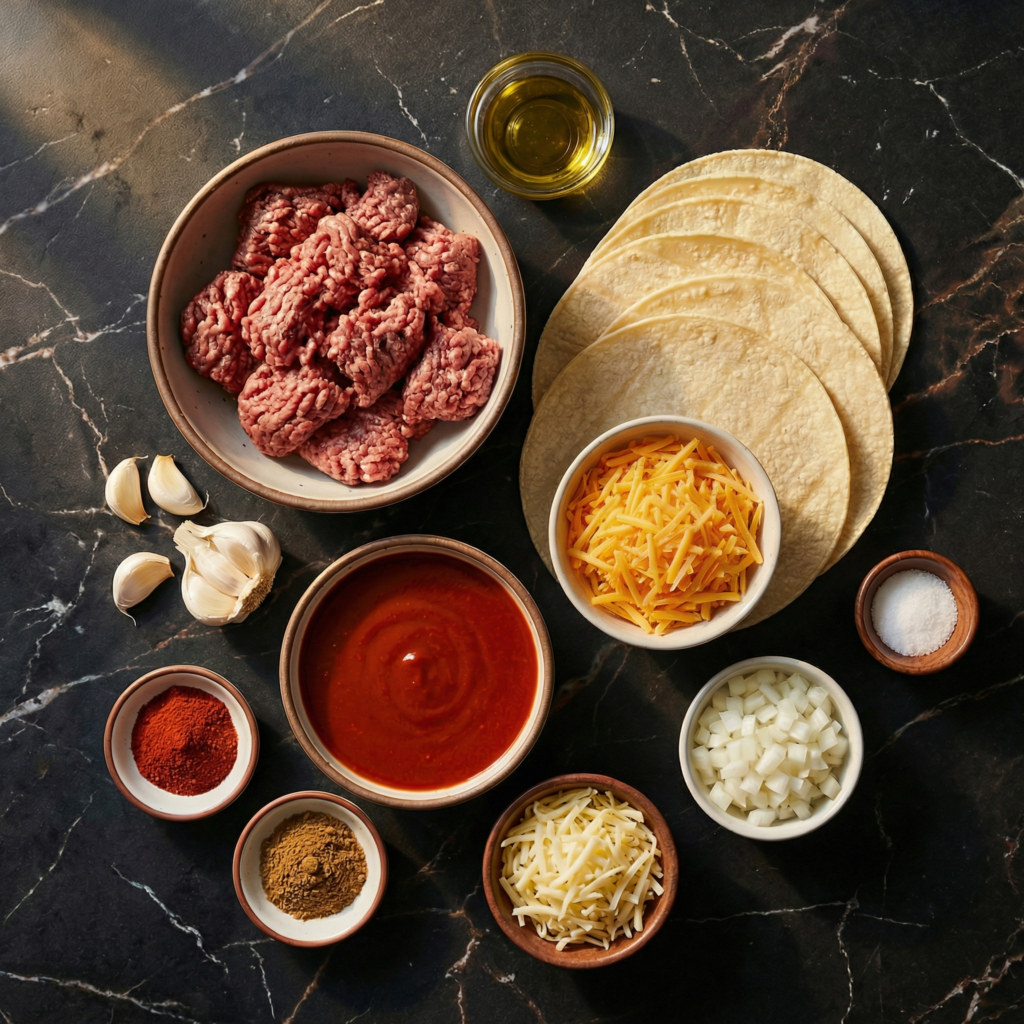
Ingredients You’ll Need
For the Beef Filling:
1 pound ground beef
1 small onion, finely diced
2 cloves garlic, minced
1 tablespoon chili powder
1 teaspoon ground cumin
½ teaspoon smoked paprika
½ teaspoon salt
¼ teaspoon black pepper
½ cup tomato sauce
For Assembly:
8 small flour or corn tortillas
2 cups red enchilada sauce (store-bought or homemade)
Preheat your oven to 375°F (190°C). Lightly grease a 9×13-inch baking dish with cooking spray or a thin layer of oil to prevent sticking.
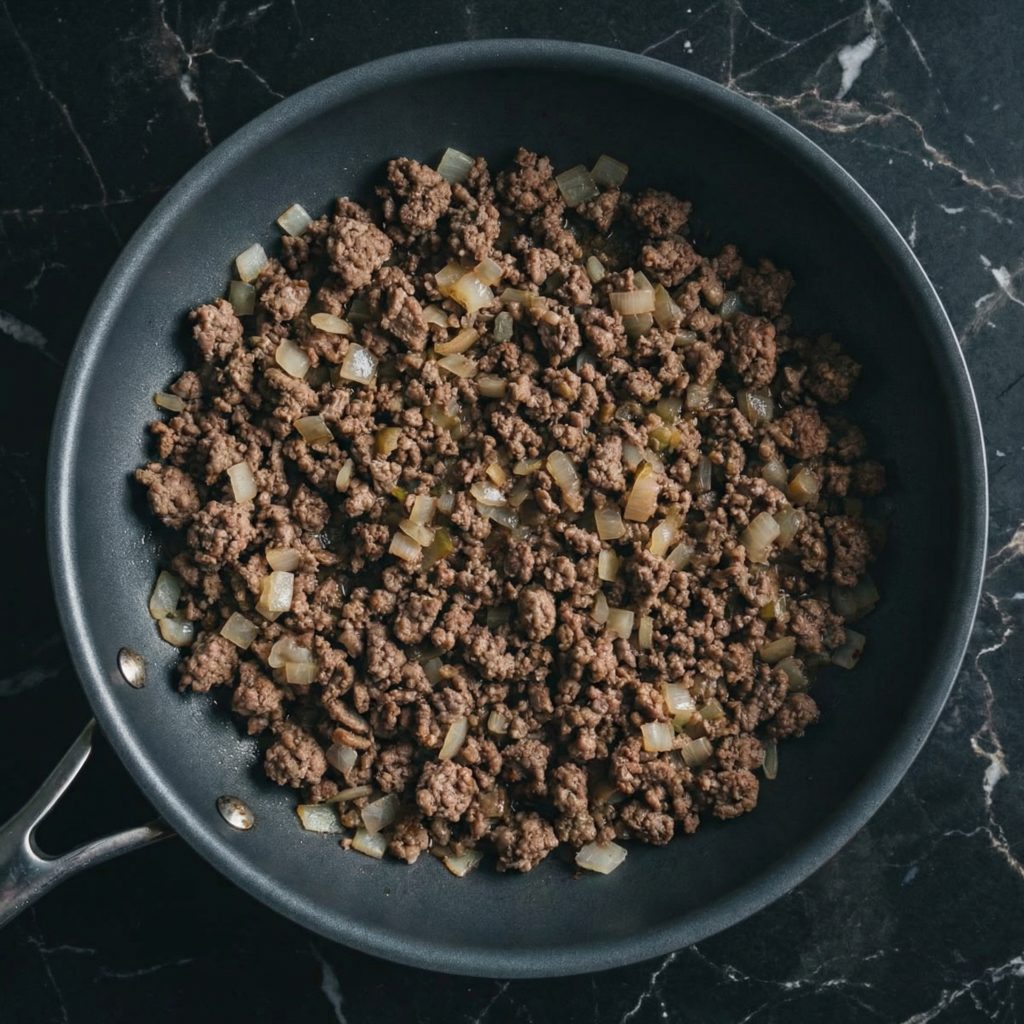
Step 2: Prepare the Beef Filling
In a large skillet over medium heat, add the ground beef. Break it apart with a wooden spoon and cook until browned, about 5–7 minutes.
Add the diced onion and cook for another 3–4 minutes until softened. Stir in the minced garlic and cook for 30 seconds until fragrant.
Drain any excess grease from the pan to prevent the enchiladas from becoming oily.
Step 3: Season the Meat
Add chili powder, cumin, smoked paprika, salt, and black pepper to the skillet. Stir well to evenly coat the beef.
Pour in ½ cup tomato sauce and stir to combine. Let the mixture simmer for 3–5 minutes until slightly thickened and flavorful. Remove from heat.
The filling should be moist but not watery.
Step 4: Warm the Tortillas
Warming tortillas prevents cracking when rolling.
You can:
Wrap them in a damp paper towel and microwave for 30 seconds, or
Lightly heat each tortilla in a dry skillet for 10–15 seconds per side
Keep them covered to stay warm and pliable.
Step 5: Prepare the Baking Dish
Spread about ½ cup of enchilada sauce evenly across the bottom of the prepared baking dish. This prevents sticking and adds flavor to the base layer.
Step 6: Fill and Roll the Enchiladas
Lay one tortilla flat on a clean surface. Spoon about 2–3 tablespoons of the beef filling down the center. Sprinkle a small handful of cheese over the filling.
Roll the tortilla tightly and place it seam-side down in the baking dish.
Repeat with the remaining tortillas, arranging them snugly side by side.
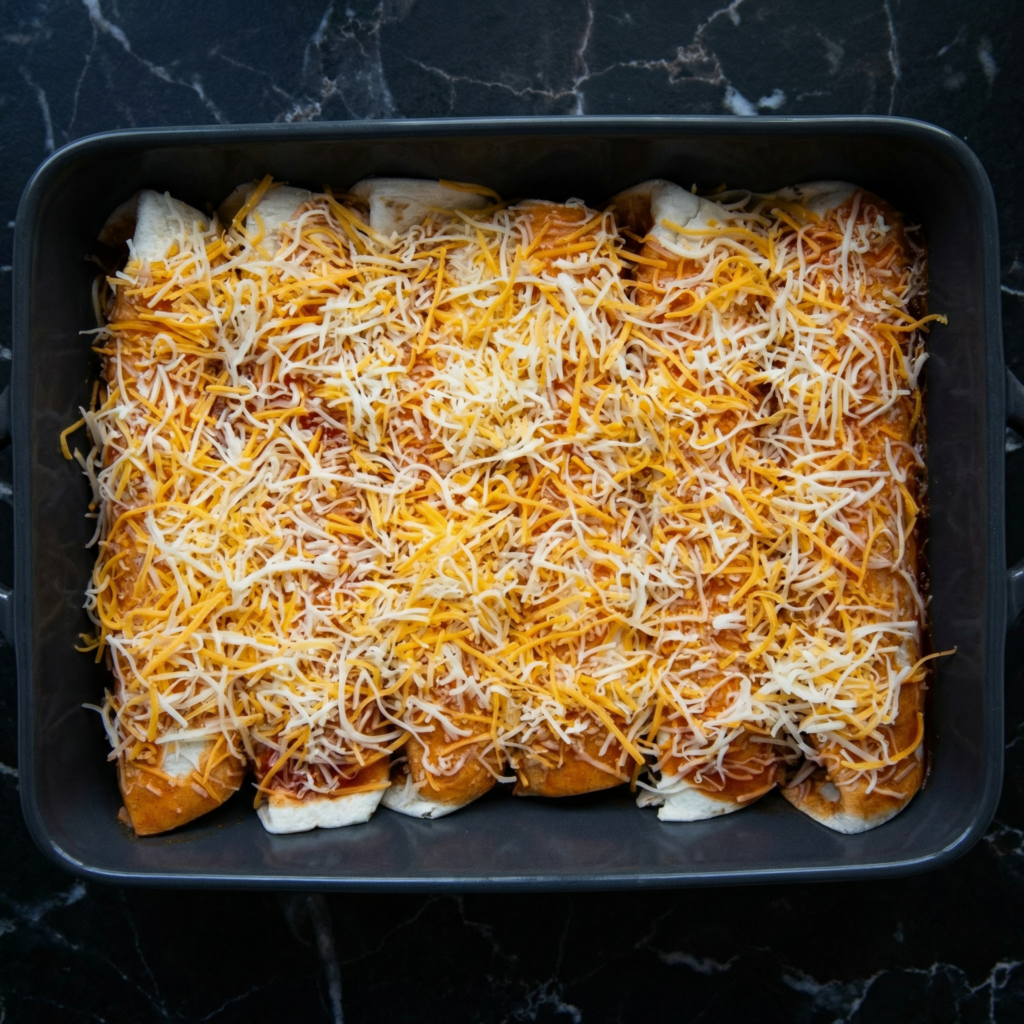
Step 7: Add Sauce and Cheese
Pour the remaining enchilada sauce evenly over the rolled tortillas, making sure they’re fully covered. This keeps them moist while baking.
Sprinkle the remaining shredded cheese generously over the top.
Step 8: Bake to Perfection
Cover the baking dish loosely with foil and bake for 20 minutes.
Remove the foil and bake for another 10–15 minutes, or until the cheese is melted, bubbly, and slightly golden.
For extra browning, broil for 1–2 minutes at the end—but watch carefully to avoid burning.
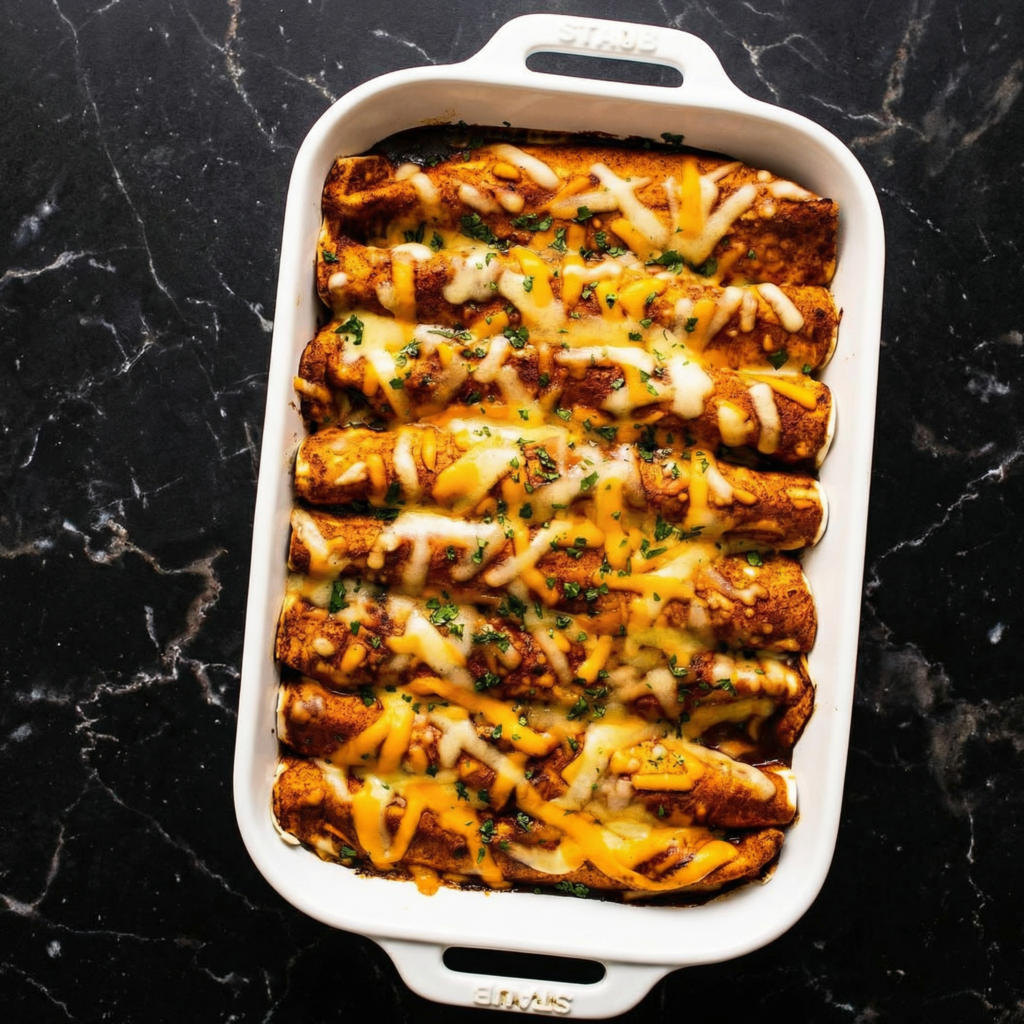
Step 9: Let Them Rest
Allow the enchiladas to rest for 5–10 minutes after removing them from the oven. This helps the filling set and makes serving easier.
Step 10: Garnish and Serve
Top with chopped cilantro, sliced jalapeños, or a dollop of sour cream for added freshness and contrast.
Serve with:
Mexican rice
Refried beans
Guacamole
A crisp side salad
Flavor and Texture Highlights
Tender tortillas soaked in savory sauce
Juicy, seasoned beef filling
Melted, gooey cheese topping
Rich, slightly spicy enchilada sauce
Every bite is a balance of warmth, spice, and cheesy comfort.
Tips for the Best Beef Enchiladas
Don’t skip warming the tortillas. Cold tortillas crack easily when rolled.
Use enough sauce. Dry enchiladas can ruin the dish—be generous but not excessive.
Drain excess grease. This prevents a greasy final result.
Customize the spice level. Add diced green chilies or extra chili powder for more heat.
Make ahead. Assemble the enchiladas, cover tightly, and refrigerate up to 24 hours before baking. Add 5–10 extra minutes to bake time if starting cold.
Optional Variations
Add Beans: Mix black beans into the beef filling.
Vegetable Boost: Add sautéed bell peppers or corn.
Creamy Version: Stir 2 tablespoons of cream cheese into the beef mixture.
Green Enchiladas: Swap red sauce for green enchilada sauce.
Low-Carb Option: Use low-carb tortillas or wrap filling in thin grilled zucchini slices.
Storage and Reheating
Store leftovers in an airtight container in the refrigerator for up to 4 days.
Reheat:
In the oven at 350°F (175°C) for 15 minutes
Or microwave individual portions for 1–2 minutes
Enchiladas also freeze beautifully. Wrap tightly and freeze for up to 2 months. Thaw overnight before reheating.
Why This Recipe Works
This beef enchilada recipe balances moisture, flavor, and texture perfectly. The seasoned beef creates a savory base, the sauce keeps everything tender, and the cheese adds richness and comfort. Baking allows the tortillas to absorb flavor while staying soft and cohesive.
It’s hearty without being heavy, flavorful without being overpowering, and simple enough for a weeknight meal while impressive enough for guests.
With its rich sauce, savory beef, and gooey melted cheese, this Beef Enchiladas recipe is guaranteed to become a family favorite. Once you master the basic technique, you can experiment with fillings, sauces, and toppings to make it your own.
Warm, comforting, and packed with flavor—this is homemade enchilada perfection.