Author: user

  • Crispy Fried Chicken: The Ultimate Bucket List Recipe

    Crispy Fried Chicken: The Ultimate Bucket List Recipe

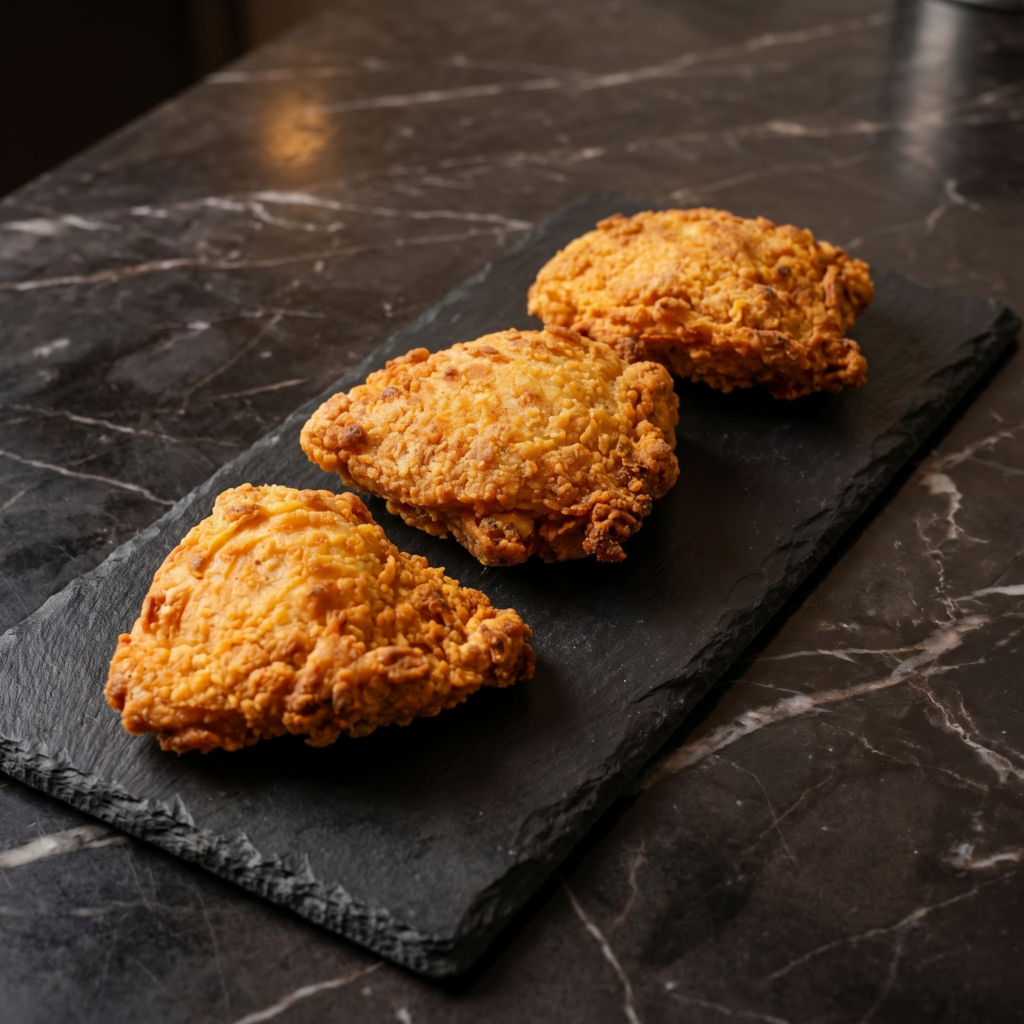
    Great fried chicken is a treasure. A crust that crackles when you bite into it. Meat that’s still juicy underneath. No greasy aftertaste.

    This recipe delivers all of that. Buttermilk brine tenderizes, double dredge builds the crunch, and the spice blend brings the heat. Make extra. You’ll need it.

    Ingredients

    Serves 4-6.

    • 3 lbs chicken pieces (drumsticks, thighs, or a mix)
    • 2 cups buttermilk
    • 2 cups all-purpose flour
    • ¼ cup cornstarch (extra crunch!)
    • 2 large eggs
    • Oil for frying (peanut or vegetable)

    Spice Blend:

    • 2 teaspoons salt
    • 2 teaspoons paprika
    • 1 teaspoon garlic powder
    • 1 teaspoon onion powder
    • 1 teaspoon black pepper
    • ½ teaspoon cayenne (optional, for heat)

    Step-by-Step Instructions

    Step 1: Brine the Chicken

    1. In a bowl, combine chicken and buttermilk with 1 teaspoon of the spice blend.
    2. Cover and refrigerate for at least 4 hours (overnight is better).

    Step 2: Make the Dredge

    1. In a large bowl, whisk flour, cornstarch, and remaining spice blend.
    2. In another bowl, beat the eggs.

    Step 3: Double Dredge

    1. Remove chicken from buttermilk, letting excess drip off.
    2. Dip in flour mixture, then egg, then flour mixture again. Press firmly.

    Step 4: Fry to Golden Glory

    1. Heat 1-2 inches of oil in a Dutch oven to 350°F (175°C).
    2. Fry chicken in batches (don’t crowd) for 12-15 minutes, turning occasionally.
    3. Internal temp should reach 165°F. Drain on a wire rack (not paper towels—keeps crunch).

    Step 5: Serve Hot

    1. Sprinkle with a little extra salt. Serve with pickles, slaw, or biscuits. Then fight over the last drumstick.

    Summary

    Prep Time: 20 minutes + 4 hours brining | Cook Time: 25 minutes | Total Time: 4 hours 45 minutes

    Yield: 4-6 servings

    Difficulty: Medium

    Storage Notes

    Fridge:

    Store leftover fried chicken in the fridge for up to 3 days. The crust will soften but the flavor remains.

    Reheating (Don’t Microwave):

    Air fryer at 375°F for 6-8 minutes. Oven at 375°F on a wire rack for 15 minutes. Microwave = soggy tragedy.

    Leftover Cold Chicken:

    Honestly? Cold fried chicken straight from the fridge is a gift. Enjoy it without shame.

  • Honey Garlic Wings: Sticky, Sweet, and Irresistible

    Honey Garlic Wings: Sticky, Sweet, and Irresistible

    Honey garlic wings are the people-pleaser of the wing world. Not too spicy, not too sweet. Just sticky, glossy, garlicky perfection.

    These are baked until crispy, then tossed in a glaze that clings to every nook and cranny. No deep fryer needed. Just a wire rack, a hot oven, and a bowl to lick clean afterward.

    Ingredients

    Serves 4.

    • 2 lbs chicken wings (drumettes and flats)
    • 1 tablespoon baking powder (not baking soda)
    • ½ teaspoon salt

    Honey Garlic Glaze:

    • ½ cup honey
    • ¼ cup soy sauce (low sodium preferred)
    • 4 cloves garlic, minced
    • 1 tablespoon rice vinegar (or apple cider vinegar)
    • 1 teaspoon sesame oil
    • Optional: 1 teaspoon sriracha for heat

    Garnish:

    • Sesame seeds, sliced green onions

    Step-by-Step Instructions

    Step 1: Prep the Wings

    1. Preheat oven to 425°F (220°C). Line a baking sheet with foil and place a wire rack on top.
    2. Pat wings completely dry with paper towels.
    3. Toss wings with baking powder and salt until coated.

    Step 2: Bake Until Crispy

    1. Arrange wings on the rack (not touching).
    2. Bake for 45-50 minutes, flipping halfway, until golden and crispy.

    Step 3: Make the Glaze

    1. While wings bake, combine honey, soy sauce, garlic, vinegar, sesame oil, and sriracha (if using) in a small saucepan.
    2. Simmer over medium-low heat for 5 minutes until slightly thickened.

    Step 4: Toss and Serve

    1. Transfer hot wings to a large bowl. Pour glaze over and toss to coat.
    2. Sprinkle with sesame seeds and green onions. Serve immediately with napkins. So many napkins.

    Summary

    Prep Time: 10 minutes | Cook Time: 50 minutes | Total Time: 1 hour

    Yield: 4 servings

    Difficulty: Easy

    Storage Notes

    Fridge:

    Store in an airtight container for up to 3 days. The glaze sets up but reheats beautifully.

    Reheating:

    Air fryer at 375°F for 5-7 minutes. Oven at 375°F for 8-10 minutes. Microwave works but softens the sticky glaze.

    Make-Ahead:

    Bake wings without glaze. Cool, refrigerate. Reheat, then toss in warmed glaze. Almost as good as fresh.

  • Mozzarella Sticks (The Cheesiest Pull of Your Life)

    Mozzarella Sticks (The Cheesiest Pull of Your Life)

    Cheese + crunch + that ridiculous stretch. Need we say more?

    Homemade mozzarella sticks are easier than you think. Freeze them, fry them, and watch everyone fight for the last one.

    Ingredients

    Makes 12 sticks.

    • 12 string cheese sticks (or block mozzarella cut into 3″ x ½” sticks)
    • ½ cup (60g) all-purpose flour
    • 2 large eggs, beaten
    • 1 cup (100g) breadcrumbs (panko is best for crunch)
    • ½ cup (50g) grated parmesan cheese
    • 1 teaspoon garlic powder
    • 1 teaspoon dried oregano
    • Oil for frying
    • Marinara sauce for dipping

    Step-by-Step Instructions

    Step 1: Freeze First (Crucial!)

    1. Place cheese sticks in freezer for at least 1 hour. Solid cheese = no blowouts.

    Step 2: Set Up Breading Station

    1. Bowl 1: Flour. Bowl 2: Beaten eggs. Bowl 3: Breadcrumbs + parmesan + garlic powder + oregano.

    Step 3: Bread Twice

    1. Dip each cheese stick: flour → egg → breadcrumbs → egg again → breadcrumbs again.
    2. Return to freezer for 15 minutes. Non-negotiable.

    Step 4: Fry & Serve

    1. Heat 1 inch of oil to 375°F (190°C).
    2. Fry 4–5 sticks at a time for 45–60 seconds until golden.
    3. Drain on paper towels. Serve immediately with marinara.

    Summary

    Prep Time: 10 minutes | Freeze Time: 1 hour 15 minutes | Cook Time: 5 minutes | Total Time: 1 hour 30 minutes

    Yield: 12 sticks

    Difficulty: Easy (patience required for freezing)

    Storage Notes

    • Freezer (raw, breaded): Store in a single layer in a freezer bag for up to 2 months. Fry from frozen — no thawing.
    • Leftovers (cooked): Almost impossible, but reheat in air fryer at 350°F for 2–3 minutes. Microwave = sad, soggy cheese tubes.

    Pro tip: Double breading + double freezing = zero cheese explosions. You’ve been warned.

  • Fried Dumplings (Crispy, Juicy, Gone in 60 Seconds)

    Fried Dumplings (Crispy, Juicy, Gone in 60 Seconds)

    Craving takeout? Make these instead. They’re crispier, juicier, and way more satisfying.

    Pan-fried dumplings have it all: a crunchy golden skirt, tender filling, and that perfect dip. Let’s get folding.

    Ingredients

    Makes 20 dumplings.

    • 20 round dumpling wrappers
    • ½ lb (225g) ground pork (or chicken/turkey)
    • 1 cup (100g) finely shredded cabbage
    • 2 green onions, minced
    • 1 clove garlic, minced
    • 1 tablespoon soy sauce
    • 1 teaspoon sesame oil
    • 2 tablespoons oil (for frying)
    • ⅓ cup water (for steaming)

    Step-by-Step Instructions

    Step 1: Make Filling

    1. Mix pork, cabbage, green onions, garlic, soy sauce, and sesame oil in a bowl.

    Step 2: Fold

    1. Place 1 teaspoon filling in center of each wrapper.
    2. Wet edges with water. Fold in half and pleat or press shut.

    Step 3: Fry & Steam

    1. Heat oil in a non-stick pan over medium-high heat.
    2. Place dumplings flat-side down. Fry 2 minutes until golden brown.
    3. Pour in water. Cover immediately. Steam 4–5 minutes until water evaporates.

    Step 4: Crisp & Serve

    1. Uncover. Let fry 1 more minute to re-crisp the bottoms.
    2. Flip onto a plate. Serve with soy sauce + rice vinegar + chili oil.

    Summary

    Prep Time: 15 minutes | Cook Time: 8 minutes | Total Time: 23 minutes

    Yield: 20 dumplings

    Difficulty: Medium (folding takes practice)

    Storage Notes

    • Fridge (uncooked): Store on a tray in a single layer, covered, for up to 1 day.
    • Freezer (uncooked): Freeze on a tray, then transfer to a bag. Cook from frozen—add 1 extra minute to steaming time.
    • Leftovers: Reheat in a dry pan over medium heat to re-crisp. Microwave makes them sad and soggy.

    Pro tip: Make a double batch. Freeze half. Future you will be very happy.

  • Stuffed Jalapeño Poppers: Creamy, Spicy, Crispy Heaven

    Stuffed Jalapeño Poppers: Creamy, Spicy, Crispy Heaven

    Jalapeño poppers are the MVP of appetizers. Spicy, creamy, salty, and crispy all at once. This version wraps them in bacon because… why wouldn’t you?

    Baked, not fried. Easy to prep ahead. And absolutely impossible to stop eating.

    Ingredients

    Makes 12-16 poppers (serves 4-6).

    • 12-16 fresh jalapeños
    • 8 oz cream cheese, softened
    • ½ cup shredded cheddar cheese
    • ¼ cup grated Parmesan (optional)
    • 2 green onions, finely chopped
    • 1 clove garlic, minced
    • ½ teaspoon smoked paprika
    • ¼ teaspoon salt
    • Optional: ranch or chipotle crema for dipping

    Step-by-Step Instructions

    Step 1: Preheat and Prep

    1. Preheat oven to 400°F (200°C). Line a baking sheet with foil and place a wire rack on top.
    2. Wearing gloves (seriously—don’t touch your eyes), cut each jalapeño in half lengthwise.
    3. Scoop out seeds and white membranes with a small spoon. Leave some seeds if you want more heat.

    Step 2: Make the Filling

    1. In a bowl, mix cream cheese, cheddar, Parmesan, green onions, garlic, paprika, and salt until smooth.

    Step 3: Fill the Jalapeños

    1. Spoon or pipe filling into each jalapeño half, mounding it slightly.

    Step 4: Bake Until Crispy

    1. Bake for 20-25 minutes until bacon is crispy and peppers are tender.
    2. For extra crispiness, broil for 1-2 minutes at the end—watch closely.

    Step 5: Serve Hot

    1. Let cool for 5 minutes (cheese lava is real). Serve with ranch or chipotle crema.

    Summary

    Prep Time: 15 minutes | Cook Time: 25 minutes | Total Time: 40 minutes

    Yield: 12-16 poppers (4-6 servings)

    Difficulty: Easy

    Storage Notes

    Fridge:

    Store baked poppers in an airtight container for up to 4 days. Reheat in air fryer at 375°F for 5 minutes or oven at 375°F for 8 minutes.

    Freezing:

    Freeze unbaked assembled poppers on a tray, then transfer to a bag. Freeze for up to 2 months. Bake from frozen at 400°F for 25-30 minutes.

    Make-Ahead:

    Prep and fill the jalapeños (without bacon) up to 2 days ahead. Refrigerate. Add bacon and bake when ready.

    Heat Warning:

    WEAR GLOVES when handling jalapeños. The oils stick to your skin and will burn your eyes, nose, and other sensitive areas for hours. Learn from our mistakes.

    Vegetarian Option:

    Skip the bacon. Sprinkle with panko breadcrumbs mixed with a little olive oil before baking.

  • Crab Rangoon: Crispy, Creamy, Disappears Fast

    Crab Rangoon: Crispy, Creamy, Disappears Fast

    Crab Rangoon are the ultimate “order too many” appetizer. A crispy, golden wonton wrapper hiding a creamy, sweet filling. The contrast is ridiculous.

    This recipe uses real or imitation crab (both work). Fold, fry, dip. You’ll never order takeout crab Rangoon again.

    Ingredients

    Makes 24-30 rangoons.

    • 24-30 wonton wrappers (square, about 3×3 inches)
    • 8 oz cream cheese, softened
    • 6 oz crab meat (fresh, canned, or imitation krab)
    • 2 green onions, finely chopped
    • 1 clove garlic, minced (optional)
    • 1 teaspoon soy sauce
    • ½ teaspoon Worcestershire sauce
    • Oil for frying (vegetable or canola)

    Sweet and Sour Dip (or use store-bought):

    • ½ cup sweet chili sauce
    • 2 tablespoons rice vinegar
    • 1 tablespoon ketchup

    Step-by-Step Instructions

    Step 1: Make the Filling

    1. In a bowl, mix cream cheese, crab, green onions, garlic, soy sauce, and Worcestershire until well combined.

    Step 2: Fill the Wontons

    1. Place a wonton wrapper on a clean surface (diamond orientation, not square).
    2. Place 1 teaspoon of filling in the center.
    3. Dip a finger in water and moisten all four edges of the wrapper.
    4. Fold one corner to the opposite corner, forming a triangle. Press edges firmly to seal, pushing out air.
    5. For the classic “nurse cap”: bring the two bottom corners together and pinch.

    Step 3: Heat the Oil

    1. Pour 2 inches of oil into a heavy pot or Dutch oven. Heat to 350°F (175°C).

    Step 4: Fry the Rangoons

    1. Fry in small batches (don’t crowd) for 2-3 minutes until golden brown and crispy.
    2. Remove with a slotted spoon. Drain on a wire rack (not paper towels).

    Step 5: Make the Dip (Optional)

    1. Whisk together sweet chili sauce, rice vinegar, and ketchup.

    Step 6: Serve Immediately

    1. Sprinkle with a pinch of salt. Serve hot with sweet and sour dip. Watch them vanish.

    Summary

    Prep Time: 20 minutes | Cook Time: 10 minutes | Total Time: 30 minutes

    Yield: 24-30 rangoons

    Difficulty: Medium (folding takes practice)

    Storage Notes

    Leftovers?

    Crab Rangoon are best fresh. Reheated ones lose their crunch. If you must, air fry at 375°F for 3-4 minutes.

    Freezing Uncooked:

    Assemble the rangoons (don’t fry). Freeze in a single layer on a tray, then transfer to a freezer bag. Freeze for up to 2 months. Fry from frozen (add 1-2 minutes to cook time).

    Make-Ahead Filling:

    Mix the filling up to 2 days ahead. Keep refrigerated. Fill and fry when ready.

    Pro Tip:

    Don’t overfill. Too much filling = bursting rangoons and messy oil. One teaspoon is plenty.

    Baked Option (Less Crispy):

    Brush with oil, bake at 400°F for 10-12 minutes. Not as crunchy, but still tasty.

  • Pork Carnitas Tacos: Crispy, Juicy, Pure Magic

    Pork Carnitas Tacos: Crispy, Juicy, Pure Magic

    Carnitas means “little meats” in Spanish. It’s pork shoulder slow-cooked until it falls apart, then crisped until the edges are golden and crunchy. Two textures. One glorious taco.

    This recipe works in a slow cooker, Instant Pot, or Dutch oven. Make a big batch. Tacos for days.

    Ingredients

    Serves 6-8 (makes 16-20 tacos).

    • 3 lbs pork shoulder (pork butt), cut into 2-inch chunks
    • 1 onion, quartered
    • 6 cloves garlic, smashed
    • 1 orange, juiced (throw the spent halves in too)
    • 1 lime, juiced
    • 1 teaspoon dried oregano
    • 1 teaspoon ground cumin
    • 1 teaspoon salt
    • ½ teaspoon black pepper
    • 2 bay leaves
    • 1 cup chicken broth (or water)

    For Serving:

    • Corn or flour tortillas
    • Diced onion, chopped cilantro, lime wedges, salsa, hot sauce

    Step-by-Step Instructions

    Step 1: Cook the Pork

    1. Place pork, onion, garlic, orange juice, lime juice, oregano, cumin, salt, pepper, bay leaves, and broth in a slow cooker, Instant Pot, or Dutch oven.
    2. Slow cooker: Low for 8-10 hours or high for 5-6 hours.
    3. Instant Pot: High pressure for 45 minutes + natural release (15 minutes).
    4. Dutch oven: 300°F for 3-4 hours until fork-tender.

    Step 2: Shred the Pork

    1. Remove pork from cooking liquid. Shred with two forks. Discard bay leaves and orange halves.
    2. Save about ½ cup of the cooking liquid.

    Step 3: Crisp the Carnitas (Crucial Step)

    1. Heat a large skillet over medium-high heat. Add a drizzle of oil or some of the pork fat.
    2. Spread shredded pork in an even layer. Don’t stir for 2-3 minutes—let it get crispy and brown.
    3. Flip and crisp the other side. Add a splash of reserved cooking liquid to keep it moist.

    Step 4: Warm the Tortillas

    1. Heat tortillas in a dry skillet, microwave (30 seconds between damp paper towels), or directly over a gas flame.

    Step 5: Assemble the Tacos

    1. Pile crispy carnitas onto warm tortillas.
    2. Top with onion, cilantro, and a squeeze of lime.
    3. Add salsa or hot sauce. Fold. Devour. Repeat.

    Summary

    Prep Time: 10 minutes | Cook Time: 4-10 hours (depending on method) | Total Time: 4-10 hours

    Yield: 16-20 tacos (6-8 servings)

    Difficulty: Easy

    Storage Notes

    Fridge:

    Store carnitas in an airtight container with some cooking liquid for up to 5 days. Re-crisp in a skillet before serving.

    Freezing:

    Freeze shredded carnitas (before crisping) for up to 3 months. Thaw overnight in the fridge. Crisp in a skillet when ready.

    Pro Tip:

    Don’t skip the crisping step. That’s what makes carnitas magical. Soft pork is fine. Crispy pork is unforgettable.

    Leftover Ideas:

    Carnitas bowls (rice, beans, avocado). Carnitas nachos. Carnitas burritos. Carnitas omelets. You can’t mess this up.

  • Beef Meatball Subs: Saucy, Cheesy, Hero Status

    Beef Meatball Subs: Saucy, Cheesy, Hero Status

    A great meatball sub is a beautiful mess. Sloppy, saucy, cheesy, and absolutely worth the napkins. The meatballs are tender and flavorful. The bread holds up. The cheese stretches for days.

    Use homemade or jarred sauce. Bake the meatballs or use leftovers. Either way, dinner is in 20 minutes.

    Ingredients

    Serves 4 (makes 4 subs).

    • 4 sub rolls (soft but sturdy)
    • 16-20 cooked beef meatballs (homemade or frozen)
    • 2 cups marinara sauce (jarred or homemade)
    • 8 slices provolone or mozzarella cheese
    • 2 tablespoons grated Parmesan cheese
    • 2 tablespoons butter, melted
    • ½ teaspoon garlic powder
    • Optional: fresh basil, red pepper flakes

    Step-by-Step Instructions

    Step 1: Heat Meatballs and Sauce

    1. In a saucepan, combine meatballs and marinara sauce.
    2. Simmer over medium-low heat for 10–15 minutes until meatballs are hot and sauce is bubbling.

    Step 2: Preheat Oven

    1. Preheat oven to 400°F (200°C).
    2. Line a baking sheet with foil or parchment paper.

    Step 3: Toast the Rolls

    1. Slice sub rolls open lengthwise (but not all the way through).
    2. Mix melted butter with garlic powder. Brush inside and outside of rolls.
    3. Place on baking sheet and toast for 3–5 minutes until lightly golden.

    Step 4: Assemble the Subs

    1. Spoon 4–5 meatballs onto each bottom roll.
    2. Top with a generous scoop of sauce.
    3. Lay 2 slices of provolone over the meatballs.
    4. Sprinkle with Parmesan.

    Step 5: Melt the Cheese

    1. Return subs to the oven (open-faced) for 3–5 minutes until cheese is bubbly and melted.

    Step 6: Close and Serve

    1. Top with fresh basil or red pepper flakes if using.
    2. Close the roll. Press down gently. Serve with extra sauce on the side and a mountain of napkins.

    Summary

    Prep Time: 5 minutes | Cook Time: 20 minutes | Total Time: 25 minutes

    Yield: 4 subs

    Difficulty: Easy

    Storage Notes

    Leftovers:

    Store meatballs and sauce separately from bread. Sub rolls get soggy fast. Assemble fresh for the best experience.

    Fridge:

    Meatballs in sauce last 4 days. Reheat in microwave or saucepan. Store bread at room temperature.

    Freezing:

    Freeze meatballs and sauce for up to 3 months. Thaw overnight. Toast fresh rolls when ready.

    Pro Tip:

    Don’t over-sauce the bread. Too much liquid = soggy collapse. Serve extra sauce on the side for dipping.

  • Taco Cups (All the Flavor, None of the Crumble)

    Taco Cups (All the Flavor, None of the Crumble)

    Tacos are great. Crumbling taco shells all over your shirt? Less great.

    Enter taco cups. Wonton wrappers pressed into a muffin tin, baked until crispy, then filled with taco meat and cheese. They hold together perfectly. One bite. No mess. Everyone wants the recipe.

    Ingredients

    Makes 12 taco cups.

    • 24 square wonton wrappers
    • 1 lb (450g) ground beef (or turkey)
    • 1 packet taco seasoning (or 2 tbsp homemade)
    • ⅓ cup water
    • 1 cup shredded Mexican cheese blend
    • Cooking spray

    Toppings:

    • Sour cream
    • Diced tomatoes
    • Sliced olives
    • Jalapeños
    • Fresh cilantro
    • Hot sauce

    Step-by-Step Instructions

    Step 1: Preheat and Prep

    1. Preheat oven to 375°F (190°C). Spray a 12-cup muffin tin with cooking spray.

    Step 2: Press Wontons

    1. Place one wonton wrapper in each cup. Press down and up the sides.
    2. Spray lightly with oil. Layer a second wrapper on top, rotated 45 degrees.
    3. Press again. Spray with oil.

    Step 3: Pre-Bake

    1. Bake empty shells for 5 minutes until lightly golden.

    Step 4: Cook Taco Meat

    1. While shells bake, brown ground beef in a skillet. Drain fat.
    2. Add taco seasoning and water. Simmer 5 minutes until thickened.

    Step 5: Fill and Bake

    1. Fill each cup with taco meat. Top with shredded cheese.
    2. Bake another 5-7 minutes until cheese melts and edges are crisp.

    Step 6: Top and Serve

    1. Let cool 2 minutes. Run a knife around edges to release.
    2. Add toppings. Serve warm.

    Summary

    Prep Time: 10 minutes | Cook Time: 15 minutes | Total Time: 25 minutes

    Yield: 12 taco cups

    Difficulty: Easy

    Storage Notes

    Refrigerate:

    Store baked (un-topped) taco cups in an airtight container for up to 3 days. Reheat at 350°F for 5-7 minutes. Add fresh toppings after reheating.

    Freeze:

    Freeze baked, unfilled shells for up to 2 months. Reheat from frozen at 375°F for 5 minutes, then fill with hot taco meat.

    Make Ahead Hack:

    Cook taco meat up to 3 days ahead. Assemble and bake when ready.

    Not For Microwave:

    Microwave makes wonton shells chewy. Always use oven or air fryer to reheat.

  • Gougères (Cheese Puffs That Make You Look Like a Chef)

    Gougères (Cheese Puffs That Make You Look Like a Chef)

    Say it with me: goo-ZHAIR.

    These French cheese puffs sound fancy. They are not. Choux pastry is just butter, water, flour, and eggs—plus a pile of nutty Gruyère. The oven does the magic. Serve them with wine and watch people think you took a class.

    Ingredients

    Makes 20-25 gougères.

    • ½ cup (120ml) water
    • ¼ cup (60g) unsalted butter, cut into pieces
    • ¼ teaspoon salt
    • ½ cup (65g) all-purpose flour
    • 2 large eggs, room temperature
    • 1 cup (80g) finely grated Gruyère or Comté cheese
    • Optional: ¼ teaspoon black pepper or nutmeg

    Step-by-Step Instructions

    Step 1: Cook the Dough

    1. In a saucepan, combine water, butter, and salt. Bring to a boil.
    2. Remove from heat. Add flour all at once. Stir vigorously until a smooth ball forms.
    3. Return to medium heat. Cook 1-2 minutes, stirring, until a thin film forms on the pan bottom.

    Step 2: Add Eggs

    1. Transfer dough to a bowl. Let cool 5 minutes.
    2. Add eggs one at a time, mixing fully after each. Dough will look broken then come together.

    Step 3: Add Cheese

    1. Stir in grated Gruyère (and pepper/nutmeg if using).

    Step 4: Pipe

    1. Preheat oven to 400°F (200°C). Line a baking sheet with parchment.
    2. Spoon or pipe 1-inch mounds of dough onto sheet, spacing 2 inches apart.

    Step 5: Bake

    1. Bake 20-25 minutes until puffed, golden, and crisp.
    2. Do NOT open the oven for the first 18 minutes (they will collapse).

    Step 6: Serve

    1. Poke a small hole in each to release steam (keeps them crisp).
    2. Serve warm or at room temperature.

    Summary

    Prep Time: 15 minutes | Cook Time: 25 minutes | Total Time: 40 minutes

    Yield: 20-25 gougères

    Difficulty: Medium (trust the process)

    Storage Notes

    Best Day Of:

    Gougères are crispiest within hours of baking. But they keep surprisingly well.

    Reheat Method:

    Store baked gougères in a paper bag (not plastic—soggy risk). Reheat at 350°F for 5 minutes to restore crunch.

    Freeze Unbaked:

    Pipe dough onto a tray, freeze solid, then transfer to a bag. Bake from frozen at 400°F for 25-28 minutes.

    Pro Tip:

    If they deflate after baking? You opened the oven too early. Still tasty. Just less puffy.