Tag: party appetizer

  • Mac and Cheese Balls (Fried, Golden, Dangerously Good)

    Mac and Cheese Balls (Fried, Golden, Dangerously Good)

    Mac and cheese is perfect. But you know what’s even better?

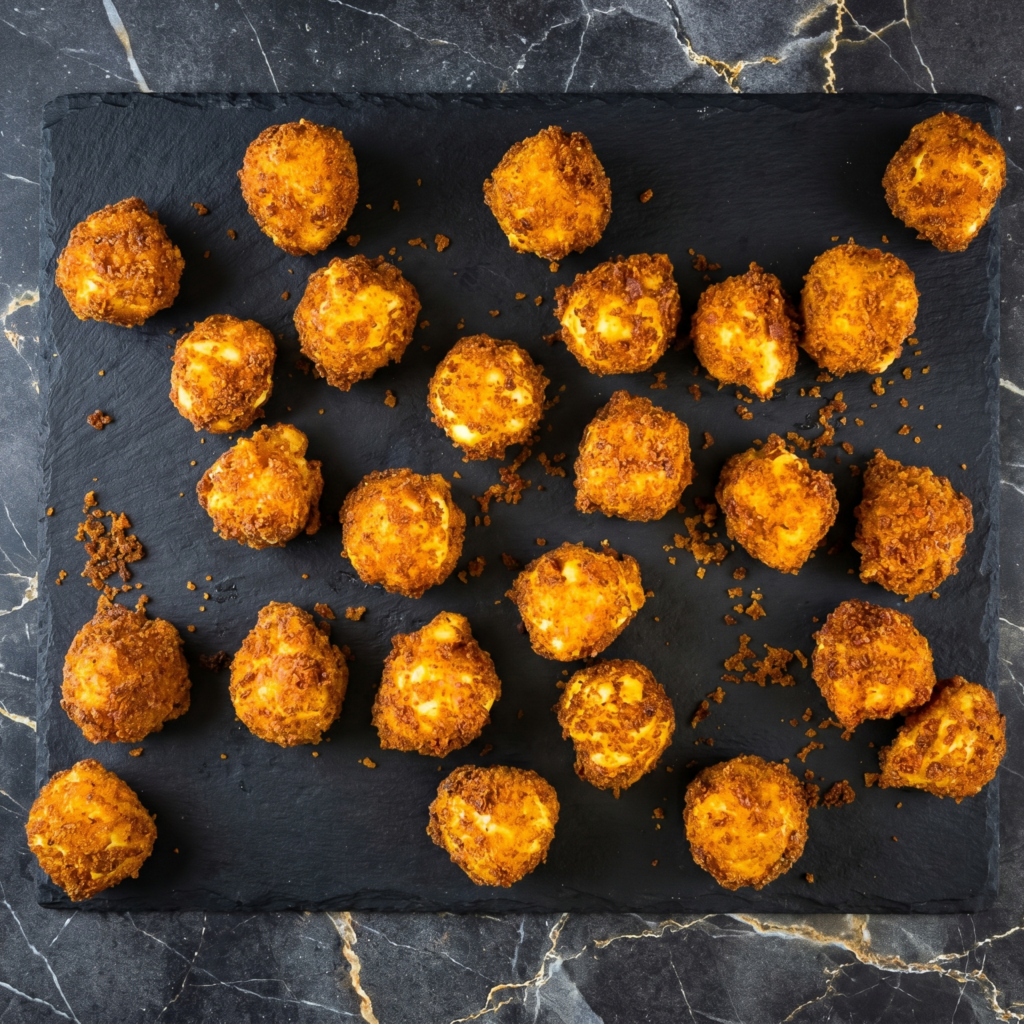
    Mac and cheese you can hold in your hand. Mac and cheese with a crunchy shell and a molten, gooey center. These mac and cheese balls take everyone’s favorite side dish and turn it into a crispy, dippable, crowd-devouring appetizer. Make them with leftovers or make them from scratch. Just make them.

    Ingredients

    Makes about 15-20 balls.

    • 3 cups leftover mac and cheese (cold, firm)
    • 1 cup all-purpose flour
    • 2 large eggs, beaten
    • 1½ cups breadcrumbs (panko preferred)
    • ½ cup grated Parmesan cheese (optional, for extra crunch)
    • Oil for frying (vegetable or canola)
    • Salt to taste

    For Dipping:

    • Marinara sauce, ranch, or sriracha mayo

    Step-by-Step Instructions

    Step 1: Prep the Mac

    1. Scoop cold mac and cheese into 1.5-inch balls. Pack tightly so they hold together.
    2. Place on a parchment-lined tray. Freeze for 30 minutes (this is key—they won’t fall apart in the oil).

    Step 2: Set Up Breading Station

    1. Three bowls: flour, beaten eggs, and breadcrumbs mixed with Parmesan.
    2. Roll each cold mac ball in flour, then egg, then breadcrumbs.

    Step 3: Fry

    1. Heat 2 inches of oil in a pot to 350°F (175°C).
    2. Fry balls in batches for 2-3 minutes until golden brown and crispy.
    3. Drain on paper towels. Sprinkle with salt.

    Step 4: Serve

    1. Serve hot with dipping sauce on the side.
    2. Warn people they’re molten inside. They won’t listen. They’ll burn their mouths anyway.

    Summary

    Prep Time: 15 minutes + 30 minutes freezing | Cook Time: 10 minutes | Total Time: 55 minutes

    Yield: 15-20 balls

    Difficulty: Medium

    Storage Notes

    • Fridge: Fried balls keep for 3 days. Reheat to restore crunch.
    • Freezer (uncooked): Breaded, uncooked balls freeze for up to 2 months. Fry from frozen (add 1-2 minutes).
    • Reheat cooked: Air fryer at 375°F for 5 minutes or oven at 400°F for 8 minutes.
    • No microwave: You’ll get a sad, greasy sponge.
  • Blooming Onion (The Outback Classic, Made at Home)

    Blooming Onion (The Outback Classic, Made at Home)

    You know the one. The giant fried onion that arrives at the table and everyone gasps.

    This blooming onion is that. Crispy, golden petals. A sweet, tender center. And that iconic dipping sauce that’s creamy, smoky, and just a little spicy. It looks impressive. It tastes even better. And yes, you can absolutely make it at home without a deep fryer.

    Ingredients

    Serves 4 as an appetizer.

    • 1 large sweet onion (Vidalia or Walla Walla)
    • 1 cup all-purpose flour
    • 1 teaspoon paprika
    • 1 teaspoon garlic powder
    • ½ teaspoon cayenne pepper
    • ½ teaspoon salt
    • ¼ teaspoon black pepper
    • 2 large eggs
    • ½ cup milk
    • Oil for frying (vegetable or canola)

    For the Dipping Sauce:

    • ½ cup mayonnaise
    • 2 tablespoons horseradish (or to taste)
    • 1 tablespoon ketchup
    • 1 teaspoon smoked paprika
    • ¼ teaspoon garlic powder
    • ¼ teaspoon cayenne

    Step-by-Step Instructions

    Step 1: Cut the Onion

    1. Slice off the top (not the root end). Peel the onion.
    2. Place root-side up. Cut down into the onion, leaving ½ inch from the root. Make 4 cuts, then 8, then 12. Petals will fall open.
    3. Gently separate the petals with your fingers.

    Step 2: Soak

    1. Place onion in a bowl of ice water for 30 minutes. This helps petals open and removes sharpness.
    2. Drain and pat dry.

    Step 3: Season the Flour

    1. In a bowl, mix flour, paprika, garlic powder, cayenne, salt, and pepper.
    2. In another bowl, whisk eggs and milk.

    Step 4: Coat the Onion

    1. Dredge onion in flour mixture (get between petals). Shake off excess.
    2. Dip in egg mixture, then back into flour mixture for a second coat.

    Step 5: Fry

    1. Heat 3 inches of oil to 375°F (190°C).
    2. Place onion root-side down in oil. Fry for 3-4 minutes, rotating carefully.
    3. Flip and fry another 2-3 minutes until golden brown.
    4. Drain on paper towels.

    Step 6: Make the Sauce

    1. Mix all sauce ingredients in a small bowl.
    2. Serve onion with sauce on the side (or in the center).

    Summary

    Prep Time: 20 minutes + 30 minutes soak | Cook Time: 10 minutes | Total Time: 1 hour

    Yield: 1 blooming onion

    Difficulty: Medium

    Storage Notes

    • Leftovers? Honestly, blooming onions don’t reheat well. They get sad and soggy.
    • Make ahead: Cut the onion and refrigerate in water for up to 4 hours. Fry fresh.
    • Sauce: Dipping sauce keeps in the fridge for 1 week.
    • Pro tip: This is a fry-and-eat-immediately situation. Plan accordingly.
  • Crispy Coconut Shrimp (Beach Weather Not Required)

    Crispy Coconut Shrimp (Beach Weather Not Required)

    Take one bite. Close your eyes. You’re on a beach. There’s a drink with an umbrella in your other hand.

    These crispy coconut shrimp are sweet, crunchy, and dangerously easy. Coconut flakes + panko = that perfect shattery crust. Bake ’em or fry ’em. Dip ’em in orange marmalade or sweet chili sauce. Make them for parties, game day, or a Tuesday that needs a little tropical energy.

    Ingredients

    Serves 4 (about 16-20 shrimp).

    • 1 lb (450g) large shrimp, peeled and deveined (tails on)
    • ½ cup all-purpose flour
    • 2 large eggs, beaten
    • 1 cup sweetened shredded coconut
    • ½ cup panko breadcrumbs
    • ½ teaspoon salt
    • ¼ teaspoon black pepper
    • Cooking spray or oil for frying

    For Dipping (pick one or two):

    • Orange marmalade
    • Sweet chili sauce
    • Spicy mayo (mayo + sriracha)
    • Coconut pineapple dip

    Step-by-Step Instructions

    Step 1: Prep the Stations

    1. Set up three bowls: flour (seasoned with salt/pepper), beaten eggs, and coconut + panko mixed together.

    Step 2: Coat the Shrimp

    1. Pat shrimp dry. Dip each shrimp in flour, then egg, then coconut mixture.
    2. Press firmly so coconut sticks. Place on a baking sheet.

    Step 3: Cook ‘Em (Your Choice)

    1. Bake: Preheat oven to 400°F (200°C). Spray shrimp with oil. Bake for 10-12 minutes until golden, flipping halfway.
    2. Fry: Heat 1 inch of oil to 350°F (175°C). Fry for 2-3 minutes until golden brown.
    3. Air fry: 375°F (190°C) for 6-8 minutes.

    Step 4: Serve

    1. Arrange on a plate with dipping sauce on the side.
    2. Squeeze of lime optional but recommended.

    Summary

    Prep Time: 10 minutes | Cook Time: 10-12 minutes | Total Time: 20-22 minutes

    Yield: 16-20 shrimp

    Difficulty: Easy

    Storage Notes

    • Fridge: Leftovers keep for 2 days. They will lose crispiness.
    • Reheat: Air fryer or oven at 375°F for 5 minutes. No microwave.
    • Make ahead: Coat raw shrimp and refrigerate for up to 4 hours before cooking.
    • Pro tip: These are best fresh and hot. Don’t over-make unless you love sad shrimp.
  • BBQ Pulled Pork Sliders (Big Flavor, Little Buns)

    BBQ Pulled Pork Sliders (Big Flavor, Little Buns)

    Some foods are meant for sharing. These BBQ pulled pork sliders are at the top of that list.

    Think tender, smoky pulled pork drenched in tangy BBQ sauce, piled onto buttery slider buns, and topped with a crisp, cool coleslaw for contrast. Your slow cooker does all the heavy lifting. You get all the credit. Perfect for game day, potlucks, or when you just want to eat seven tiny sandwiches in one sitting.

    Ingredients

    Makes 12 sliders.

    • 3 lbs (1.4 kg) pork shoulder (or pork butt)
    • 1 cup BBQ sauce (plus more for serving)
    • ½ cup chicken broth
    • 1 tablespoon smoked paprika
    • 1 tablespoon brown sugar
    • 1 teaspoon garlic powder
    • 1 teaspoon onion powder
    • 12 slider buns (brioche or potato)
    • 1 cup coleslaw mix (for topping)
    • Pickles (optional)

    Step-by-Step Instructions

    Step 1: Season the Pork

    1. Mix smoked paprika, brown sugar, garlic powder, and onion powder in a small bowl.
    2. Rub the spice mix all over the pork shoulder.

    Step 2: Slow Cook

    1. Place pork in the slow cooker. Add chicken broth.
    2. Cook on LOW for 8 hours or HIGH for 5 hours, until pork falls apart easily with a fork.

    Step 3: Shred and Sauce

    1. Remove pork and shred using two forks. Discard the fat.
    2. Return shredded pork to the slow cooker. Add BBQ sauce and stir to coat.
    3. Let sit for 10 minutes to soak up the flavor.

    Step 4: Toast the Buns

    1. Split slider buns and toast them lightly on a skillet or in the oven.

    Step 5: Assemble

    1. Place a generous pile of pulled pork on each bun bottom.
    2. Top with coleslaw mix and pickles (if using).
    3. Add a drizzle of extra BBQ sauce.
    4. Close with the bun top and secure with a toothpick.

    Summary

    Prep Time: 10 minutes | Cook Time: 8 hours (slow cooker) | Total Time: 8 hours 10 minutes

    Yield: 12 sliders

    Difficulty: Super Easy

    Storage Notes

    • Fridge: Pulled pork keeps for 4-5 days in an airtight container.
    • Freezer: Freezes beautifully for up to 3 months.
    • Reheat: Warm in a skillet or microwave with a splash of BBQ sauce.
    • Pro tip: Store pork separately from buns and slaw. Assemble fresh.
  • Deviled Eggs with Bacon (The First Thing to Disappear)

    Deviled Eggs with Bacon (The First Thing to Disappear)

    Deviled eggs are a party classic. Deviled eggs with bacon? That’s a riot.

    Creamy, tangy, smoky, and topped with crispy bacon bits. They’re the first thing to disappear from every table. Make a double batch. Trust us.

    Ingredients

    Makes 12 deviled egg halves (serves 4–6).

    • 6 large eggs
    • 4 strips bacon, cooked crispy and finely chopped
    • ¼ cup mayonnaise
    • 1 teaspoon Dijon mustard
    • 1 teaspoon white vinegar or pickle juice
    • ¼ teaspoon salt
    • ¼ teaspoon black pepper
    • Paprika for garnish
    • Fresh chives or parsley, chopped

    Step-by-Step Instructions

    Step 1: Hard-Boil the Eggs

    1. Place eggs in a pot. Cover with cold water by 1 inch.
    2. Bring to a boil. Turn off heat. Cover and let sit for 12 minutes.
    3. Transfer to an ice bath for 5 minutes. Peel carefully.

    Step 2: Cook the Bacon

    1. Cook bacon until crispy. Drain on paper towels. Finely chop. Set aside.

    Step 3: Make the Filling

    1. Slice eggs in half lengthwise. Remove yolks into a bowl.
    2. Mash yolks with a fork. Add mayo, mustard, vinegar, salt, and pepper. Mix until smooth and creamy.

    Step 4: Fill the Eggs

    1. Spoon or pipe yolk mixture into the egg white halves.

    Step 5: Top & Serve

    1. Sprinkle with crispy bacon bits, paprika, and fresh chives.
    2. Refrigerate until ready to serve. Watch them vanish.

    Summary

    Prep Time: 15 minutes | Cook Time: 12 minutes | Total Time: 30 minutes

    Yield: 12 deviled egg halves

    Difficulty: Easy

    Storage Notes

    These are perfect make-ahead party food. Just don’t assemble too early.

    • Fridge (filling only): Store yolk mixture in a piping bag or container for up to 2 days. Keep egg whites separate in a sealed container. Fill fresh before serving.
    • Fridge (assembled): Store in an airtight container for up to 1 day. Bacon may lose crispiness.
    • Do not freeze. Texture disaster.
    • Pro tip: Use a piping bag or zip-top bag with the corner snipped off for Instagram-worthy filling.